alusion
-
Dockerized Multiserver
05/08/2015 at 18:11 • 0 comments![]()
Docker is a free and open source platform for developers and sys-admins to build, ship, and run distributed applications securely isolated in a container. In short: Docker is a shipping container for code.
- It encapsulates an application with all its dependencies, abstracting away differences in OS distributions and underlying infrastructure and provides standardized environments for development, QA, and production teams.
- Compared to Virtual Machines, Docker is is might more efficient with system resources and uses lightweight LinuX Containers (LXC) rather than machine/hardware emulation such as hypervisor, KVM, and XEN.
- Containers are extremely portable and can run on a developer's local host, physical or virtual machines in a data center, or in the cloud. Deployment is less constrained by infrastructure technology and is instead driven by business priorities and policies. Furthermore, the Docker Engine's lightweight runtime enables rapid scale-up and scale-down in response to changes in demand.
- Docker containers are, by default, quite secure; especially if you take
care of running your processes inside the containers as non-privileged
users (i.e., non-root). The container is a sandbox for your application and will not contaminate other resources in the event it gets compromised. You can add an extra layer of safety by enabling Apparmor, SELinux,
GRSEC, or your favorite hardening solution.
![]()
As much as I've been reading about Docker recently, I've been curious as to how it can contribute towards the infrastructure of the metaverse. I decided to get my feet wet and Dockerize the Janus Multiserver. First, need to install the latest version of Docker:
wget -qO- https://get.docker.com/ | sh
## Add user to Docker group, must logout and back in to work
sudo usermod -aG docker user
## Verify you have a working installation of Docker
sudo docker info
I decided to use ubuntu as my base image## download a pre-built image docker pull ubuntu ## view docker images docker images
You can test that it works by running a shell inside the container using this command:docker run -i -t ubuntu /bin/bash
Press Ctrl-p + Ctrl-q to escape. This will continue to exist in a stopped state once exited (see "docker ps -a")
Before continuing, I'd like to elaborate more on what the Janus Multiserver is:
Janus VR allows the use of custom multiplayer servers for any room. The Janus VR client will create a new connection to the specified multiplayer server if a connection does not exist, and in addition subscribe to the URL on that server (to listen to and broadcast user events which happen in the room). The custom multiplayer server is specified by adding server and port for the Room.
server - (default "babylon.vrsites.com") Set to the domain name or IP of the custom multiplayer server for the room
port - (default "5566") Set to the port of the custom multiplayer server for the room
Here is an example which uses spyd.junkonet.org:5567 as the multiplayer server for the Room:<Room server="spyd.junkonet.org" port="5567" ...Note* While creating the Docker image for the multi-server, one of the problems I faced was with the certificate generation. I needed a way to generate a certificate without the interactive prompt. In order to solve this, I forked the repo and modified the line in the generate_key shell script with the -subj flag (arguments will replace subject field of input request with specified data and outputs modified request.)
I wrote a small shell script that will do most of the work in setting up and initializing the multi-server:
cd /tmp

# try to remove the repo if it already exists
rm -rf janus-server

# clone the branch with the modified openssl script
git clone -b Janus-Docker https://github.com/alusion/janus-server.git

cd janus-server

# install all module dependencies that are listed in package.json
npm install

# generate the SSL certificate  for the server
sh generate_key

# initialize the server
nodejs server.js
To build the image, I created a Dockerfile and populated it with the following:
FROM ubuntu:1404

# Install our dependencies and nodejs
RUN apt-get update
RUN apt-get -y install nodejs npm git git-core

# Add the script created earlier
ADD start.sh /tmp/
RUN chmod +x /tmp/start.sh

# Expose webUI port
EXPOSE 8080

# Execute the script to install Janus-Server and initialize daemon
CMD ./tmp/start.sh
The following commands will build and test our Dockerized application:# build docker image docker build -t avision/ubuntu-janserver . # run the docker image and map port 5566 and port 8080 on host to the ports in the image. Use port 5567 for SSL. docker run -p 5566:5566 -p 8080:8080 avision/ubuntu-janserver # We should see output that it is working and listening on 5566. # View the logs by running the command on the container ID docker exec tail -f /tmp/janus-server/server.log
Reference the server in the <Room> tag in your firebox html or load Janus with the -server flag <ip>.
That's it! We have a Dockerized Janus multi-server. I think I will realize the enormous implications of this practice in the future but for right now I believe that this is incredible to have and will help to scale the infrastructure of the metaverse considerably while adding more security.![]()
-
AVALON Pt. 2
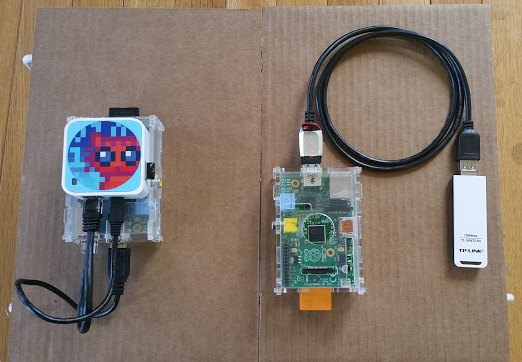
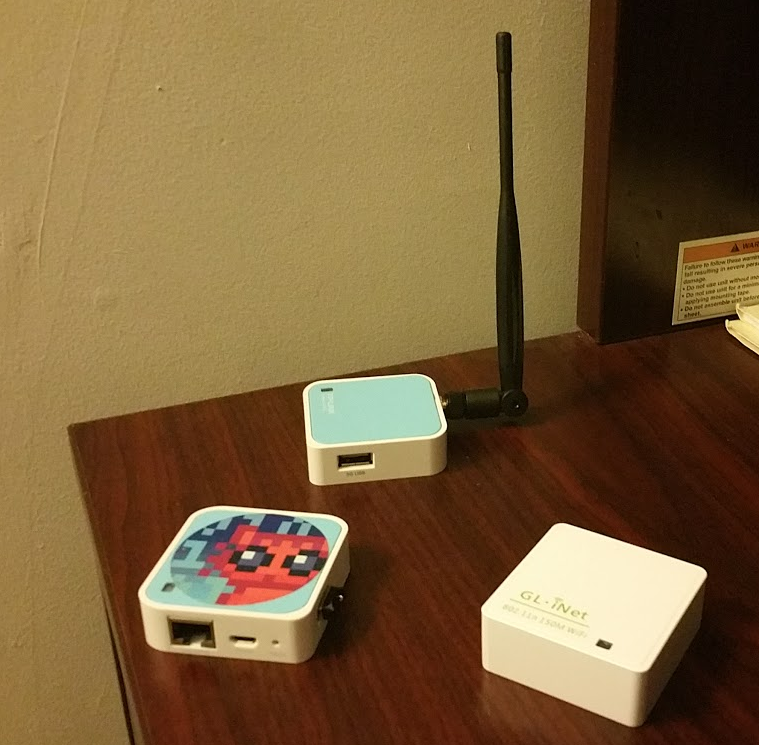
05/03/2015 at 05:11 • 0 commentsSuccessful progress on getting AVALON [Anonymous Virtual/Augmented LOcal Networks] to work plug in play with some boot time scripts and new hardware upgrades. I shopped around and got a couple new raspberry pi 2 model B and ABS plastic cases. Here's some pics of the upgraded devices:
![]()
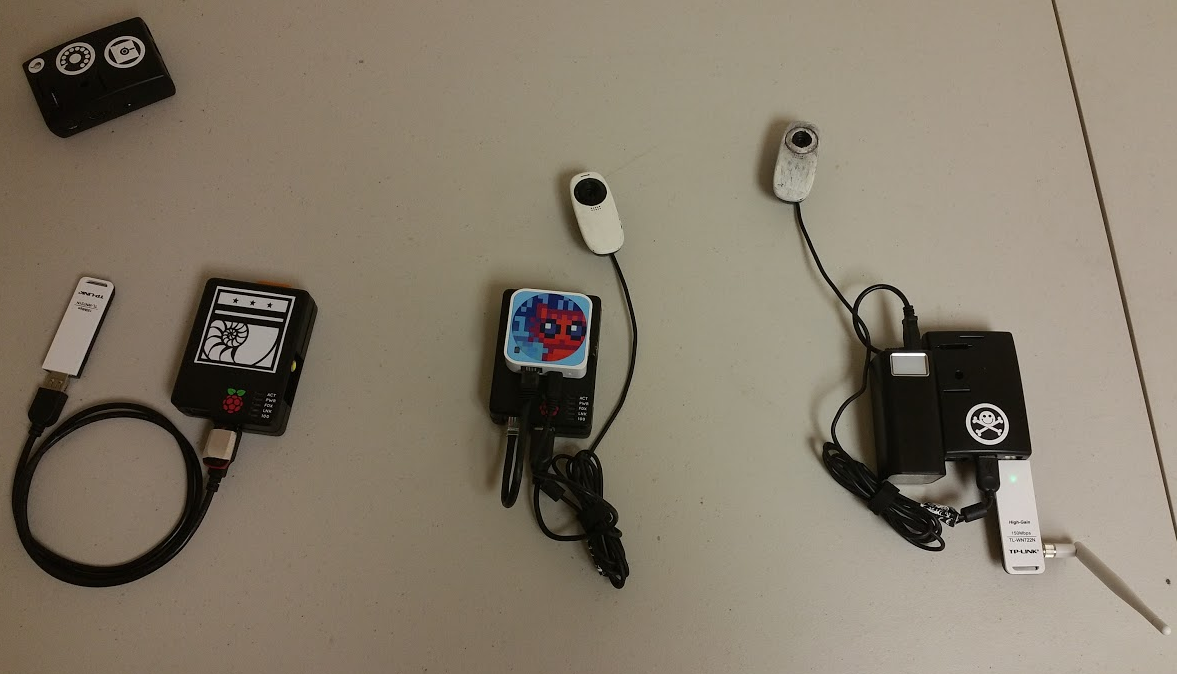
The one on the far left is the basic Raspberry Pi 1 model B that is running the Janus multiserver and Piratebox via the Raspberry Pi build (Arch Linux). The middle one is the same device but PirateBox mounted on top, while the pi is running a webcam server and Janus multiserver inside. On the far right is the current prototype:
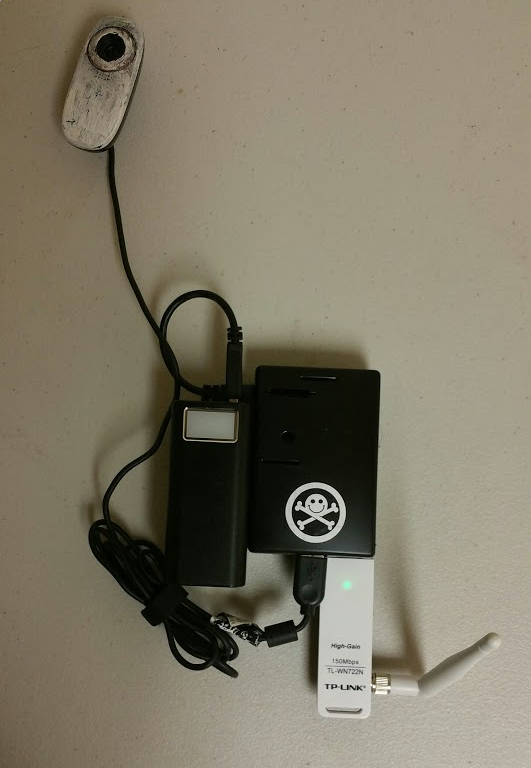
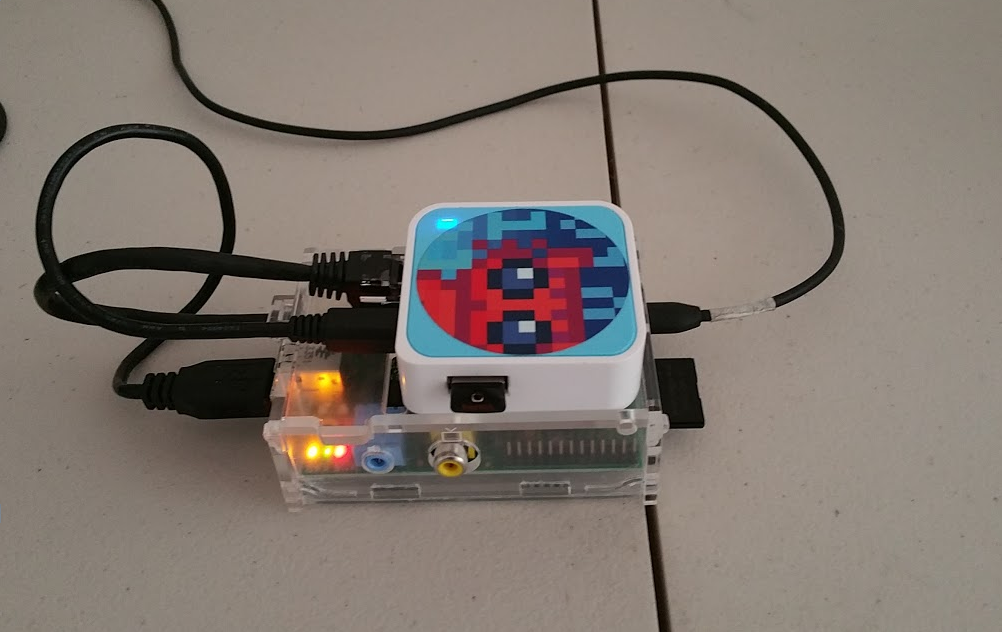
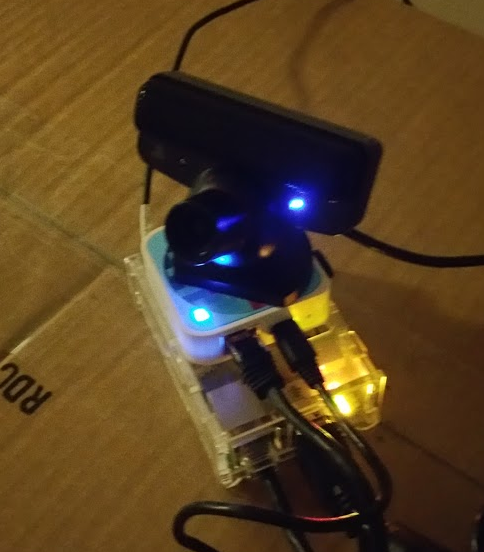
![]()
Everything is now self contained with the Raspberry Pi 2 model B + TL-WN722N WiFi adapter, USB battery pack, and a Logitech webcam. It's capable of offline filesharing and communication that is Oculus Rift enabled for realtime 3D Virtual/Augmented reality interaction. This device automatically starts a WiFi hotspot that users can connect to and streams the Webcam video over the web browser which can be viewed inside Janus.
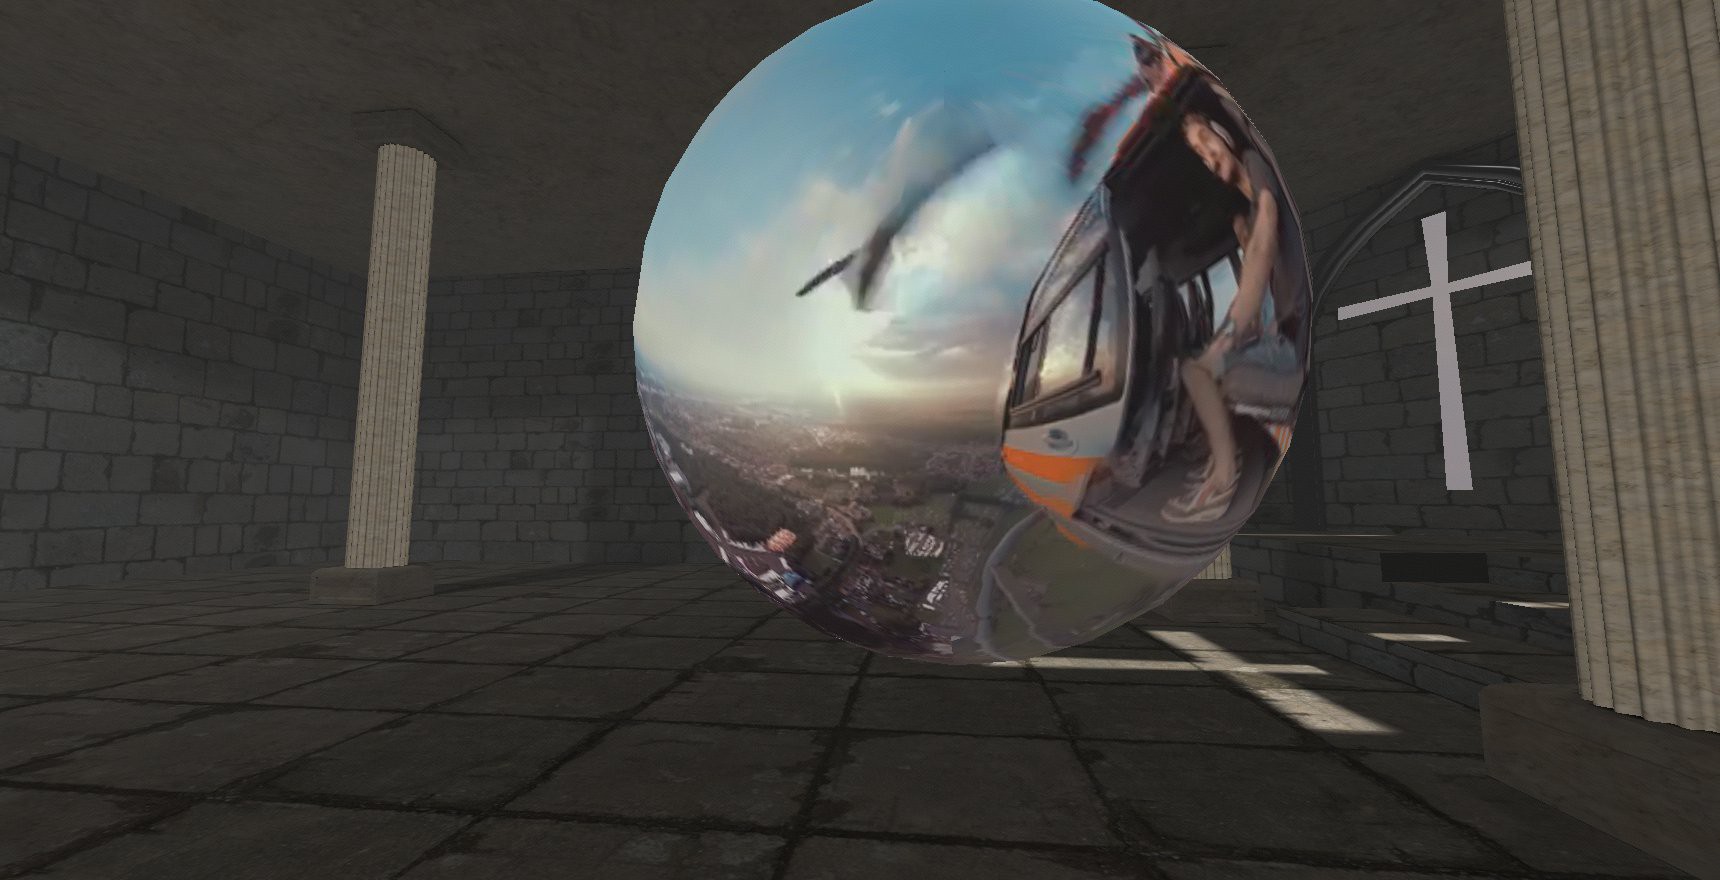
![]()
Can now have a window into the outside world inside my private VR/AR network. Quite meta with the camera looking at the device that we are currently inside of.
I've tested the Video Streaming into Janus with both Logitech c270 and Playstation Eye camera. They both work but I would recommend using the Logitech since the PS Eye only has 640x480 resolution. I'm going to write up a how-to on building your own AVALON for the Raspberry Pi 2 next!
First install Raspbian onto a MicroSD card. The Raspberry Pi 2 now uses the tiny SDHC cards for loading its operating system. We need to install the PirateBox utilities. If you're comfortable on the command line you can choose to do this in a chroot environment:
mount -o bind /dev /mnt/dev
mount -t proc none /mnt/proc
sudo chroot /mnt/ /bin/bash
Otherwise, download Raspbian from the official Raspberry Pi downloads page and aftering following the install guide then you can plug it in to your raspberry pi and either SSH in or attach monitor/keyboard/networking devices to interact and install the things. Expandthe FS, change root passwd, and enable SSH for now.
As root:apt-get update apt-get upgrade apt-get install git tmux apt-get -y install lighttpd /etc/init.d/lighttpd stop update-rc.d lighttpd remove apt-get -y install dnsmasq /etc/init.d/dnsmasq stop update-rc.d dnsmasq remove apt-get -y install hostapd /etc/init.d/hostapd stop update-rc.d hostapd remove apt-get -y install iw rm /bin/sh ln /bin/bash /bin/sh chmod a+rw /bin/shThen edit your network config file /etc/network/interfacesauto lo iface lo inet loopback iface eth0 inet dhcp iface wlan0 inet manualSave and exit. Then browse to your home directory and finish installing the rest of the packages:wget http://downloads.piratebox.de/piratebox-ws_current.tar.gz tar xzf piratebox-ws_current.tar.gz cd piratebox mkdir -p /opt cp -rv piratebox /opt cd /opt/piratebox sed 's:DROOPY_USE_USER="no":DROOPY_USE_USER="yes":' -i /opt/piratebox/conf/piratebox.conf sed 's:PROBE_INTERFACE="no":PROBE_INTERFACE="yes":' -i /opt/piratebox/conf/piratebox.conf ln /opt/piratebox/init.d/piratebox /etc/init.d/piratebox cd ../../ rm -rv piratebox/ piratebox-ws_current.tar.gzYou will want to run the PirateBox server by default on startup as well:sudo update-rc.d piratebox defaults sudo /etc/init.d/piratebox start sudo touch /opt/piratebox/conf/init_doneWhen I first tested this, I was frustrated with the reason why PirateBox software was crashing whenever I ran the stream / Janus server. The reason was because of a port conflict over 8080. So you'll need to edit the DROOPY_PORT in the /opt/piratebox/conf/piratebox.conf file and set it to 8085. Then edit the html /opt/piratebox/www/index.html and adjust to 8085. Will fix in pi image.
Now it's time to install the Webcam streamer that allows us to seamlessly pull visual information from the real world into the virtual reality environment as websurface content that you can put anywhere as you want inside your firebox room in Janus.
* The software is extremely versatile and has been successfully tested on openWRT devices as well!
Follow these instructions to compile and start mjpg-streamer working on your raspberry pi with an HD webcam:
cd /usr/src/
sudo mkdir mjpg-streamer
sudo chown `whoami`:users mjpg-streamer
cd mjpg-streamer/
git clone https://github.com/jacksonliam/mjpg-streamer.git .
sudo apt-get install libv4l-dev libjpeg8-dev imagemagick build-essential cmake subversion
cd mjpg-streamer-experimental
make
export LD_LIBRARY_PATH=.
/usr/src/mjpg-streamer/mjpg-streamer-experimental
./mjpg_streamer -i "./input_uvc.so -r 1280x720" -o "./output_http.so -w ./www -p 8090"
The streaming video will be resized to 1280x720 over port 8090. Port 8090 won't conflict with the other services the Raspberry Pi is running. Your IP address will be set to 192.168.77.1 when running PirateBox so type into your browser url:http://192.168.77.1:8090
Test if it works. If it doesn't, don't worry I'm working on an AVALON Pi image you can just flash. If it does, cool lets move on.Lets create a script start_mjpg that will initiate the service on boot time. SSH into your pi and create new text file start_mjpg
#!/bin/bash
cd /usr/src/mjpg-streamer/mjpg-streamer-experimental
./mjpg_streamer -i "./input_uvc.so -r 1280x720" -o "./output_http.so -w ./www -p 8090"
Lets repeat that last step to autostart our Janus multiserver as well. Create a new file start_janus and put this inside. Remember to replace user with your username! **
#!/bin/bash
cd /home/user/janus-server
/usr/local/bin/node /home/user/janus-server/server.js
Save and exit. Now make the scripts executable:
chmod 755 start_mjpg
chmod 755 start_janus
Stick the script into /usr/local/bin to run the scripts from wherever you are when logged into your Raspberry Pi. chown stands for change ownership.
sudo cp save_mjpg start_janus /usr/local/bin/
sudo chown 'whoami' /usr/local/bin/start_mjpg /usr/local/bin/start_janus
Now to configure your script to autorun at boot time, edit the /etc/rc.local file and append the following below the comments and above exit 0.
** Do not forget to change user in the below script to your username!
## Print the IP address

_IP=$(hostname -I) || true
if [ "$_IP" ]; then
  printf "My IP address is %s\n" "$_IP"
fi

## /etc/rc.local will run as root by default
## you must change user in your script!
## Start mjpg-streamer

(sleep 5; su - user -c "/usr/local/bin/start_mjpg; echo 'Browse to $_IP:8090/javascript_simple.html'")&

## Autostart Janus-Server

(sleep 2; su - user -c "sh /usr/local/bin/start_janus")&

exit 0
Reboot and check if everything is working. Make sure that the access point from Piratebox scripts is available and you can connect to it, that upload and download works, that you can browse to http://192.168.77.1:8090/javascript_simple.html and view the webcam livestream. I will upload some default rooms and avatars for AVALON soon so that you can test the janus multi-server easily. Just remember that all the filepaths for your firebox room must correspond to the path hosted from PirateBox!To do:
Customize defaults and UI then create a Raspberry Pi image for AVALON
Create a Github repo for default rooms and avatars that can be downloadable to a user's pi
Testing of CCTV functionality
Take some cool screen-shots / Video and also find a cool lunchbox to stick all the things inside.
Mount AVALON system onto a drone when given the opportunity.
-
AVALON
04/27/2015 at 01:43 • 0 commentsAnonymous Virtual/Augmented LOcal Networks
AVALON is a work in progress. I started with a fork PirateBox and turned it into a PirateWorld. Using JanusVR as the client, users can explore Oculus Rift enabled content together within a private shared space.
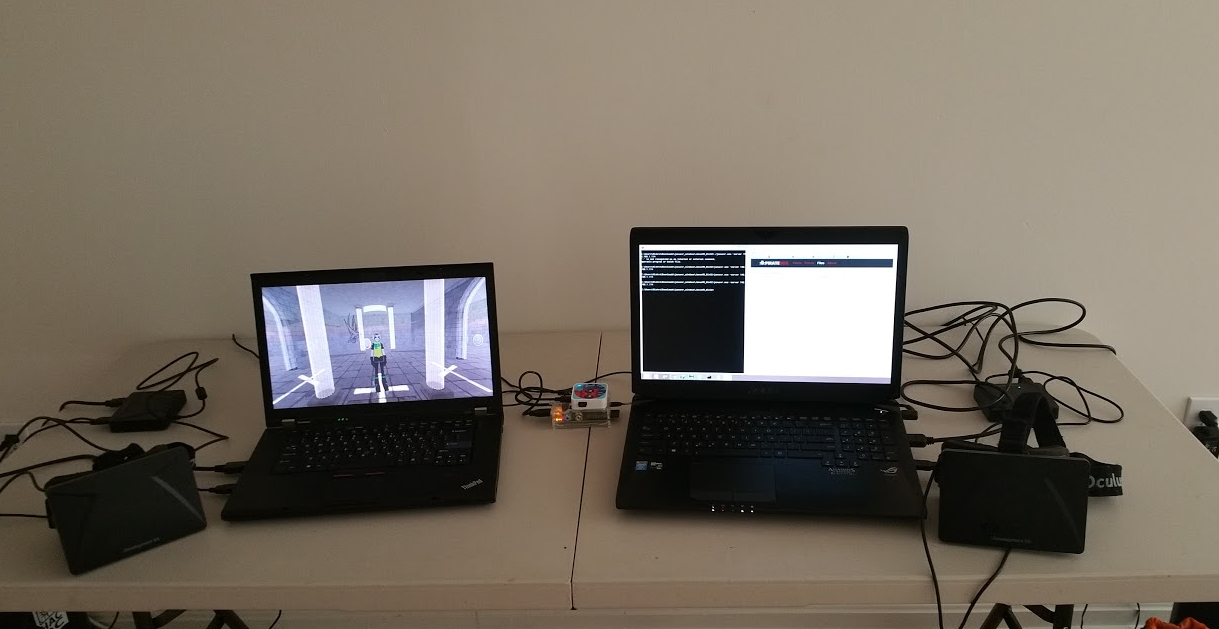
OpenWRT router running PirateBox with a Raspberry Pi connected with the JanusVR multi-server.
![]()
![]()
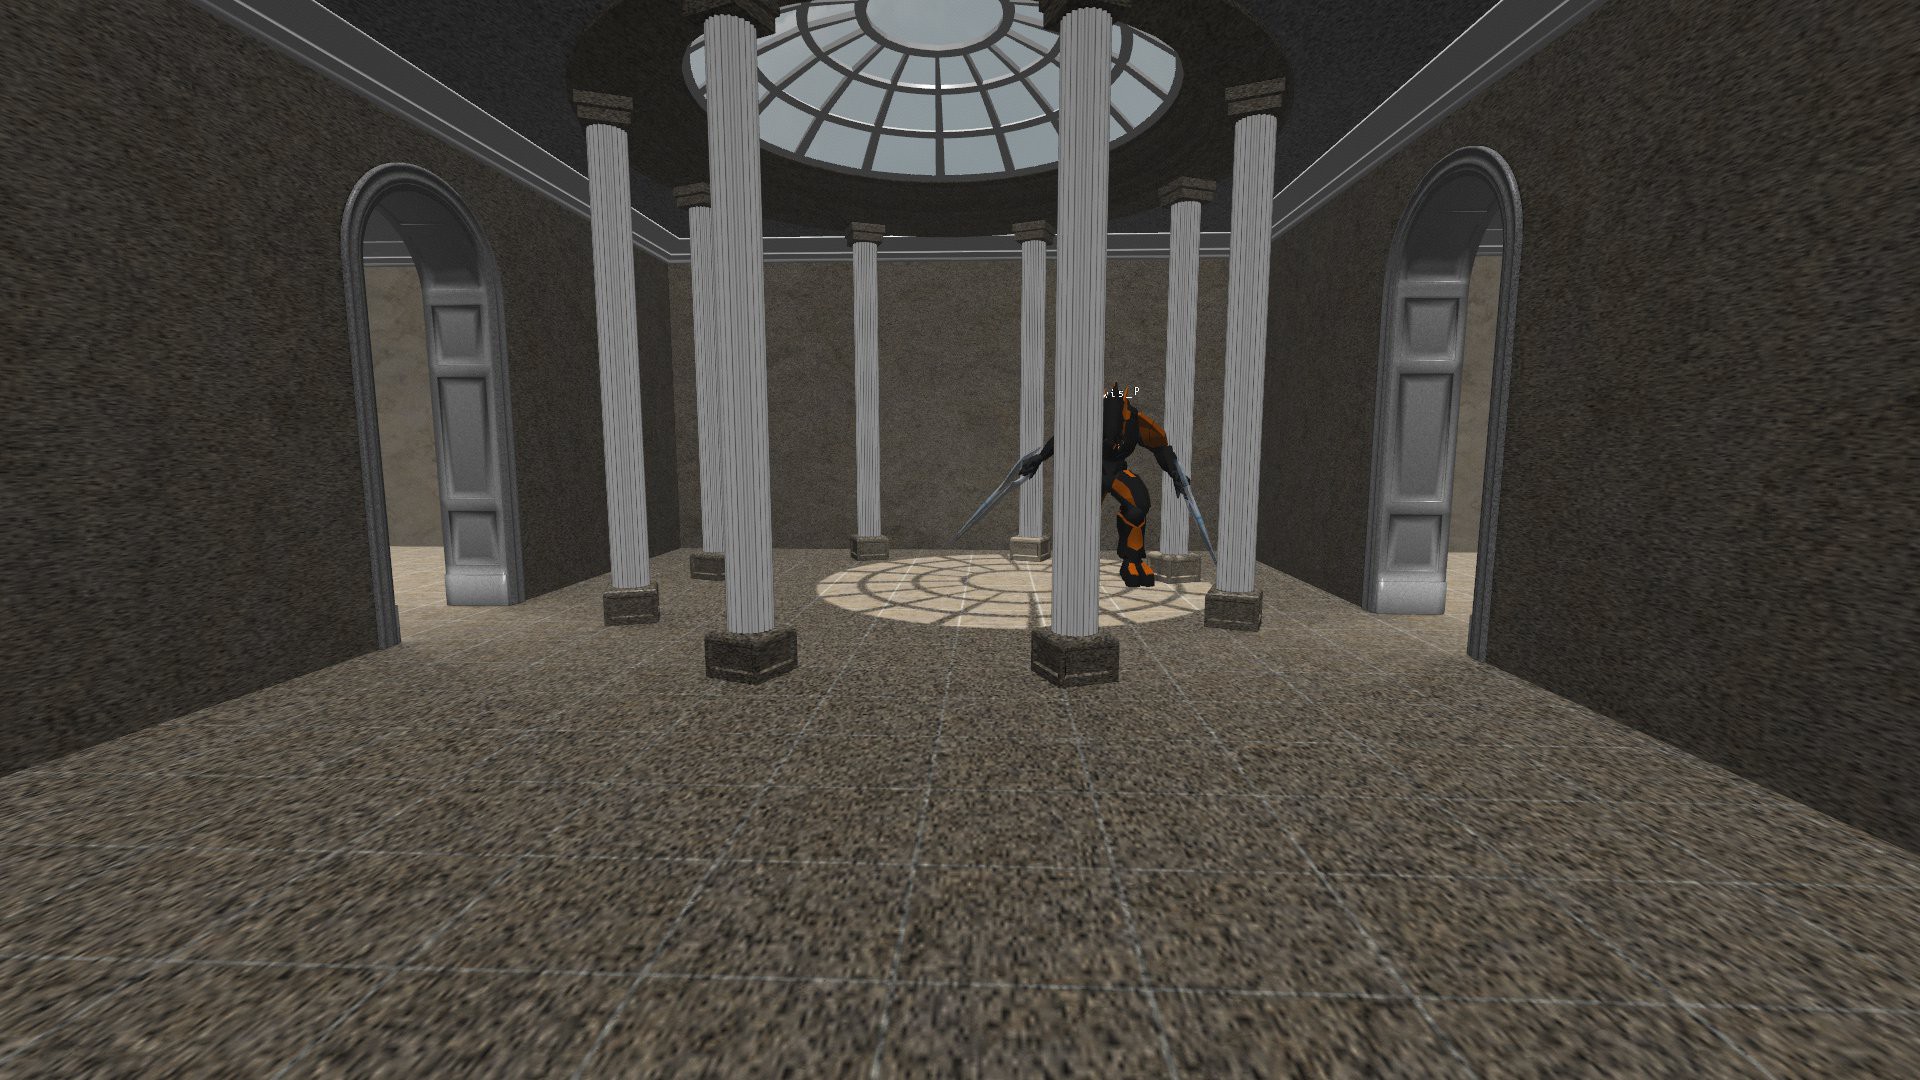
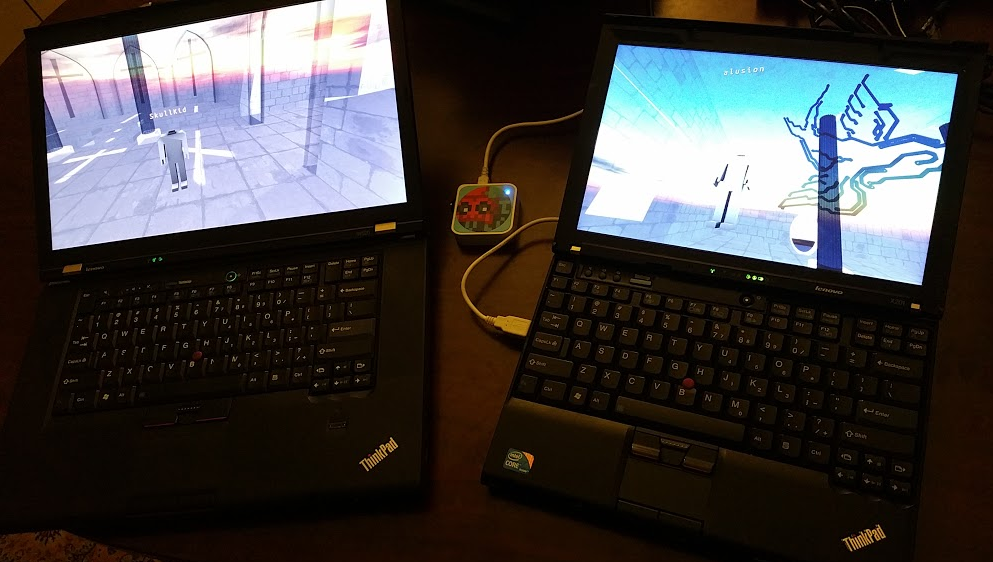
These two computers are connected to the same PirateBox Wireless Hotspot and can now talk to each other inside a 3D Oculus Rift enabled Ad-Hoc network!
![]() Person A and Person B are able to see each other inside with their own Avatars and can communicate anonymously, collaborate and create worlds, watch streams together on giant screens. It's a pocket universe with endless possibilities.
Person A and Person B are able to see each other inside with their own Avatars and can communicate anonymously, collaborate and create worlds, watch streams together on giant screens. It's a pocket universe with endless possibilities.![]()
Your avatar can literally be anything, just upload it to the PirateBox through the WebUI and point the to it for the src in your userid.txt file. (~/.local/share/janusvr/userid.txt for linux; %appdata% for Windows). Edit the <Assets> like so:
<AssetObject id="body" src="http://piratebox.lan/Shared/gen.obj" mtl="http://piratebox.lan/Shared/gen.mtl" />All of the src files for Firebox rooms and avatars should point to the Shared directory in your PirateBox. You're free to upload files from inside Janus and edit rooms in real time together.![]()
The second version is entirely self contained within the Raspberry Pi. The USB WiFi Adapter sets up an access point for other people to connect to and the external USB stores the content. Node.js powers the janus-server and allows for a multi-user experience. I've already posted the build instructions for the Pi on the left so that you can create your own.
To Do / Future implementations and ideas:
Livestreaming / Timelapse photography into AVALON. (Seamless Audio/Visual sensory information upload)
![]()
Meshnet testing
Customizing PirateBox UI / Defaults, creating a downloadable image.
Android implementation
Virtual Reality computing environment (Metaverse Hackerspace)
OpenVPN support / Hardening security
Virtual Reality Classrooms and Libraries
![]()
-
Decentralized Infrastructure
04/22/2015 at 05:23 • 0 commentsI first setup a Janus Server inside of a virtual machine on one of my laptops. I downloaded a netinstall of Debian Jessie and on it I installed git, tmux, and nodejs for the server. In network settings, I bridged the wifi adapter to the card connected to my PirateBox wifi. When you run the command 'ip a' in a terminal, you should see a 192.168.X.X IP address associated with the PirateBox.
![]()
I have two laptops connected to the PirateBox access point between them (the usb is just for power). The DHCP server assigns an IP address for each PC. When I started janus, I make sure to point to the Janus Server I setup earlier by launching with
/janusvr -server 192.168.1.144That was just my server's IP, yours might vary. The same rule applies to windows as well. You may also add it to the room html.![]()
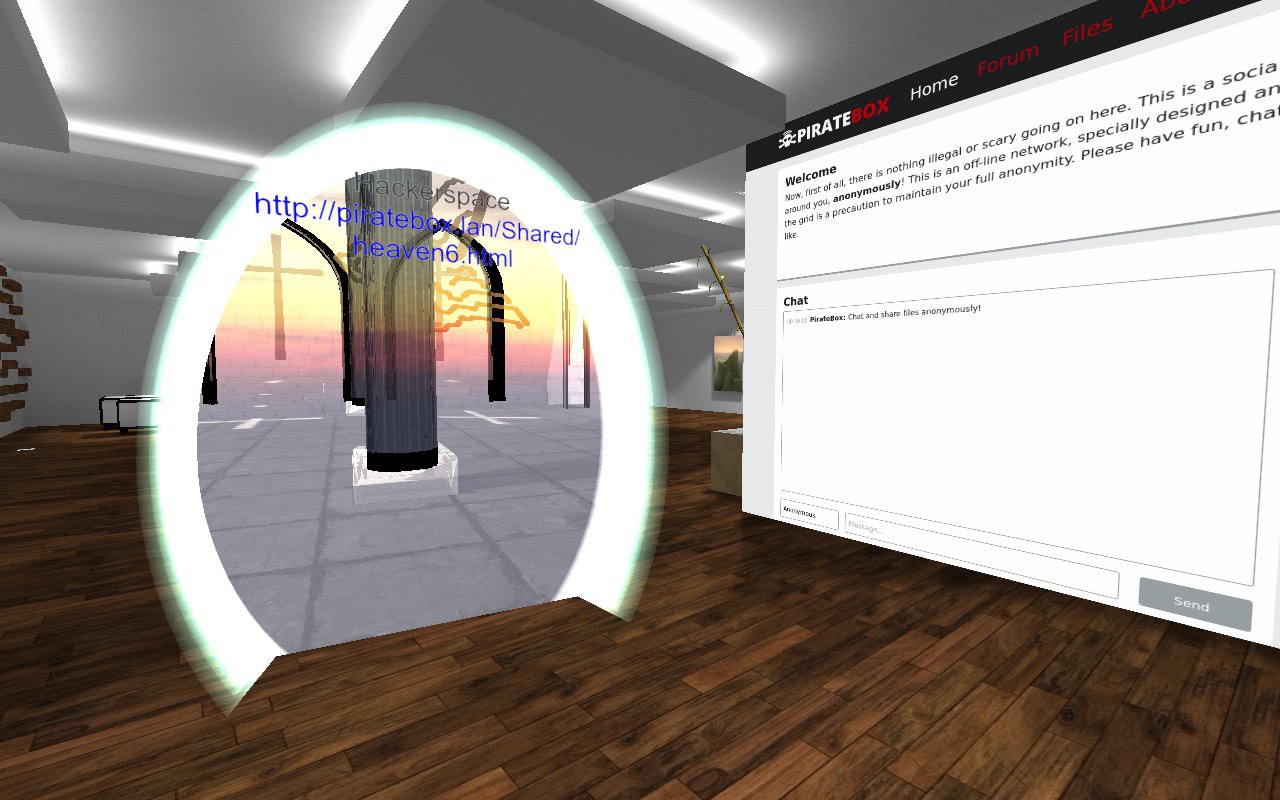
You'll automatically default into the piratebox.lan homepage where you can chat / upload & browse files / access the imageboard. I have all the files uploaded to the PirateBox already, so I just need to open a portal to where the html file is.
![]()
The room loaded up very fast since everything is running locally.
![]()
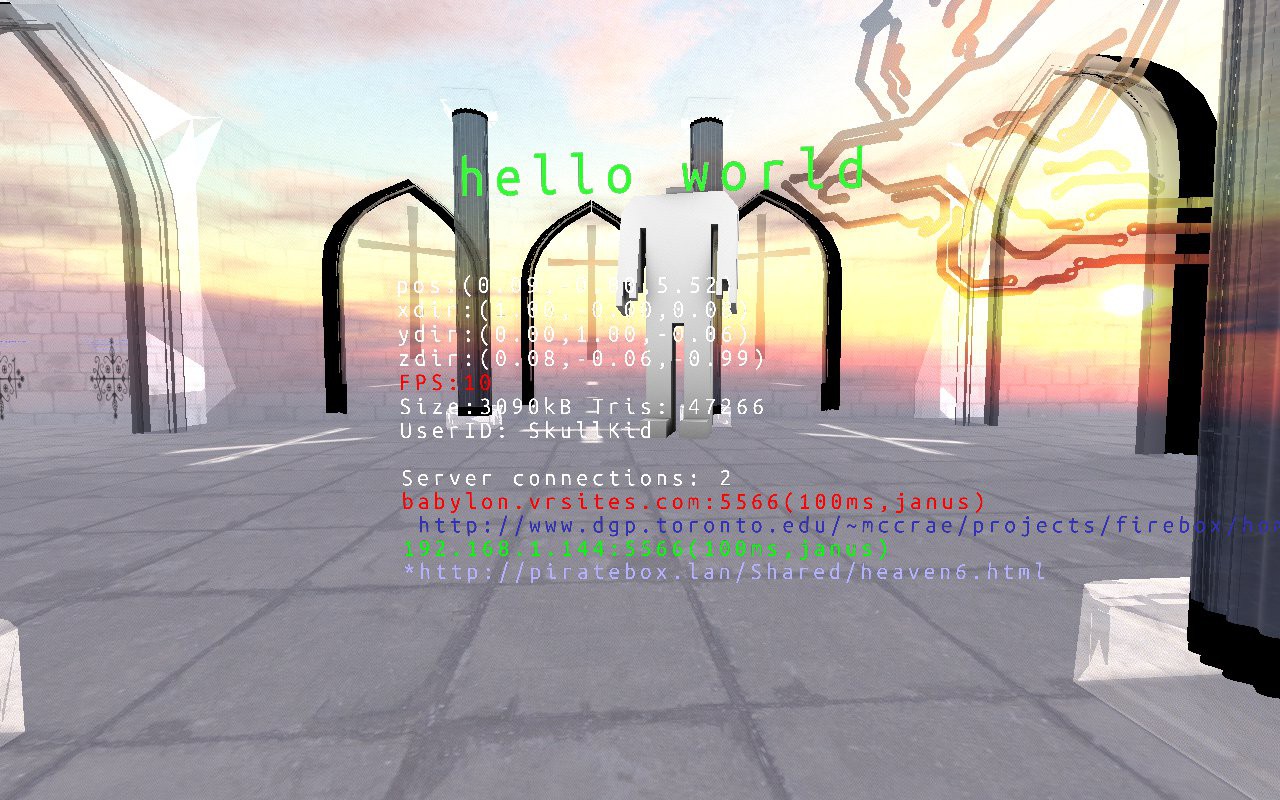
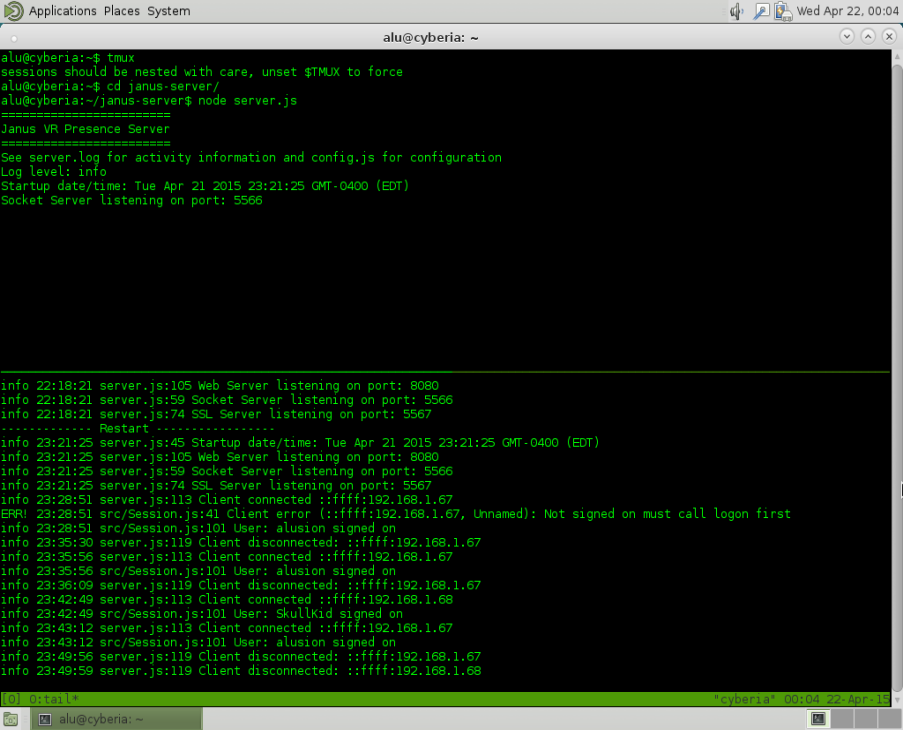
We can see here that the client is connected to our Janus Server in green
![]()
The server log is showing that our clients successfully connected. We can see each other, in 3D -- over a WiFi hotspot!!
Just think about that for a moment, we're inside that nano router in a shared immersive 3D environment. By design we are not connected to the world wide web; this is our personal and private VR world! There's lots we can do here, share content -- talk -- and even collaborate! I tested to see if I could tunnel into my Linux computer from inside the private world. Works.
![]()
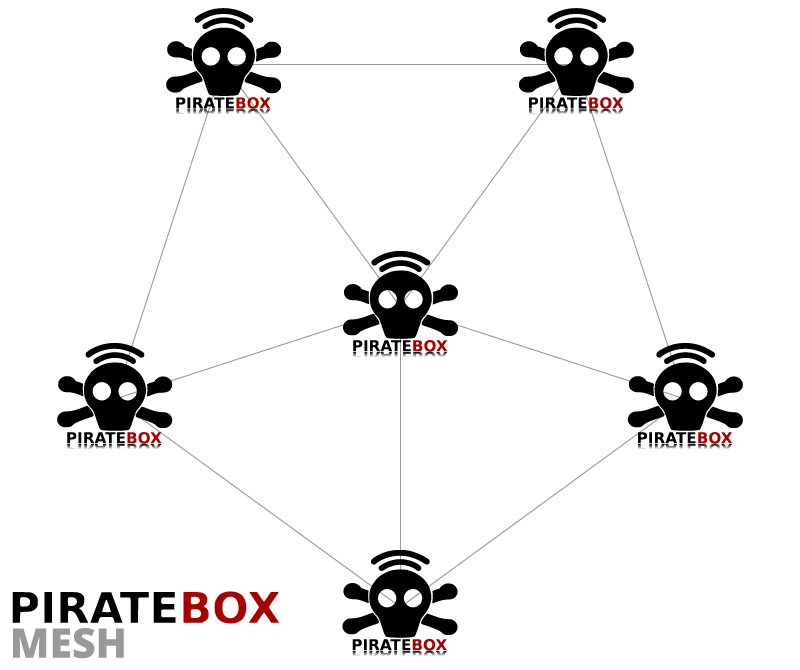
The same setup works just as well with an android phone using the PirateBox app and Rasberry Pi. I'm currently compiling node.js from source on my Raspberry Pi and setting up a Janus Server so that the entire system is self contained. I'll create an image for others to download when I have it working. I envision the backbone for the 3D internet to be run on cheap consumer hardware and open software. The next logical step for me is to get the devices to talk to each other in an ad-hoc configuration. Wireless mesh networks, an emerging technology, may bring the dream of a seamlessly connected world into reality.
http://piratebox.aod-rpg.de/dokuwiki/doku.php/mesh/introduction
![]()
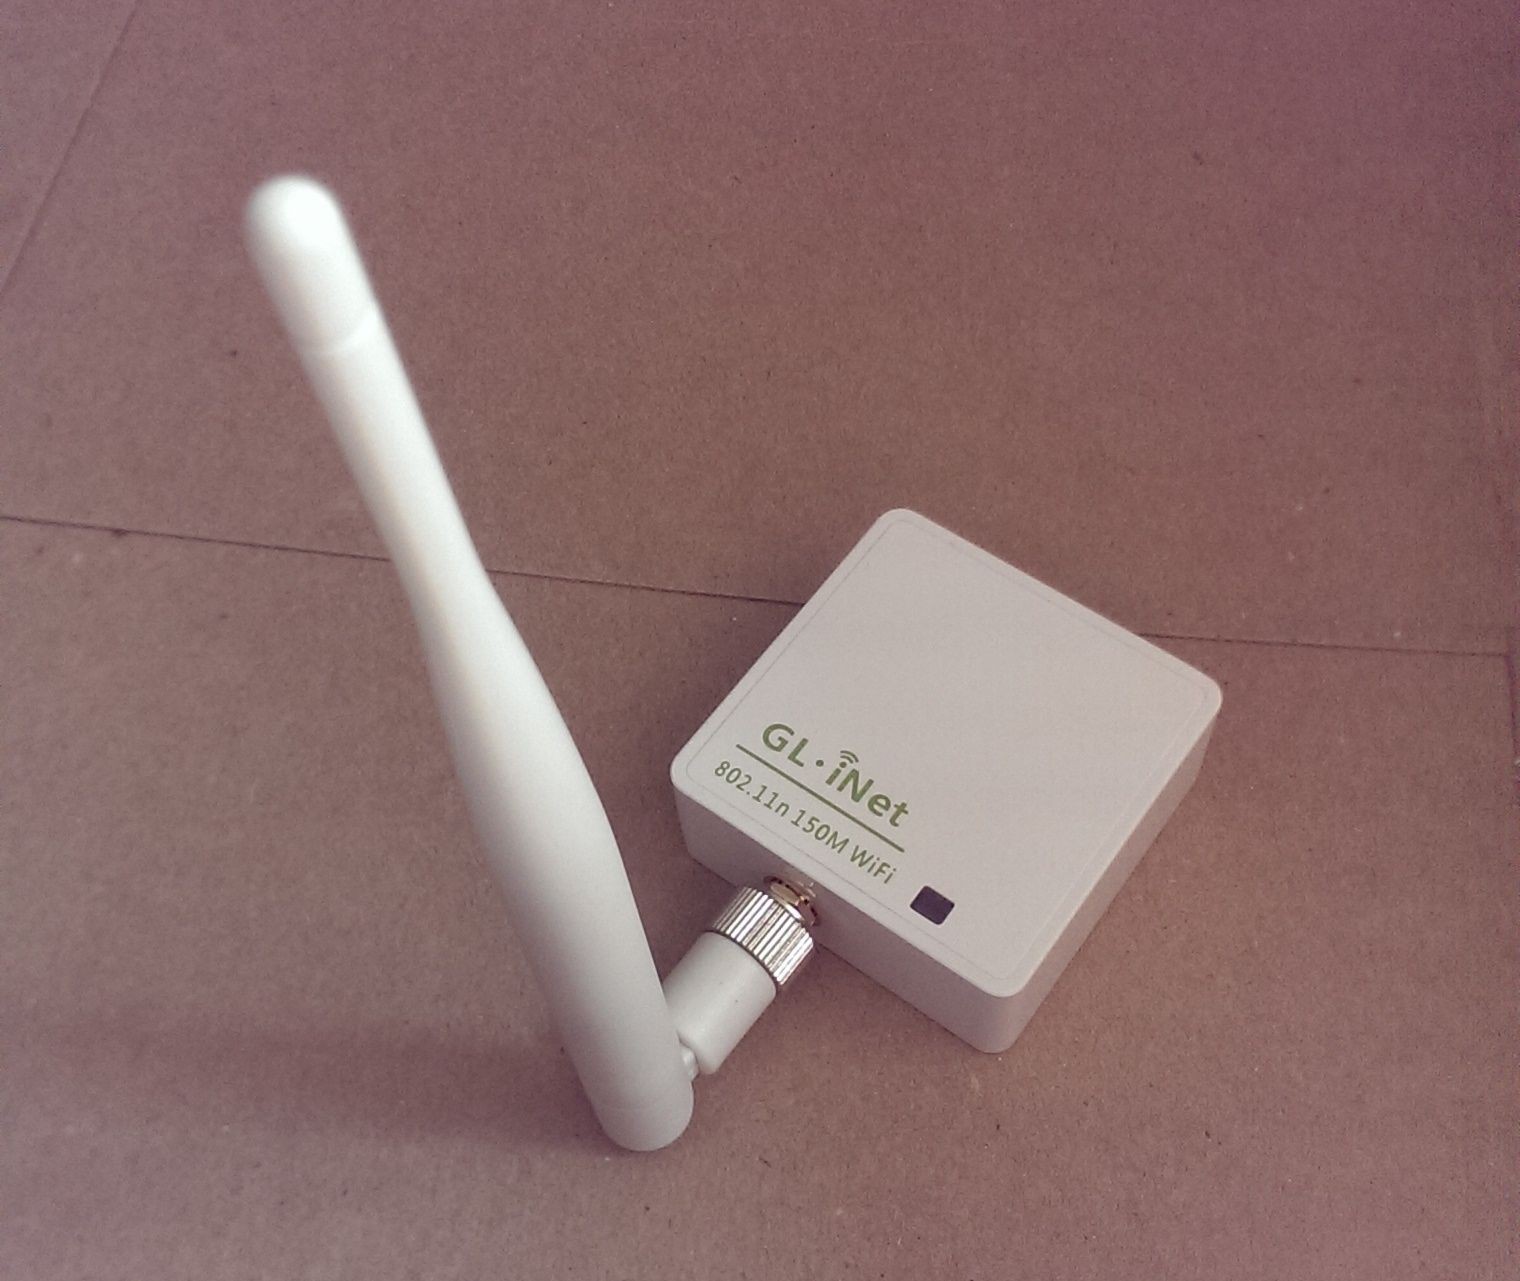
The current implemented mesh protocol for PirateBox is BATMAN-advanced. CJDNS can't have broadcasting support but it's worth taking a look at. The newer wr703n travel routers aren't supported anymore for the new mesh features (TP-Link changed the webui and upgrade process). The hardware recommended to use is the gl-inet:
http://wiki.openwrt.org/toh/gl-inet/gl-inet
![]()
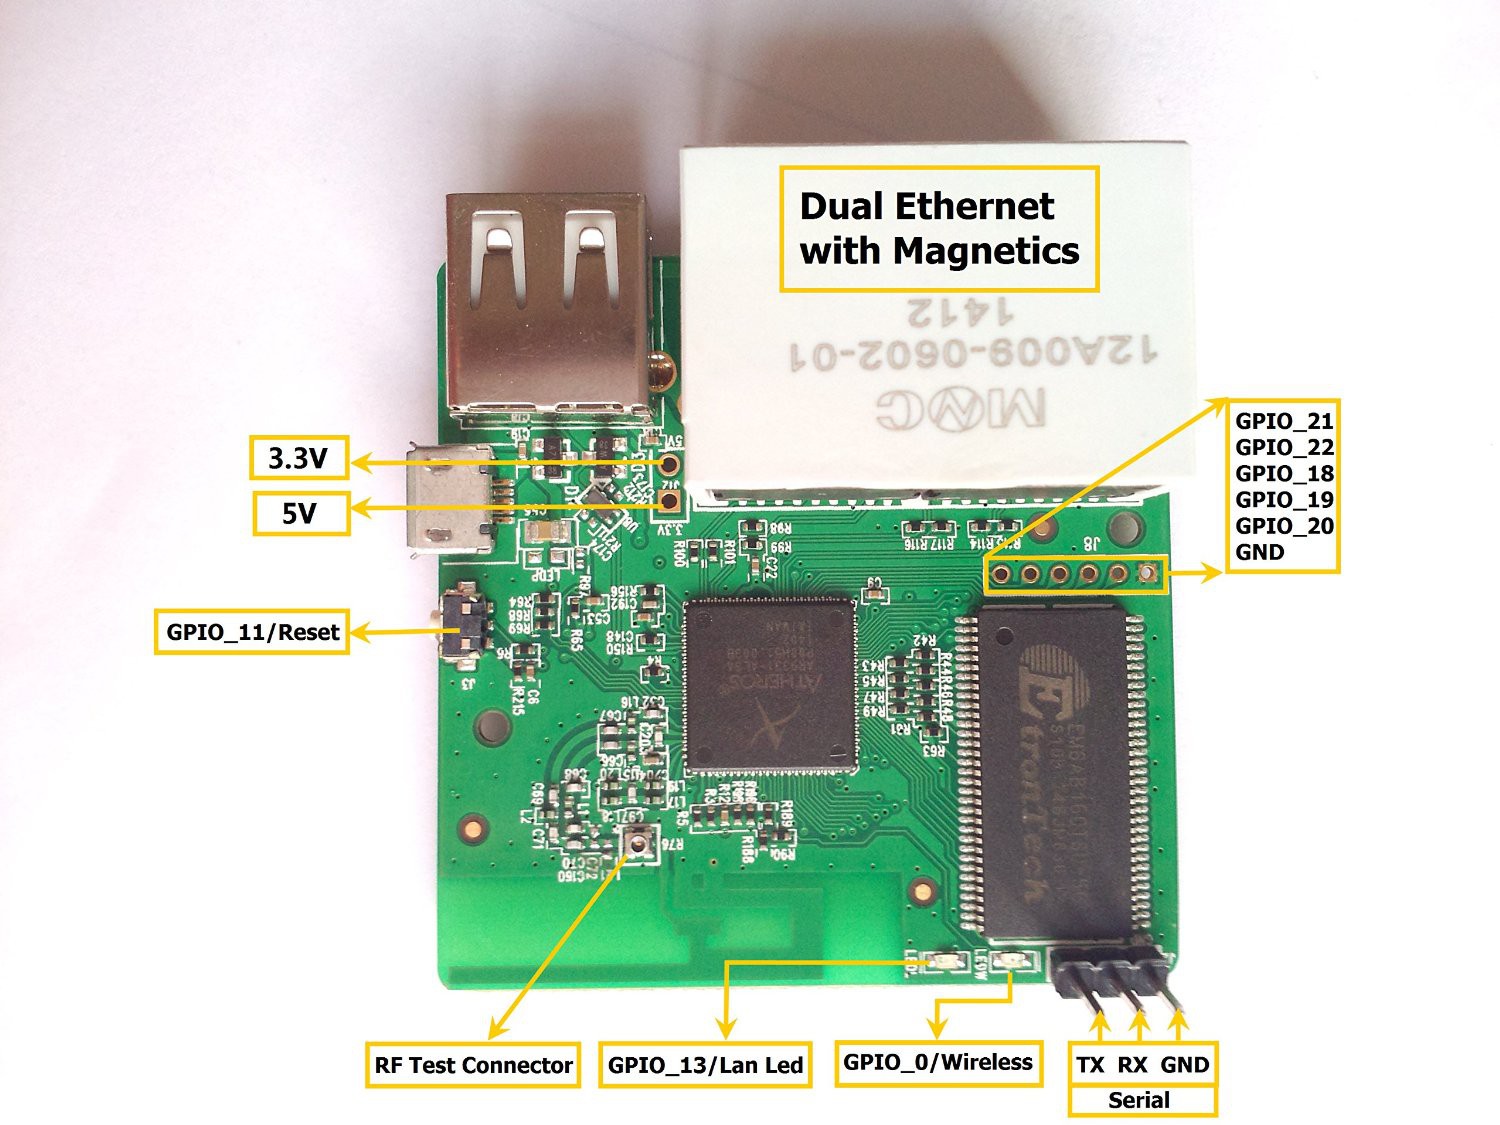
This openWRT router is sold on ebay and Amazon and can be modded with an external antenna as well
![]()
![]()
The testing image with the mesh features can be found here then you just follow the normal upgrade process here.
These devices will become the gateways into the virtual 3D reconstruction of reality. The Internet of Things meets VR.
-
Digital Immortality
04/19/2015 at 08:03 • 0 commentsI had to rewrite much of this after my browser fucked up . It's never as good as the first time :(
![]()
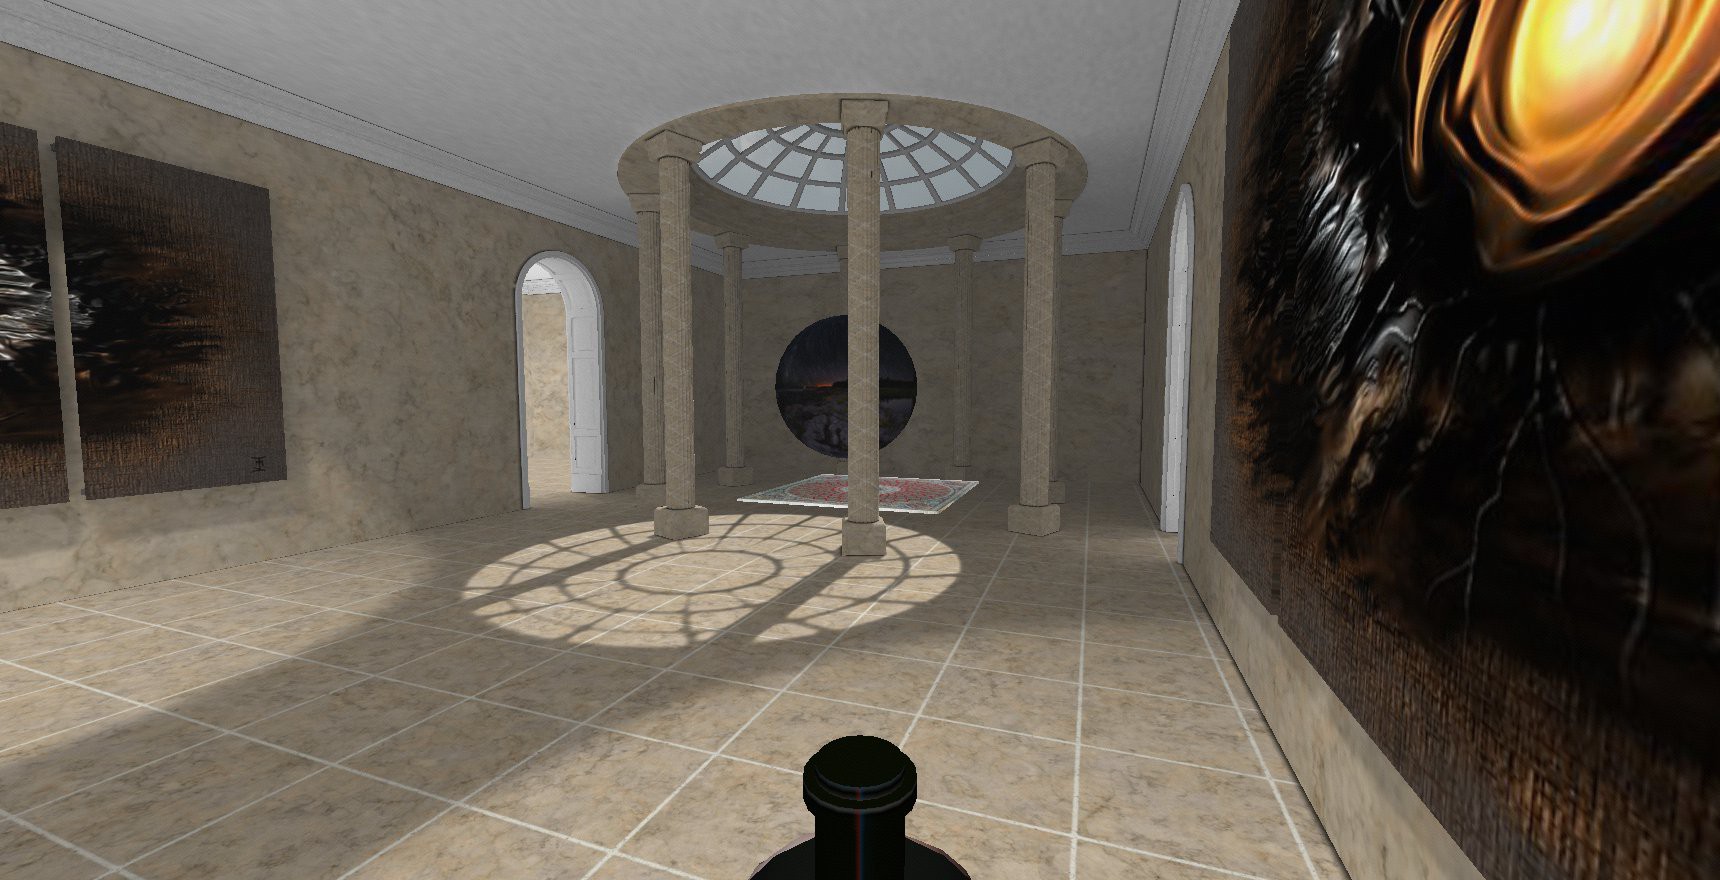
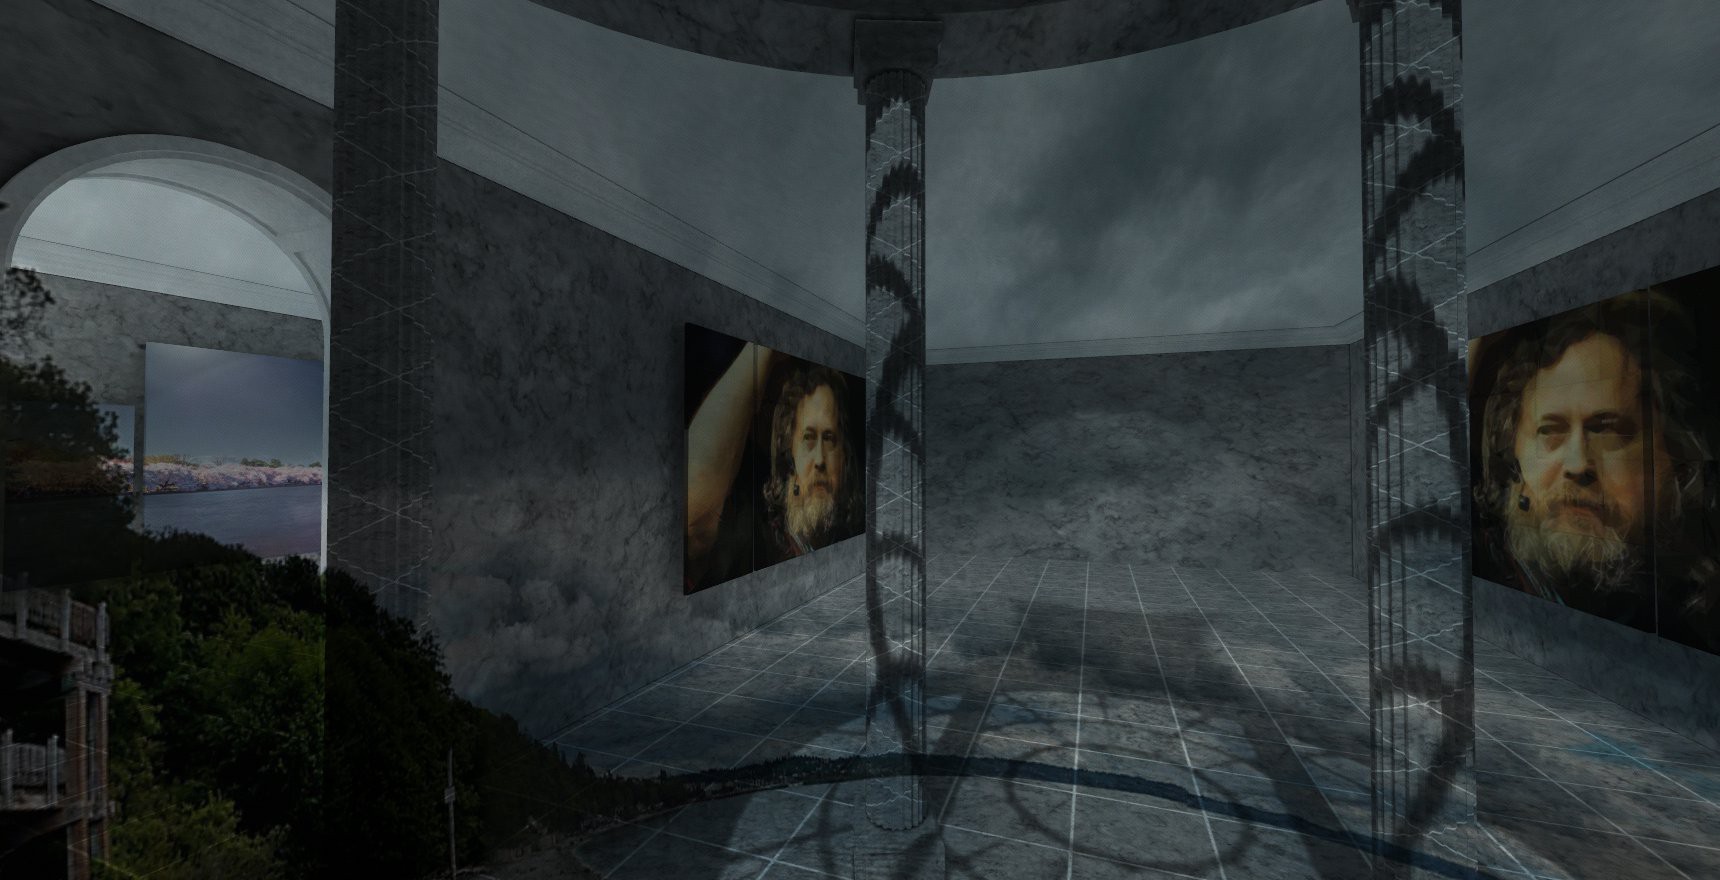
The church isn't of course real -- it exists as pure information. Immortalized as code: the foundations of a 3D reconstruction of reality is being built. Lets not forget that this is meant to be seen in 3D.
![]()
I decided to use sewer doors as the portal doors to represent the binding between the church and the underground. One day this will be one of a million copies, a place for the average Joe to have a conversation with "God" (some form of AI).
The Flowers of Lo-Life
![]()
Tunnel through the underground and emerge somewhere else or as someone else. These portals will be connected to real places in the physical world that allow you to "exit" out into meatspace.
What I mean by exit is the abstract representation of "self" which we can represent through avatars. Taken into context, an avatar is simply an audio/visual representation of "self" -- such as the current generation of social media pages such as Facebook. The avatar can be expressed in many ways and we should not be tied down to one identity.
"The future is already here, it's just not evenly distributed"
Everything in this project must be set to scale with the physical world to be effective at delivering its vision. Access into Janus from a browser client is under development. I have chosen the approach of exploring ARM / Mobile devices such as Raspberry Pi & Android to act as nodes for JanusVR.
![]()
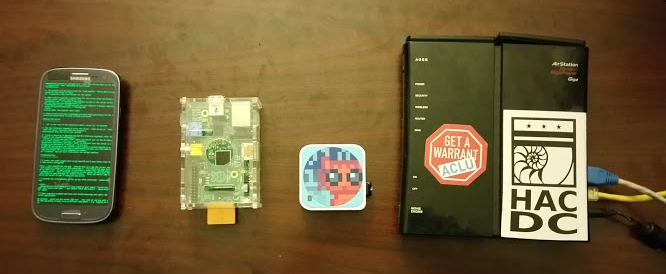
Rooted Galaxy S3 i9300, Raspberry Pi, TP-Link wr703n travel router, Buffalo WZR-HP-G300NH Gigabit router.
I began with the smallest device, the wr703n router, as it was already flashed with OpenWRT firmware with a usb install of Piratebox: a DIY anonymous offline file-sharing and communications system built with free software and inexpensive off-the-shelf hardware. PirateBox is essentially a wireless dead drop
![]()
Another reason for choosing PirateBox is because it is designed to be private and secure. No logins are required and no user data is logged. Users remain anonymous – the system is purposely not connected to the Internet in order to subvert tracking and preserve user privacy.
When PirateBox sets up a wireless access point and a user on their browser gets redirected into the PirateBox homepage. From there, they can chat anonymously - upload / download files - or post on the anonymous imageboard.
Another project might worth taking a look at is Librarybox.
PirateBox notes
Few difficulties when installing PirateBox. I had a clean install of Raspbian and followed this guide
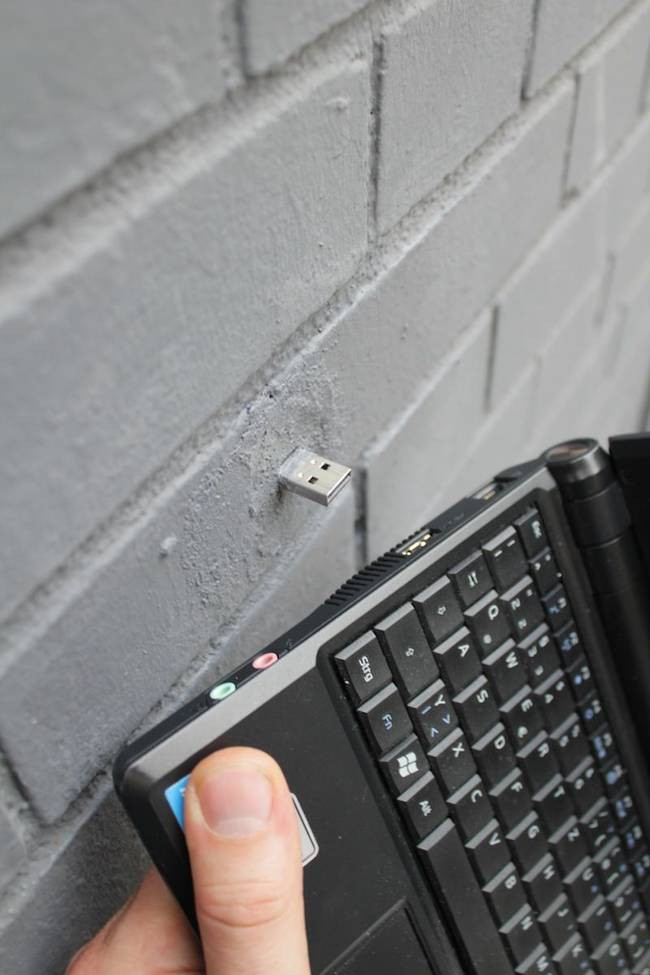
to install piratebox on my Raspberry Pi but I couldn't initiate my wireless network device. I plugged in my alfa AWUS036h into my raspberry pi and proceeded to install the drivers but when it came to compiling and installing the packages, my device failed to connect to the internet even though it was wired and seemingly fine 5 minutes ago. I also noticed was that mesh net functions for PirateBox were not tested on my specific hardware but that doesn't really worry me too much, I was planning to use something else other than the B.A.T.M.A.N. mesh protocol. Another issue came with the LiveUSB version of PirateBox, which I tusted on an old netbook and x200. For the thinkpad, if you use unetbootin to write the image it'll boot. However, after that one time boot it stops working [tested on other computers too. I formatted it with ext4. When I tried using dd instead of unetbootin, it didn't even boot at all on those PC's.
![]()
USB Dead Drop
-
A Rift in the Metaverse
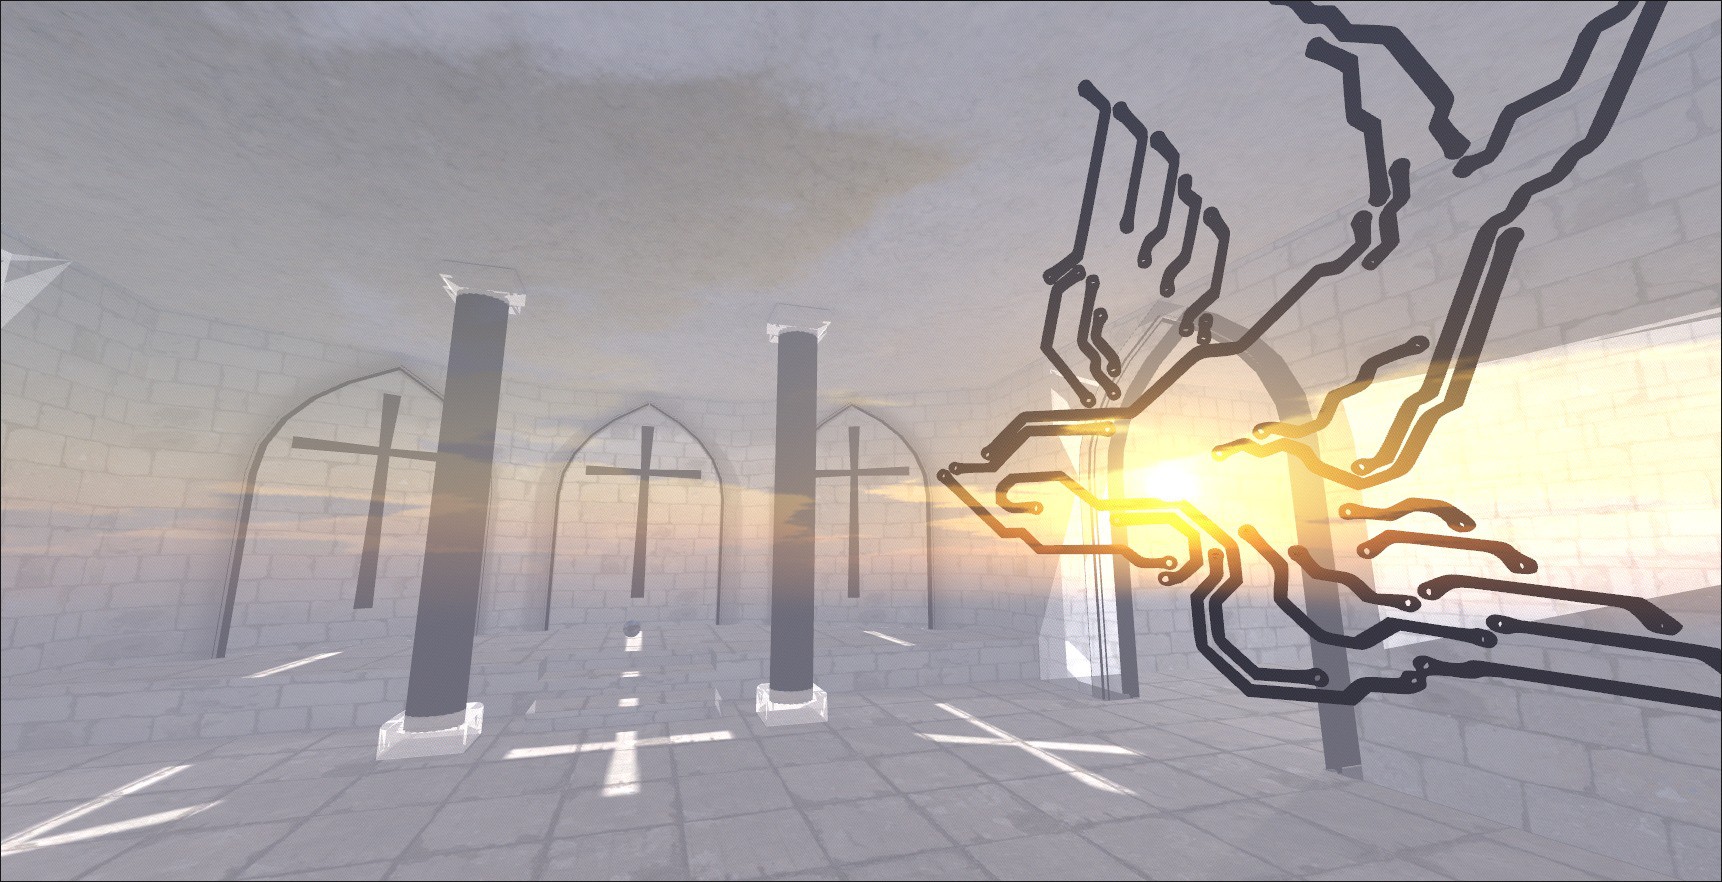
04/19/2015 at 02:24 • 0 commentsVersion 40.10 introduced alpha layers and blend arguments. How awesome this is? I'll show you in pictures:
![]()
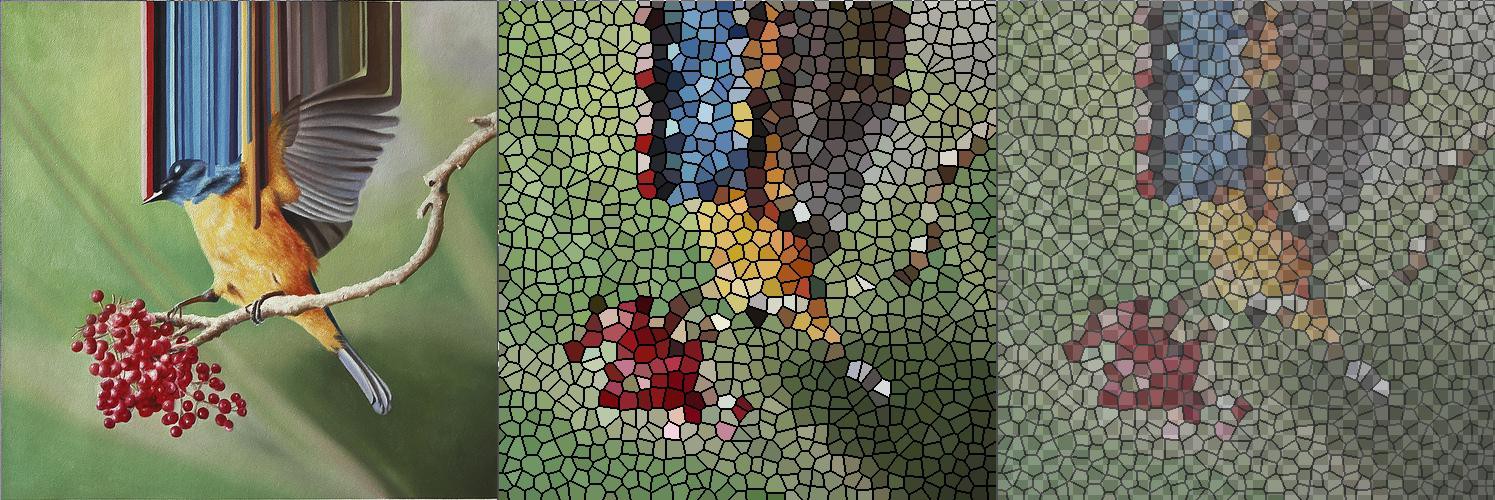
<Object id="bird" js_id="16" pos="3.700000 4.200000 0.000000" xdir="-0.707 0.000 -0.707" ydir="0.707 0.000 -0.707" zdir="0.000 -1.000 0.000" scale="0.600000 0.300000 0.600000" blend_src="one_minus_constant_alpha" blend_dest="dst_color" />

<Object id="sphere1" js_id="172s2" pos="0.000000 1.500000 0.700000" scale="1.000000 0.700000 1.000000" lighting="false" cull_face="none" collision_id="sphere1" blend_src="dst_alpha" blend_dest="dst_alpha" />

<Object id="sphere2" js_id="17223c" pos="0.000000 1.500000 0.700000" scale="1.000000 0.700000 1.000000" blend_src="one" blend_dest="one_minus_src_color" />
The new options in 40.10 introduce blend_src and blend_dest which toggle alpha channels and transparency options for your objects!![]()
GLSL (OpenGL Shader Language) is used to take advantage of the alpha channel transparency to view a second skybox. When you walk in it's like the world behind you disappears completely until you walk out in a long enough direction.
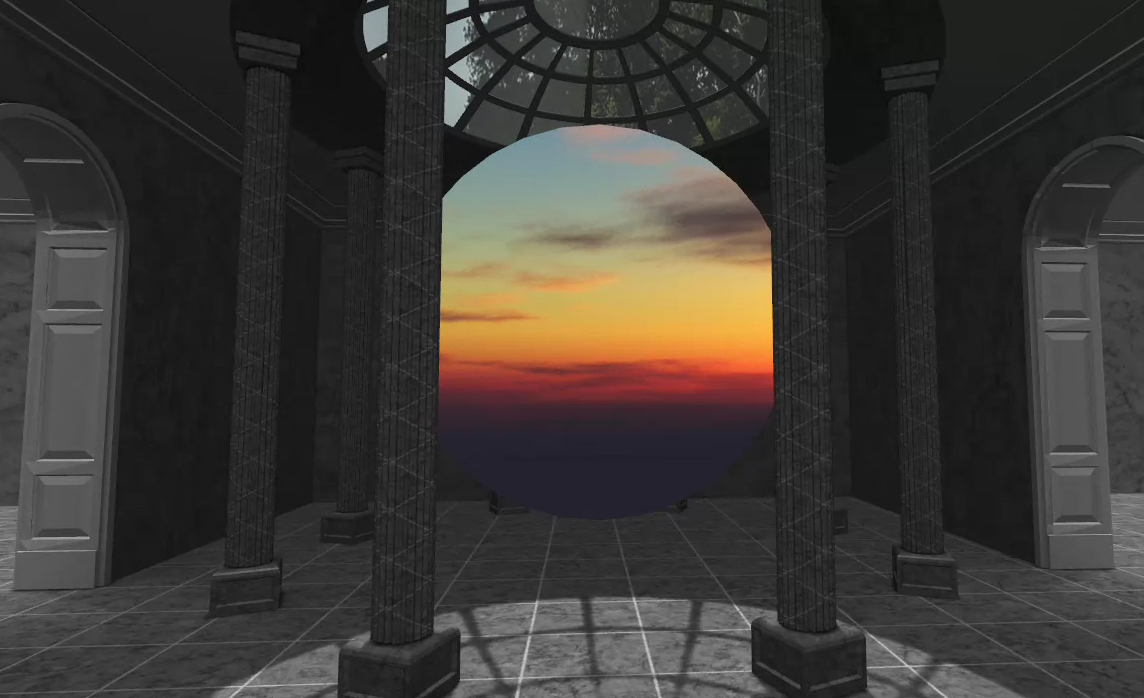
![]() The textures and colors enrich with blend_src="src_color" & blend_dest="one_minus_dst_alpha"
The textures and colors enrich with blend_src="src_color" & blend_dest="one_minus_dst_alpha"![]()
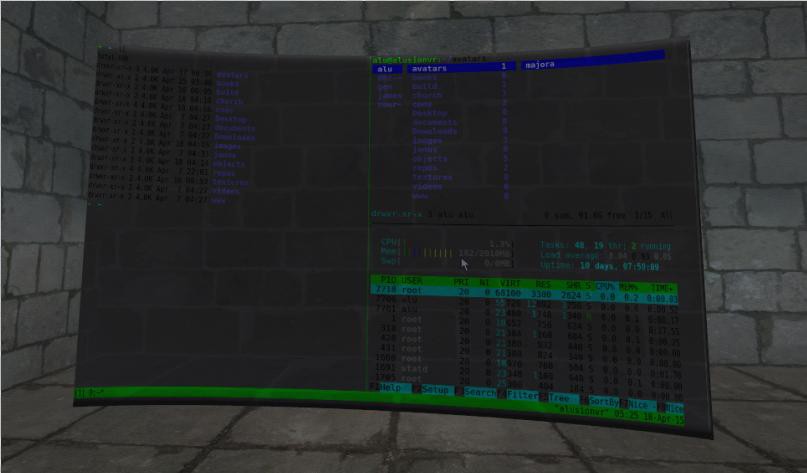
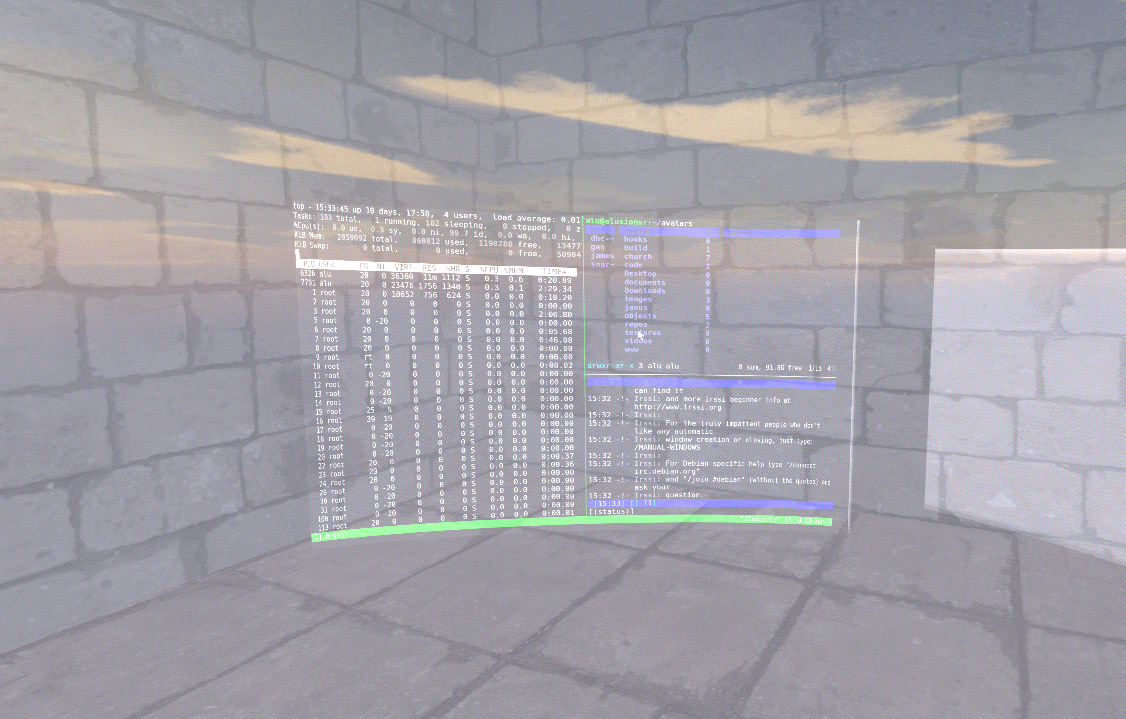
Transparent terminals that make you feel right at home. Now if someone can just program 3D tiling software.
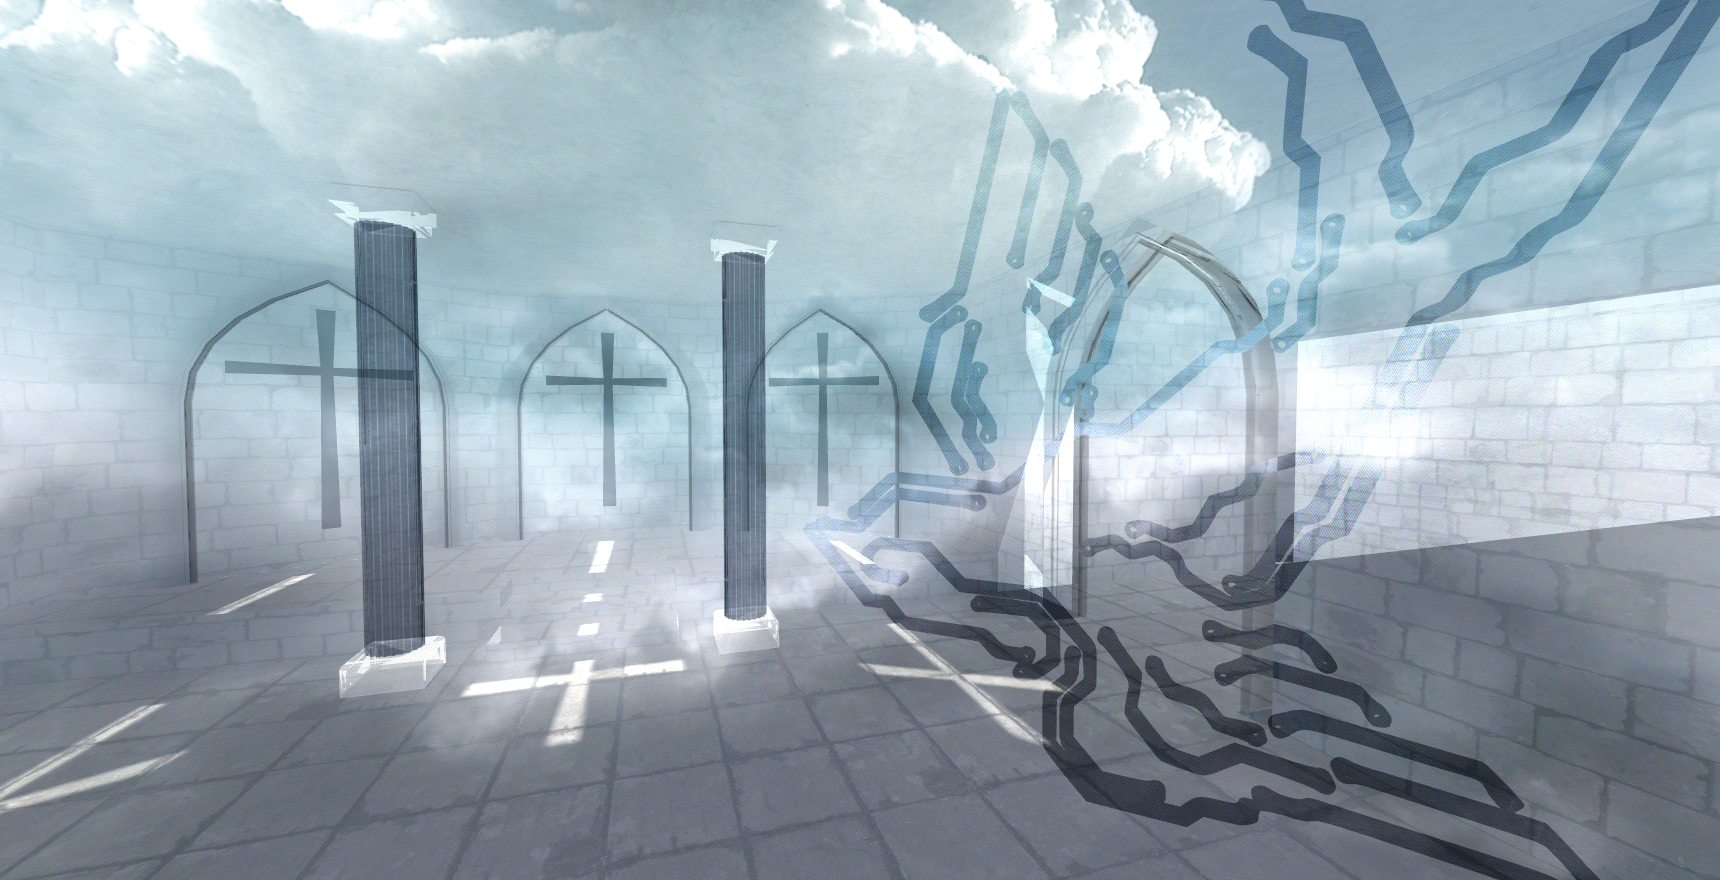
![]()
There's many different options but this adds unimaginable layers of depth into Janus. I'm only beginning to explore what this can be capable of doing, and at first I was just interested in transparent concrete. Now I'm thinking about incorporating stained glass windows:
![]()
I used imagemagick to create the effects you see. I'm exploring designs for a stained glass portal door. This one just ended up being kind of confusing in a way, the room needed a theme with art on the walls.
![]()
Heaven is under construction.
![]()
Please ping back later.
-
Seamless Import
04/15/2015 at 23:16 • 0 commentsslop (Select Operation) is an application that queries for a selection from the user and prints the region to stdout.
For this you will need FFmpeg and xclip installed. I needed to have a way to select something on my desktop and open it in Janus. For the filehosting I used Teknik and modified the file upload script to copy to clipboard:
#!/usr/bin/env bash
# requires: bash 4.0+, curl
files="$@"
if [[ -z "${files}" ]]; then
    printf 'You must submit a file to be uploaded!\n'
    exit 1
else
    printf 'Uploading file(s) now!'
    n=1
    for i in "$@"; do
        printf "\nUploading file #${n} ... "
        out=$(curl -sf -F file="@${i}" https://api.somewebsite.io/upload/post)
        if [[ "${out}" =~ "error" ]]; then
            printf 'error uploading file!\n'
            exit 1
        else
            out="${out##*name\":\"}"
            out="${out%%\"*}"
            printf "uploaded! Your file can be found at https://u.somewebsite.io/${out}\n"
            xclip -selection clipboard <<< "https://u.somewebsite.io/${out}"
        fi
        ((n++))
    done
fi
I stuck the script in my /usr/local/bin directory. Before installing slop make sure you have libXext installed as a dependency. The steps are straight forward from there:
git clone https://github.com/naelstrof/slop.git
cd slop
cmake ./
make && sudo make install
Slop has a lot of nice features such as supporting transparency, selecting x-display, removing window decorations, and having a much cleaner select rectangle than scrot -s.
You can create a video recording script in two lines of code, and ffmpeg will record it in a format of your choice. The combination is insanely powerful.
#!/bin/bash
eval $(slop)
ffmpeg -f x11grab -s "$W"x"$H" -i :0.0+$X,$Y -f alsa -i pulse ~/myfile.webm
Here is the one liner I made to record a window or selection and automatically upload it to a website, copying the URL directly to keyboard:
KEK="$(mktemp /tmp/out-XXXXXXXX.webm)"; eval $(slop); ffmpeg -f x11grab -s "$W"x"$H" -i :0.0+$X,$Y -f alsa -i pulse $KEK; upload $KEKI know using eval $(slop) isn't the cleanest solution and the examples on the github were terrible (calling awk 6 times) so I wrote my own bash script to improve the dirty one liner. Here's the finished script:
#!/bin/bash
# Requires xclip, upload, slop, ffmpeg
# optional maim ( https://github.com/naelstrof/maim )
# create a temporary file with -u flag
tmp="$(mktemp -u /tmp/out-XXXXXXXX.webm)";
# g and id are used when maim is called
read -r x y w h g id < <(slop -f "%x %y %w %h %g $id");
# maim -g $g -i $id
# record x11 window and output as webm
ffmpeg -f x11grab -s "$w"x"$h" -i :0.0+"$x","$y" -f alsa -i pulse "$tmp";
# upload to some website
upload "$tmp"
A cool way to implement this was to save it as a shell script (topkek) and gave it execute permission with chmod +x topkek and keybind it to a hotkey. I use openbox so I edited my rc.xml file (~/.config/openbox) and added the keybind to map to my windows key + j. Now just restart openbox and it should work. As a note, you should also hotkey a kill command.
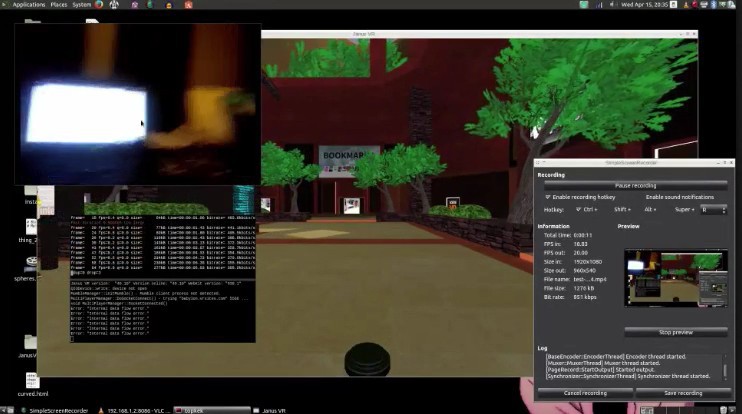
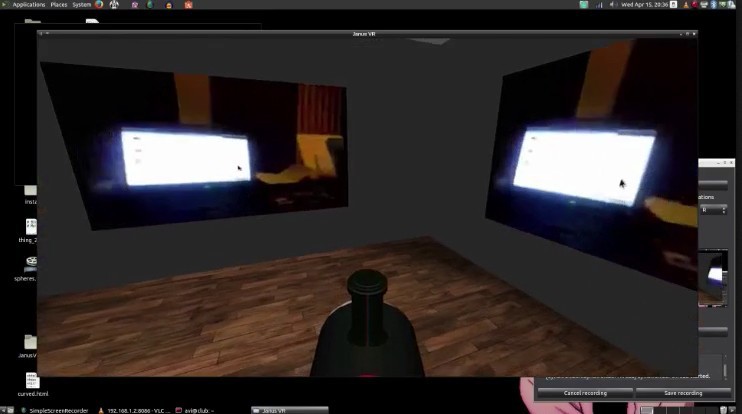
    <keybind key="W-j">
        <action name="Execute">
            <startupnotify>
                <enabled>true</enabled>
                <name>slop</name>
            </startupnotify>
            <command>topkek</command>
        </action>
    </keybind>
I livestreamed from my android phone to vlc on my computer using Spydroid, ran the script that records the VLC window and uploads it to the filehosting site and copies the URL to my clipboard. I then open up the link in a new portal to see that which I just recorded:
![]()
![]()
I'm going to do some more tests and videos that can show the process better as well as how useful the application of this program can be. One test I have in mind is to go into a tunnel into a Linux shell from inside janus and record the x11 Window of a webcam and import that into the room. It's acts like you are reaching into the physical world and bringing it back into the virtual, audio included. I'll setup a raspberry pi or spare laptop and return to this idea later.
-
Digital Library
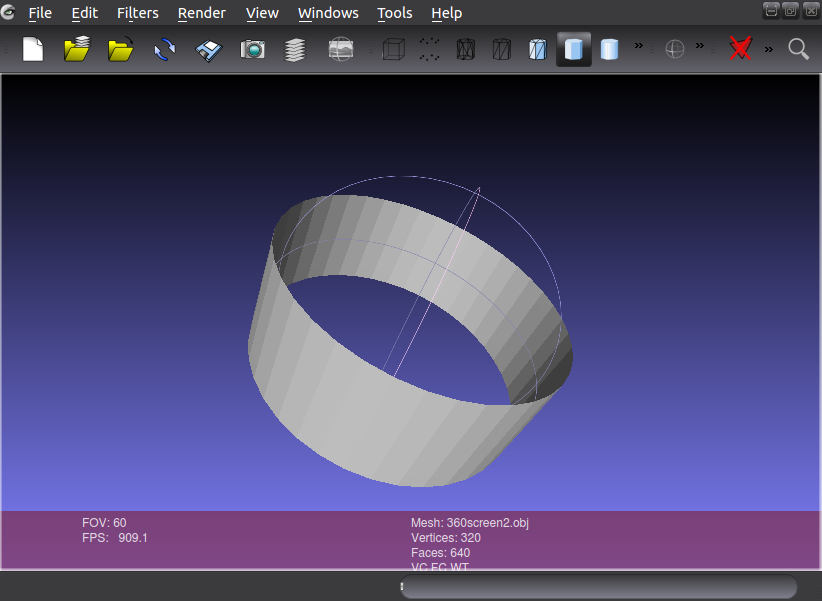
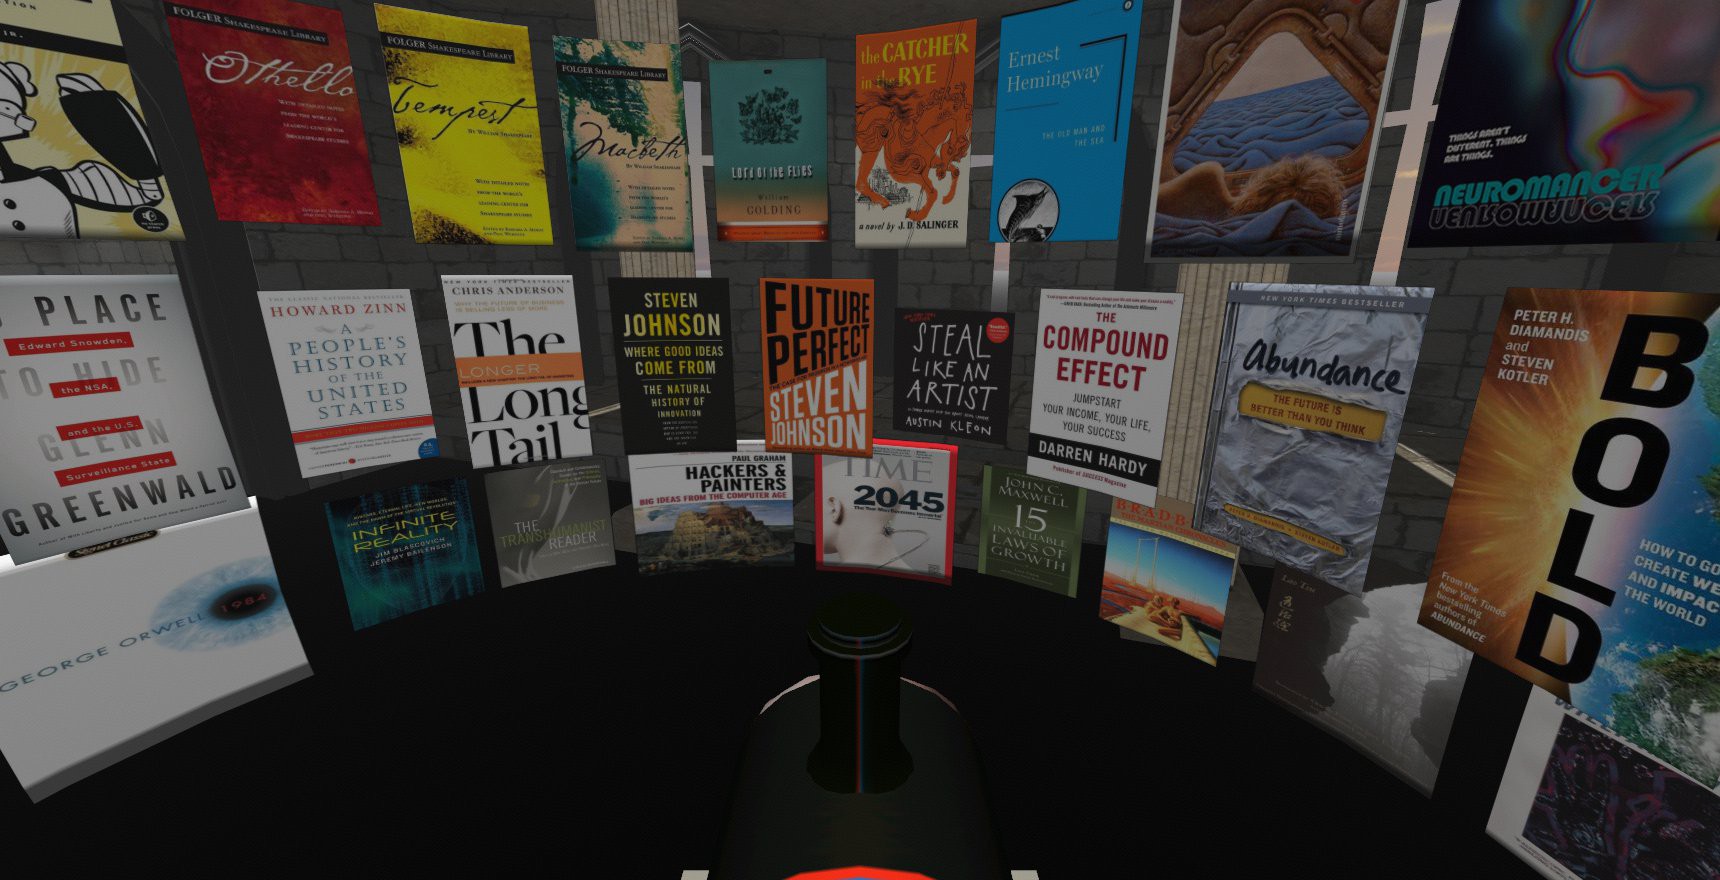
04/15/2015 at 18:11 • 2 commentsWhile creating a porfolio of my work, I was interested in the interface in which I would like to showcase the books that I have read. A personal library can tell a lot about a person and I have been interested in creating a virtual reality library because of the cool hacks I've done with software similar to spritz. I tried at first using the pipe and cylinder objects found in that come with Janus by default inside ~/JanusVRBin/assets/primitives/ but they weren't so good. What I found worked best was from an asset pack an Aussie had sent me earlier, now uploaded on the master branch of gitlab.
![]()
This would be perfect for displaying the books. So what I did next was open gimp and create a transparent background of about 3840 x 600 and added in my book covers that I downloaded from Goodreads:
![]()
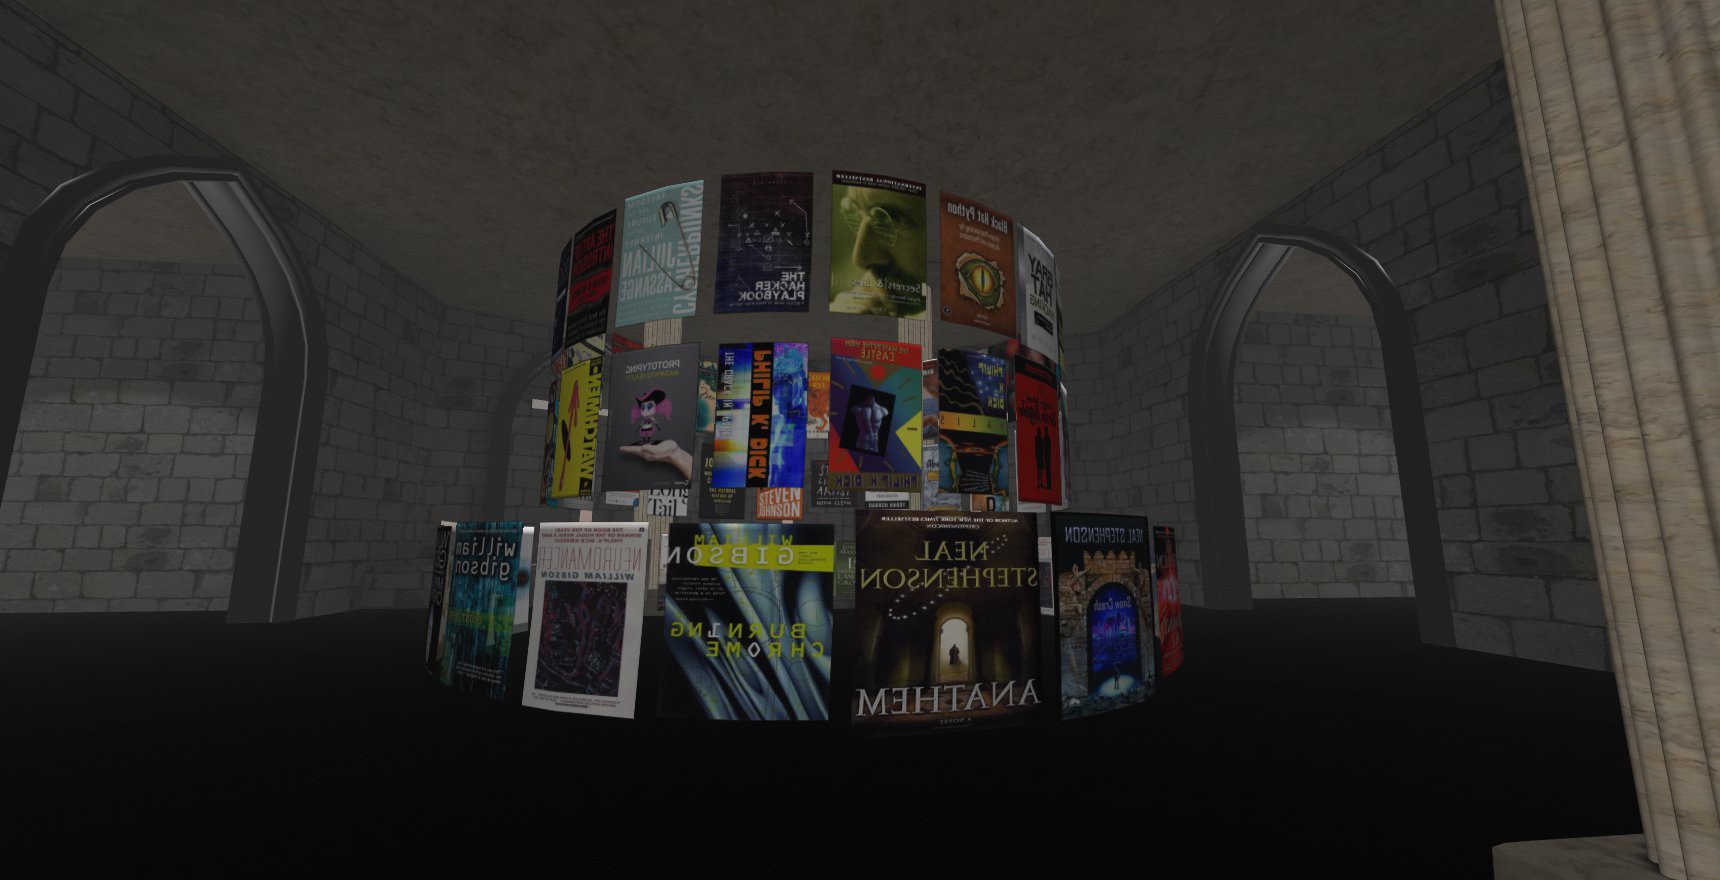
I created an AssetObject id="screen360" pointed to the raw mesh file and the AssetImage's of the transparent png's I just made in gimp. The HTML looks like this:
<!-- Written with Janus VR.  URL: file:///home/avi/library.html -->
<html>
<head>
<title>Library</title>
</head>
<body>
<FireBoxRoom>
<Assets>
<AssetObject id="screen360" src="https://gitlab.com/janusvr/cyberia/raw/master/obj/360screen2.obj" />
<AssetObject id="sphere1" src="https://gitlab.com/janusvr/cyberia/raw/master/church.dae" />
<AssetObject id="sphere2" src="https://gitlab.com/janusvr/cyberia/raw/master/church1.dae" />
<AssetObject id="cylinder" src="https://gitlab.com/janusvr/cyberia/raw/master/obj/cylinder.obj" />
<AssetImage id="HacDC" src="https://gitlab.com/janusvr/cyberia/raw/master/hacdc-logo.png" />
<AssetImage id="books1" src="http://a.pomf.se/sbhfcr.png" />
<AssetImage id="books2" src="http://a.pomf.se/budcrw.png" />
<AssetImage id="books3" src="http://a.pomf.se/icjdew.png" />
<AssetImage id="books4" src="http://a.pomf.se/aoutbn.png" />
<AssetImage id="books5" src="http://a.pomf.se/ubbhsq.png" />
<AssetImage id="books6" src="http://a.pomf.se/zlunyw.png" />
</Assets>
<Room use_local_asset="room_plane" pos="0.000000 0.100000 10.000000" xdir="-1.000000 0.000000 0.000004" ydir="0.000000 1.000000 0.000000" zdir="-0.000004 0.000000 -1.000000" col="0.000000 0.000000 0.000000" default_sounds="false" fog="true" fog_density="0.010000" fog_end="50.000000" fog_col="0.600000 0.600000 0.600000">
<Image id="HacDC" js_id="dasdas3" pos="0.000000 5.400000 10.400001" xdir="-1.000 0.000 0.000" zdir="0.000 0.000 -1.000" scale="1.500000 1.500000 1.000000" />
<Object id="sphere2" js_id="17223c" pos="0.000000 1.500000 0.000000" scale="1.000000 0.700000 1.000000" cull_face="none" />
<Object id="sphere1" js_id="172s2" pos="0.000000 1.500000 0.000000" scale="1.000000 0.700000 1.000000" lighting="false" cull_face="none" collision_id="sphere1" />
<Object id="screen360" js_id="alusion-0-1429073195" pos="0.400000 1.900000 -5.100000" xdir="-0.322 0.003 0.947" ydir="-0.006 -1.000 0.001" zdir="0.947 -0.005 0.322" scale="0.200000 0.100000 0.200000" image_id="books1" />
<Object id="screen360" js_id="" pos="0.400000 2.600000 -5.100000" xdir="-0.322 0.003 0.947" ydir="-0.006 -1.000 0.001" zdir="0.947 -0.005 0.322" scale="0.200000 0.100000 0.200000" image_id="books2" />
<Object id="screen360" js_id="" pos="0.400000 3.200000 -5.100000" xdir="-0.322 0.003 0.947" ydir="-0.006 -1.000 0.001" zdir="0.947 -0.005 0.322" scale="0.200000 0.100000 0.200000" image_id="books3" />
</Room>
</FireBoxRoom>
</body>
</html>
The only thing I changed was I adjoined two of the transparent png's horizontally so I can fit 20 books in a ring, the total resolution of the file being 7680x600 pixels at < 5mb in size. The results look very good inside ~![]()
From the outside it seems like you could build a tower of books this way
![]()
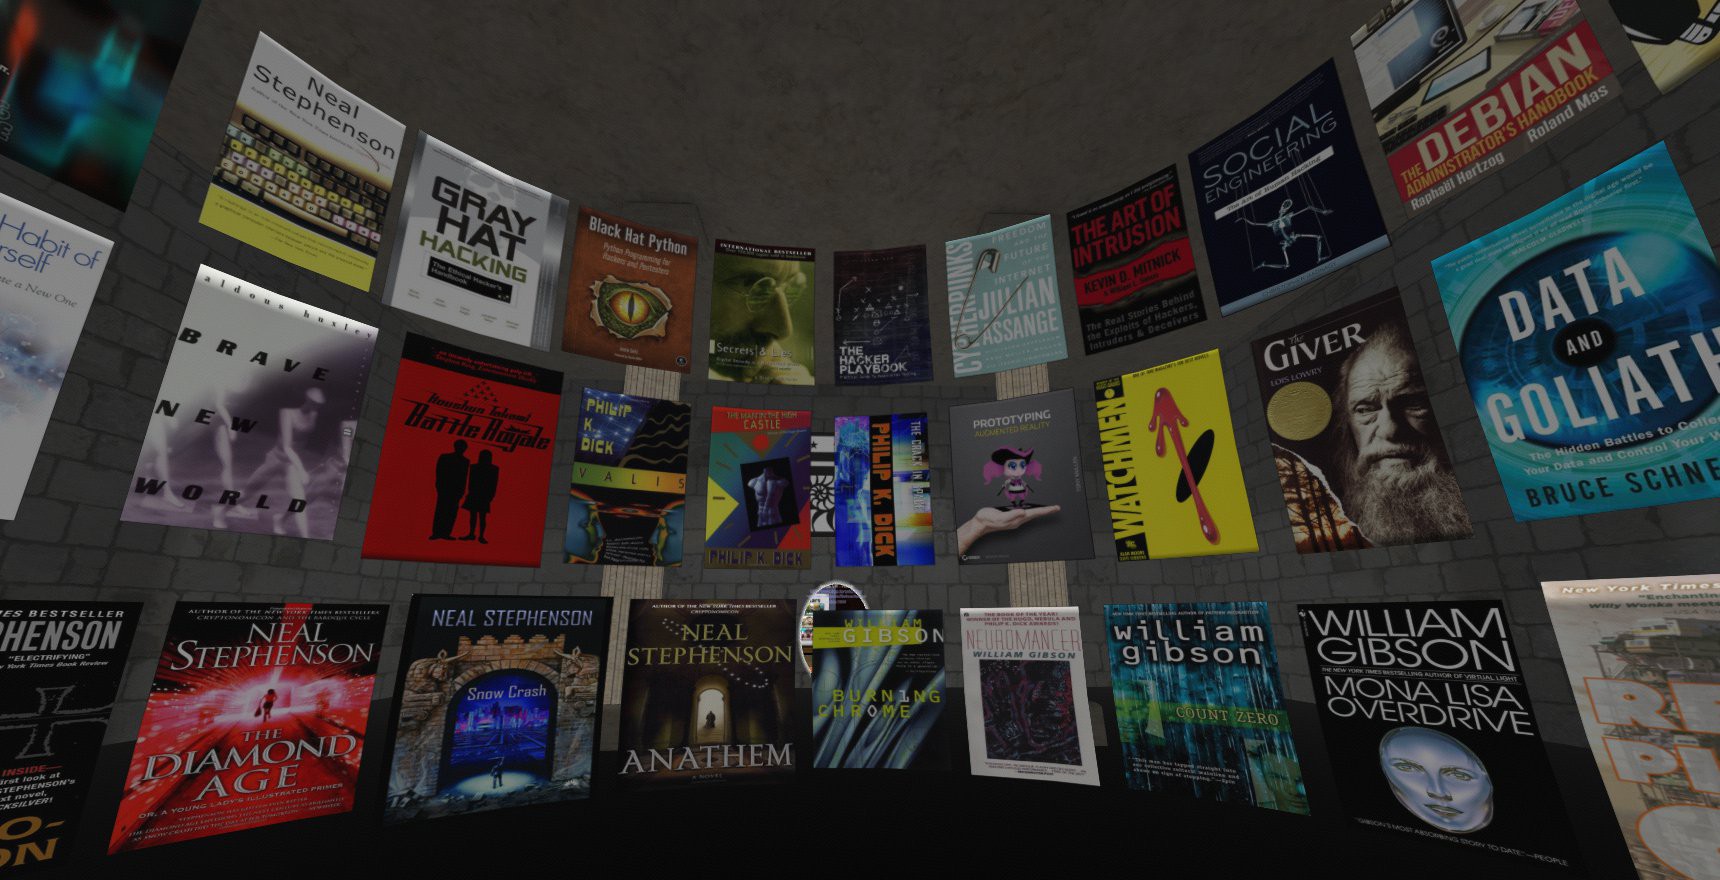
The inside looks spectacular, everything is readable and it is a funny feeling being surrounded by the books you read and love. I would like to implement some JavaScript for the images to rotate on mousehold next.
![]()
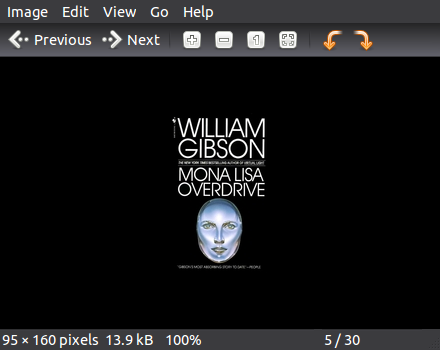
I have the full text file of Mona Lisa Overdrive and in the future plan to play with this idea further to allow conversion of the book into a speed read video or an audiobook reading. It'd be cool to have a virtual reality library where you can just pick a book and relax as the words stream into your subconsciousness in any environment of your choosing.
The process of grabbing the book covers and creating the panormas was a bit too manual for me so I sought ways to automate it, here's what I found out so far:
I first went into my goodreads profile here:
https://www.goodreads.com/user/show/22526865-alusion
and then traversed to view all books (20 by page)
https://www.goodreads.com/review/list/22526865-alusion?page=1&print=true&shelf=%23ALL%23&view=covers
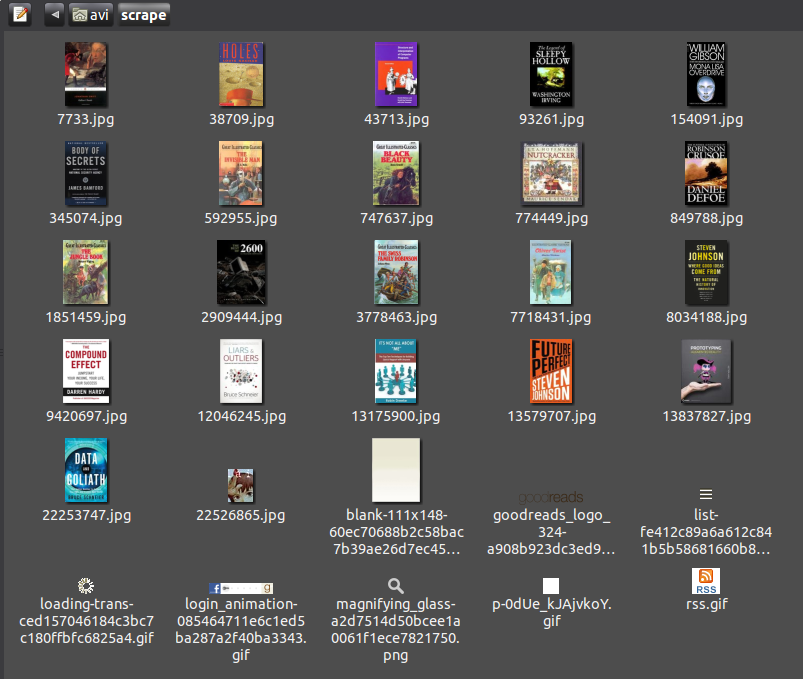
From here, I could use image-scraper (written in python) to see how much it can grab, the results weren't bad
# Create new directory, scrape max of 30 images to saved directory scrape/ of the url
mkdir scrape/; image-scraper -m 30 -s scrape/  https://www.goodreads.com/review/list/22526865-alusion\?utf8\=%E2%9C%93\&utf8\=%E2%9C%93\&shelf\=%23ALL%23\&view\=covers\&per_page\=20
Lets check out the loot!![]()
Book covers! Tiny book covers!
I needed to dig deeper to get the enlarged book covers. I went on goodreads, opened up firebug, and clicked on a book. The url looks like this:![]()
https://www.goodreads.com/book/show/13529210-the-15-invaluable-laws-of-growth
I then searched through the html with firebug to look for that unique number that came attached with the url (13529210) and here's what I found when I took a look at a couple books:
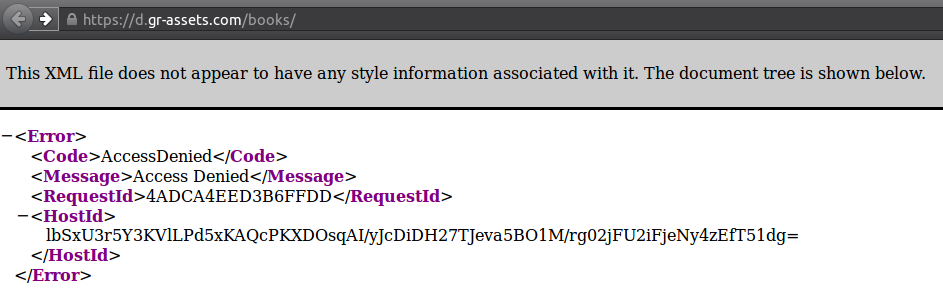
## Book 1
https://www.goodreads.com/book/show/13529210-the-15-invaluable-laws-of-growth
<img id="coverImage" src="https://d.gr-assets.com/books/1372058919l/13529210.jpg" alt="The 15 Invaluable Laws of Growth: Live Them and Reach Your Potential">

## Book 2
https://www.goodreads.com/book/show/8034188-where-good-ideas-come-from
<img id="coverImage" src="https://d.gr-assets.com/books/1311705993l/8034188.jpg" alt="Where Good Ideas Come From: The Natural History of Innovation">
The number has a relationship with the pathname to the image source of the enlarged book cover. Here's where it appears again with some context:<div class="bookCoverActions" style="display: none;"> <div class="coverButtonContainer"> <div class="coverButtonContainer"> <div id="edition_8034188_enlarge" class="coverButton enlargeCover"> Enlarge cover </div> <div id="edition_8034188_enlarge_cover" class="editionCover" style="display: none;"> <img src="https://d.gr-assets.com/books/1311705993l/8034188.jpg" alt="8034188">I also noticed some other things through firebug such as a weak SHA-1 certificate. If one were to browse to https://d.gr-assets.com/books/ you'd get an AccessDenied page:
This will continue to be a work in progress as I figure out how to get quickly grab those nice higher quality book covers. If anyone has any ideas through python or curl let me know ^.~![]()
-
Metaverse Hackerspace
04/15/2015 at 00:55 • 0 comments![]()
This weekend I competed in a major hackathon called Bitcamp and was testing how far I could expand the resolution of my display from inside VR. I was excited that the websurfaces inside Janus could scale up to 4K resolution, although it carried some noticable lag with the virtual machine guest was bridged over Ethernet to my host.
![]()
The hackerspace we built inside Janus serves as a space that encourages people to collaborate together and explore the metaverse. I decorated it with some cyberpunk wall art and added into it an internet radio connected Jukebox.
![]()
On the right hallway is a hall of doors with a giant portal that connects to the classy music room. There's a ghost of Gaben the Hype Train going back and forth and you can clone your avatar by ctrl right clicking on the train. The doors connect to various cool rooms inside Janus and is a nice touch to go from hacking and working on a cool project to get lost in the metaverse for a bit.
![]()
The hackerspace will be hosted on github for others to view and contribute towards. You can actually directly connect into the hackerspace by following the raw html file hosted on git. Contributions can be made on the spot from within the Virtual environment. I plan to fix it up to serve as a "template" for others to create personal creative environments.
![]()
The music room looks beautiful. The photosphere in the middle has some javascript running that makes the sphere "breathe" and it as a really interested effect when viewed within. I also found that having colored photospheres inside black & white rooms really makes the 360 picture pop out. It's really nice to dive into the colorful immersive world and I plan to experiment more with batch editing the texture files to spin up different versions of the same space.
![]()
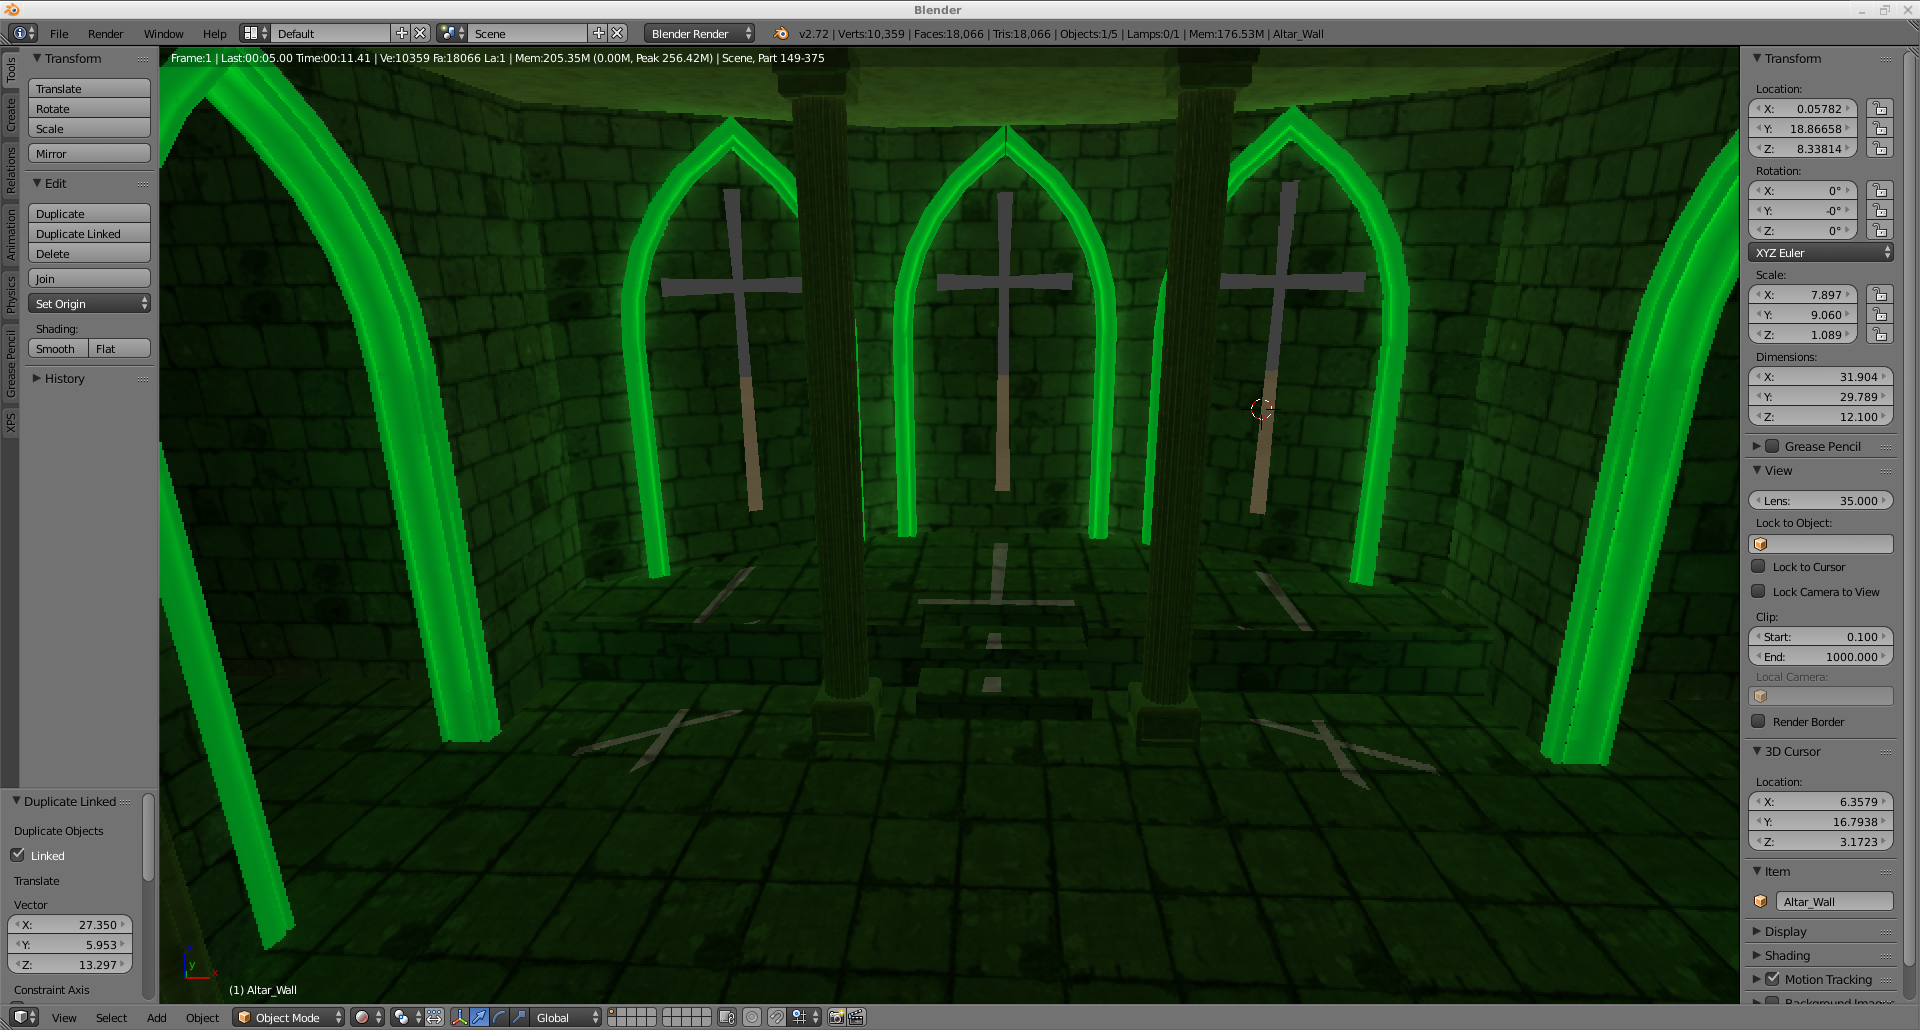
Just for comparison, here is how the room looks WITHOUT the textures baked on.
I'm pleased overall but there's plenty of work to be done. I want the room to have a cybergoth IDM theme to it, and I also need to add in a skybox and ground to it as well. My friend Source did some lighting to the arches and added in a cool sand scape we found on blendswap, it looks really sweet but I want to change the middle arches to RGB [in that order].
![]()
Livestreaming is close to working as well. I talked to the dev behind vrhost.us and we'll be fixing the bugs. Livestream videos on youtube carry the same standard youtube ID so I feel like they will surely work. I will try to attempt to grab the session ID token and through trial and error find a way to make it work. It seems like my tests with how Vimeo serves video might lead somewhere with youtube. For the moment, it's just a blank screen.
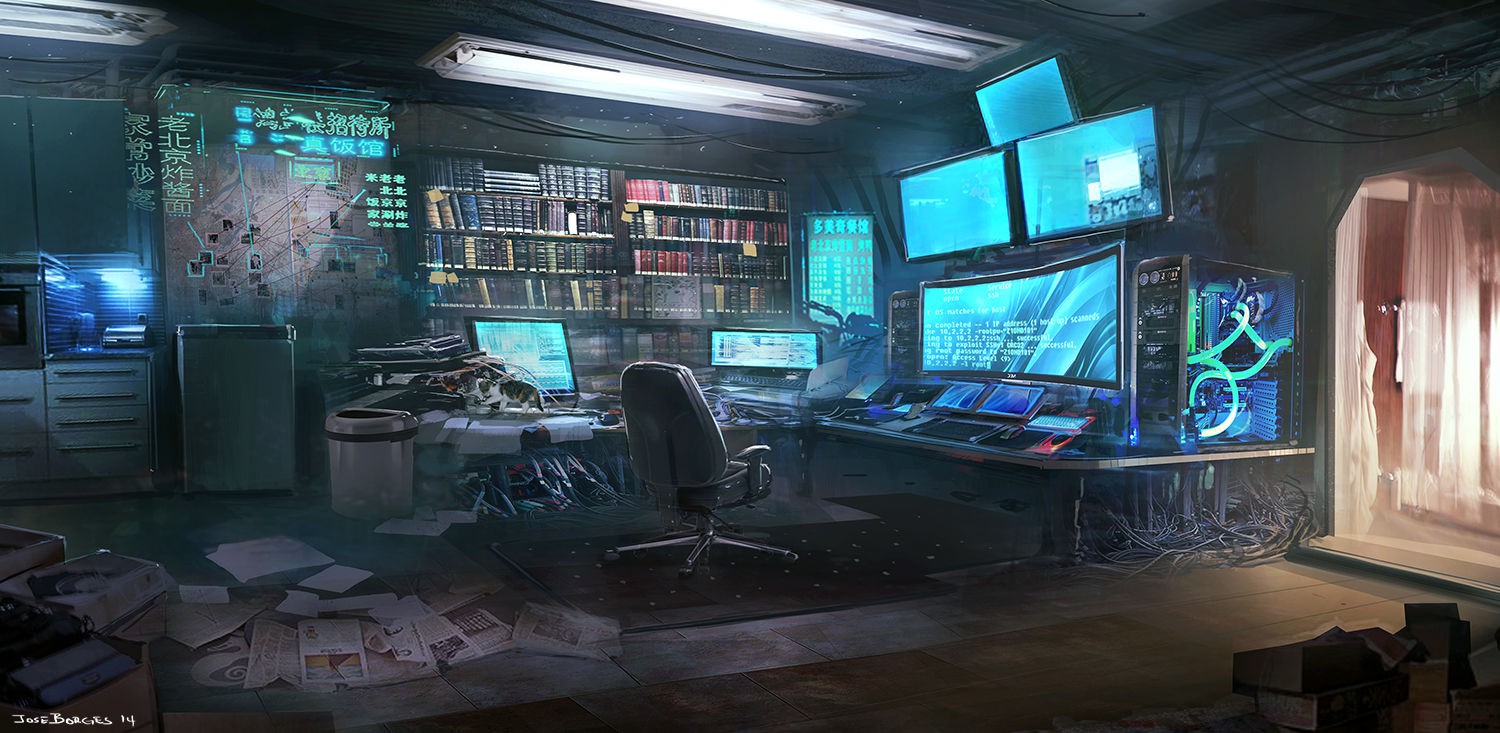
Here's some inspiration on how I want the hackerspace office to look like:
![]()
Everyone will have their own office in separate portals. I could even implement iptables to add a layer of security to allow only certain connections. Atleast I know that when one enters a room, the terminal sessions are by default secure and will reset to the login prompt when you walk out of the room. I tested Wemux with a friend and found that it worked beautifully, opening the path towards collaborative multi-user terminal sessions in the same way that google docs has collaboration. We can code side by side in Vim or just do sysadmin activities through shared tmux sessions:
![]()
-
360 Video
04/09/2015 at 04:49 • 0 commentsI've been testing video playback from Youtube and Vimeo, here's what it looks like right now:
![]()
<!-- Written with Janus VR.  URL: file:///home/avi/art/cyberia/church/cyberia/hackerspace_sphere.html -->
<html>
<head>
<title>Hackerspace</title>
</head>
<body>
<FireBoxRoom>
<Assets>
<AssetObject id="photospheremesh" src="file:///home/avi/art/cyberia/PHOTOSPHEREinFacing.obj" />
<AssetObject id="sphere1" src="https://gitlab.com/janusvr/cyberia/raw/master/church.dae" />
<AssetObject id="sphere2" src="https://gitlab.com/janusvr/cyberia/raw/master/church1.dae" />
<AssetImage id="HacDC" src="https://gitlab.com/janusvr/cyberia/raw/master/hacdc-logo.png" />
<AssetVideo id="vid_id" src="http://www.vrhost.us:80/vtvideo/j81DDY4nvos" loop="true" auto_play="true" />
</Assets>
<Room use_local_asset="room_plane" visible="false" pos="0.000000 0.100000 10.000000" xdir="-1.000000 0.000000 0.000004" ydir="0.000000 1.000000 0.000000" zdir="-0.000004 0.000000 -1.000000" col="0.000000 0.000000 0.000000" default_sounds="false" fog="true" fog_density="0.010000" fog_end="50.000000" fog_col="0.600000 0.600000 0.600000">
<Object id="sphere1" js_id="172s2" pos="0.000000 1.500000 0.000000" scale="1.000000 0.700000 1.000000" lighting="false" cull_face="none" collision_id="sphere1" />
<Object id="sphere2" js_id="17223c" pos="0.000000 1.500000 0.000000" scale="1.000000 0.700000 1.000000" cull_face="none" />
<Object id="photospheremesh" js_id="4" pos="0.000000 3.300000 -6.900000" scale="3.300000 3.300000 3.300000" lighting="false" video_id="vid_id" />
<Image id="HacDC" js_id="dasdas3" pos="0.000000 5.400000 10.400001" xdir="-1.000 0.000 0.000" zdir="0.000 0.000 -1.000" scale="1.500000 1.500000 1.000000" />
</Room>
</FireBoxRoom>
</body>
</html>
You need to first have an AssetObject for the PhotoSphere to map the video on. Also in Assets is the AssetVideo with the src pointing to the actual video file. At the end of the src is the youtubeid of the video (src="http://www.vrhost.us:80/vtvideo/j81DDY4nvos") I haven't quite figured out how to increase the quality of the video from Youtube. The process of getting that video is slightly tricky: I'll show you with Vimeo as an example. I used Firebug but you can open the Firefox inspector with Ctrl-Shift-K. Browse to the video you want and make sure you toggle the desired quality you want and open the inspector. Click the net tab and then look in media, you should see a long URL that gets the video. Copy that location and stick it in a URL shortener.
![]()
In the HTML file, this link serves as the src for the AssetVideo. Stick that in there and create an Object with the id of the photosphere [or video screen] and add the video_id="vid_id" at the end to point it to your video. This is how it looks like:
<html>
<head>
<title>Hackerspace</title>
</head>
<body>
<FireBoxRoom>
<Assets>
<AssetObject id="photospheremesh" src="PHOTOSPHEREinFacing.obj" />
<AssetObject id="sphere1" src="church.dae" />
<AssetObject id="sphere2" src="church1.dae" />
<AssetImage id="HacDC" src="hacdc-logo.png" />
<AssetVideo id="vid_id" src="http://goo.gl/g0FcmQ" loop="true" auto_play="true" />
</Assets>
<Room use_local_asset="room_plane" visible="false" pos="0.000000 0.100000 10.000000" xdir="-1.000000 0.000000 0.000004" ydir="0.000000 1.000000 0.000000" zdir="-0.000004 0.000000 -1.000000" col="0.000000 0.000000 0.000000" default_sounds="false" fog="true" fog_density="0.010000" fog_end="50.000000" fog_col="0.600000 0.600000 0.600000">
<Object id="sphere2" js_id="17223c" pos="0.000000 1.500000 0.000000" scale="1.000000 0.700000 1.000000" cull_face="none" />
<Object id="sphere1" js_id="172s2" pos="0.000000 1.500000 0.000000" scale="1.000000 0.700000 1.000000" lighting="false" cull_face="none" collision_id="sphere1" />
<Image id="HacDC" js_id="dasdas3" pos="0.000000 5.400000 10.400001" xdir="-1.000 0.000 0.000" zdir="0.000 0.000 -1.000" scale="1.500000 1.500000 1.000000" />
<Object id="photospheremesh" js_id="1" pos="0.000000 3.300000 -6.900000" scale="3.300000 3.300000 3.300000" lighting="false" video_id="vid_id" />
</Room>
</FireBoxRoom>
</body>
</html>
This is a temporary solution because of the way Vimeo handles session id tokens. The link will die and so will your VideoObject as well. (°ヘ°)"
Metaverse Lab
Experiments with Decentralized VR/AR Infrastructure, Neural Networks, and 3D Internet.


 Person A and Person B are able to see each other inside with their own Avatars and can communicate anonymously, collaborate and create worlds, watch streams together on giant screens. It's a pocket universe with endless possibilities.
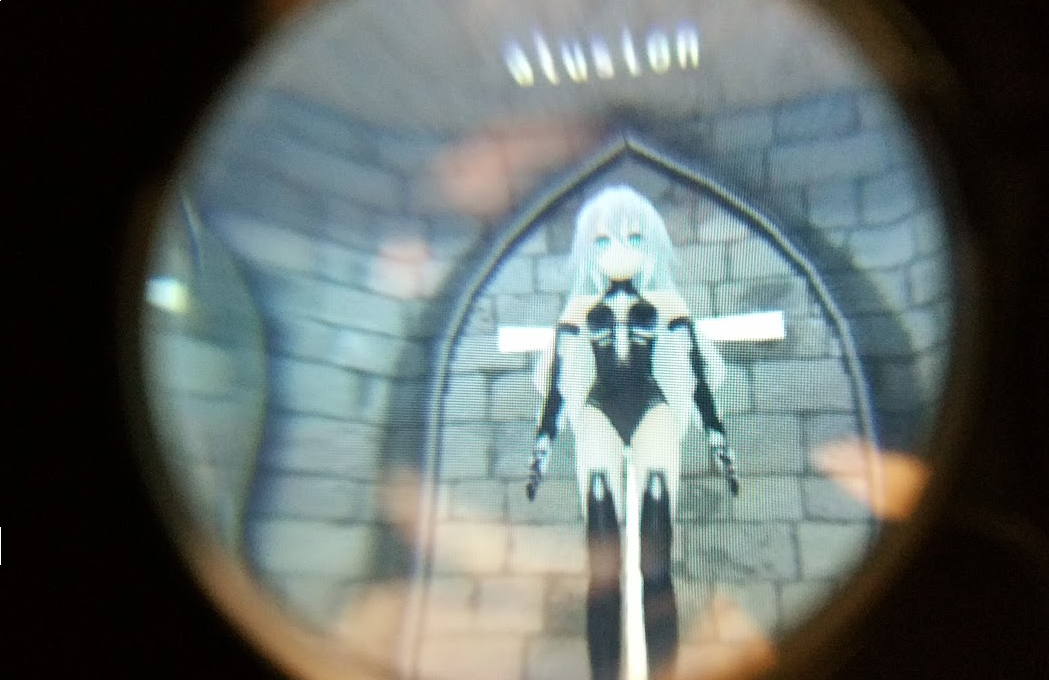


 The textures and colors enrich with blend_src="src_color" & blend_dest="one_minus_dst_alpha"