 RoboMonkey
-
1Step 1
Normally used DeviceMaster product.
This is the device I most commonly use. Normally I use it to provide a serial tunnel across my networks (both public and VPN) to control devices remotely. Works very well in those cases and I urge those of you looking for an off the shelf solution to look to these devices. Not a spammer here mind you, just a good product that does what it promises.
-
2Step 2
So, the devicemaster works with the tunnel, which is where my journey began, UDP signaling, where I went first when trying to use this with an arduino, and finally with TCP socketing. The TCP sockets are how it achieves the tunnel. This information is not very well documented anywhere from what I can tell.
-
3Step 3
What I was trying to achieve was learning arduino. I'm a fast learner, but I prefer to have a product or problem to solve prior to learning a new system.
Where I work, I have a very controllable unit at a remote site for adjusting audio levels. It responds to GPIO to trigger macros, Serial to do more complicated things, and with one version I have deployed it will take Telnet commands in about the same format as a serial command sent. I did try Telnet protocols with the other unit, but Arduino didn't seem to end the connection cleanly enough to be reliable.
So, back to serial....
-
4Step 4
Showing below the code to make this work. See annotations in the code for anything I have found so far...
//ipaddresses for units we will connect with
char firstUnitIp[] = "xxx.xxx.xxx.xxx";
char secUnitIp[] = "xxx.xxx.xxx.xxx";
//standard Ethernet shield setup byte mac[] = { 0xDE, 0xAD, 0xBE, 0xEF, 0xFE, 0xED }; IPAddress gateway(xxx, xxx, x, x); IPAddress subnet(255, 255, 0, 0); IPAddress dnServer(xxx, xxx, xxx, xxx); IPAddress ip(xxx, xxx, xxx, xxx); //ports used by Devicemaster product on other end. (localPort //doesn't seem to matter) unsigned int firstUnitPort = 8072; unsigned int secondUnitPort = 8073; unsigned int localPort = 8010; // start ethernet client EthernetClient client;//Took a while to crack this one for me anyway //unless I issue the command like this, gateway and subnet don't //work //I'm probably missing something you guys know by memory Ethernet.begin(mac, ip, dnServer, gateway, subnet); delay (1000); Serial.begin(57600); //neat little routine here that helps me verify that my box is going to //connect properly. Need to port this to the LCD so it's easier //to diagnose issues. Serial.print("IP Address : "); Serial.println(Ethernet.localIP()); Serial.print("Subnet Mask : "); Serial.println(Ethernet.subnetMask()); Serial.print("Default Gateway IP: "); Serial.println(Ethernet.gatewayIP()); -
5Step 5
How to connect....
void loop() { lcd_key = read_LCD_buttons(); // read the buttons switch (lcd_key) { case btnRIGHT: { //we disconnect in case we're already connected to another client Serial.println("disconnecting existing client."); client.stop(); lcd.setCursor(0,0); lcd.print("STOP CONNECT "); // print a simple message delay(1000); name = 2; Serial.println("connecting..."); delay(1000); if (client.connect(secUnitIp, 8000)) { Serial.println("connected to Second Unit port"); lcd.setCursor(0,0); lcd.print("CONNECT SEC DEV!"); delay(1000); lcd.setCursor(0,0); lcd.print(names[name]); // print a simple message } else { Serial.println("Second Unit connection failed"); lcd.setCursor(0,0); lcd.print("SEC DEV CON FAIL"); } break; } -
6Step 6
Now, to send the serial string....
//so very very simple, and I tried every complicated way I
//could imagine
// I use routines to send converted values, but it's just a string send
//command
client.println(stringToSend);
reading data back, nearly as simple....
if (client.available()) { char c = client.read(); //Serial.print(c); clientMsg+=c;//store the recieved chracters in a string //if the character is an "end of line" the whole message is recieved if (c == '\n') { String inputString(clientMsg); //your end of line from a device may vary, but if it's standard serial // I doubt it. Program as needed. Parse as needed. Honestly, // the world is your oyster here! -
7Step 7
Up next, I'll show you some screenshots of the DeviceMaster side of this equation. It's simple to set up to do this.
Am I missing things so far? Yes. I need to add some routines to determine if I've lost connectivity. That's a next generation fix, and will only be added if I see the need. Why add compute cycles when it's not needed, right?
Unit is not yet deployed. But when it is I'll report back on the effectiveness of it out in the user's hands. Initial response has been positive with the prototype.
-
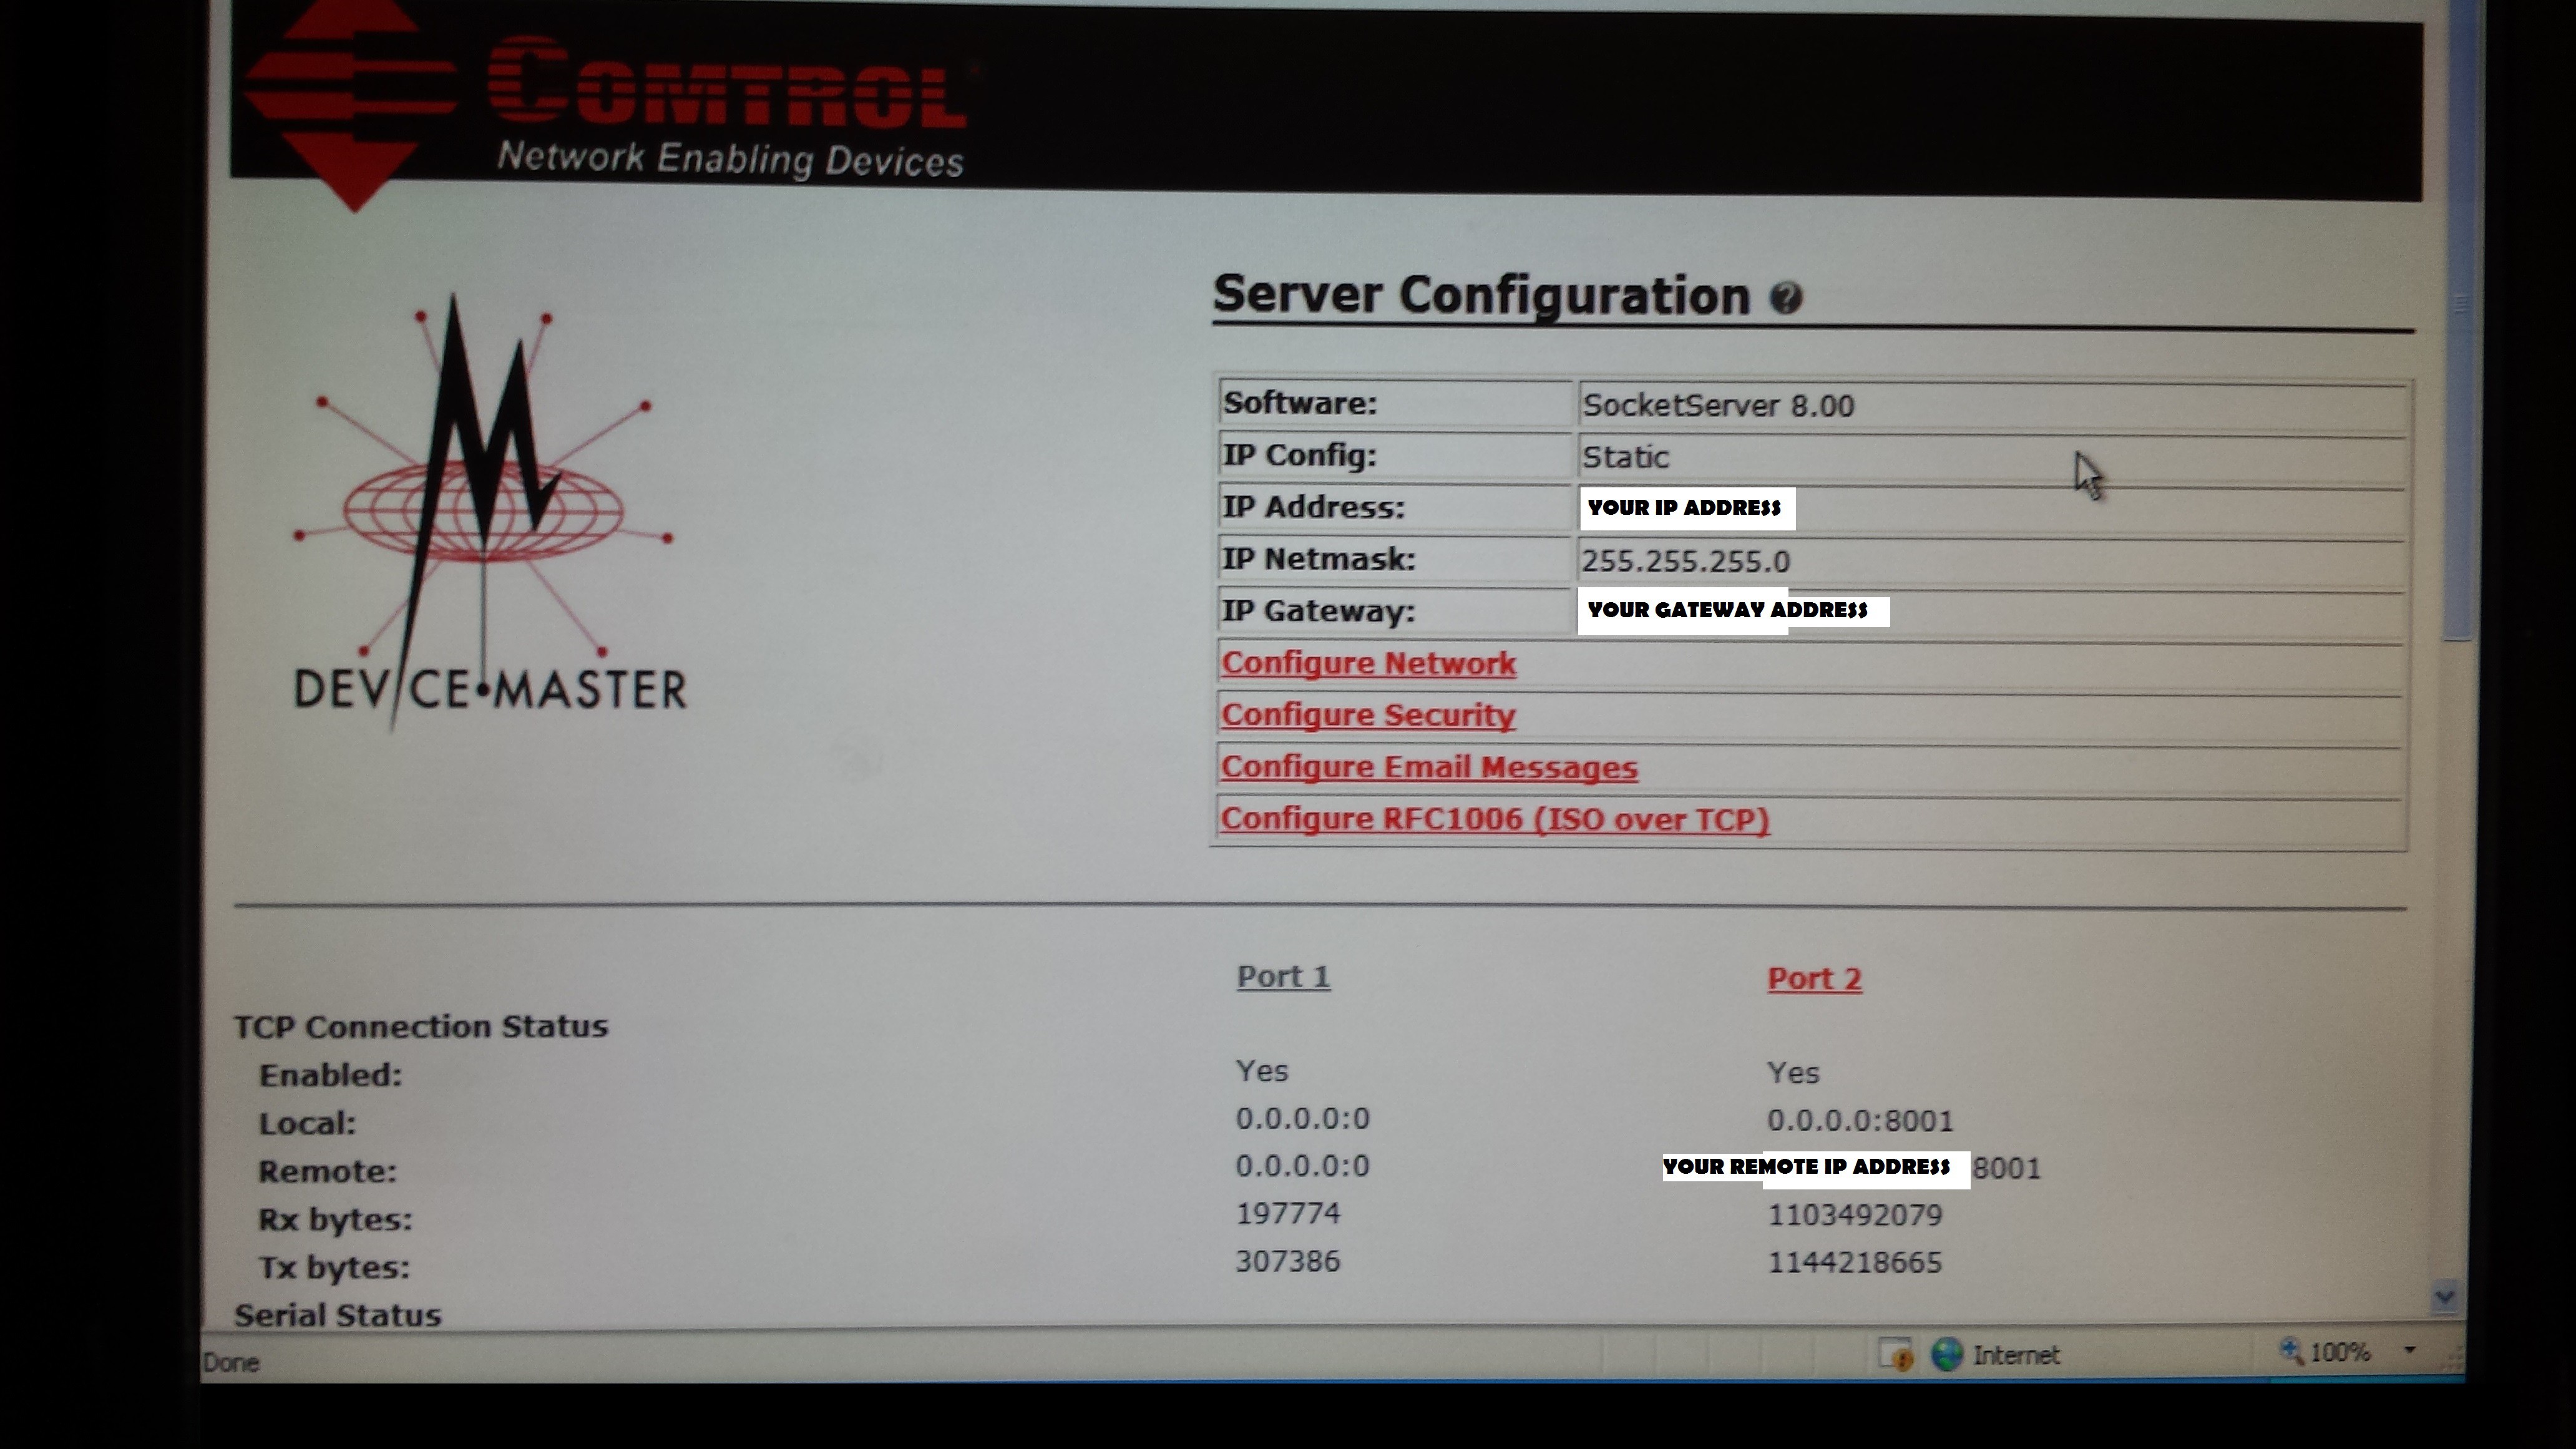
8Step 8
Here is the configuration pages of the comtrol devicemaster products. Note in the following pictures where circles appear, these are the settings you'll be interested in.
I'm assuming that everyone who is reading this is already familiar with IP address basics, and to protect my systems, I have removed the IP address information on these....just common sense.
![]()
-
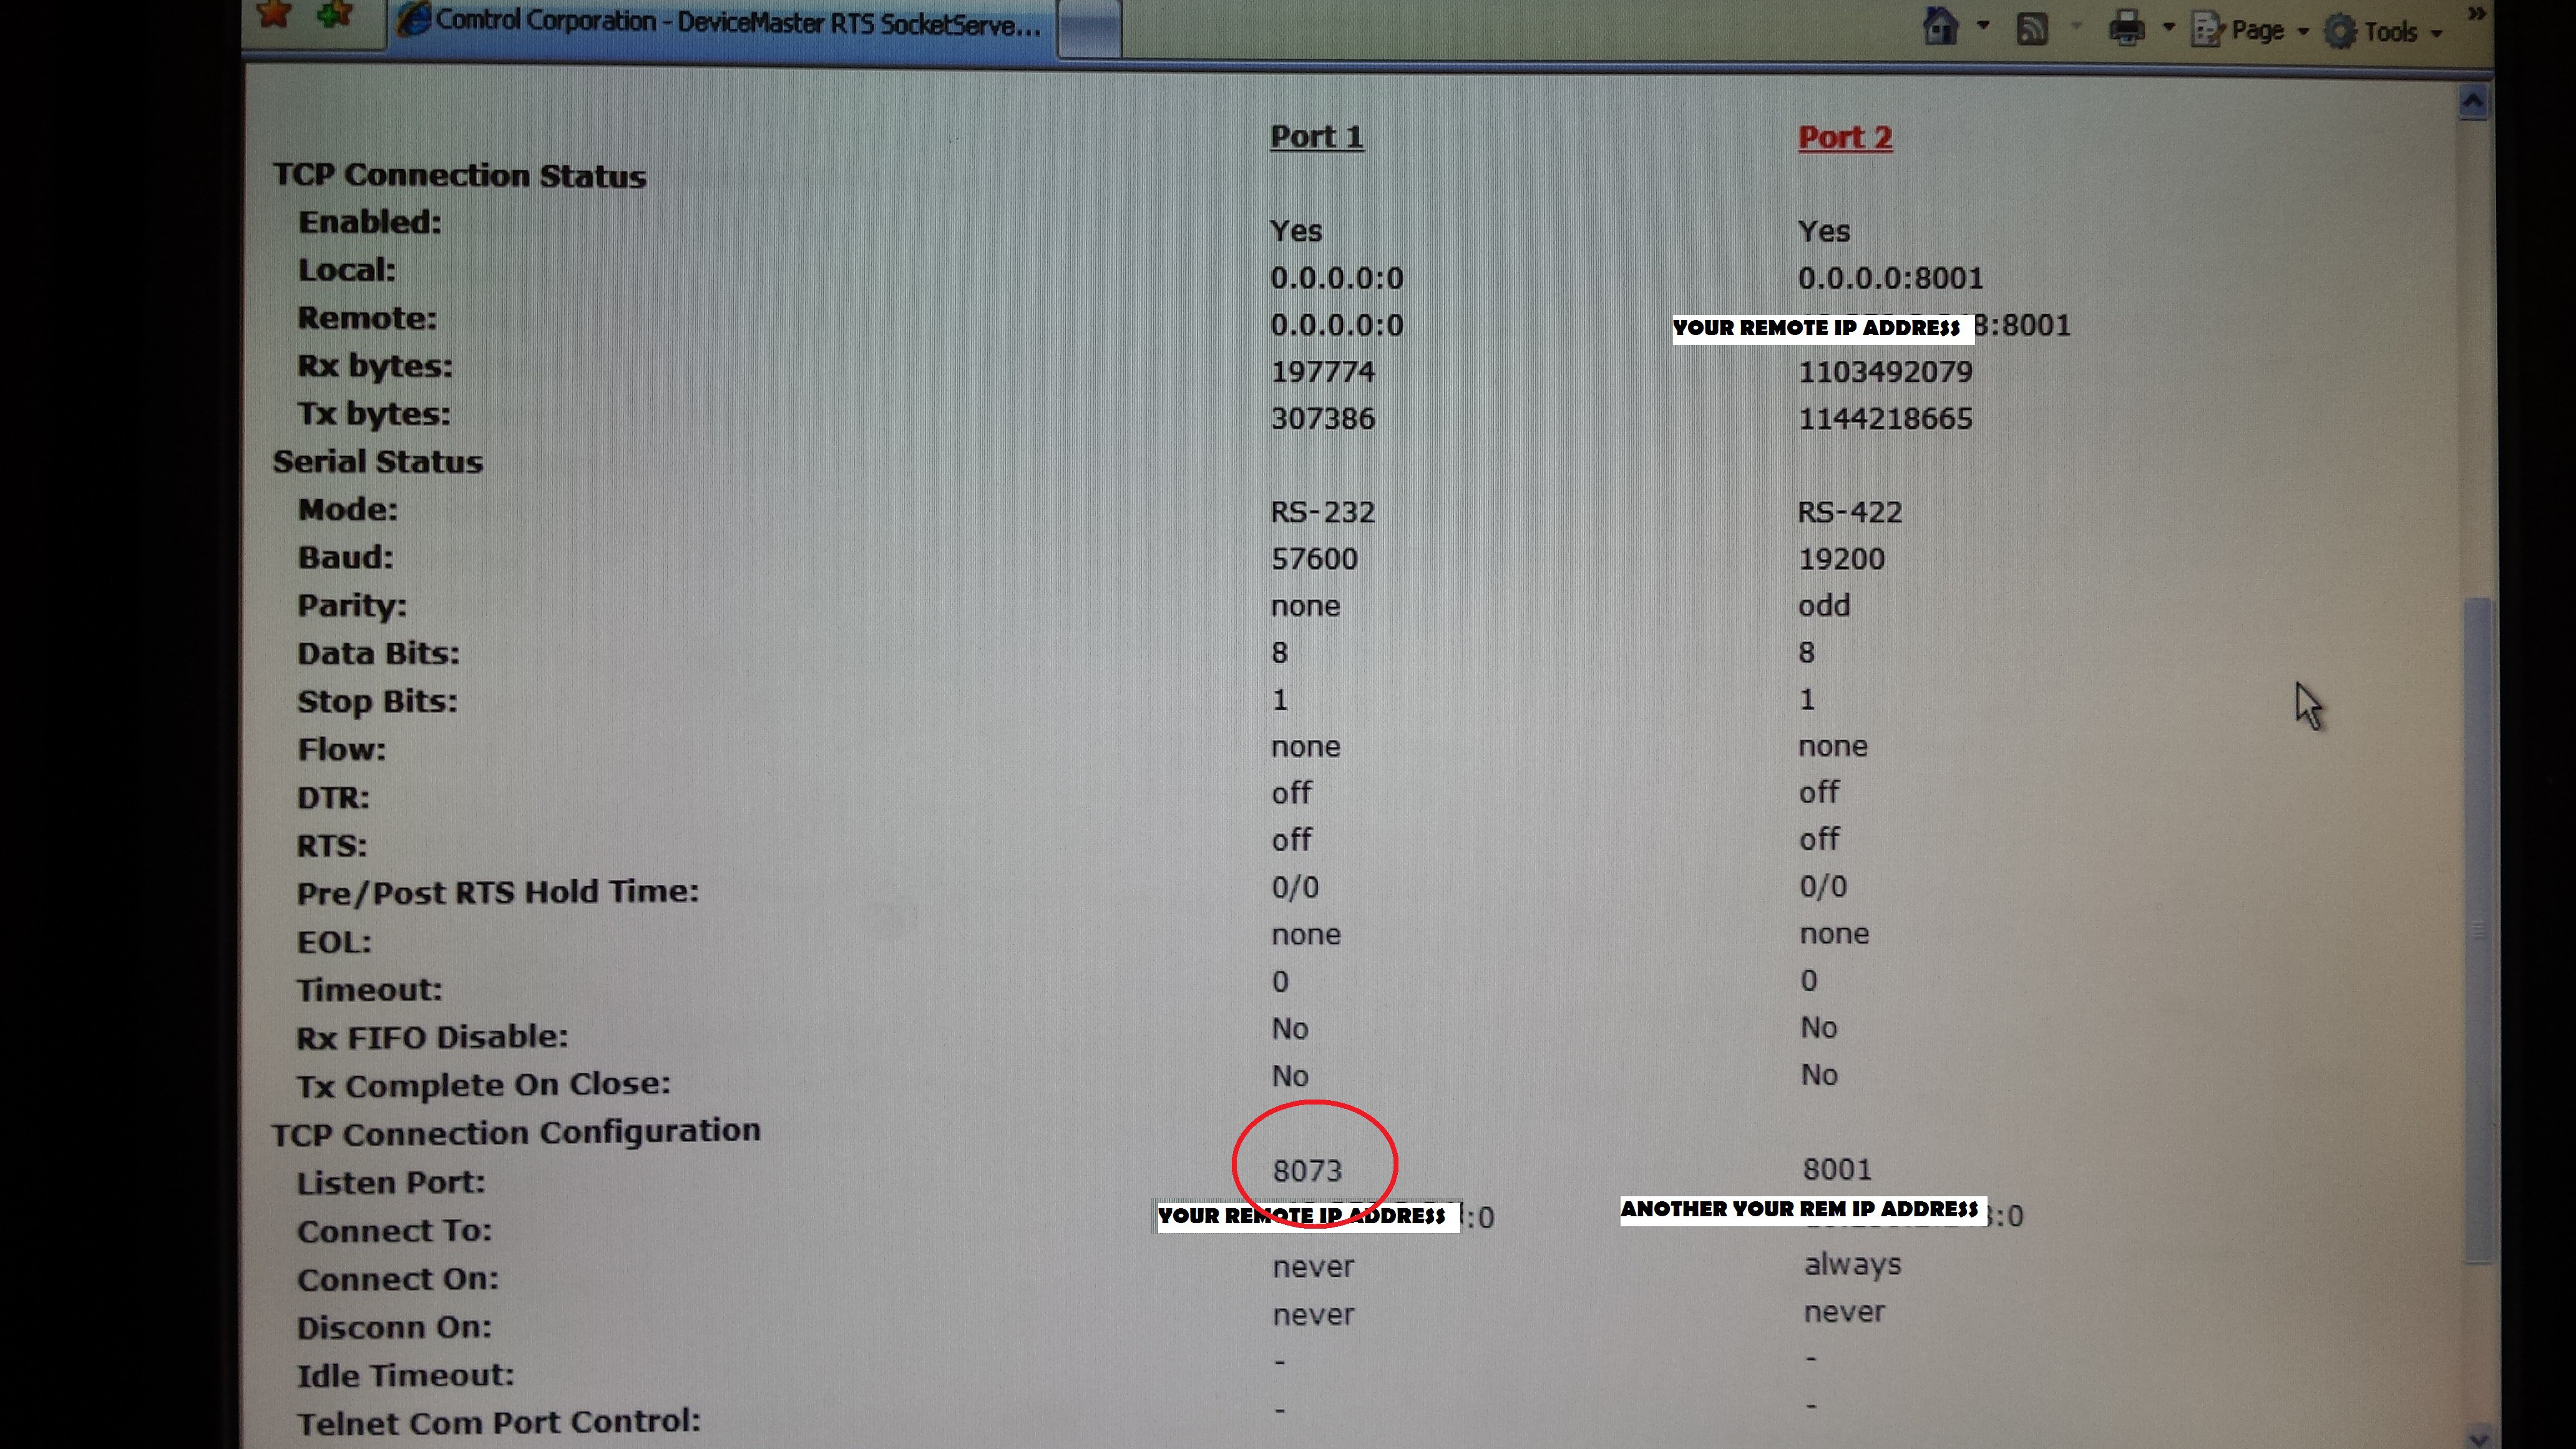
9Step 9
Note that the unit I am using is 2 port. They make many styles. Pick the one that works for you.
![]()
The port number matches the port number you see up above for secondUnitPort. That along with the remote comtrol unit IP address is what makes the TCP connection work with this product.
-
10Step 10
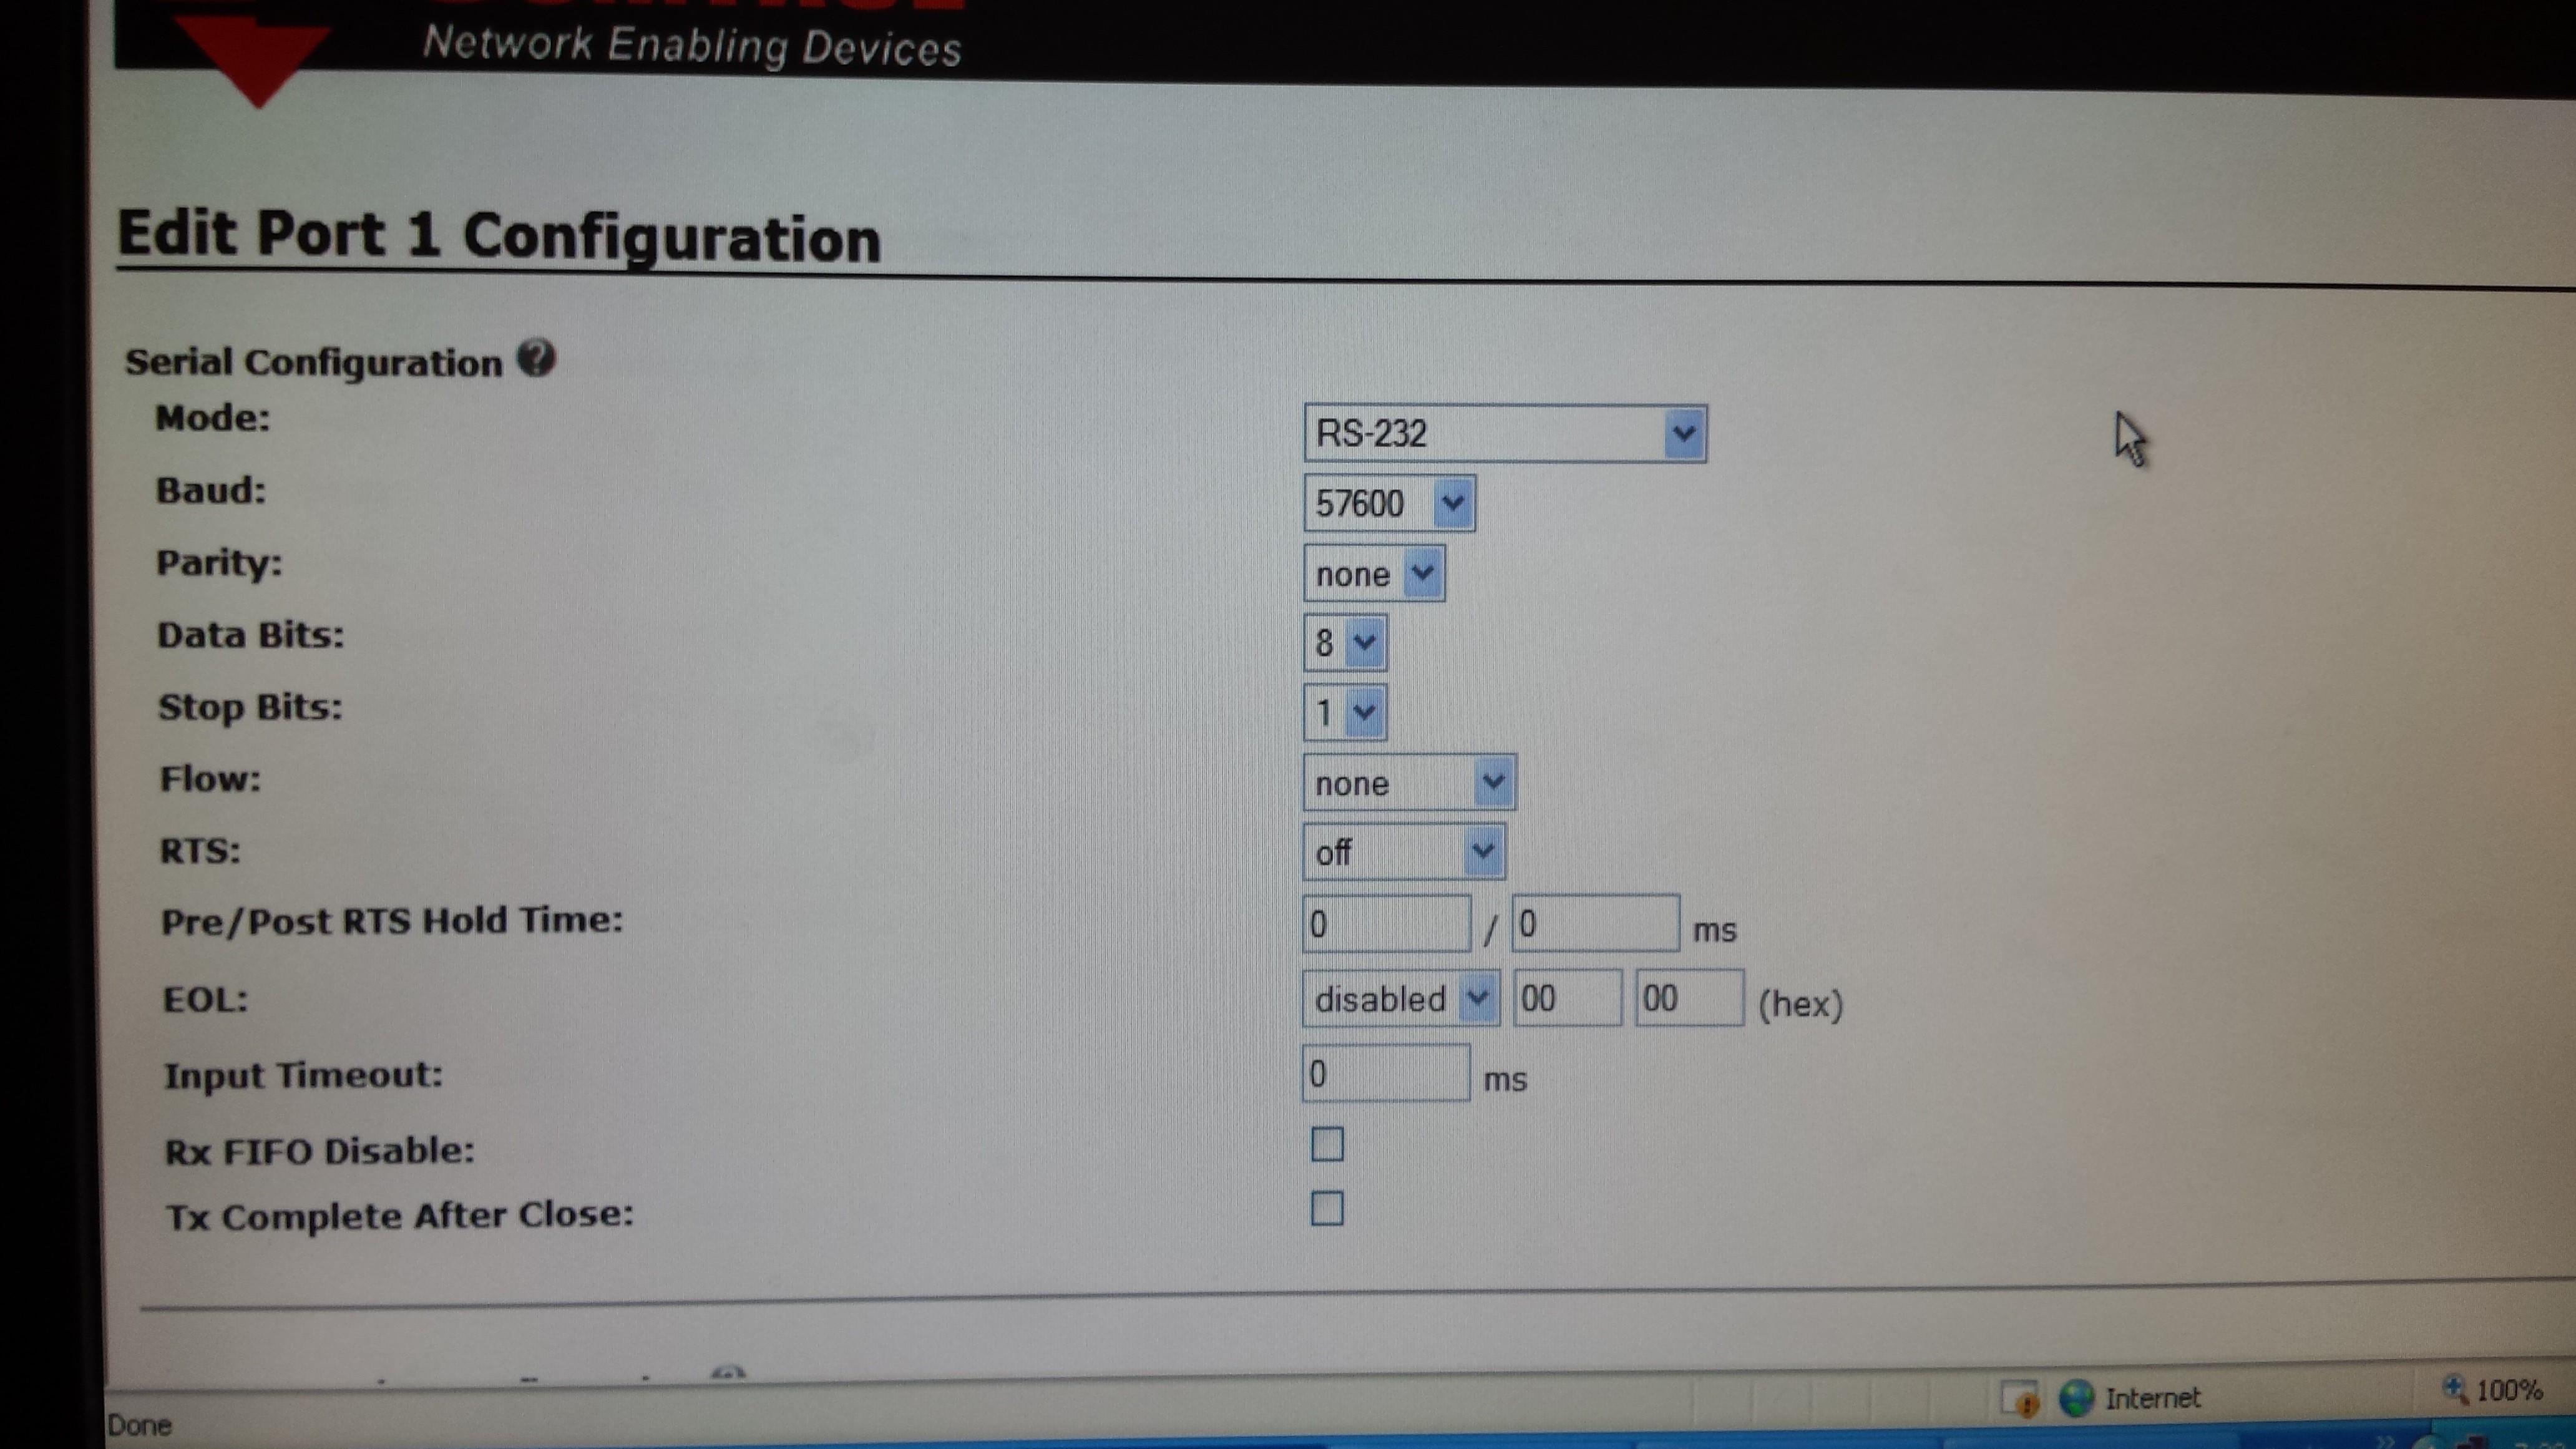
![]()
This is the breakout to configure Port 1 on my unit. Standard 232 stuff here. I realize many people are old hat with 232, and I urge you to learn it if you're not. Ethernet is a wonderful technology, but 232 had it beat by decades and it's a great secure way to remotely control devices.
Send serial to Comtrol Devicemaster with Arduino
In my professional life I deal with serial devices Ad Nauseum. Sometimes they're remotely located. This makes remote control easier!
Discussions
Become a Hackaday.io Member
Create an account to leave a comment. Already have an account? Log In.
I haven't seen the devicemaster products - interesting. Thanks.
Are you sure? yes | no
been using them in various automation units for over 10 years. Mighty reliable product.
Are you sure? yes | no