Close
0%
0%

Authentic Blueprints

You know, the kind that are actually blue.

Similar projects worth following
So I wanted some old fashioned blueprints because they look so cool. Turns out that nobody makes them anymore, but you can still do it yourself. Here's how.

Blueprinting, or cyanotyping, is one of the most primitive photographic processes and basically the oldest form of xeroxing. It was phased out many decades ago as better techniques were developed. But the term 'blueprint' stuck and is still used to describe engineering and architectural plans, even though they're not blue anymore.

The process is simple enough, and its easy to see why it was originally used for copying documents. You mix equal parts of two chemical solutions (Potassium Ferricyanide and Ferric Ammonium Citrate) then apply it to a sheet of paper. Lay a transparent positive on top of the paper and expose it to UV light.

  • 1
    Step 1

    Get Some "Blueprints"

    Find some schematics for your favorite fictional starship or whatever. I used this drawing of the RSI Aurora from Star Citizen. For something more from the appropriate era, you might go for the Nautilus. You could also obviously use some technical drawings you've made yourself or some other image entirely.

  • 2
    Step 2

    Don Your Lab Coat and Rubber Gloves

    ...because it is now time for science!

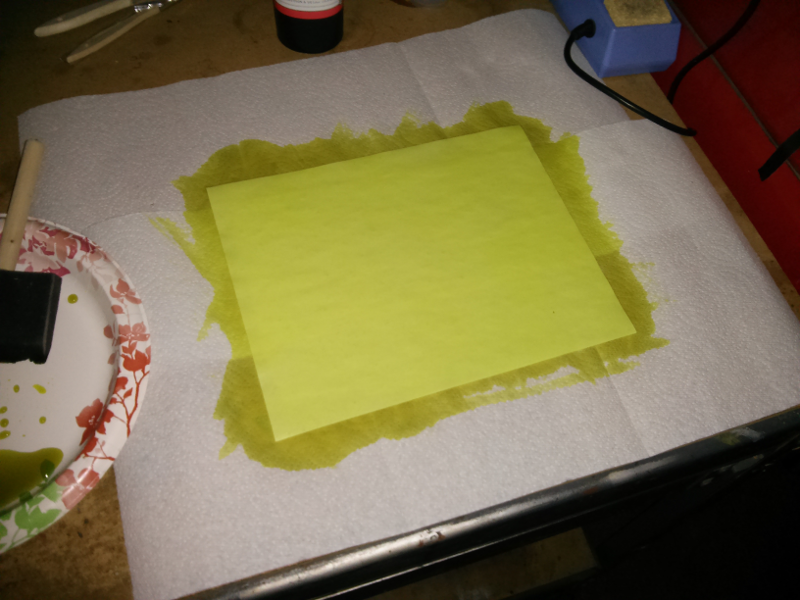
    Mix equal parts of solutions A and B. You will not need much. I found about 5ml of each to be just enough for a full page. Spread the solution evenly over a sheet of paper. Those spongy paint brushes work well. I used regular printer paper but this process should work on just about anything, including fabric. Remember the solution is sensitive to UV light. It is best to do this in a dimly lit room, or at least a room with no natural sunlight.

    Put the paper somewhere dark and let it dry. Wait for a couple hours. If the paper is not completely dry when you do the exposure, the image will come out fuzzy.

  • 3
    Step 3

    Expose the Image

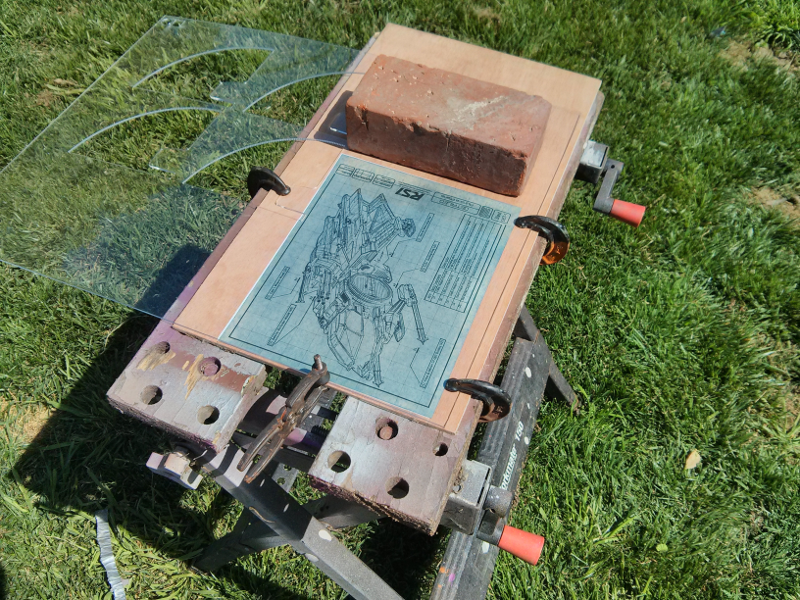
    Lay the transparency on top of the photo paper and set it outside under a sheet of glass or acrylic. Professionals would use a UV light box (some of you may already have one for making PCBs), but 20 minutes in the California sun works just as well. Today we had a UV index of 7. Obviously it is best to do this around noon.

    To keep everything flat, I used an old sheet of plexiglass I had laying around. Some clamps around the perimeter hold it in place. Cyanotyping is a contact printing process, so the positive needs to lay completely flat against the photo paper. If it is lifted even slightly, then the resulting image will be fuzzy in that area. This happened on my first try, so the text in some spots was unreadable.

View all 8 instructions

Enjoy this project?

Share

Discussions

mick.chainan wrote 09/10/2016 at 20:21 point

Hi, I have just recently came across a highly experienced manufacturer for Diazo Ammonia paper (a.k.a. Blueprint paper) named Reprotech Co. Ltd. I was surprised with the product price and quality as I was getting remarkably higher price from other sources. Check them out at www.reprotech.co.th

Regards,

Steven 

  Are you sure? yes | no

solutions4circuits wrote 08/08/2015 at 08:15 point

"Ferricyanide"

Sounds healthy enough to pour down the kitchen sink when done

  Are you sure? yes | no

Karsten Fuhst wrote 04/12/2016 at 17:49 point

well, it has nothing to do with the extrem toxic potassium cyanide or sodium cyanide!

  Are you sure? yes | no

lukasz.iwaszkiewicz wrote 02/05/2015 at 15:19 point

Wow! I just realised that GIMP has a single-window mode! Didn't know that!

  Are you sure? yes | no

Greg Kennedy wrote 10/23/2014 at 20:05 point
Some GIMP tips:
* Step 2, "Maximum Contrast" can be achieved most easily using the "Threshold" color tool. You simply set the split point - everything else is rammed to 0 or 255 accordingly. No futzing with levels etc.
* If your image lacks clear lines, play around with one of the "edge detect" operations under the "filters" menu. These can give the hand-drawn look you're after.

  Are you sure? yes | no

Michael Morlan wrote 07/10/2014 at 13:15 point
Hey Tyler,

We're featuring your blueprints project on Galactic Inquiry, the Star Citizen fan web show. Check it out at https://www.youtube.com/user/GalacticInquiry this Friday afternoon.

Best,

Michael

  Are you sure? yes | no

Ouacaze wrote 07/09/2014 at 08:32 point
That's great ! I think I'll try it :)
One thought: as the "drawing" has to be as close as possible to the paper, maybe you could flip the image left to right before printing it, so that you would have to put the inked side of the transparent against the paper to have the drawing in the right way, making them as close as possible.

  Are you sure? yes | no

Christoph wrote 05/21/2014 at 08:37 point
Have you (or anyone else) tried this on transparent paper which is used for handmade technical drawings? I have many sheets lying around, up to A0, and they need a purpose.

  Are you sure? yes | no

Tyler Anderson wrote 05/22/2014 at 19:41 point
No, but it should work as long as you have a printer that can handle paper that size. Or you do the drawings by hand.

  Are you sure? yes | no

Reagen Ward wrote 05/04/2014 at 00:27 point
10 years or so ago, I used to do photography with blueprint paper, both direct exposure in place of film and enlarging MF chromes onto it (such as my profile photo). Great fun and super cheap. Somehow, I never thought to make actual blueprints with it! I missed out! Nice work.

  Are you sure? yes | no

pctango wrote 03/25/2014 at 14:05 point
great...

  Are you sure? yes | no

Rhys wrote 03/20/2014 at 03:18 point
I work for the largest reprographics (blueprinting) firm in the US. My office in particular has been in business since the 50's. I regularly get to handle old blueprints from local governments and the University of Notre Dame. It's amazing some of the hand drawn art I've seen pass through our production room for copying and scan-to-file archiving. Some of the prints date back to the late 1800s and are have so much tape holding them together they might as well be laminated.

What I find amazing is I still have customers who actively use the old Diazit blue-line machines that require specially coated paper and anhydrous ammonia developer.

Cool project though. Awesome to see people outside of the repro industry who still think old blueprints look cool. And for anyone looking to do larger prints this way, your local repro shop can likely do clear mylar prints at up to 36x48 (Architectural E) for your originals, and may even be able to special order ready to go blueprint paper.

  Are you sure? yes | no

Samuel Wittman wrote 03/19/2014 at 21:10 point
I love old mechanical drawing.

TL;DR: There's no content to this comment.

One of my first jobs (an internship in high school) was converting old mechanical drawings to a new parametric 3D modeling program. I spent 3 months modeling nuts, collars, o-rings, screws, plungers, and a bunch of other random junk from drawings that I pulled from this musky old drawer in the basement. These drawings were dated, mostly from the 70's. You could tell which parts were more common, as these had been copied onto nice, thick mylar photo polymer, while the less common parts were left in their original, hand drawn pen over pencil. Paper size ranged from standard A size paper to full D size scale. Some of the larger prints detailed humorously small pieces that had to be scaled by at least 10 to justify using such large paper.

My task was to redraw the 3D models, generate the digital engineering drawings, and present the original and replica to a supervisor for approval. I remembered the first time the supervisor approved one of my replicas, I asked what he was gonna do with the originals.

He laughed and said "File them away!" He folded it and threw it in the trash.

I had to excuse myself to my car, and I cried for a long while. I was so upset that he didn't understand the value of these drawings, the work that they represented. They were art in my mind.

I stormed back in with a vengeance, and he cut a deal with me. Any drawings I finished, I got to keep. I worked like a madman all summer, including free, unapproved overtime, to liberate as many of these historic drawings as I could. I worked as hard as I could to improve my 3D modeling skills, working toward saving some of the more interesting drawings.

I saved as many as I could model within my abilities. Currently, almost 10 years later, they're all sitting in a really nice art portfolio box in my bedroom, waiting for the day where I can afford frames for all of them, and a workshop full of wall space where they can be proudly displayed.

  Are you sure? yes | no

Tyler Anderson wrote 03/19/2014 at 23:08 point
Holy cow. Maybe you could sell some on Etsy or something and find some good homes for them.

  Are you sure? yes | no

Samuel Wittman wrote 03/20/2014 at 17:20 point
I'd question the legality of selling them.

  Are you sure? yes | no

dammitcoetzee wrote 03/21/2014 at 14:05 point
You're a good person. The best.

  Are you sure? yes | no

erenemre wrote 03/19/2014 at 17:18 point
This looks very cool! And great documenting too, thanks.

  Are you sure? yes | no

Tyler Anderson wrote 03/19/2014 at 20:33 point
Thanks. I wasn't sure if anyone else would be interested in this.

  Are you sure? yes | no

Similar Projects

Does this project spark your interest?

Become a member to follow this project and never miss any updates