 Frank Vigilante
Here is a video showing what you will be able to do after following the instructions on this project. This is a very simple use for the 1Sheeld, but it shows how easy it is to start manipulating your smart phone in conjunction with the Arduino.
0%
0%
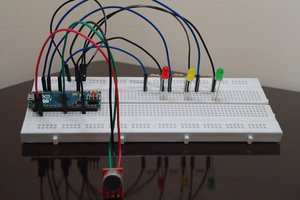
Simple Voice Recognition With 1Sheeld
Turn a LED on and off using voice commands
Become a Hackaday.io member
Already have an account? Log in.
Just one more thing
To make the experience fit your profile, pick a username and tell us what interests you.
Pick an awesome username
hackaday.io/
Your profile's URL: hackaday.io/username. Max 25 alphanumeric characters.
Pick a few interests
Projects that share your interests
People that share your interests
 Dixon Selvan
 jsc
jsc