 Mike Cochrane
After a successful first deployment it's time to work on the battery life.
I already had some ideas for how to reduce the power usage, so time to start working on them:
- Turn the Sim800l off and keep it off
- Hibernate the Teeny 3.0 instead of just delay()
- Reduce the time each send cycle takes
- Kill the blinky LED
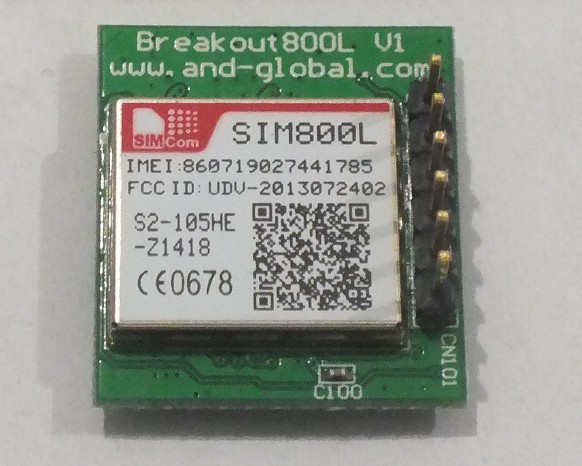
New Sim800l breakout board
The previous breakout board I was using was the only one I could get easily in New Zealand. It broke out pover, ground, Tx, Rx, and Reset. Turns out the Power Key pin is tied to ground forcing the module to stay power on.
After much searching I found an equally simple break out board from AND Technology on AliExpress that gives me the Power Key (PWRKEY) instead of Reset. I ordered three and handed over the extra cash to get the DHL'd (8 days) instead of snail mailed (probably a month).
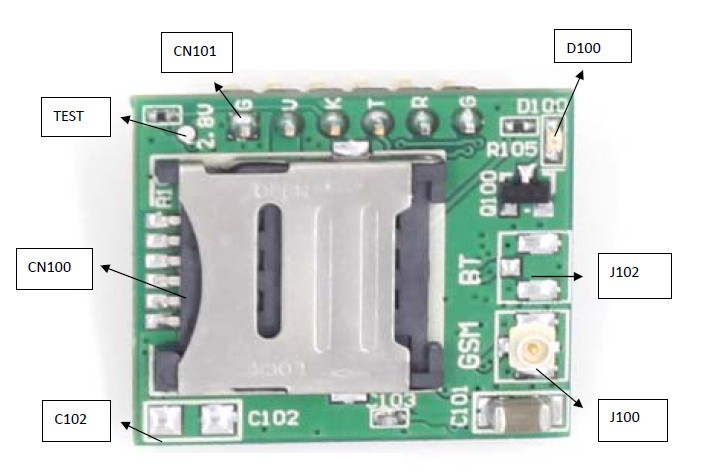
A welcome surprise I got email diagrams and documentation for the break out board in perfect english. It contained one critical piece of information about the PWRKEY pin "Shorted with GND via R104 by default". So I knew I had to remove R104 so I could use the PWRKEY, guess which is the only resistor not labeled on the diagram:
![]() So it's the unlabled one top left, by the 2.8v test point. So that got wiped off with the soldering iron and a 100R resistor from that to a I/O pin on the Teensy.
So it's the unlabled one top left, by the 2.8v test point. So that got wiped off with the soldering iron and a 100R resistor from that to a I/O pin on the Teensy.// Pull PWRKEY low
pinMode(2, OUTPUT);
digitalWrite(2, LOW);
// For at least one second
delay(1100);
// Then let it go high again
pinMode(2, INPUT);
Hibernate the Teensy
 So it's the unlabled one top left, by the 2.8v test point. So that got wiped off with the soldering iron and a 100R resistor from that to a I/O pin on the Teensy.
The Freescale MK20DX128VLH5 on the Teensy 3.0 has some awesome low power / hibernate modes available. Thankfully [duff2013] is more patient than I and has created an awesome Snooze library for the Teensy.
I added a watch crystal to the Teensy so I could use the RTC, not for the clock but for waking from hibernate.
So
for (int i = 0; i <= 9; i++) {
    delay(60000);
}
Changed to the way more accurate and low power// Update Every 15 mins
#define UpdateTime 15
// Sleep
#include <Snooze.h>
SnoozeBlock config;
// Timing
elapsedMillis sinceWake;
...
void setup() {
...
}
void loop() {
// Reset ms since wake up timer
sinceWake = 0;
... do the useful stuff ...
// Sleep until next reading
uint8_t sleepTime = 60 - sinceWake/1000; // number of seconds
config.setAlarm(0, UpdateTime - 1, sleepTime); // how long to sleep for
Snooze.deepSleep(config); // go to sleep
}This now gave me very reliable 900 seconds between receiving readings, ever if the sim800l was a bit inconsistent with its response time.
Reduce the time things take
A lot of the code for the first version was about getting it working, so instead of waiting for an expected result from the Sim800L there was just a "wait 4 seconds". So time to get some real code in here:
/**
 * Wait for a define length of time for a
 * particular response from the Sim800l
 */
elapsedMillis waitTime;
bool waitFor(String searchString, int waitTimeMS) {
    waitTime = 0;
    String foundText;
    while (waitTime < waitTimeMS) {
        if (!HWSERIAL.available()) {
            // Nothing in the buffer, wait a bit
            delay(5);
            continue;
        }

        // Get the next character in the buffer
        incomingByte = HWSERIAL.read();
        if (incomingByte == 0) {
            // Ignore NULL character
            continue;
        }
        foundText += incomingByte;

        if (foundText.lastIndexOf(searchString) != -1) {
            // Found the search string
            return true;
        }
    }

    // Timed out before finding it
    return false;
}

/**
 * Wait for "OK" from the Sim800l
 */
bool waitForOK() {
    return waitFor("\nOK\r\n", 4000);
}
Now instead of delay(4000), I've got waitForOK(). Turns out some of the responses were coming back in 23ms where I was waiting 4000!With smart waits in place from Sim800l is now turned on for a little over 30 seconds where it was previously on for nearly 90 seconds. This saves a lot of power (the Sim800l can peak at 2A power usage).
Kill the Blinky LED
All the breakout boards have status LEDs on them, they flash at different rates depending on the status of the module. Really handy during testing, not so handy for conserving battery. So the three component top right of the board had to go too. I'm not sure how much this saves, but it seemed worth it.
That's it for power saving changes in this version. Full code is in the GitHub repo.
Discussions
Become a Hackaday.io Member
Create an account to leave a comment. Already have an account? Log In.
Mike, it's really a great project! How did you managed to kill the leds? For status led there is an AT command to disable it, but for power led I couldn't find any. Or you just unsolder them?
Are you sure? yes | no