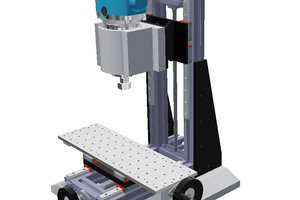
A machine designed to make end plates etc for other CNC machines, and various other plate designs.
OpenBuilds C-Beam™ Machine Build
C-Beam Machine is a CNC machine design based on the popular V-Slot linear guide system.
C-Beam Machine is a CNC machine design based on the popular V-Slot linear guide system.
To make the experience fit your profile, pick a username and tell us what interests you.
We found and based on your interests.
A machine designed to make end plates etc for other CNC machines, and various other plate designs.
testing the linear rails with some weight
used the existing Y axis to cut out holes and countersink for the new plate. Small problem on the right side, where one of the flat nuts were in the c beam runner and it stopped it from moving over which caused some head scratching for a bit since it moved away again, so there was some mysteriously shifted holes cut, i re-ran it to fix the holes so a couple had some extra holes just off to the side, otherwise it fitted well. The tool plate is bolted all the way down to the black Y axis plate through the MDF.
added the trucks and the delrin lead screw holder, with the 3mm spacers. i milled these holes at the same time as the holes for the truck so everything is parallel or perpendicular to everything else. zero movement in the Y axis now.. you can stand on it and slide back and forth with zero deflection.
i did cut it with mostly face cutting vs side cutting so it took a long time to mill, just picked the wrong cam operation in Fusion360 really.
I may end up bolting the whole thing down to either a granite/marble slab or another piece of tool plate, that will make it even more rigid and square.
Fixed the google+ image links, thanks google+ for changing that under me...
I've noted before there is a lot of flex in the y axis/work holding gantry. So what to do about it?
Well looking around the shop, earlier this year I'd picked up an NSK LH25 linear rail up from fleabay with the assurance it was a good rail and the usual "like new". Upon arrival it had a nasty scratch on the upper surface but worse on the bearing race there was dent, pretty much in the middle of it, so i'd discarded it into the ever growing pile o things, it moved around but there was a definite click and stall at that spot.
So when looking at options for the C-Beam I realised i could chop that rail in half and put a truck under near side
of the build plate, bolt it to the build plate and the front and rear extrusions, so a quick check and the overall height of the rail was just about perfect for it to ride on. So chris chopped the linear rail into two halves and discarded the part with the dent
hmm, this might not be right!
some adjustments were made... it's important to keep the hardened rails cooler so take time cutting them. tape off the rest of the rail.
onto the build plate, remove the old one, mine has the tool plate. So i flipped it over, and bolted it back into the plate so i could position the holes for the delrin nut properly.
grabbed the right size transfer punch
used my tap guide to keep it straighter
marked off the two punched holes for easy to see on the drill press.
and drilled with 4.2mm drills.
broke the edges of the holes
tapped with an M5 tap and tap magic,. useful tap guide again
test fit of the bolts
still needs the spacers
mounted the nut
and back on the machine
measuring and laying out the guides
I decided to over board and pick up another two trucks so i could put one at each corner, back to fleabay for that.
very solid so far, slight shim needed of 1-2mm haven't decided yet, and i'll put the shims on top of the trucks then bolt them in.
we did cut out some steel on this before this mod, and once i'd realised i'd left a HSS bit instead of the carbide, it went pretty well, kept hitting Z bottom so need to install that limit switch or just improve the travel, took a bit to realise what was going on since it was about 4mm off each time, thought the bit was slipping.
So i've been using it for a month or so, and just settling in.
Things i've learnt.
Don't upgrade firmware or serial JSON unless you must (which is a normal thing), I went from a nice working known environment to a frustrating day of trying to get it back to where it was, even after reverting firmware and servers.
Check the saved config file from Chilipeppr, inches (working with an american) save doesn't seem to work well and i used mm, there are rounding errors. The config file i ended up saving had three copies of itself all intermingled and i couldn't get it to reload. Better to note each change and reset to scratch, then enter them in manually with the tinyG commands.
Limit switches on TinyG means the hardware has to be physically reset ( or at least that is all I can find ) which is really annoying when you're dealing with the aforementioned upgrade problems and installing new limit switches (i'll write about that in another log) and the common ground was a wee bit loose, that made me think that it was going into boot loader mode all the time and seemed to be resetting the flash, nope NC mode on the switches and loose common ground = needs hardware reset.
Set machine zero Z vertically above work/G54 zero, bad things happen otherwise especially from Fusion 360.
The little help bubbles that pop up in chillipeppr everywhere are neat, but they can be annoying the will cover up the things you want to see. The feed hold should be bigger and somewhere else, too much going on in that area.
The build plate is just too flexible even with my toolplate mod, it works for a lot of things but once you're on the outer edges it flexes a lot especially on straight rough plunges. So i am definitely looking to improve that.
Hitting << on the GCODE playback after stopping it can make the machine move, didn't expect that.
Some things on chilipeppr remember the settings, some don't (feed rate override)
But so far its just learning the in's and out's i have to say this was the easiest build to put together and fastest to get up and running, pretty happy with it so far. I just cut out a Y axis cover for the G0704 this morning
this bit is not as nice cutter as the one i was using to do the larger plates, but i botched up the order for new 0.125" end mill bits and ended up with yet more router bits for my PCB CNC mill, in all eventuality i'll never run out of those now which for years i'd been just ordering one or two at a time, i decided to go and order 10 packs and get the wrong ones.. :\
The outer edge is a bandsaw cut.
needed to grind out some of the saddle on the G0704 for the new double ball buts we were installing on saturday, since the C-Beam wasn't officially running we ran it as a manual mill , worked pretty good!
added the tool plate
basically i removed the z, punched the first hole, drilled it out, tapped it, screwed it to the plate, punched the diagonal corner repeated for three holes, then punched out the rest of the holes and mounted it on the Z.
the original thin metal gantry is too flexible for my tastes so i sill want to try mounting it directly, there are some clearance issues to fix though, the end plates of the c beam track needs to be flush.
came out good.
ran a test cut after adding sacrificial mdf
people say the run their electronics open up here, i believe they do, but its a disaster waiting to happen, fully enclosed would make it hot, so going to mount it underneath i think, also lots of conformal coating!
cut pretty decently, i had a lightbulb moment with the G0704 and said, hey why don't we mount the original pulley drives from the flashcut kit and just make new pulleys for the ballscrews. this is part of that .
i did try pushing the speed and not using coolant since we'll see about the spindle motor being open and different types of coolant.
makes a mess of bits if you don't clear the chips or coolant well enough.
the carbide bit was a lot worse, since cutting aluminium and i really SAE measurements, used the wrong size so its feed rate was way off. Picked up some lye from amazon so we'll see what it does and what terrors lie beneath the aluminium
I changed out the 1030 two pieces of extrusion for a single 3030, it's much stiffer and easier to level with this mod,, and if i alter the Z itself i can get more cutting area. I just used a abrasive grinding wheel to slice the 8020 in half, my band-saw table wasn't big enough to accommodate a 380 mm cut.
Haven't finished the bracketing yet. I wanted to use the beefier ones i had for the 3030, but the hole ends up in the middle of the C-Beam
The lowest part of the Z actuator is what controls the useable cutting area height.. So i might look at making something to extend the plate down beyond the end of the actuator.
Some noise on the Z.but not too bad
The wheels on the Z were loose, pulled it apart and sorted them out.
I'd forgotten to order a new colllet as well, so did just did that.
First i sawed the "500 mm" in half, they're about 496 mm so either have one 250mm and one 244 mm or so, or split the difference
mismatched length, which becomes a problem later so fix it now.
add the cast corners
mark up the center and sides of the Y axis, lay the Y axis over one of the extrusions and mark the sides.
mark front and back beams
square off and build the frame, this is where you'll see the inaccuracy in the extrusion cuts first i think.
setup both sides of the frame with t-nuts
start squaring it off.
add the backs, i did the four wide facing forward, i am probably going to change the whole thing.
add the Y axis on top, square it and bolt down the casts, make sure the rear of the front bearing plate is flush with the extrusion, so it is out further than the extrusion towards you, the Y axis end should be flush with the side of the X extrusion.
add the Z axis, its tricky i added the T-Nuts to the casts and put one side in at a time, another pair of hands helps and something to rest the Z on.
the mismatches, all kinds of wrong
obviously i was expecting this,. but i was thinking about changing it out for a column rather than two pieces of 3x1 so a 4x4 or 3x3
Instead of using the self tapping screws for the two top brackets. I tapped the holes with an M4 tap same as the OX, and starting switching out some of the bolts, i recommend changing out the thin pan heads on some spots that are hard to get too because they're easy to wear out, i'm using the nicer machine bolts.
so together for now, i'm going to pull off some of the parts and fix the lengths etc.
with the MDF
With the tool plate (sitting on top of the MDF , which isn't the plan, it'll replace it)
TinyG time..
Part list
install the corner brackets with a T-Nut and 10 mm bolts on the C Beam
install left side mount plate with 4 M4 20 mm
I found it easier to install the lead screw with the gantry off the C Beam
install the bearing, add the washer round side towards bearing, and the lock collar, fit it all in, flush the lead screw
install the other side now
leave a small gap on the mounting plate, don't tighten the 20 mm M4's all the way
push it all together, lock the collar and then tighten down the plate so it'll preload
Add the flexible coupling, leave a small gap away from the plate
add the 55 mm bolts to the motor, add to 40 mm spacers
wire going out this way
and install the motor and tighten the coupler
And its all together
I cut out a couple of pieces of MDF 12" x 12" 1/2" thick, i had some spare from the waste board for the OX. But I think i want to use a different method and ordered tool plate instead. MDF is fairly stable since it'll expand and contract in all directions vs one or two, which would cause warping but if it gets wet or knocked around it tends to fall
So i'll use tool plate for the build plate upper, and MDF for the waste board. This means i'll redo the way the board mounts too, countersink the bolts into the plate and then attach those to the gantry. I could even replace the existing gantry plate with the tool plate. then i can also thread it, drill holes to build jigs etc.
I'll use the MDF for now, while the 1/2" plate arrives.
I also noticed one of the v wheels had a nick, which does cause a slight stutter in the movement, loosening up on the eccentric helped, also running some 1500 over it also helped.
I threaded the
holes in the build plate with an M4 tap and tap guide.
threaded in, then add an m4 nut on the other side.
counter sunk in
i'm only doing four for now, since i'll be replacing this with a metal plate. in the interim since the holes are threaded then you can run an M4 bolt from the underside, add t eh space and flush it with the MDF
Create an account to leave a comment. Already have an account? Log In.
Become a member to follow this project and never miss any updates

 enrique

 Magnus Selin
 [zit] Olivier Gade