 David Prutchi
I completed the code for complete Stokes polarization analysis for DOLPi-MECH.
I have the camera aimed at my linear polarizer fan target. The two squares on the middle bottom are circular polarizers. This is how the scene looks without polarization-capable vision:

This is the linear RGB polarization encoding (my default real-time preview):

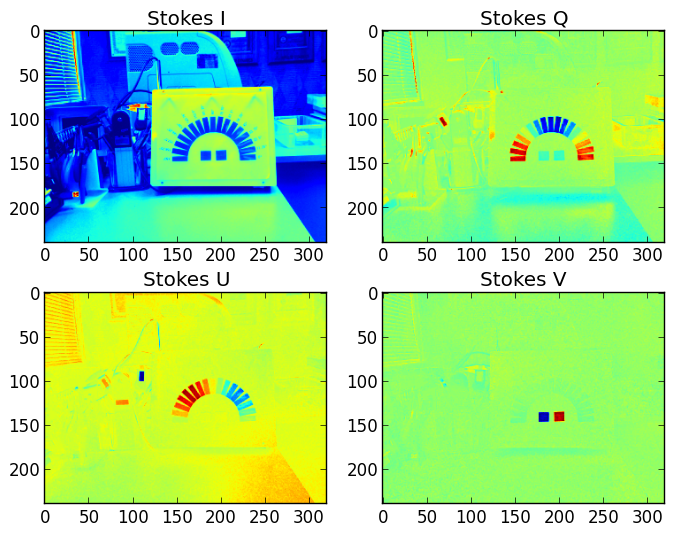
These are the complete Stokes parameters. Note that the last parameter (V) relates to circular polarization, correctly identifying the two circular polarizers and their handedness:
This is the polarization analysis:
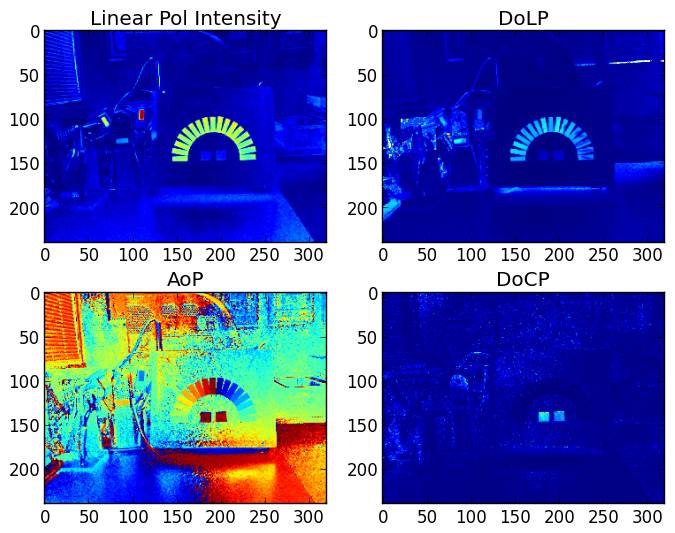
By coincidence, the penholder where I put my digital calipers was standing by the target, and the LCDs show brightly in the LPI image.
Finally, this is the Python code:
#   DOLPiMechComplete.py
#
#   This Python program demonstrates the DOLPi_Mech polarimetric camera.
#
#   A servo motor rotates a polarization filter wheel in front of the
#   Raspberry Pi camera.  An Adafruit PWM Servo HAT drives the servo.
#
#   (c) 2015 David Prutchi, Ph.D., licensed under MIT license
#                                  (MIT, opensource.org/licenses/MIT)
#
#
#import the necessary packages
from picamera.array import PiRGBArray
from picamera import PiCamera
import time
import cv2
from Adafruit_PWM_Servo_Driver import PWM
import numpy as np
import matplotlib.pyplot as plt

def dispStokes(stokesI, stokesQ, stokesU, stokesV):
    #Function dispStokes - Save and optionally display Stokes parameters
    plt.figure("Stokes")
    plt.subplot(2,2,1)
    plt.imshow(stokesI)
    plt.title("Stokes I")
    #
    plt.subplot(2,2,2)
    plt.imshow(stokesQ)
    plt.title("Stokes Q")
    #
    plt.subplot(2,2,3)
    plt.imshow(stokesU)
    plt.title("Stokes U")
    #
    plt.subplot(2,2,4)
    plt.imshow(stokesV)
    plt.title("Stokes V")
    #
    plt.savefig('Stokes.png',bbox_inches='tight')
    plt.show(block=False)

def dispPol(polInt, polDoLP, polAoP, polDoCP):
    #Function dispPol - Save and optionally display polarization parameters
    plt.figure("pol")
    plt.subplot(2,2,1)
    plt.imshow(polInt)
    plt.title("Linear Pol Intensity")
    #
    plt.subplot(2,2,2)
    plt.imshow(polDoLP)
    plt.title("DoLP")
    #
    plt.subplot(2,2,3)
    plt.imshow(polAoP)
    plt.title("AoP")
    #
    plt.subplot(2,2,4)
    plt.imshow(polDoCP)
    plt.title("DoCP")
    #
    plt.savefig('polarization.png',bbox_inches='tight')
    plt.show(block=False)

# Initialise the Adafruit PWM HAT using the default address
pwm = PWM(0x40)
pwm.setPWMFreq(60)   # Set PWM frequency to 60 Hz
servoMin = 180       # Min pulse length out of 4096
servoMax = 615       # Max pulse length out of 4096
# Servo PWM values for different filter wheel positions
servoNone = 615      # PWM setting for open window
servo0=541           # PWM setting for 0 degree filter
servo90=468          # PWM setting for 90 degree filter
servo45=395          # PWM setting for 45 degree filter
servo135=321         # PWM setting for -45 degree (=135 degree) filter
servoLHCP=247        # PWM setting for LHCP filter
servoRHCP=180        # PWM setting for RHCP filter

#Raspberry Pi Camera Initialization
#----------------------------------
#Initialize the camera and grab a reference to the raw camera capture
camera = PiCamera()
camera.resolution = (320, 240)
#camera.resolution = (640, 480)
#camera.resolution = (1280,720)
camera.framerate=30
rawCapture = PiRGBArray(camera)
camera.led=False

#Auto-Exposure Lock
#------------------
# Wait for the automatic gain control to settle
time.sleep(2)
# Now fix the values
camera.shutter_speed = camera.exposure_speed
camera.exposure_mode = 'off'
gain = camera.awb_gains
camera.awb_mode = 'off'
camera.awb_gains = gain

#Initialize flags
loop=True  #Initial state of loop flag
first=False #Flag to skip display during first loop
video=False #Use video port?  Video is faster, but image quality is significantly
            #lower than using still-image capture

while loop:
    #grab an image from the camera with no filter
    pwm.setPWM(0, 0, servoNone)
    time.sleep(0.5)
    rawCapture.truncate(0)
    camera.capture(rawCapture, format="bgr",use_video_port=video)
    imageNone=rawCapture.array

    #grab an image from the camera with linear polarizer at 0 degrees
    pwm.setPWM(0, 0, servo0)
    time.sleep(0.1)    #Wait for filter wheel to moves
    rawCapture.truncate(0)
    camera.capture(rawCapture, format="bgr",use_video_port=video)
    image0=cv2.cvtColor(rawCapture.array,cv2.COLOR_BGR2GRAY)

    #grab an image from the camera with linear polarizer at 90 degrees
    pwm.setPWM(0, 0, servo90)
    time.sleep(0.1)
    rawCapture.truncate(0)
    camera.capture(rawCapture, format="bgr",use_video_port=video)
    image90=cv2.cvtColor(rawCapture.array,cv2.COLOR_BGR2GRAY)

    #grab an image from the camera with linear polarizer at 45 degrees
    pwm.setPWM(0, 0, servo45)
    time.sleep(0.1)
    rawCapture.truncate(0)
    camera.capture(rawCapture, format="bgr",use_video_port=video)
    image45=cv2.cvtColor(rawCapture.array,cv2.COLOR_BGR2GRAY)

    #grab an image from the camera with linear polarizer at -45 degrees (=135 degrees)
    pwm.setPWM(0, 0, servo135)
    time.sleep(0.1)
    rawCapture.truncate(0)
    camera.capture(rawCapture, format="bgr",use_video_port=video)
    image135=cv2.cvtColor(rawCapture.array,cv2.COLOR_BGR2GRAY)

    #grab an image from the camera with LHCP filter
    pwm.setPWM(0, 0, servoLHCP)
    time.sleep(0.1)
    rawCapture.truncate(0)
    camera.capture(rawCapture, format="bgr",use_video_port=video)
    imageLHCP=cv2.cvtColor(rawCapture.array,cv2.COLOR_BGR2GRAY)

    #grab an image from the camera with RHCP filter
    pwm.setPWM(0, 0, servoRHCP)
    time.sleep(0.1)
    rawCapture.truncate(0)
    camera.capture(rawCapture, format="bgr",use_video_port=video)
    imageRHCP=cv2.cvtColor(rawCapture.array,cv2.COLOR_BGR2GRAY)

    #convert images to signed double (int16)
    image0_d=np.int16(image0)
    image90_d=np.int16(image90)
    image45_d=np.int16(image45)
    image135_d=np.int16(image135)
    imageLHCP_d=np.int16(imageLHCP)
    imageRHCP_d=np.int16(imageRHCP)
    #calculate Stokes parameters
    stokesI=image0_d+image90_d
    stokesQ=image0_d-image90_d
    stokesU=image45_d-image135_d
    stokesV=imageLHCP_d-imageRHCP_d
    #calculate polarization parameters
    polInt=np.sqrt(1+np.square(stokesQ)+np.square(stokesU))  #Linear Polarization Intensity
    polDoLP=polInt/stokesI   #Degree of Linear Polarization
    polAoP=0.5*(np.arctan2(stokesU,stokesQ))  #Angle of Polarization
    polDoCP=(2*np.absolute(stokesV))/polInt  #Degree of Circular Polarization

    #prepare DOLPi RGB image
    R=image0
    B=image90
    G=image45
    imageDOLPi=cv2.merge([B,G,R])
    cv2.imshow("Image_DOLPi",imageDOLPi)  #Display DOLPi preview image

    #cv2.imshow("Image_DOLPi",cv2.resize(imageDOLPi,(320,240),interpolation=cv2.INTER_AREA))  #Display DOLP image
    k = cv2.waitKey(1)  #Check keyboard for input
    if k == ord('x'):   # wait for x key to exit
        loop=False


#   Save and Prepare to leave
#   -------------------------
#
pwm.setPWM(0, 0, servoNone) #return filter wheel to no-filter position
#display and save calculated polarization parameters
dispStokes(stokesI, stokesQ, stokesU, stokesV)
dispPol(polInt, polDoLP, polAoP, polDoCP)
#save images
cv2.imwrite("imageNone.jpg",imageNone)
cv2.imwrite("image0.jpg",image0)
cv2.imwrite("image90.jpg",image90)
cv2.imwrite("image45.jpg",image45)
cv2.imwrite("image135.jpg",image135)
cv2.imwrite("imageLHCP.jpg",imageLHCP)
cv2.imwrite("imageRHCP.jpg",imageRHCP)
cv2.imwrite("RGBpol.jpg",cv2.merge([B,G,R]))
#exit
time.sleep(10)
cv2.destroyAllWindows()
quit
Discussions
Become a Hackaday.io Member
Create an account to leave a comment. Already have an account? Log In.
Hi, David. I tried to run your code, but I keep getting RuntimeWarning: invalid value encountered in sqrt
Why is that? I tried to understand why but I can't find any answer by myself, so I thought I could reach a conclusion through you.
The camera worked well, the motor also spun well, but the error always pops up, thus not showing any Stokes analysis and I can't save any images.
Thank you in advance!
Are you sure? yes | no