Close
0%
0%

Rasky, raspberry pi 2 KVM over IP

Rasky is an expansion board for raspberry pi model 2, a collection of software and some 3d models to build an open source KVM over IP

Similar projects worth following
Rasky is a low cost open source (hardware and software) KVM over IP built on top of the well known RaspberryPI model 2B featuring VGA video capture, USB keyboard and mouse emulation, remote control both by web (ajax VNC) and VNC, remote relay switches and digital inputs.

It predates some other projects ( https://hackaday.io/project/2872-driverless-mouse-and-keyboard-sharing, http://www.rpg.fi/desaster/blog/2013/04/19/vga-framegrabbing-with-tvp7002/ ) and many great open source software and glue them togheter to create the first fully open source KVM over IP.

Rasky is a low cost open source (hardware and software) KVM over IP built on top of the well known RaspberryPI model 2B.

The primary goal of the project is to provide a low cost and completely open source alternative to commercially available KVM over IP and other remote consoles like iDRAC, iLO and so on.

A side goal is also to produce Rasky with a complete FLOSS workflow, so, no proprietary software will be used in any development step, all has to be strictly open and free software.

The expansion board for Rpi will be engineered in a way that is suitable for DIY PCB makers, and a 3d printable model of the enclosure will be available too, with an explicit goal to make it feasible to build at home a complete KVM for under 150 euro or to buy one assembled device for less than 200 euro.

Features:

For the first release it will feature:

  • VGA video capture
  • USB keyboard and mouse emulation
  • Web (ajax VNC) and VNC remote access over IP
  • 2 programmable and remote controllable Relays to switch on/off the remote machine and to virtually "press" a button (reset?)
  • 2 digital inputs to attach sensors
  • Completely open source design for software, hardware and box will be released (early and often). License will be GPL or similar.

The project is in a very early stage and some features may change.

Some other features I'm considering, i don't know yet if for the first or the second release, is the emulation of an USB remote storage/cd drive and to add a couple of analog inputs.

All those features are implemented without the needs to install anything on the remote controlled machine/OS, so, they can be used even at a BIOS or equivalent level to remote control any machine that have at least one USB port and a VGA or, using an adapter, DVI or HDMI video output.

Block schematics

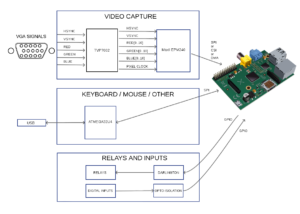
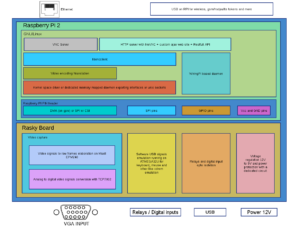
Rasky features 3 primary circuits, one for video capture, one for keyboard, mouse and eventually cdrom emulation, and one to control relays and digital inputs ( click on the image to enlarge )

Rasky-blockRasky-logic-block

The remote machine will be reachable on web using an ajax webvnc or using vnc directly.

For bandwith saving vnc will be configurable for different level of quality/resolution/colorset/refresh.

The enclosure will be 3d printable and both the stl model and the OpenSCAD source will be available on gitlab.

From the hardware site the goal features are:

capture at least up to 800x600 for the first prototype, with the goal to go up at least to 1280x1024 for the first release

VGA input connector, DVI and HDMI are supported by using a common available adapter

VGA output connector in bridge with the input one

USB keyboard and mouse emulation on a single USB connector

relays up to 250VAC / 10A

opto-isolated, self powered digital inputs

12VDC power supply connector to power both the Rpi and the expansion board, estimated a 2A power supply needed.

Rasky can be connected to LAN both by ethernet and/or wifi, in latter case using a common Rpi compatible wifi usb dongle.

The KVM over IP will be implemented as an expansion board for Raspberry PI model 2, the PCB will be as simple as possibile, in any case no more than 2 layers design and using only commonly available components, so, it will be suitable for DIY makers to be built at home.

Relay and digital inputs will be controlled by using the Well known Wiring PI library and then exported on the web for remote control.

For the Keyboard and Mouse circuit and software, an ATMEGA32U4 will be used connected to the raspberry through the SPI bus, all the code needed for the MCU is already available thanks to projects like the hackaday driverless mouse and keyboard sharing

  • 1 × TI TVP7002 Video capture ADC
  • 1 × Altera MaxII EPM570 CPLD CPLD for video capture acquisition
  • 1 × ATMEGA32U4 Microprocessors, MicroUSB controllers, DSPs / ARM, RISC-Based Microcontrollers, host for USB keyboard and mouse

  • 21 September 2016 update

    Franco (nextime) Lanza09/21/2016 at 22:01 0 comments


    Long time (too many months) is passed without updates. This was due to the missing goal of the crowdfunding campaign and some personal issues.

    Anyway, despite my long silence on Rasky, i have great news, and in those months I've worked out some tests on both hw and software side, and, amazingly and unbelievably they fully worked at first try.

    Also, the prototype was tested on rpi2 B+ AND rpi3 with success, rpi3 is working even better thanks to a faster bus clock and more resources in general.

    This allowed me to move forward and start to optimize the design for final production.

    I'm working on the new and final PCB, the one i will finally ship, and, if anything goes as expected, i will be able to ship to backers before the end of the year, probably first PCB even before the end of October.

    The new PCB design will introduce a lot of simplifications and optimizations, and will get rid of most of the useless hardware and components there was on the prototype. The most notable changes are:

    - Get rid of all the useless I/O buffers, we don't need to connect every chipset to every SPI/I2C, they all work great on the RPI, so, only a single buffer to manage different voltage levels is needed, no more duplication.

    - Power supply circuit completely revisited, battery support removed as I have now a board that can stacked up with Rasky to provide this functionality, and removing it will simplify the circuits, will drive down costs, and will let anyone doesn't want to use it doesn't pay for it. The supporters of the project will have a SafePI included in rewards.

    Stay tuned, in next few days i will put online new material, schematics and PCB design for the new board.

    Thanks to all backers for your patience, Rasky is back and it's here to stay and get real!

  • update: First assembled rasky ready for test

    Franco (nextime) Lanza10/02/2015 at 04:25 0 comments

    First assembled Rasky is ready for tests.
    There are a couple of wrong components footprint that need to be fixed, but it's good enough to start writing the needed low level software and then deeply testing it, this is a great milestone reached!

    Next month i will focus on the software part and in testing the first board, and hoping all goes well, i will proceed to the first "beta" version production batch

  • 14 September update: schematic complete, PCB routing on his way

    Franco (nextime) Lanza09/15/2015 at 09:30 0 comments

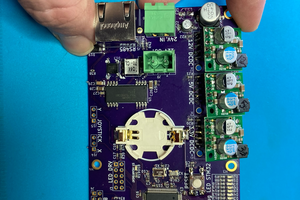
    The schematic for Rasky is now complete. A couple of notes:

    - Rasky will have a power supply circuit to manage 4x Ni-MH AA rechargeable batteries used to assure safe/clean shutdown of the raspberry in case of power loss or failure

    - The ATMEGA used for keyboard and mouse emulation can be reprogrammed from the raspberry, so, a future update to add usb storage emulation can be pushed without external hw

    The final schematic is here, details of this update: https://www.nexlab.net/product/rasky/#tab-status-updates

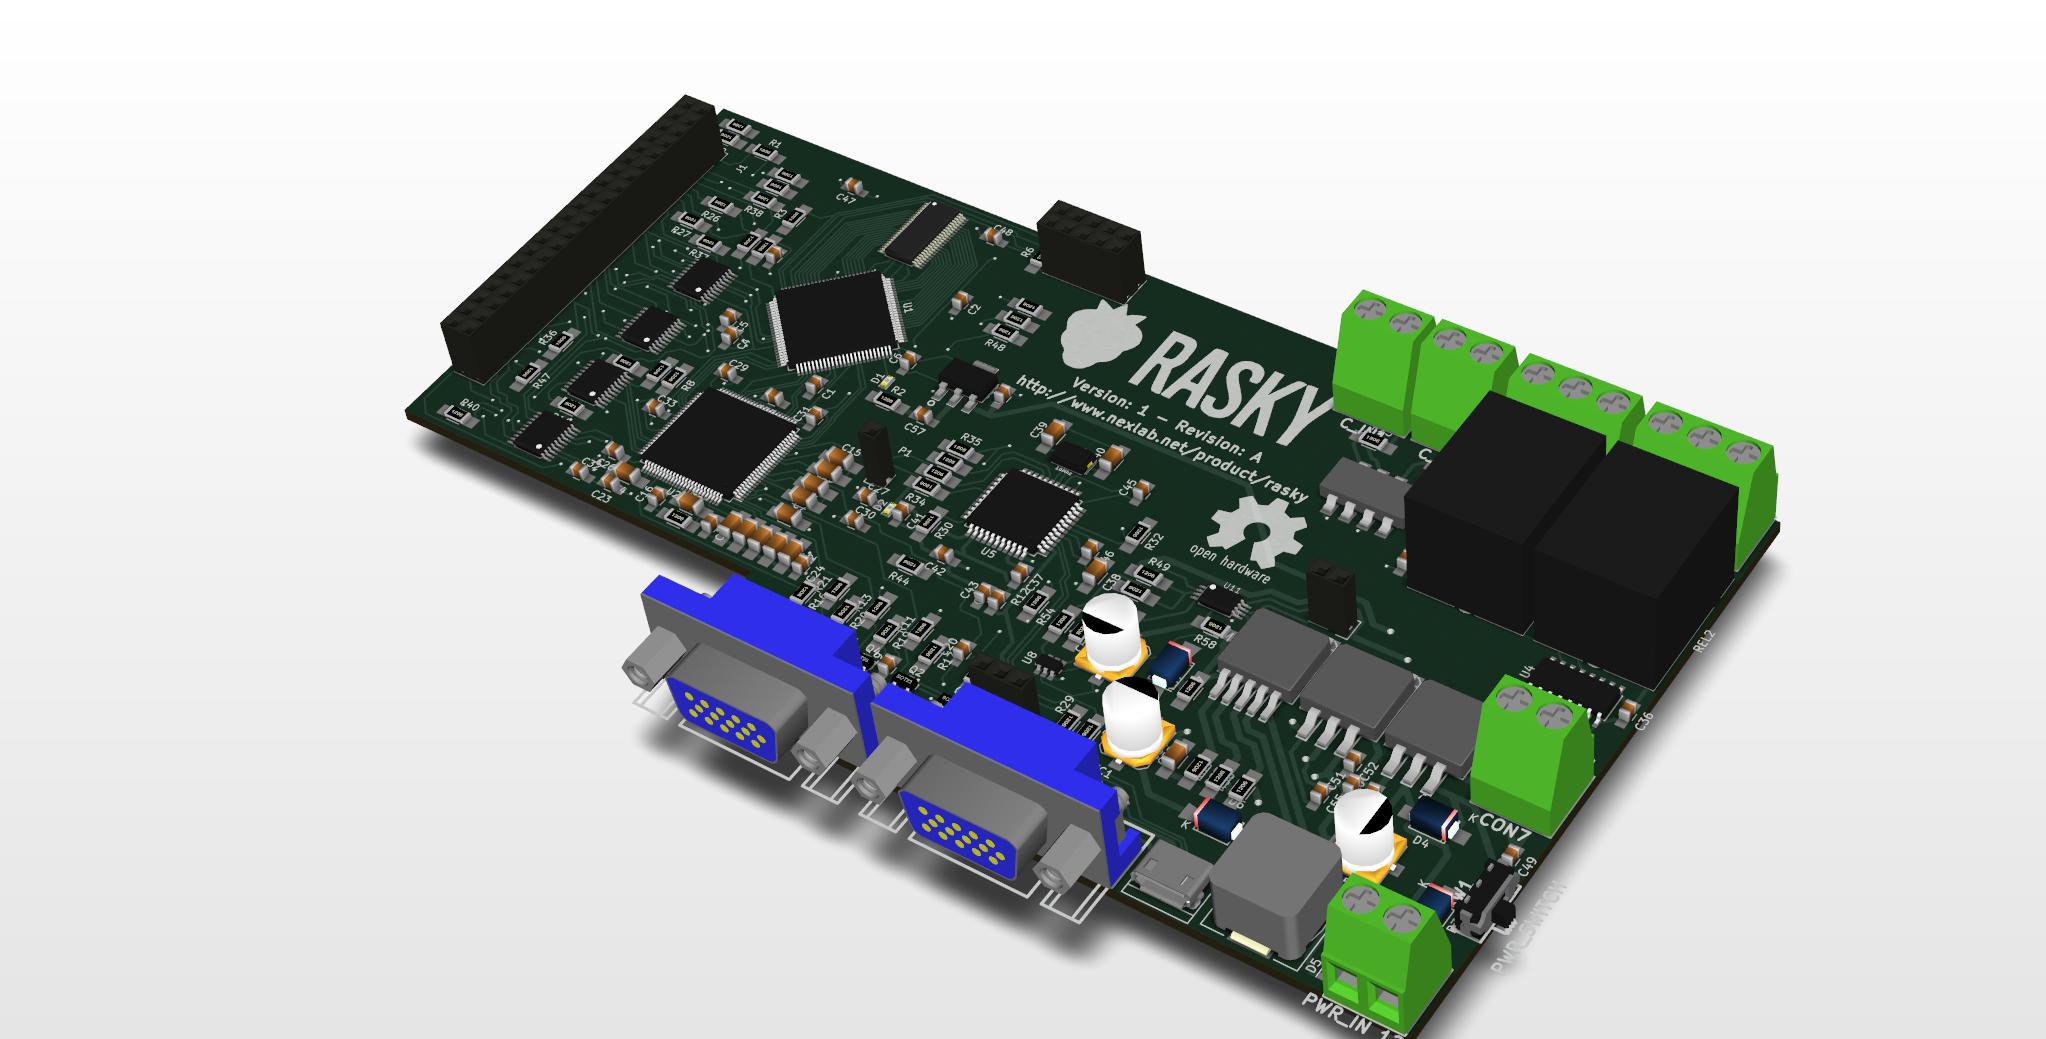
    A couple of 3d models of the board

  • 3 Sept 2015 update: the schematic is almost done.

    Franco (nextime) Lanza09/03/2015 at 22:08 0 comments

    The most relevant change is the CPLD that is changed from MaxII EPM240 do EPM570.

    Details and schematics on https://www.nexlab.net/2015/09/03/rasky-update-schematic-almost-complete/

  • UPDATE: CSI2 vs SPI vs GPIO for transferring frames to Rpi

    Franco (nextime) Lanza08/19/2015 at 15:42 0 comments

    Choose how to transfer grabbed frames to the raspberry pi is a central part of the project as it's probably the harder part where it's easy to loose to many performances. I've just posted an update explaining how i come to choose to do that over SPI bus
    Full story at https://www.nexlab.net/2015/08/19/rasky-update-choosing-how-to-connect-the-cpld-to-raspberrypi/

View all 5 project logs

Enjoy this project?

Share

Discussions

doccaz wrote 08/10/2020 at 14:45 point

I see the repository with the schematics and gerber files is here (https://git.nexlab.net/rasky/Rasky_hw/tree/master), but is it done? Will it ever be done?

  Are you sure? yes | no

Anton wrote 01/01/2018 at 01:05 point

Is there any news on this? Is it available for ordering?

  Are you sure? yes | no

D Khazz wrote 04/06/2016 at 13:27 point

Very cool

  Are you sure? yes | no

Craig Hissett wrote 01/27/2016 at 13:25 point

This is bloody marvellous!

I have a project on hold using the ATMega32U4-based Arduino pro micros to create a modular Keyboard/Mouse switcher, and was aiming to use a Pi further down the line to address the 'V' part of KVM. You've already nailed it in one go!

Great work!

  Are you sure? yes | no

Franco (nextime) Lanza wrote 01/27/2016 at 13:37 point

Thanks!

  Are you sure? yes | no

Craig Hissett wrote 01/27/2016 at 13:40 point

You're welcome - I look forward to seeing this little beast in action.

  Are you sure? yes | no

jaromir.sukuba wrote 01/27/2016 at 09:03 point

Hello, I'm thinking of reusing some parts of this project into my project, particularly the parts around TVP7002. Is your hardware already tested and known to work? What framerates/pixels resolution did you test?

  Are you sure? yes | no

Franco (nextime) Lanza wrote 01/27/2016 at 13:36 point

I have done preliminary tests with a very similar circuit ( but separate from the rest of the board ) and i'm writing now the code to test the final circuit i will release in some days, so, i suggest you to wait a couple of weeks to take the final and tested circuit.

Actually i've done a relatively slow frame rate ( 5FPS ) but with just bad testing code, more a proof of concept that an alpha version, i'm confident i can at least double that speed without change components, hopefully even go up to 15FPS. Take care that the slower part isn't the TVP7002 that is relatively fast and can reach great framerates, but the CLPD part that is somewhat non-optimized for speed.

  Are you sure? yes | no

jaromir.sukuba wrote 02/03/2016 at 12:25 point

In the meantime, could you, please, confirm the parts around VGA inputs work as expected? Transistors Q1-Q5 are PNP on your schematics, but NPN would give more sense in this circuit (provided collector goes to 5V and emitter is grounded via 100R resistor - voltage follower). PNP here would work as amplifier and inverter, what sounds strange to me.

  Are you sure? yes | no

Franco (nextime) Lanza wrote 02/03/2016 at 13:59 point

jaromir.sukoba: yes, it works, Q1-Q5 are PNP cause this part of the circuit is, basically, a VGA splitter where you get signals from the VGA input and split it between the VGA output from one side and the TVP7002 on the other side

  Are you sure? yes | no

Franco (nextime) Lanza wrote 01/21/2016 at 11:21 point

Hello, it's not released yet, i'm working on it and it will be ready for late spring / initial summer this year. For the moment you can pre-order it or buy an early adopter model on my website by contributing to the crowdfunding campaign here: http://nexlab.net/rasky

  Are you sure? yes | no

chauvoluuhuong wrote 01/21/2016 at 10:48 point

hi !  how can i buy this module ???

  Are you sure? yes | no

Franco (nextime) Lanza wrote 01/27/2016 at 13:38 point

is there a crowdfunding for pre-sell it right now, but it isn't yet ready . It will be ready around june of this year.

If you like to contribute, anyway, http://nexlab.net/rasky

  Are you sure? yes | no

chauvoluuhuong wrote 01/21/2016 at 10:48 point

hi !  how can i buy this module ???

  Are you sure? yes | no

Franco (nextime) Lanza wrote 04/06/2016 at 17:04 point

Is not yet available to build, it will be where now there is the crowdfunding campaign

  Are you sure? yes | no

Similar Projects

Does this project spark your interest?

Become a member to follow this project and never miss any updates