Close
0%
0%

Spartan Mini FPGA handheld NES

A handheld FPGA based NES which utilizes the Spartan 6 FPGA by Xilinx.

Similar projects worth following
I've been a fan of the original NES from childhood. To me it was a magical system, which captured my interest for the first time one Christmas morning. As an adult, I still have fond memories of that console. Part of the impetus for this project came from those childhood memories.

The Spartan Mini NES, as its name implies, has at its foundation a Spartan Mini FPGA board. The Spartan Mini is a development board I built around the Spartan 6 FPGA by Xilinx. The NES core that runs on the FPGA is a modified version of Brian Bennett's design. To facilitate the transfer of games from the SD card to the FPGA, I'm using a Parallax Propeller, which is connected to the FPGA with a serial link.

At its heart, this project relies on the Spartan 6 FPGA by Xilinx. I'm using the TQFP 144 pin version for ease of soldering. To facilitate breaking out all of the pins and getting the project up and running quickly, I've used the Spartan Mini FPGA board, as well as the perfboard shield. 

For the NES core I chose this one developed by Brian Bennett. I first prototyped the project as much as possible on a breadboard, working out the kinks in the design until it was ready to be wired onto perfboard. 
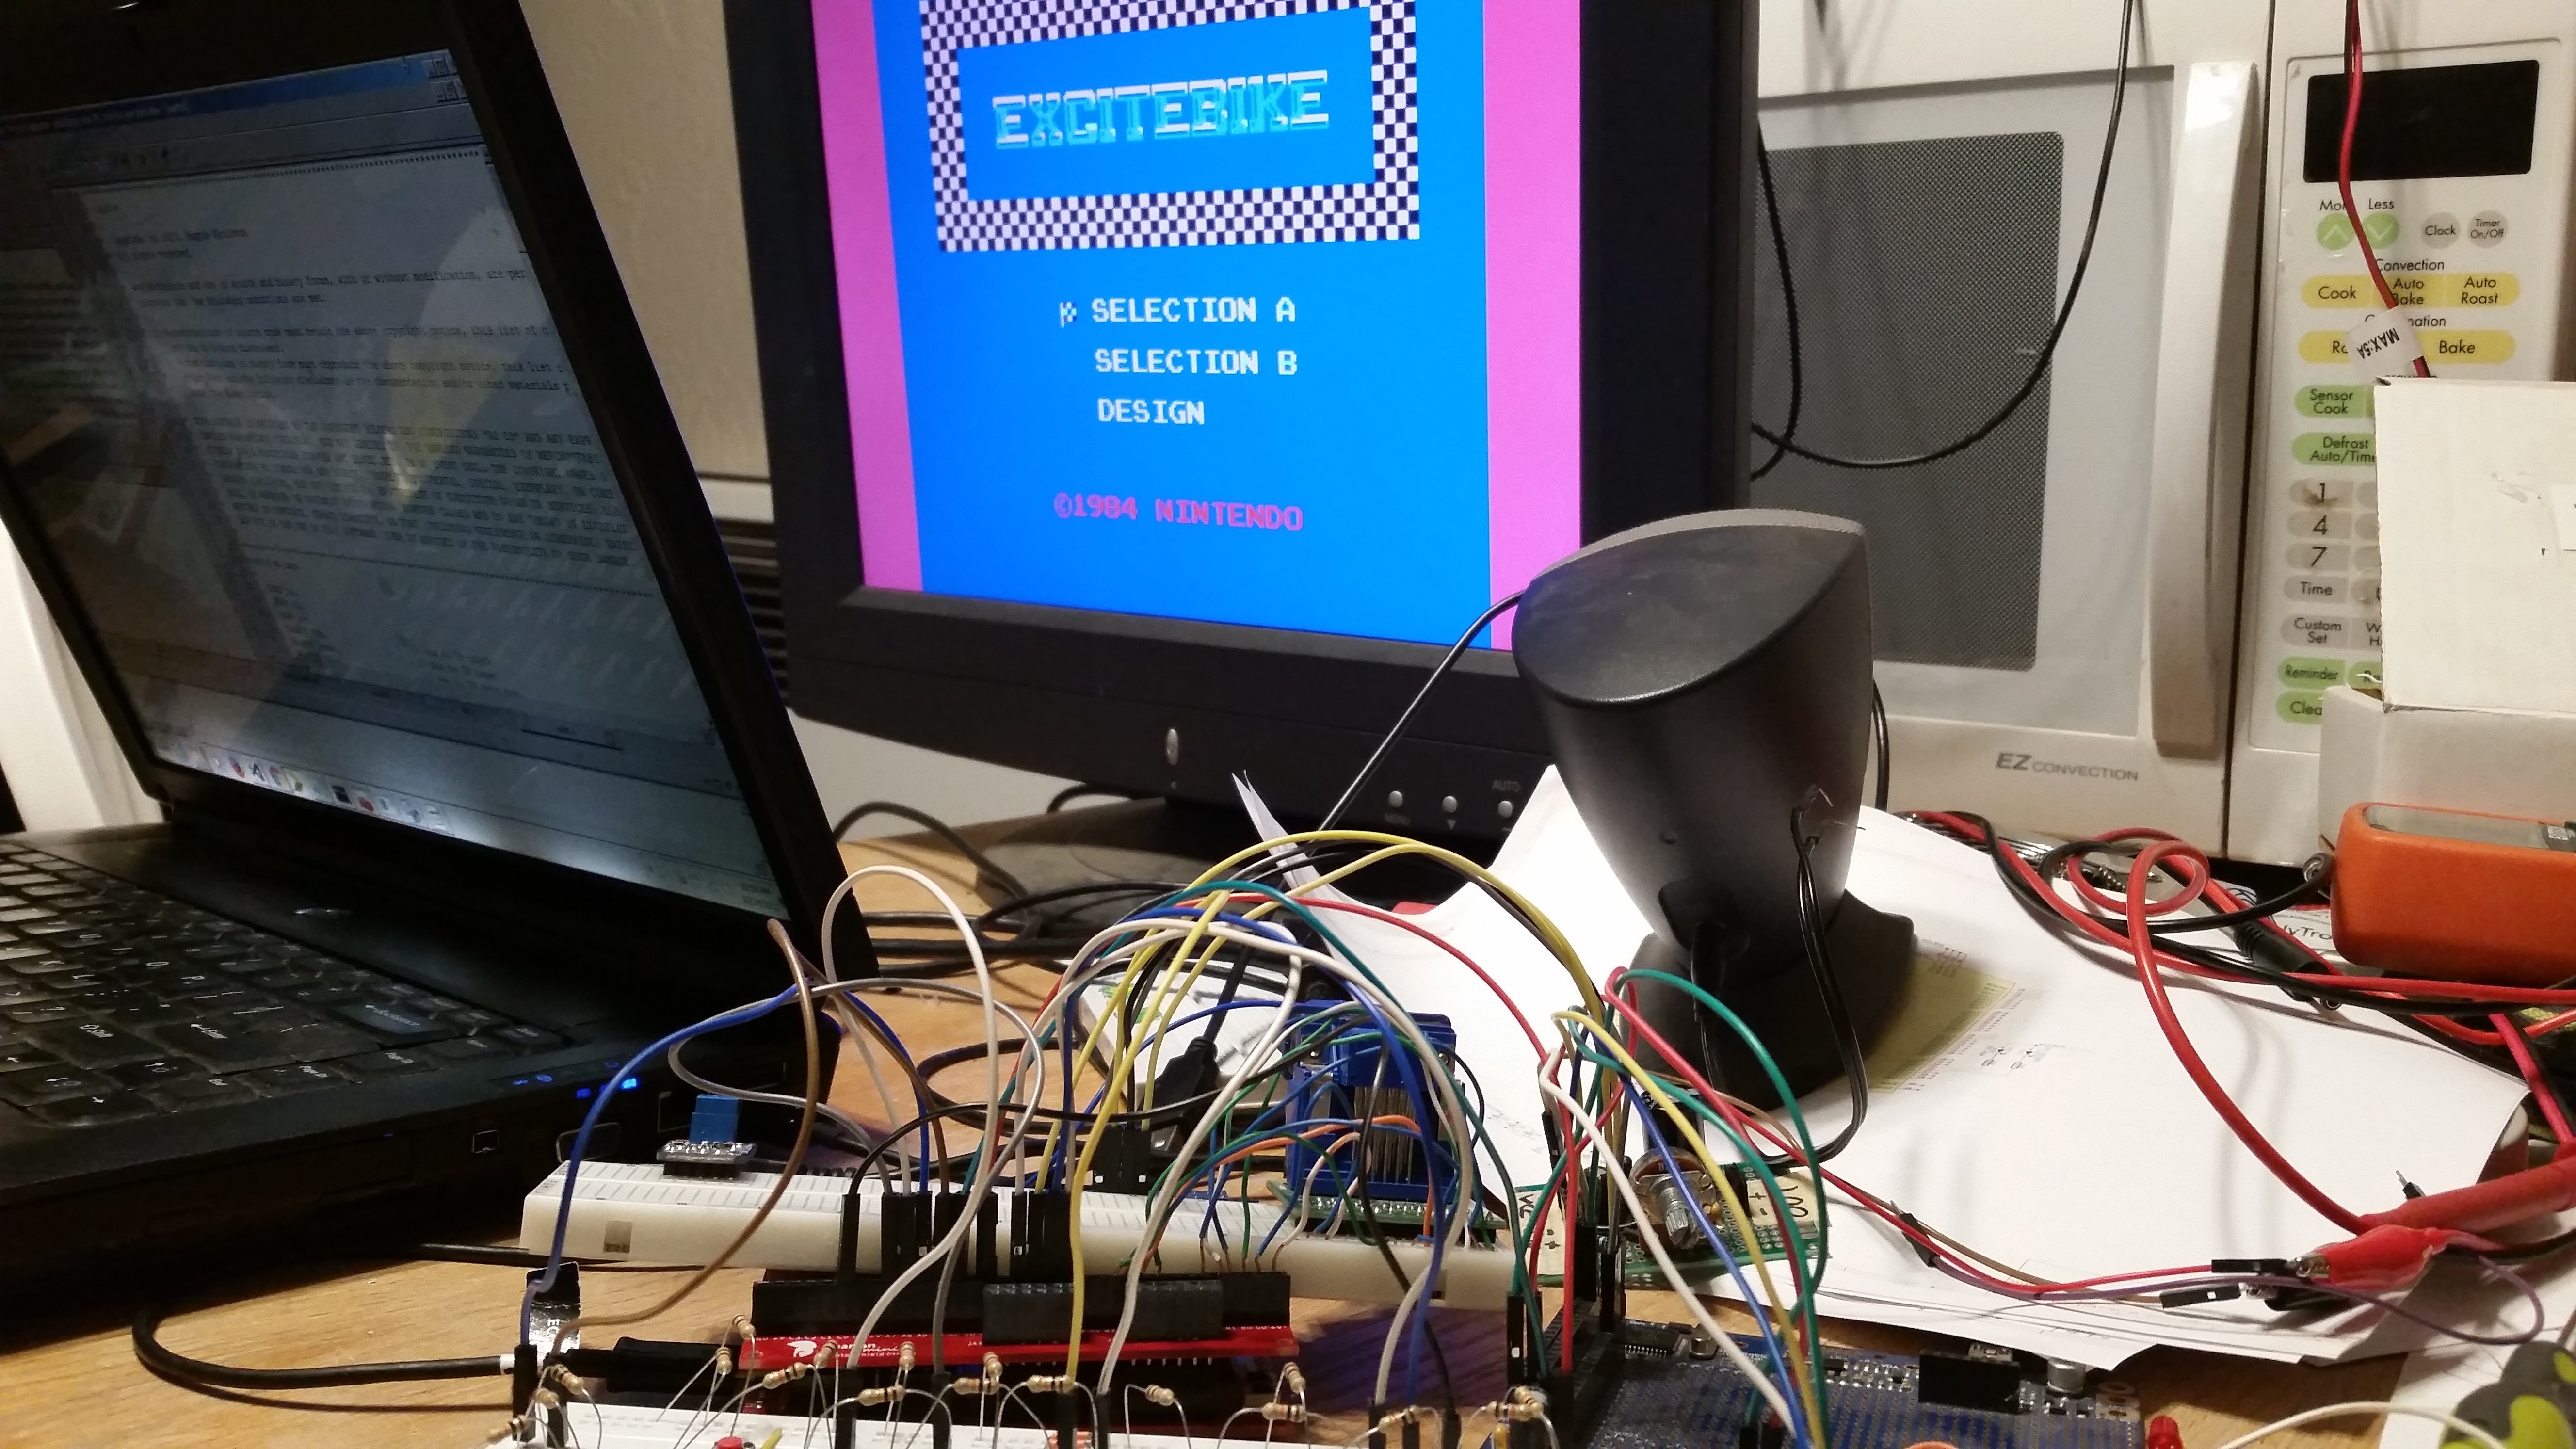
Besides the Spartan Mini, the other components used for this build were:

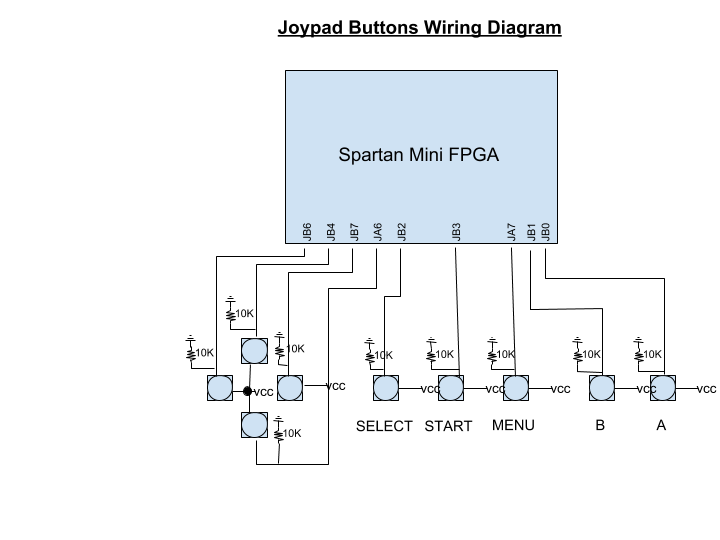
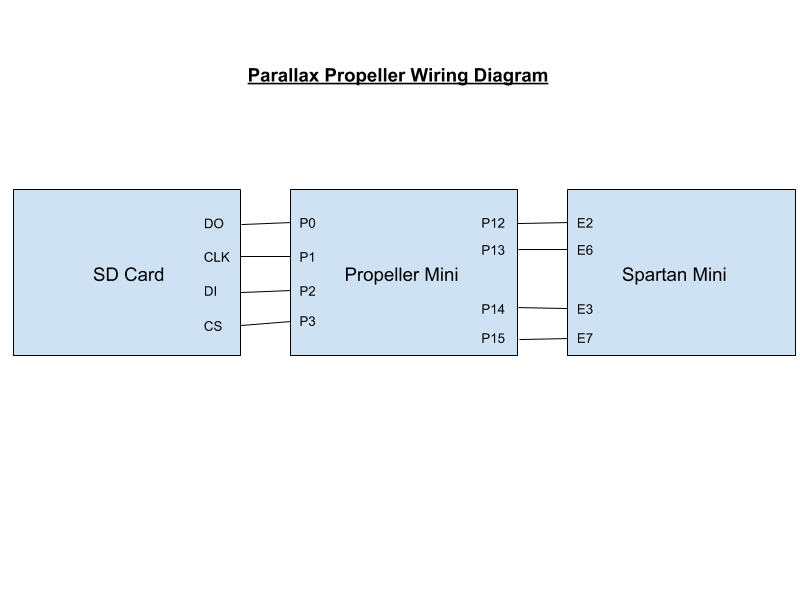
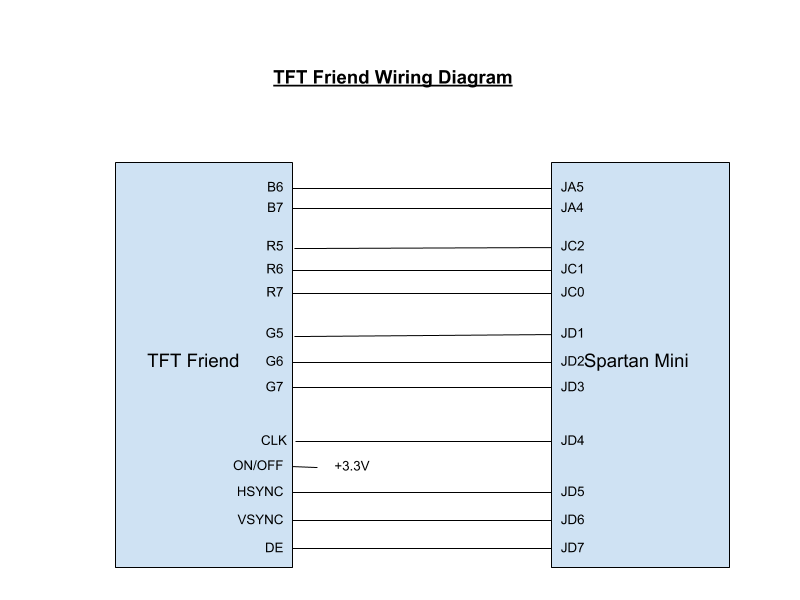
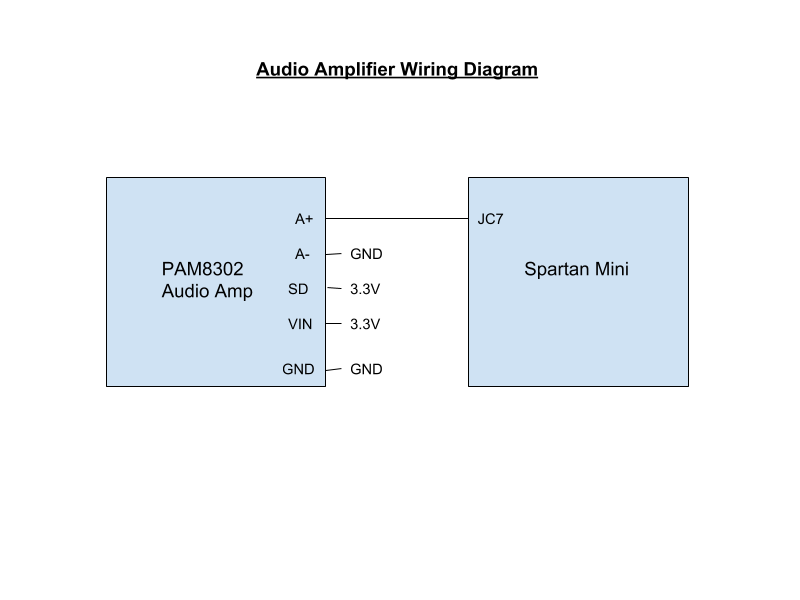
Here are the wiring diagrams I used to get the project all wired up.

Joypad:
Parallax Propeller and SD Card Interface:
TFT Display:
Audio Amplifier:
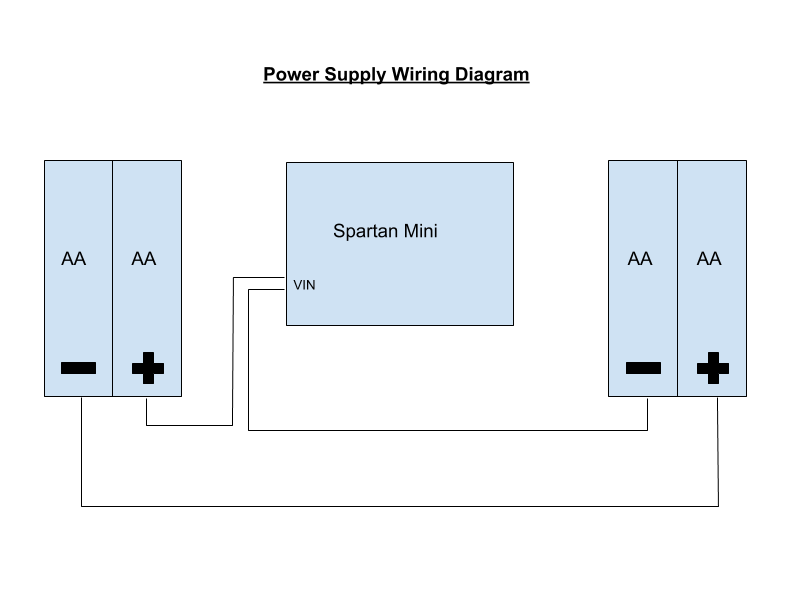
Power Supply:
Here's a short video of it in action:

Spartan Mini NES Wiring Diagram.pdf

Adobe Portable Document Format - 170.32 kB - 03/14/2018 at 03:01

Preview

  • 1 × Spartan Mini Dev Board
  • 1 × 8 ohm speaker
  • 1 × Parallax Propeller Mini
  • 1 × Adafruit Mono 2.5W Class D Audio Amplifier - PAM8302
  • 1 × Adafruit TFT Friend LED Driver

View all 6 components

  • Video demonstration

    Jon Thomasson04/06/2018 at 14:53 1 comment

    Here's a short video I made demonstrating the basic functionality of the project:

  • Finishing up

    Jon Thomasson03/07/2018 at 17:40 0 comments

    I finished up the Spartan Mini NES project today. This is a project developed around my Spartan 6 FPGA development project. The end goal of this project was to learn Verilog and FPGA design, while also creating a handheld NES gamepad. I left off last time with the wiring done to the perfboard shield that connects to the FPGA board. Since there wasn't enough room on that board to place the display and all the buttons I decided to bolt the shield to a larger perfboard that would fit all the components needed. I ran some measurements on the largest perfboard I had and mounted the shield to the board.

    From there I wired up the joypad buttons, the SD card, speaker, and the Prop Plug connector for flashing the propeller board. For the speaker I bought one of these PCB mount varieties from Adafruit.

    For the power supply I used 4 AA batteries wired in series and plugged directly into the barrel jack on the Spartan Mini board. I found that by placing the battery packs on the outer edge of the board, they could double as handle grips. I used velcro to hold down both the display as well as the battery holders. I did this in the hopes that it would be easier to modify or repair the board if it was needed in the future.

    Here's the finished project.

    I'm going to swap out the Alkaline batteries for some NiMH 2100mAh rechargeable batteries. The total current drain of this project as measured by my power supply was around 400mA, so hopefully that should give me around 5 hours or so of operation before recharge. All in all I'm happy with how this project turned out. It was a lot of fun diving into FPGA's and being challenged by aspects of electronics that I hadn't encountered before.

  • Wiring shield and final project start

    Jon Thomasson03/07/2018 at 17:36 0 comments

    Spent some more time soldering the final handheld NES project. Just like in routing PCB traces, the majority of the time seems to be in getting the placement of the components just right. For this particular project it wasn't too bad. My main concern was just aligning the components so that they wouldn't hinder the connection between the FPGA board and the proto shield. I wired in a Parallax Propeller Mini board to save on space. Here's what the finished placement looks like:

    I cut a small slot for the lcd cable to enter through the board and connect to the led driver. I ended up desoldering the screw terminals from the audio amp board in order to save room for the usb plug.

    The only connections missing now are the speaker, sd card, and joypad buttons. The plan right now is to mount this to a larger board where i'll have a bit more room to work with.

  • SPI Flash and FPGA configuration

    Jon Thomasson03/07/2018 at 17:26 0 comments

    I cleared off enough room on the workbench to do some more testing on my spartan mini fpga board with the end goal of completing this handheld NES project. Of course to be truly portable, I didn't want to have to reprogram the NES core into the FPGA each time I wanted to play a game. It would be nice to persist the FPGA configuration off to the external SPI flash attached to the Spartan 6, and have it load in that configuration automatically when it starts up.

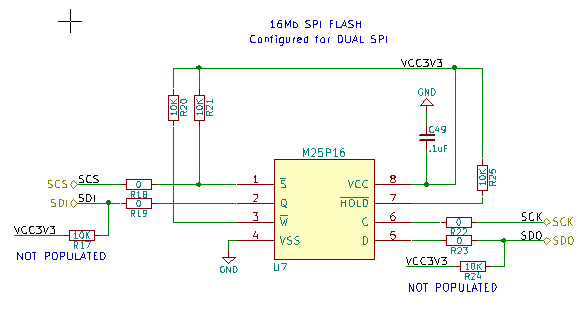
    Here's the pertinent part of the spartan mini schematic, showing the connections to the SPI flash:

    The spartan 6 provides a way to read configuration data from an attached SPI flash. The Xilinx Impact software is used to program the SPI flash via an indirect programming method. This all seemed pretty simple and straightforward, at least on paper. But my friend Murphy likes to show up and tell me that I can mess up even the simplest of things.

    After squandering what seemed like countless hours of my life, messing around with the Impact software, I was getting nowhere. I was getting the error message "spi device not found, id check failed". That's odd I thought, I see it right there in front of me, why can't it find it?  My every failed instinct seemed to take me further down the rabbit hole. I went to the schematic to see if maybe I had set the wrong mode configuration on the fpga. Then I went to check the schematic for the flash, to make sure it looked ok. I looked for clues from the manufacturer datasheet on what I was doing wrong.

    Finally, when I had exhausted every last possible resource I could think of, I fished out the logic analyzer from the garage storage and clamped some probes onto the circuit :). I hooked up the probes to the chip select, data, and clock lines. To my astonishment, not a whole lot was going on. The clock was cycling a few times, but no other communication was really happening. This prompted me to start probing with the multi meter. The voice of Dave Jones echoed in my head "Thou shalt check voltages". After confirming the voltages looked ok, I started checking for continuity between the various spi pins to the fpga. It was at this step that I found that there was no continuity between the chip select pin on the flash and the fpga. Aha! Finally I was getting somewhere. Looking at the schematic I saw that there was a 0 ohm resistor(R18) in series with the chip select pin, so I checked for continuity to it, but got nothing. Thinking it may be just a bad solder joint, I was about to grab the iron to re-flow the solder, when the multi meter probe glanced off of R20, a 10k pull-up resistor, and to my surprise I got a chirp indicating that there was continuity between that and the chip select. I pulled up the board file for these 2 resistors to see what was happening.

    When I selected R18 in pcbnew, the problem became obvious. The R18 and R20 reference designators were swapped. So instead of soldering in a 0 ohm resistor on R18, I had seen the misplaced reference and placed a 10K resistor in its place. Mystery solved! After switching the resistor values, I fired Impact up, and was able to save the configuration off to the spi flash without a hitch. I guess there's a few lessons I want to take away from this whole experience. First, make sure to pay extra attention when placing those references, that they're next to the right component. And second, don't wait so long to reach for the trusty logic analyzer or oscilloscope when problems arise. This may be one of the classic "trap for young players" that Dave Jones mentions on occasion.

  • Parallax Propeller and SD Card

    Jon Thomasson03/07/2018 at 17:14 0 comments

    I spent a little time decoupling the NES FPGA system from the computer recently. Instead of needing a program running on the computer to upload games, I really wanted to have the ability to upload games via an SD card on the board itself.

    The way this worked previously was you would open a program on the computer to navigate to an NES rom file, and select it. The rom would be sent via the serial USB link to the FPGA. To facilitate this same functionality, I would need to replicate how the computer program was sending packets, and in what sequence on a microcontroller connected to an SD card loaded with roms.

    I chose to use the Parallax Propeller microcontroller to do the heavy lifting between the SD card and the FPGA. The Propeller has a somewhat different architecture than the traditional micro. It has essentially 8 cores, or what Parallax calls cogs, running on the chip. Each of these cogs can run tasks independently of the other cogs. So, for my application I'm using one cog to access the SD card, one cog to provide a serial link to display the file contents, one cog to provide a serial link for streaming the rom packets, and one cog that runs the main program loop. I used the FLiP module Parallax sells to provide easy access to the Propeller on the breadboard.

    To duplicate the serial packets that the software was using involved looking through the source code and analyzing how it was sending the data. The program started out by sending commands to tell the FPGA to disable the PPU (picture processing unit) of the NES, then it would send over the iNES header of the rom. The iNES header basically holds information on which mapper to use for the game, as well as the size of the program and PPU rom. After sending this data, it would send a command letting the FPGA know that it would start receiving the actual game packets. Next it would send the address to start writing the data to, as well as the size of the packet (in this case the packets were 1KB). Finally, when the last packet was received, the program retrieved the reset vector from the rom and issued a command to the cpu to let it know where to start executing the code.

    In order to make sure the Propeller sent the correct data exactly as the original software had done, I used this program called Advanced Serial Port Monitor to spy on the usb serial port and log the bytes that were being sent. This way I could step through the code and see which bytes were being sent in relation to which commands and that the packets were being sent correctly.

    In order to facilitate displaying the menu on the FPGA, I setup an 80 column by 30 row tile map. Each tile was made up of an 8x16 pixel grid. I also setup a rom image to store the font of each individual character type that would be displayed as it was received from the serial port. I added a menu toggle button on the controller to facilitate toggling from the menu display back to the game display. The menu is pretty basic for now, it displays the game title, the size of the rom, as well as the total number of games, and current page. By using the up/down/right/left and select buttons on the controller while in menu mode you're able to scroll up and down and forward and backward to different pages in order to select the game you want.

    Next, I need to figure out how to get the FPGA to load the bit file via the attached SPI flash so I no longer need to load it via the USB to JTAG link. Then, who knows, maybe I could cobble together some perfboard and make a proper handheld prototype.

  • FPGA core, component selection and joypad wiring

    Jon Thomasson03/07/2018 at 17:08 0 comments

    I've been fortunate recently to have a few rainy days where I can further test my fpga board. I decided it would be fun to try and port an NES core to my board. I chose to try out this core built by Brian Bennett. This one seemed pretty well structured, and simple enough that I could hopefully add onto it in the future.

    The first step for me was to update the constraint file of the project to map to the pins I had configured on the Spartan Mini. This was relatively straightforward. Next I plopped on my bread board shield and began to build up the connections needed to display the vga video. The way this core works is it uploads rom files from the computer to the fpga via the usb to uart link. After fiddling with the app for a bit, I was able to get games to load and display on the monitor. :slight_smile:

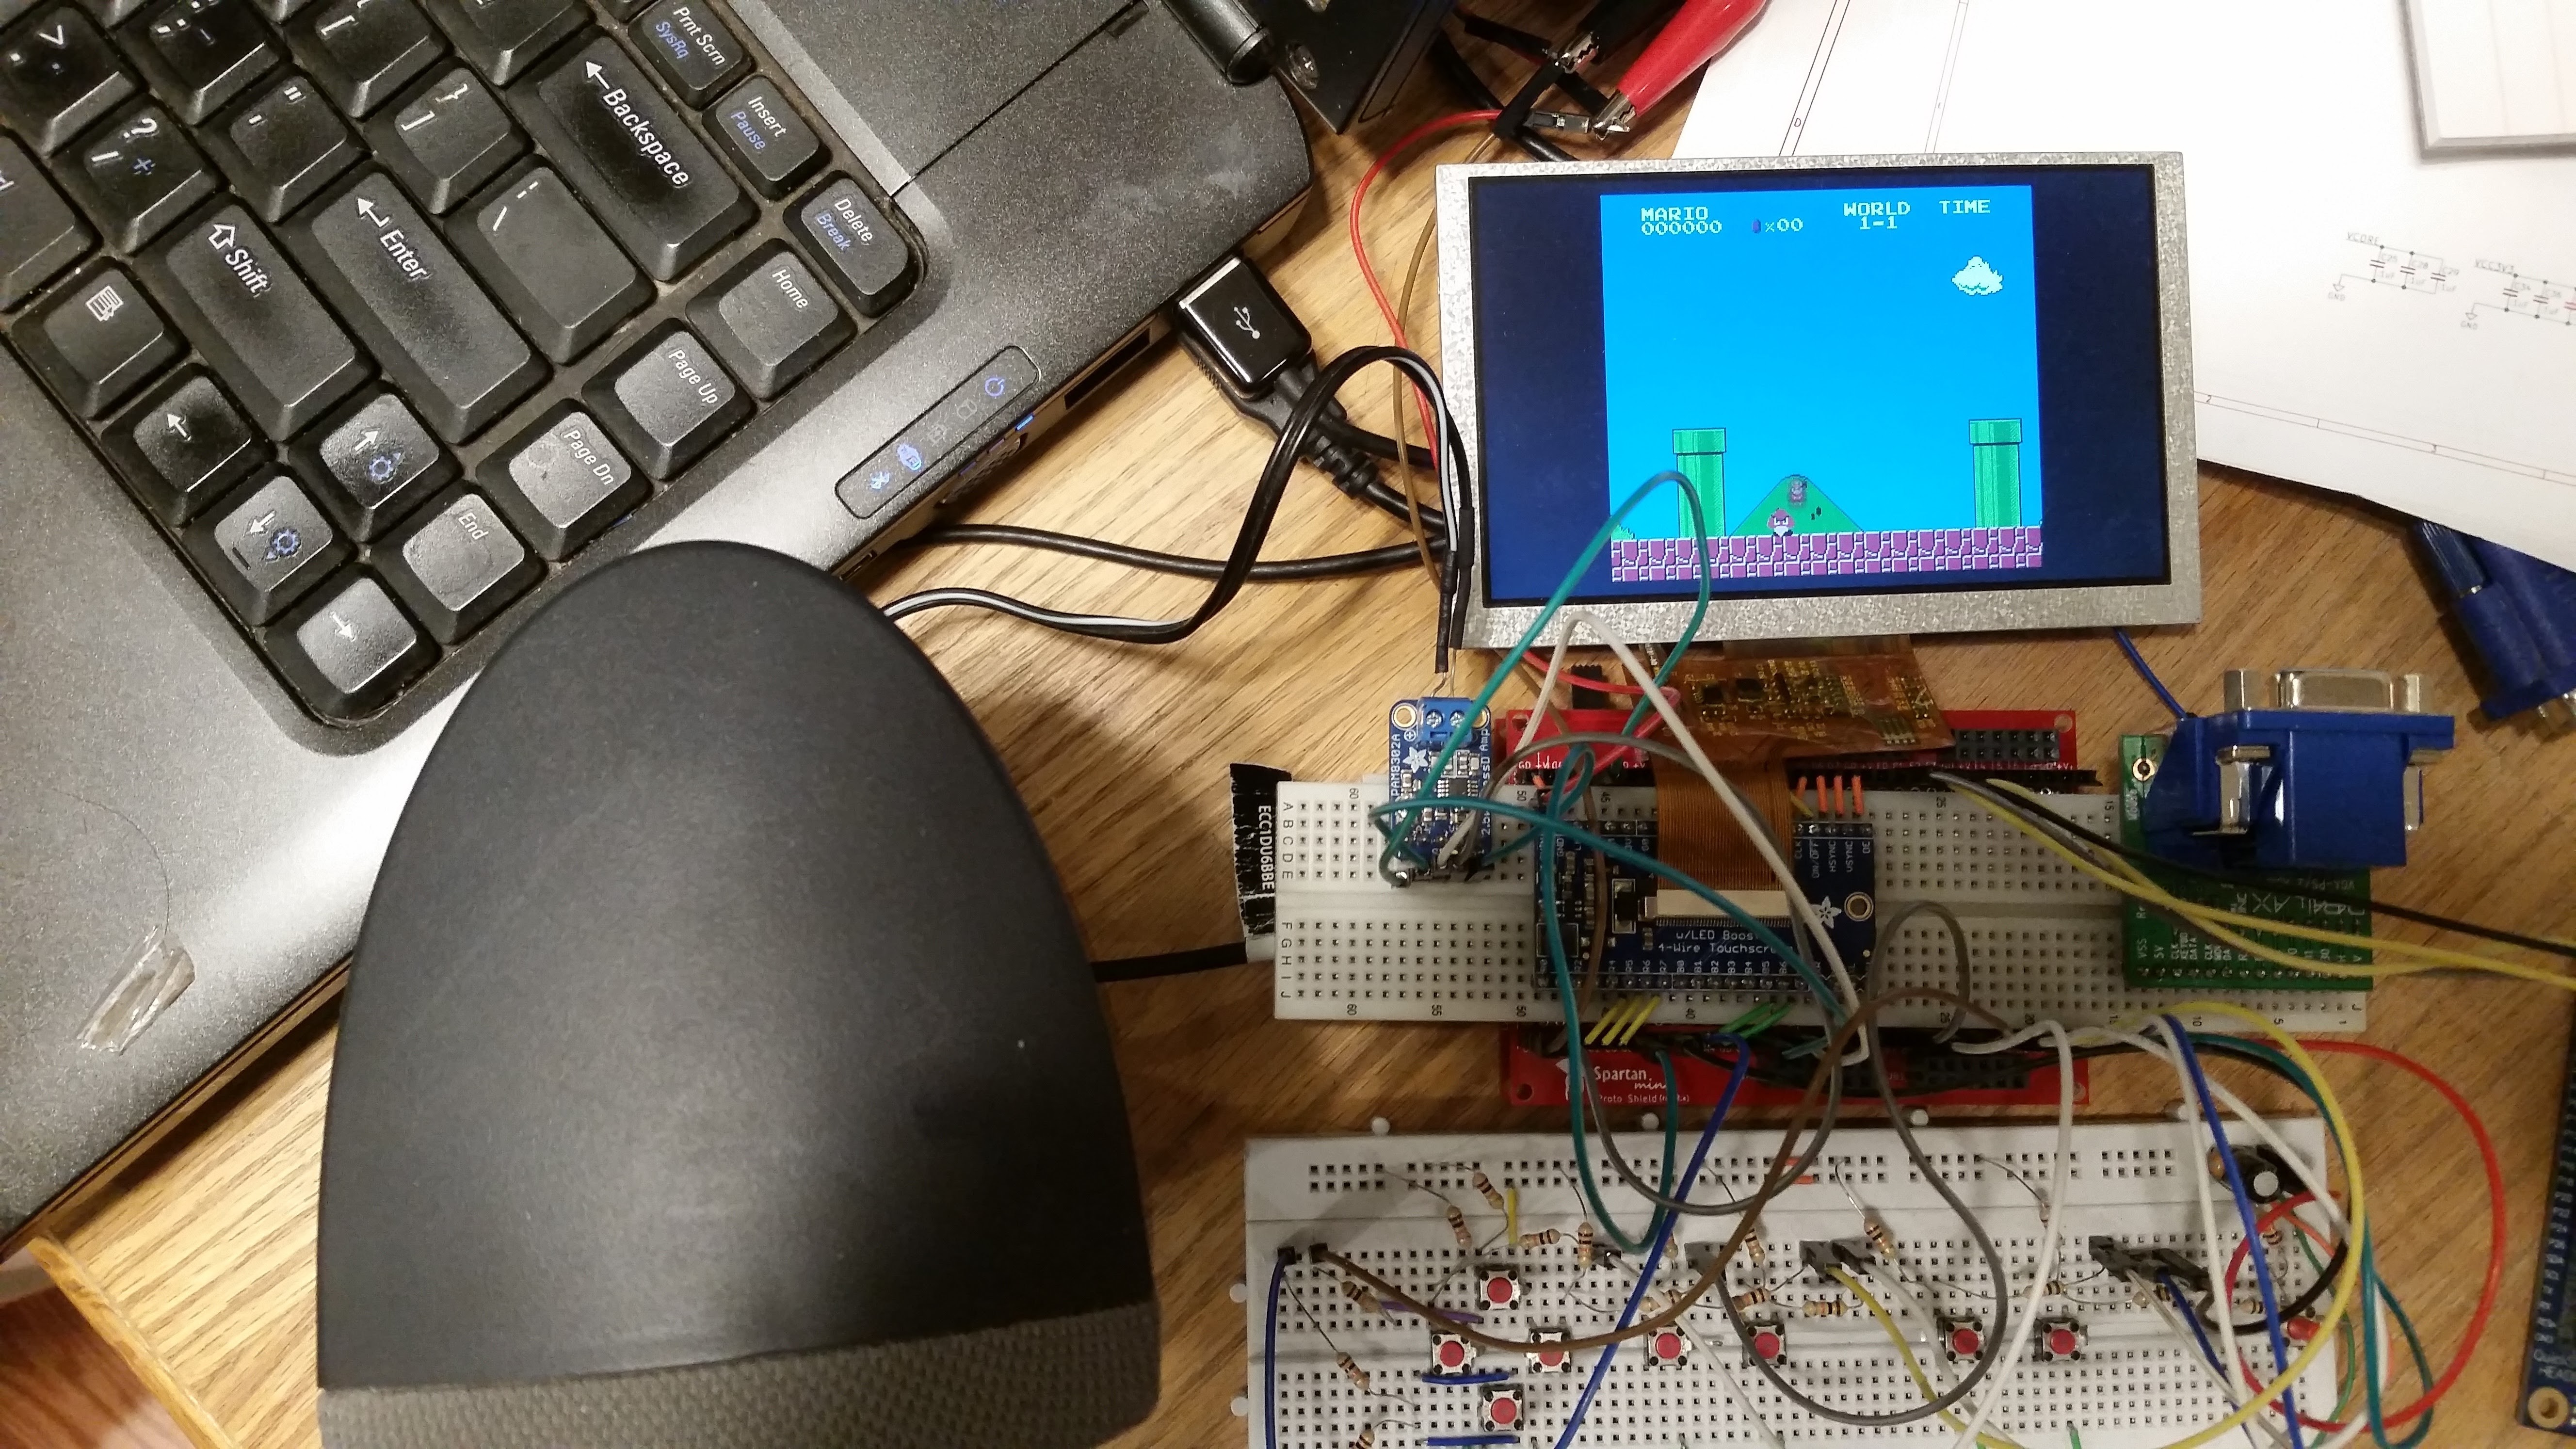
    Next I thought it would be fun to swap out the VGA connection for a small TFT pixel clocked LCD I bought at Adafruit. I used the TFT Friend board Adafruit sells to connect the TFT display. The connection was fairly straightforward. The 8 bit rgb signal was wired into the most significant bits of the display, along with the hsync, vsync, data enable, and pixel clock pins. The video sync module was modified to allow for an 800x480 display area to accommodate the resolution of the TFT. To center the image in the display I'm just shifting the x value of the sync module by 80 pixels in order to compensate for the wider screen.

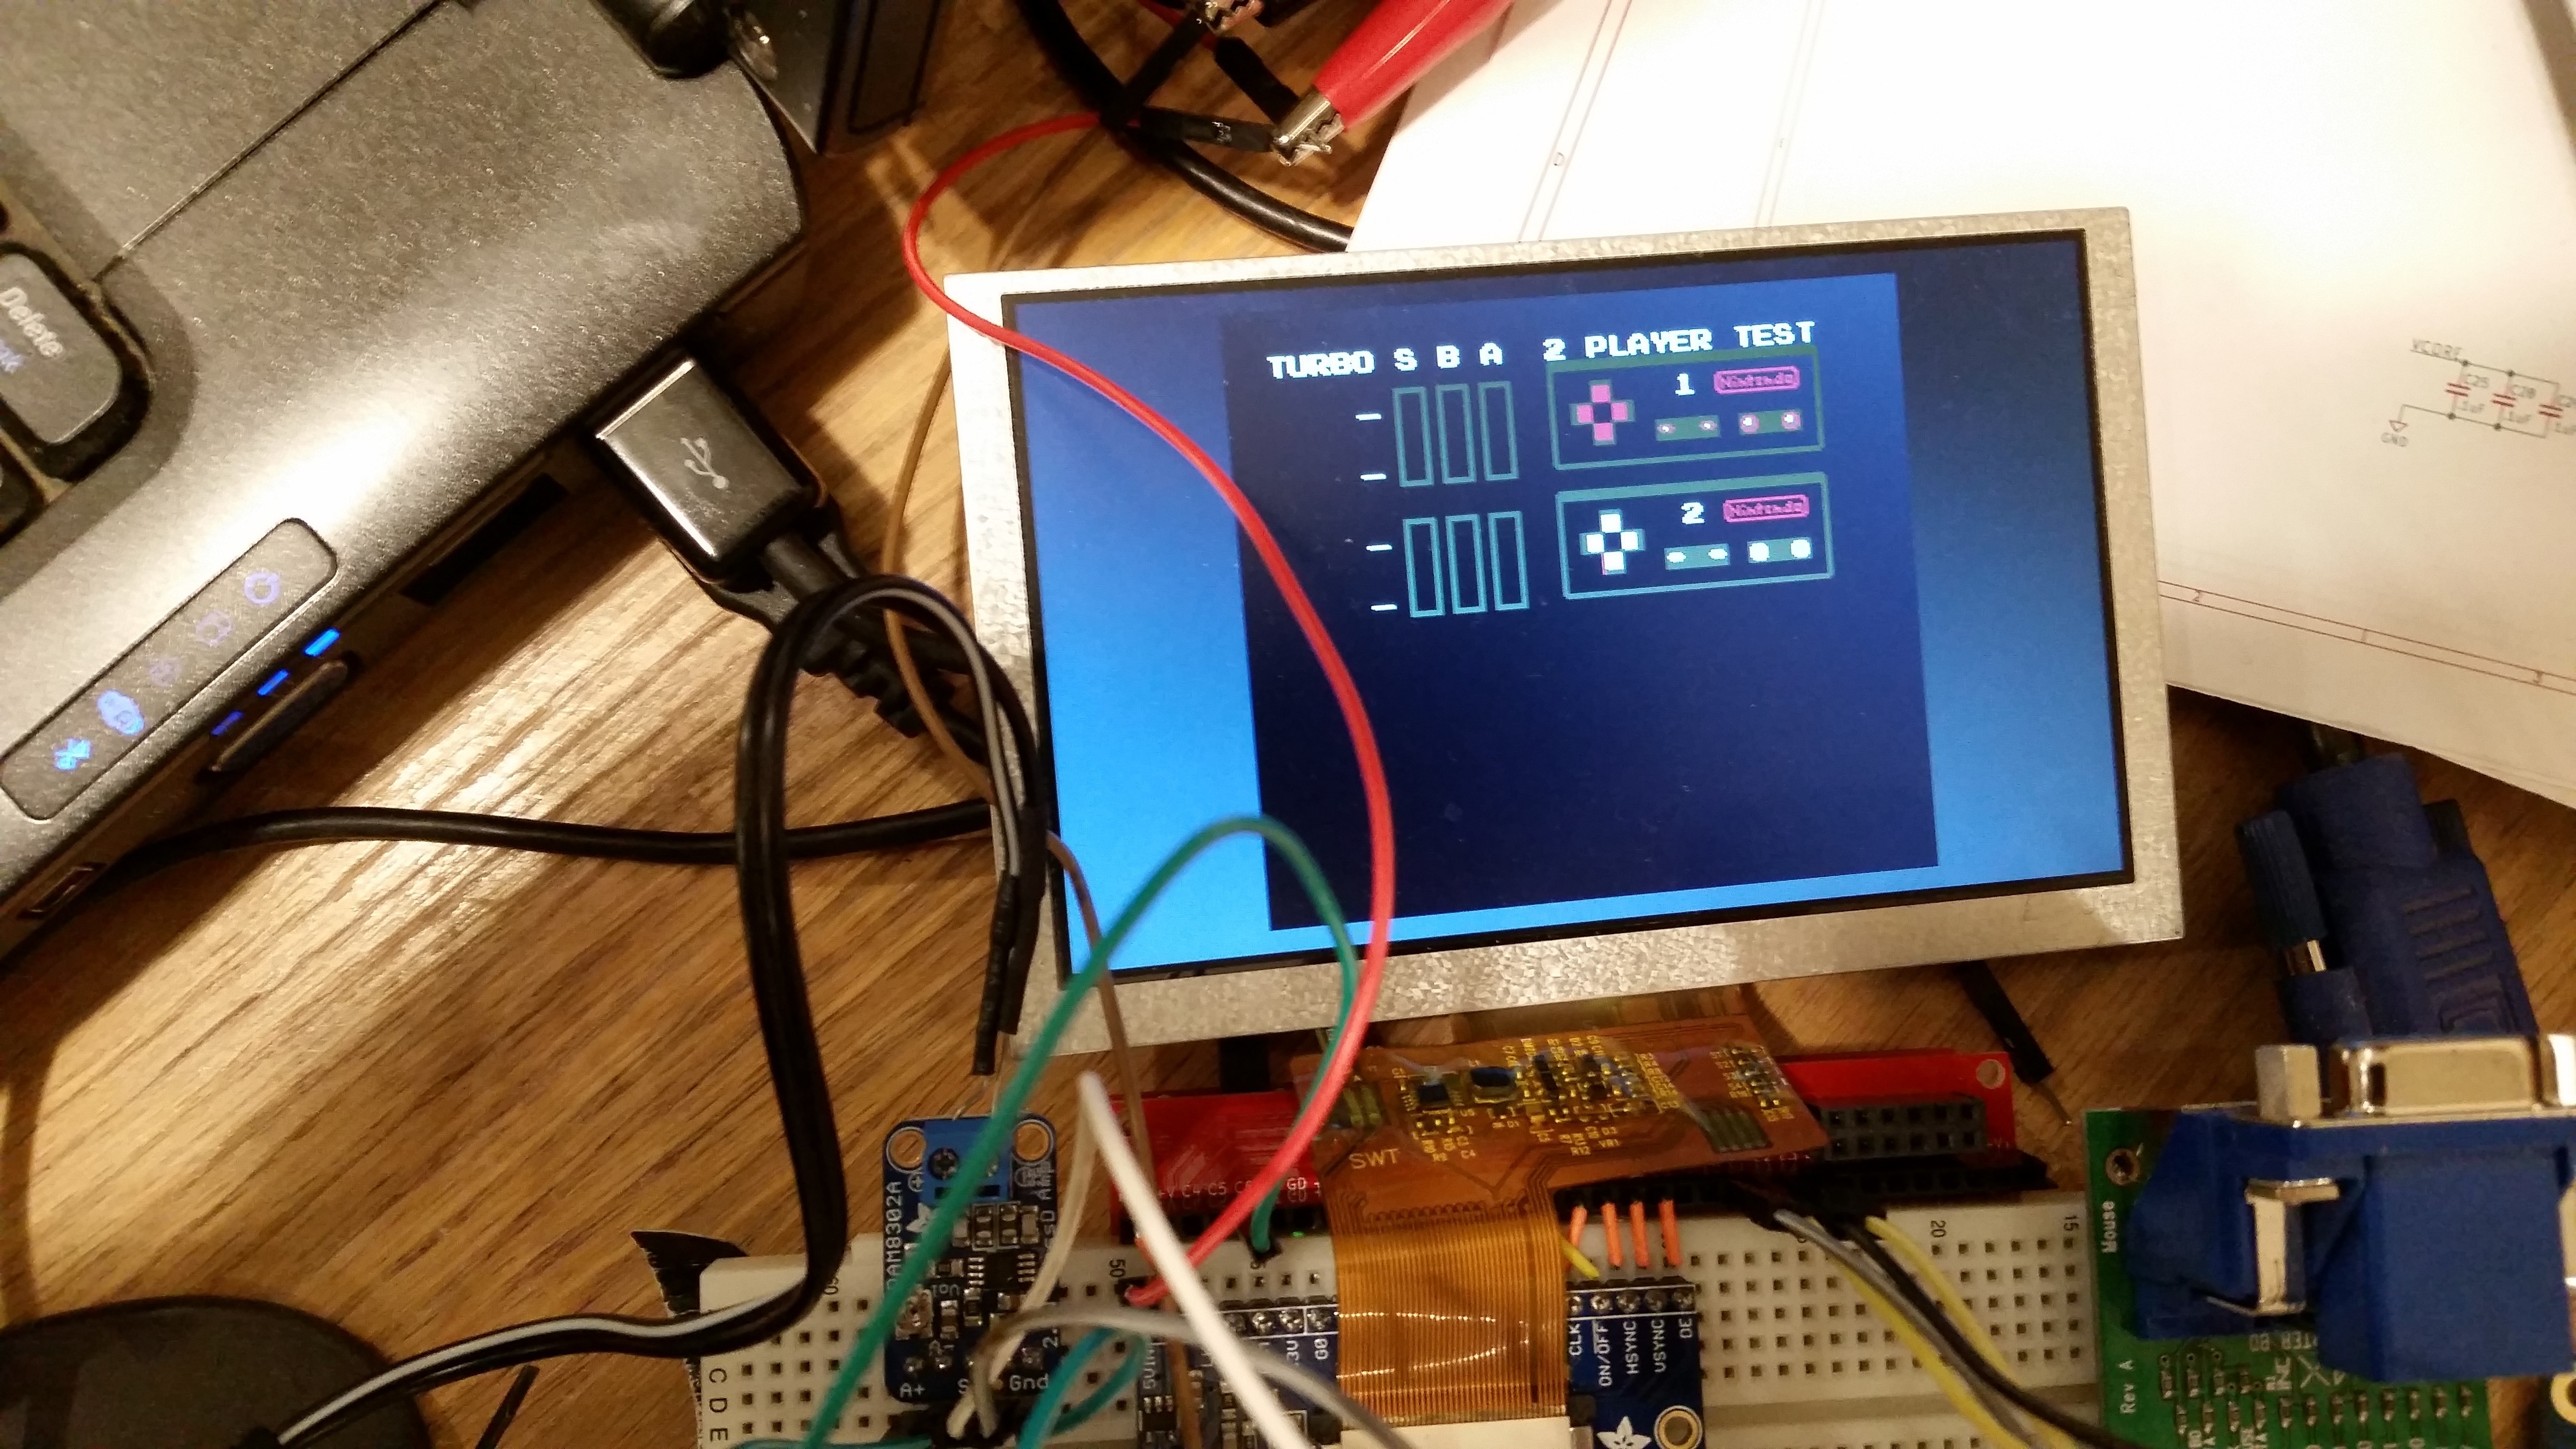
    For the audio, I used an Adafruit PAM8302A amplifier board to run the sound output to an old pc speaker. The last piece I needed was the controller. The project was setup to use an original NES controller, which I didn't have. I decided to try and build my own controller on a breadboard and get it working that way. The actual build of the controller was pretty simple, I just arranged some tactile buttons with pull down resistors on a breadboard in a way that resembled an NES controller. 

    The inner workings of an NES controller are fairly simple, basically the 8 buttons are hooked to a parallel to serial shift register which is mapped to the memory location $4016. Writing to that address latches out each individual button state. In my controller module i have 2 8 bit registers to hold the state of my buttons. Whenever $4016 is read the bits are shifted out one per clock cycle onto the data bus. To test the controller out I found a Controller Test rom online that was simple to use. It basically just lights up the buttons as they're pressed.

    Here's the finished prototype:

View all 6 project logs

Enjoy this project?

Share

Discussions

Phil wrote 03/19/2019 at 09:07 point

love it !!!

Unfortunately there are a lot of  (expensive) parts to buy and solder together... do you think there is any chance to port this great project to a DIPFORTy1 "Soft Propeller" with Zynq (https://www.xilinx.com/products/boards-and-kits/1-oz8bqb.html).  You don´t need the Propeller Mini and the external SD Card Slot. I think it will get tiny enough to put it in a nice case.

  Are you sure? yes | no

owszem wrote 02/03/2019 at 15:24 point

Very interesting

Meybe inne future create kickstarter campaining like clockworkpi and Linux console

  Are you sure? yes | no

Srinivas Nistala wrote 08/11/2018 at 22:12 point

Nice

  Are you sure? yes | no

kimo_wbas wrote 03/12/2018 at 20:16 point

nice man 

can i see a code ??

  Are you sure? yes | no

Jon Thomasson wrote 04/03/2018 at 22:59 point

thanks! I posted the code in the github repo.

  Are you sure? yes | no

Wenting Zhang wrote 03/06/2018 at 20:01 point

This looks really neat!

  Are you sure? yes | no

Jon Thomasson wrote 03/06/2018 at 21:02 point

Thanks! 

  Are you sure? yes | no

Similar Projects

Does this project spark your interest?

Become a member to follow this project and never miss any updates