-
A very late update
08/29/2018 at 06:32 • 0 commentsA few updates...
- We're going to try for the Microtransat Challenge as a stepping stone to going all the way around.
- We've been sailing a few times since our last update. Our current wings are a bit on the heavy side, and their centers of gravity are high. This drastically limits the sort of wind we can sail in, which really cuts into our testing opportunities, and slows us down.
- We've made huge progress on software -- check out our Github for details.
- I've done some talks about the boat, including at MakerFaire Bay Area 2018 and Toorcamp 2018. Check out the slides at our blog. I'm trying to find video of the Toorcamp talk, but no luck yet.
- Over the past few months, we made a set of molds for the wings for the Microtransat boat. I'm a little dissatisfied with them and I'm having a hell of a time making the pivots we designed, so they may turn out to be a failed experiment. We shall see.
-
Under Sail
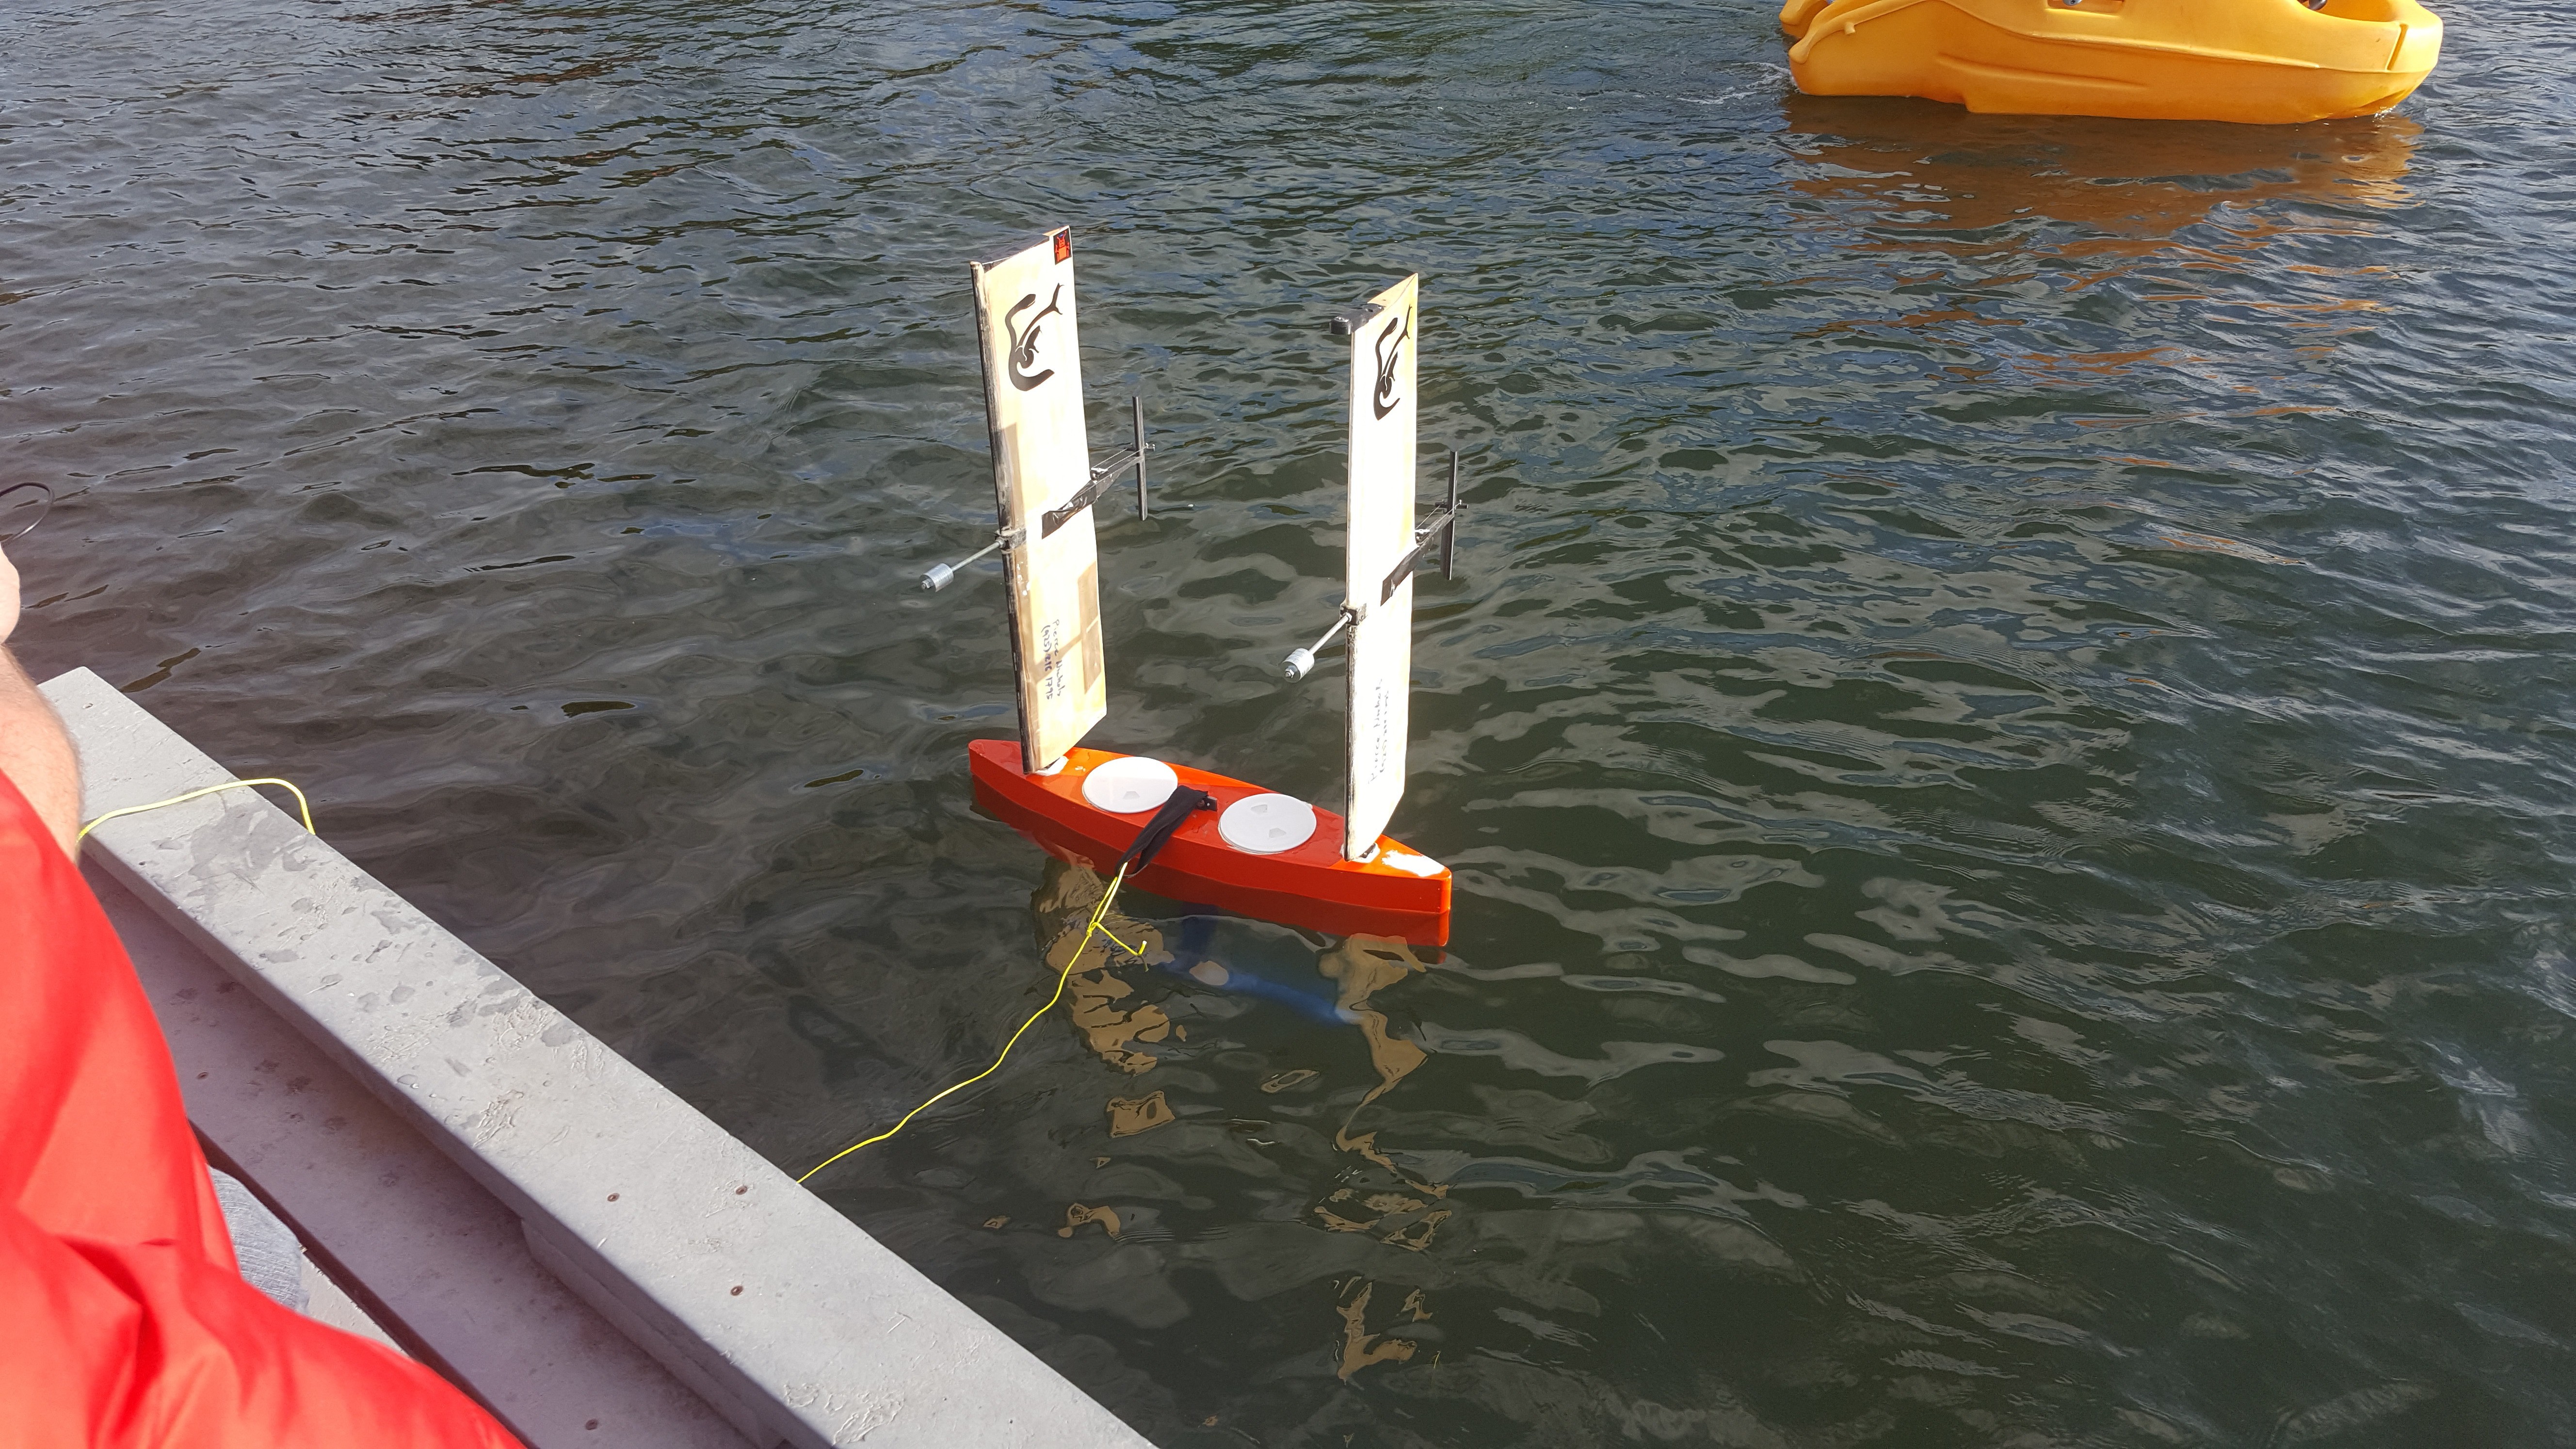
10/02/2017 at 03:19 • 0 commentsDue to some last minute wind, we were able to get the boat in the water today and do some quick sailing tests.
![]()
We did get the boat moving under sail power. However, doing so in a predictable and readily controllable manner is going to take some more work. The tether you can see in the above picture turned out to be invaluable.
The most obvious problem is that the tails are not big enough to reliably control the inertia of the sails in relatively light and variable winds, like we had today. There are two approaches to this problem -- lighten the wings and make the tails bigger. These sails are the weight they are and that's not going to change until we build the next sails (already in process). We can always print some larger tails, and plan to do that ASAP. -
Updating updating
09/08/2017 at 15:34 • 0 commentsThe detailed description is woefully out of date, so I am updating it in stages. Then I'll write a nice long log about all the fun we've had with sails. If you don't want to wait for all that, come to Seattle Mini Maker Faire next weekend (Sept 16-17) and ask us in person! You will also have the opportunity to sail our demonstrator boat while it's safely attached to a turntable.
-
Dead motor, dead batteries, on to sails!
07/31/2017 at 20:40 • 1 commentAnalyzing the data from our last test and some motor experimentation has made it clear to me that both our batteries and our motor are toast.
First, the batteries are nine years old. From the test experience and the data, I was pretty sure they were toasted. I took them in to Batteries Plus for testing, and they smoked during the load test. So they're done. Luckily, the guy who donated the first set has a second set available for us, so that's not a show stopper.
However, the motor is dead. I suspected after we weren't able to get the speed we expected out of the boat during our last test that it had the wrong prop on it. Trolling motors are generally propped to drive a heavy boat slowly, so with the lighter and faster boat, it just was not up to the task. In order to properly size a new prop, I had to measure the motor constant.
Sadly, I don't have any picture of my setup -- I was using an IR diode with an IR remote receiver mounted in a breadboard and the prop as an interrupter. I drove the LED at the required 38 kHz with an Arduino. I measured the back EMF with a multi-meter and the pulse rate out of the IR receiver with my Saleae. I chucked the prop nut into a drill to drive it. I measured the Kv just fine -- 420 RPM and 2.5V for a Kv of 168 RPM/V, pretty much as expected from online discussions.
I then went to measure the DC resistance through the motor. Nominally, this motor draws 30A @ 12V when at full throttle. I expected a DC resistance commensurate with those numbers. However, I measured 10 ohms. This means the motor is most likely dead. This would explain why the boat slowed down dramatically in the last half of the test.
A new trolling motor would be about $100. However, we decided that it's long past time to make sail development our highest priority, because that's what's going to get us around the world. We filled and sanded the first wing this past weekend, so it's just about ready for paint and final electronics fit. The second one is waiting on its leading edges for final assembly. We'll go back to power if we really need it for something, but for now, we're a sailing operation from here on in. -
Successful Test!
06/12/2017 at 05:03 • 0 commentsWe took the boat out for longer and farther than we ever have before. The boat successfully ran a set of waypoints and demonstrated virtual anchoring. We were going for a second run of our waypoint set when the boat started to slow down. We thought at the time that it might be due to a declining battery, but hand measuring the cell voltage before and after the trip casts some doubt on that idea, especially since we were only out for about half the time the batteries ought to last. Once i dump the boat data I can graph the motor current and voltage and see where we're really at.
-
MFBA2017 Slides
05/24/2017 at 15:40 • 0 comments -
MakerFaire Bay Area 2017
05/19/2017 at 06:10 • 0 commentsI'll be talking about Project Ladon at MakerFaire Bay Area this Sunday at 3:30 on the Make: Show and Tell stage. Drop by and say hi! http://makerfaire.com/maker/entry/60458/
-
2017 Apr 09 Autonomous Test
04/18/2017 at 04:24 • 0 commentsWe took the boat out on the water for a test the weekend before last. Check out our blog post with details, including maps: http://www.hackerbotlabs.com/2017/04/hackerboat-autonomous-test/
-
3D Printed Sails
02/15/2017 at 22:38 • 0 commentsCode for the big boat has been taking up most of my time, but in the mean time I've still been working on the sails for the little boat.
The original sail design didn't work -- I couldn't get enough weight on to balance it against the overly long lever arm. The airfoil shape is also not great, because my first shot at hot wire cutting and using heat shrink film didn't turn out so well.
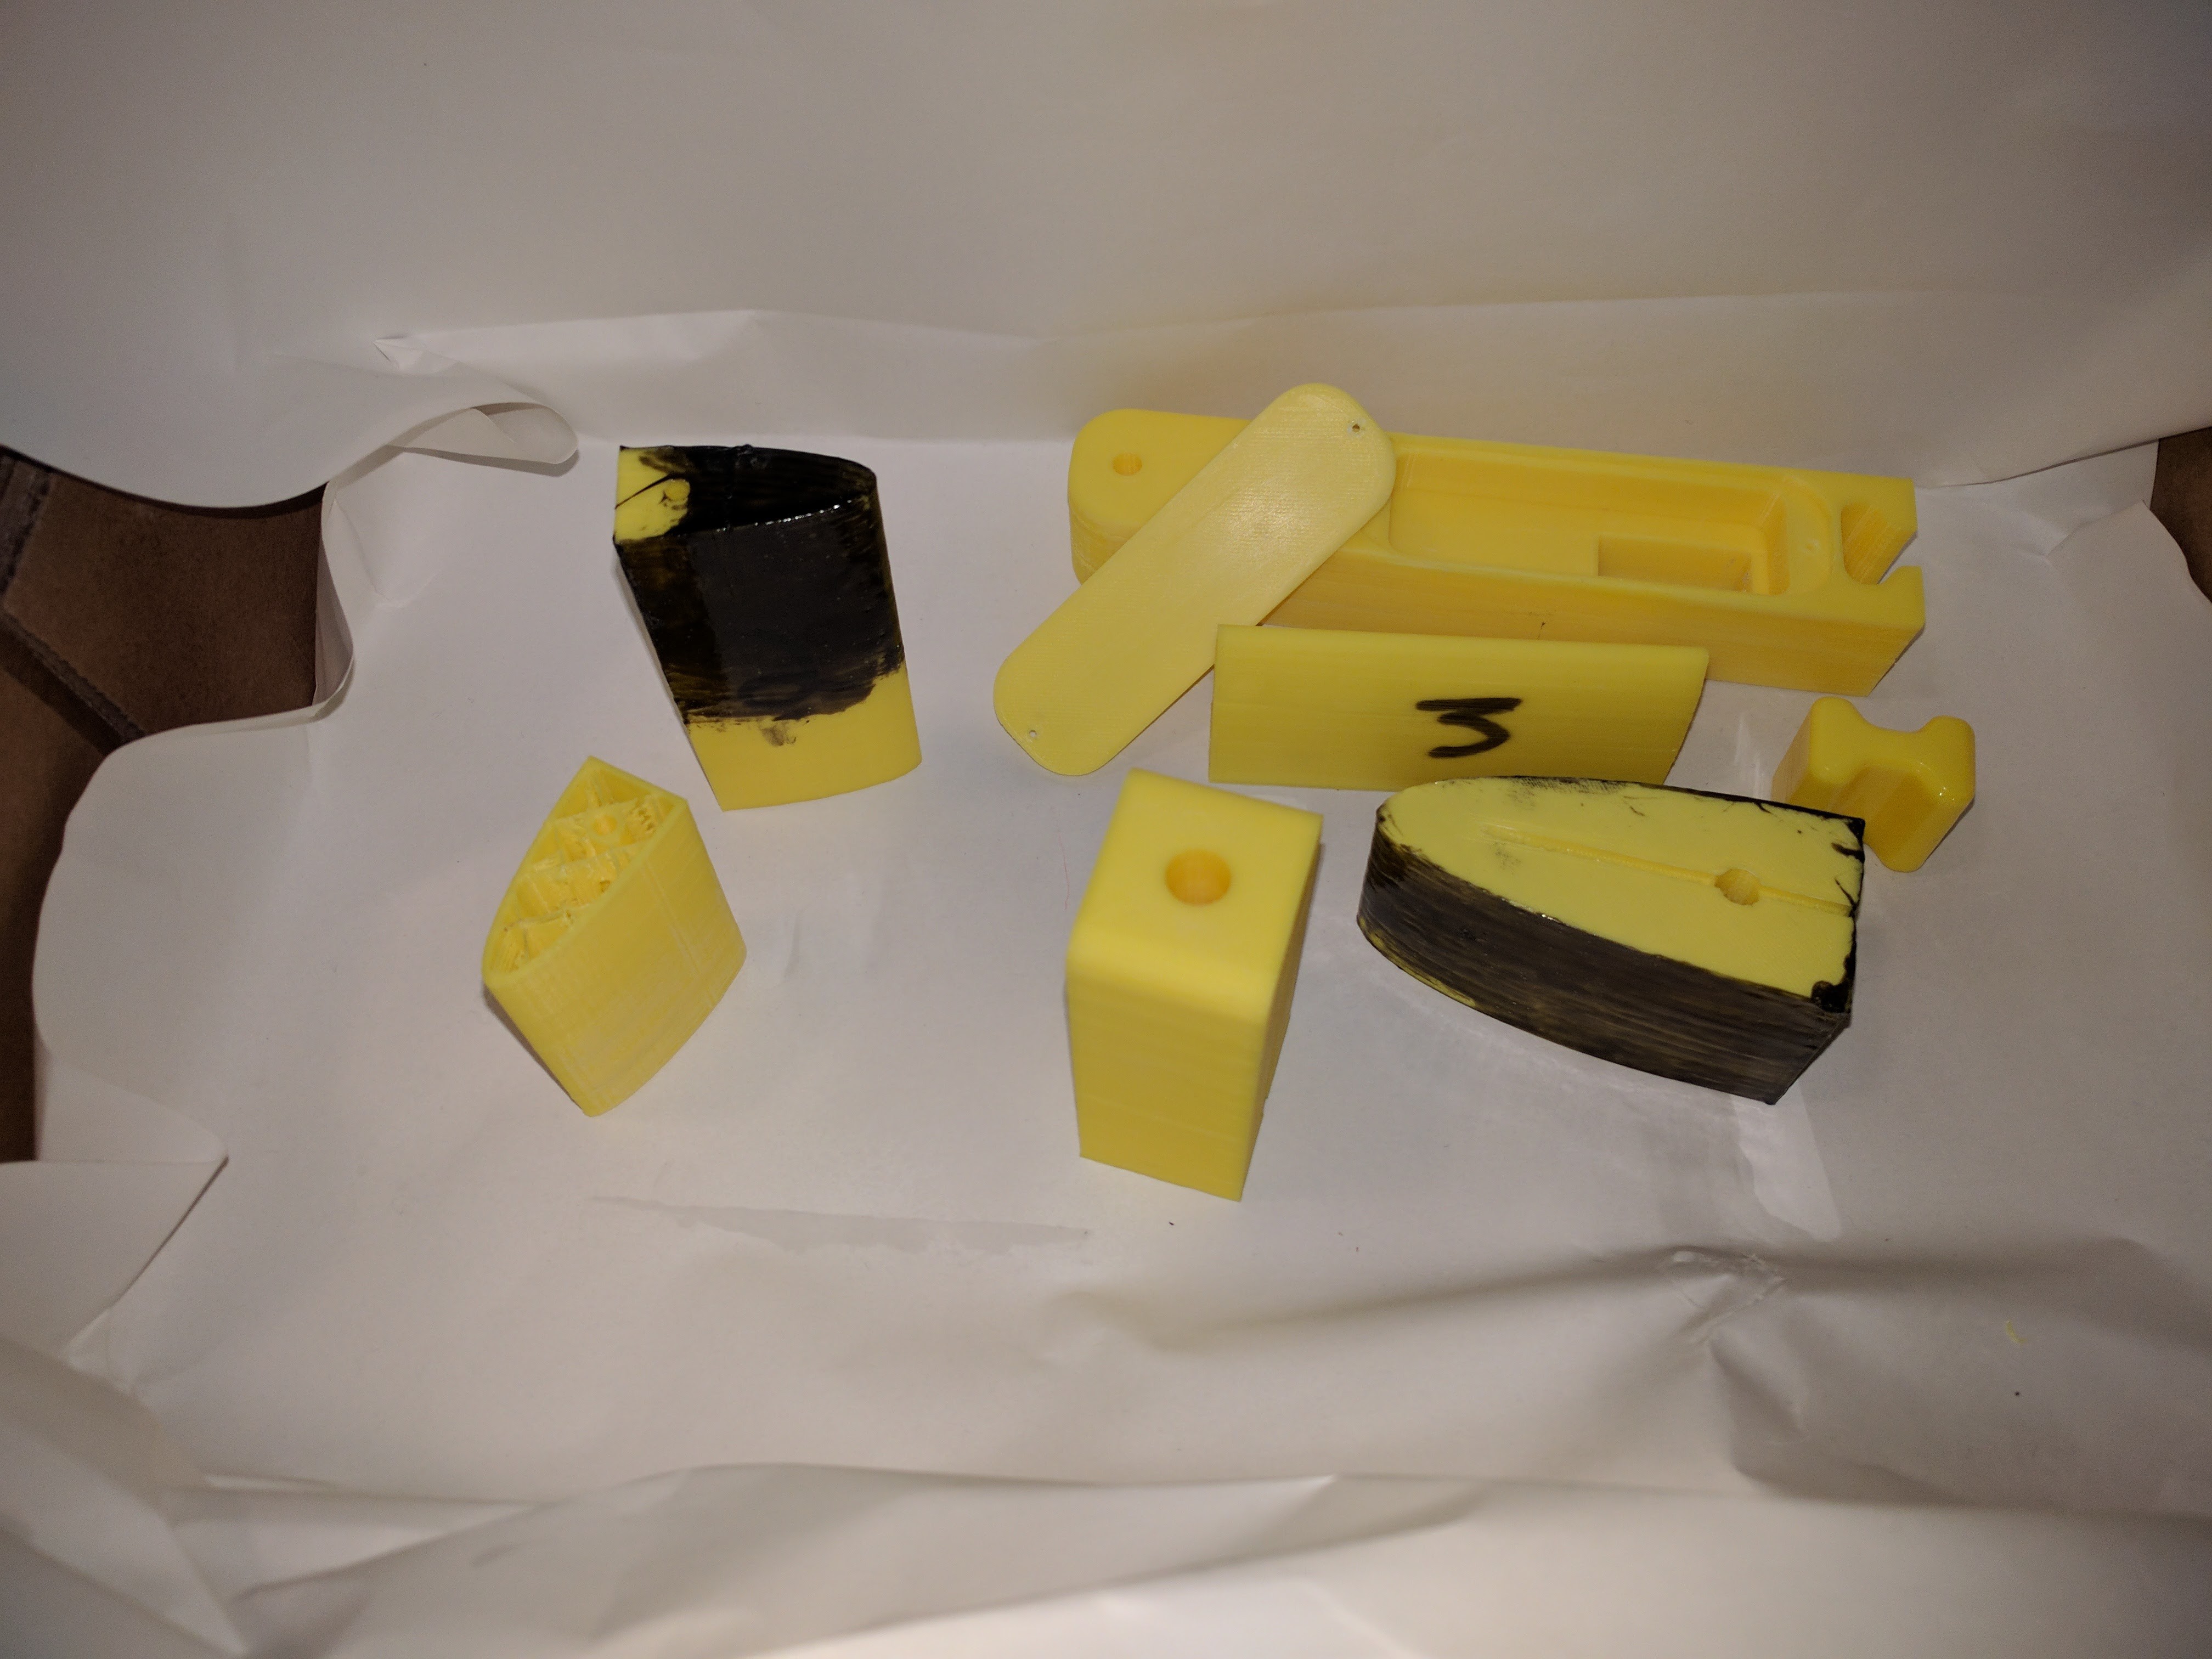
As a result, we're working on some new wings. One of the ideas I am pursuing for them is 3D printing in ABS. To that end, I've acquired a 3D printer (one of the $300 Monoprice ones, if you're curious) to help with building the next set of test sails for the little boat. The printer has largely worked very well, especially for the price, but the delamination was awful. I solved that with a quick box made of pink styrofoam panels and hot glue. It's neither pretty nor clever, but it works. It's just five 2'x2'x1" project panels hot glued together.
Putting the printer on the concrete floor rather than the rickety table helped as well. Here's some of my test prints:
![]()
The dog-bone was printed inside a box and then finished with cold acetone vapor, which works amazingly well. The black coating is black ABS dissolved in acetone and painted on. It works, but it's heavy. This was part of my original thought, which was to 3D print everything except a spar to hold the whole thing together. I don't think this is the right way to go, because it will take approximately forever and a day to print the whole damn thing.
Luckily, Autodesk just ported Slicer over to Fusion 360, which makes it simple to turn a solid body into a grid of laser cut pieces. I can then skin that with either very thin plywood or heat shrink film. I will probably go with the plywood, because I think I can apply that with a thin film of glue and heat shrink tape acting as a poor man's vacuum bag.
-
Software Update
01/25/2017 at 16:31 • 0 commentsI just realized we haven't posted an update in a while, but I promise we aren't dead -- we've been working on software. Check out the network graph on our github (all the recent action is on the new-hardware branch): https://github.com/JeremyRuhland/hackerboat/network
We had a solid in-water test in October that verified the new electronics work well and that we can drive the boat around by remote control and that it will steer to a course on its own.
Most of the recent action has been filling out the various boat states and writing unit tests for everything. Just writing the tests has kicked up lots of bugs that have been duly fixed and make me far more confident of our code than I was before.
Along with the other changes, we've just acquired a Beaglebone Green Wireless as our latest brain. This has built-in wireless (replacing the HDMI) and a built-in four port USB hub (replacing the Ethernet). Since we're not currently using either of the deleted peripherals, this is nothing but win. We now have an on-board port free to plug in the AIS and three spare ports for other instrument or harddrives. On the around the world boat, we're planning to plug in three external harddrives and arrange them in a RAID array for storing mission logs and photos.
However, I discovered a little wrinkle. The BBGW uses the eMMC pins for the wifi module. This is a problem because in a bout of thick-headedness I double-booked those pins to drive the throttle relays. That means that I can't use it on this hardware revision. Another kick in the ass to get the next revision going.
The software to the point where we are ready to do some waypoint navigation testing. The gating item right now is getting a day that works for the whole team and when we have access to a powered chase boat. Paddling along in a kayak isn't going to cut it for the waypoint following, especially in the middle of winter. Falling into Elliot Bay would be a very, very bad thing at this time of year. The second weekend in February is looking good.