-
More Hardware and Software Progress
09/14/2016 at 05:55 • 0 commentsFirst, Seattle Mini Maker Faire is this coming weekend at EMP (Sep 17/18). We'll be showing off the Hackerboat outside near the monorail -- please come by and take a look at the boat in person!
![]()
Second, we created a Patreon account to help raise money for the boat. Please donate!
![]()
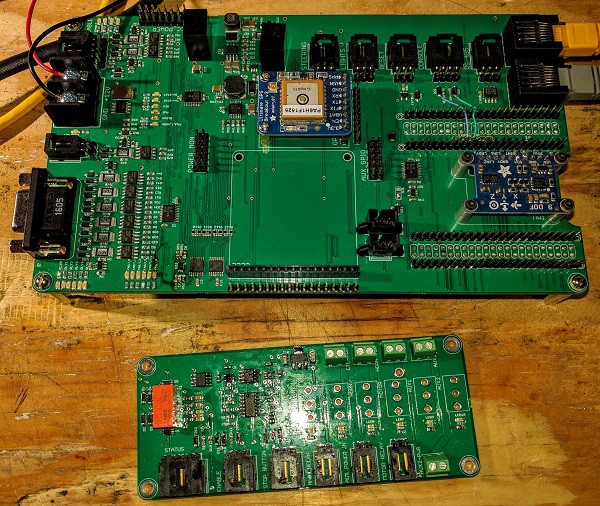
I finally got a chance to assemble the power distribution control board assembled. I haven't mounted the switches, since I am going to solder them to fit once the whole thing is mounted in the dry box. Here's a picture of the two boards together:
![]()
The distribution board manages the question of whether the boat is armed or disarmed with a latching relay, which is the orange bit on the left of the image. Most of the rest of the circuitry on the board is a pair of timer circuits to debounce the emergency stop button and to require the operator to hold down the arm button for a substantial amount of time before the boat is armed. This board also cuts the motor power as soon as the emergency stop button is engaged, which should make things a bit safer.
The software is coming along -- have a look at our Github for the latest progress. It's mostly a slog at this point, but the end is in sight, at least for the main code. I still need to write proper unit and functional tests so we can assure ourselves that it a) works and b) we can change up the code as necessary in the future. In other words, all the benefits of having solid unit and integration tests.
We'll probably do another launch the weekend after Makerfaire to test the RC and compass subsystems, as well as gather some more video for a proper Patreon video.
-
New Hardware
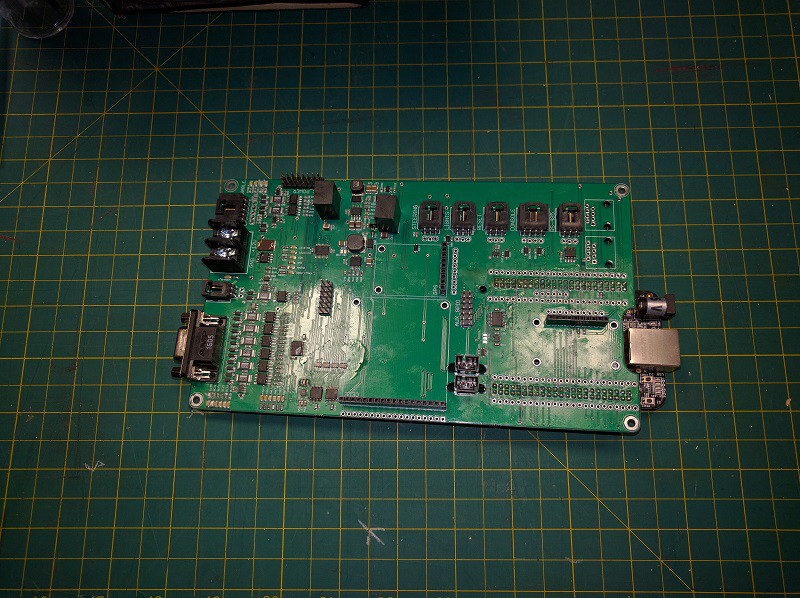
08/28/2016 at 17:39 • 0 comments![]() I've got the new control board mostly assembled. USPS mis-delivered my stencil (my regular mail carrier was on vacation, and her sub was not too bright), so I did this with Nick's solder paste dispenser. It really is a magical tool, but you do need to make sure you have extra dispensing needles on hand and your solder paste is in good shape, otherwise you get clogging problems and that sucks.
I've got the new control board mostly assembled. USPS mis-delivered my stencil (my regular mail carrier was on vacation, and her sub was not too bright), so I did this with Nick's solder paste dispenser. It really is a magical tool, but you do need to make sure you have extra dispensing needles on hand and your solder paste is in good shape, otherwise you get clogging problems and that sucks. -
Toorcamp 2016 Video and Update
08/26/2016 at 14:36 • 0 commentsAlex put together an awesome video of my talk at Toorcamp 2016, combined with some video of our launches this summer.
I also wrote a bit about the major hardware overhaul that we've been working on over at the Hackerboat blog.
Please come see us at the Seattle Mini MakerFaire, Sep 17-18 at Seattle Center. I will also be at XOXO Fest down in Portland the weekend before. If you are going to be there, ping me on the festival Slack team and say hi!
-
24 July 2016 Launch and next steps
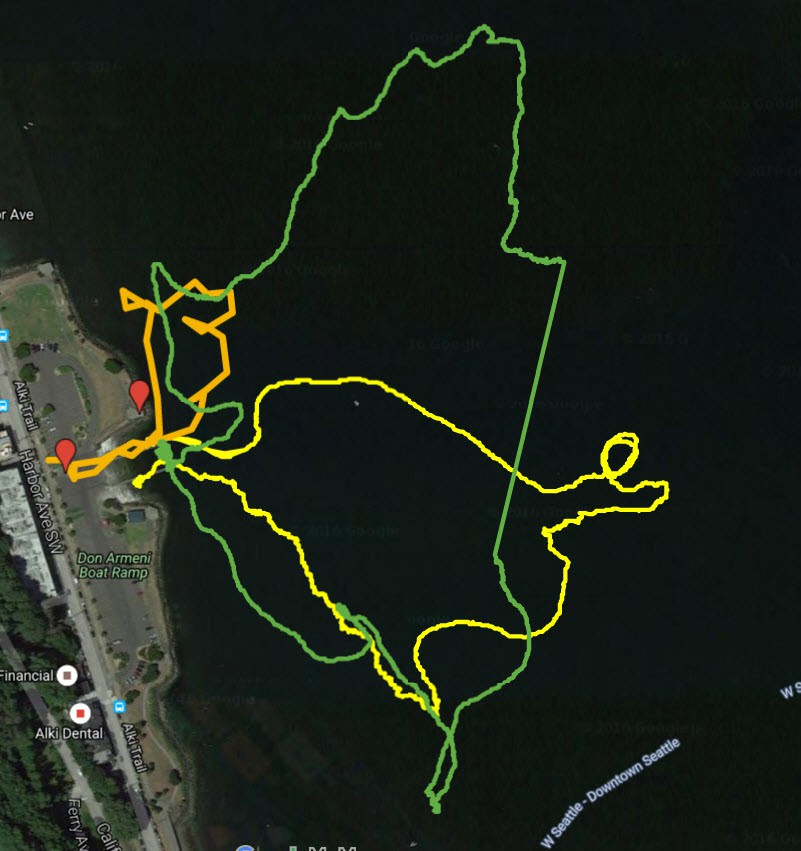
08/11/2016 at 03:11 • 0 commentsWe got back in the water on July 24th, and it was our best test yet. We got the boat steering straight and we got enough data to figure out a speed/current draw comparison which will enable us to plan longer missions. We even returned to the dock under power! You can see all of our tests at Don Armeni overlaid here:
![]()
The green line is our latest test. I marked our old shore station site and our new one out on the point. However, we consistently lost our ship to shore link at a bit less than a quarter of a mile and had to be towed back into range by the safety boat. This isn't really enough for any of the serious testing we want to do, so it's time to rework things.
Our current electronics are getting a bit long in the tooth, and it's becoming increasingly clear that having both the Arduino and the Beaglebone is making things more complex than they have to be. Therefore, we've redesigned a pure-BBB version of the hardware, and we're starting to rework the software to match it. You can see our work to date on our new hardware branch.
Beyond the deletion of the Arduino, there are two other major architectural changes. First, we're modifying the boat to call a control server that serves out the interface rather than serving the interface itself. The biggest benefit of this is that we don't have to figure out how to set up a cell phone or satellite link to run a local server. The boat can then phone in on a schedule. This gets us much closer to an architecture suitable for open ocean work. In the short term, this means we can use a portable cell hotspot for our ship to shore work.
Second, we're going to use COTS R/C gear for our in-shore control work rather than the long-range communications. Many modern R/C controllers support something called S.BUS, which transmits the control signals from the receiver as a serial stream (at 100 kbps 8E2, just to be weird) instead of as a series of separate PWM signals. This makes the interface that much easier. The Turnigy 9XR Pro plus an S.BUUS compatible transmitter/receiver pair plus a battery cost only $140, and the software is open to boot, so this should work well for us.
In addition, we're planning to store waypoints and paths directly in KML format and maintain them using Github. This has the added advantage of providing a tamper-evident record of our location and waypoints, which is good for autonomous sailing competitions. There's a pile of stuff to implement for the new hardware, and we could really use some help writing unit tests and implementing various classes. If you are interested, take a look at the unimplemented headers in our new hardware branch and grab one to implement.
-
Maps and Preparation for the Next Launch
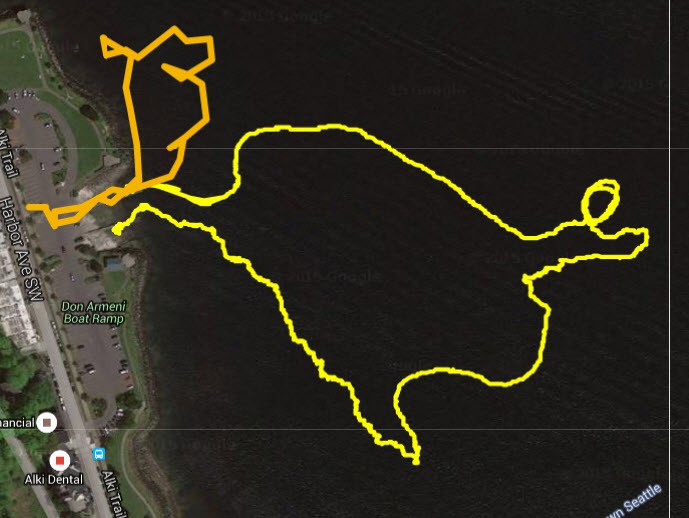
07/16/2016 at 17:55 • 0 commentsI wrote a quick gawk script to parse the GPS log file and turn it into a KML. The orange line on this map is our launch last October and the much longer yellow line is last month's launch.
![]()
As you can see, our steering is not locked down, and that's because we're still controlling it from the command line. While this is all nice and hackery, it's no good for precision steering. A longer blog post on software/hardware architecture is on my priority list but seems to keep falling behind working on getting the software working.
We had a GoPro strapped to the antenna mast pointed at the boat during the last launch; I'm going to see if I can put that up on YouTube RSN.
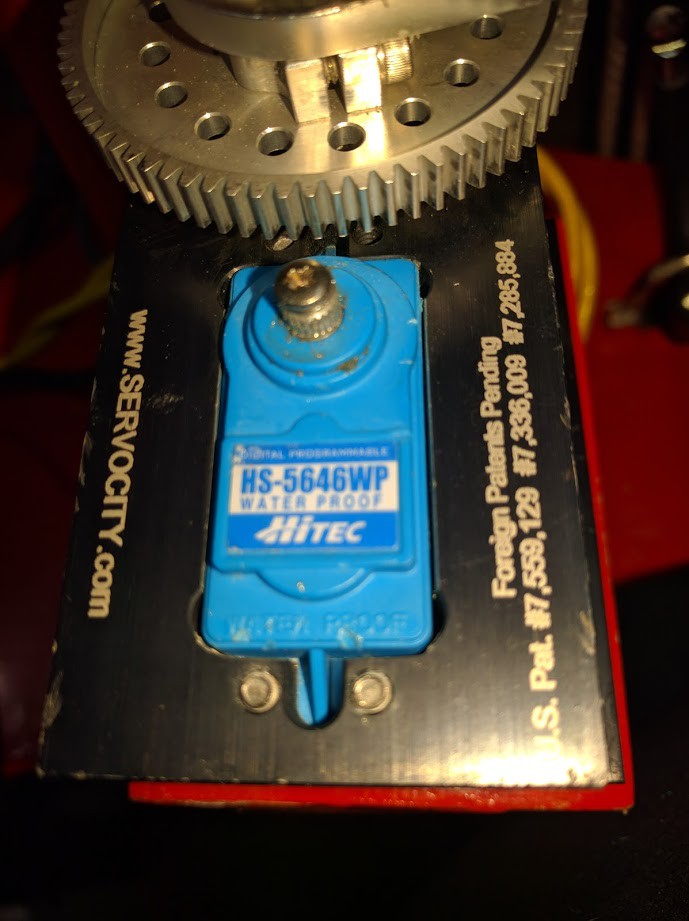
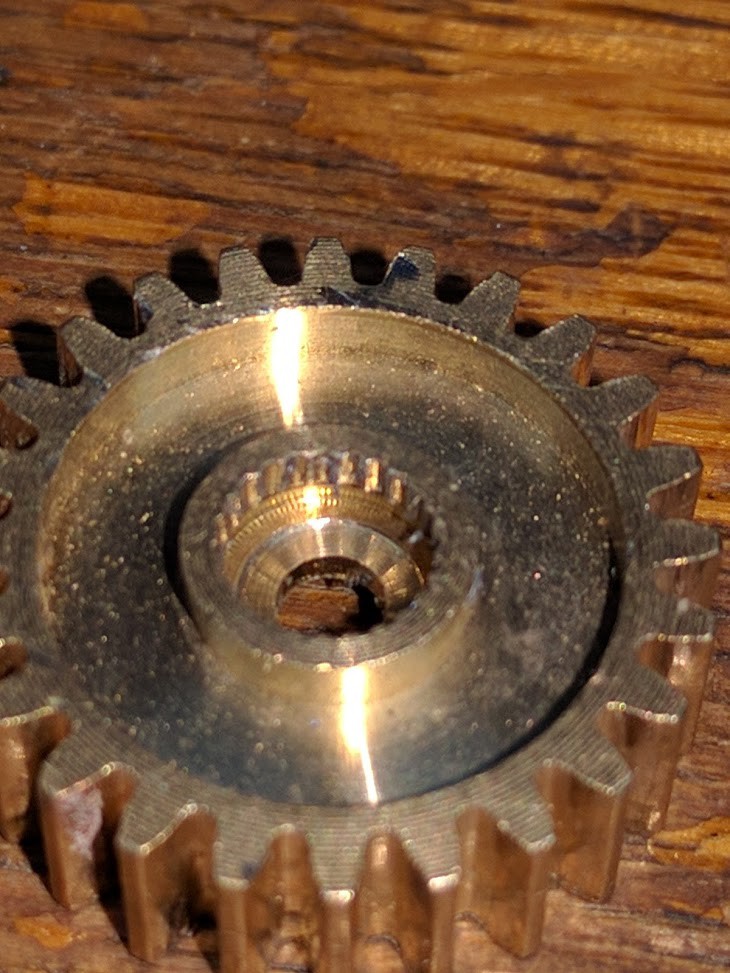
Our plan had been to launch this weekend, but we had a couple of problems. First, one of our core team members is recovering from a nasty cold. Second, the splines on the servo output of our steering gear stripped. The brass spur gear definitely stripped and the steel output splines on the servo don't look great either. I'm ordering replacement parts for both so we can try again next weekend.
![]()
![]()
We're also working on designing a launch cart so we don't have to manually haul the boat down the launch ramp. It's not going to be anything fancy -- just a way to attach four HarborFreight wheels to a frame that will hold the boat and not collapse. There will be pictures when we're finished with it.
Once we have the software nailed down to at the least the point where we can do the JS control and basic waypoint navigation, we will pull the trigger on our control hardware update.
-
25 Jun 2016 Launch
06/27/2016 at 01:41 • 0 comments3ric shot some video from his drone. More update later.
-
Media Roundup
06/19/2016 at 00:52 • 0 commentsOur trips to MakerFaire and Toorcamp has gotten us a bit of media coverage.
Hackaday's Mike Szczys interviewed me at MakerFaire.
Adafruit did a nice video roundup on Toorcamp. Hackerboat starts at 1:33:
And finally, TWiT interviewed me for their San Mateo MakerFaire 2016 coverage. Hackerboat coverage starts at 23:30, and I can't seem to embed it.
-
Hackerboat at Toorcamp 2016
06/16/2016 at 06:05 • 1 commentToorcamp 2016 was awesome, as always. Many thanks to the whole awesome crew that puts it on, and to Doe Bay for hosting it.
First, a quick overview -- we put the boat in the water and it remained upright. However, we had a bad WiFi dongle so we were not able to do much more with the boat. I gave a talk about the boat on Saturday afternoon.
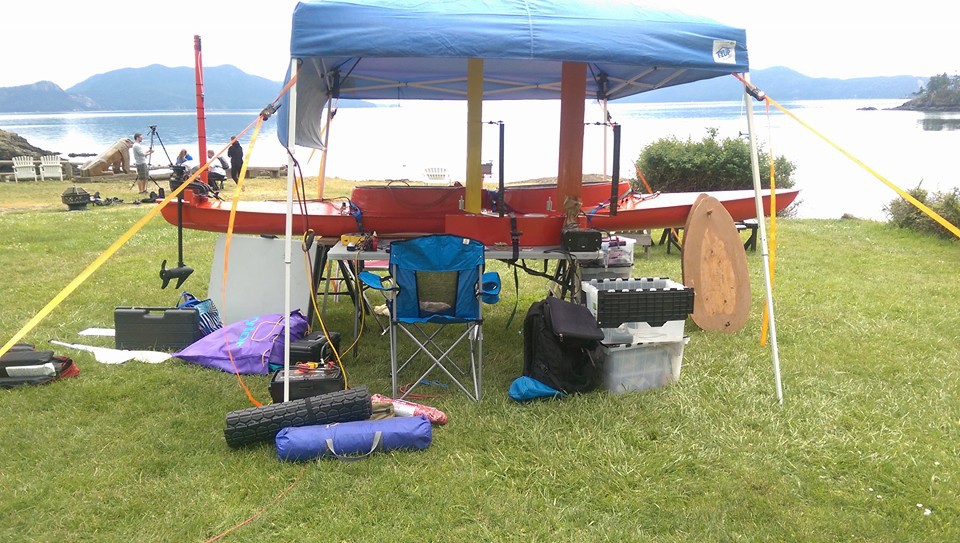
Doe Bay was the best location yet for the best Toorcamp yet. We set up the Hackerboat work area/boat storage down near the Doe Bay store, right by the water. Great view, but a little exposed to the wind. Just about everyone came by that area of the camp, since it was also right next to the Social District of the camp.
![]()
I got there first, on Wednesday and got the boat off the truck and set up on shore with the help of some nice folks at camp.
The new software wasn't quite ready for Toorcamp. I always have visions of hacking on awesome shit at Toorcamp, but in the words of Rocky Squirrel, that trick never works. There's too much to see, too many people to talk to, and too much beer to drink. The only substantial thing I got done was creating the slides for my talk on Saturday.
![]()
Jeremy, Alex, Wim, and I got together to discuss what we could do to get the boat in the water on Saturday morning. We discussed rolling back to the software we used last October. However, we realized that the REST interface we used for the Arduino gave us the opportunity to control the boat by SSHing into the Beaglebone and hand-typing commands to the Arduino from there. Command-line robots for the win, or something like that. Very hackery, and enough to let us get some data on motor performance and tune the steering loop constants.
My talk went really well -- I think I held the audience well and got across our goals and where we are in the project. Frank Heidt of Leviathan Security was kind enough to offer a thousand dollars of matching funds, which helped us raise money at Toorcamp -- we left with $1350 we didn't have before, which is going to be a huge help in our near future work. Many thanks to everyone who donated!
We considered putting the boat in the water after closing remarks. However, given the wedding and approaching darkness, we decided to put it off until Sunday. This gave me some time to nail down the procedure for issuing commands via terminal window and fix a wiring error introduced when I 'fixed' the servo wiring the day before. Once that fix was confirmed, the critical hardware was all ready to go. The horn and status lights were not working, but we decided we could do without them.
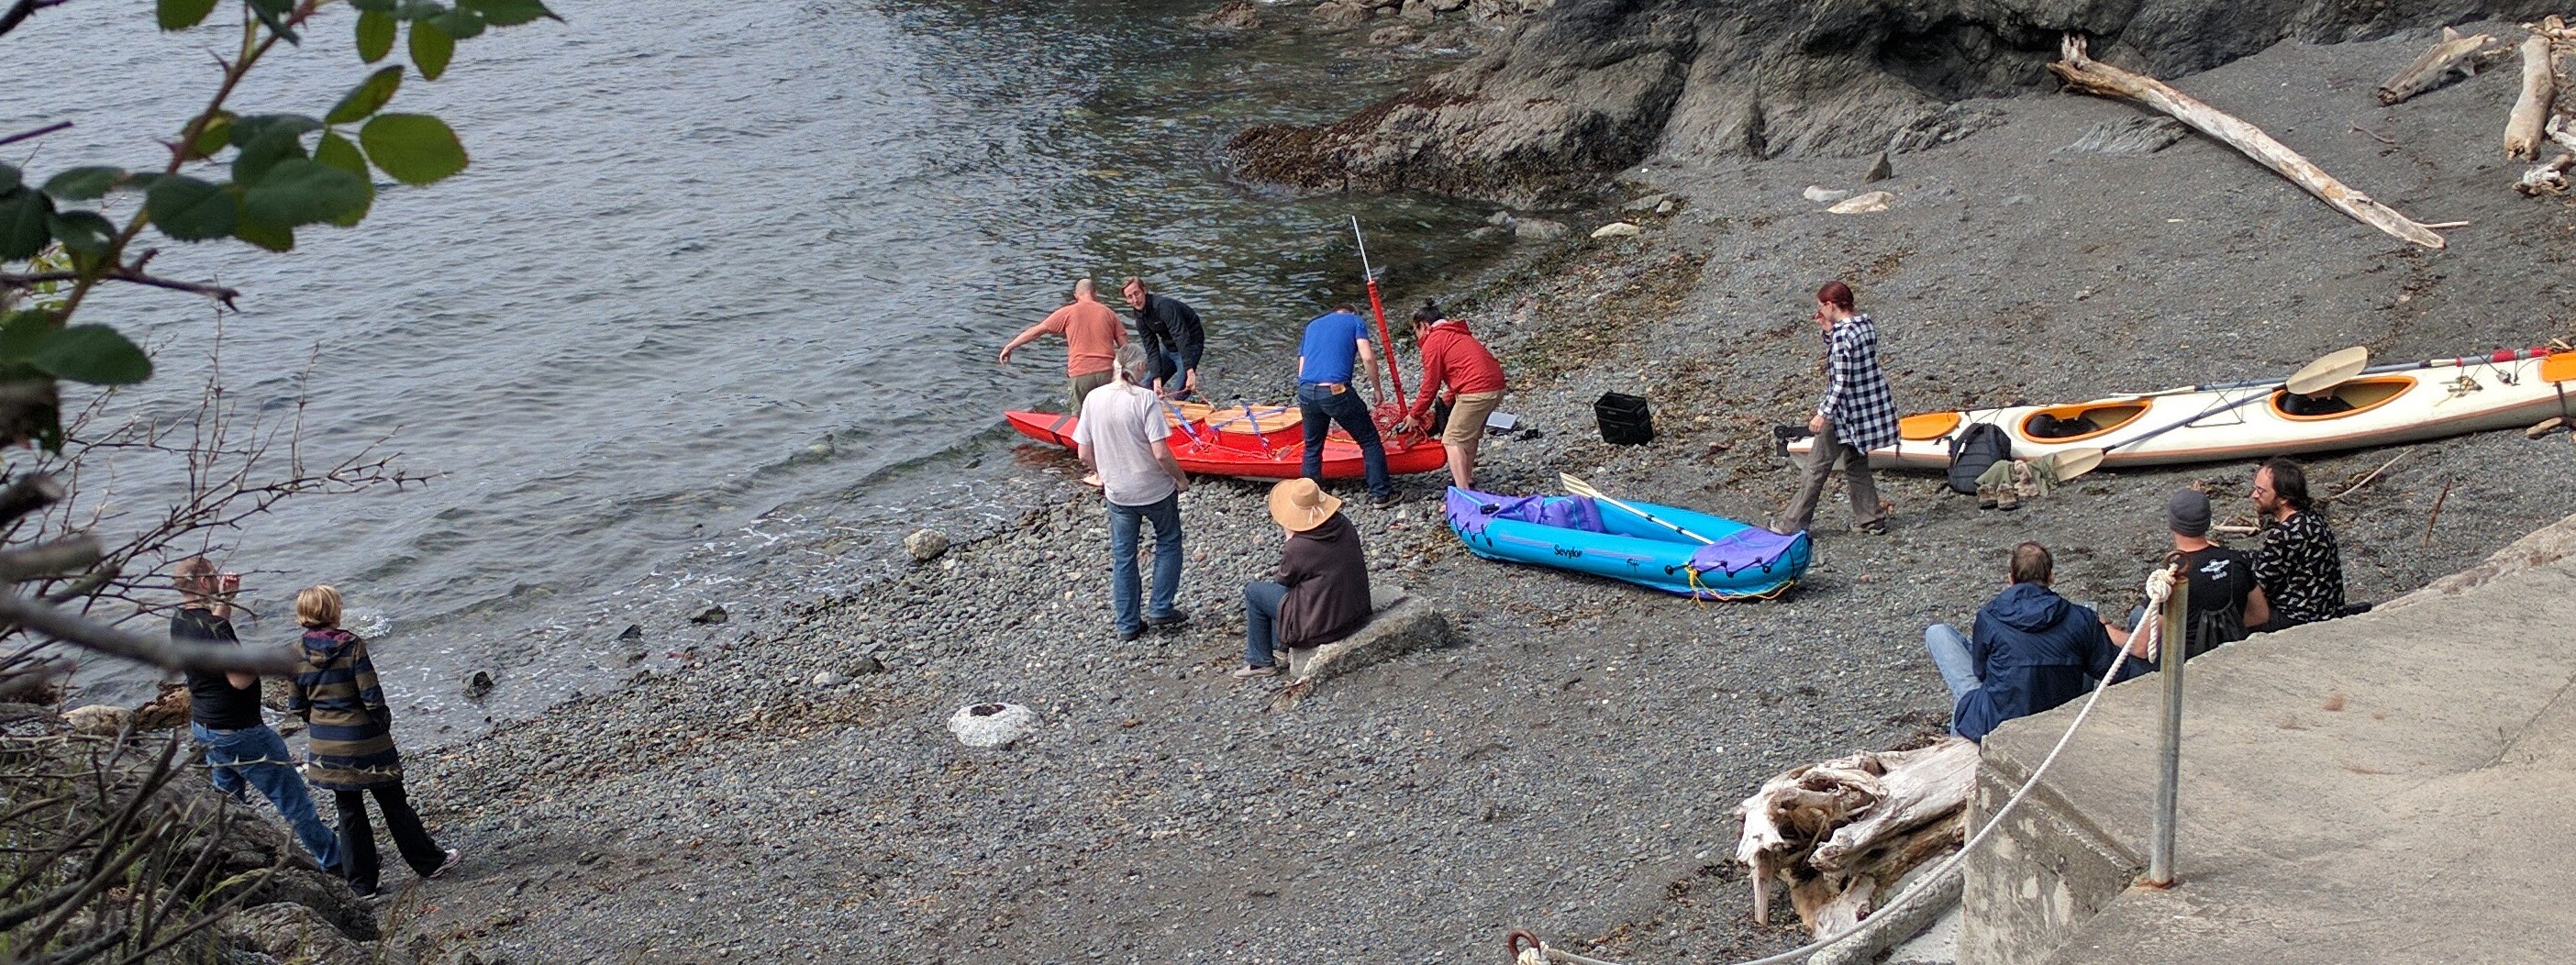
On Sunday morning, we were able to corral a substantial number of volunteers to help carry the boat down to the beach and put it in the water. Alex volunteered to pull chase duty in Jeremy's inflatable kayak. When we powered up the boat, the entire network came to life and things looked great for a good test.
![]()
Pavel was kind enough to loan us an extra HT for communication between the shore and the chase boat. We quickly discovered the the microphone on Jeremy's HT had failed, and Pavel loaned us a handset to use with Jeremy's HT. As soon as we had the HTs working, the wifi dongle that connects the Beaglebone to the radio box failed. We didn't have a spare on hand, so this was the end of test for the day. We've already acquired some better quality wifi dongles to test in its place.
On the positive side, we confirmed that the boat is stable even without the ballast bulb. The rocks on the launching beach managed to break the straps holding it on. While the boat was a little bit tippier without it, it's not in danger of tipping over. This appears to confirm that a big part of our stability problems at the last Toorcamp were due to poor battery retention.
The only reason we're not getting back in the water this weekend is because it's Father's Day on Sunday. Our current plan is to prep for launch this Friday night (25 Jun) and launch the following day from the Don Armeni boat ramp in Seattle.
-
Back from Toorcamp
06/14/2016 at 22:26 • 0 commentsWe're back from Toorcamp! We got the boat into the water, but were thwarted by a dead WiFi dongle. We'll be back in the water the week after next, and a more complete Toorcamp recap will be coming today or tomorrow. Thanks to everyone who donated, and to Frank Heidt for matching funds.
-
Sail Power
05/25/2016 at 01:07 • 0 commentsMotivation
Our existing boat, now named TSV Disputed Right of Way, is a great platform for software, electronics, and sensor development. However, for long ocean crossings, sail is where it's at. My off the cuff explanation for this at MakerFaire is that the wind blows more often than the sun shines. This is generally true at sea, and it's even more true in the waters we need to traverse in order to circumnavigate the globe.
However, sails on an autonomous boat, especially one intended to be at sea for long periods, are demonstrably tricky. The Microtransat Challenge, an autonomous transatlantic race held every year since 2010, has yet to crown a single winner. Last year, none of the competitors even made it to the starting lines. The farthest any boat has covered was 653 km, most of that under shore command. The farthest any boat in the race had covered autonomously as of 2014 was 408 km. The World Robotic Sailing Championships are marked by numerous failures to finish among the competitors. The current record holder for autonomous sailing is the Saildrone folks, who have made it from San Francisco to Hawaii.
We're doing something a little different than most of the robotic sailboats we've found, and that's using a self-tending wingsail, similar to Saildrone. It's a rigid wing, mounted vertically in the boat, and free to rotate. Attached to the trailing edge is a boom with a movable tail that controls the angle of attack of the wing. This allows the control system to set the direction and magnitude of the propulsive force provided by the wing. This only requires a single, small actuator placed well clear of the water. If configured correctly, the actuator can be self-locking, meaning that it does not need power except when moving. The result is, at least conceptually, more durable and requires less electrical power than other options. We're doing Saildrone one better by using multiple sails (two or four) to eliminate the need for a rudder, which is another potential failure point.
Hull Design & Construction
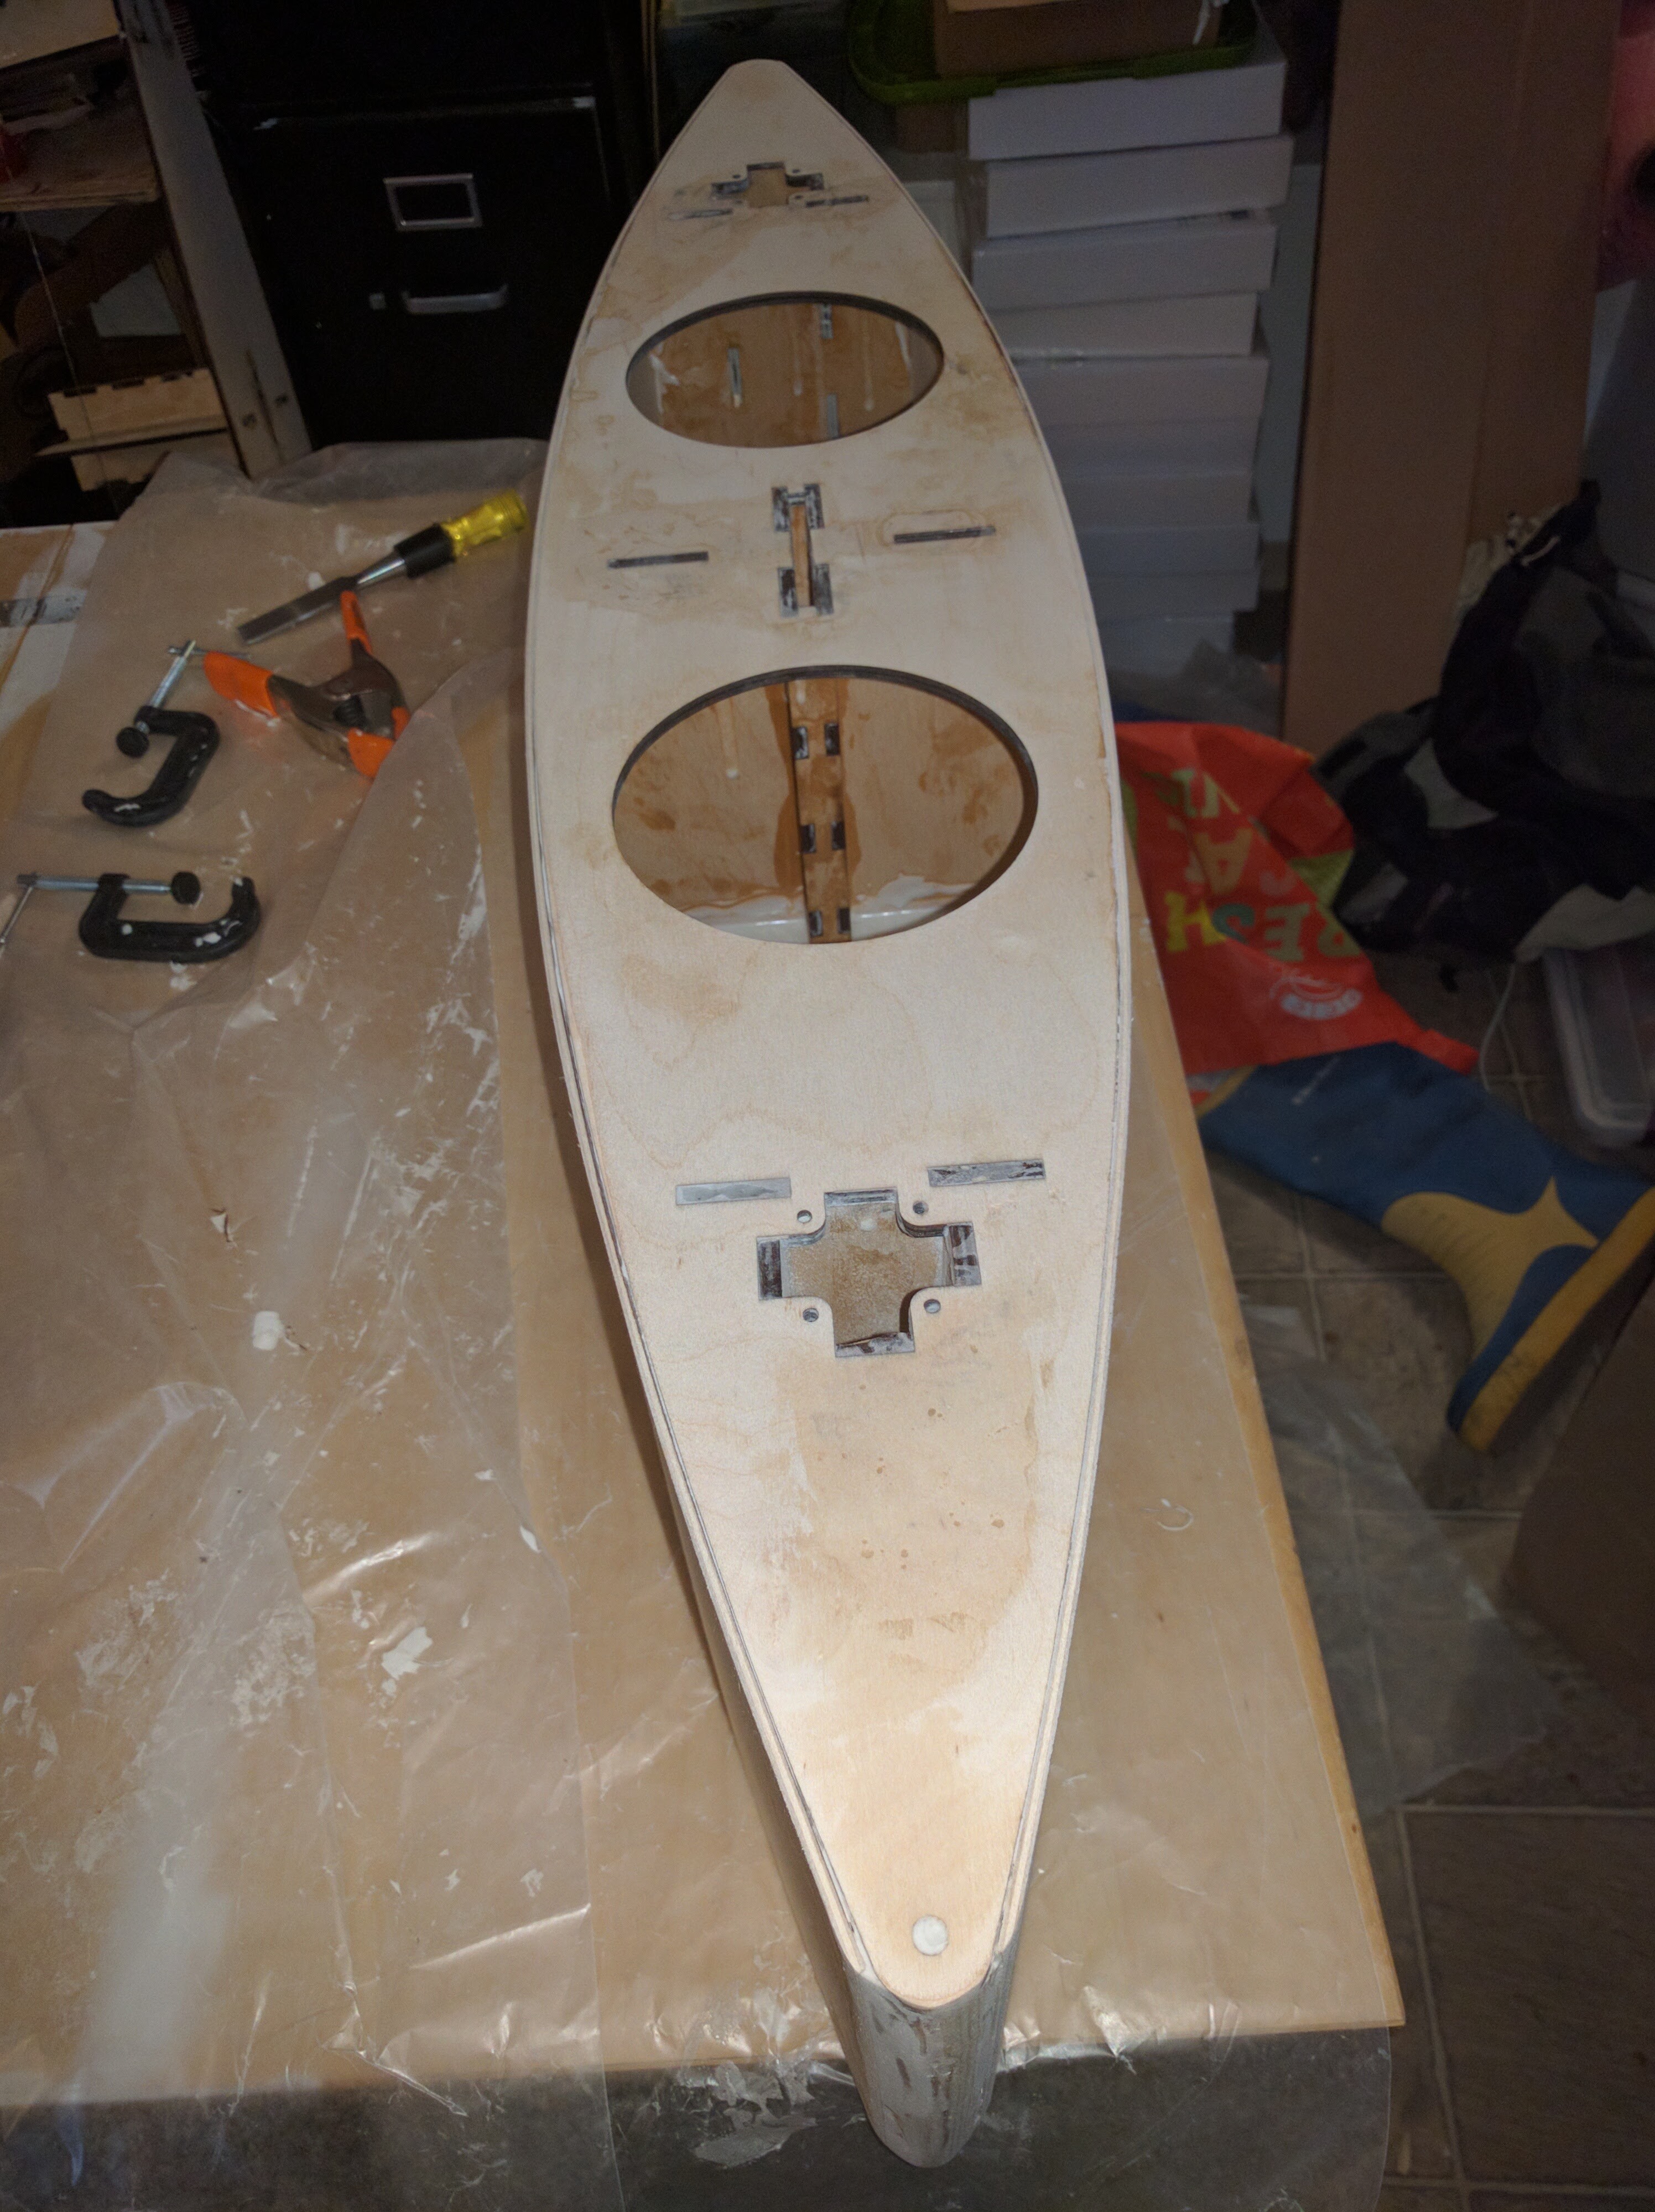
Over the past few weeks, I built the hull and sails for our first cut at building a test boat for this concept. The hull is deliberately the absolutely simplest way to make a hull I know of -- an Advanced Sharpie/Bolger Box made from laser cut plywood. This meant the boat's length was restricted to the width of the laser cutter at Metrix, 42 inches. This is more than long enough. The beam (width) is set such that I can use some 5" Beckson twist-out deck plates for hatches and still have room for a keel/daggerboard at the center of the boat. That came out to eight inches, and I set the hull depth equal to that. The shape of the boat is defined by two arcs struck along these lines, as you can see from the top of the boat:
![]()
I cut the bottom, deck, bulkheads, sail trunks, and centerboard trunk from 6mm baltic birch and the sides from 3mm. The stem and stern posts are just a couple of pieces of 1.5" dowel. I glued the pieces together with thickened epoxy (TAP 1:1 epoxy and microballoons, because lazy) and I think it came out pretty nice for as easy and cheap it was to put together. This picture of the hull during assembly lays out the various internal pieces nicely:
![]()
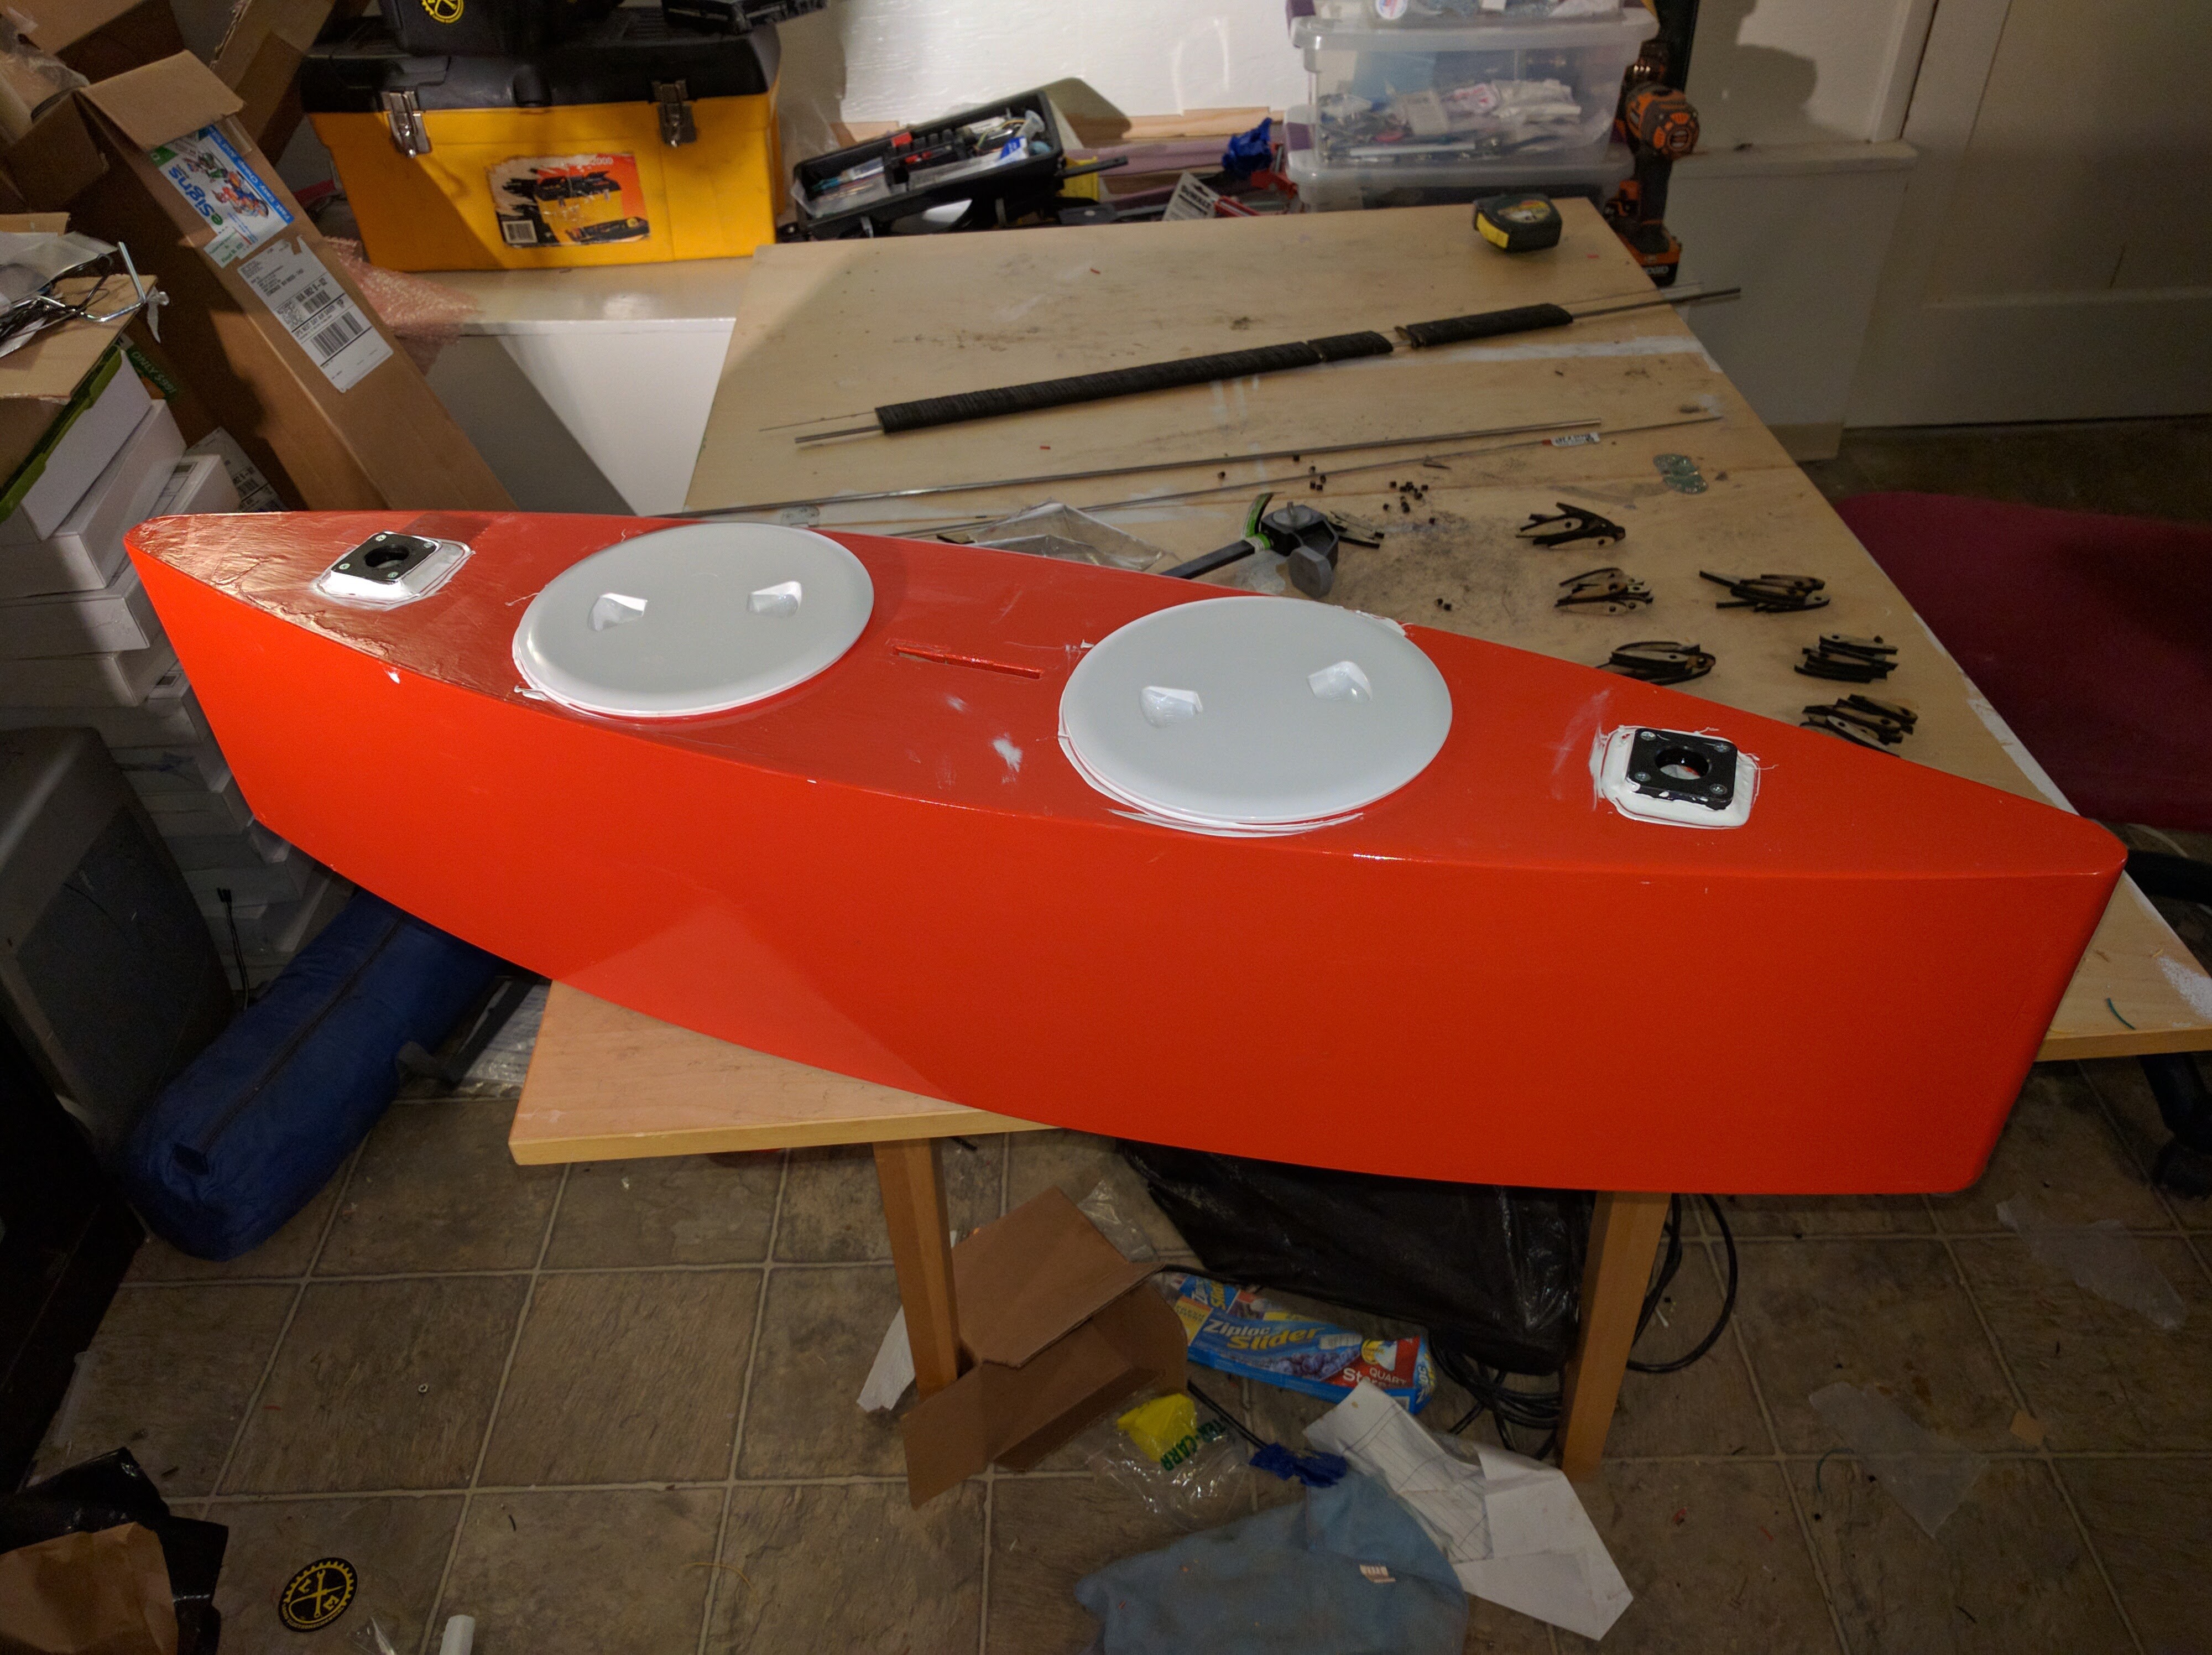
Naturally, I gave it a nice coat of paint for Makerfaire:
![]()
The sail bearings are double-sealed stainless skate bearings from McMaster held in the NEMA-17 sized bearing blocks from our friends at OpenBeam. In a failure of technological panhandling, I failed to get the bearing blocks for free, but they're cheap enough I don't care much. Using the skate bearings sets the size of the wing pivots to 8mm, which is a reasonably convenient size. 8mm stainless rod came from McMaster (again). This mounting arrangement is great because it gives me the ability to easily and quickly swap sails.
Wingsail Design & Construction
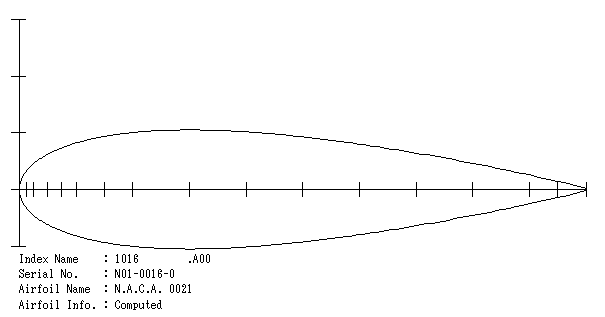
The design of the wingsails is pretty basic. I rooted through airfoiltools.com looking for the highest lift coefficient available in a symmetrical airfoil. It's not terribly well organized for that sort of search, so it was slow and I settled on the good old NACA 0021 as the best option at the relatively low Reynolds numbers (~70,000 @ 10 mph windspeed) we can expect for wings of this size. The 0021 means it's a symmetrical foil whose maximum thickness is 21% of the chord (distance from leading to trailing edge). The section looks like this:
![]()
The tables also give me the coefficient of moment around the 25% chord point. This moment attempts to return the angle of attack to zero degrees. The tail on the wing sets the angle of attack by producing a moment that balances out this moment at the desired angle of attack. The relationships between lift, moment, and angle of attack are sufficiently smooth and monotonic that no further control is required. I calculated the size and location of the tail based on these numbers... and I'm not really sure how well I did. The experience from doing it this time should allow me to correct for next time. In particular, I suspect I will want a large tailplane closer to the wing, for packaging reasons if nothing else. It would also raise the Reynold's number of the tail, which would increase its effectiveness.
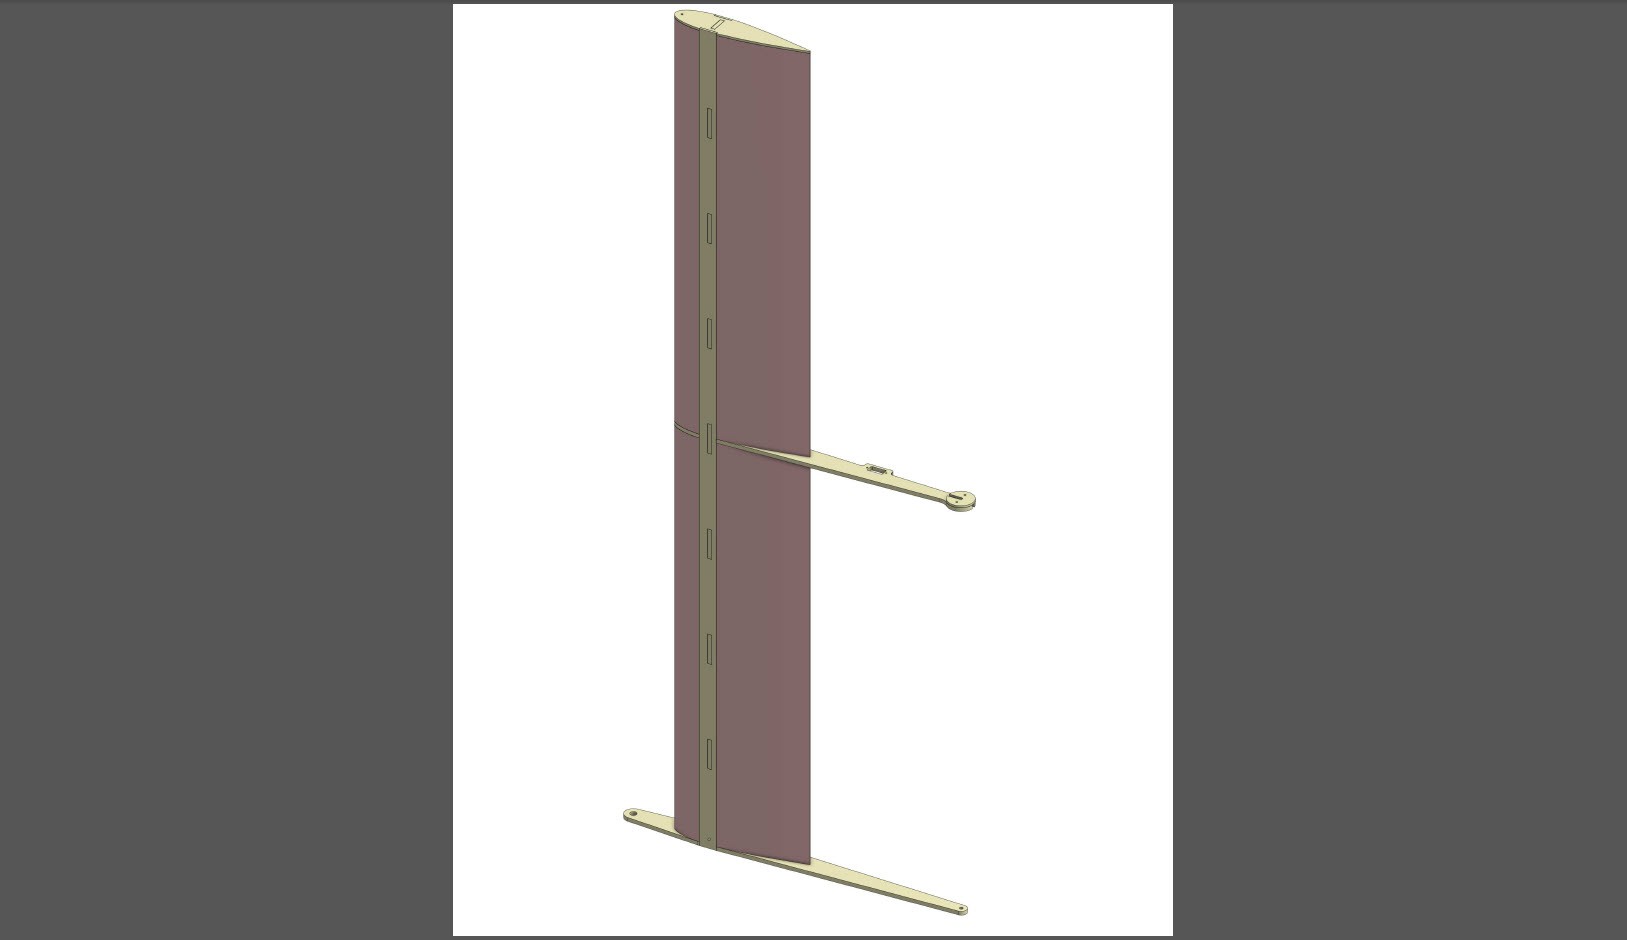
The wingsails have a laser cut wood frame, filled with hot wire cut pink foam and covered with Monokote, an adhesive-coated heat shrinkable film designed for covering model aircraft. The length of the wing is set by two things -- the maximum diagonal distance of the Metrix laser cutter and the sizes of pink foam available at Home Despot. The foam comes in 2' x 8' x 2" sheets, so the wing is just over four feet (two sheet widths) long... which just fits diagonally. Here's what my Onshape assembly looks like (light yellow is wood, pink is foam):
![]()
While cutting the foam for the wingsails, I learned that hot wire cutting is trickier than in looks on Youtube. Next time, I will use the hot wire cutter to make blanks that are then routed or sanded to shape. I wasn't able to get a very good wing shape, but it looks alright when covered with Monokote:
![]()
The wings are different color so I can tell which end is which from a long distance. The orange wing is the forward wing.
Figuring out how to make the tailplane turned into a bit of a trick. It's too small for wire cutting and too big to be 3D printed at a reasonable cost. I ended up laminating the tail planes out of 118 slices (each) of laser cut 6mm birch. This was possible because I ran two rods through the tailplane -- a 3/16" stainless rod to provide the main pivot and a piece of 0.039" music wire up the trailing edge. This is very easy to do with a laser cutter. The only difficult part was stacking them together and gluing them up.
![]()
See the wing design at OnShape.
Control & Electronics
The electronics are still mostly notional, but I'm hoping to get them assembled in time for Toorcamp next month.
Each tail is controlled by a micro servo mounted on the upper control arm and driven by an Arduino MKR1000. I installed the servos before Makerfaire, and lots of people (including me) wiggled them. I suspect this may have damaged them.. we will see.
I won an MKR1000 in the Hackster.io contest earlier this year and picked up a couple at MakerFaire. In order to avoid having to deal with rotating contacts or anything like that, each wing has its own MKR1000, and the third is the remote control. The forward (orange) wing is configured as an access point; the aft wing and the controller connect to it.
I'm looking at two possible control schemas. Both use a pair of knobs on the controller. The most obvious way is to attach each knob directly to one tail. This gives the most direct control, but strikes me as a bit unintuitive. The other is to dedicate one knob to tack/overall power and set the differential control with the other knob. I'll code both up and see which works best in context; I might even have a toggle on the remote to see which is which.


 I've got the new control board mostly assembled. USPS mis-delivered my stencil (my regular mail carrier was on vacation, and her sub was not too bright), so I did this with Nick's