-
11Step 11
Schematic
![]()
-
12Step 12
Source Code
The core code for this project is written in Lua scripting languages, while the web interface is written in html and javascript. All the files are packed into a single zip file which is available here.
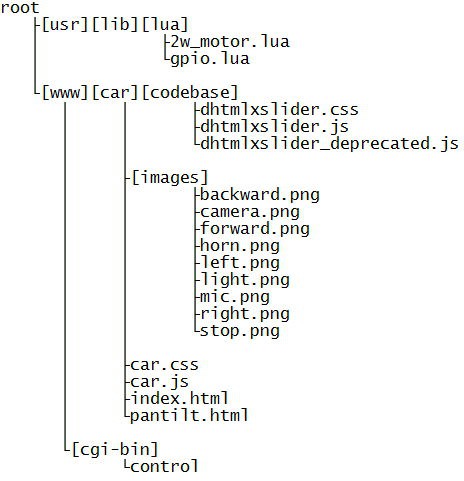
Lua is an interpreted language, a change in a script will not necessarily require a rebuild of the entire project, its code is executes immediately after you have saved it, and therefore it is easier to update and maintain. Please read the following Lua files for those interested in seeing how it works.
- /usr/lib/lua/gpio.lua
GPIO's read/write function for router, more information is available here. - /usr/lib/lua/2w_motor.lua
Work with gpio.lua in order to control 2 DC motors, more information is available here. - /www/cgi-bin/control
A program that acts as an interface between browser (web page) and router.
As mentioned above, the web interface is written in html and javascript. Please study the following files for those who wants to develop their own interface (GUI).
- /www/car/index.html
The main program, load the external js & css files and implement image onClick events. - /www/car/pantilt.html
The main program, bigger video size. - /www/car/car.css
Layout options such as image postion, colors, and fonts. - /www/car/car.js
Consists of javascript function. - /www/images
A folder consists of the images which shows on the web page. - /www/codebase
Consists of javascript components to create slider (dhtmlxSlider), more information is available here.
- /usr/lib/lua/gpio.lua
-
13Step 13
Software Installation
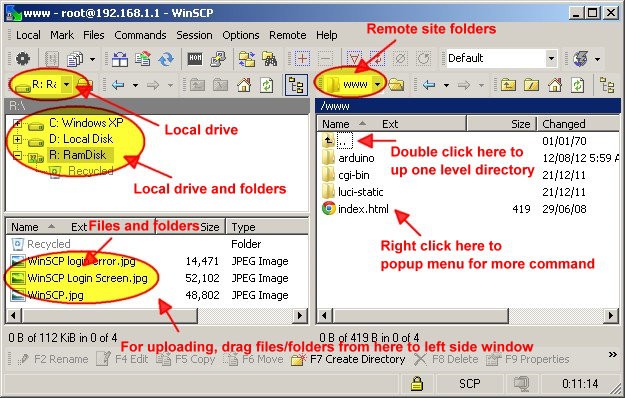
The software do not need installation, make sure you have transfer them to the correct folders on router. I'm using WinSCP to manage files and folders.
WinSCP is a SFTP/FTP/WebDAV/SCP client for Microsoft Windows that allow you to transfer files and manage folders between computer and router.
![]()
Assumes you already have WinSCP running on your computer and are connected to the router. Now extract the downloaded file (2W_WiFi_car.zip) to your computer and transfer them to the respective folders on router as shown in figure below.
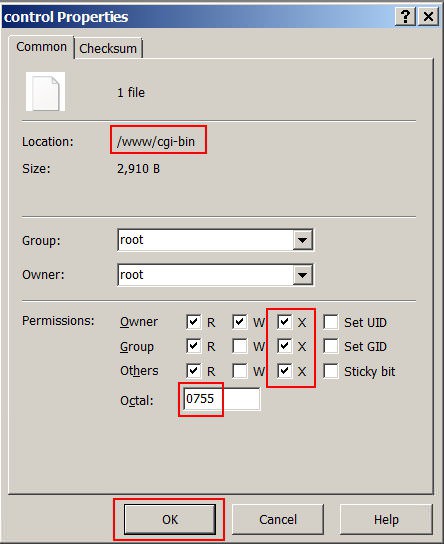
The /www/cgi-bin/control file require execute permission, please change its permission to 0755 (rwxr-xr-x) as shown in figure below. Please refer to WinSCP on how to changing permission.![]()
![]()
-
14Step 14
Controlling the car
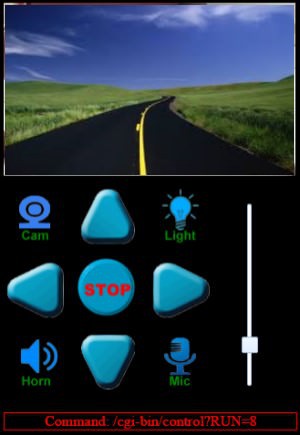
You can control the car from a web browser (do not use Internet Explorer, recommended Google Chrome) or Android application.
- Open up a browser and navigate to http://routerIP/car/ (eg. http://192.168.8.1/car/) or http://routerIP/car/pantilt.html
![]()
- Click on the images or use a keyboard to control the car
- Keep pressing a key on the keyboard will keep the car running, release the key will stop the car.
-
15Step 15
Keyboard Function Command 8 or Up arrow Move forward routerIP/cgi-bin/control?RUN=8 2 or Down Arrow Move backward routerIP/cgi-bin/control?RUN=2 4 or Left Arrow Move left routerIP/cgi-bin/control?RUN=4 6 or Right Arrow Move right routerIP/cgi-bin/control?RUN=6 5 or Space Stop routerIP/cgi-bin/control?RUN=5 7 Enable/Disable webcam routerIP/cgi-bin/control?CAM 9 Headlight ON/OFF (use GPIO20) routerIP/cgi-bin/control?LED=20 1 Horn (not implemented) routerIP/cgi-bin/control?SPK 3 Enable/Disable mic input (not implemented) routerIP/cgi-bin/control?MIC Q Speed 1 (lowest speed) routerIP/cgi-bin/control?SPD=40 W Speed 2 (low speed) routerIP/cgi-bin/control?RUN=60 E Speed 3 (high speed) routerIP/cgi-bin/control?RUN=80 R Speed 4 (full speed) routerIP/cgi-bin/control?RUN=100 -
16Step 16
More photos
More photos are availabled on Flickr
https://www.flickr.com/photos/ediy2u/albums/72157660823719741
 eDIY
eDIY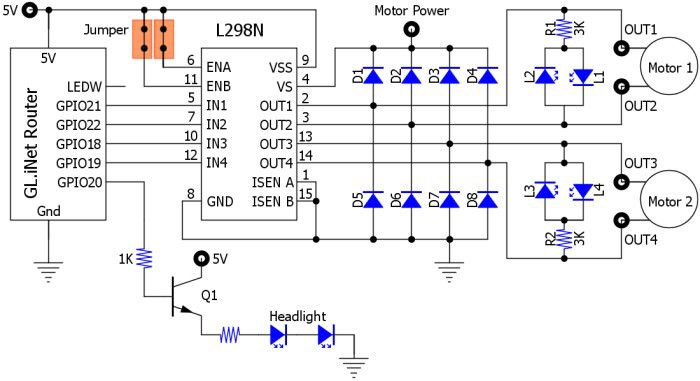
Discussions
Become a Hackaday.io Member
Create an account to leave a comment. Already have an account? Log In.