 Ken Yap
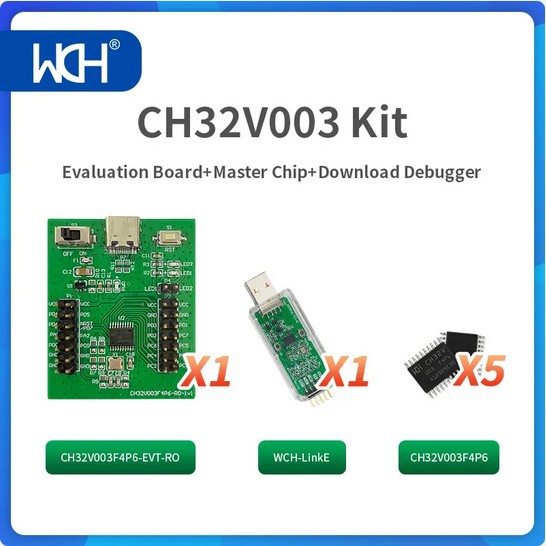
Motivation
I decided to dip my toes into the current generation of cheap RISC-V MCUs under 20¢ each. The QingKe CH32V003 looked like a good candidate for a basic workhorse MCU. I have some MCUs from the ARM Cortex family like the STM32 and RPI2040 but I have a preference for an open ISA as I think this will drive prices down. I had tried out the GD32V Longan Nano but that was too expensive. The W806 looked promising but that used the Csky architecture which is manufacturer specific, and not much has been heard from them since.
Note that WeActStudio has got into the RISC-V game with the CH5[789]x which can in fact use the same toolchain as the WCH products. The ESP32-C3 is also RISC-V based and of course comes with WiFi and Bluetooth support.
I'm actually late to the game; there are lots of projects on HaD and on the Internet already using the CH32V. I just want to document my initial experiences and maybe help others avoid pitfalls. I'm on Linux but many details are similar on other host OSes.
Ordering
I ordered the kit pictured above for about $10 from the WCH official store on AliExpress which guaranteed me that I would be getting the correct combo. You need the WCH-LinkE to start off, despite any webpages out there talking about programming using the USB-C port. That can only be done if you have installed a bootloader that listens to the USB-C port. Also do not buy the older WCH-Link without the E, it cannot program the 00x series.
Setup
Both Arduino and PlatformIO have support for CH32V. Arduino uses the official gcc 8.2 toolchain and an open source OpenOCD for downloading. PlatformIO uses the xpack distribution of the same software. Later I will explore using command line tools instead of an IDE for development, but it's useful to see what commands an IDE is issuing behind the scenes.
After installing either or both IDEs, there are a couple of udev rule files you need to copy to /etc/udev/rules.d so that you have access to the USB device as an ordinary user (do not do development as root!). You can find them under the openocd directory in either IDE. I had to change the group from plugdev to dialout for my distro. Yeah, it's historical.
Now plug in the WCH-LinkE and you will see a new USB device appear. In my case the device was /dev/ttyACM0.
Instructions say you need to connect GND, 3V3 and SWDIO on the dongle side to GND, VCC, and PD1 on the dev board side. This required a 3 wire pin socket cable which was not included. I found a 4 wire cable from PC days, and fortunately the wires are in the same order on both ends, and 4th pin socket was off the end of the connector pad and didn't connect to anything.
Testing
I fired up the Arduino IDE and selected the CH32V00x target and /dev/ttyACM0 port. I could then get the board info and this showed me the MCU ID in addition to the USB IDs.
I loaded the blink sketch from Examples, compiled and downloaded it. But nothing blinked. I found out from a tutorial that the 2 onboard LEDs are not connected to any port pin. I guess this gives flexibility for development and debugging later. So I had to find another pin socket jumper wire. Which port pin should I connect it to though, in other words what does LED_BUILTIN map to? I looked in the include files in the toolchain and discovered that it's not defined as any port pin. So I edited the sketch to use PD0. When I connected the jumper between pins PD0 and LED1, I got a blinking blue LED. Success!
Ok, that's where I'll leave it as that was my goal for today.
Discussions
Become a Hackaday.io Member
Create an account to leave a comment. Already have an account? Log In.
Did you look at this?
https://github.com/cnlohr/ch32v003fun
Are you sure? yes | no
Thanks, bookmarked.
Are you sure? yes | no