-
March 19 2023 Update
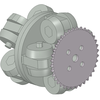
03/19/2023 at 21:29 • 0 commentsIn my previous post, I mentioned two projects I would be working on: creating a hybrid VR shoe/slider and a mecanum wheel.
Hybrid VR shoe/slider
In the last post I explained how I made a cheap slidemill and walking on it was very unstable. To improve stability and allow for omnidirectional movement, I designed a slider with a row of wheels on the bottom to keep the foot moving in a straight line while still allowing for sideways movement. So I came up with this design.
![]()
![]()
![]()
The is meant to go on the right foot. The bottom of the slider has a row of wheels under the left side of the right foot. The rest of the slider is covered with a silicone pad. This overall design is very similar to my current pair of VR shoes, but it's mostly 3D printed instead of being made out of aluminum.
Initial testing with one slider have been successful. It feels much more stable than the last time I walked on the simple slidemill, yet I can still easily move my foot sideways. I now need to make the left foot slider.
Mecanum wheel
I managed to make a design for a mecanum wheel that has a 2.063in diameter. I'm going to need to make 3 more and mount them onto a shoe-like frame and see if they work well. I'll be checking how bumpy they are, if they can move nicely under my weight, what kinds of surfaces I can use them on, and how loud they are.
![]()
![]()
![]()
-
March 2023 Update
03/11/2023 at 01:31 • 0 commentsIn this update I'll be going over several devices I've been experimenting with over the last several months. Then I'll talk about next steps.
Leg Exoskeleton
In my last update I said I was trying to focus on making a new VR locomotion setup using a leg exoskeleton design. Well, that isn't going as planned. I made a few designs to try out. These differ from the first exoskeleton design I tried out a while ago. I wanted a design that would run along the user's leg so that supporting sitting would be easier and the user could cross their feet without the exoskeleton on one leg colliding with the other leg.
Here are a few of the designs I made.
![]()
![]()
With this design I wanted to make something that was easy to adjust to curve around anyone's butt. Each of the individual links can be rotated to make different curves.
![]()
![]()
This design was less customizable but had a simpler design. The lengths could still be adjusted by using bolts of different lengths.
The 3D printed parts in both designs are made out of TPU.
With both designs the idea was there would be some flexibility to move back and forth as the user's hips swing, but still be rigid enough to keep the user in place.
Both designs felt awkward to strap my thigh to. It didn't really provide much resistance to me bending or moving my leg around like I'd hoped. Sitting would cause the strap around my thigh to tighten very uncomfortably.
In the last post I listed a series of benefits a leg exoskeleton could provide. Now I'm not so sure about several of them, because of the testing I did with these designs as well as some other testing with other devices I will explain later in this post.
I think I'm going to pause creating a leg exoskeleton, and if I start again it's going to be something like my very first design, which doesn't run tightly along the user's waist, butt, and legs.
A Simple Slidemill
I wanted to see if I could make a slippery surface like a slidemill has, but avoid some of the issues slidemills run into. Slidemills suffer from feeling like you're running on ice and lack stability as you run. I wondered if I could use a slippery surface because it could simplify the design of a device, but also have the device have a way to make running feel more natural and stable. Oh, and hopefully make something not as loud as slidemills are.
My thought was that if the device could always be trying to keep the user's foot centered better than the bowled surface of a slidemill, it would provide stability. As the user brings their foot forward, there will be some resistance they push through, but once they put their foot back down on the platform it won't slip because the device will help the user pull their foot back. The devices I was thinking of were the leg exoskeleton and a device I'll talk about in the next section.
Here is the slippery surface I made.
The materials
To make a slippery surface, I tried out a variety of surface materials and lubricants. The surface materials were acrylic, a few types of wood, HDPE, UHMW, and a metal sheet. The lubricants were silicon spray, heavy grease, a few types of furniture polish, sex lube, vegetable oil (liquid and spray), and dish soap with and without water.
The acrylic sheet seemed to be the best surface type, followed by the HDPE. With acrylic I was not only able to make a slipperier surface than the rest, but it was also quiet.
The best lubricants were the lube, dish soap with no water added, and a furniture polish spray. The lube was the best, but dish soap was almost just as good. Since dish soap is the most widely available and cheap, I did further testing with it.
I have done a few test sessions where I walk on an acrylic sheet covered in dish soap for up to 15 minutes. The soap didn't dry out in that time. In further testing I'm going to see if while playing it needs to be sprayed with a little bit of water every now and again. Between play sessions, I'm...
Read more -
Feb 2023 Update
02/14/2023 at 04:08 • 0 commentsOver the past 8 months I've been making prototypes of many different VR locomotion devices. I've been trying out many different concepts, but now I'm starting to focus on one setup again.
Tldr
I'll be expanding upon the leg exoskeleton concept I tried. It will be attached to either a VR shoe with wheels or a floor slider. I will attach the leg exoskeletons to my ceiling mounted support rig first, but then I want to try to make a new free standing support rig.
Leg Exoskeleton
I'll be making the next leg exoskeleton out of EMT conduit like I did with the last prototype. The joints will be 3D printed and designed to be springy. I first wrote about the idea here, with this quick summary -
When the joints flex, they will store some energy and want to return to their original form, like a spring.
The basic idea is that as the user brings their foot forward, there will be some resistance because the joints will flex, then as they bring their foot back, the joints will help them. The joints store some energy when they bring their foot forward, then release it when they bring their foot back.
Benefits
- Stability.
- With the mechanism always wanting to bring the foot back to the starting position, it will be harder for slipping to occur.
- The shoe could be taller if needed since the mechanism should make it harder to tip the shoes.
- The weight of the shoe can be negated.
- The mechanism can help the user lift their foot. To lower their foot, they just let the weight of their own legs overcome the force from the joints.
- Springy joints can help reduce impact on knees.
- A taller and/or heavier shoe or floor slider is easier to add more features to, such as something simple like cushioning to reduce impact on ankles or something complicated like simulating stairs.
- Less effort
- Since energy can be stored in the springy joints, once the user gets going, it should be easier to keep going.
- Can be paired with an omnidirectional VR shoe or a floor slider to provide omnidirectional movement.
- Can support sitting in the same way wearable chairs can.
- User can be strapped to the leg mechanism, so a climbing harness, waist harness, or vest is not needed.
- Nothing needs to be strapped to the user's back, reducing the possibility of back pain.
- Less constrained movement.
- Great tracking.
- Potentiometers or encoders can be placed in each joint to track leg and foot movement precisely.
- Turning will still need to be tracked via an IMU or encoder on the support rig.
- Conduit can be telescoping rods making it adjustable to different heights.
- Simple, durable design made of cheap materials (conduit, 3D printer plastic mostly).
- Coupled to a support rig, this still provides safety and keeps user constrained to a small space (around 42in in diameter in my case).
- No electronics except trackers.
- Design is can be adapted to be motorized later if I want.
Cons
- Compared to motorized VR shoes by themselves -
- More hardware.
- More storage space.
- More constrained.
- Less convenient to strap into.
- A passive system with springs will probably still not feel as natural as a motorized system.
VR Shoe or Floor Slider
I've been looking into making small omnidirectional wheels, such as the omni-sphere, to use in a VR shoe, as well as looking into if a floor slider could work.
Making small omnidirectional wheels (2in or less in diameter) that are not bumpy, can handle the load, and are not noisy has been a challenge I will write about later. I still have more ideas, including possibly using large omnidirectional wheels in a design similar to these motorized shoes.
Regarding floor sliders, I've made some progress. The issue I've ran into in the past is the friction is too high and they are noisy. Even if I could lower the friction, they are also unstable. However, the leg exoskeleton providing stability means lower friction shouldn't be a problem. With that in mind I've tried various combinations of floor types such as acrylic, wood,...
Read more - Stability.
-
Omni-Sphere
02/05/2023 at 23:50 • 0 commentsIn this article I'm going to go over a 2in diameter omnidirectional sphere I designed.
Prior Designs and Builds
The design is based of what is shown in this video.
This video shows the same design, but scaled up and 3D printed.
Requirements of the Omniwheel
For my next VR shoe I want to use omnidirectional wheels, but they need to fulfill some criteria.
- They need to be small enough to fit into a VR shoe. I'd like the wheels to be a maximum of 2in tall.
- They need to be able to hold my weight (approximately 170 pounds).
- I want them to work on the thin (1/8in thick) rubber mat I've been using so that noise is reduced, or they need to be quite on their own.
The omniwheels I've used in the past, Rotacaster, don't meet these criteria and I believe most omniwheels in general don't. They are a little noisy on their own and cannot be used on my mat, because the whee's frame would rub against the mat. Additionally, I'd have to combine several of them to hold my weight.
The spherical wheels in the videos above looked to me like they could be quiet, work on a rubber mat, and be designed to handle my body weight. The last part was to make them small enough, but I managed to reduce their size to 2in in diameter.
Demo of my Design
Here is a short video showing my design.
Design Details
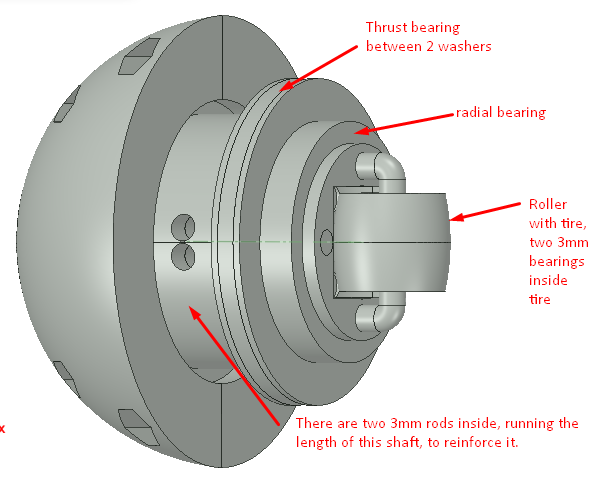
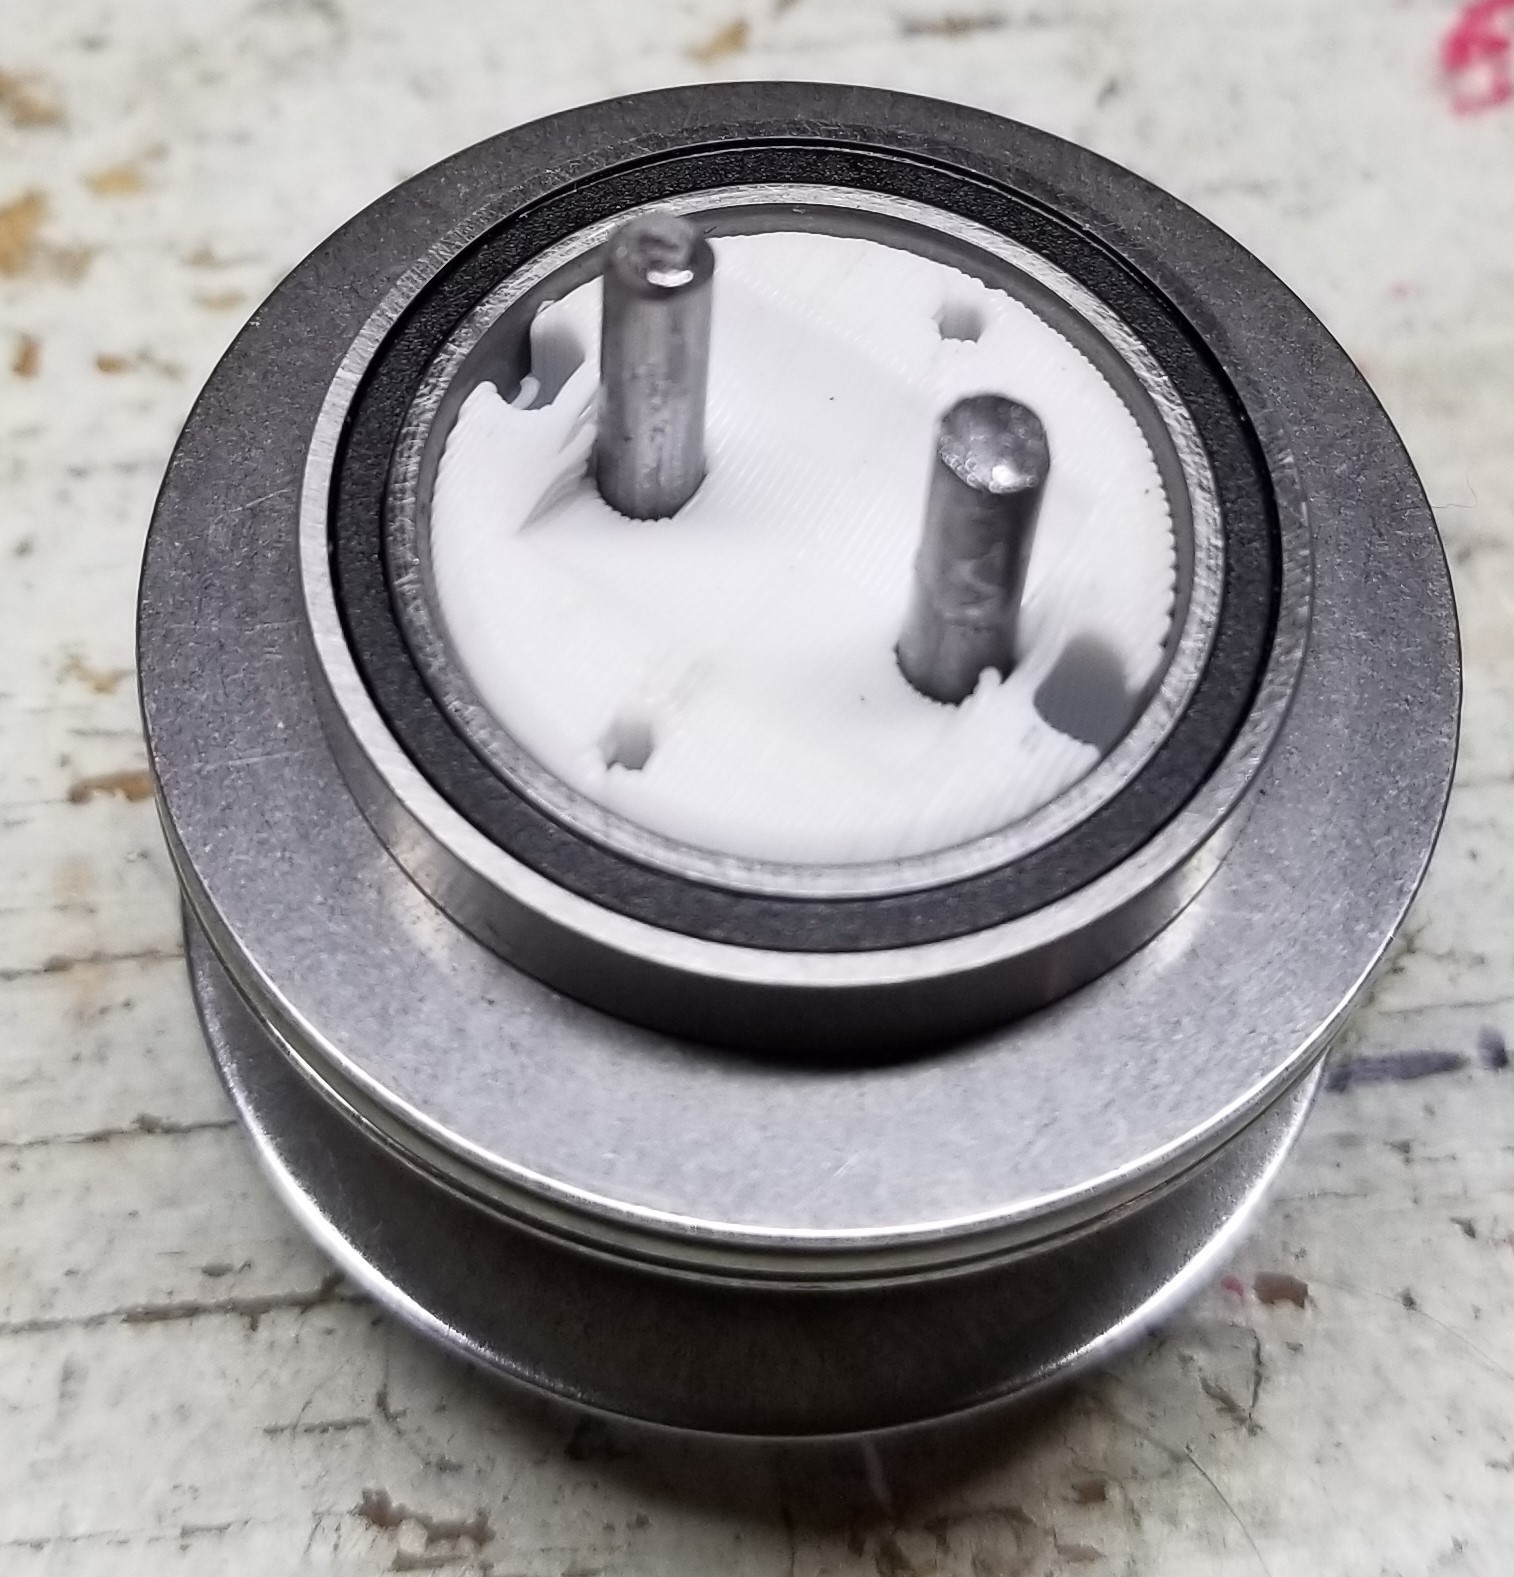
For how the wheel works, here is an image of the design that shows some of the internal details.
![]()
The larger components of the wheel are 2 hemispheres and the shaft. The shaft at its thinnest point is 0.875in in diameter. The shaft and hemispheres are 3D printed out of PETG.
Inside each hemisphere is a thrust bearing, radial bearing, and a roller. The roller has a TPU tire I 3D printed that goes around two 3mm bearings.
When the sphere is "upright" as shown in the image above, the radial bearings will be absorbing the load placed on the it. As the sphere rotates 90 degrees, the thrust bearing will take more and more of the load. When at 90 degrees, the roller will take all of the load.
You can see each hemisphere is cut in half. This makes assembly much easier. The halves of the hemisphere are held together by four 0-80 screws and nuts.
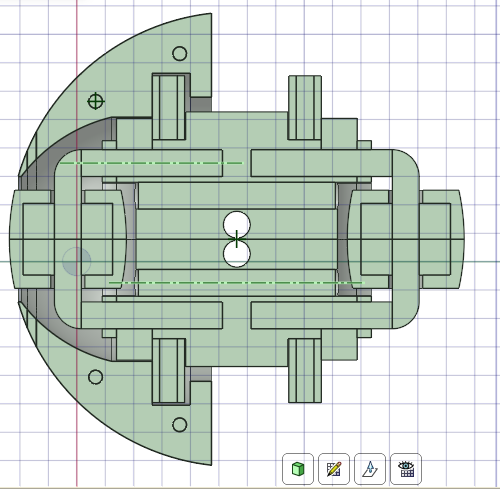
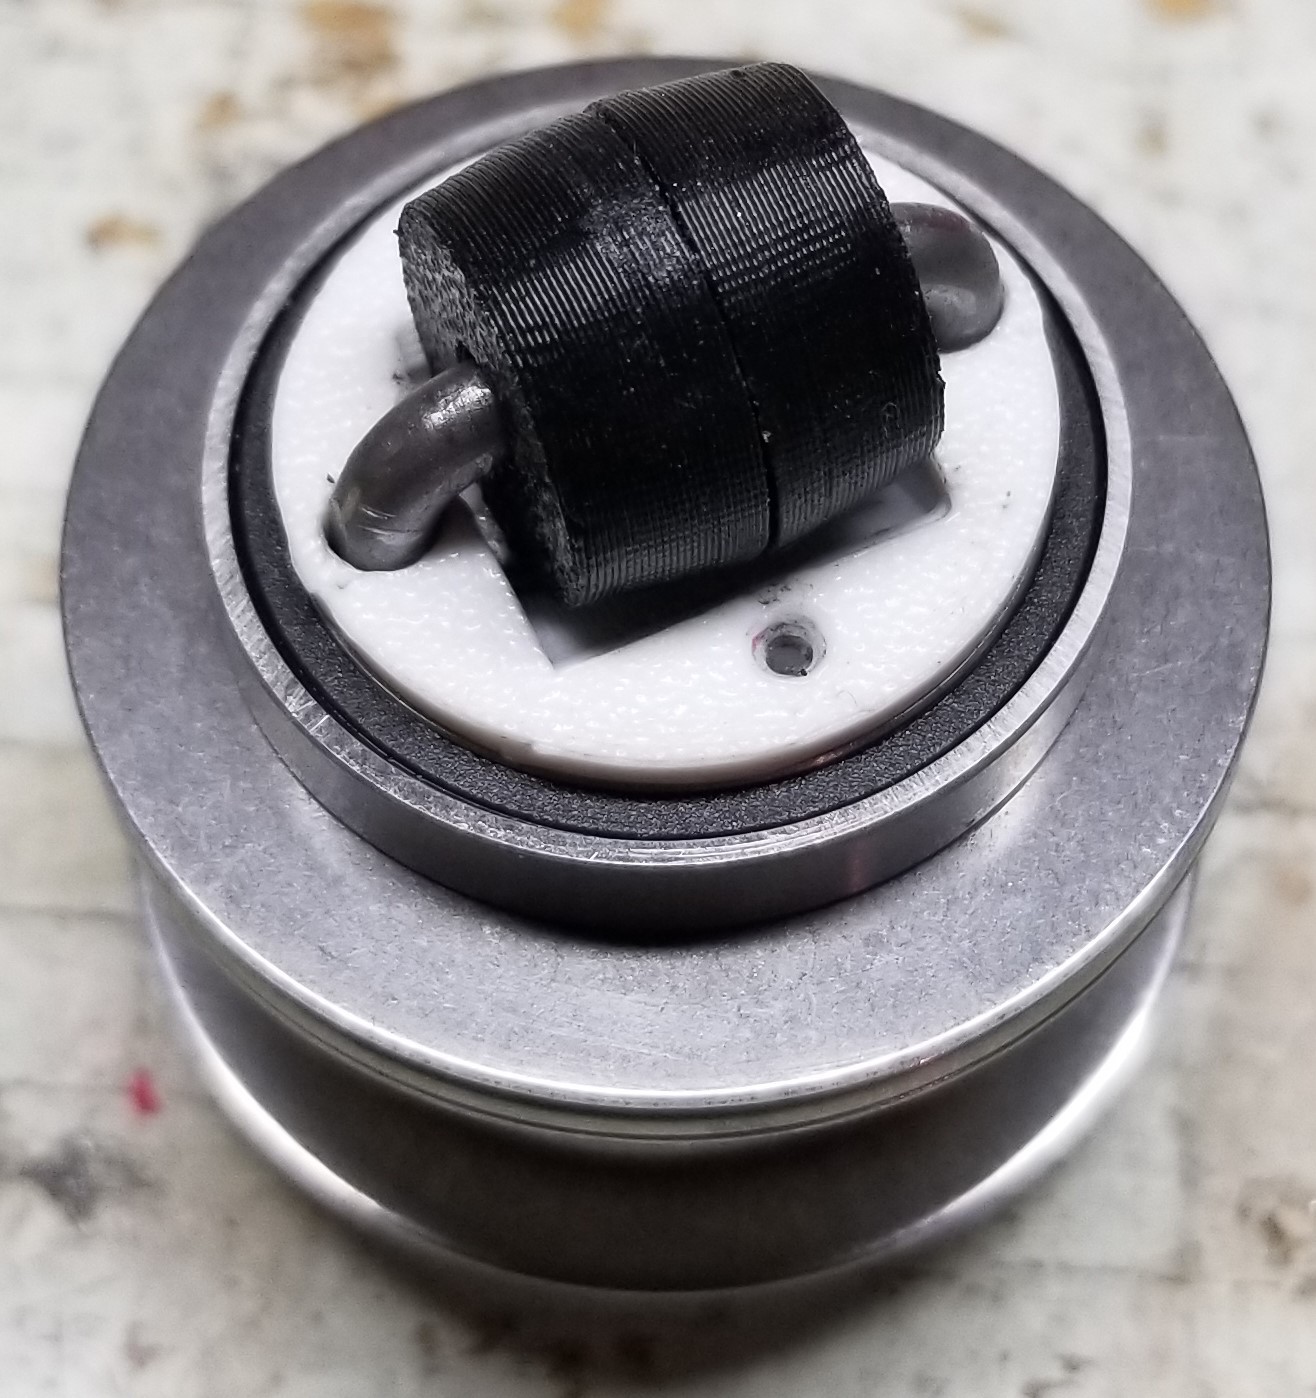
Here is a cross section of the design.
![]()
There are two 3mm rods running the length of the shaft to reinforce it. If aspects of the design are still not clear, the next section shows how I assembled the wheel and may clarify how the wheel works.
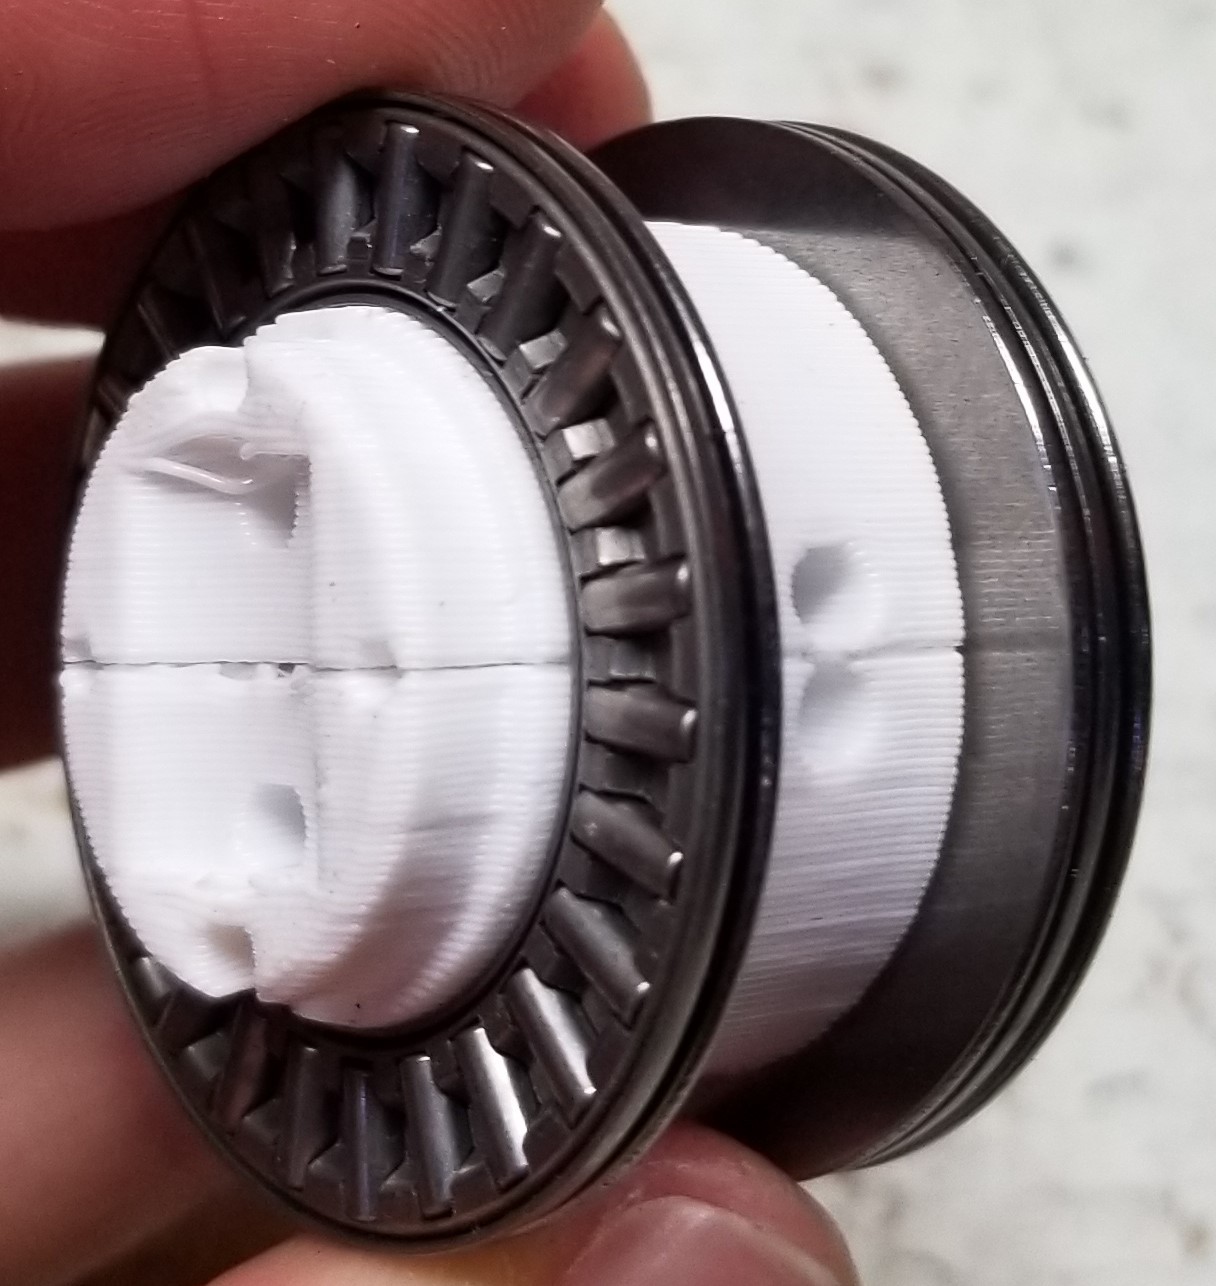
Building the Wheel
You can see in the image below that the shaft is printed in two separate pieces just to make 3D printing it easier and to ensure that the layer lines are perpendicular to the force applied to the shaft. First the thrust bearings and their washers are pushed onto the shaft. The thrust bearings and radial bearings keep the shaft halves together.
![]()
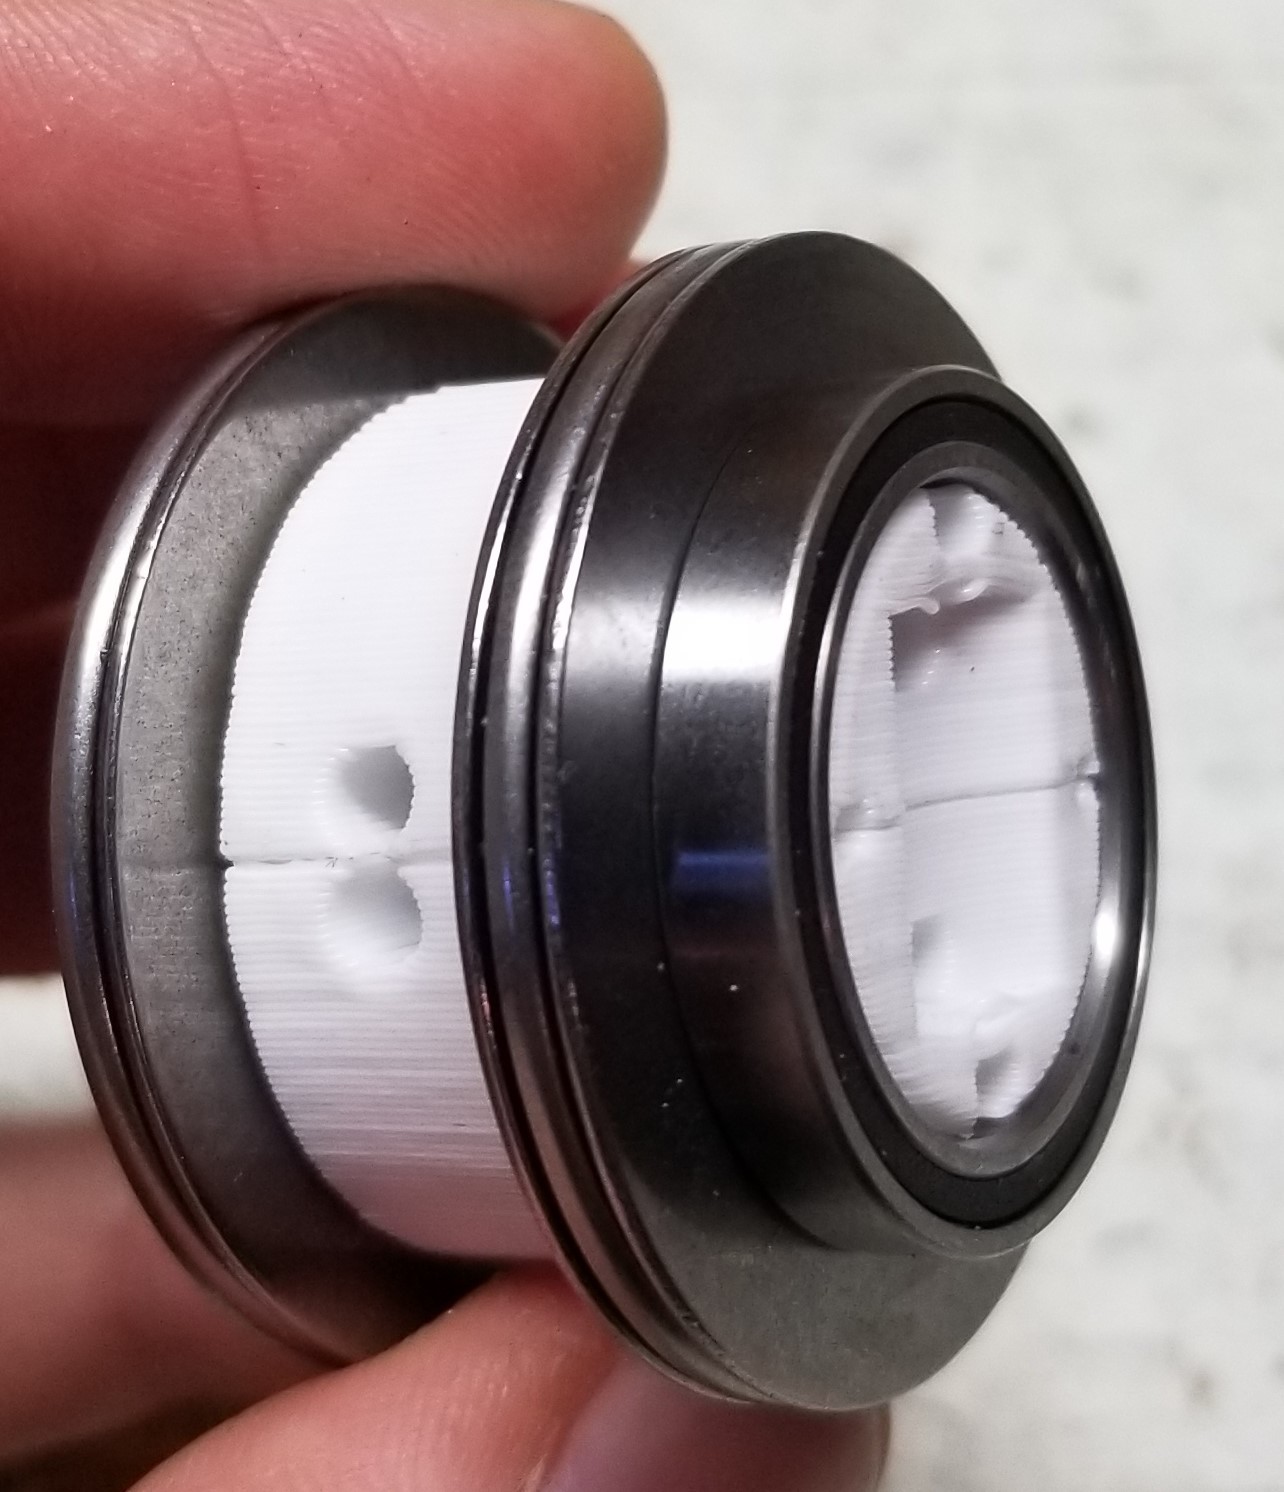
Next the radial bearing is pushed onto the shaft.
![]()
The two 3mm rods that are used to reinforce the shaft are hammered into it.
![]()
The roller is also hammered into the shaft.
![]()
If you're curious as to how I made the roller, I bent one side of the roller's axle in my vice by hand and I 3D printed some parts that allowed me to hold the axle and two 3mm bearings in the vice and bend the other side. I'll go more into detail on this when I eventually make a guide for the VR shoe I plan to build, or I can clarify further if anyone wants to know more details.
You may have noticed in the last image that there is a white cap that was also placed along with the roller. This cap is screwed to the shaft with two 0-80 screws (and some nuts inside the shaft) and its purpose is to keep the radial bearing from popping off. However, the bearing fits so tightly onto the shaft that I don't think it's necessary.
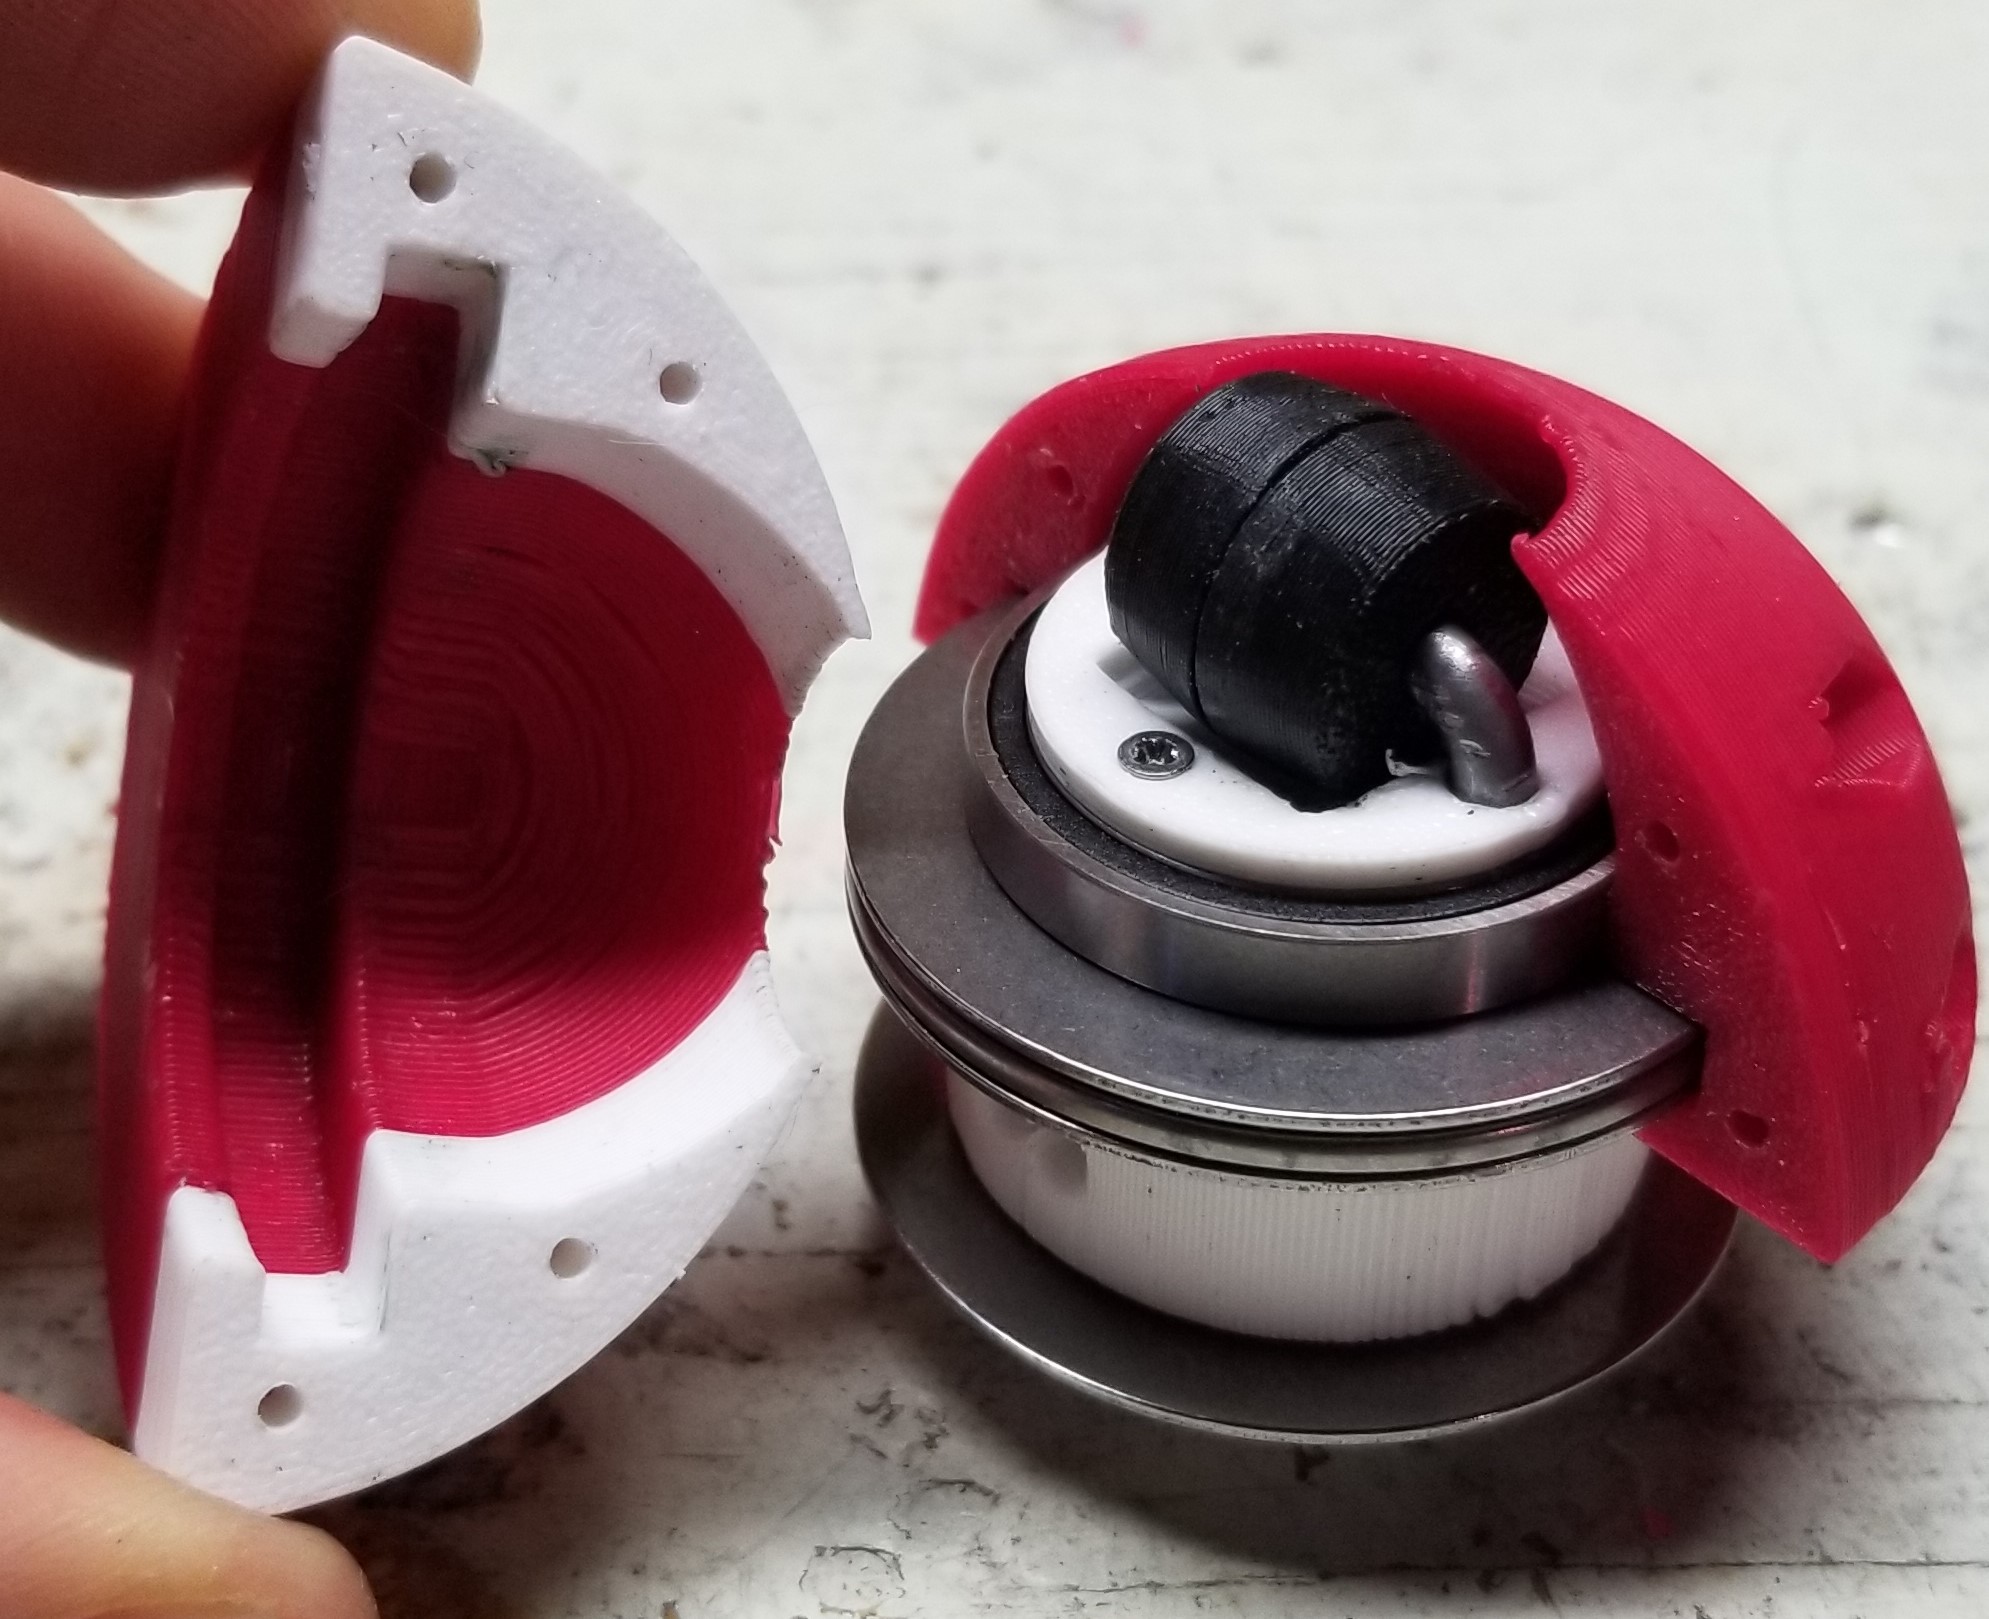
Next one of the hemisphere halves is slid on as shown below.
![]()
The other half is also slid on and then they are screwed together.
Roller Exposure
I did some experimenting with how much material...
Read more -
Progress Update
10/19/2022 at 00:19 • 0 commentsThis article goes over what I've been working on since my last video. Design files are available on my github.
Summary -
- A leg exoskeleton-ish mechanism
- A new VR locomotion device based on the concept I discuss here.
- An improved ceiling mounted support rig
- Some progress on sensors and tracking
Leg Mechanism
I'm working on making a leg mechanism, or exoskeleton. The first draft is shown in this video.
Each joint is made of flexible plastic, TPU. When the joints flex, they will store some energy and want to return to their original form, like a spring.
The basic idea is that as the user brings their foot forward, there will be some resistance because the joints will flex, then as they bring their foot back, the joints will help them. The joints store some energy when they bring their foot forward, then release it when they bring their foot back.
I believe the main benefits this mechanism will give are extra stability, smoothing out the user's effort, and reducing the user's effort. I'll talk about these and other benefits below, such as weight negation.
Stability
I believe this mechanism will provide enough stability to make omnidirectional passive VR shoes feel comfortable.
I have held off making omnidirectional passive VR shoes mainly because I think that they would be too unstable. I can see the shoes sliding sideways out from under the user. My current unidirectional (only forward and back motion) passive VR shoes are easy to control because I'm more than strong enough to prevent my foot from sliding too far forward or backward, but it may feel too slippery to also introduce sideways motion.
The leg mechanism is always trying to bring the user's foot back to the starting position. As the user moves their foot further forward, backwards, or sideways, they experience more resistance. This should help keep the user from slipping. I of course don't want too much resistance so there will need to be a balance. Hard stops could also be added to prevent the user from sliding a maximum distance.
After I'm happy with the leg mechanism, I will design an omnidirectional passive VR shoe. I'll briefly talk about that design below.
One small note, the extra stability could allow the shoe to possibly be a bit taller if I want.
Smoothing Out Effort
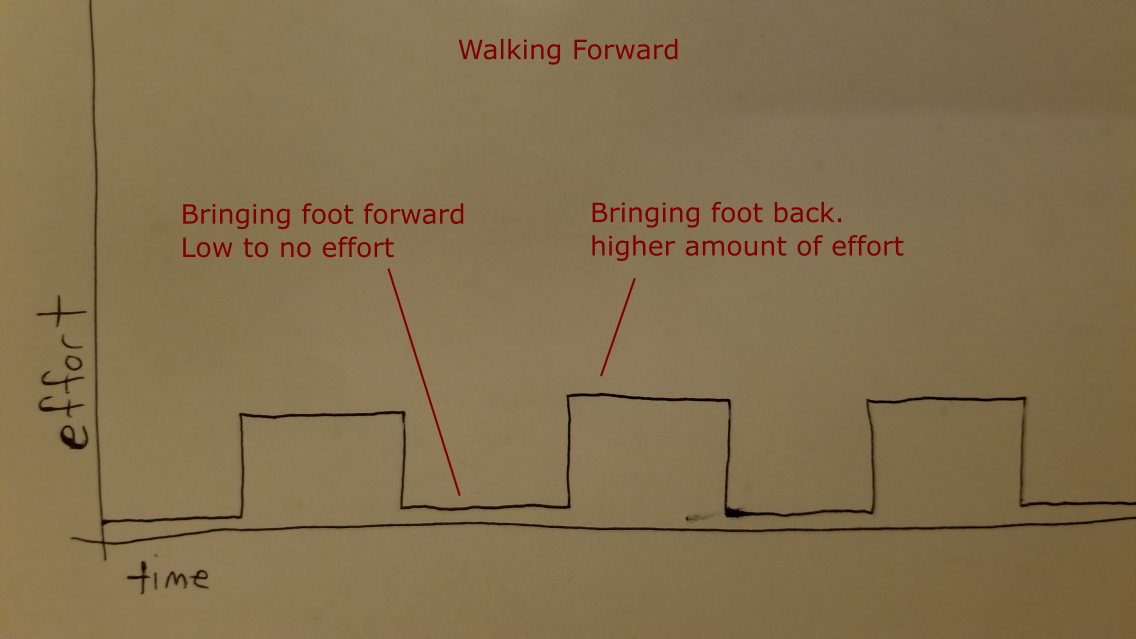
When walking forward, it takes very little effort to bring the foot forward in the air. Once the user puts their foot down in front of them, they need to use a relatively high amount of effort to bring their foot back. This is illustrated in the simple graph below.
![]()
The graph is probably oversimplified a bit, but it explains the idea.
I believe the walking mechanism will help smooth this square graph out. As the user brings their foot forward, instead of it being no effort, there will be a little more effort due to the resistance the mechanism exerts on the user. When the user brings their foot back, there will be a little less effort because the mechanism is helping them. The mechanism should raise the valleys and lower the peaks in the graph, which I think will be more comfortable for the user.
Reducing Effort
If you've ever used an elliptical before, you may have noticed that once you get going, it's easier to keep going because of the momentum you've built up. This leg mechanism might have a similar effect. As you walk or run, the mechanism may act like a spring that is moving your leg back and forth. Instead of losing some energy when your foot goes from moving forward to backward, some of that energy is stored in the mechanism. It may end up in a scenario like the following -
- User brings foot forward, pushing against springs, storing energy in them.
- Springs release the energy and push the user's foot back. As the foot goes behind the user, some of that energy is captured again in the springs.
- Springs release energy again, pushing the foot forward. As the foot goes in front of the user, some of the energy is again captured...
-
Liability Disclaimer
03/27/2022 at 13:17 • 1 comment"My content" is defined as any of my pages, projects, or any other content that I, Alexander Evans, produce.
The information provided in my content, is for general informational purposes only. All information provided by my content is provided in good faith, however I make no representation or warranty of any kind, express or implied, regarding the accuracy, adequacy, validity, reliability, availability, or completeness of any information provided by content.
Under no circumstances shall I have any liability to you for any loss or damages of any kind incurred as a result of the use of my content or reliance on any information provided by my content. Your use of my content, any actions you take upon the information provided by content, and your reliance on any information provided by my content is solely at your own risk.
-
Are you going to start a business? Sell these? Start a Kickstarter? Get a patent?
03/22/2022 at 22:06 • 0 commentsNo I do not plan on doing any of these things at this time.
This project is an escape for me where I can create something without the constraints that a business would have. I am free to work on this project whenever I want, free to not work on it, free to take as much time as I want, free to pursue any idea I feel like. I do not have to worry about making money from it. Business constraints like having to make money to feed myself, constantly being under a time crunch, and many other business concerns (like I describe below) , will kill my passion for this project. Ever heard the saying that the fastest way to kill an enjoyable hobby is to try to make money from it? I just like to create things in my spare time, on my own time, answering to nobody, and sharing what I learn.
Running A Startup
I like my life the way it is. I like my job. I like having time every night to spend with my wife, friends, pets, relax, and work on my project. I'm pretty happy and very grateful for the life I have. I'm not interested in running a startup as I would need to dramatically change my life to do so. After researching it, I have a much more realistic view of entrepreneurship than I believe a lot of people have and it's not for me at this time.
Running a startup is hard. I'd need to pore enormous amounts of time into it for it to have a chance to succeed. 60, 80, 100 hour work weeks. I'd spend most of my time running the business instead of actual product development. I'd spend my time managing employees/other members, working on finances, legal, logistics, applying for grants, reaching out to investors, meeting with people. I've asked a few business owners who had an engineering background if they spend much time doing engineering. They all said no, they wish they could do more, but most of their time is spent on business owner stuff. Engineering sounds fun. Running a business does not.
People commonly say they want to start a business so they don't have a boss. Business owners do have bosses, which are their customers, clients, investors, and partners. Yes, business owners have more control. They can drop bad clients or customers. But they still have people they must answer to.
A huge percentage of businesses fail. Even if I'd do everything right, the chances of failure are still very high. Making VR hardware is very hard.
Even if I had a very successful startup and got rich, I do not believe I would be happier. There are many examples of rich people who are not happy. The hedonistic treadmill is very real. There are external sources of happiness, things that can raise your happiness baseline, but they are rare are you should be very skeptical of people, goals, and things increasing your happiness long-term.
So given that I don't want to spend 80 hours a week working, I wouldn't like running a business, the chances of failure are high, I don't think I'd be happier if I had a successful startup, and I already have a life I enjoy and am grateful for, I'm not running a startup.
But You Could Make Millions!
There is a lot more to running a successful business than a great idea. Yes, a great idea is needed, but there is so much more involved. The execution of that idea and how you run your business are arguably more important. Having a great idea doesn't mean you're guaranteed to get rich.
What About a Patent?
I'm not getting one. This is open-source. This video is a good summary of why I decided to not get a patent. Patents do not prevent someone from stealing your idea. They give you the right to sue, not the money to do so. Patent litigation can cost hundreds of thousands or millions of dollars.
My ideas also change very rapidly. If I'd have patented my first version, that patent would be useless now as my design has changed so much.
Some people have told me if I don't patent my idea someone else will. Yes, someone else can. The patent...
Read more