-
Why Is My Cricut Mini Press Beeping Red Light? (Tutorial Steps)
12/30/2025 at 07:02 • 0 commentsYou are working on a small project, maybe pressing a design onto a tote bag or a baby onesie, and everything seems normal. Suddenly, the Cricut EasyPress Mini starts beeping, and the light turns red. It catches you off guard, and most people stop right away. Many users talk about this moment online, saying they paused their work because they worried the machine was getting too hot or might stop working completely.
If this has happened to you, then take a breath. A red light and beeping mean the machine is trying to tell you something important, not that it is broken. In this post, you are going to learn why the Cricut heat press is flashing a red light, what that signal means, and what to do next. The steps are simple and clear, so you can return to your iron-on project without worry or confusion.
Common Reasons Cricut EasyPress Mini Is Beeping Red
When your Cricut EasyPress Mini starts beeping and shows a red light, it’s a sign that the press needs your attention. Most of the time, this happens because of a power problem, too much heat, or a safety feature kicking in. The heat press does this to protect itself and to keep your iron-on project safe before you move forward.
Here are some reasons the red light and beeping may appear:
- Power Problems: Using a power strip or extension cord can cause uneven power. When that happens, the heat press may start flashing a red light. Plugging it into a wall socket works better.
- Overheating or Sensor Issues: If the machine overheats or the temperature sensor fails to read, then it may flash a red light as a safety warning. This helps stop damage before it gets worse.
- Firmware Glitch: Sometimes the internal software can freeze or act up, causing the light to turn red and beep.
- Debris or Blockage: Although less common, dirt or material residue on the heat plate can interfere with normal operation.
How to Fix the Cricut EasyPress Mini Red Beeping Issue
If your ‘heat press is beeping red‘, then it means there is an overheating issue, a sensor problem, or an unstable power supply. The best thing is that you resolved it with some simple steps. Always start by turning the machine off and letting it cool down completely before trying anything else.
Basic Solutions
- Unplug and Let It Cool: Unplug the machine and give it a short break. Wait about 30 to 60 seconds so it can cool down and reset. This simple step can fix the issue.
- Check the Power Source: Connect the machine straight to an electric outlet instead of using a power strip or extension cord. Those can interrupt the power and cause the red light and beeping.
- Check for Obstructions: Look closely at the heat plate and surrounding areas for lint, debris, or stuck material, and clean it if needed.
- Restart the Heat App: If you are using the Cricut Heat app, then close it completely and sign back in to refresh the connection.
Advanced Solutions
- Try a Power Cycle Reset: Plug the machine back in, press the Power button, then unplug and re-plug it a few times until it starts normally. This can help reset internal errors.
- Update the Firmware: Open the Cricut Heat app on your device and check for any available firmware updates. Installing the latest update can fix software-related issues.
- Watch for Temperature Changes: If the temperature keeps jumping up and down before the red beeping starts, the internal sensor or thermal part may be failing.
Frequently Asked Questions (FAQs)
How Do I Reset My Cricut EasyPress Mini?
To reset your EasyPress Mini, unplug it from the power outlet and wait about one to 2 to 3 minutes. This allows the internal power to fully clear. After that, plug it back in and turn it on. This simple power reset usually fixes minor issues.
Why Does My Cricut EasyPress Mini Shut off...
Read more -
How to Create Rhinestone Template With Cricut: Full Guide
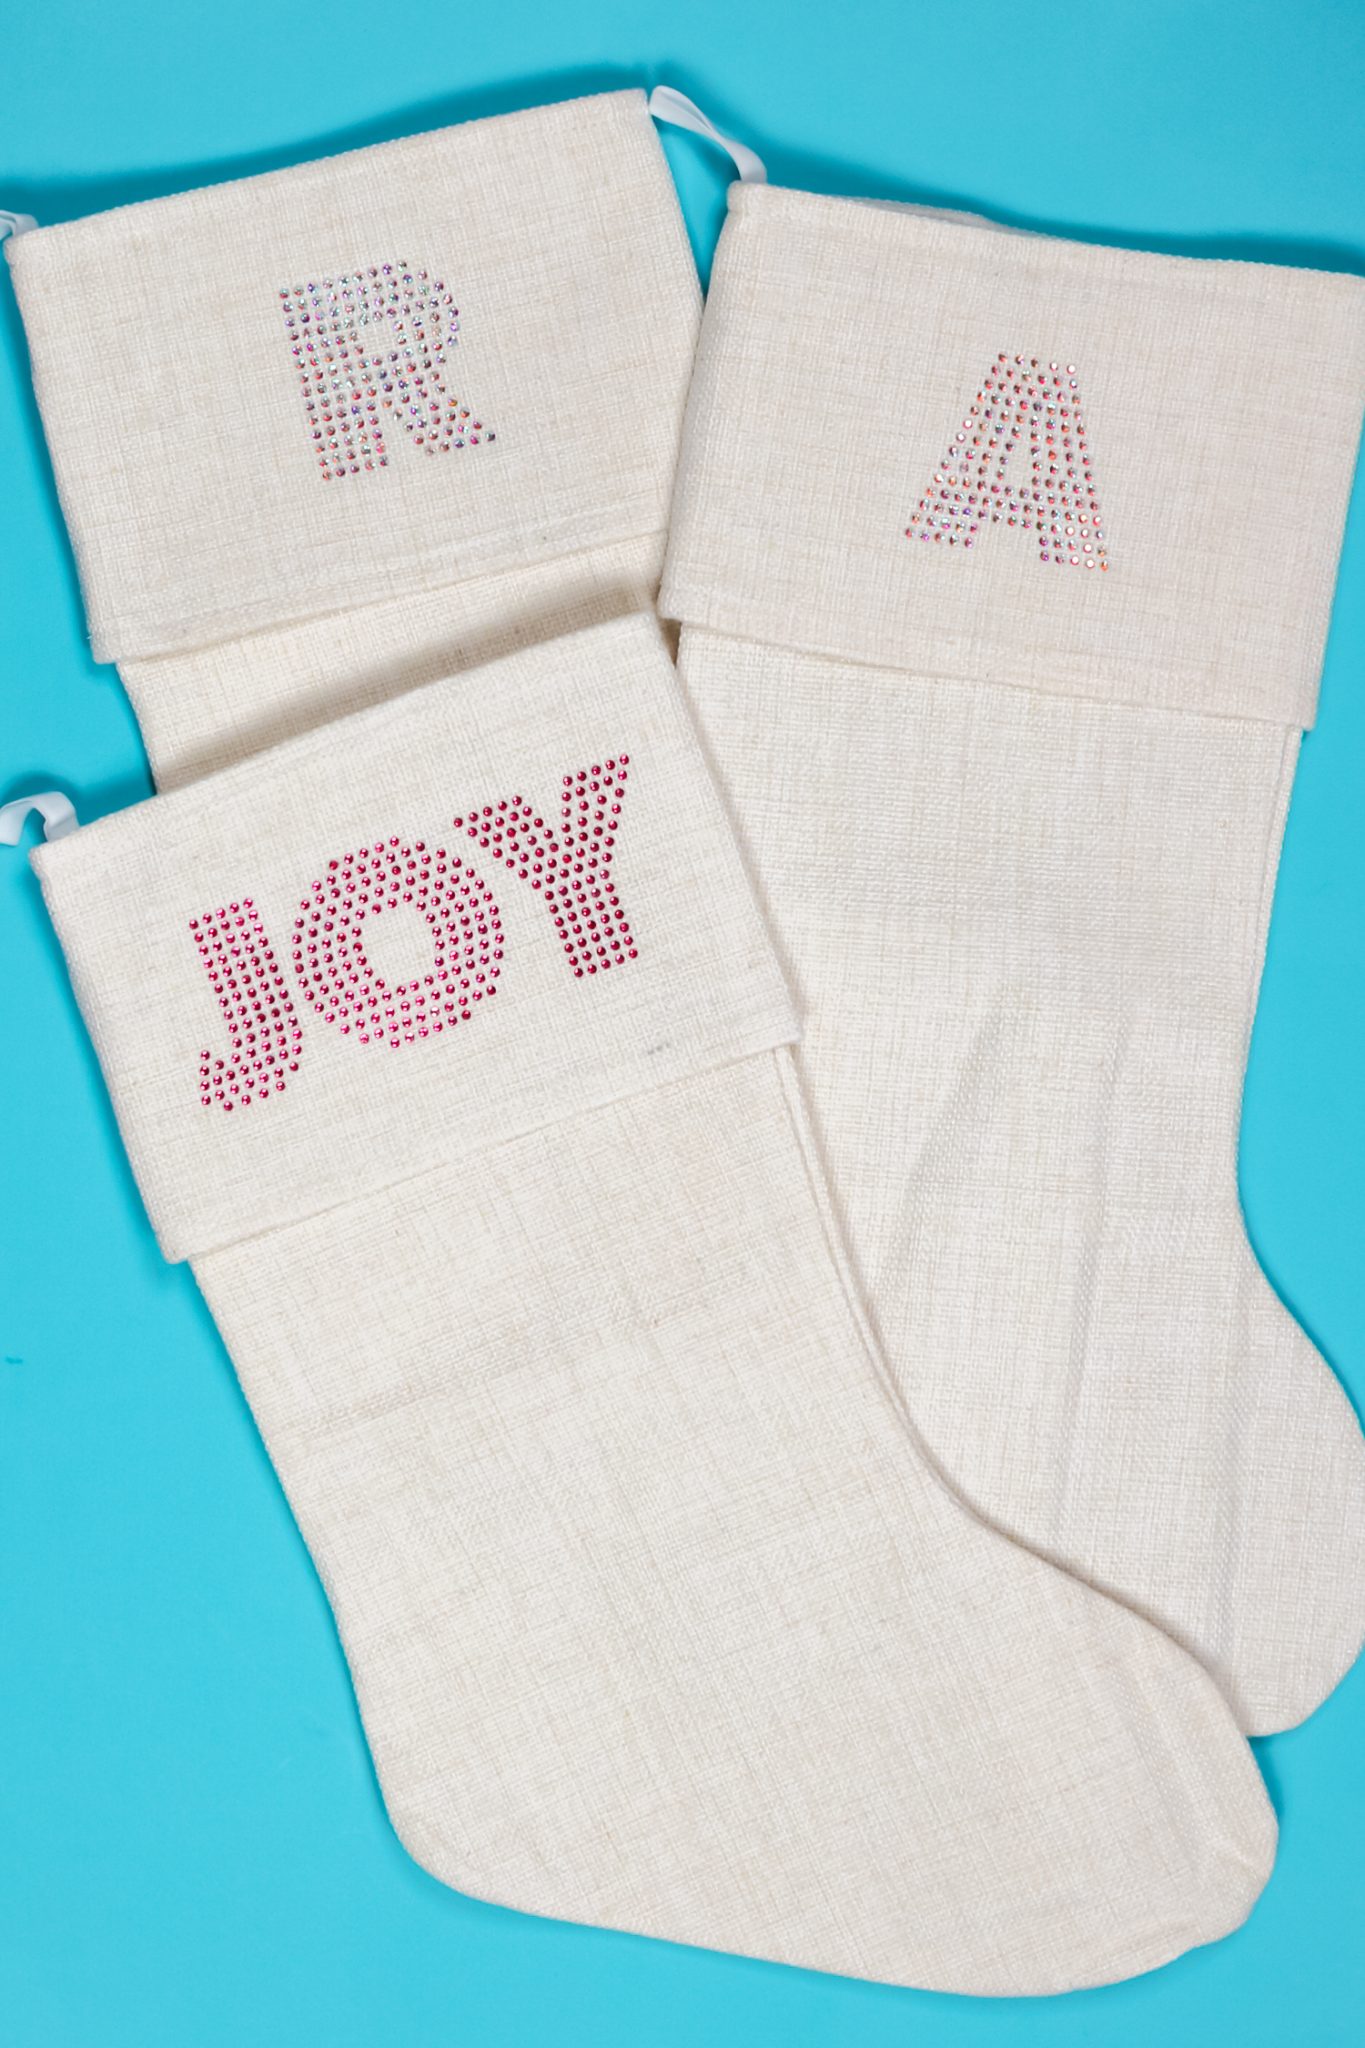
11/21/2025 at 12:09 • 0 commentsMany crafters use Cricut Maker and Cricut Explore series machines to create rhinestone templates, a lesser-known but powerful feature. Magic Flock is a specialized ‘rhinestone template material‘ that allows you to transfer and adhere rhinestones easily. This material is known as flock or hotfix, and it is pressed onto your garment or fabric with a heat press.
![how to create rhinestone template with Cricut]()
Get ready with your Cricut machine that can cut the rhinestone template material, especially in the Maker and Explore series. Whether you’re preparing for a custom project or looking forward to expanding your crafting skills, this guide will teach you ‘How to Create Rhinestone template with Cricut‘, with full step-by-step instructions.
Supplies Needed for Your Rhinestone Project
You will need the following supplies and tools for making rhinestone projects:
- Rhinestone font
- Cricut Maker or Explore series machine
- Weeding tool
- Heat press or household iron
- StandardGrip cutting mat
- Rhinestones
- Rhinestone template flock
- Brush or rhinestone applicator tool
- Transfer tape
- Garments or items to apply the rhinestones
Important Note: Cricut Joy is not designed to create rhinestone projects.
How to Create a Rhinestone Template With Cricut
If you’re planning to create a rhinestone template with your Cricut machine, you must follow a structured approach. Follow this step-by-step guide to get optimal results at every stage.
Step 1: Choose or Design Rhinestone Pattern
The Cricut Design Space software doesn’t currently support rhinestone fills. You have two options:
Option A: Use a Pre-made Design
- Open Cricut Design Space and upload your pre-made design image or SVG file.
- Choose the Upload Image option and then Browse.
- Select your SVG file from your system and click Open.
- Insert the design onto the canvas.
Option B: Create Your Own
- Use the Shapes tool to create individual shapes and arrange these shapes in the desired pattern on the design.
- Add a rhinestone grid to your design.
- Adjust the spacing and size of the grid to match the size of your rhinestones.
- Place the design on the top of the grid.
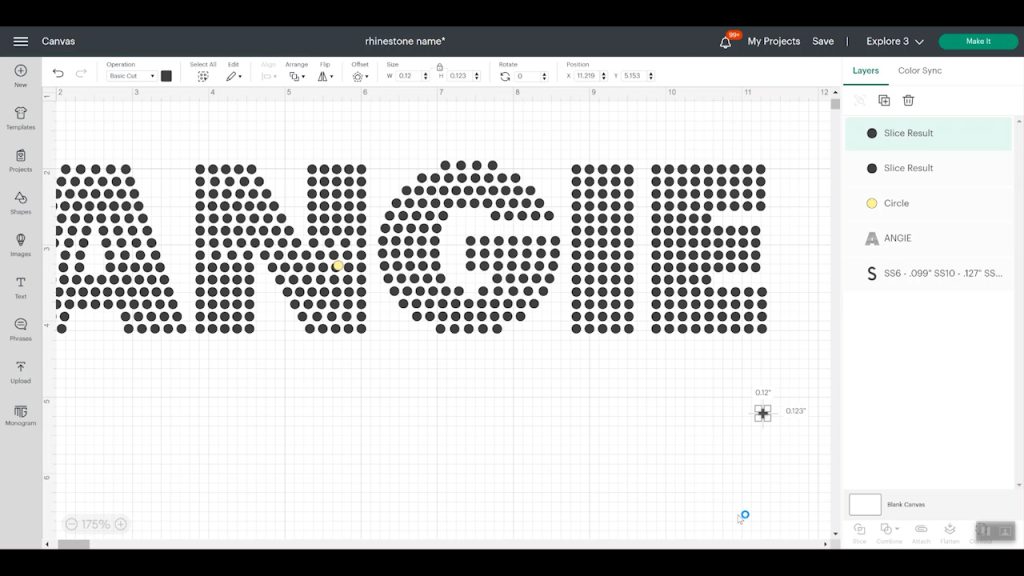
Step 2: Resize Your Design
- Resize the font design so each circle has a diameter of 0.127 inches. Once this is achieved, you’re ready to proceed.
- Verify that each circle is correctly sized.
- Ensure all circle layers are set to Cut.
- Use Attach to keep everything in place during cutting.
- If you want the design to act as a template, you can use the Slice feature to cut the design from the rhinestone grid. You can use the Weld feature for the individual rhinestone shapes to create a single shape for cutting.
![How to Install Rhinestone https://www.dafont.com/ app on windows]()
Note: Remember to mirror your design, especially when it contains text, to ensure proper orientation after pressing.
Step 3: Set Material Settings
- Tap on Browse All Materials and go to Material Settings.
- Click “Add New Material” and locate the green tab at the bottom of the screen.
- Name it as Rhinestone Flock, and then click Save.
- Select “More Pressure” and select the box to apply to all mats.
- Return to the cut screen.
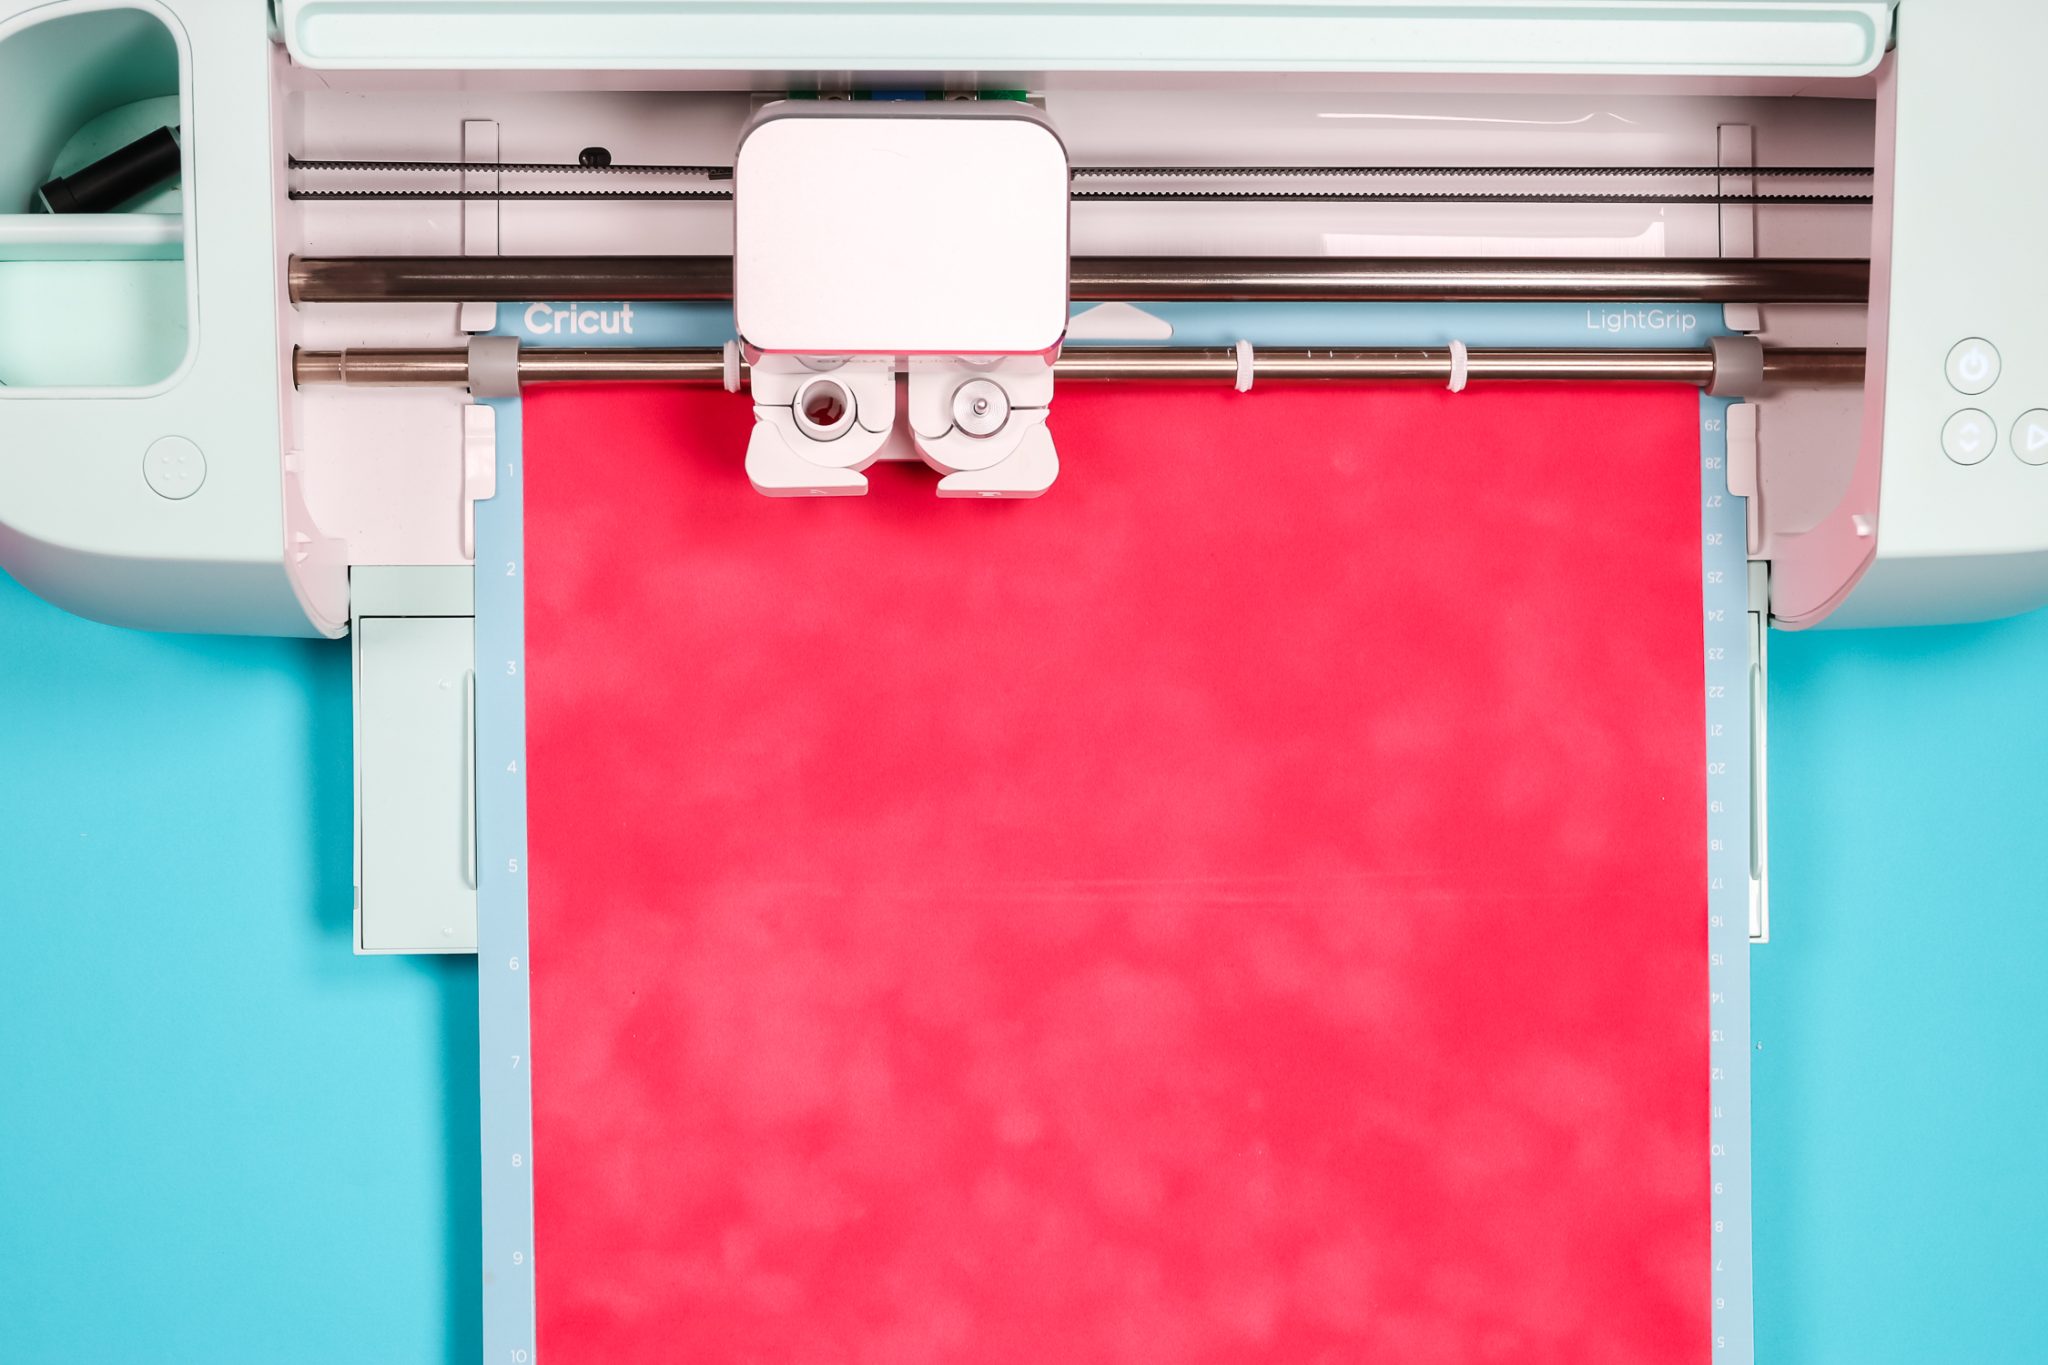
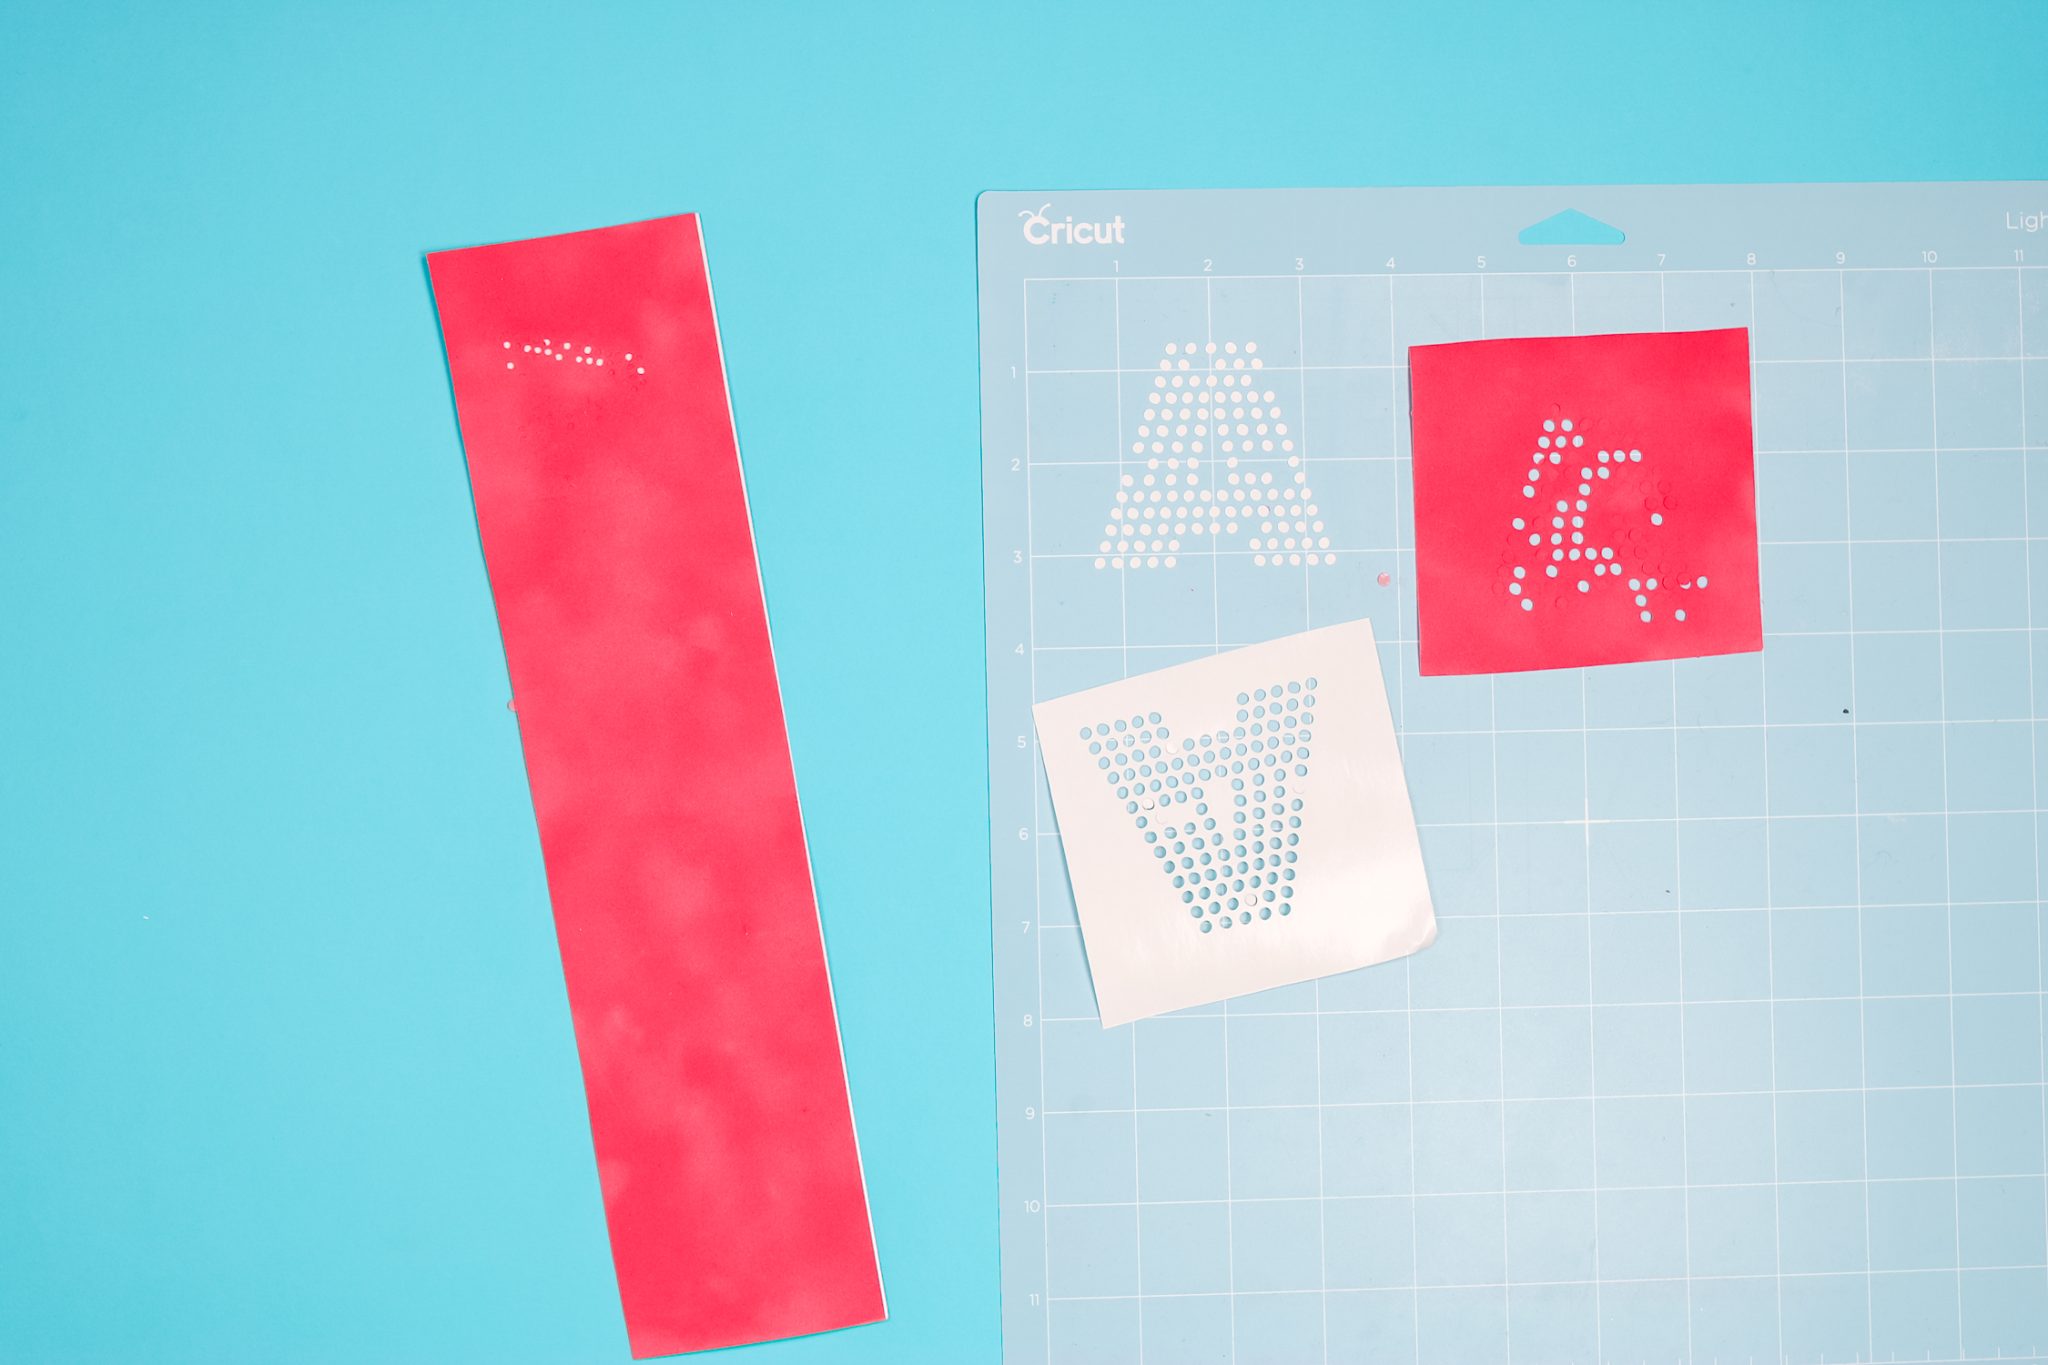
Step 4: Cut the Rhinestone Template
- Now, place the flocked template material on a StandardGrip mat (sticky side down).
- Use a brayer tool to press the material onto the mat.
![Cricut Standard Grip mat]()
- After that, ‘Click Go‘ to begin cutting.
- If you select “Felt” as your material setting in ‘Cricut Design Space‘, the mat may become cluttered with debris, as shown in the image.
![Cricut Design Space Download]()
- Try selecting the flocked paper setting with less pressure. This will allow you to move the mat easily without making a mess.
- Consider using a double-cut setting to ensure a complete cut, especially for detailed designs....
-
install cricut Design Space app
11/08/2025 at 08:52 • 0 commentsGetting started with Cricut is simple, even if you are new to crafting. You can make gifts, wall art, and many other designs using your crafting machine. Before you begin, go to the cricut.com/setup website to download and install cricut Design Space app. Once you connect your machine, you can start creating your own designs or use ready-made ones from the app’s collection.
![Cricut.com Setup (2)]()
-
How to Restart Cricut Explore Air 2? (Easy Steps)
10/29/2025 at 10:32 • 0 commentsHave you ever been in the middle of a DIY project when your Cricut Explore Air 2 suddenly stops working? Don’t worry – it happens to many Cricut users. Sometimes, a quick restart is all your machine needs to get back to normal. Restarting helps fix small glitches, connection issues, or software errors that can slow down your work. Here, I am going to walk you through when and how to restart your Cricut machine the right way. Whether it is a simple restart or a hard reset, these easy steps will help you get your machine running again so you can go back to creating your favorite designs without any stress.
When Should You Restart Your Cricut Explore Air 2?
You should restart your Cricut machine when it stops working properly or doesn’t respond as expected. Restarting helps fix small issues and refreshes the system so it can work smoothly again.
- During a cut: If your project freezes in the middle of cutting, then press the “Stop” button. If the light is still on, turn off the machine and turn it back on to reset it.
- After updates: Once you install a Cricut Design Space or firmware update, restart the machine to make sure the new changes work properly.
- For minor glitches: If your machine starts acting strangely or doesn’t follow your commands, then a restart can help clear temporary bugs.
- To clear the buffer: If you cancel a DIY project, then restarting clears leftover commands so your next design runs without problems.
- After connection loss: If your Cricut machine loses connection to your device, then restarting can help reconnect it easily.
Steps to Restart Cricut Explore Air 2
Restarting your Cricut Explore Machine is an easy process that helps resolve small issues and refresh your machine for smooth performance. Perform the steps in the section below to do it the right way:
Step 1: Press the power button to turn off your crafting machine. Make sure all the lights on the machine are off.
Step 2: After that, unplug the power cord from the machine and the wall outlet.
Step 3: Wait for about 1 minute. This short break allows the machine to reset completely.
Step 4: Next, connect the power cord to the wall socket and then to your machine.
Step 5: Now, you have to press the power button again to turn it back on.
Once your Cricut Explore machine restarts, you can try running a simple cut test to confirm that everything is working correctly.
Steps to Restart Cricut Explore Air 2 via Cricut Design Space
You can also restart your Cricut Explore Air 2 through the Cricut Design Space app if your machine is connected to a desktop or mobile phone. This method is very easy and helps fix software-related issues or connection errors. Follow these easy steps:
Step 1: First of all, you will need to open the ‘Cricut Design Space app‘ on your computer or phone.
Step 2: In the top-left corner, click on the Menu icon and go to Account or Settings.
Step 3: From the menu, select Machine and choose your Cricut model from the list.
Step 4: Click on Disconnect or Forget Device to remove the connection temporarily.
Step 5: After that, close the Cricut Design Space Software completely and then wait for a few seconds.
Step 6: Now, reopen Cricut Design Space, go to Connect Machine, and follow the prompts to reconnect your machine.
Once reconnected, your Cricut cutting machine will automatically restart through the app, which helps clear connection glitches or command issues.
When to Try a Hard Restart for Cricut Explore Air 2
You should try a hard restart for your Cricut Explore Air 2 when it stops working properly or doesn’t respond like it normally does. A...
Read more -
How to Reset Cricut Maker 4? (Tutorial Steps)
10/13/2025 at 12:21 • 0 commentsIs your Cricut Maker 4 not behaving the way it used to recently? Maybe it’s freezing, not cutting right, or just won’t connect to your computer or phone. Before you panic or assume it’s broken, you should know that most Cricut issues can be fixed with a simple reset.
Resetting the Cricut Maker 4 gives it a fresh start, the same way we restart our phones when they start lagging or freezing. It clears small errors, deletes background tasks taking up space, and gets things running smoothly again.
In this blog, we’ll learn “How to Reset Cricut Maker 4“. So, without further ado, let’s get started.
Types of Resets in Cricut Maker 4?
When you reset your Maker 4 machine, you basically refresh its memory and settings. But there are three different types of resets you can do on this machine.
- Soft reset: It restarts your machine, clearing small bugs and freezes.
- Bluetooth or connection reset: This reset is helpful when the Maker 4 fails to connect to your computer or mobile device.
- Factory reset: This type of reset completely resets the machine to its original settings. You should only use this as the last option.
When to Reset Your Cricut Maker 4?
You should only reset your Cricut Maker 4 when it’s not working fine. Here are the scenarios where it’s perfectly applicable to use the reset option.
- Your Cricut Maker 4 won’t turn on or is stuck on the loading screen.
- It’s connected, but the cutting command doesn’t start.
- The Bluetooth connection keeps dropping or isn’t showing up.
- The machine isn’t responding to button presses.
- Your cuts are off, or the blade keeps stopping mid-cut.
- The software (Cricut Design Space) says “Machine not found.”
- You just installed an update, and the machine is acting weird afterward.
If any of these are true for your Cricut Maker 4, a quick reset can save you from a lot of frustration.
Method 1: Soft Reset (Quick Restart)
This is the easiest and safest reset to try first. It simply restarts the machine and clears temporary bugs.
- Press the Power button and wait for the light to go off.
- Remove the power cord from the back of the machine.
- This gives the machine time to discharge any stored power and clear its temporary memory.
- Reconnect the power cord and press the Power button to turn on the machine.
Method 2: Bluetooth or Connection Reset
If your Cricut Maker 4 is having trouble connecting to your computer, tablet, or phone, even after restarting, the Bluetooth connection might just need a reset.
Note: Always make sure the machine is within 10–15 feet of your device when pairing.
For Windows
- Press the Windows key, type Bluetooth, and select the “Bluetooth & other devices settings” option.
- Under paired devices, find your Maker 4 and remove or forget it from the list.
- Once removed, restart the computer.
- Then, go to the “Bluetooth & other devices settings” option again.
- Click Add Device > Bluetooth > Cricut Maker 4.
For Mac
- Go to the Apple menu > System Settings > Bluetooth.
- Find your Cricut Maker 4 on the list.
- Click the small “x” or Remove next to it.
- Restart your Mac.
- Again, go to Apple menu > System Settings > Bluetooth and re-pair the Cricut Maker 4 by clicking Connect when it reappears.
Method 3: Factory Reset
If your Cricut Maker 4 still isn’t working after the soft and Bluetooth resets, maybe it’s stuck, not responding, or acting completely out of sync. Now, you should do a factory reset.
This will restore all settings to the way they were when you first got the machine. It won’t delete your projects from Cricut Design Space, but it will remove custom material settings and Bluetooth pairings.
- Hold...
-
How to Pair Cricut Maker to iPhone? (Full Guide)
09/03/2025 at 05:57 • 0 commentsWant to learn “how to pair your Cricut Maker Machine to iPhone, Android“? The Follow Easy Steps Given in this article and read it till the End you’ll get all your Cricut Machine solutions.
Cricut Maker supports both Bluetooth and USB connections, allowing you to choose between a wired or wireless method based on your device’s compatibility.
If you’re ready to learn how to pair your Cricut Maker with your phone, this guide will walk you through the procedure step-by-step. In this blog, I’ll explain how to connect your mobile device (iPhone or Android) to your machine.
Before starting, make sure to download the Cricut app and complete the initial machine setup. You’ll also need to create a Cricut account or sign in to an existing one to use the app. So, let’s get started!
System Requirements for Cricut Design Space
Design Space has specific system requirements depending on the device you’re using. To ensure a seamless download experience, please verify that the following system requirements are met when downloading Design Space on mobile devices.
- Operating System: iOS 16 or later and Android 10.0 or later.
- Storage: At least 200 MB of free space.
- At least 4 GB RAM (2 GB minimum) for better performance.
- Connectivity: Bluetooth or USB port.
- Display: Minimum screen resolution of 1024px x 768px.
- Internet connection: Needed for downloading the app and for logging in.
Note: Offline mode is not available for Android devices; an internet connection is required.
Download Cricut Design Space on Your Phone
You cannot pair your Cricut machine without downloading and installing the Cricut Design Space app. Design Space is a free app for both iOS and Android that helps you design with your crafting machine. During the initial setup process for your machine, this software will guide you through connecting and registering it. Let’s see how:
For Android
- First, you have to open the Google Play Store app on your mobile device.
- In the search bar at the top, search for Cricut Design Space.
- Find the right Design Space app (it should have a white square icon with Cricut written in the middle).
- Now, tap the Install tab to download and install the Design Space app.
- Once you are done with the installation, the software will appear among your other apps.
- Open the app and log in with your Cricut username & password, or create a new account if you don’t have one yet.
For iOS
- For downloading Design Space, you need to visit the App Store on your iOS device’s home screen.
- Search for Cricut Design Space.
- Find the right one and tap the Get button to download. You may need to enter your iTunes password.
- After download, open the app and sign in with your Cricut ID or set up your machine.
How to Pair Cricut Maker to Phone via Bluetooth?
Pairing your Cricut Maker with your phone (Android or iOS) via Bluetooth is a straightforward process, but it’s even easier with the perfect guide. Follow the instructions below to easily connect your machine to your phone via Bluetooth.
Pair With an Android Phone (Bluetooth)
- Open the Settings on your Android device, either from the app or the dropdown menu as shown in the image below.
- Go to Bluetooth settings.
- Next, ensure that Bluetooth is turned on.
- Your Android phone will search for nearby Bluetooth devices.
- Now, select your Cricut Maker from the list of available devices.
- If prompted, enter the PIN code 0000.
- Once paired, your machine will appear as Connected.
- Open the Cricut Design Space app and navigate to the Machine Setup or New Machine Setup.
- Choose your machine model from the list of available machines.
- Now, the software will guide you with the rest of the setup process, including any necessary updates.
- Once your Cricut Maker is connected, the app may guide...
-
How to Use Cricut EasyPress? (Beginners Tutorial)
07/30/2025 at 11:50 • 0 commentsIn this blog, I will provide a complete guide on “How to use Cricut EasyPress“, illustrated through a simple T-shirt project, in easy-to-follow steps. From key considerations for beginners to the full process of using the EasyPress machine, this blog covers everything you need to know. But before we dive into the process, let’s understand what the Cricut EasyPress is used for and what makes it special.
The Cricut EasyPress is lightweight and easier to store than a bulky heat press. It’s designed to apply iron-on designs (also known as heat transfer vinyl or HTV) to surfaces like fabric, wood, and more. With this advanced heat press machine, you can easily create custom T-shirts, tote bags, home decor, wood projects, and infusible ink crafts.
The EasyPress provides consistent, even heat across its heating plate, unlike a standard iron, which may have uneven hot spots. You can set the exact temperature required for your iron-on material, ensuring proper adhesion every time.
Overview of Cricut EasyPress Buttons
The Cricut EasyPress has key buttons like power, temperature, and timer controls. Here’s a simple explanation of how each one works.
- Power button: This button turns the Cricut EasyPress on and off.
- Temperature button: Use this button to set the desired temperature for your project. Use the (+) and (-) buttons to adjust the temperature.
- Time button: This button is used to set the timer for your heat application with the help of the plus and minus buttons to adjust the time.
- Cricut Go button: Starts heat transfer and countdown. The EasyPress beeps when the time is up.
Things to Know Before You Start
Before learning how to use Cricut EasyPress, it’s important to know these things for safe handling, proper setup, and the best results.
- Avoid ironing boards. Use a flat, sturdy surface, such as a table or worktop, preferably at waist height.
- The Cricut EasyPress mat is recommended for even heat distribution, but a firm, heat-resistant pad can be used as an alternative.
- Ensure your fabric or base material is dry and pre-pressed for 5-10 seconds to remove wrinkles and moisture.
- Always return the EasyPress to its safety base when not in use.
- Use caution when handling the EasyPress, as it gets very hot.
- EasyPress automatically shuts off when not in use for a continuous 13 minutes.
Steps for Using Cricut EasyPress
Don’t worry if you’re a beginner or a pro; you can follow these quick and easy steps to get started with Cricut EasyPress:
Step 1: Prepare the Design
- Make sure to power on your EasyPress machine.
- Download the Cricut Design Space software to your device.
- Use your machine and Cricut Design Space software to create and cut your design from heat transfer vinyl (HTV) material.
- Weed your design by removing the extra material, leaving only the image on the clear backing sheet.
Step 2: Prepare Your T-Shirt
- Place your t-shirt on a firm, flat, heat-resistant surface, like a Cricut EasyPress mat or a folded towel.
- Preheat the area where you will be applying the design for 2-3 seconds to remove any moisture and wrinkles.
Step 3: Set Time and Temperature
- Open your browser and go to cricut.com/heatguide.
- Select your machine model from the given options.
- Select a suitable heat transfer material and base material.
- On the next window, the Heat Guide will display the accurate time and temperature.
- Use the (+) or (-) buttons to set the correct time and temperature.
Note: To switch between Celsius and Fahrenheit, you will have to press and hold the temperature button.
Step 4: Apply the Design
- It’s time to place your design on the t-shirt, ensuring it’s straight and aligned.
- Cover the design with...
-
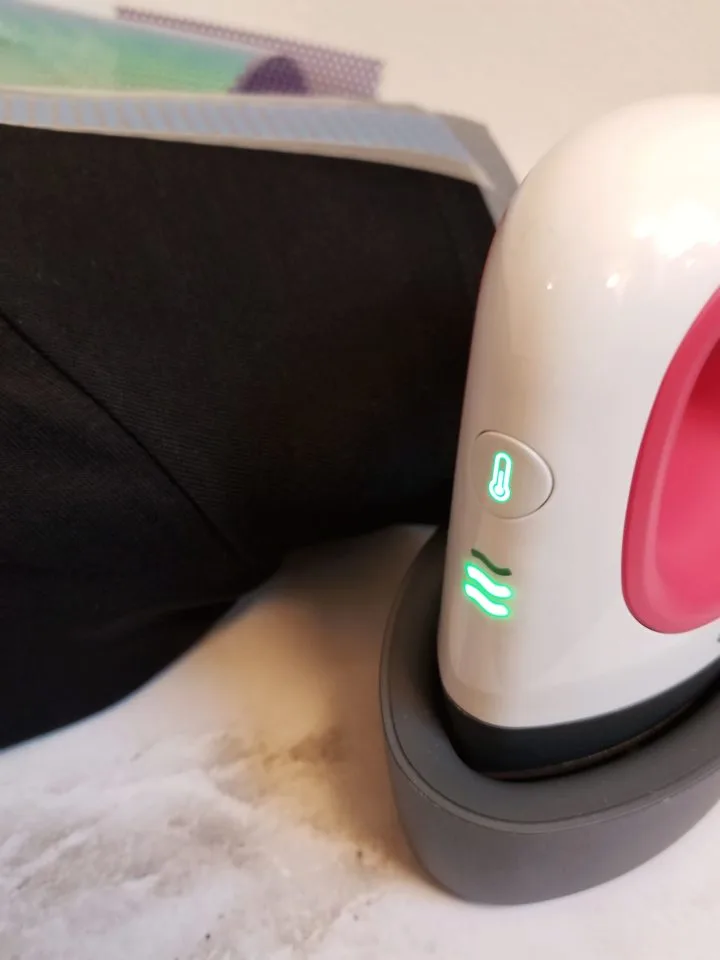
How to Use Cricut Mini Press? (Complete Tutorial)
07/05/2025 at 11:57 • 0 commentsNeed a handy press? Cricut has its own EasyPress Mini machine. In this write-up, we will discover the Cricut Mini Press heat guide printable. Its lightweight and compact design makes it unique and accessible. This machine also slides smoothly over any rough surface, and it is created for unusual objects and places that are harder to reach, like pockets, sleeves, tote bags, etc.
For crafters who work with small designs and projects where it is impossible to reach and stick the design, now it will be possible with this press machine. You can work with small designs and hard-to-reach places.
Its ceramic coating and sharp precision tips provide smooth and consistent motion with less pressure. Because it is light in weight, you do not need to exert much pressure. It has only one button with three settings: low, medium, and high.
Key Features of the Cricut Mini Press Heat Guide Printable
Before you start working with the machine, let’s examine its key features, which distinguish it from an iron or other press machine.
Heat Settings
Contrary to other presses, it has one button that works for all three settings: low, medium, and high. These settings are compatible with materials like iron-on designs, patches, and transfers.
It has three different heat settings. When you press it once, it goes low, then on the second tap, it goes medium, and the last is high. When you switch it on and set the temperature, it turns orange, and when it reaches the temperature, it turns green. Also, it has an auto shut-off feature that will automatically switch off if you do not use it for 13 minutes.
Size and Shape
The size is 3.25 x 1.92 inches, and the bottom looks like a little iron. It is easy to use with the comfortable handle provided, and in shape, it is not very different from an iron. But what makes it different is its flat surface, unlike most irons, which have some little holes for the stem to come out.
Heating Plate
This machine has a ceramic coating that helps to heat the base quickly. By applying heat evenly, it can perfectly smooth the surface. It also has high-temperature-resistant materials, which make it more durable.
What Materials Do You Need for Your Project?
To print on a shirt sleeve with your press machine, you will need the following materials:
- Cricut Design Space for making a design
- Cricut cutting machine
- Cotton shirt because it is absorbent, breathable, and comfortable.
- HTV (Heat Transfer Vinyl) is the ink that will be used to make designs applied to your shirt
- Inkjet printer
- Protective mat
- Teflon sheet or protective sheet
How to Use Cricut EasyPress Mini to Print on a Shirt Sleeve?
Now that you know the key features of this press machine, follow these steps for your project before you start using it.
- Open your Cricut Design Space software and choose or create a design. Then, customize its shape and size.
- When you are done making the design, select it or upload it directly to the machine. After that, it is ready to be cut with a cutting machine.
![Cricut EasyPress Mini machine]()
- Next, load the cutting machine, and you need to cut the design into iron-on vinyl.
- When the design is cut, prepare the machine for heat transfer. Plug in, set the temperature, and wait for the machine to heat up. When it does, it will turn green.
![Cricut EasyPress Mini machine]()
- Now, use a mat to put your design on the shirt’s sleeve, and then use the press machine to apply heat to it.
![Cricut EasyPress Mini machine]()
- Also, wait for the design to cool down properly before peeling off the protective sheet; otherwise, the design can come off the sleeve. And your shirt is ready to use.
![Cricut EasyPress Mini machine rhinestone]()
Note: Always use a Cricut EasyPress Mini machine at room temperature. Before using the machine, make sure your base material or the project you are working on is dry and moisture-free.
Summary
In conclusion, using a press machine is relatively easy. If you are a crafter working with small iron-on...
Read more -
How to Make Stickers With Cricut? (Easy Steps)
06/17/2025 at 11:33 • 0 commentsLearn “how to make stickers with Cricut“. To do so, you need to download the Design Space app on your device. The sticker creation feature in Cricut Design Space is available exclusively to Cricut Access subscribers. Anyone can preview this tool by clicking on “Make It” on their project.
Before we dive into the how-to, let’s talk about why. Making your own stickers is not just creative and fun – it’s also a way to save money, personalize gifts, grow your brand, or start a small business. Whether you’re customizing packaging or decorating laptops, Cricut’s Print Then Cut feature gives you full control over every detail, from design to execution.
Essential Supplies for Creating Custom Stickers
Cricut printable sticker materials are compatible only with inkjet printers. Using a laser printer can damage the materials or the printer. You require the following supplies for making your stickers:
- You will need a Cricut machine that supports the Print Then Cut feature.
- The latest Cricut Design Space software is installed on your computer or mobile device.
- Fine-point blade and housing
- An inkjet printer that supports AirPrint or mobile printing.
- Scraper tool
- LightGrip machine mat
Note: The Explore, Maker, Venture, and Joy Xtra machines are compatible with the Print Then Cut feature. The Cricut Joy is the only model that does not support Print Then Cut.
How to Make Stickers With Cricut: Easy Steps
Making stickers with Cricut is the fastest and easiest way ever. To do so, you need to open your Design Space. Then, follow the steps given below:
Step 1: Use any combination of images and text.
Step 2: Select an image from the Design Space library or upload your own.
Step 3: Choose an image on Canvas.
Step 4: On the top edit bar, click on the Create Sticker button (For Windows).
Choose the Edit option and then click the Create Sticker option (For mobile devices).
Step 5: Now, your screen will prompt you to choose your cut style. You can choose to die-cut or kiss-cut, depending on your convenience.
- Die Cut – It cuts around your design all the way through the material and liner.
- Kiss Cut – It cuts through the printable layer only, leaving the liner intact.
Step 6: It’s time to customize the color and thickness of your sticker’s border.
![How to Make Stickers With Cricut Machine]()
Step 7: If you have selected Kiss Cut, you will have the option to add a Die-Cut Edge. This will add an easy-peel border that cuts all the way through the liner. This makes it easier to hand out individual stickers, as they can be easily peeled from the liner.
Step 8: Next, click the Apply button when you’ve made all your selections, as shown in the image below.
Step 9: If you make any adjustments, locate and re-enable the Create Sticker tool, now labeled as “Edit Sticker.” Click on it.
Step 10: Select Make and follow the instructions in Cricut Design Space to print your sticker.
Step 11: If you haven’t completed the Print Then Cut calibration yet, you will be prompted to do so at this point. Use regular printer paper and follow the instructions to complete the calibration. Only then can you continue with your stickers project.
Step 12: If you want multiple copies of your sticker, you can use the Project Copies optionon the Mat Preview to increase the number of copies.
Step 13: Select Browse All Materials, then choose the specific material setting that will be listed under the Compatible tab.
If you have a Cricut Explore Air 2 or an older model, first turn the Smart Set dial to the “Custom” setting.
Step 14: Now, it’s time to place your printed sticker material on a...
Read more -
How to Connect Cricut Machine to Your Computer and Mobile?
09/03/2024 at 11:56 • 0 commentsSince I’m a craftsperson, I’m here to teach you how to connect Cricut machine to your device. I’ll not talk about any machine in particular. It will be a basic setup process that all of you should follow to set up your machine and start working with it.
Cricut machines are amazingly helpful for people and DIY crafters like you who are passionate about crafting and want to create something unique. Also, the good thing is that you can connect a machine to any device, whether it is a desktop or a smartphone.
If you’ve got a new Cricut machine and you want to make the most out of it, stay tuned to this blog and learn everything you need.
How to Connect Cricut Machine to Computer?
If you want to connect your machine to your computer, check the steps below and try connecting your devices. Let’s begin with the process.
Windows
If you’re a Windows user, these are the steps for you. Check out and continue with these steps.
- Place your machine and Windows computer about 10-15 feet apart.
- Then, check if your PC has Bluetooth settings or not. If not, get a Bluetooth adapter.
- If your PC supports Bluetooth, go to the Start menu and choose Device Manager to continue.
- After that, go to the Start menu and select the Settings option.
- Now, move on to the Devices option and verify if the Bluetooth option is ON.
- In the next step, click the Add Bluetooth or other device option.
- Next, select the Bluetooth option and let your computer detect your machine.
- When your PC finds your machine, choose it from the list on the screen.
- Also, if you need to enter a PIN, type “0000” and hit Connect.
- Finally, you’ll complete the Bluetooth setup between your machine and Windows computer.
This is how to connect Cricut machine to your Windows PC. Now, it’s time to check the steps for a Mac computer.
Mac
If you’re a Mactonish, follow these steps to connect your machine to your Mac computer.
- Place your machine and Mac computer about 10-15 feet apart.
- Then, check whether your Mac supports Bluetooth.
- Now, head to the Apple menu and go to the System Preferences option.
- After that, locate the Bluetooth option.
- If you detect that the Bluetooth connection is OFF, turn it ON.
- Moving forward, select the Pair option.
- Enter “0000” as the password if you’re asked to do so.
- Finally, your machine will be paired to your Mac computer.
That’s how you can connect your devices with each other in simple steps. Now, it’s time to learn the process for mobile devices.
How to Connect Cricut Machine to Mobile Device?
When you are a mobile user, follow these steps to connect your machine to it. You’ll learn how to connect your machine to a mobile device via Bluetooth.
Android
If you’re an Android user, let’s check the steps to learn how to connect Cricut machine to Android. Check the steps below.
- First, make sure that your machine is 10-15 feet apart from your Android device.
- Then, go to Settings on your phone and choose Bluetooth.
- Now, confirm that the Bluetooth connection is ON, and then choose your machine from the available list of devices.
- After that, let your machine be paired with your mobile device via Bluetooth.
- Finally, go to your Design Space and hit the New Product Setup option.
That’s how you can successfully connect your crafting machine to an Android device.
iOS
If you’re an iOS user, check the steps below to learn how to connect Cricut machine to your iOS device.
- First of all, confirm that your machine is ON and only 10-15 feet apart.
- Then, go to the Settings menu and select the Bluetooth option.
- Now, check if the Bluetooth option is ON, and choose your machine from the on-screen list.
- After that, your machine...

williamwilsond32's pages
Hey there, I’m William. I’m a web developer living in San Diego California. I am a fan of DIY, web development, and design.