Close
0%
0%

Lightweight Personal IoT Framework

Reducing the complex nature of more mature automation and IoT frameworks by way of limiting components and scope.

Similar projects worth following
As is a common theme with many projects that I have undertaken, I was looking for a solution to a mundane problem and found the "existing" solutions to be far from ideal. The solutions available to me were too complex, took too many resources, and from my perspective took on a "Rube Goldberg" look and feel.

The problem I am attempting to solve is a simple problem and one that is not uncommon. I have a garage door and a driveway gate. I tend to leave them open on occasion. If I want to check to see if I left them open, I have to physically go out there and look.

Using a KISS approach, I have developed a lightweight framework consisting of an MQTT server running on minimalist hardware and ESP8266 based IoT nodes connect via my local WiFi network. Activation nodes for activating and reporting the status of my garage door and gate, status nodes reporting the status of my garage door and gate, and a web interface for human interaction.

Project Summary

This project documents the development of my own personal and lightweight IoT and automation implementation. Certain details are certain to be left out to protect the security of my household.

I needed a way to monitor the status of my driveway gate and my garage door. There are many reasons for this:

  • On occasion, we would leave them open at night or during the day while we are away and we needed a way to monitor whether they were opened or closed.
  • The RF range of the garage door opener, because of the way it is situated, required that we be within 20 feet of the door for it to open reliably.
  • The garage door opener in our house is very slow, so because of the range issue we found ourselves always waiting for the door to open.
  • The RF range of the driveway gate is also very short. The gate is also very slow. Maddingly so...
  • By way of an unfortunate oversight (doh!), our new car did not come with a built-in garage door opener. So, now we've got two remotes hanging on the visor. That doesn't meet SAF (spousal acceptance factor)
  • I can do better!!!

I investigated some open source/freeware home automation solutions. They all had several things in common that conflicted with my need to get out of the dog house on the car situation:

  • They are somewhat mature and support many different legacy interfaces.
  • They are heavyweight software. By that I mean that I couldn't get any of them to run reliably (or at all) on my minimalist Debian computer (PogoPlug).
  • They are very feature rich, but also very complex. It would take me days to fully understand and at the end of the day I would still need to build and program my own hardware. Too much...

Enough! I was drowning in obscure Linux packages, a billion jar files, and thousands of pages of documentation. Not to mention my poor PogoPlug server has been brought to its knees multiple times with all the experimenting. I need something much more lightweight than this:
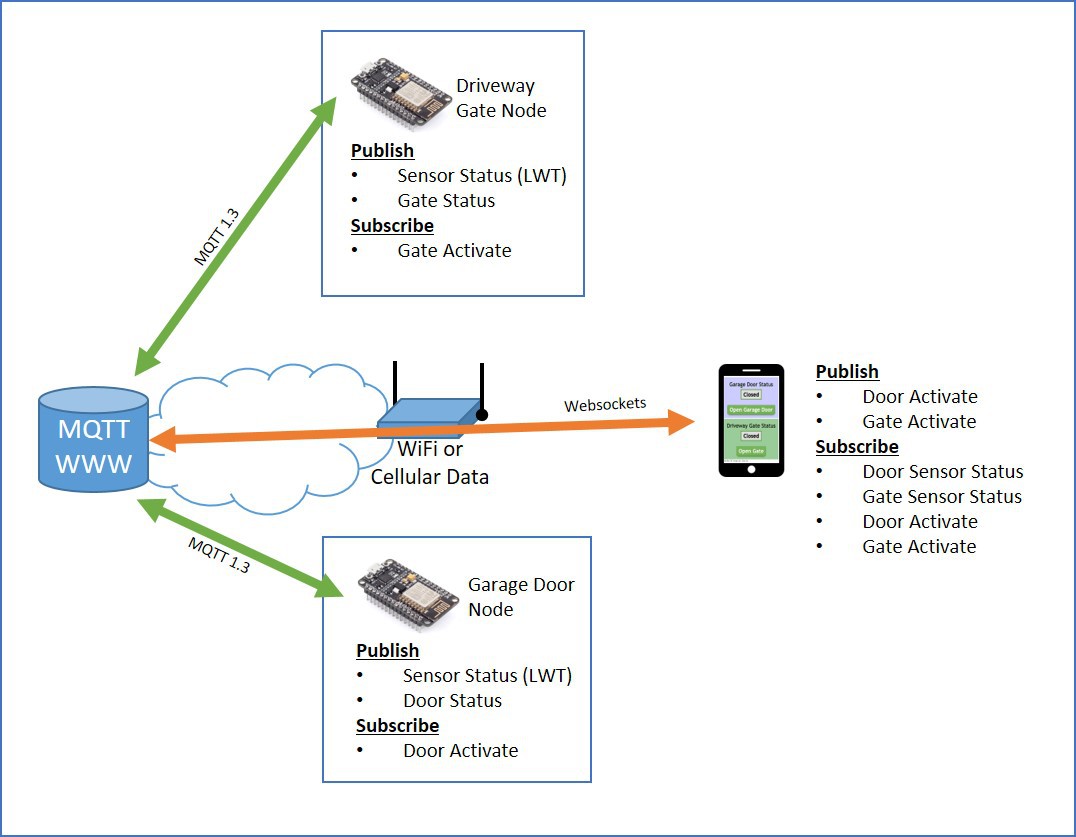
  • A central server process that can run on my PogoPlug or Pi Zero (if I can find one)
    • Why PogoPlug? Well, it's not about the PogoPlug, it's about a small, low power, zero noise, and cheap Linux server platform. Pi Zero is my next stop on the minimalist train.
    • I could have done this on my BBB or my RPi but I wanted to save them for other projects.
    • This is a headless affair, so the PP is perfect. It has everything I need and nothing I don't.
    • My office already heats up enough in the summer. The last thing I need is yet another computer pumping heat into my office space. Yep, home office. Happy camper.
    • Someone get me a Pi Zero already...seriously...
  • A common and mature protocol between nodes and servers.
    • MQTT popped up on my radar as a possible candidate and boy has it impressed.
    • MQTT is abstract enough that I can create my own schema.
    • MQTT is simple enough to run easily on the aforementioned hardware.
    • MQTT libraries are available for a large number of platforms, including "maker friendly" hardware.
    • MQTT is fun to say. MQTT MQTT MQTT!
  • A common and mature transport mechanism.
    • I didn't want to rely on an automation gateway of any kind. Using 315/433/900 MHz RF or BLE would necessitate some sort of RF to IP gateway. That just seems like a snake pit of frustration to me.
    • I could run Ethernet to all my nodes, but I already did that with my security cameras and that was a major PITA. Not a chance.
    • I already have WiFi, so ESP8266 looked to be a good option.
    • Yep, I was right. ESP8266 really did fit the bill.
  • Support for nodes in "maker friendly" hardware.
    • I knew I was going to have to create my own interface hardware.
    • I knew I was going to have to develop my own firmware.
    • I'm not a total genius programmer. Don't get me wrong...I can do some sweet stuff, but I'm not the type to whip up a custom cross compiling toolchain. That's just not me.
    • The NodeMCU 1.0 hardware turned out to hit the sweet spot.
      • It's in a 0.1" pitch format where I can build a node baseboard with all my interface circuitry and then just plug it in.
      • It's super cheap. I can't make anything like that at that...
Read more »

relay_schematic.jpg

JPEG Image - 255.42 kB - 03/24/2016 at 20:51

Preview

control.html

HyperText Markup Language (HTML) - 11.82 kB - 03/17/2016 at 01:05

Download

pogoplugseries4_2.jpg

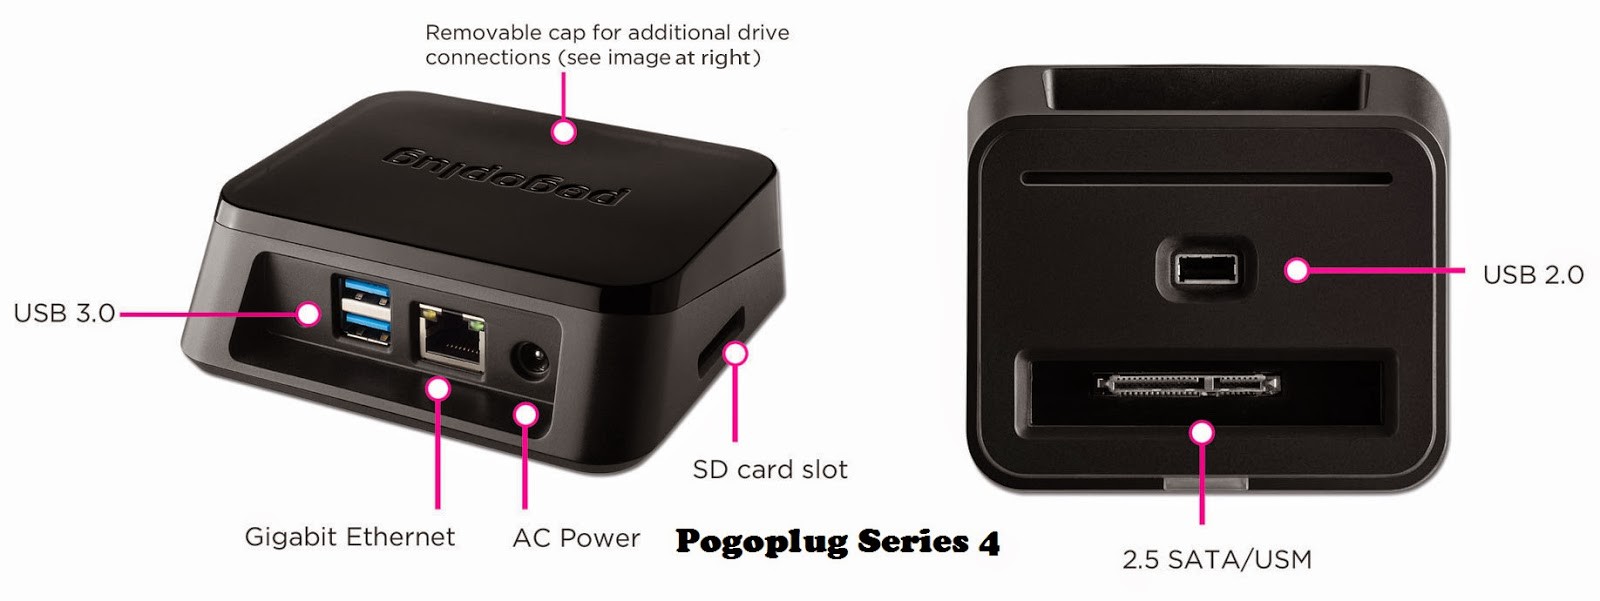
Boy, this photo makes the pogoplug look awesome. It's probably less awesome than that, but it's rock solid and gets the job done.

JPEG Image - 95.38 kB - 03/16/2016 at 22:45

Preview

web interface.jpg

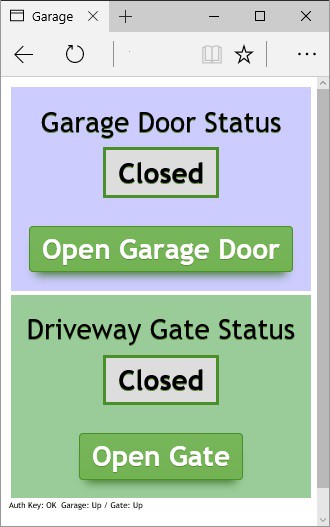
Web Interface view for Smartphone activation.

JPEG Image - 45.13 kB - 03/16/2016 at 22:45

Preview

20160314_150821_001-cropped.jpg

Photo of the Garage Door Sensor (pictured just above the opener)

JPEG Image - 326.73 kB - 03/16/2016 at 22:45

Preview

  • 1 × Minimalist Linux Server Beagle Bone Black, Raspberry PI, PogoPlug, etc. running Mosquitto and Apache
  • 1 × Wireless LAN Wireless for Nodes, Ethernet for Server
  • 2 × NodeMCU 1.0 One for the Garage, one for the Gate
  • 1 × Web Browser (iPhone/Android/PC/Mac) Any browser will do

  • So Far, So Good

    krich04/28/2016 at 16:22 0 comments

    Well, this project has been installed for several months now and I wanted to give an update. It's been an overwhelming success, but I have had couple issues and some lessons learned along the way, so here they are:

    One of my original requirements was to not rely on an active Internet connection at my house in order to be able to open the driveway gate and garage door. This ruled out all of the "cloud" IoT services out there, and there are many. This is why I have my beloved PogoPlug.

    Well, if you look at my code that I posted, I didn't follow that same requirement when I wrote the JavaScript. I found out the hard way (after a rather nasty thunderstorm) that I was way off target on that requirement.

    Because my cable company can't keep my Internet working 24/7, the whole solution took a dirt nap during and after that thunderstorm even though my power, WiFi, Nodes, and PogoPlug were working just fine. I went into troubleshooting mode.

    I figured out that because I was loading up the jQuery and the Paho MQTT libraries from an URL on the Internet, the solution simply won't work without an Internet connection. Thankfully, this was easy enough to fix. After a slightly painful facepalm, I just downloaded the libraries to a directory reachable by the webserver on the PogoPlug, changed the path in the JavaScript code and it's fixed.

    The second thing that took down the project when the Internet failed was DNS resolution. Again, by a fault/laziness in my JavaScript, I was connecting to the MQTT server using the DNS name of my Internet connection (brought to me by DuckDNS [awesome]). The cool thing with that is that my router is smart enough to do a hairpin NAT if I make the request from inside my network as well. So, whether I am connected on my home WiFi or on my SmartPhone on LTE, I can reach my solution through this DNS name.

    Here's the problem. If the Internet is down, 1) I can't reach the solution from the Internet (of course), and 2) I can reach the solution from my local WiFi, but the MQTT connection fails due to the dependency on DNS which is hosted on the Internet. To some JavaScript programmers, you're probably laughing right now and you probably saw this coming. Being that I learned JavaScript just for this project, I think I did pretty well (thank you very much).

    The solution, as it turns out, is a simple tweak to the code that takes advantage of the fact that the web server and the MQTT server are both running on the same host. I simply use the hostname portion of the document URL as the hostname for the MQTT connection. Thus, when accessing from the Internet with a DNS name, the MQTT connection uses the DNS name. When accessing from local WiFi with a DNS name, the router can resolve the DNS, hairpin NAT me and I'm good. And, finally, when accessing from local WiFi with a simple IP address (let's call it emergency mode because it's a different URL from normal), the MQTT connection uses the local IP address to connect to MQTT. PERFECT!!

    So, I'm a little embarrassed about some of the issues I had. I should have seen those coming and fixed them the first go around. It was maybe a little sloppy of me, but I feel pretty good about this project overall because it's really been super reliable and everyone in the house is using it now.

    My next step is to try to build an app rather than rely on a webpage because there are some complexities with the way smartphones interact with their browsers that kind of suck. Like, what happens if you bring up the web page on the WiFi to open the driveway gate and then as you leave in the car, the phone roams over to LTE before you close the driveway gate? This happens a lot with certain uncoachable people in my household. The answer is that you have to reload the page manually (on iOS, on Android the page refreshes automatically about 50% of the time...arrrgh!!). The bottom line is that I don't have total and full control of the MQTT session in JavaScript and I think I can address these things with the control...

    Read more »

  • The Activation Schematic

    krich03/24/2016 at 21:09 0 comments

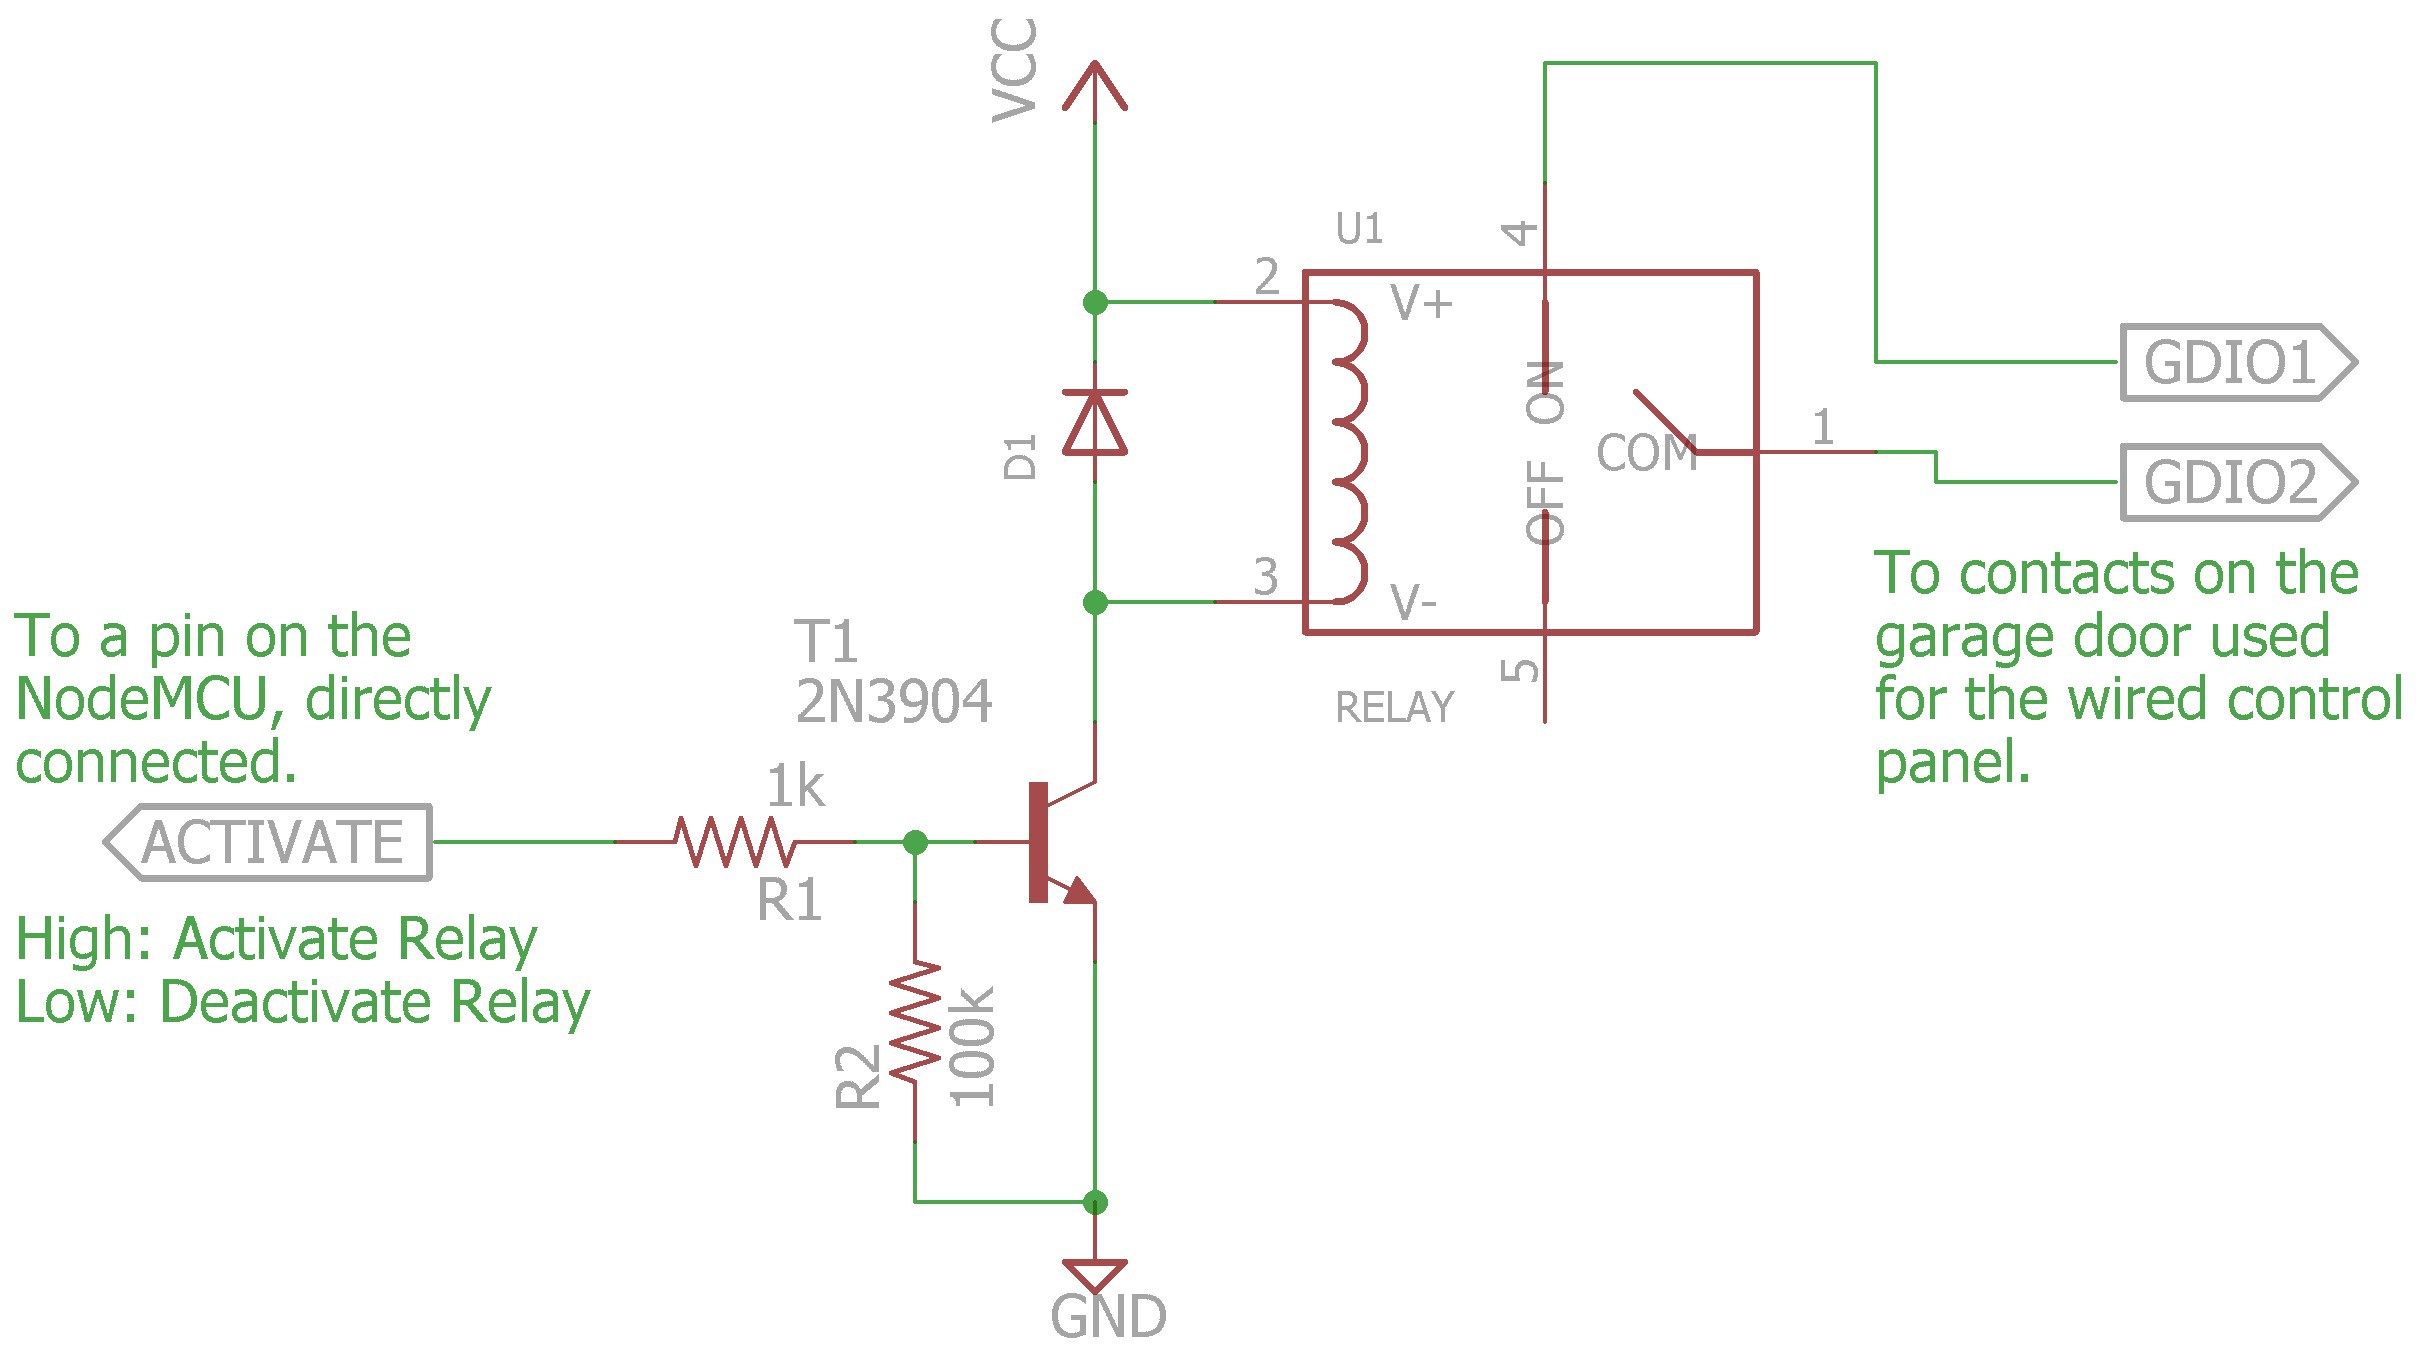
    Gosh, I'm not sure how much I can say about this little circuit that hasn't been said a million times over on the internet in dozens of languages. This is simply a "use a transistor to activate a relay" circuit.

    I'm no electrical engineer, but I will attempt to explain the circuit.

    The basis of this circuit is to find a way to activate a relay which requires 12v or better to activate with a pin on the ESP8266 which is only at 3v. This is where the transistor comes in.

    The transistor is being driven so that it is essentially a switch, that is to say it is either on or off and rarely in between. When the pin on the ESP8266 is driven high (3v), the current through the base (side) turns on the transistor between the collector (top) and the emitter (bottom).

    The resistor connected to the ESP8266 pin (activate) is there to limit the current to reasonable levels so that you don't blow out the IO pin on the ESP8266. The larger value resistor connected to the ground reference keeps the circuit in line and essentially deactivated when or if the ESP8266's pin is floating.

    Because the coil in the relay is an inductive load, it can (and likely always will) generate a high voltage spike as the electromagnet inside the relay turns off. The diode gives that spike a better path to dissipate than through the transistor, thus saving the transistor from an almost certain and unpleasant fate.

    And finally, when the relay activates, it connects the two GDIO1 and GDIO2 terminals together, which is what activates the garage door.

    And, while I'm at it and even though I'm sure it's pretty obvious, I guess I should mention that this circuit to activate the garage door is operated as a "pulse", similar to a button push. That means to activate the garage door, you set the ESP8266 pin high, wait a second, then set it low again. Just like a button push. You push it and then let it go.

    Next I think I'll post about the power supply I used for the NodeMCU (for which I was written up in Hack a Day quite a while back, and, yes, I am still doing it). Stay tuned.

    Happy hacking!

  • The Gate/Door Control Web Page

    krich03/16/2016 at 22:56 0 comments

    In this section, I am going to attempt to show and describe the Javascript, CSS, and HTML used to interact with the MQTT server. I don't know if I will be successful. The entire control.html file is also added to the files section of this website.

    The Paho MQTT client requires a couple Javascript libraries. Link directly to them or load them on your server. You'll need jquery and mqttws31. Google finds them pretty easily.

    <script type='text/javascript' src='/source/jquery-1.8.3.js'></script>
    <script type='text/javascript' src="/source/mqttws31.js"></script>
    

    All the important stuff is set up and handled in the Javascript load function:

    <script type='text/javascript'>//<![CDATA[
    	$(window).load(function(){
    		var client = new Paho.MQTT.Client("myserver.somewhere.com", Number(8080), "clientId" + Date.now().toString());
    		// set callback handlers
    		client.onConnectionLost = onConnectionLost;
    		client.onMessageArrived = onMessageArrived;
    		//Options object for connection
    		var connect_options = {
    			timeout: 3,
    			onSuccess: function () {
    				// Connection succeeded; subscribe to our topic
    				client.subscribe('feeds/Garage/Door/Status', {qos: 0});
    				client.subscribe('feeds/Garage/Sensor/Status', {qos: 0});
    				client.subscribe('feeds/Driveway/Gate/Status', {qos: 0});
    				client.subscribe('feeds/Driveway/Sensor/Status', {qos: 0});
    			},
    			onFailure: function (message) {
    				window.location.reload(false);
    			}
    		};
    		// connect the client
    		client.connect(connect_options);
    		// called when the client loses its connection
    		function onConnectionLost(responseObject) {
    			if (responseObject.errorCode !== 0) {
    				window.location.reload(false);
    			}
    		}
    
    		// called when a message arrives
    		function onMessageArrived(message) {
    			if (message.destinationName == "feeds/Garage/Door/Status") {
    				if (message.payloadString == "Moving...") {     // neither sensor set (opening?)
    					$("#gdstatus").html("Moving...");
    					$("#gdaction").html("Moving...");
    				} else if (message.payloadString == "Closed") { // open sensor set
    					$("#gdstatus").html("Closed");
    					$("#gdaction").html("Open Garage Door");
    				} else if (message.payloadString == "Open") {   // close sensor set
    					$("#gdstatus").html("Open");
    					$("#gdaction").html("Close Garage Door");
    				} else {
    					$("#gdstatus").html(message.payloadString);
    					$("#gdaction").html("Unknown Status");
    				}
    			} else if (message.destinationName == "feeds/Driveway/Gate/Status") {
    				if (message.payloadString == "Moving...") {     // neither sensor set (opening?)
    					$("#gatestatus").html("Moving...");
    					$("#gateaction").html("Moving...");
    				} else if (message.payloadString == "Closed") { // open sensor set
    					$("#gatestatus").html("Closed");
    					$("#gateaction").html("Open Gate");
    				} else if (message.payloadString == "Open") {   // close sensor set
    					$("#gatestatus").html("Open");
    					$("#gateaction").html("Close Gate");
    				} else {
    					$("#gatestatus").html(message.payloadString);
    					$("#gateaction").html("Unknown Status");
    				}
    			} else if (message.destinationName == "feeds/Garage/Sensor/Status") {
    				$("#sensor").html(message.payloadString);
    			} else if (message.destinationName == "feeds/Driveway/Sensor/Status") {
    				$("#gatesensor").html(message.payloadString);
    			}
    		}
    		//Do this when button is clicked.
    		$( "#gdbutton" ).click(function() {
    			message = new Paho.MQTT.Message("1");
    			message.destinationName = "feeds/Garage/Door/Activate";
    			client.send(message);
    		});
    		$( "#gatebutton" ).click(function() {
    			message = new Paho.MQTT.Message("1");
    			message.destinationName = "feeds/Driveway/Gate/Activate";
    			client.send(message);
    		});
    	});//]]>
    </script>
    
    Much of this is self explanatory to those familiar with Javascript. Some of the more odd things in this code are around making sure that when a smartphone brings up the web page after being screen locked or the app has been in the background for a while the proper status is shown. I found that many smartphones, most... Read more »

  • The MQTT Server

    krich03/16/2016 at 22:42 0 comments

    PogoPlug Series 4

    The server I am using is a PogoPlug Series 4 NAS device converted to run Debian Linux. It takes about 100mW of power, is fanless so it runs silently. It doesn't have a whole lot of horsepower and not a lot of RAM and storage on board (I can't remember how much off the top of my head), but it's like it was purpose built for me. I have the server booting off a 8gig USB drive and have a 4TB external hard drive attached. It's running my FTP, SMB, HTTP, RADIUS, and MQTT servers at the moment. Probably a few more that I didn't remember. I get about 160 mbps throughput on large transfers. Good enough.


    Mosquitto 1.4.5

    This version supports not only MQTT, but also a Websocket interface. This is key because the web page that I serve up to control the system uses a javascript Paho MQTT client which uses a Websocket interface to talk to Mosquitto. There is not much configuration to do on Mosquitto, although I admittedly could do some security related configurations and modifications to the project. I wouldn't document that here anyway...so maybe I've done that already!

    mosquitto version 1.4.5 (build date 2015-12-25 23:35:55-0800)
    
    mosquitto is an MQTT v3.1 broker.
    
    See http://mosquitto.org/ for more information.


    Apache

    I have no clue what version of Apache I'm running. I don't think it matters that much. I'm simply serving up a couple web pages. The first is a "registration" web page where credentials are passed back and forth between the client and Apache. These credentials are required for access to the web page that actually provides the interface to control the door and gate.

    The smartphone friendly interface

    The page that is served to control the door and gate, as previously mentioned, uses the Paho javascript MQTT client. It presents a simple interface that shows the door status and a simple push button activation method. This page is designed to render well on smartphones with big text and large finger sized buttons.

    If you're familiar with MQTT, you know that it's a publish/subscribe style service. If you have something interesting to share, you publish a Message to whats called a Topic. If someone has something that interests you, you subscribe to that Topic. Way simple. This way only those interested in an update will receive that update. Additionally, you can make a topic push the last known message to new subscribers. This is perfect for pushing node and gate/door status. And finally, but the coolest thing of oall, MQTT has a feature called Last Will and Testament. That is, when a client connects it can specify a topic and message for the MQTT server to send if that client ever a) disconnects or b) stops responding to keep alives. This way I can monitor the status of my sensor nodes. If I have node that decides to take a dirt nap, the MQTT server will automatically take care of updating the node's up/down status. So simple, so easy.

    You can find more about MQTT and Mosquitto here: www.mosquitto.org

  • Why not BLE?

    krich03/14/2016 at 20:30 0 comments

    Why not BLE?

    Well, honestly I've never understood the blind love affair folks have with BLE. It's short range, it's (for the most part) insecure, and it still needs a gateway to get out to the Internet to be part of the Internet of Things. Yeah, okay, WiFi also requires a gateway. Touche', but the WiFi APs (gateways) are pretty much ubiquitous in the home these days, not to mention WiFi is much more mature, secure, and reliable.

    Now, if I was after a super low power consumption scenario then maybe I would consider BLE with a gateway. But, for the time being, I'm limiting the scope so as to KISS. Remember? You did read the project summary, didn't you?

View all 5 project logs

Enjoy this project?

Share

Discussions

Liam wrote 10/04/2024 at 05:39 point

This project is a great example of how simple, effective solutions can be developed to solve everyday problems with minimal resources. The KISS approach really shines here, and the use of ESP8266 and MQTT seems perfect for the task. It’s inspiring to see how you’ve managed to bypass complex, resource-heavy alternatives with your own lightweight framework. For those studying and working on their own IoT projects, a good environment can make all the difference—check out these great study cafes in London: https://servicevista.co.uk/london-study-cafes-for-students/

  Are you sure? yes | no

Leojames wrote 09/10/2024 at 08:30 point

Thank you for sharing this insightful article! It covers important aspects that many students often overlook. If anyone finds themselves needing extra assistance with their MATLAB assignments, I recommend checking out https://www.mycoursehelp.com/matlab-assignment-help for expert guidance. It can really make a difference in understanding the material better!

  Are you sure? yes | no

asypyba wrote 10/01/2023 at 20:53 point

When I was tasked with creating an annotated bibliography for my research project, I knew I needed expert assistance. That's when I turned to https://essaypro.com/annotated-bibliography-writing-service annotated bibliography writing service, and I haven't looked back since.EssayPro's team of writers has proven to be exceptionally skilled in crafting annotated bibliographies that meet the highest academic standards. They excel at summarizing sources, evaluating their relevance, and providing insightful annotations.

  Are you sure? yes | no

Ray Sherman wrote 06/06/2017 at 14:55 point

KRICH, 

Great Project.  Do you mind sharing more information on the programming for the esp8266?

Thanks.

  Are you sure? yes | no

Benjamin Sjavik wrote 03/27/2017 at 17:55 point

I enjoyed your project! I'm sure I'll be using pieces of this (with attribution, of course) for my own garage door opener sometime down the line. I have a couple other projects in the queue ahead.

I don't know how this will work in your situation, but when I do my build I'm going to experiment with an esp8266 that is attached to the car. I have a 12v port in the trunk that is unused, so it'd be easy to convert your typical cell phone charger into a power supply for something like the nodeMCU you're using. When the car starts, the esp8266 boots and connects to the network. It spams "I'm here!" to an mqtt broker which listens and tells the garage door to open. In short, car starts, esp8266 gets power, garage door opens.

Once the esp8266 exits wifi range, the "I'm here!" message stops. After a timeout, the mqtt broker will tell the garage door to close.

When the car returns, the esp8266 will connect again, and the garage door will open again. When the car is parked and power is cut, the mqtt broker will start the timeout and close the garage door.

This handles the majority of my inconveniences:

1) I don't have to worry about forgetting to close the garage door

2) I don't have to remember to open the garage door when returning home

3) If I am carrying my children or am otherwise unable to open the garage door when I enter, it'll open when I start the car.

Obviously there are some variables I can't measure until I actually do it. As best as I can tell, it takes about 5 seconds for the esp8266 to connect to a network after power is provided. If the wifi range is not great enough, I might have to add an antenna or something to ensure that the door is open by the time I get to the garage.

Because of your cell/wifi hopping issues, I'm guessing you don't have wifi at your gate, so this may not be an option for you. You may be able to use an hc-12, which is a serial to 433 mhz radio adapter, to do something similar. Because the hc-12 has extensive power/range options, and works up to 1.8 km in the open air, you could set up a similar system, and 'proximity detection' would be managed by decreasing the power / range of the broadcasting unit. You could have one hc-12 in your house paired to an esp8266 that talks to your mqtt broker, then another in your car that is constantly broadcasting a code when powered, and when the hc-12 at the house hears the code it tells the esp8266 to tell the mqtt broker to tell the gate and garage door to open.

The hc-12 can be powered by 3.3 or 5v (I can't remember the actual tolerances, just that it works with esp8266 and arduino hardware), and I'm currently building a well tank level sensor that sends data to an esp8266 and repeats it up to the local network. Unfortunately I haven't gotten far enough to send any useful info on that, but I'll write up my project when it's done and send you a link if you're interested.

  Are you sure? yes | no

krich wrote 03/30/2017 at 01:51 point

Hey, thanks for following my project Ben!  I had considered "proximity" triggers, but at the end of the day I just couldn't guarantee that my ladies wouldn't just get it all fouled up.  OMG, they are so judgemental.  The second something doesn't work, it's worthless.  I needed a sure thing, so I decided it would be easier to "train" them to use a positive on/off button style interaction.  Having said that, I am definitely interested in how others skin that cat.  Keep me in the loop (or let me know if you post your project to Hackaday.io).  I want it to work like you describe...

Also, I have made some significant additions to this project, mostly involving the new Amazon Echo I got for Christmas a few months ago.  I plan on documenting that stuff pretty soon.  As a teaser, I finally broke down and had to supplement my MQTT broker with Node-Red.  It turns out that was a great decision.  The downside, it turns out my ladies are uncomfortable talking to a hockey puck.  Oh well...this part of the project is for me.  :-)

  Are you sure? yes | no

Similar Projects

Does this project spark your interest?

Become a member to follow this project and never miss any updates