-
So Far, So Good
04/28/2016 at 16:22 • 0 commentsWell, this project has been installed for several months now and I wanted to give an update. It's been an overwhelming success, but I have had couple issues and some lessons learned along the way, so here they are:
One of my original requirements was to not rely on an active Internet connection at my house in order to be able to open the driveway gate and garage door. This ruled out all of the "cloud" IoT services out there, and there are many. This is why I have my beloved PogoPlug.
Well, if you look at my code that I posted, I didn't follow that same requirement when I wrote the JavaScript. I found out the hard way (after a rather nasty thunderstorm) that I was way off target on that requirement.
Because my cable company can't keep my Internet working 24/7, the whole solution took a dirt nap during and after that thunderstorm even though my power, WiFi, Nodes, and PogoPlug were working just fine. I went into troubleshooting mode.
I figured out that because I was loading up the jQuery and the Paho MQTT libraries from an URL on the Internet, the solution simply won't work without an Internet connection. Thankfully, this was easy enough to fix. After a slightly painful facepalm, I just downloaded the libraries to a directory reachable by the webserver on the PogoPlug, changed the path in the JavaScript code and it's fixed.
The second thing that took down the project when the Internet failed was DNS resolution. Again, by a fault/laziness in my JavaScript, I was connecting to the MQTT server using the DNS name of my Internet connection (brought to me by DuckDNS [awesome]). The cool thing with that is that my router is smart enough to do a hairpin NAT if I make the request from inside my network as well. So, whether I am connected on my home WiFi or on my SmartPhone on LTE, I can reach my solution through this DNS name.
Here's the problem. If the Internet is down, 1) I can't reach the solution from the Internet (of course), and 2) I can reach the solution from my local WiFi, but the MQTT connection fails due to the dependency on DNS which is hosted on the Internet. To some JavaScript programmers, you're probably laughing right now and you probably saw this coming. Being that I learned JavaScript just for this project, I think I did pretty well (thank you very much).
The solution, as it turns out, is a simple tweak to the code that takes advantage of the fact that the web server and the MQTT server are both running on the same host. I simply use the hostname portion of the document URL as the hostname for the MQTT connection. Thus, when accessing from the Internet with a DNS name, the MQTT connection uses the DNS name. When accessing from local WiFi with a DNS name, the router can resolve the DNS, hairpin NAT me and I'm good. And, finally, when accessing from local WiFi with a simple IP address (let's call it emergency mode because it's a different URL from normal), the MQTT connection uses the local IP address to connect to MQTT. PERFECT!!
So, I'm a little embarrassed about some of the issues I had. I should have seen those coming and fixed them the first go around. It was maybe a little sloppy of me, but I feel pretty good about this project overall because it's really been super reliable and everyone in the house is using it now.
My next step is to try to build an app rather than rely on a webpage because there are some complexities with the way smartphones interact with their browsers that kind of suck. Like, what happens if you bring up the web page on the WiFi to open the driveway gate and then as you leave in the car, the phone roams over to LTE before you close the driveway gate? This happens a lot with certain uncoachable people in my household. The answer is that you have to reload the page manually (on iOS, on Android the page refreshes automatically about 50% of the time...arrrgh!!). The bottom line is that I don't have total and full control of the MQTT session in JavaScript and I think I can address these things with the control that an app gives me. The first target is Android (which is what I carry), but I want to do an iOS app as well for the wife and kids. That's a whole new project though.
-
The Activation Schematic
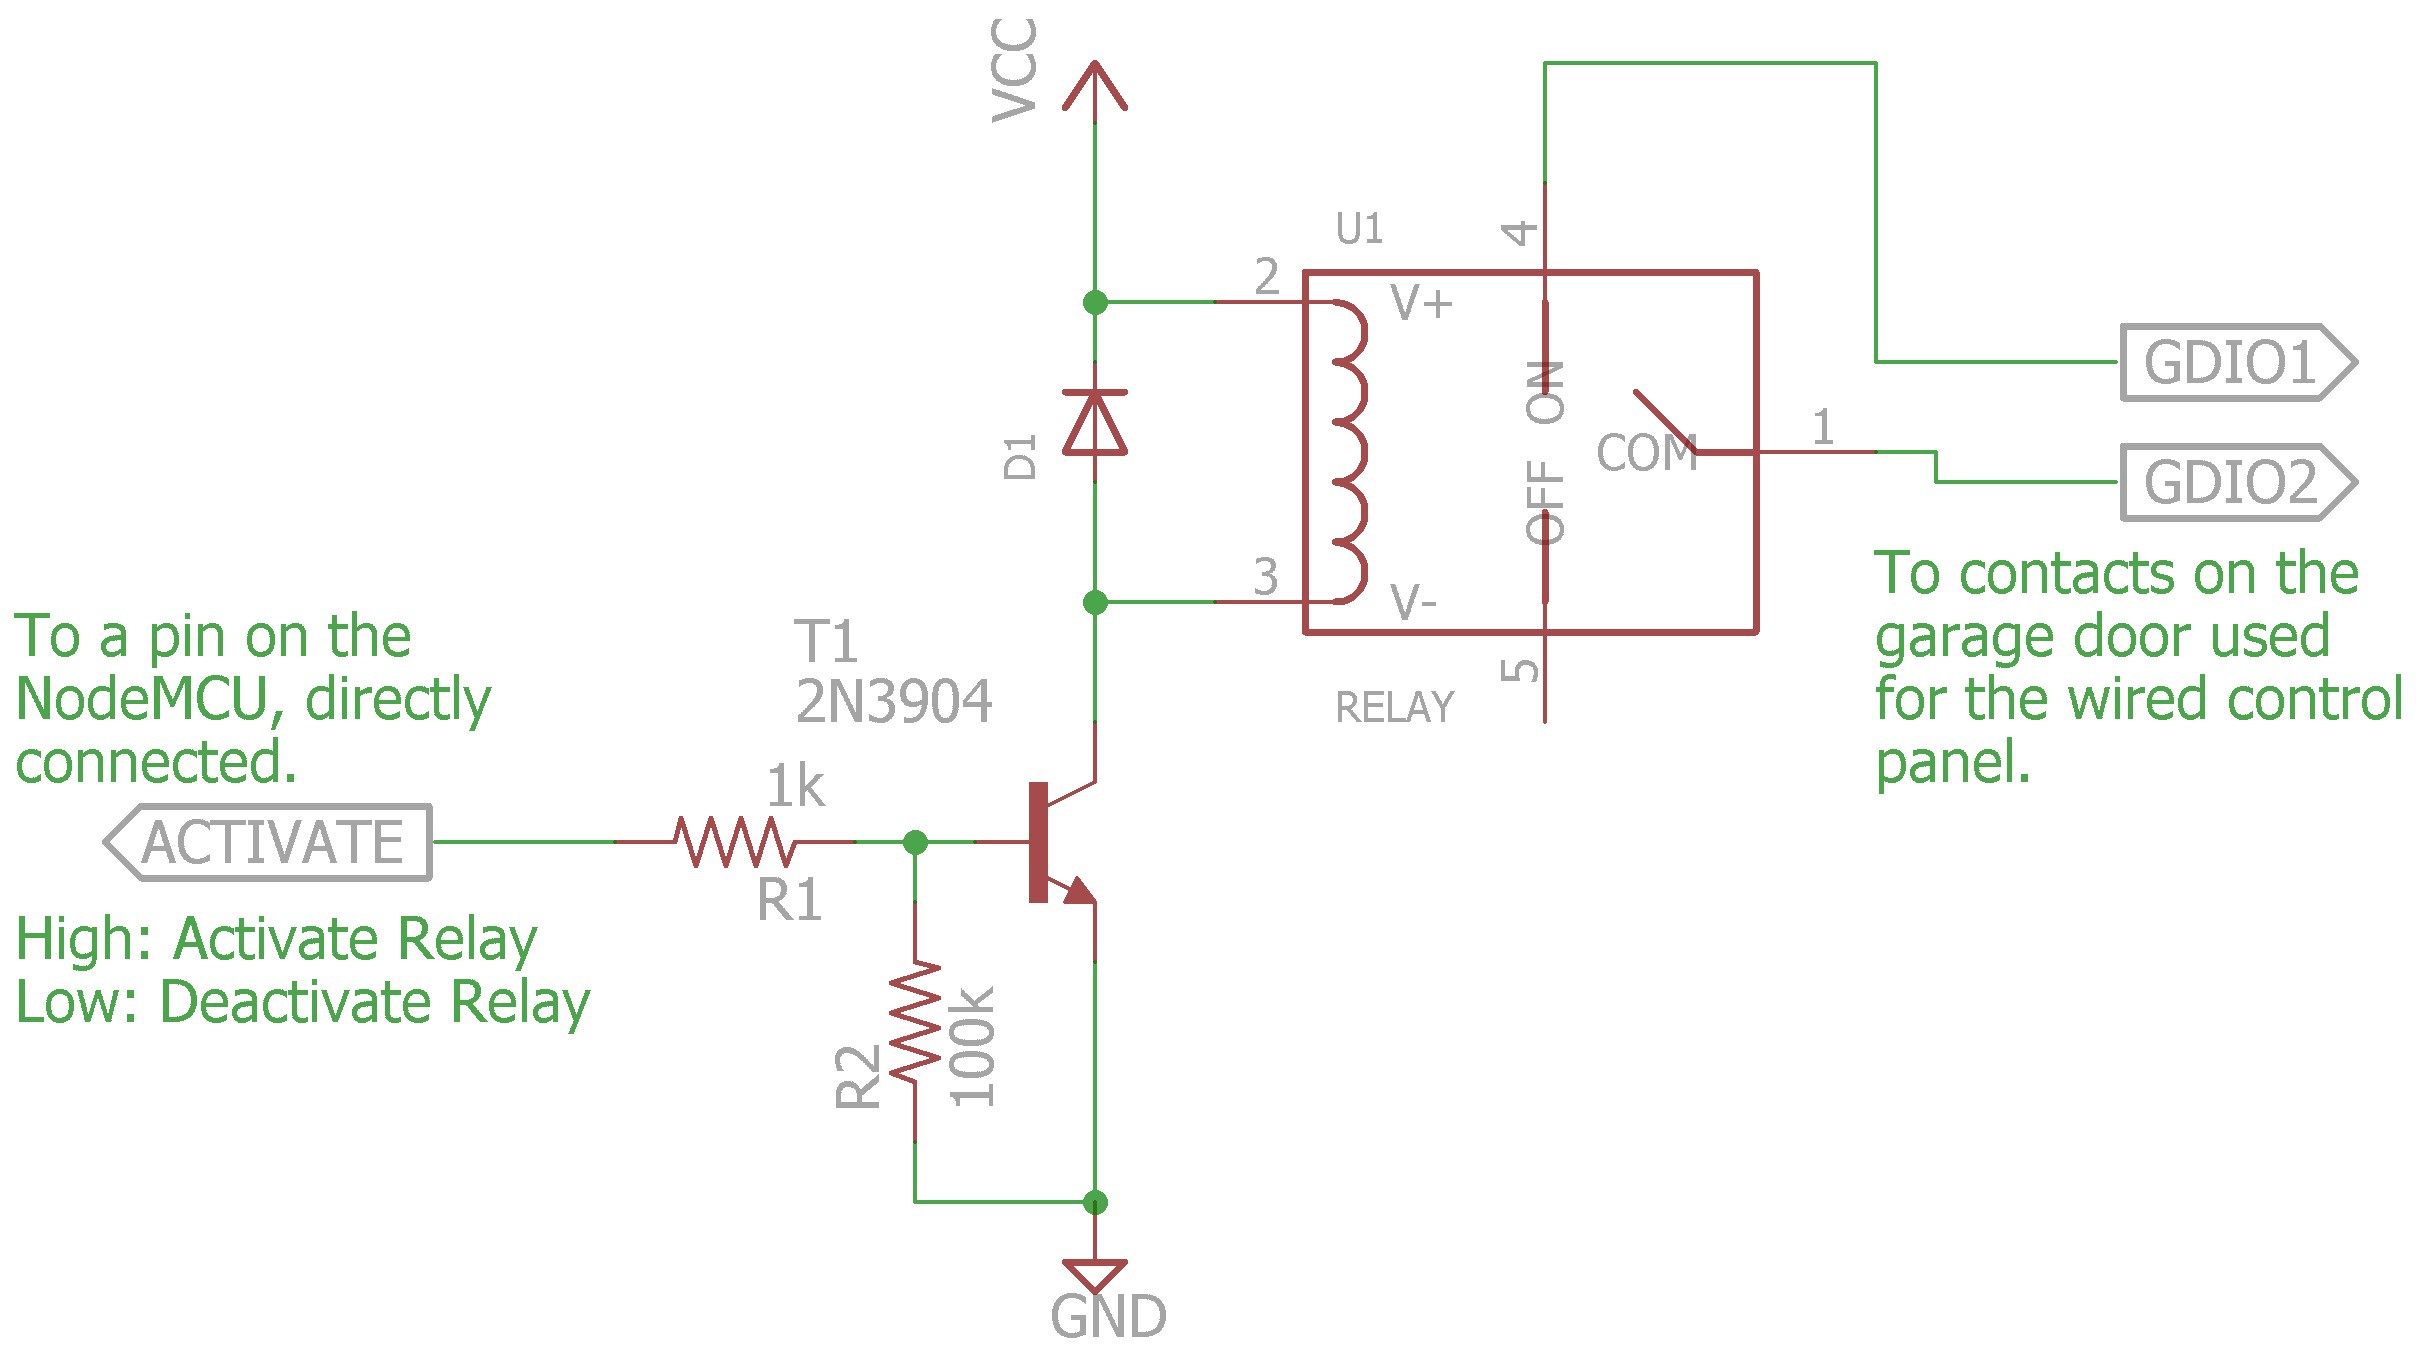
03/24/2016 at 21:09 • 0 commentsGosh, I'm not sure how much I can say about this little circuit that hasn't been said a million times over on the internet in dozens of languages. This is simply a "use a transistor to activate a relay" circuit.
I'm no electrical engineer, but I will attempt to explain the circuit.
The basis of this circuit is to find a way to activate a relay which requires 12v or better to activate with a pin on the ESP8266 which is only at 3v. This is where the transistor comes in.
The transistor is being driven so that it is essentially a switch, that is to say it is either on or off and rarely in between. When the pin on the ESP8266 is driven high (3v), the current through the base (side) turns on the transistor between the collector (top) and the emitter (bottom).
The resistor connected to the ESP8266 pin (activate) is there to limit the current to reasonable levels so that you don't blow out the IO pin on the ESP8266. The larger value resistor connected to the ground reference keeps the circuit in line and essentially deactivated when or if the ESP8266's pin is floating.
Because the coil in the relay is an inductive load, it can (and likely always will) generate a high voltage spike as the electromagnet inside the relay turns off. The diode gives that spike a better path to dissipate than through the transistor, thus saving the transistor from an almost certain and unpleasant fate.
And finally, when the relay activates, it connects the two GDIO1 and GDIO2 terminals together, which is what activates the garage door.
And, while I'm at it and even though I'm sure it's pretty obvious, I guess I should mention that this circuit to activate the garage door is operated as a "pulse", similar to a button push. That means to activate the garage door, you set the ESP8266 pin high, wait a second, then set it low again. Just like a button push. You push it and then let it go.
Next I think I'll post about the power supply I used for the NodeMCU (for which I was written up in Hack a Day quite a while back, and, yes, I am still doing it). Stay tuned.
Happy hacking!
-
The Gate/Door Control Web Page
03/16/2016 at 22:56 • 0 commentsIn this section, I am going to attempt to show and describe the Javascript, CSS, and HTML used to interact with the MQTT server. I don't know if I will be successful. The entire control.html file is also added to the files section of this website.
The Paho MQTT client requires a couple Javascript libraries. Link directly to them or load them on your server. You'll need jquery and mqttws31. Google finds them pretty easily.
<script type='text/javascript' src='/source/jquery-1.8.3.js'></script>
<script type='text/javascript' src="/source/mqttws31.js"></script>
All the important stuff is set up and handled in the Javascript load function:
<script type='text/javascript'>//<![CDATA[
	$(window).load(function(){
		var client = new Paho.MQTT.Client("myserver.somewhere.com", Number(8080), "clientId" + Date.now().toString());
		// set callback handlers
		client.onConnectionLost = onConnectionLost;
		client.onMessageArrived = onMessageArrived;
		//Options object for connection
		var connect_options = {
			timeout: 3,
			onSuccess: function () {
				// Connection succeeded; subscribe to our topic
				client.subscribe('feeds/Garage/Door/Status', {qos: 0});
				client.subscribe('feeds/Garage/Sensor/Status', {qos: 0});
				client.subscribe('feeds/Driveway/Gate/Status', {qos: 0});
				client.subscribe('feeds/Driveway/Sensor/Status', {qos: 0});
			},
			onFailure: function (message) {
				window.location.reload(false);
			}
		};
		// connect the client
		client.connect(connect_options);
		// called when the client loses its connection
		function onConnectionLost(responseObject) {
			if (responseObject.errorCode !== 0) {
				window.location.reload(false);
			}
		}

		// called when a message arrives
		function onMessageArrived(message) {
			if (message.destinationName == "feeds/Garage/Door/Status") {
				if (message.payloadString == "Moving...") {     // neither sensor set (opening?)
					$("#gdstatus").html("Moving...");
					$("#gdaction").html("Moving...");
				} else if (message.payloadString == "Closed") { // open sensor set
					$("#gdstatus").html("Closed");
					$("#gdaction").html("Open Garage Door");
				} else if (message.payloadString == "Open") {   // close sensor set
					$("#gdstatus").html("Open");
					$("#gdaction").html("Close Garage Door");
				} else {
					$("#gdstatus").html(message.payloadString);
					$("#gdaction").html("Unknown Status");
				}
			} else if (message.destinationName == "feeds/Driveway/Gate/Status") {
				if (message.payloadString == "Moving...") {     // neither sensor set (opening?)
					$("#gatestatus").html("Moving...");
					$("#gateaction").html("Moving...");
				} else if (message.payloadString == "Closed") { // open sensor set
					$("#gatestatus").html("Closed");
					$("#gateaction").html("Open Gate");
				} else if (message.payloadString == "Open") {   // close sensor set
					$("#gatestatus").html("Open");
					$("#gateaction").html("Close Gate");
				} else {
					$("#gatestatus").html(message.payloadString);
					$("#gateaction").html("Unknown Status");
				}
			} else if (message.destinationName == "feeds/Garage/Sensor/Status") {
				$("#sensor").html(message.payloadString);
			} else if (message.destinationName == "feeds/Driveway/Sensor/Status") {
				$("#gatesensor").html(message.payloadString);
			}
		}
		//Do this when button is clicked.
		$( "#gdbutton" ).click(function() {
			message = new Paho.MQTT.Message("1");
			message.destinationName = "feeds/Garage/Door/Activate";
			client.send(message);
		});
		$( "#gatebutton" ).click(function() {
			message = new Paho.MQTT.Message("1");
			message.destinationName = "feeds/Driveway/Gate/Activate";
			client.send(message);
		});
	});//]]>
</script>
Much of this is self explanatory to those familiar with Javascript. Some of the more odd things in this code are around making sure that when a smartphone brings up the web page after being screen locked or the app has been in the background for a while the proper status is shown. I found that many smartphones, most importantly my wife's smartphone, would disconnect from the wifi and/or the cellular data connection to save battery which disconnected the MQTT Websockets connection. So, I had to come up with a way for the page to reload when the page was displayed after being in the background or behind a locked screen.I created an inline style sheet mainly because I just wanted to deal with a single file. Again, simplicity. I may move it out into it's own file eventually. Easy enough.
Oh, and yeah, I cheated and used a CSS button tool to make buttons that didn't look like crap.
<style media="screen" type="text/css">
	.gdbuttonclass {
		-moz-box-shadow: 0px 10px 14px -7px #3e7327;
		-webkit-box-shadow: 0px 10px 14px -7px #3e7327;
		box-shadow: 0px 10px 14px -7px #3e7327;
		background:-webkit-gradient(linear, left top, left bottom, color-stop(0.05, #77b55a), color-stop(1, #72b352));
		background:-moz-linear-gradient(top, #77b55a 5%, #72b352 100%);
		background:-webkit-linear-gradient(top, #77b55a 5%, #72b352 100%);
		background:-o-linear-gradient(top, #77b55a 5%, #72b352 100%);
		background:-ms-linear-gradient(top, #77b55a 5%, #72b352 100%);
		background:linear-gradient(to bottom, #77b55a 5%, #72b352 100%);
		filter:progid:DXImageTransform.Microsoft.gradient(startColorstr='#77b55a', endColorstr='#72b352',GradientType=0);
		background-color:#77b55a;
		-moz-border-radius:4px;
		-webkit-border-radius:4px;
		border-radius:4px;
		border:1px solid #4b8f29;
		display:inline-block;
		cursor:pointer;
		color:#ffffff;
		font-family:Trebuchet MS;
		font-size:28px;
		font-weight:bold;
		padding:6px 12px;
		text-decoration:none;
		text-shadow:0px 1px 0px #5b8a3c;
		text-align: center;
	}
	.gdbuttonclass:hover {
		background:-webkit-gradient(linear, left top, left bottom, color-stop(0.05, #72b352), color-stop(1, #77b55a));
		background:-moz-linear-gradient(top, #72b352 5%, #77b55a 100%);
		background:-webkit-linear-gradient(top, #72b352 5%, #77b55a 100%);
		background:-o-linear-gradient(top, #72b352 5%, #77b55a 100%);
		background:-ms-linear-gradient(top, #72b352 5%, #77b55a 100%);
		background:linear-gradient(to bottom, #72b352 5%, #77b55a 100%);
		filter:progid:DXImageTransform.Microsoft.gradient(startColorstr='#72b352', endColorstr='#77b55a',GradientType=0);
		background-color:#72b352;
	}
	.gdbuttonclass:active {
		position:relative;
		top:1px;
	}
	.gdtextclass {
		color:#000000;
		font-family:Trebuchet MS;
		font-size:28px;
		padding:6px 12px;
		text-shadow:0px 1px 0px #5b8a3c;
		text-align: center;
	}
	.gdtextclassbold {
		color:#000000;
		background-color: #dddddd;
		border:3px solid #4b8f29;
		font-family:Trebuchet MS;
		font-size:28px;
		font-weight:bold;
		padding:6px 12px;
		text-shadow:0px 1px 0px #5b8a3c;
		text-align: center;
	}

</style>
And finally the body of the web page. Very simple compared to the above.
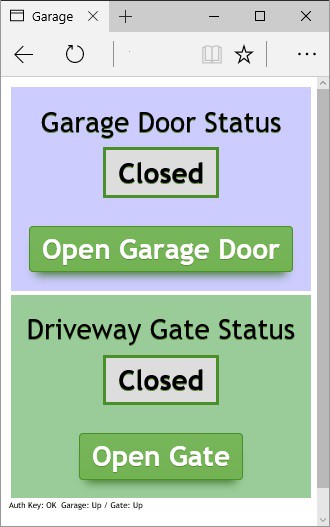
<body> <div style="text-align: center; background-color: #ccccff; width: 300px; border: 2px solid #ffffff"> <br> <span class="gdtextclass">Garage Door Status</span> <br> <br> <span id="gdstatus" class="gdtextclassbold"></span> <br> <br> <br> <a href="#" id="gdbutton" class="gdbuttonclass"><span id="gdaction"></span></a> <br> <br> </div> <div style="text-align: center; background-color: #99cc99; width: 300px; border: 2px solid #ffffff"> <br> <span class="gdtextclass">Driveway Gate Status</span> <br> <br> <span id="gatestatus" class="gdtextclassbold"></span> <br> <br> <br> <a href="#" id="gatebutton" class="gdbuttonclass"><span id="gateaction"></span></a> <br> <br> </div> <div style="font-family:Trebuchet MS; font-size:8px"> Garage: <span id="sensor">Unknown</span> / Gate: <span id="gatesensor">Unknown</span> </div> <br><br> </body> -
The MQTT Server
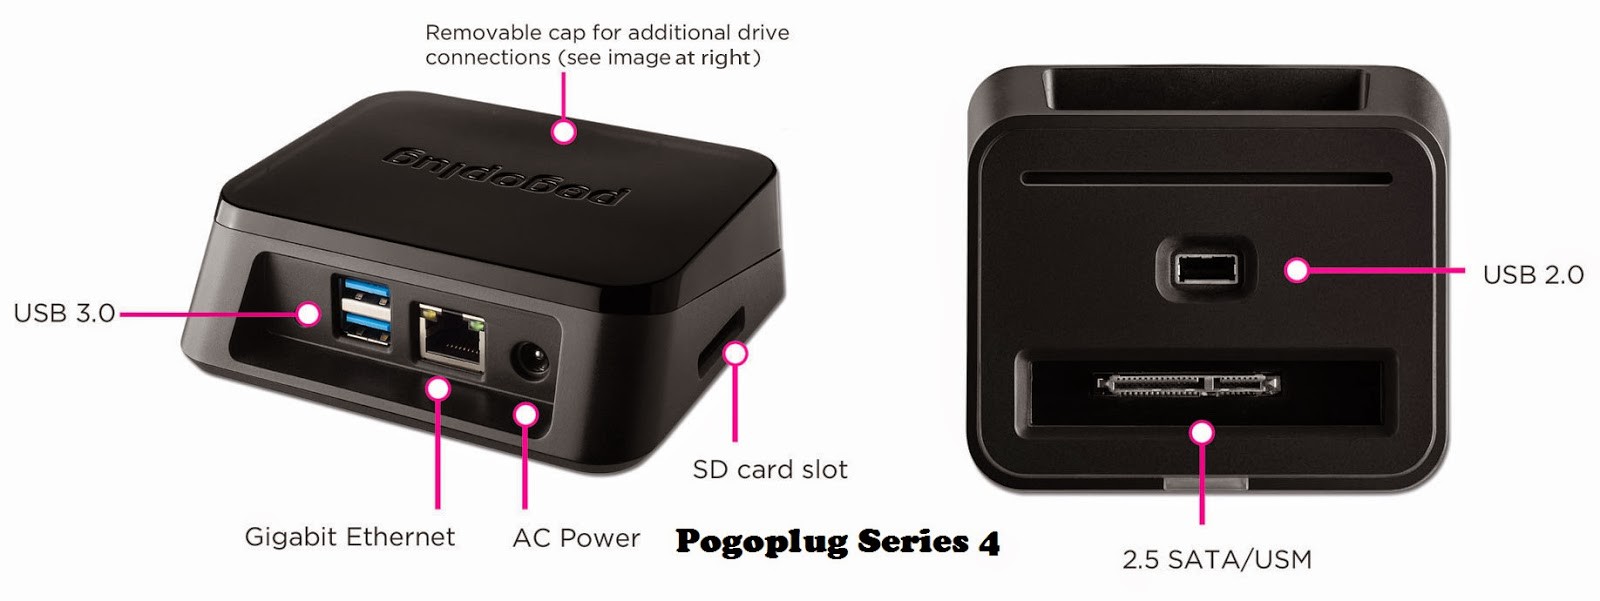
03/16/2016 at 22:42 • 0 commentsPogoPlug Series 4
The server I am using is a PogoPlug Series 4 NAS device converted to run Debian Linux. It takes about 100mW of power, is fanless so it runs silently. It doesn't have a whole lot of horsepower and not a lot of RAM and storage on board (I can't remember how much off the top of my head), but it's like it was purpose built for me. I have the server booting off a 8gig USB drive and have a 4TB external hard drive attached. It's running my FTP, SMB, HTTP, RADIUS, and MQTT servers at the moment. Probably a few more that I didn't remember. I get about 160 mbps throughput on large transfers. Good enough.
Mosquitto 1.4.5
This version supports not only MQTT, but also a Websocket interface. This is key because the web page that I serve up to control the system uses a javascript Paho MQTT client which uses a Websocket interface to talk to Mosquitto. There is not much configuration to do on Mosquitto, although I admittedly could do some security related configurations and modifications to the project. I wouldn't document that here anyway...so maybe I've done that already!
mosquitto version 1.4.5 (build date 2015-12-25 23:35:55-0800)

mosquitto is an MQTT v3.1 broker.

See http://mosquitto.org/ for more information.
Apache
I have no clue what version of Apache I'm running. I don't think it matters that much. I'm simply serving up a couple web pages. The first is a "registration" web page where credentials are passed back and forth between the client and Apache. These credentials are required for access to the web page that actually provides the interface to control the door and gate.
The page that is served to control the door and gate, as previously mentioned, uses the Paho javascript MQTT client. It presents a simple interface that shows the door status and a simple push button activation method. This page is designed to render well on smartphones with big text and large finger sized buttons.
If you're familiar with MQTT, you know that it's a publish/subscribe style service. If you have something interesting to share, you publish a Message to whats called a Topic. If someone has something that interests you, you subscribe to that Topic. Way simple. This way only those interested in an update will receive that update. Additionally, you can make a topic push the last known message to new subscribers. This is perfect for pushing node and gate/door status. And finally, but the coolest thing of oall, MQTT has a feature called Last Will and Testament. That is, when a client connects it can specify a topic and message for the MQTT server to send if that client ever a) disconnects or b) stops responding to keep alives. This way I can monitor the status of my sensor nodes. If I have node that decides to take a dirt nap, the MQTT server will automatically take care of updating the node's up/down status. So simple, so easy.
You can find more about MQTT and Mosquitto here: www.mosquitto.org
-
Why not BLE?
03/14/2016 at 20:30 • 0 commentsWhy not BLE?
Well, honestly I've never understood the blind love affair folks have with BLE. It's short range, it's (for the most part) insecure, and it still needs a gateway to get out to the Internet to be part of the Internet of Things. Yeah, okay, WiFi also requires a gateway. Touche', but the WiFi APs (gateways) are pretty much ubiquitous in the home these days, not to mention WiFi is much more mature, secure, and reliable.
Now, if I was after a super low power consumption scenario then maybe I would consider BLE with a gateway. But, for the time being, I'm limiting the scope so as to KISS. Remember? You did read the project summary, didn't you?
Lightweight Personal IoT Framework
Reducing the complex nature of more mature automation and IoT frameworks by way of limiting components and scope.
 krich
krich

