Close
0%
0%

Home Automation Power Socket

A simple power socket that contains a relay, a temperature/humidity sensor, a motion sensor and that is manageable over WiFi

Similar projects worth following
I removed the content of a remote controlled power socket and replaced it with my custom PCB. The core is the ESP8266 that I programmed using NodeMCU and Lua language. The temperature/humidity sensor is a DHT11 or DHT22 . The relay is Sharp SSR that is rated for 1,5A but I also added external pads that you can use to control a more powerful relay if needed. There is also a motion sensor.
The socket data (temperature,humidity,SSR status and motion sensor status) can be accessed by IP address when it is connected to your network. The data returned is JSON type which makes it easy to create custom applications or integrate it with existing home automation systems such as Domoticz.

Details about some components:

  • AC/DC Converter

The AC/DC converter is made by Hi-Link and the model is HLK-PM01. This component is perfect for this project because it is really small and cheap. It supplies 5V/600mA from 130VAC or 240VAC. It is plenty of power for this project as the current consumption doesn't go over 200mA.
See there for a detailed test : http://lygte-info.dk

  • Solid State Relay

The relay is a Sharp Microelectronics model PR3BMF. I picked up that model because it is an 8 DIP package (small) and it has a decent Load current (max 1.2A) . I kinda copied the schematic from Sparkfun from their 8A Sharp relay . I designed the PCB with the possibility to add an external, more powerful, relay if needed.

  • ESP8266

I picked up the esp-07 version for 2 main reasons : small form factor with enclosure and possibility to add an external antenna.
The firmware I use is NodeMCU . You can create your own custom build containing the modules you want over there . I have added the build I use in the files section of this project. The NodeMCU API documentation is the starting point of any project. To code and push my code to the ESP8266 I use ESPlorer which is built with Java making it available for multiple OS's. The programming language used by NodeMCU is lua . For people who are familiar with Arduino, it should not be a problem to get used to.

  • Power Socket

The power socket is a cheap 3-pack you can buy in Clas Ohlson shops. Those shops are in a few European countries :
Finland : http://www.clasohlson.com/fi/Kaukokytkin-3-kpl-Cotech-Smart-Home/36-6010

Sweden : http://www.clasohlson.com/se/Fjärrströmbrytare-3-pack-Cotech-Smart-Home/36-6010

Norway : http://www.clasohlson.com/no/Cotech-Smart-Home,-fjernbryter-3-pack-/36-6010

UK : http://www.clasohlson.com/uk/Remote-Switch-Set-3-Pack/18-1255

Germany : No online shop, but I assume it should be available in the stores.

I only bough the Finnish version but it looks like the Swedish and the Norwegian are identical. I would imagine the German is also similar. The UK version looks different because they use different plugs but the inside is probably very similar.

Those sockets require the use of a tri-wing screwdriver bit (at least the Finnish version) to be opened

init_basic.lua

Basic lua script for the ESP8266. It creates a webserver that listens on port 80

x-lua - 1.90 kB - 04/23/2016 at 12:27

Download

HomeAuto.brd.png

PNG file of the PCB in Eagle

Portable Network Graphics (PNG) - 89.36 kB - 04/10/2016 at 13:53

Preview

HomeAuto.sch.png

PNG file of the Schematic in Eagle

Portable Network Graphics (PNG) - 27.94 kB - 04/10/2016 at 13:53

Preview

nodemcu_float_cjson_bit.bin

Node MCU Firmware with the following 10 modules: node file gpio wifi net tmr uart bit cjson dht.

octet-stream - 371.20 kB - 04/10/2016 at 13:18

Download

HomeAuto.sch

Schematic made with Eagle

sch - 1.30 MB - 04/10/2016 at 13:09

Download

View all 6 files

  • 1 × ESP8266 WiFi chip model ESP-07
  • 1 × Sensor - Temperature/Humidity DHT11 or DHT22
  • 1 × Sensor - Motion search for 'PIR' on eBay
  • 1 × Relay - SSR 425-2562-5-ND
  • 1 × AC/DC Converter HLK-PM01

View all 21 components

  • Instructions Update

    David Davenne04/23/2016 at 12:57 0 comments

    Hello,

    I have added a basic lua script to the list of files for the project. I also added a few instructions on how to flash the ESP8266 and how to load scripts using ESPlorer.

    I have a lot of work at the moment and I am away from home during the week meaning that the updates of the project are not coming as often as I would like. Sorry about that.

    Have a nice weekend !

    -David

  • Small update

    David Davenne04/10/2016 at 14:06 0 comments

    Hello,

    I have updated a few things in the project page :

    • Added component list and their Digikey reference
    • Added details about AC/DC converter, SSR and ESP8266
    • Added Eagle files for Schematic and PCB
    • Added NodeMCU firmware

    I also did some power consumption testing this weekend and the average consumption is about 30mA (see picture in the gallery) when updating a server every minute. This makes a power consumption of about 150mW. The power eating component is the ESP8266 when starting and making/receiving requests. Unfortunately I don't have an oscilloscope and I can't see the "pulse" length when the module sends an HTTP request but it is so short that it should not affect the average that much.

    I will keep adding details about components as well as files in the next few weeks.

    Thanks for following !

    -David

  • Welcome !

    David Davenne03/28/2016 at 15:19 0 comments

    Hello Everyone,

    I have been working on this project for a while during my free time and I am close to a final product. The last PCB I have designed requires some tweaking but nothing too complicated. I have all the documentation I have created during the process and I will make it available for everyone by updating this project page regularly.

    Thanks for following this project!
    -David

View all 3 project logs

  • 1
    Step 1

    Flash ESP8266

    1. You need to set the ESP8266 into Program mode by setting up the jumper correctly between IO_0 and GND.
    2. Connect TX,RX and GND to your serial converter (or Arduino board without the microcontroller)
    3. Start the flashing tool first
    For Linux, you can use esptool that you can use like this :
    python2 esptool.py --port /dev/ttyUSB0 write_flash 0x00000 nodemcu_firmware.bin

    For Windows, you can use NodeMCU flasher

    4. Start the HomeAutomation board.

    In case of problems, you might need to switch TX and RX connectors. Make sure you connect GND as well.

  • 2
    Step 2

    Load scripts to ESP8266

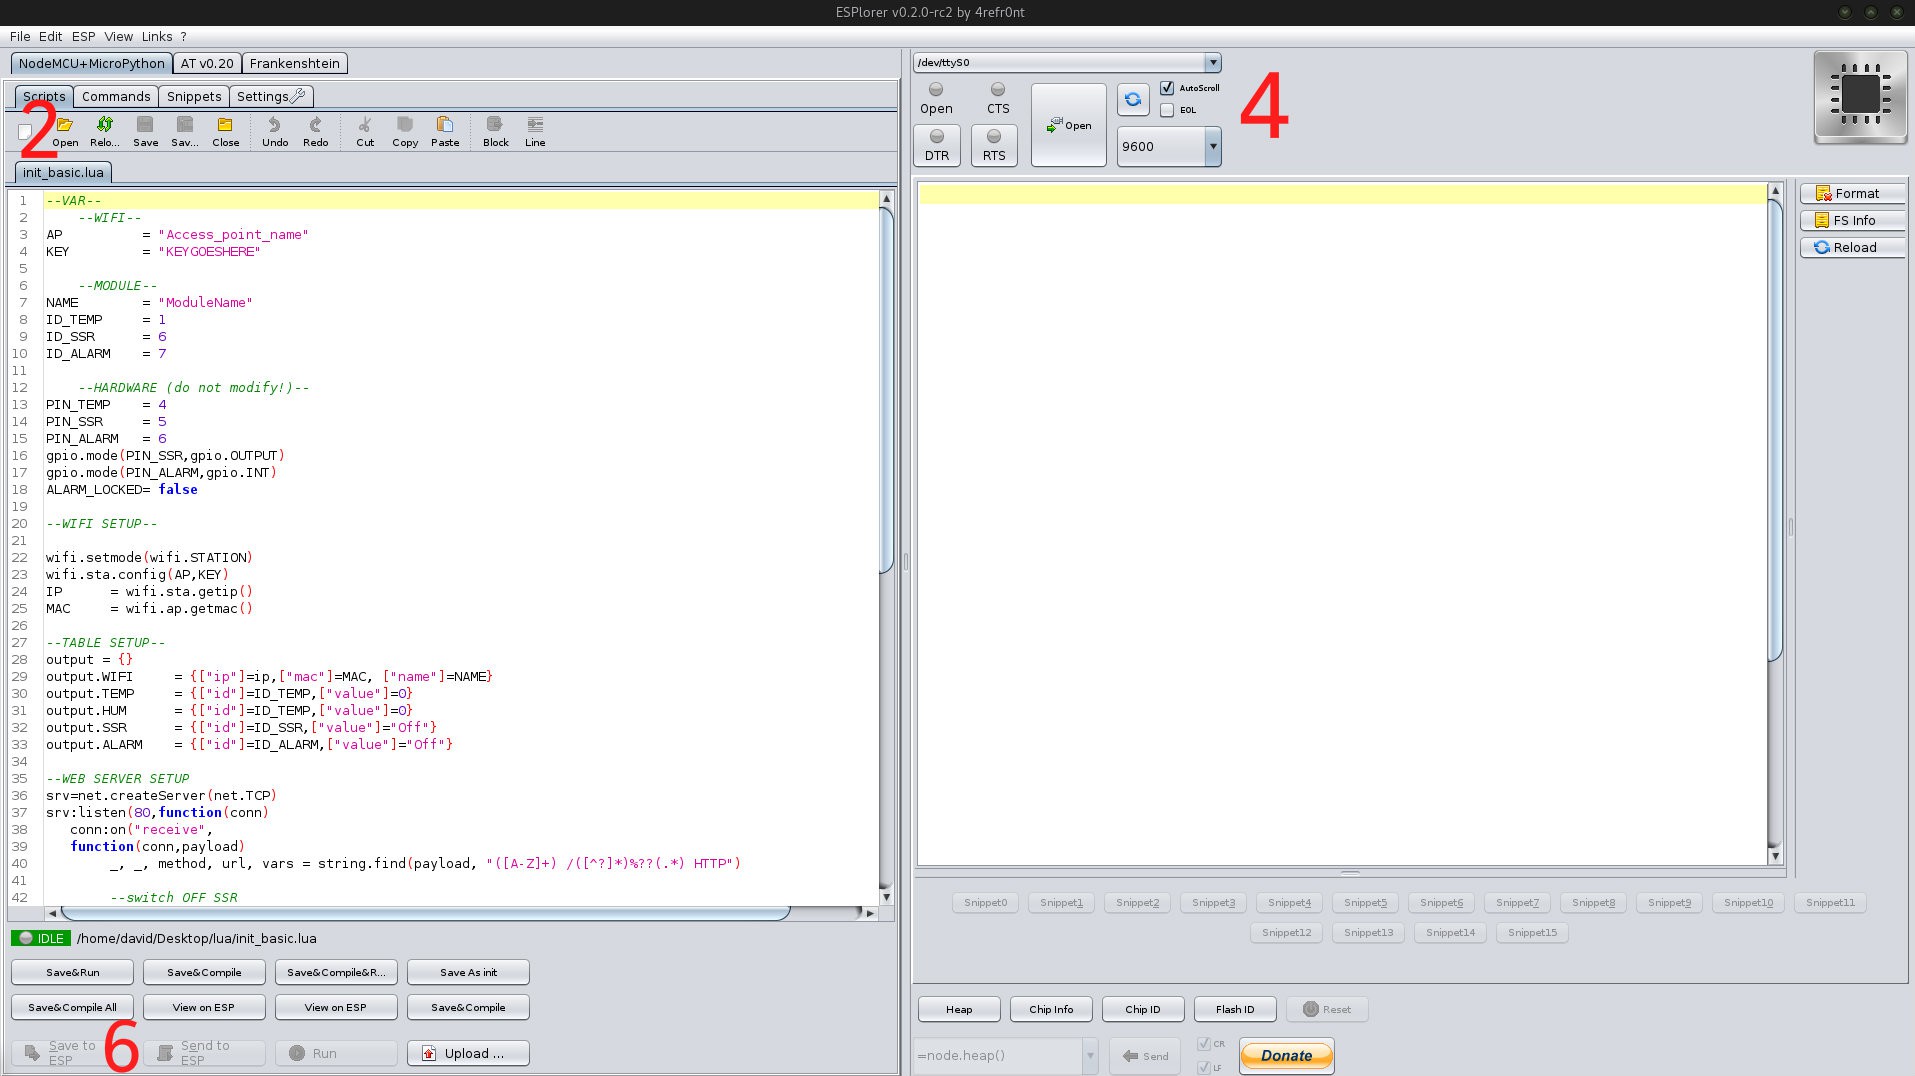
    1. Download ESPlorer ( works with both Linux and Windows ).
    2. Open your file. You can try the file init_basic.lua available in the project page. (the file should be named : init.lua )
    3. Remove the jumper between IO_0 and GND. The program mode is only required to flash the ESP8266.
    4. Select the correct device and baud rate ( 9600 ) , click Open in the right panel, at the top.
    5. Start the HomeAutomation board .
    6. Click "Save to ESP" in the bottom left corner.
    7. The board might require a reset for the new code to be effective.

    If it doesn't work, make sure you have connected TX, RX and GND correctly. Check that the baud rate and the port are correct. Always open the port first and then start the board, it will not work if you start the board first.

View all instructions

Enjoy this project?

Share

Discussions

Similar Projects

Does this project spark your interest?

Become a member to follow this project and never miss any updates