-
Poor excuses and use in the wild
06/09/2016 at 21:31 • 0 commentsI got a private message this week asking about the status of this project, which means I definitely haven't updated it in too long!
After the hard-drive debacle of the last log, I never really got back into this project in-ernest, other than to reconstruct my build environment. So, the actual functional state of things is about where it was then (but I have written a little more documentation, and made some improvements to the webserver).
Use in the wild
In the meantime, I have been using my Gadget a reasonable amount. So far mainly for talking to i2c things (Like #picopixel), programming AVRs, and as a mega-super-overkill USB-serial adapter. So actually, I'm already calling that a win - I don't need to carry a Pi, USB-serial adapter and AVR programmer, I can just chuck Gadget in my bag and know that I'm set
A few weeks back I was at a conference where we had bluetooth-enabled badges which effectively let you exchange contact details with other delegates by tapping the badges together. They had e-ink screens showing a business-card type screen and maps/schedules for the conference.
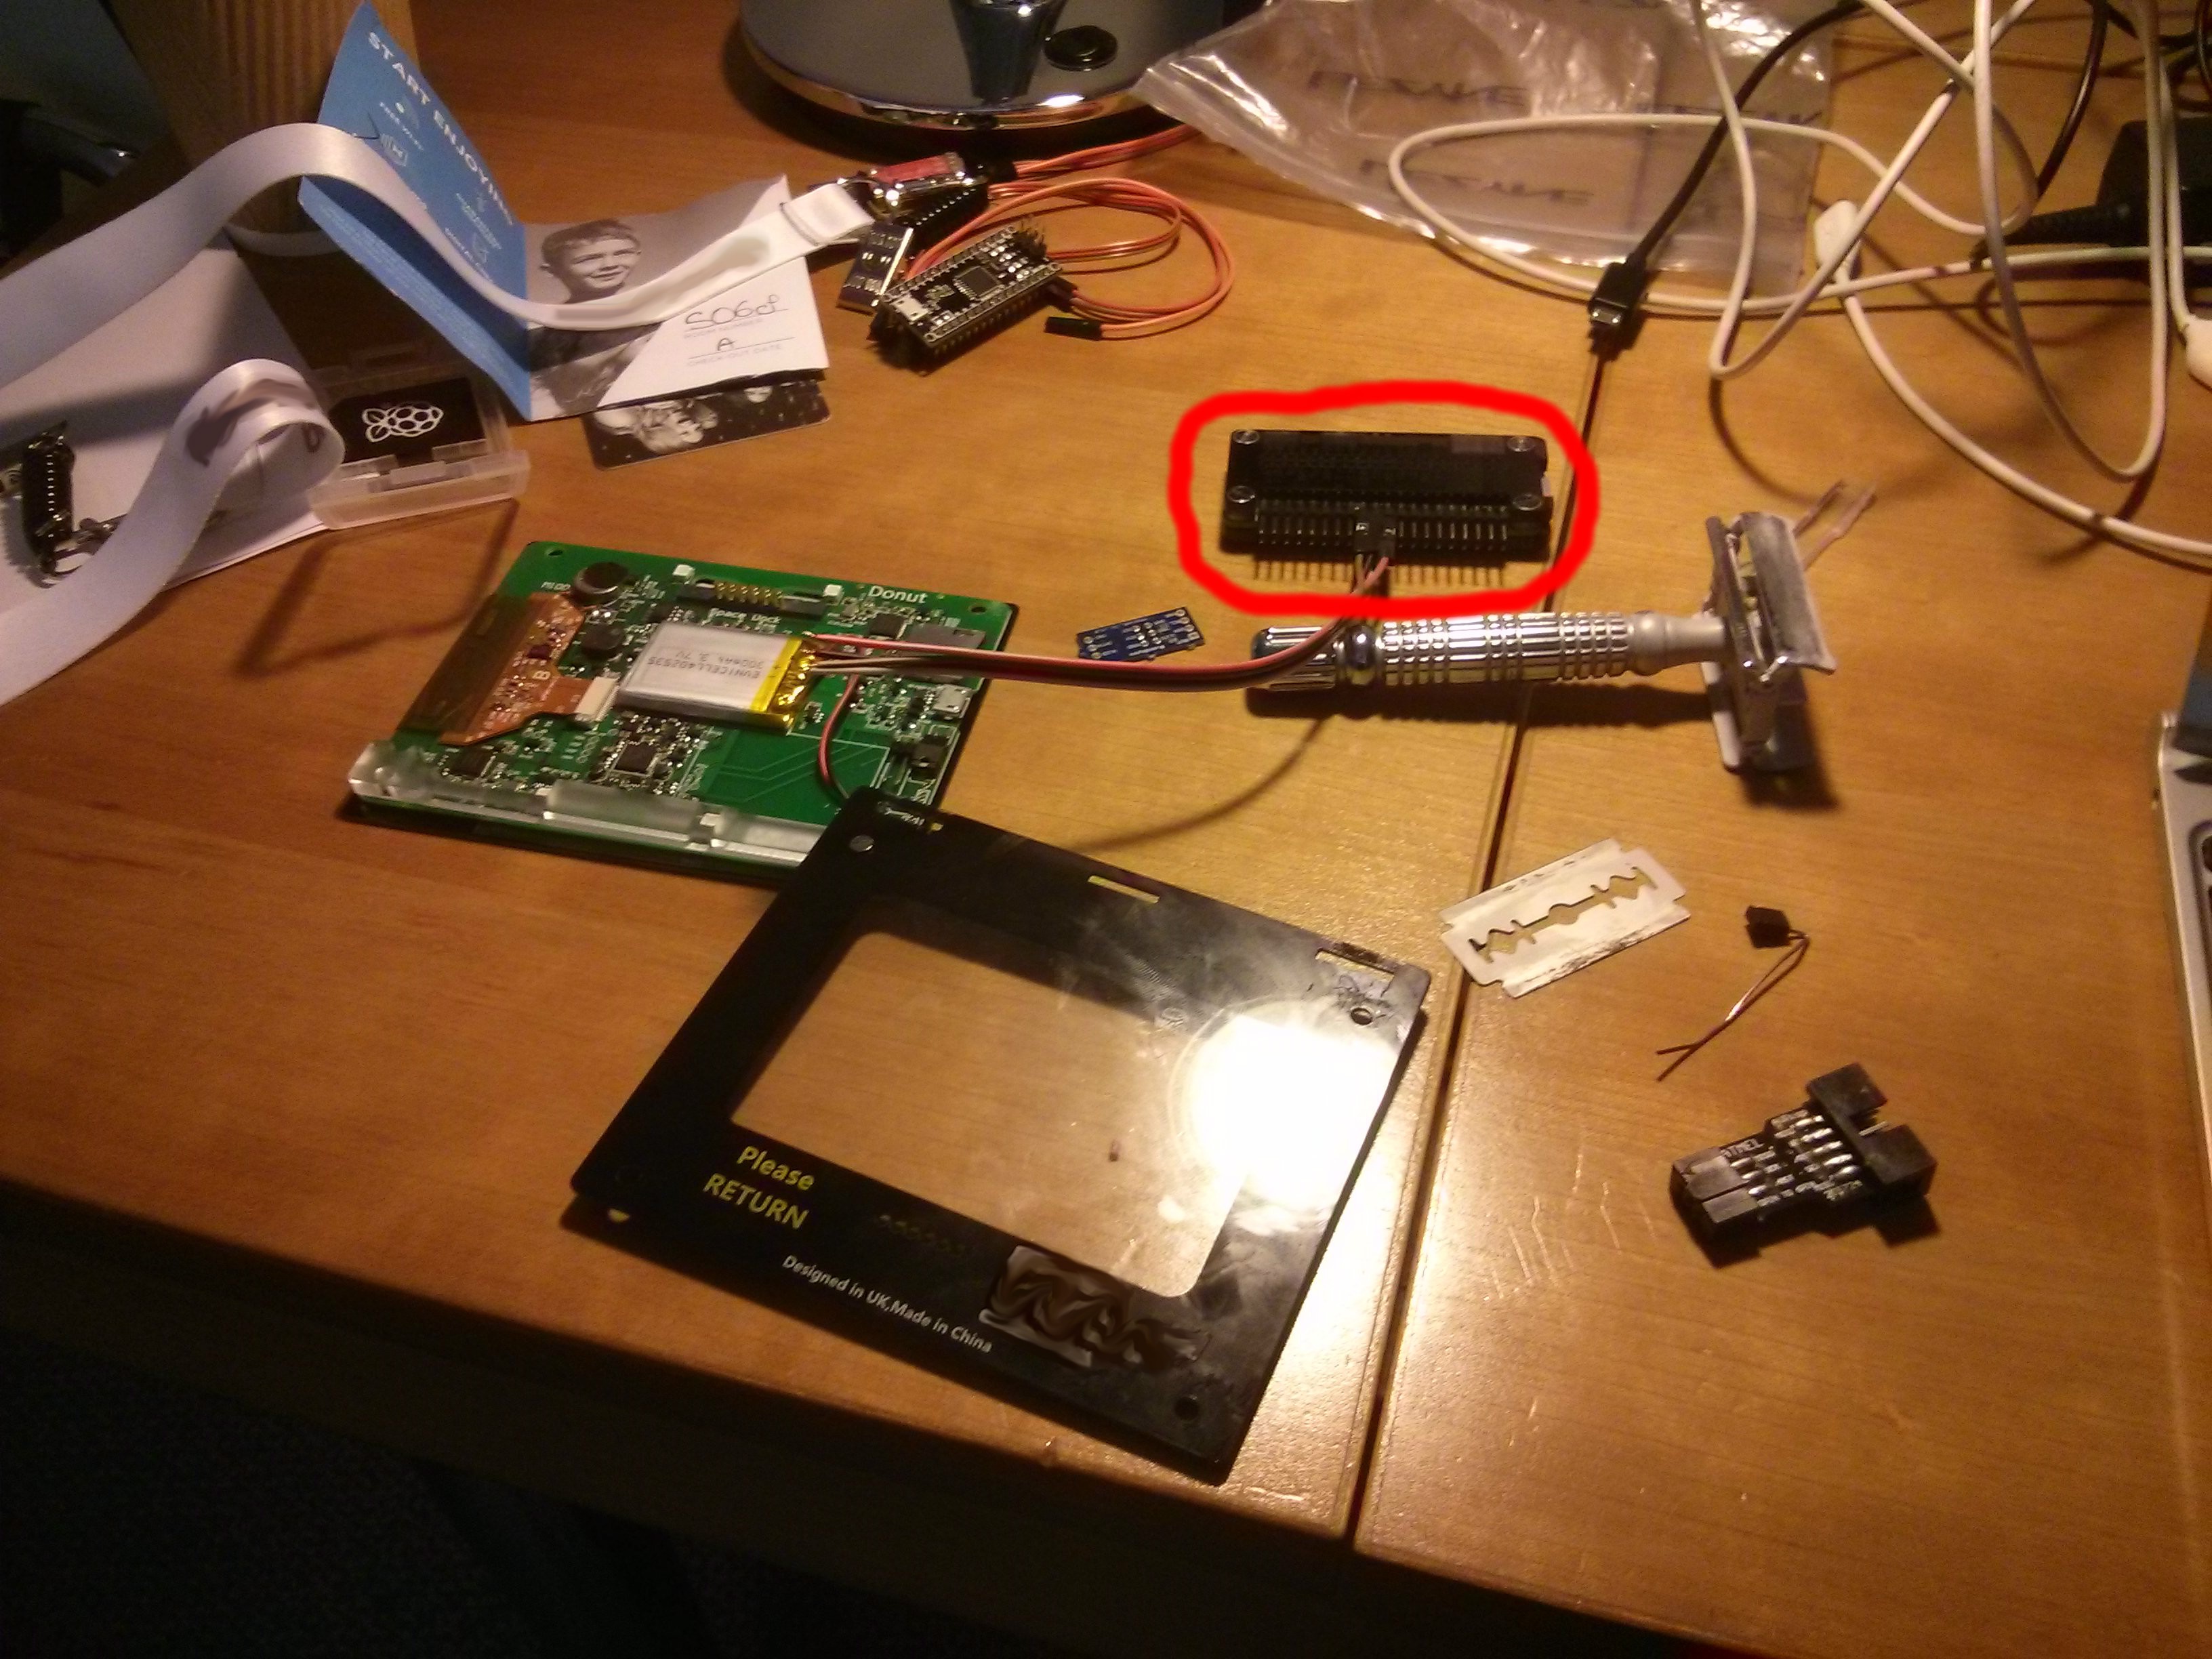
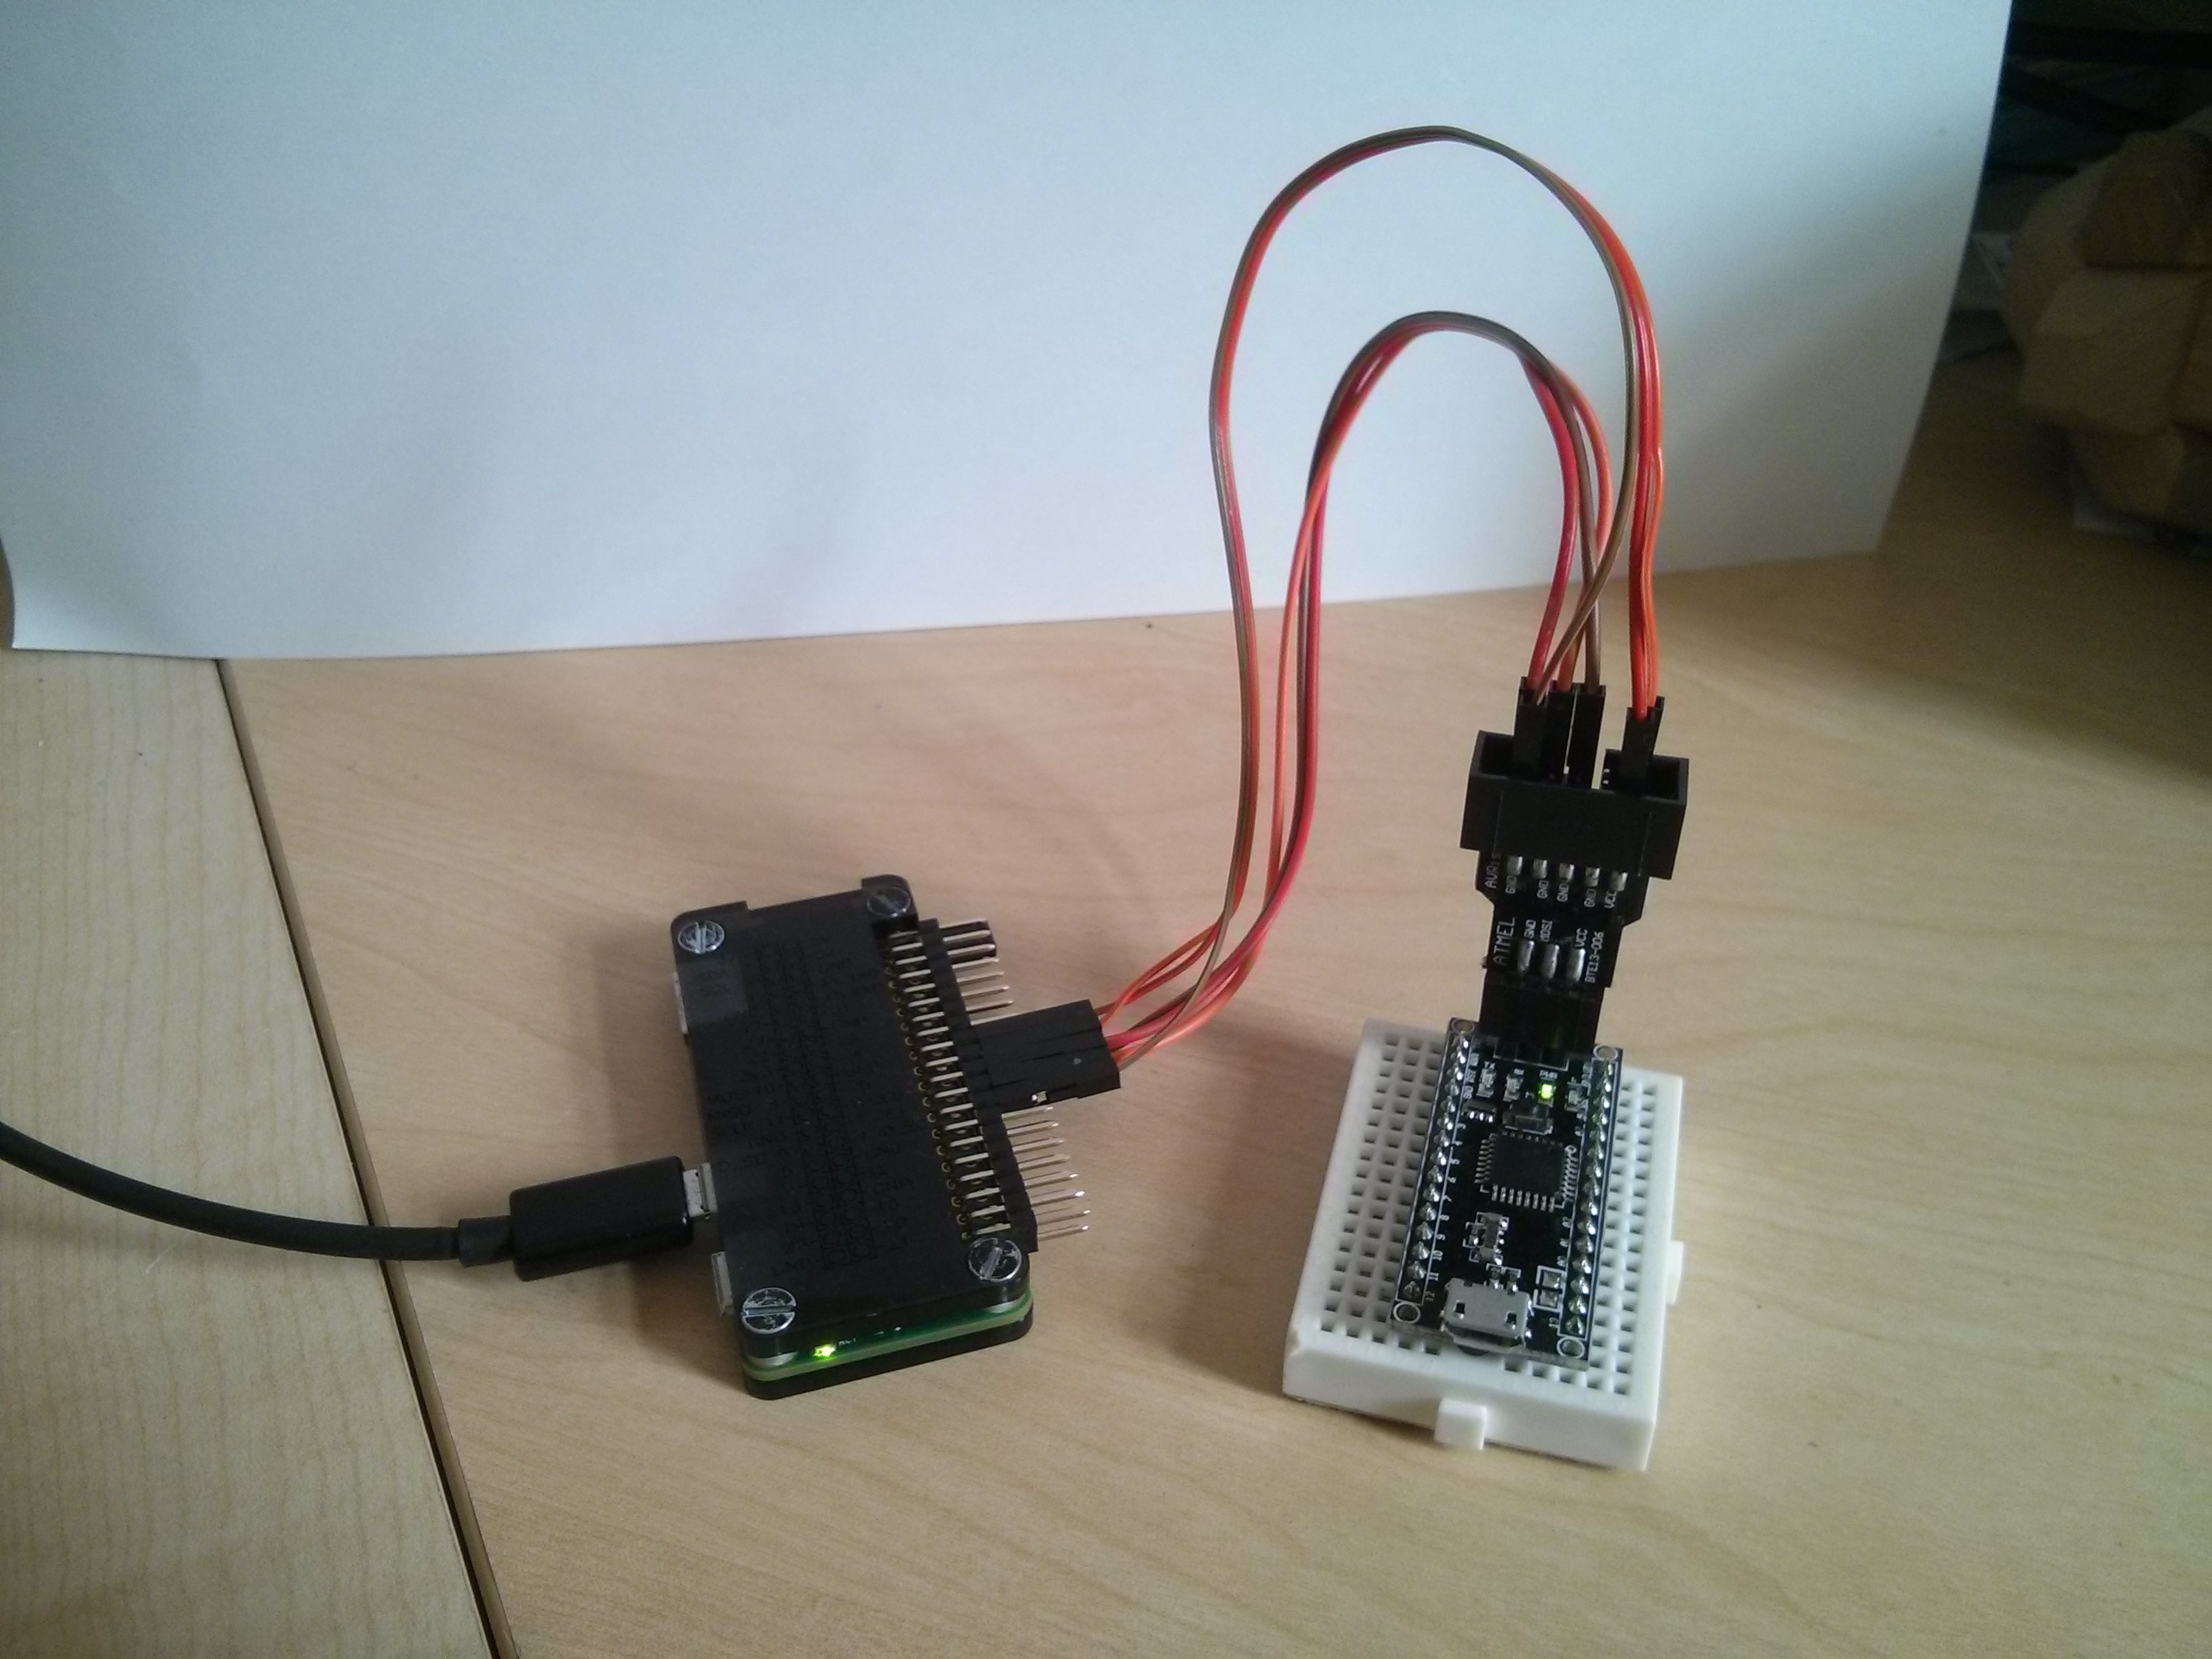
That e-ink screen was just begging to have something else put on it, so I spent some of my time trying to reverse engineer the thing, helped by Gadget:
![]()
As you can see, I didn't really have the right equipment to do very well. I used my razor's blade for wire-stripping, twist-ties as wire, and Arduino and Gadget. The goal was to capture the traffic from those brass pins just above the battery (success, via AVR programmed via Gadget), and to dump the SPI flash (using Gadget - fail, due to not being able to hold 8 dodgy wires onto an SOIC package while typing). Still, it was entertaining, and I was glad I had Gadget with me.
In the end, I failed at my goal (and the CTO of the company that made the badges told me that actually the flash data was encrypted, so perhaps even if I had dumped it, that would only have been the beginning).
But, it taught me two things:
1. I need a 'proper' logic analyser on Gadget
2. Always take a multimeter!
Next Steps
Buildroot 2016.05 was just released, which includes support for Google Go (which I use for some of my utilities). So, the next thing for me to do is switch over to 2016.05, and update the kernel to 4.6
After that, I'll start putting everything together "properly" in buildroot (there's a great presentation on that here: http://elinux.org/images/2/2a/Using-buildroot-real-project.pdf), at which point I can publish all the source and it should be easily reproducable.
I'm not looking to add any more functionality until after I've got that repeatable Buildroot workflow published, and then I can start incrementally adding features/packages.
Top of the list is probably piscope! I'm interested to see how that works out.
For those who don't have a linux box, or the inclination to build their own disk images, I'll try to host some images somewhere too.
If anyone is interested in helping to get things working on Windows/Mac please let me know!
-
Functionality update
04/16/2016 at 14:39 • 0 commentsSo I suffered a hard-drive failure the other week which has slowed me down a bit while I got that resolved, but the Gadget software is pretty much at a decent proof-of-concept stage. All the various services start automatically at boot (except for the webserver which starts on the first connection).
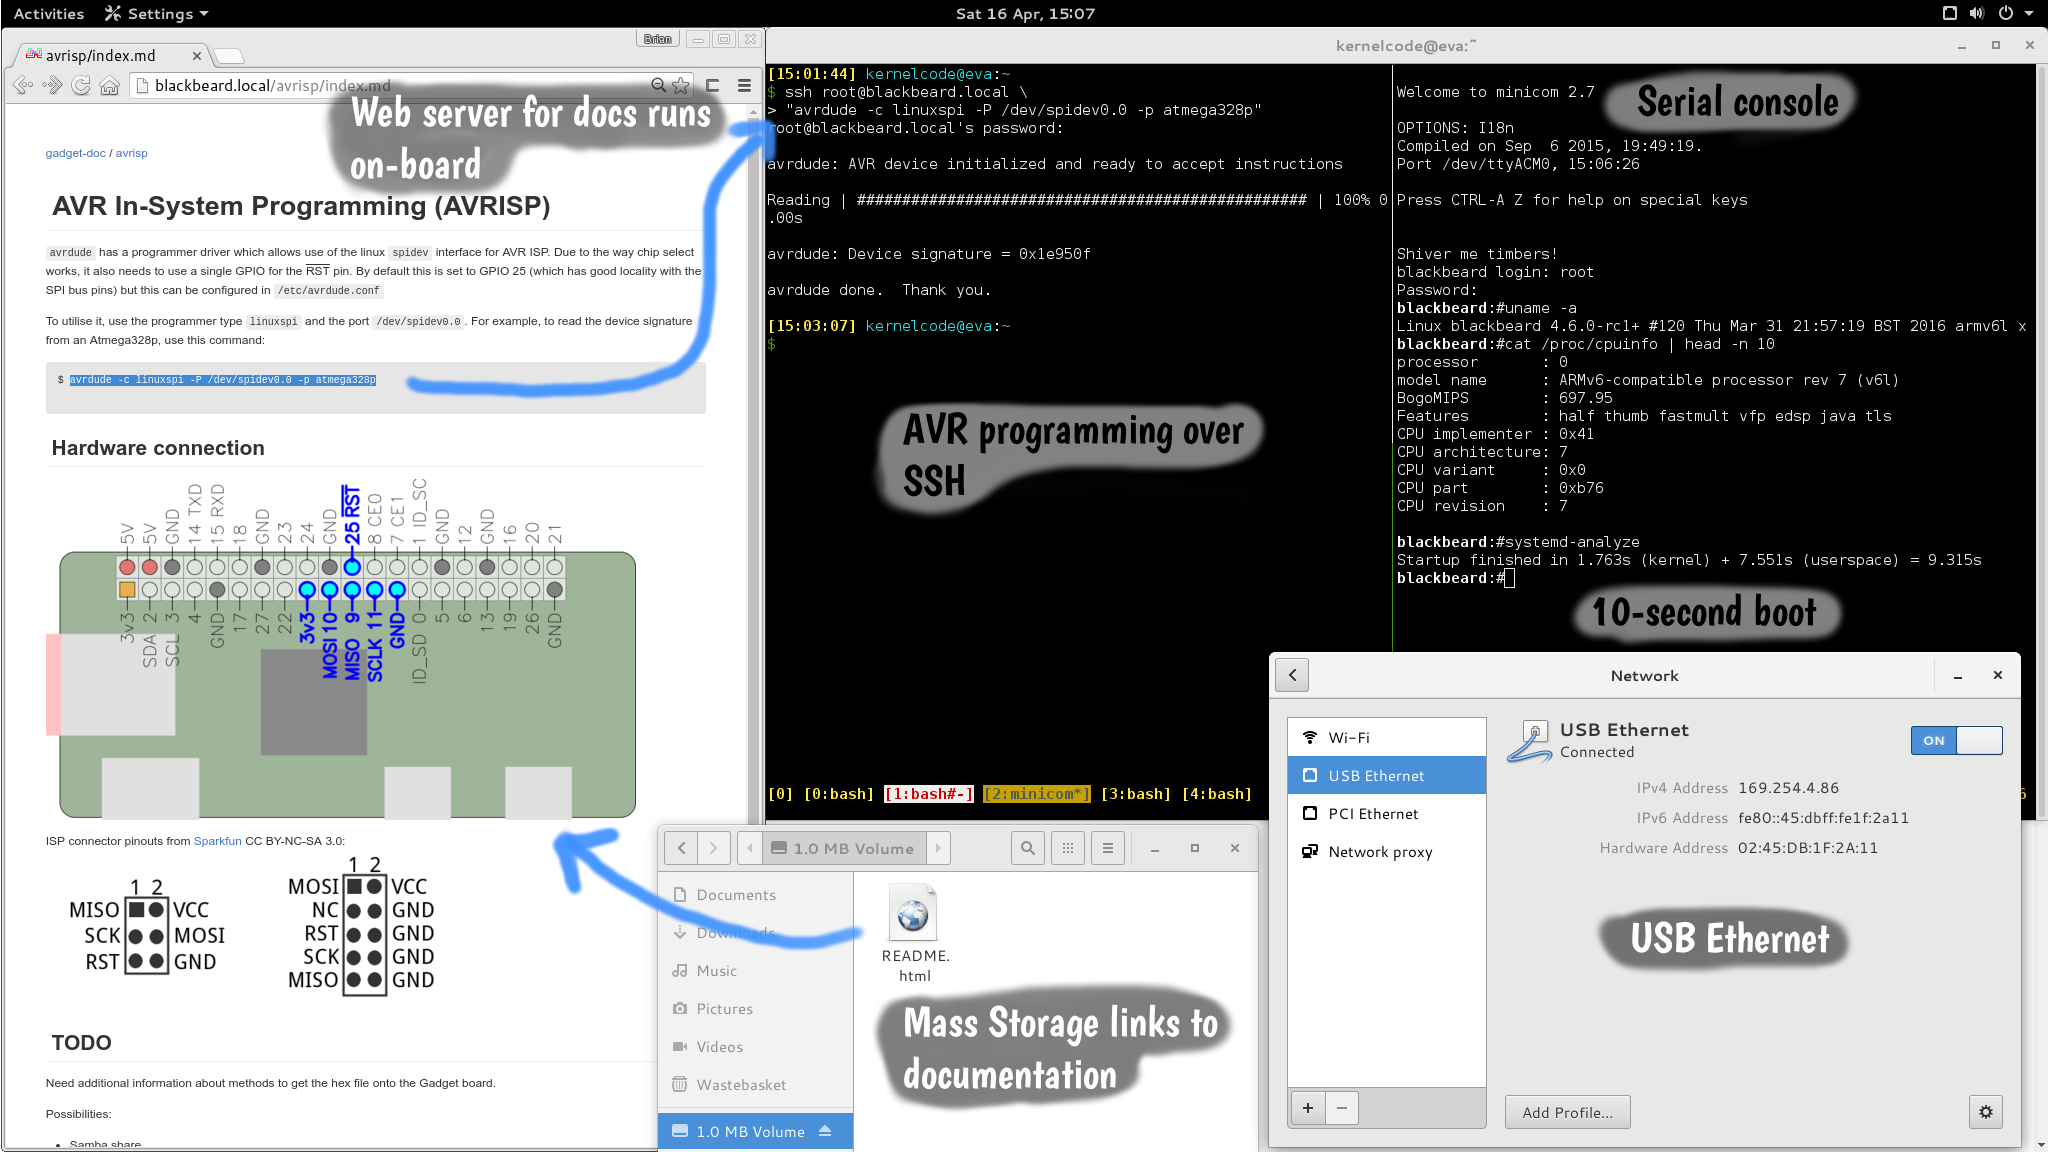
Here's how it goes:
- Plug in Pi Zero
- Wait 10 seconds
- USB ethernet, serial and mass storage pop up
- If needed, set ethernet device to "link local only" - this should be a one-time thing
- Open README.html on mass storage to get linked to the documentation
- Do what you gotta do
Here's a picture and a rather cramped screenshot showing all of this, and programming an AVR from the Pi:
![]()
![]()
I need polish this all, and neaten up my buildroot environment to make it more reproducible. The boot time is currently just over 9 seconds. I want to add SAMBA, which might push it over 10 seconds which would be a shame.
I haven't done anything about read-only rootfs yet. That also might have an impact on boot-time while the init script to set that up runs.
Still it's looking pretty good, for the most-part I'm happy with it.
I'm not too happy about the link-local addressing. For one, GNOME's network manager doesn't fall back to link-local (by design) when it can't get a DHCP address. Windows and Mac I believe do. Also I haven't managed to figure out how to bridge a link-local address so the Pi can get internet access. Might have to go back to on-board DHCP
I've been thinking a bit about how best to interact with it. Terminals are great for linux nerds, but perhaps not for the more casual hobbyist. Also, having to type in the hostname etc is a bit cumbersome. Here's two ideas I've been toying with:
- Web interfaces for common tasks, examples:
- Upload a hex file to flash an AVR with
- Interactive i2c console
- In-browser terminal.
- Something based on hterm (Chrome only... maybe Firefox)
- ... Chrome SSH app (Chrome only...)
- Some custom Javascript thing (way too much work)
-
Mysterious crashing - PLL issue
03/28/2016 at 20:16 • 2 commentsI'm mainly writing this here so I've got something to refer to.
I've got the base system running how I like now. It boots, starts the USB gadget serial and ethernet, and registers a link-local IP address. I've got AVAHI running, so I can find the board by hostname. So far so good. Boot time is currently sitting between 10-12 seconds.Next I wanted to free up the serial port (i.e. no console logging on the serial port). It works OK, as long as you never ever use the serial port!
So:
- if the kernel console uses the serial port: OK!
- If no-one ever uses the serial port: OK!
- If the kernel console doesn't use the serial port, but you later open it with minicom, picocom or whatever: System hang!
We're talking hard hang, LED doesn't flash any more etc.
I thought the kernel was panicking - but without the serial port console it's impossible to tell. I added some print statements in the relevant parts of the kernel and it looks like it's making it through all of the tty/serial code just fine. It actually crashes *after* minicom exits - this doesn't really match up with a panic. It there were a panic it should happen during the exit sequence.
After some lucky Googling, I found this thread: http://lists.infradead.org/pipermail/linux-arm-kernel/2016-February/406730.html, which indicates that there's a problem with the PLL refcounting, which means the PLL can get turned off when the PL011 (serial) driver isn't in constant use.
I commented out the clock reference count decrement in the PL011 driver, and bam! Everything works. So that's not a proper fix but at least I know what the problem is now.
My next step is probably to switch to a 4.5/4.6-rc1 kernel (I'm currently on 4.5-rc7) and see if any of the recent bcm283x clock changes I've seen flying through the mailing list fixes the problem.
What better way to spend a Bank Holiday Monday?
-
On Windows, drivers and USB gadgets
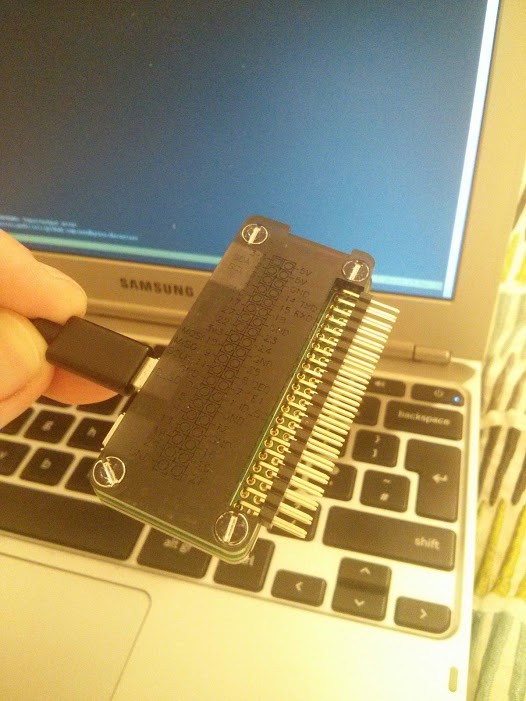
03/23/2016 at 22:53 • 4 commentsSo this week I got my new Pi Zero set up (that's right! I have two! Not even sorry.)
I made a little case - whole thing is less than 10mm thick (full details forthcoming Update details here: https://hackaday.io/project/10540-gadget-case) and got to work on USB gadget support:![Slim Pi Zero Case]()
Actually setting up the gadget was easy. I enabled all the relevant config options in the kernel (CONFIG_USB_DWC_PERIPHERAL, CONFIG_USB_GADGET, CONFIG_USB_F_* and so on) and then you configure it in "configfs".
I'd never used configfs before, but it's a magical place. Creating a directory in configfs triggers some machinations in the kernel, creating a data structure (or structures) depending on where you create the directory. For USB gadget, you create directories in /sys/kernel/config/usb_gadget
For the full lowdown, the kernel documentation is long but useful: https://www.kernel.org/doc/Documentation/usb/gadget_configfs.txt
I wrote a little script which creates a combination ("composite") gadget with an RNDIS ethernet port and a ACM serial port:
#!/bin/bash
CONFIGFS=/sys/kernel/config/usb_gadget
GADGET=$CONFIGFS/gadget

# Create a gadget
mkdir $GADGET
# Set the VID/PID - this is a pid.codes test code. I'll get a proper one later
echo 0x1209 > $GADGET/idVendor
echo 0x0001 > $GADGET/idProduct

# Set strings - 0x409 is a magic number in the USB spec meaning "English (United States)"
mkdir $GADGET/strings/0x409
echo "00000001" > $GADGET/strings/0x409/serialnumber
echo "usedbytes" > $GADGET/strings/0x409/manufacturer
echo "Gadget" > $GADGET/strings/0x409/product

# Create a config called 'c.1'. Configs can have multiple functions. A device can have multiple configs. Only one config can be enabled at a time
mkdir $GADGET/configs/c.1
mkdir $GADGET/configs/c.1/strings/0x409
echo "Config 1" > $GADGET/configs/c.1/strings/0x409/configuration
echo 500 > $GADGET/configs/c.1/MaxPower

# Create ACM and RNDIS functions, and add them to config 'c.1'
# The 'acm' and 'rndis' parts of the directory name are important, they set the type of function. Other possibilities are 'lun' for mass storage, 'hid' for human interface....
mkdir $GADGET/functions/acm.usb0
ln -s $GADGET/functions/acm.usb0 $GADGET/configs/c.1
mkdir $GADGET/functions/rndis.0
ln -s $GADGET/functions/rndis.0 $GADGET/configs/c.1

# Finally, enable the gadget by setting its USB Device Controller. The 20980000.usb is the name of the (only) UDC on the Raspberry Pi
echo 20980000.usb > $GADGET/UDC
This works a treat. The device enumerates on Linux fine (as long as you plug the cable into the right socket on the Zero... that took me longer to notice than I'd like to admit).On the Pi, the two devices look like this:
# ls -l /dev/ttyGS0
crw-------    1 root     root      251,   0 Feb 11 16:40 /dev/ttyGS0
# ip link
1: lo: <LOOPBACK,UP,LOWER_UP> mtu 65536 qdisc noqueue qlen 1
    link/loopback 00:00:00:00:00:00 brd 00:00:00:00:00:00
2: sit0@NONE: <NOARP> mtu 1480 qdisc noop qlen 1
    link/sit 0.0.0.0 brd 0.0.0.0
3: usb0: <BROADCAST,MULTICAST> mtu 1500 qdisc noop qlen 1000
    link/ether 72:4b:a5:91:2c:ef brd ff:ff:ff:ff:ff:ff
/dev/ttyGS0 is the serial port (Gadget Serial 0 I guess), and network device usb0 is the ethernet device.On the host, they show up as /dev/ttyACM0 (because it's an ACM serial device) and as network interface usb0 again.
I wrote a simple one-shot systemd service to create my gadget at boot:
# cat /etc/systemd/system/gadget.service
[Unit]
Description=Initialise USB gadget

[Service]
Type=oneshot
ExecStart=/root/make_gadget.sh

[Install]
WantedBy=multi-user.target
# systemctl enable gadget
Created symlink from /etc/systemd/system/multi-user.target.wants/gadget.service to /etc/systemd/system/gadget.service.
Then to get a login shell on the USB serial port, simply enable the systemd serial-getty service for the ttyGS0 serial device:
# systemctl enable serial-getty\@ttyGS0
That will start automatically at the next boot and give you a login prompt on the USB serial port.Ethernet works too. For now I did some manual configuration. On the Pi:
# ip addr add 192.168.3.142/24 dev usb0
# ip link set usb0 up
and on the host:# ip addr add 192.168.3.1/24 dev usb0 # ping 192.168.3.142 PING 192.168.3.142 (192.168.3.142) 56(84) bytes of data. 64 bytes from 192.168.3.142: icmp_seq=1 ttl=64 time=0.761 ms 64 bytes from 192.168.3.142: icmp_seq=2 ttl=64 time=0.331 ms 64 bytes from 192.168.3.142: icmp_seq=3 ttl=64 time=0.610 msHuzzah!Next step is to autoconfigure the network, probably by running a DHCP server on the Pi
Windows
I had thought that both RNDIS and ACM serial should work driver-free on Windows. On one Windows computer, neither worked. On another, the serial port showed up and worked fine (eventually) but the RNDIS was "unknown". On both Windows computers, it showed the "USB device has malfunctioned" message.
So, I need to do some more investigation on the Windows front. I know that there are drivers, but I would really like Gadget to be driver-free if possible. This is a bit of a pain, because I don't actually have any boxes with Windows on, and I don't own any Windows licenses either. Huff.
I haven't tried a Mac yet, but I think it should more or less work out of the box. T.B.D.
-
On-board Documentation
03/19/2016 at 17:28 • 0 commentsI think that easily-available, accurate and easy-to-consume documentation really provides significant value to any tool. I think its critical to provide this on Gadget and providing it on-board is about as easy as it gets.
Most open-source, hacker-oriented tools have online wiki-based documentation, which is great until you don't have a solid internet connection (actually happens to me more than I'd like to admit... yes, even in 2016!).
I like the idea of a wiki, but such an approach often leads to outdated, inconsistent or hard-to-follow docs. I've opted to go for Markdown-based documentation stored in a public Github which I think is a good middle-ground - anyone who wants to contribute is welcome to submit pull requests, but at the end of the day there is a controlled point of entry (...me) to try and make sure it stays in good order.
My aim is to have a basic page on each major feature of Gadget, this will provide an overview of what the feature is, what it can do, as well as the pins to use and basic usage of any commands. This should provide the bare-minimum required to make someone able to use the feature in its most common use-case. Here's a sneak-peek of a section of the i2c page:
![]()
The commands should not be thoroughly documented on these introductory pages - a simple "usage" text and example invocation should be enough - this should help jog the memory of any user who has used the tool before, and provide a known-good "Hello World" for any first-time user.
From these pages, more detailed pages on particular tools can be linked if deemed necessary, however I think for a lot of cases the best thing would be to link the the respective project's own documentation (which yes, needs an internet connection).
You can view the documentation repository on Github: https://github.com/usedbytes/gadget-doc. Of course it's a work in progress and pretty empty right now. It's more of a look-and-feel proof of concept than a useful resource at the moment
-
Documentation Server
03/19/2016 at 17:16 • 0 commentsOn-board documentation is a key feature for Gadget. There are several facets to the documentation project:
- Easy to write documentation
- The lower the barrier to writing it, the more likely it is to get written
- Wide availability
- Gadget is just a Linux box. Almost all of the documentation will have relevance outside of Gadget boards.
- Uniformity
- I want the documentation to look and act the same whether it's viewed on-board or online
- Readable source code
With these constraints in mind, I decided that Markdown-based documentation was the right choice. It's easy to write, the source is almost as pretty as the rendered version and it's ubiquitous (if everyone knows it, everyone can help me write it, right?)
I want Gadget to be a light-weight as possible, so I decided to write a very simple web-server to render and serve the Markdown documentation.
I chose golang to implement it as it has a very powerful HTTP library built in, and its static linkage makes for easy deployment to the target without needing to do a whole bunch of configuration - single executable, run it with some arguments, lovely jubbly. This means I can just as easily run it on my development machine without needing to keep two web server configurations in sync (one on the target and one on the host).
The result is docserver, its less than 500 lines of Go and will render and serve Markdown pages with a minimum of fuss.
With this in place, I can set about writing the documentation to accompany my proof-of-concept dogfooding phase of the project.
Example docserver session:
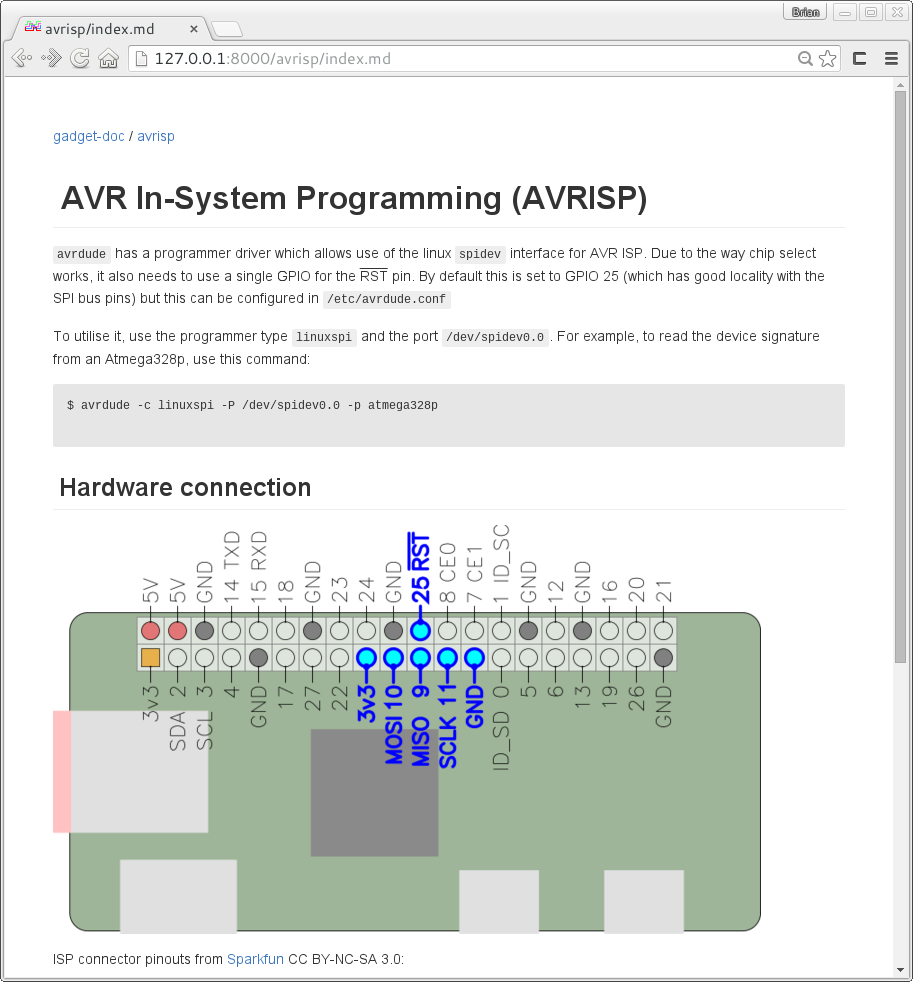
$ docserver --root . --template private/md_template.html --filter '^private' --error-template=private/error_template.html
2016/03/19 17:14:40 Using template: private/md_template.html
2016/03/19 17:14:40 Using error-template: private/error_template.html
2016/03/19 17:14:40 Document root: .
2016/03/19 17:14:40 Adding filter: ^private
2016/03/19 17:14:40 Serving on ':8000'
2016/03/19 17:14:43 From: 127.0.0.1:52164 -> GET 127.0.0.1:8000/avrisp/index.md
2016/03/19 17:14:43 |-> Resolving: avrisp/index.md
2016/03/19 17:14:43 |-> Resolved: avrisp/index.md
2016/03/19 17:14:43 `-> Serving markdown: avrisp/index.md
2016/03/19 17:14:43 From: 127.0.0.1:52164 -> GET 127.0.0.1:8000/style/github-flavored-markdown.css
2016/03/19 17:14:43 |-> Resolving: style/github-flavored-markdown.css
2016/03/19 17:14:43 |-> Resolved: style/github-flavored-markdown.css
2016/03/19 17:14:43 `-> Serving file: style/github-flavored-markdown.css
2016/03/19 17:14:43 From: 127.0.0.1:52166 -> GET 127.0.0.1:8000/style/octicons/octicons.css
2016/03/19 17:14:43 |-> Resolving: style/octicons/octicons.css
2016/03/19 17:14:43 From: 127.0.0.1:52168 -> GET 127.0.0.1:8000/style/gadget-doc.css
2016/03/19 17:14:43 |-> Resolved: style/octicons/octicons.css
2016/03/19 17:14:43 `-> Serving file: style/octicons/octicons.css
2016/03/19 17:14:43 |-> Resolving: style/gadget-doc.css
2016/03/19 17:14:43 |-> Resolved: style/gadget-doc.css
2016/03/19 17:14:43 `-> Serving file: style/gadget-doc.css
2016/03/19 17:14:43 From: 127.0.0.1:52170 -> GET 127.0.0.1:8000/avrisp/isp_pins.png
2016/03/19 17:14:43 |-> Resolving: avrisp/isp_pins.png
2016/03/19 17:14:43 |-> Resolved: avrisp/isp_pins.png
2016/03/19 17:14:43 `-> Serving file: avrisp/isp_pins.png
2016/03/19 17:14:43 From: 127.0.0.1:52170 -> GET 127.0.0.1:8000/avrisp/avr_isp.png
2016/03/19 17:14:43 |-> Resolving: avrisp/avr_isp.png
2016/03/19 17:14:43 |-> Resolved: avrisp/avr_isp.png
2016/03/19 17:14:43 `-> Serving file: avrisp/avr_isp.png
2016/03/19 17:14:43 From: 127.0.0.1:52170 -> GET 127.0.0.1:8000/style/octicons/octicons.woff
2016/03/19 17:14:43 |-> Resolving: style/octicons/octicons.woff
2016/03/19 17:14:43 |-> Resolved: style/octicons/octicons.woff
2016/03/19 17:14:43 `-> Serving file: style/octicons/octicons.woff
Rendered Markdown page:
![]()
- Easy to write documentation
Gadget
USB-gadget-based Bus Pirate-style hacker toolkit for Linux boards (targeting Pi Zero for now)