Varun Suresh
-
Video Log 1
08/26/2018 at 01:42 • 0 commentsHi, We have published a video detailing the various aspects of respiration sensing and the importance of sensing breathing in NeuroCuddl. Please have a watch and provide feedback.
-
Game design log 1
08/25/2018 at 20:47 • 0 comments![]()
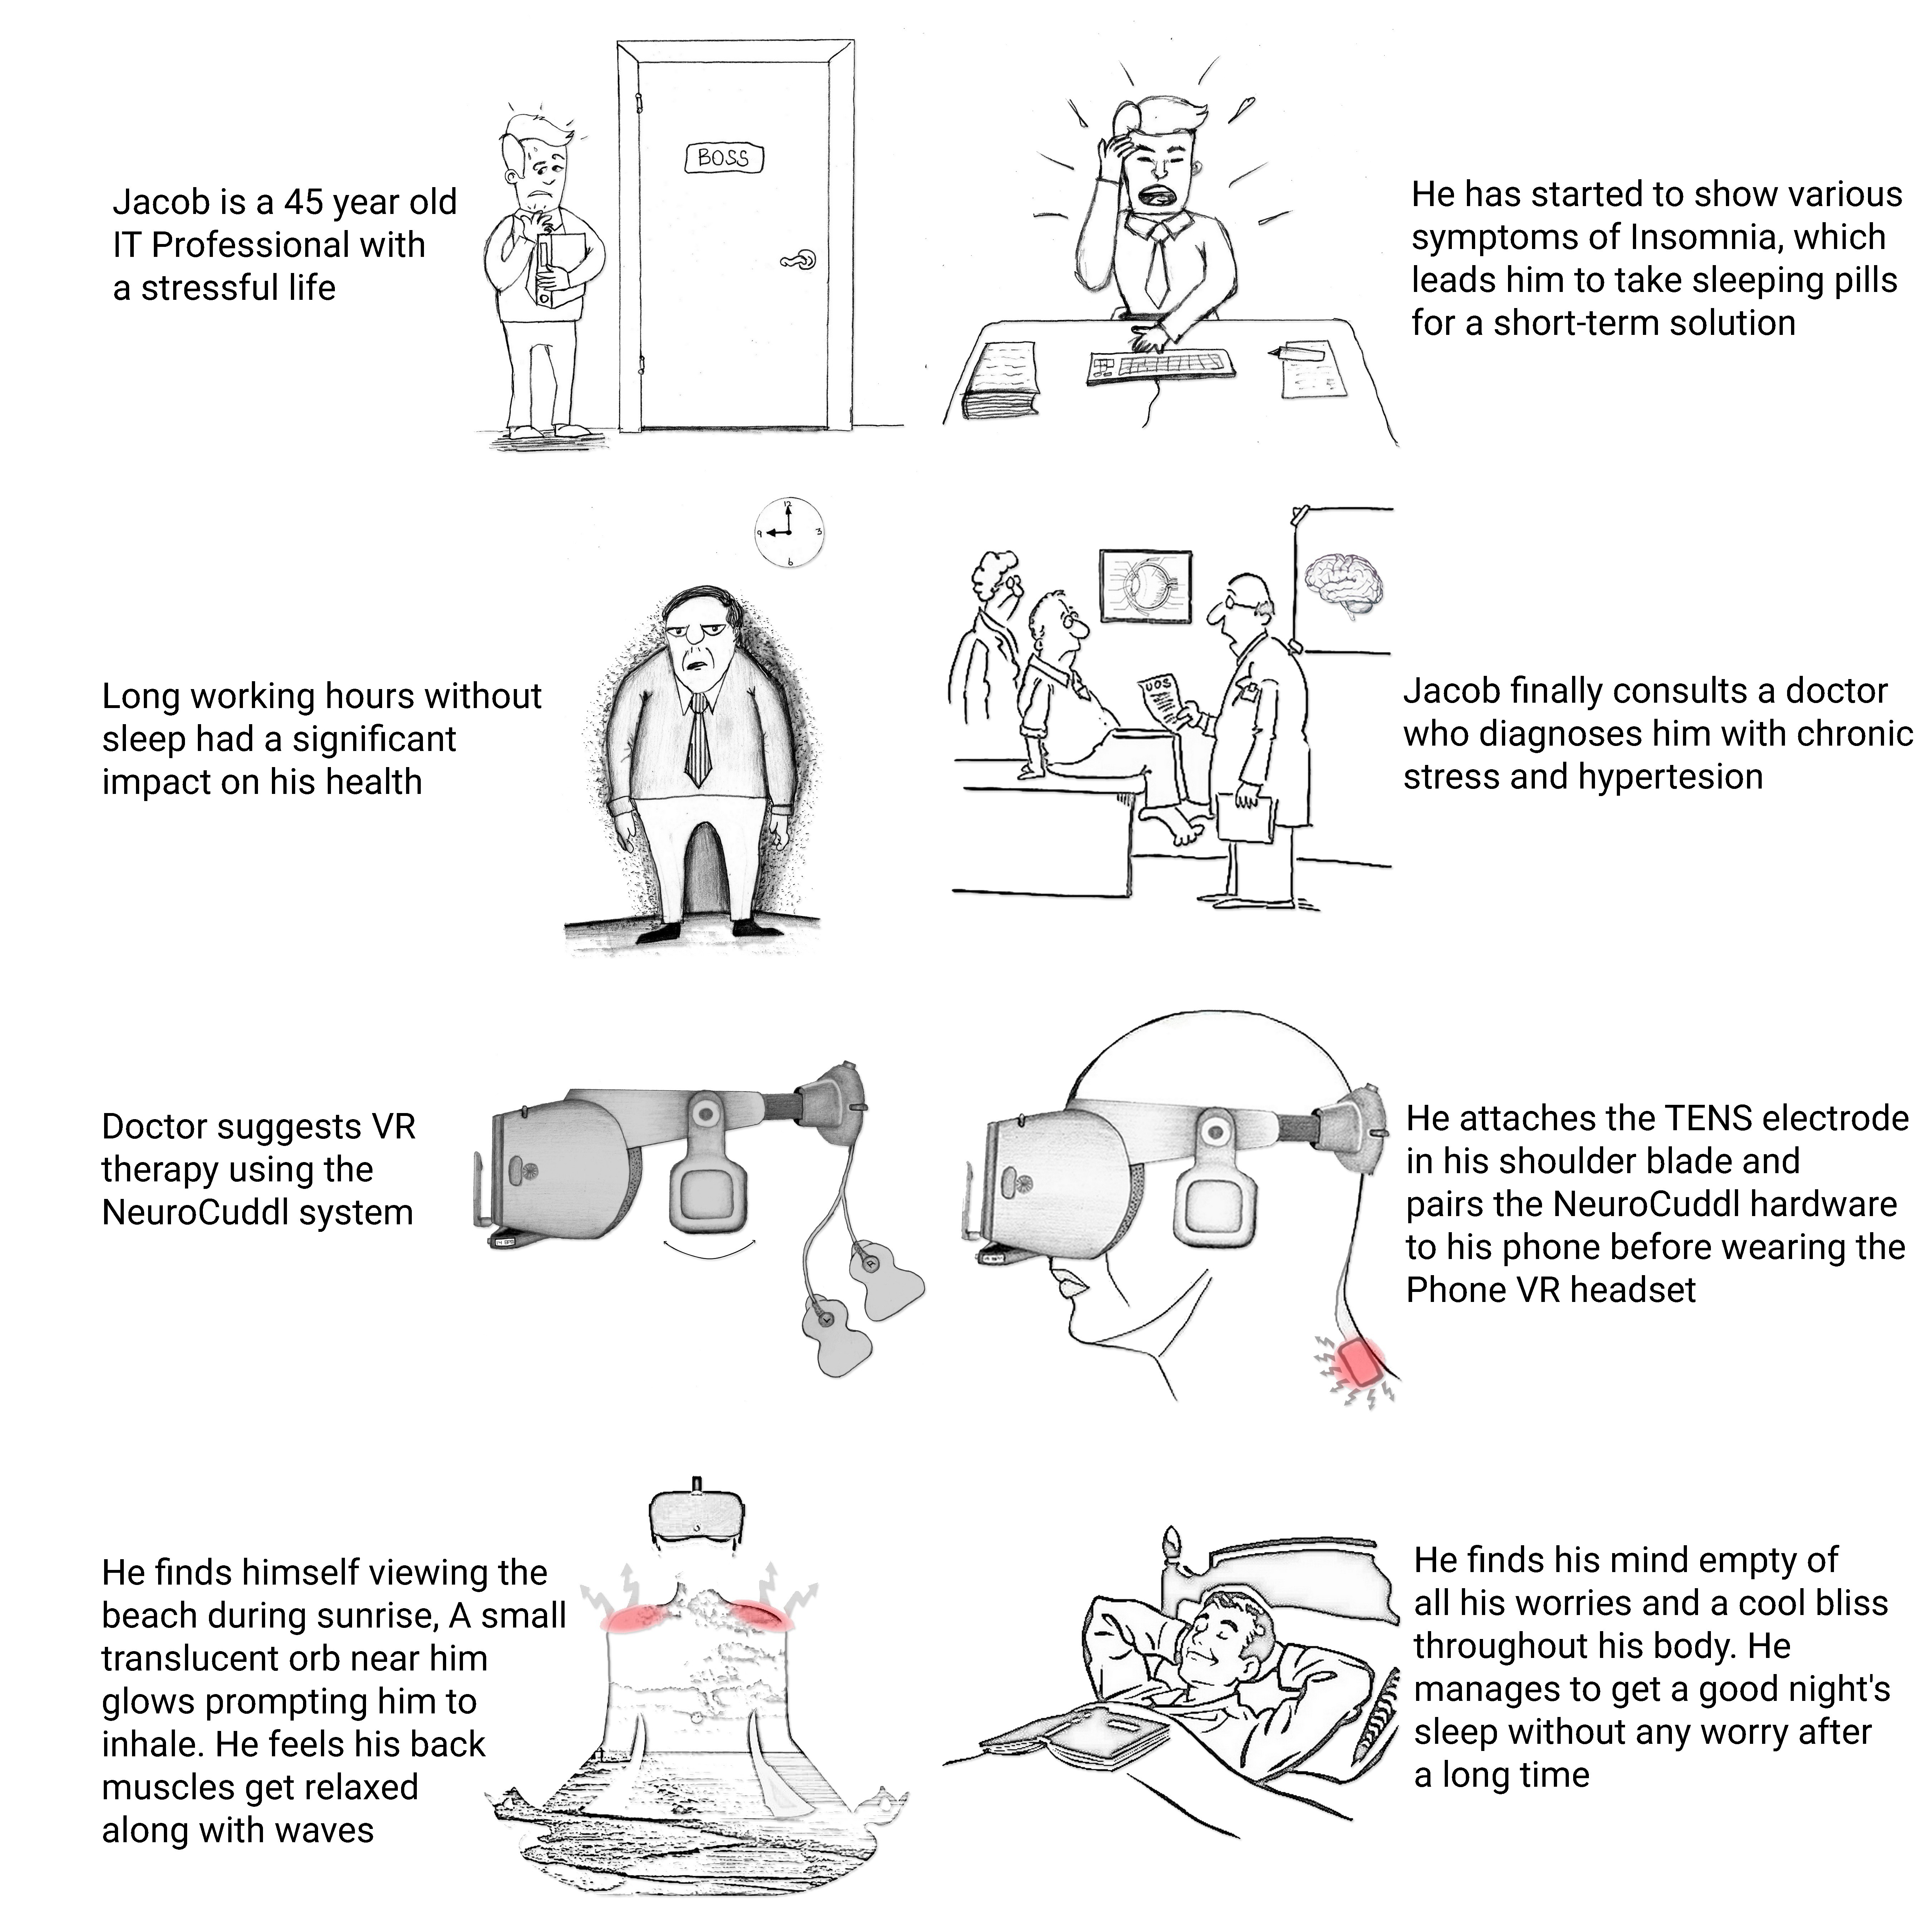
In this log we will give some understand about the game design and a sneak peek into the current game for mindfulness training. We will also get some looks into visuals and design elements of the game. This log contains only small amount of hardware content compared to our earlier logs and delves more into aspects of design from a VR game POV.
![]()
NeuroCuddl unity game development The primary reason we wanted to build NeuroCuddl was born from what we found lacking in traditional relaxation themed games. Games surprisingly provide a good medium to relax primarily due to the detachment we get from from stresses and strains of everyday life. Virtual reality in particular has a unique position to provide an extremely high degree of immersion. While designing the game we looked for experiences that would give us similar effects.
First game we found inspiring from an art and music perspective was Journey:
![]()
Journey on PS We next looked at games like The Long Dark which had a minimalist art style yet was highly immersive and we could clock hours both fearing and in awe of the cold Artic wilderness.
In virtual reality experiences we looked at games like LUMEN VR which provided a serene experience of glowing trees under an aurora. We even took a look at a highly simple mobile game called Pause, where the user has to slowly focus on follow a growing bubble across the screen.![]()
Pause Application We analyzed the above games to understand some design rules and constraints to keep in mind while developing our NeuroCuddl experience. The factors we found be crucial were:
1. The game need not be graphically intensive, Infact many successful relaxation games are minimal
2. The game must be very simple to use and need only minimal user agency in setup
3. Audio plays a key role in engaging the user in such a session
4. The color tones and temperature play a key role too
A need hence emerges, to create an environment in which, the stimuli and the being can interact in a controlled manner. In order to make the experience multisensory, it was vital that we marry visuals, sounds and touch into a single experience. It was therefore no surprise that we chose to use VR as the medium to create our project. We decided early on that the project would be implemented on mobile devices. This meant, that we had to be overcome technical limitations creatively. We knew we had to push our game design in such a way that we could provide a beautiful aesthetic despite having limited graphical fidelity. The challenges of providing a multisensory experience within the limitations of a cheap mobile device was evident from the get go. We were fully aware that if we bogged down our game with high poly models and complex shaders we would introduce lag to the point that the immersion in our game would be shattered. We decided to hence to adopt a design style that would be visually pleasing whilst still maintaining a low load.
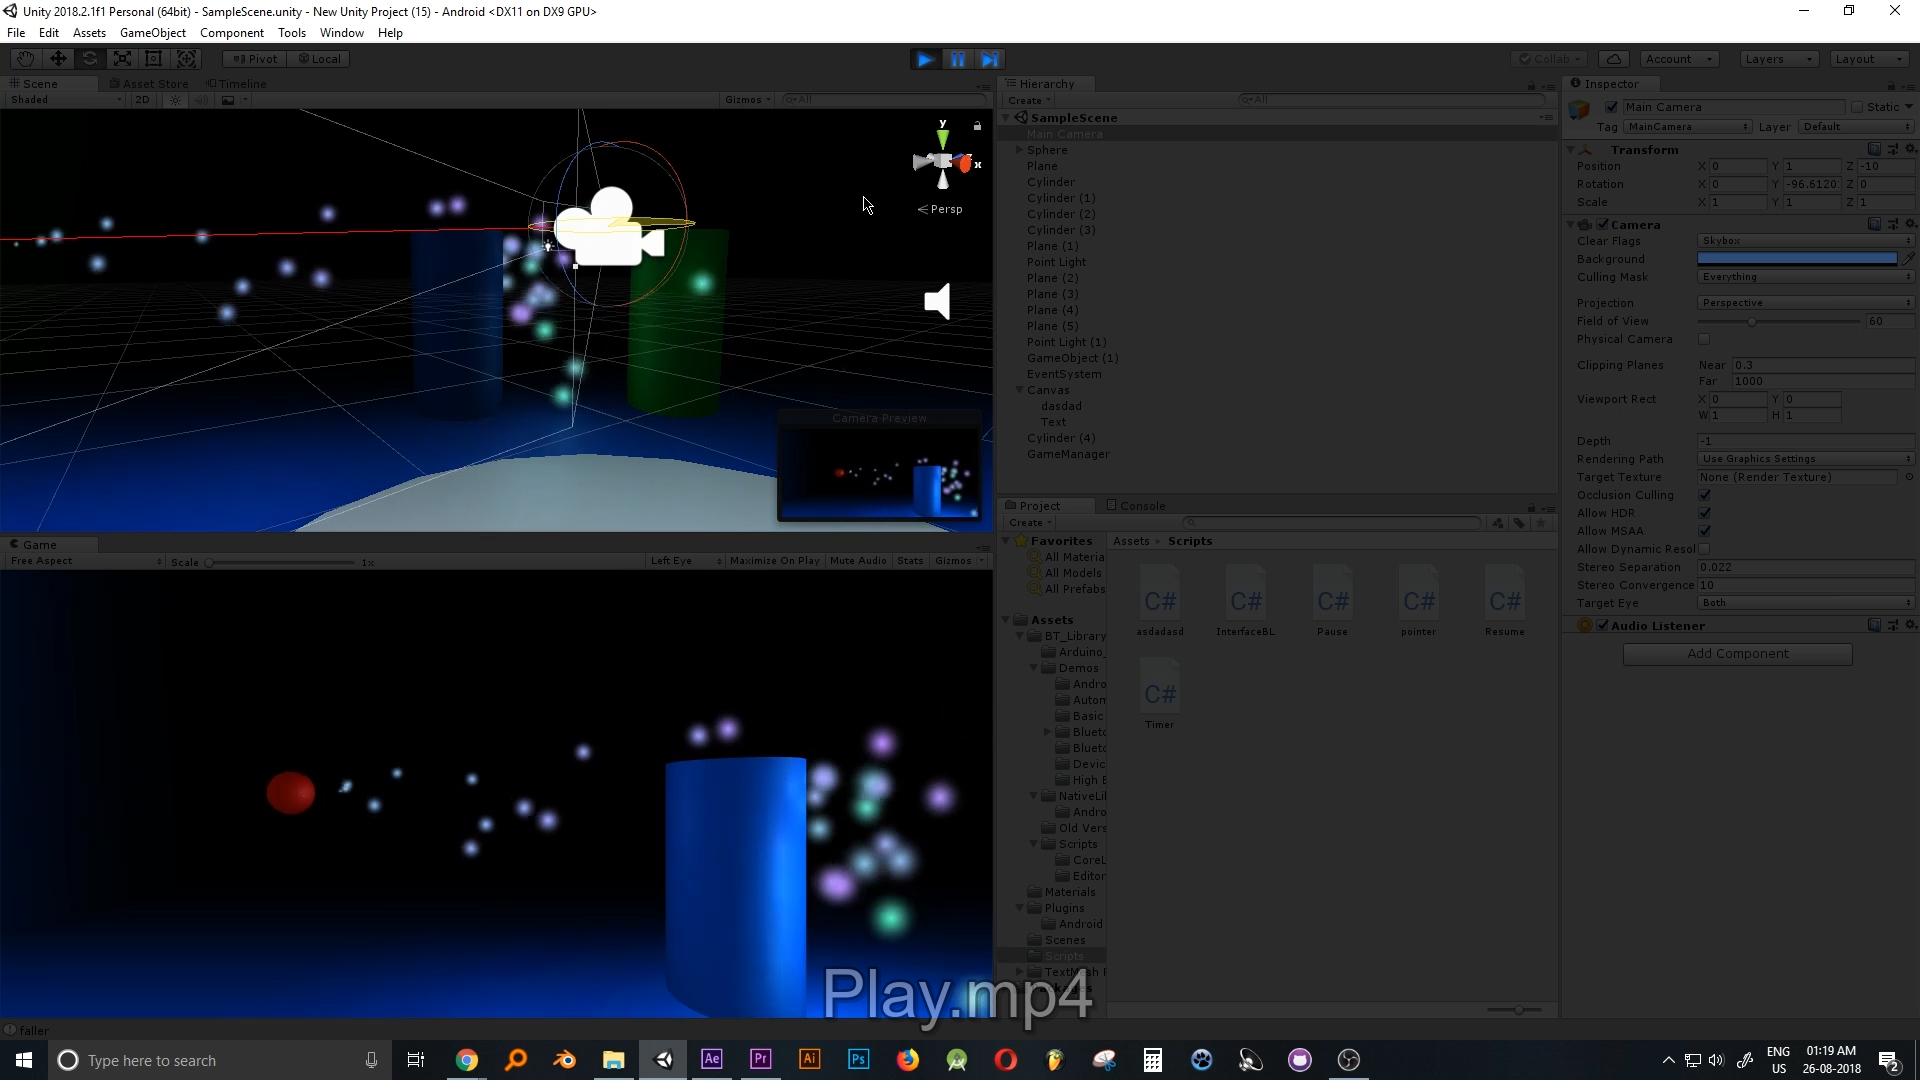
The application had to serve as a platform for other senses to take center stage and allow that user to project their inner emotions. We wanted to make an environment that could be easily moulded to the incorporate the psyche of the user. For these reasons we adopted a minimalistic approach. In choosing a suitable game engine, Unity was chosen as the right candidate. This was due to the fact that making mobile applications and its compatibility with android. Upon choosing the engine, it was time to build the application. Our due diligence led to us analyzing existing google cardboard experiences. We decided to stray away from the conventional 2D pointer mechanism of the existing cardboard API and decided to build those aspects from the ground up. We settled on a 3D pointer mechanism that would interact more realistically with the environment.
Pointer system in action The pointer needs to be smooth flowing and detect obstacles. We decided to use a ray from the center of the screen to serve as a location indicator. The benefit of using a 3D reticle that exists in the world is that it can be used to collide with objects realistically and can be expanded and contracted based on the breathing of the user. The primary intent of this basic game play set up, is to see whether smooth tracking is possible with a latency that doesn’t distract the user. The first stage for the game is a simple scene that involves a floor plane and an angled plane. The pointer object will have to move smoothly across the 3D environment at a certain distance from the camera if the player points at nothing, and to interact with the surface, if the player is pointing to a wall. The first obstacle to overcome is that the ray fires infinitely far and determining a default distance that the object would differ to in the absence of any collision obstacles was the first step. 10 units was considered to be the ray length. The ray would fire only a distance of 10 units, if no collider was detected, the end of the ray would be the target position of the pointer. The next step involved smooth tracking. This was achieved using the Linear Interpolation functionality of Unity ( Lerp) to generate a target position and move the pointer to it gradually. This lead to a smooth gliding motion of the pointer that would gently follow the players gaze. The center of the screen was chosen as the screen space point to be converted into world space coordinate. With the pointer system ready we are ready to interface to the external world. We used the Bluetooth asset library from the Unity Store to interface with a HC-05 bluetooth module. The respiration effort is received over bluetooth as a function of nasal temperature, this value is used to determine the pointer size and the amount the particles and luminosity of particles emitted by the ball. In order to make the game into a VR application that would work well in a mobile platform. It was crucial to observe the technical and graphical limitations of the platform. This demanded a rudimentary prototype build that would enable us to study the game in its intended platform of delivery. The required Android SDK was installed, as was the Google Cardboard and Google Daydream packages. However, a decision was taken to not use any of the prebuild Google VR assets and code. This was mainly to see how far we could push the technology without relying on the crutches of existing material. In order to push the lighting engine to its limit, a fog atmosphere was introduced and several particle simulations were added into the game. These particle systems emitted light and would float off the objects. The room was darkened by closing it. It was at this stage temporary music was added.
This is how it looks. -
Electrical stimulation based Haptics
08/23/2018 at 16:39 • 0 commentsIn this log we will give an introduction into muscle stimulation and about our Electrical stimulationbased haptic setup. We will also look at our haptic system in action in a short video.
What is transcutaneous electrical nerve stimulation and how does it work?
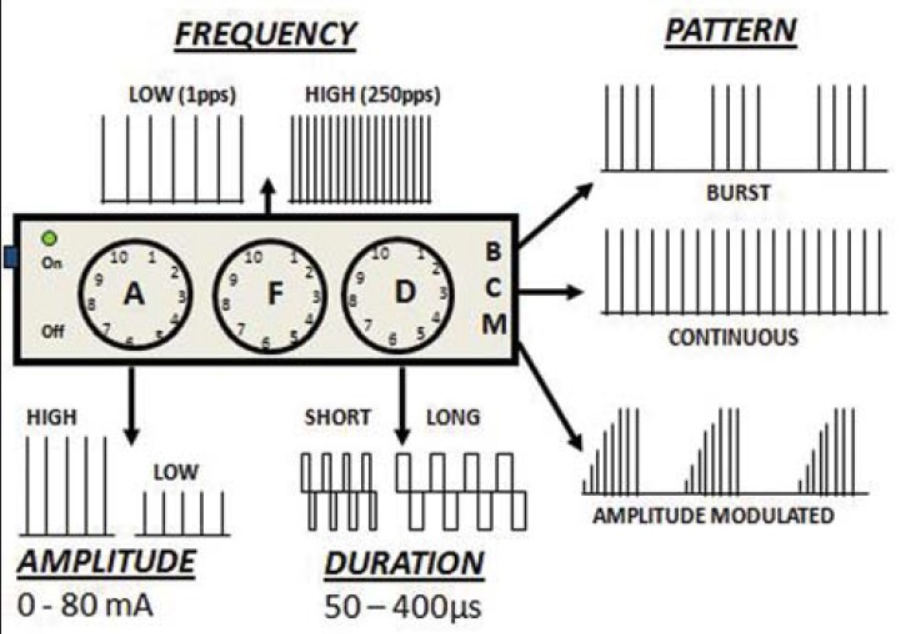
Electrical stimulation (E-Stim) refers to the application of electrical current to muscles or nerves in order to achieve functional and therapeutic goals. It has been extensively used in various clinical settings. Electrical muscle stimulation (EMS) is the process of providing electrical impulses using a signal generator to cause muscles to contract. using electrodes The muscles naturally contract in response to electrical signals from the EMS impulse similar to how they would contract some an input from the brain. EMS devices have been used in physiotherapy and rehab medicine since the 1960s to regenerate lost motor functions. EMS is now used in fitness training, wellness applications, medical applications, and even in HCI design applications. The other primary electrotherapy systems like Transcutaneous electrical nerve stimulation (TENS) uses a very similar setup to instead stimulate nerve endings to provide pain relief. TENS units primarily provide pain relief by exciting sensory nerves and thereby stimulating either the pain gate mechanism and/or the opioid system. TENS as a treatment technique is non invasive and has few side effects when compared with drug therapy.The TENS machine will deliver discrete ‘pulses’ of electrical energy, at a pulse rate or frequency that may be varied from about 1 or 2 Hz up to 200Hz. To be clinically effective, it is suggested that the TENS machine should cover a range from about 2 – 150Hz. The other important factor for TENS units is pulse width or the duration for each pulsation. Intensity of the pulsation too is another important key factor for TENS units.
The various factors in a TENS unit Consumer TENS devices typically have presets modes wherein they have different combinations of pulse intensity, time duration and frequency. By carefully managing the profile of the TENS unit's stimulation we can provide both muscle and nerve stimulation.
Note on safety:
A key point to note at this juncture is that we aim to provide electro stimulation for the muscle bundles and proximate nerves and not Neruostimulation (Neurostimulation is still in early research stage and requires extensive supervision by experts). To ensure safety of the user we decided early in our design against generating our own TENS pulsations. We instead chose the approach of modulating the output of a FDA certified TENS unit instead using safe switching.
Reference works and must read work:
Much of our work in electrostimulation devices was inspired by the amazing work by
Max Pfeiffer's amazing work with EMS based haptic feedback and Pedro Lopes's work with the OpenEMSStim. Their solutions involve a similar setup of using a clinical TENS/EMS as a source for pulsations and switching it on and off with a digital switch (Relay/MOSFET). The inspiration for linking breathing and TENS came from a study conducted by Dr. Shen Li wherein he designed a system to deliver a pulsed electrical stimulus to a target area when voluntary inspiration reaches the threshold. His system, BreEStim integrates intrinsic physiological interactions which get activated during voluntary breathing, his method has shown stellar results and increased patient compliance. Further we were inspired by studies using TENS for alleviating mental stress through soothing stimulations.
Before we start, it is crucial to follow every instruction provided by Pedro's Do's and Dont's. This was a principal guide for the design of this section of our project. Now with that out of the way, let's look at the core elements of controlling TENS output suggested by the above researchers.
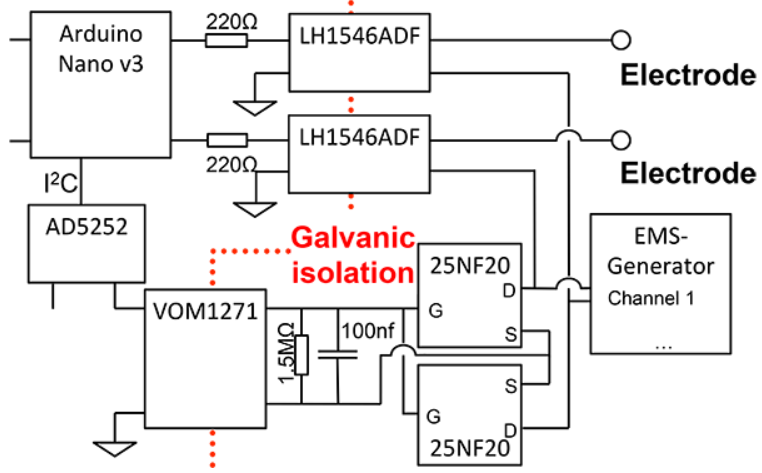
Schematic of Max's EMS modulation system The above schematic shows the cruicial elements of Max's system, He first provides galvanic isolation between the EMS modulation circuitry and the other electronics including the MCU and power through use of Optoisolators. He then uses the isolated gate pulses to drive two 25NF20 N channel MOSFETS to control the intensity of the EMS/TENS pulsation delivered to the electrodes. Two MOSFETS are essential since almost all EMS/TENS units use biphasic pulses to prevent electrolyte deposition and the allergic reaction associated with it. The output is also controlled through use of two relays which provide connection between the electrodes and modulated output from the the drain of the MOSFETs.
Our system:
For start, due to the very sensitive nature of this subdomain of the project we chose to first implement the Max's LetYourBodyMove work and control it for starters to get a firm understanding of the complexities involved in designing a system modulating TENS inputs. We put the PCB out on OSHPARK and got it assembled at start.
![]()
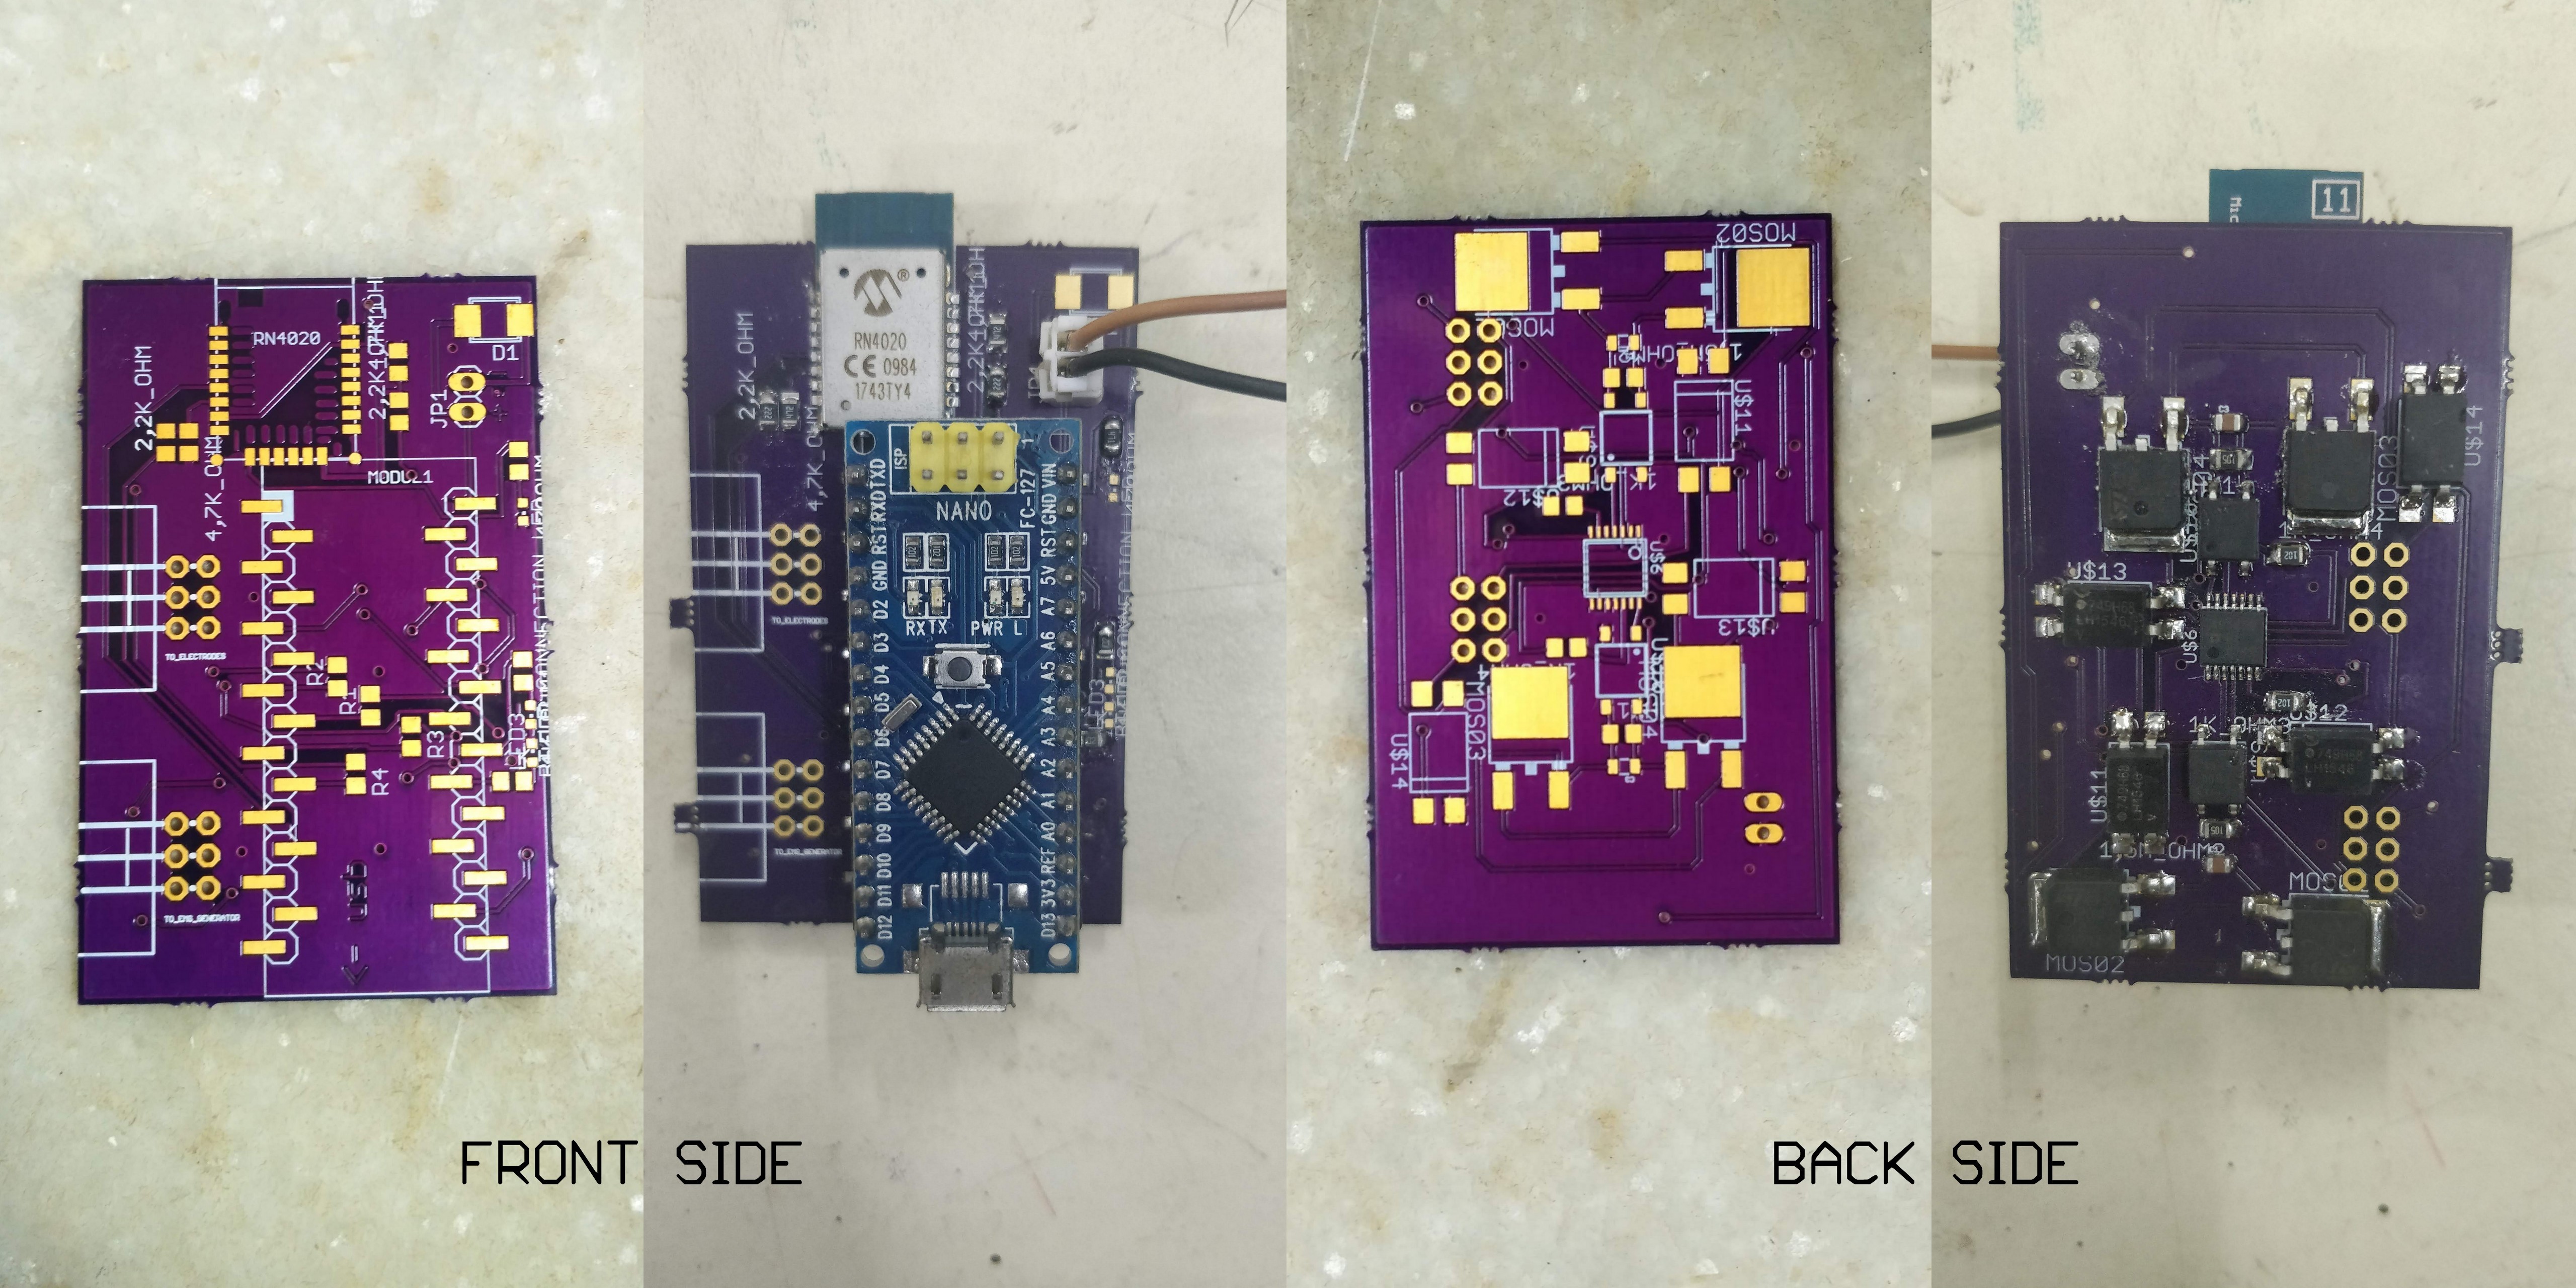
EMS modulation system - PCB's from OSHPark
The setup uses a Arduino Nano to provide switching for the relay, the AD5252 10 bit 2-channel Digital to Analog converter talks over i2c to the nano and provides analog input to the gate of the MOSFETS through the optoisolators. The system allows dual channel TENS interfacing and provides stimulation through electrodes. The setup also uses an RN4050 BLE module to allow remote control over phone. The setup is powered using a 9V battery and uses the Nano's internal voltage regulator to power all electronics. The setup gave us a firm grasp into what went on in the setup. This prompted us to start tweaking the setup to allow us to integrate with the rest of NeuroCuddl interface.
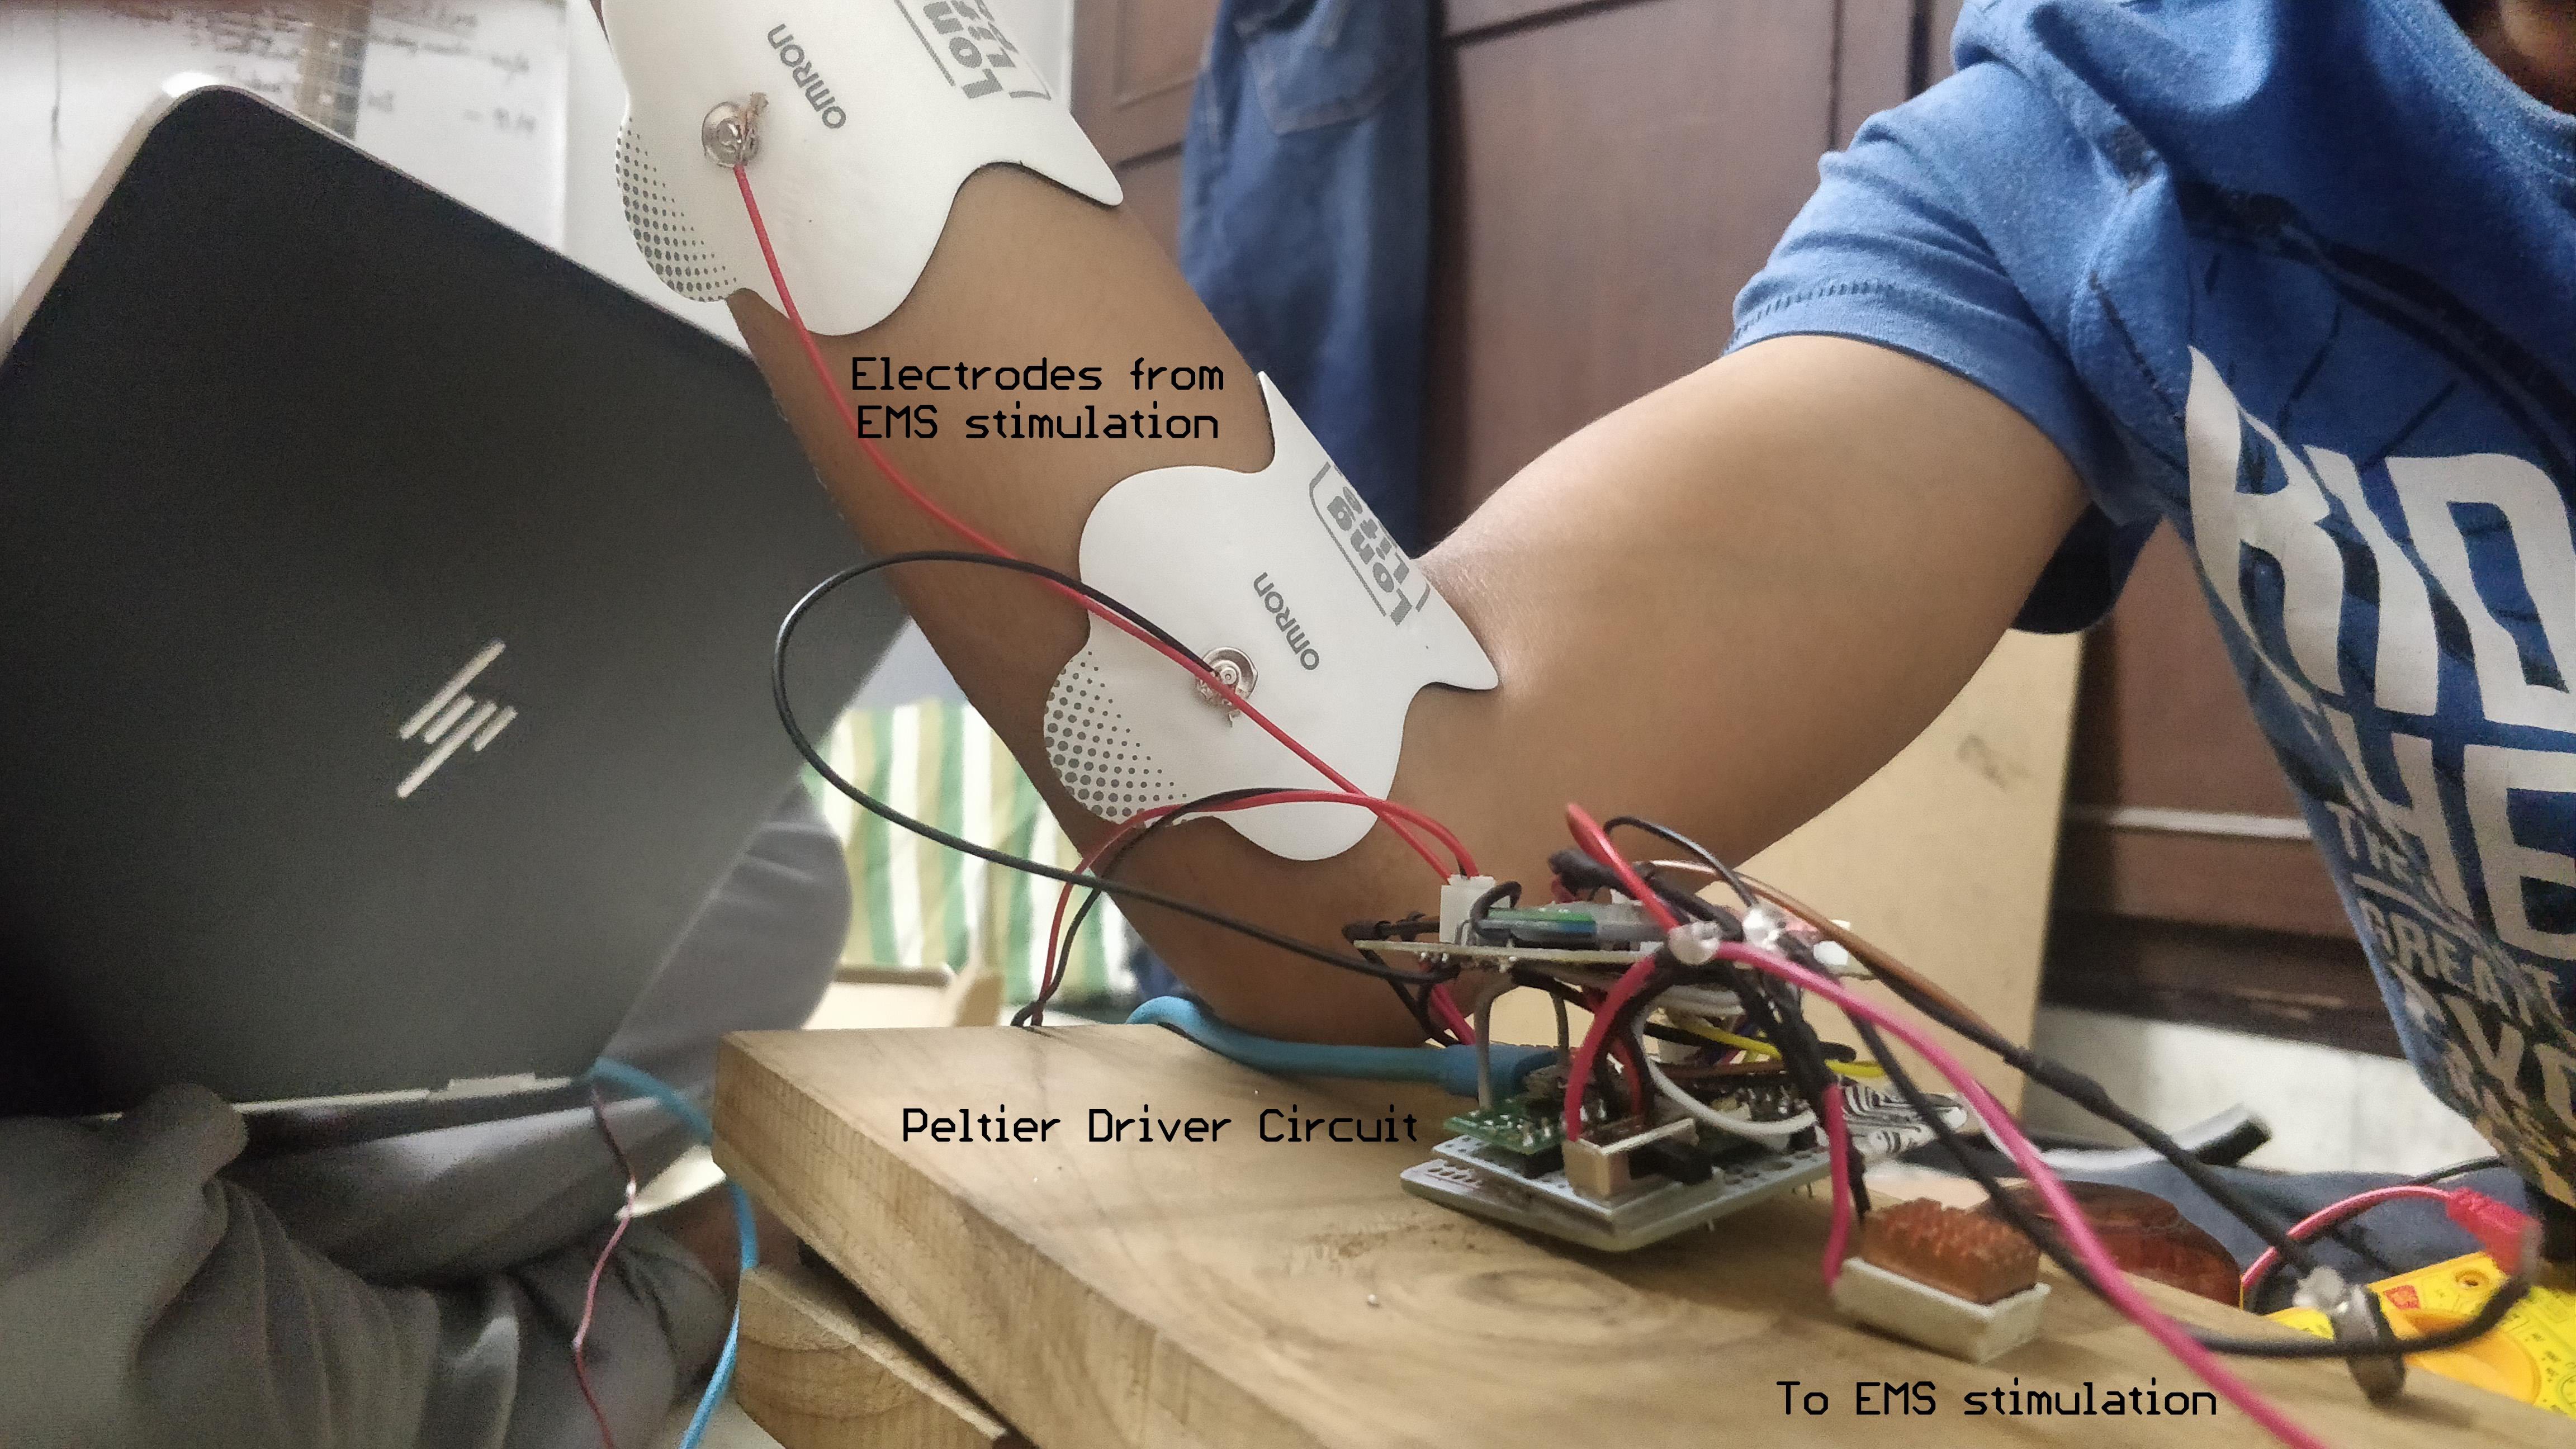
We first began by removing the AD5252 carefully soldering a wire to the SMD pinout of the optoisolator and using the Teensy's own 12 bit DAC (1-channel) to provide gate voltage to the MOSFET's. We then proceeded to power the whole unit using a 3.3V regulator and we then successfully got the unit working with the Teensy. We removed much of the original code and used Teensy's AnalogWrite and the DigitalWrite for the relay controls. The TENS unit we used, Ultima 3t is a FDA certified dual channel TENS with analog control.
Look ma, I'm doing some physiotherapy Here are some photos during our early experiments.
![]()
In conclusion, We found electrostimulation to be an excellent sensation for pain and stress relief and observed certain frequencies to have buzzing and relaxing effects. We further understood the carefully steps we would need to take to ensure safety of the user and we hope to incorporate features in our design to prevent users from accidentally configuring the TENS electrodes wrong. The next steps would be to integrate the TENS modulation system with our own system and ensure the safety standards are maintained.
In the next log we will look at the game in action and see what design decisions we had to make for design of the game.
-
Thermal Haptic stimulation
08/21/2018 at 17:23 • 0 commentsIn this log we aim to give some basic understanding about our peltier based thermal haptic setup and cover basics of peltier elements too. As a bonus, We will share some lovely thermal camera footage of our peltier elements in action.
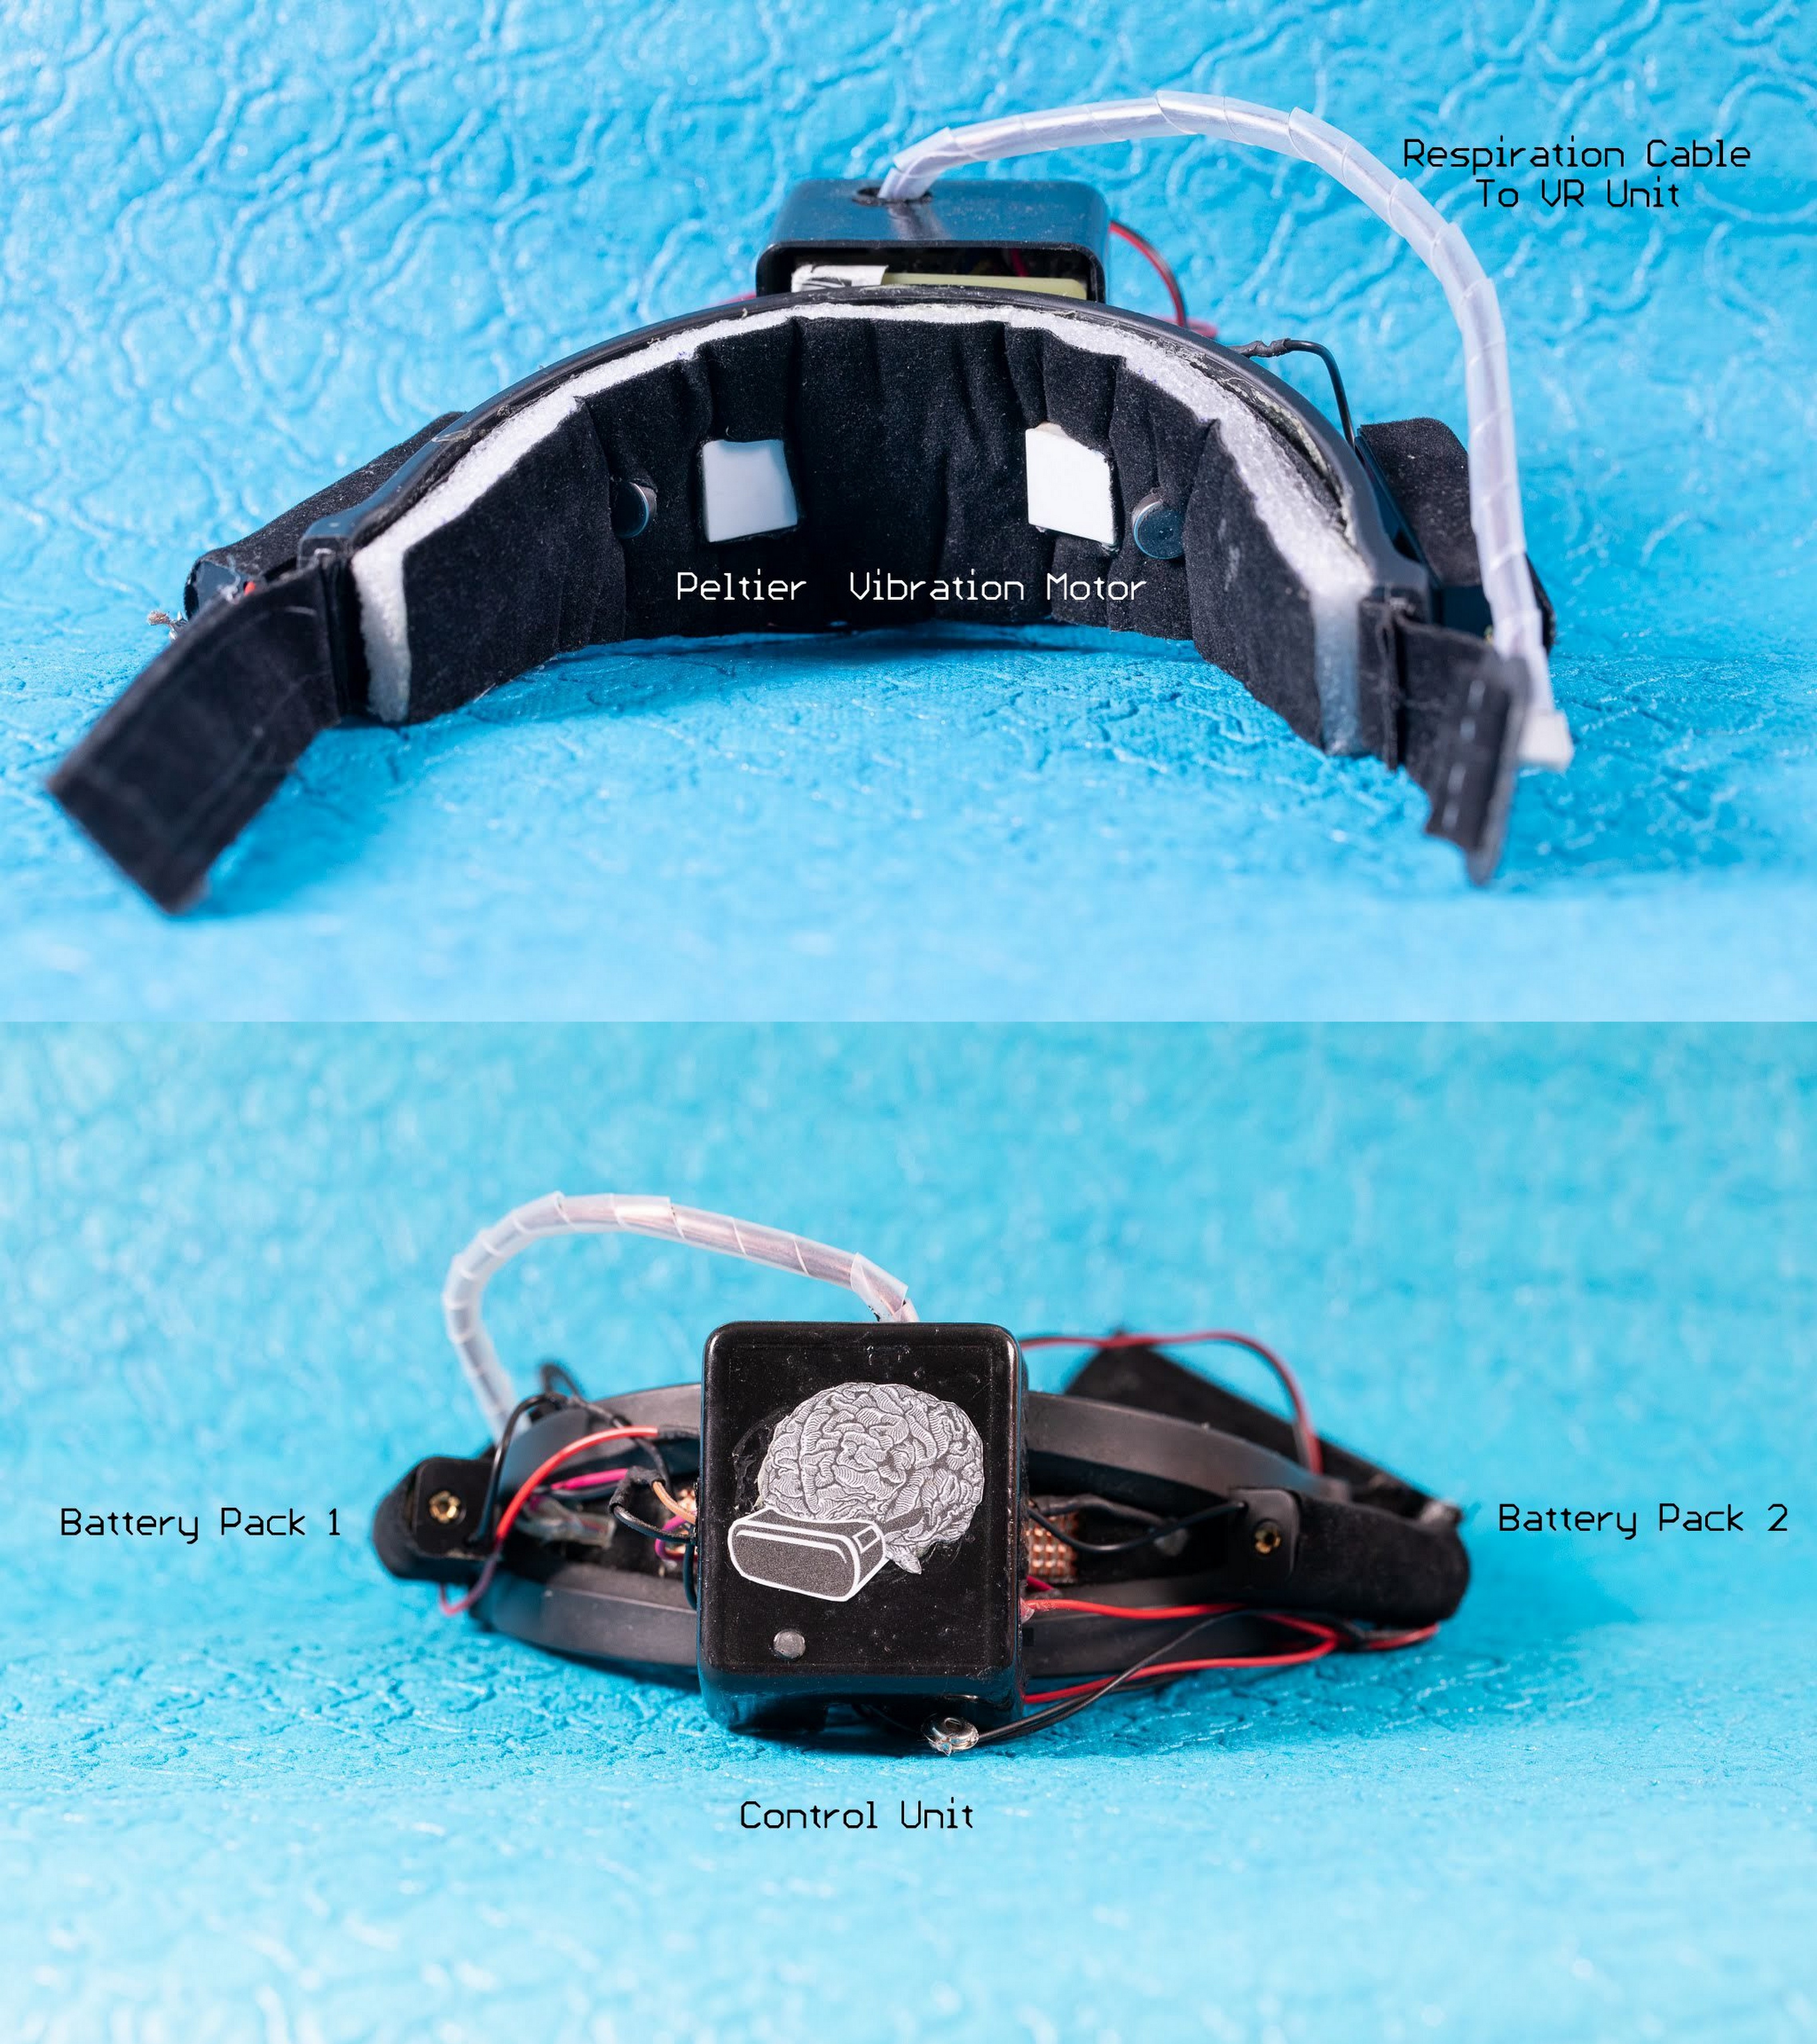
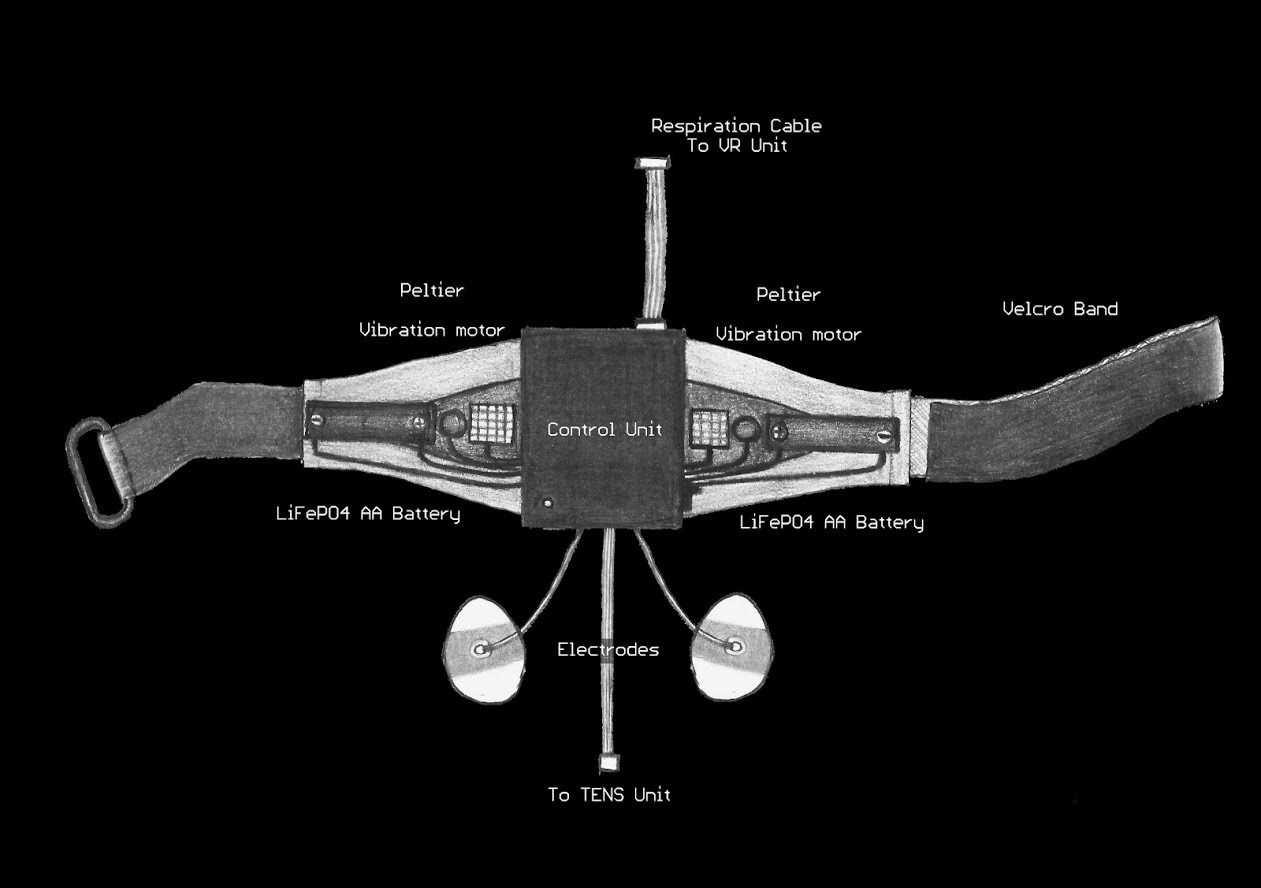
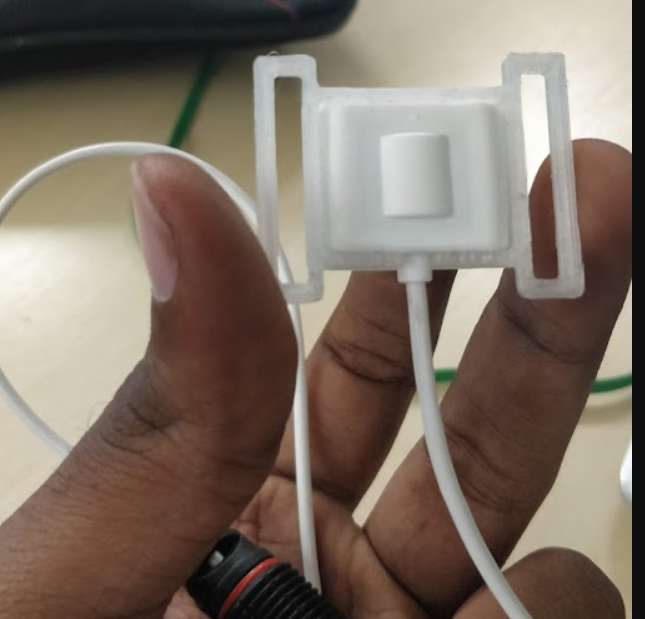
![]()
Final version of Haptic Feedback Unit
What are peltier and how do they work?
Peltier elements or Thermoelectric Coolers are electronic devices which are essentially solid state heat pumps. When a voltage is applied across the peltier element, the peltier begins to transfer heat from one end to the other end creating a temperature difference between the two sides. The inverse property can be used where in a difference in temperature is used to generate power, this configuration is a called a thermoelectric generator.
![]()
Peltier effect operation The Peltier assembly consists of alternate p & n type elements connected together by a solid copper plate housed by a ceramic material. Cooling occurs when a current passes through one or more pairs of elements from n- to p-type; there is a decrease in temperature at the junction ("cold side"), resulting in the absorption of heat from the environment. The heat is carried along the elements by electron transport and released on the opposite ("hot") side as the electrons move from a high- to low-energy state. A peltier element will can easily produce a large temperature difference of over 40°C between its hot and cold sides. However the more heat that moved, the less efficient it becomes. This is due to the peltier having to dissipate both the heat being moved and the heat it generates itself from its own power consumption. The peltier elements can be driven through using either constant voltage drivers or using motor drivers.
Peltier elements are widely used for various applications where accurate temperature control is required. They are used places like Insulin storage boxes to laser diode cooling elements.
Our Peltier system design
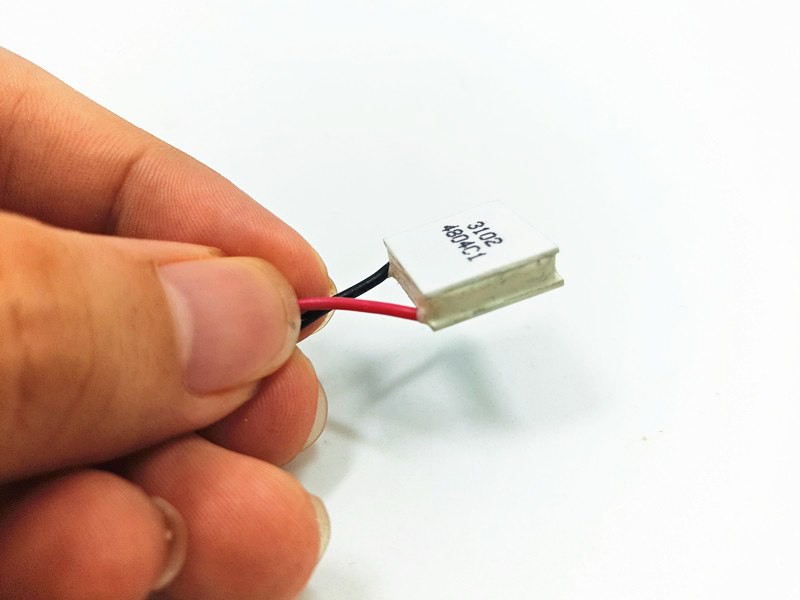
We started by looking for low power (<2A) & compact(<20mm) peltier elements, this however was not as easy we hoped due to many peltiers we needed were far too large or drew too much current and we had to search quite bit till we found the peltier element to fit our needs. The one we finally settled in on was the TES1-03102. This element had a 15*15 mm size and drew about 2.1A at 3.7V.
![]()
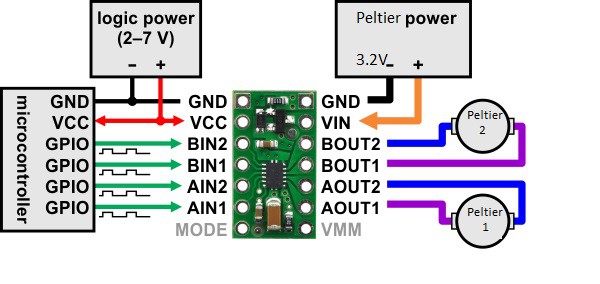
The teeny TES1-03102 Peltier The cooling & heating effect was solid and we were able to get a quick response to changes in the current. We went with some existing guidelines of driving peltier elements using standard motor drivers like the LM293D but we found the driver to have issues driving two peltier elements. We then went on to use the DRV8835 dual channel motor driver to both power and control the peltier elements. The control scheme for the DRV8835 allows to easily reverse the direction of the peltier heat flow. This would allow to provide more smoother and enaging thermal haptics. One thing to note is that Peltier elements need a proper heatsink to function properly. We used these awesome looking copper heatsinks that were originally used on memory chips and phone SOC's.
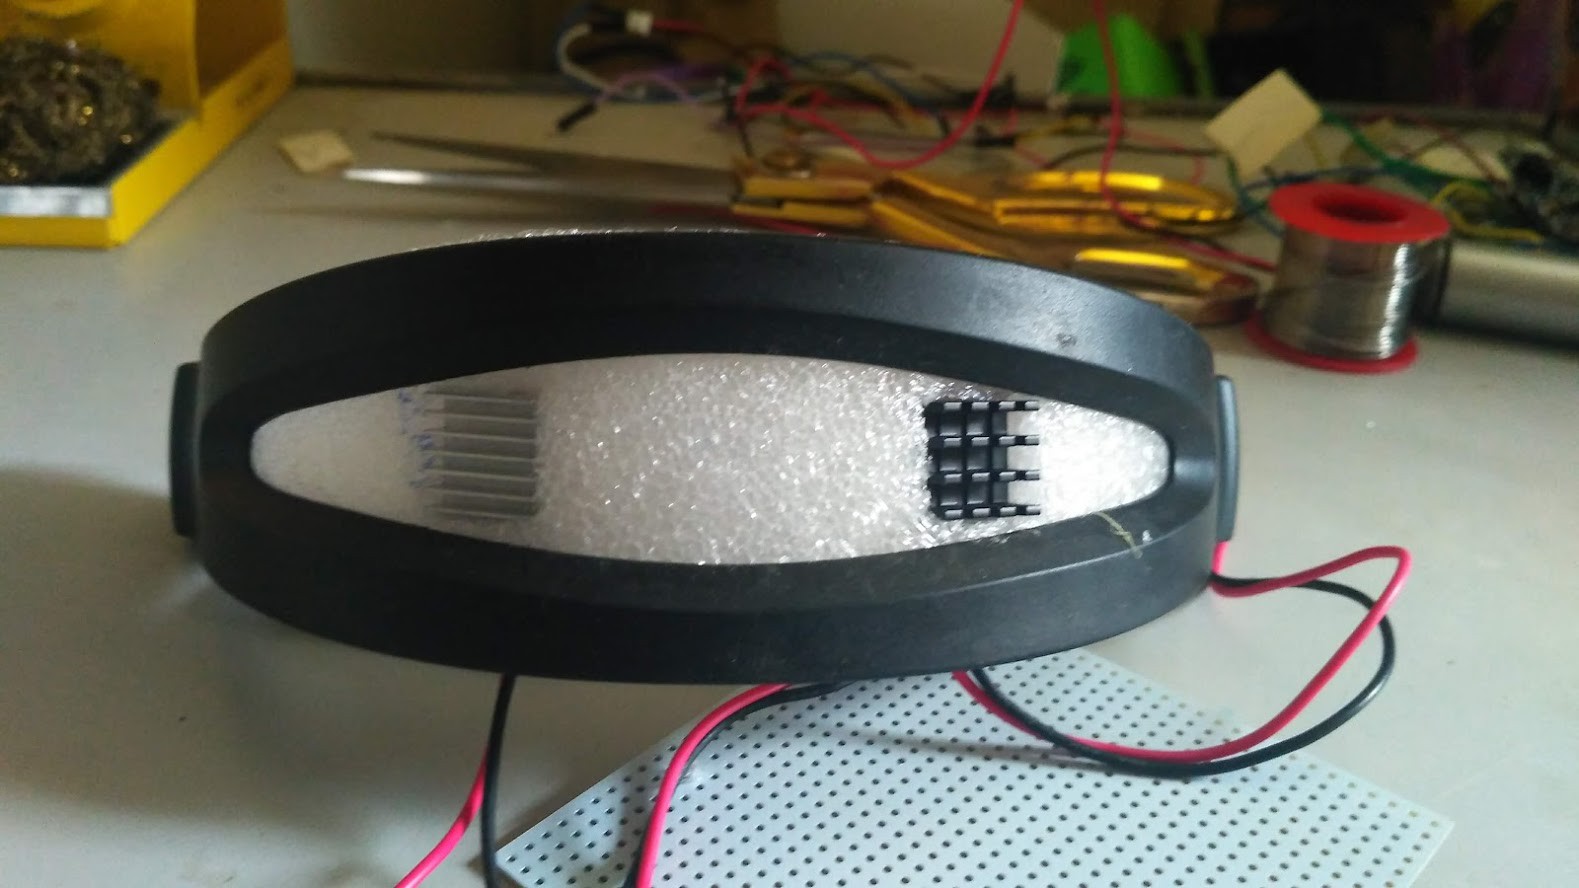
![]()
Picture of the NeuroCuddl neck band with the old Peltier heatsinks ![]()
DRV8835 Peltier drive circuit I cooked up some basic control logic to drive the peltier through regular PWM (Though several whitebearded bearers of arcane analog electronics suggest smoothing PWM).
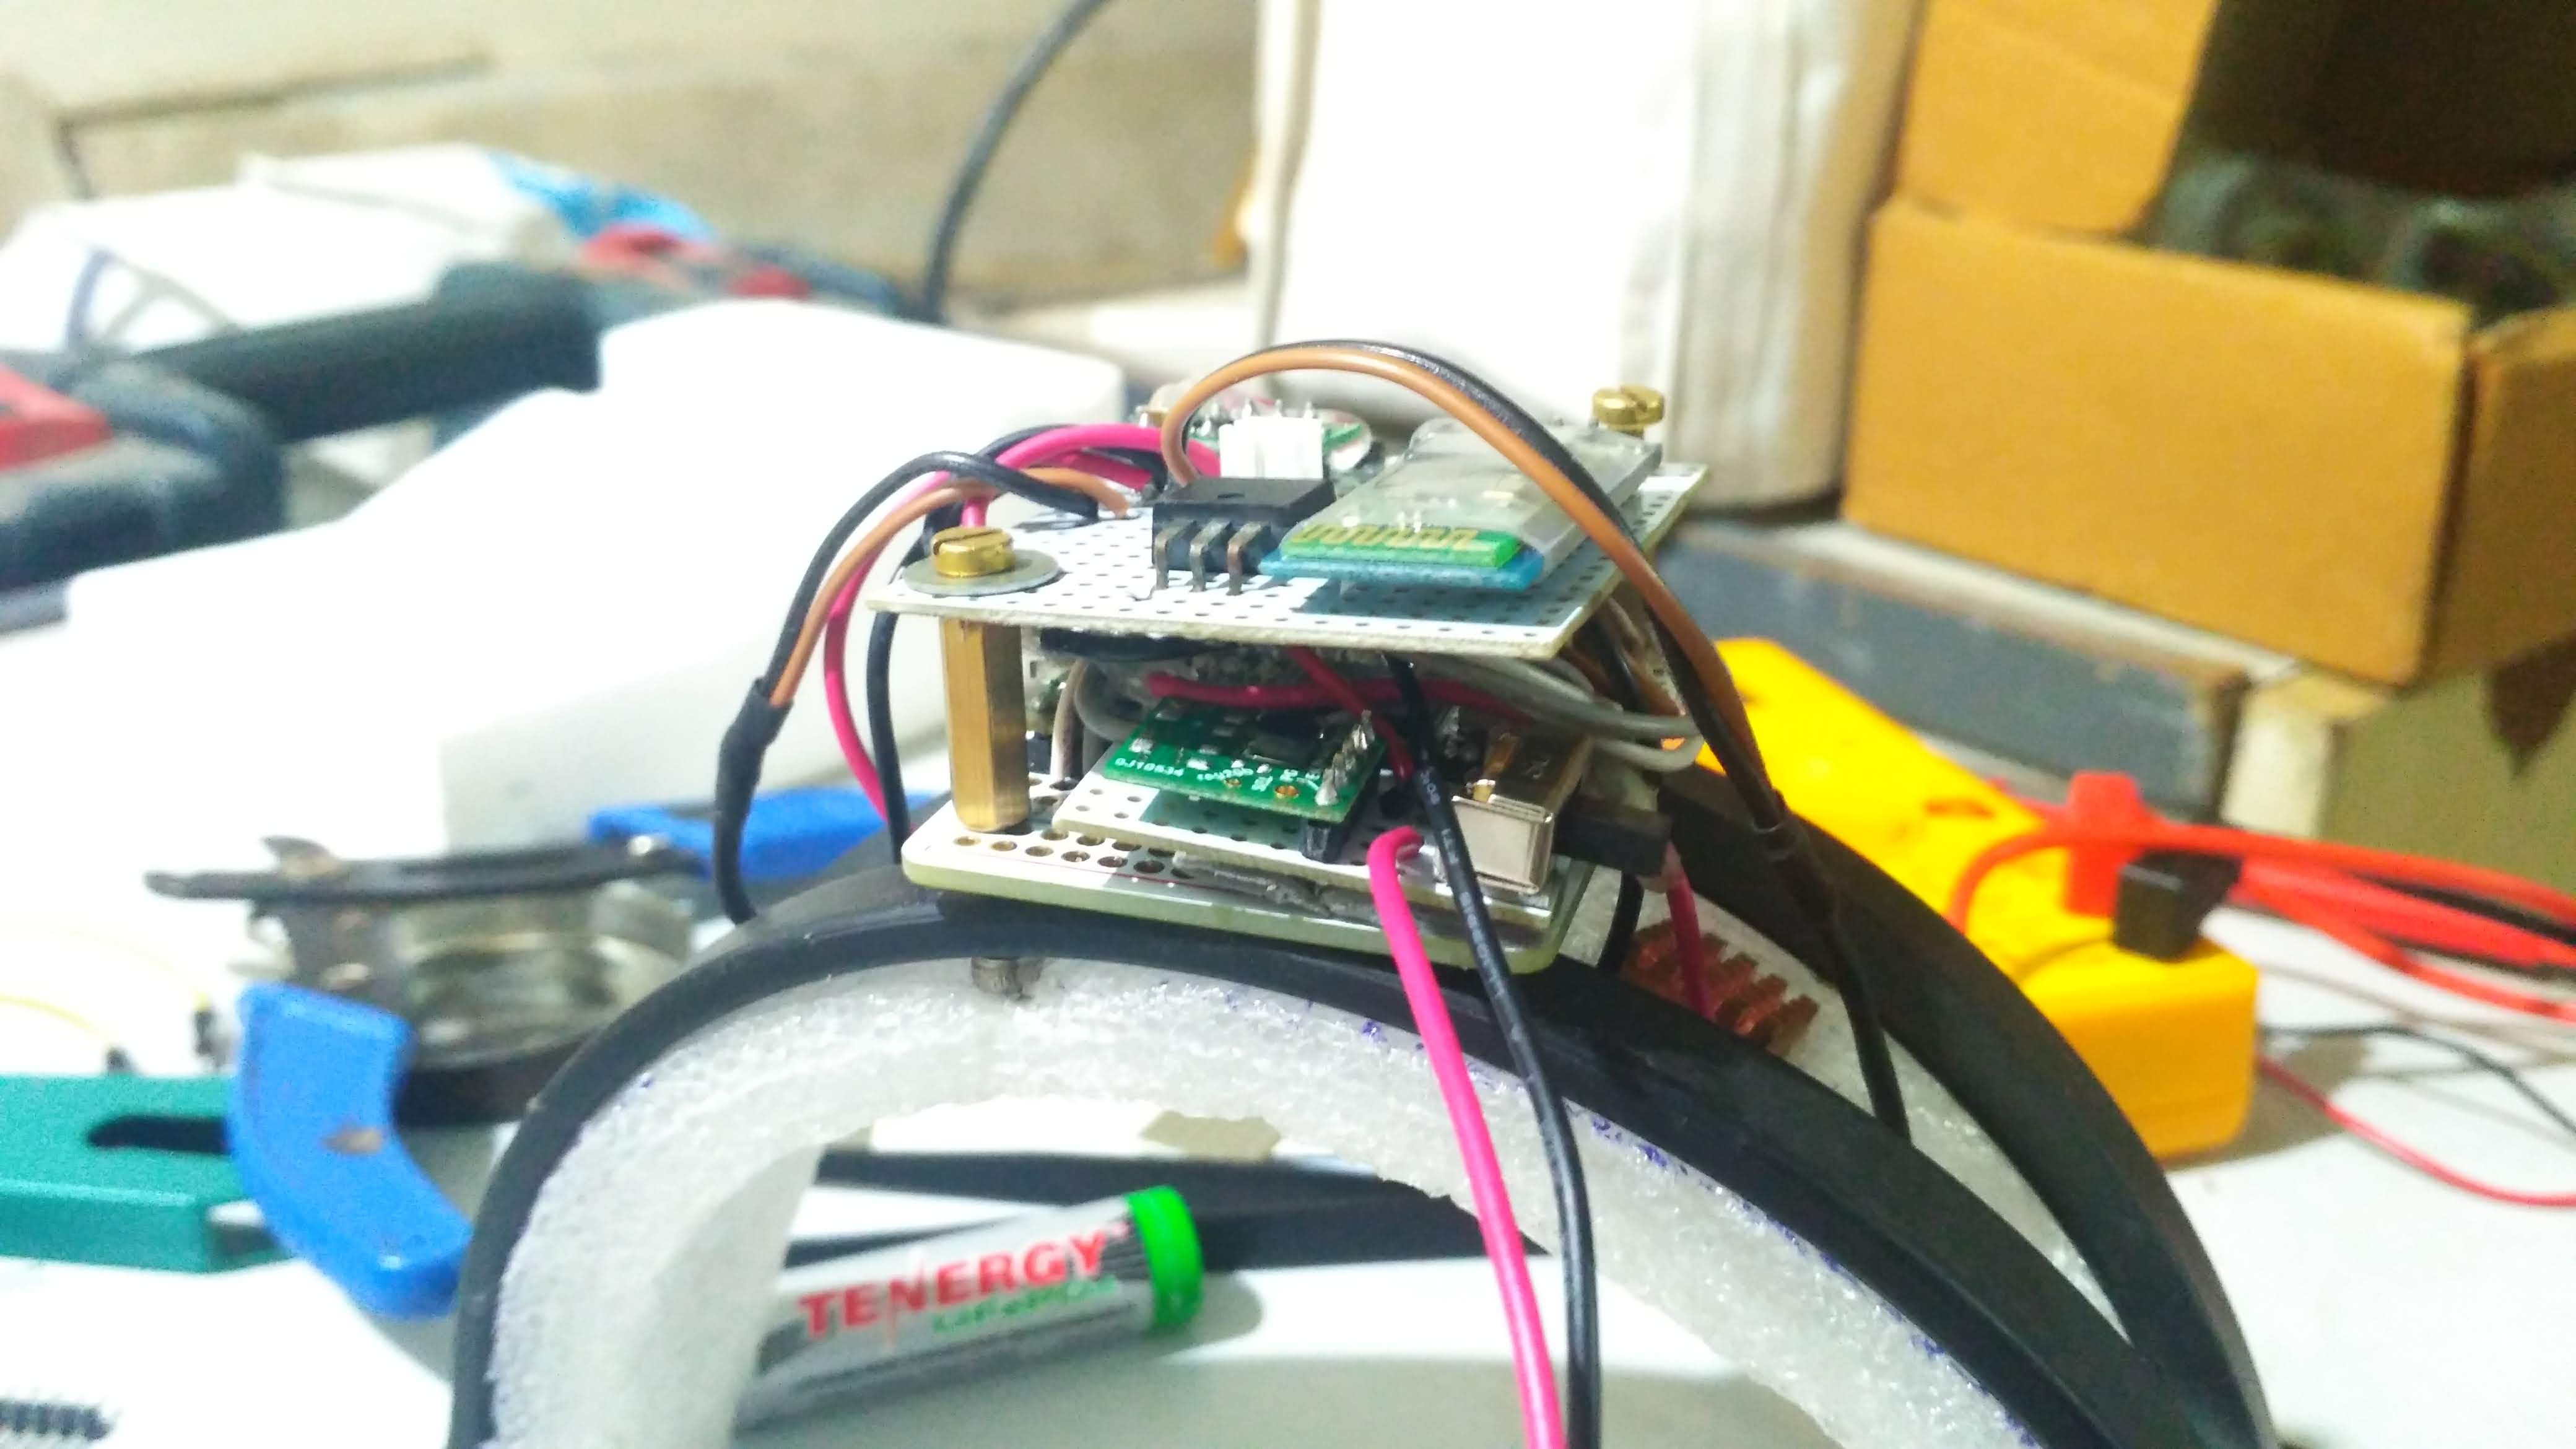
After getting done with the circuitry, I soldered everything on a veroboard and used hinges to stack up two boards one above the another in order to make it a bit compact. Here is a photo after the 1st prototype.
![]()
As promised here is the thermal GIF of the peltiers heating and cooling.
Please forgive the potato quality, we had to use the lower resolution FLIR Lepton for this.![]()
1 minute time lapse of the peltier elements heating and cooling The experience of thermal haptics feels real good and evokes good feelings when we use it. There are still complexities involved with power and size that needs to accounted with this.
Next build log we'll talk about Muscle Stimulation haptics and how our journey into it has been.
Anyways, Happy Hacking folks.
-
Design Choices and Form Factor Ideas
08/19/2018 at 16:53 • 0 commentsIn the previous logs we talked about the problem statement in general and about technical aspects of breathing sensing technology. I wanted to use this build log to document the various design decisions we had to make and the core rationale behind the approaches we are taking.
Our goal with NeuroCuddl is to build a wearable VR system that combines of breath sensing and audiovisual, thermal, vibrotactile and muscle stimulation haptics. Through these sensors and haptics we aim to deliver a VR experience that would provide users with an immersive and blissful mindfulness training session.
While designing NeuroCuddl we have to ensure a balance in design between functionality and user comfort while remaining compact. The design should ensure proper biofeedback stimuli is delivered while being unobtrusive to the user during usage. User immersion during regular VR activity should be unaffected. The first decision along the process was to decide between NeuroCuddl being developed as either a desktop VR accessory or a mobile based VR accessory. Due financial constraints at this moment we are unable to purchase a desktop VR headset like Vive or Oculus Rift.
This alone however is not the main reason for us not building for desktop VR headsets at this moment, our decision was driven by the amazing growth of mobile VR with Google's daydream to Samsung GearVR to Oculus Go. This we envision as being the first point of contact for average consumers to the amazing world of VR. With better mobile processors like Snapdragon XR and more inexpensive displays and the dawn of Augumented Reality headsets we see this space as being highly interesting to explore through the use of an accessory to extend haptic feedback and physiological sensing. We thus chose a route of building battery powered wearable accessory for mobile VR headsets.
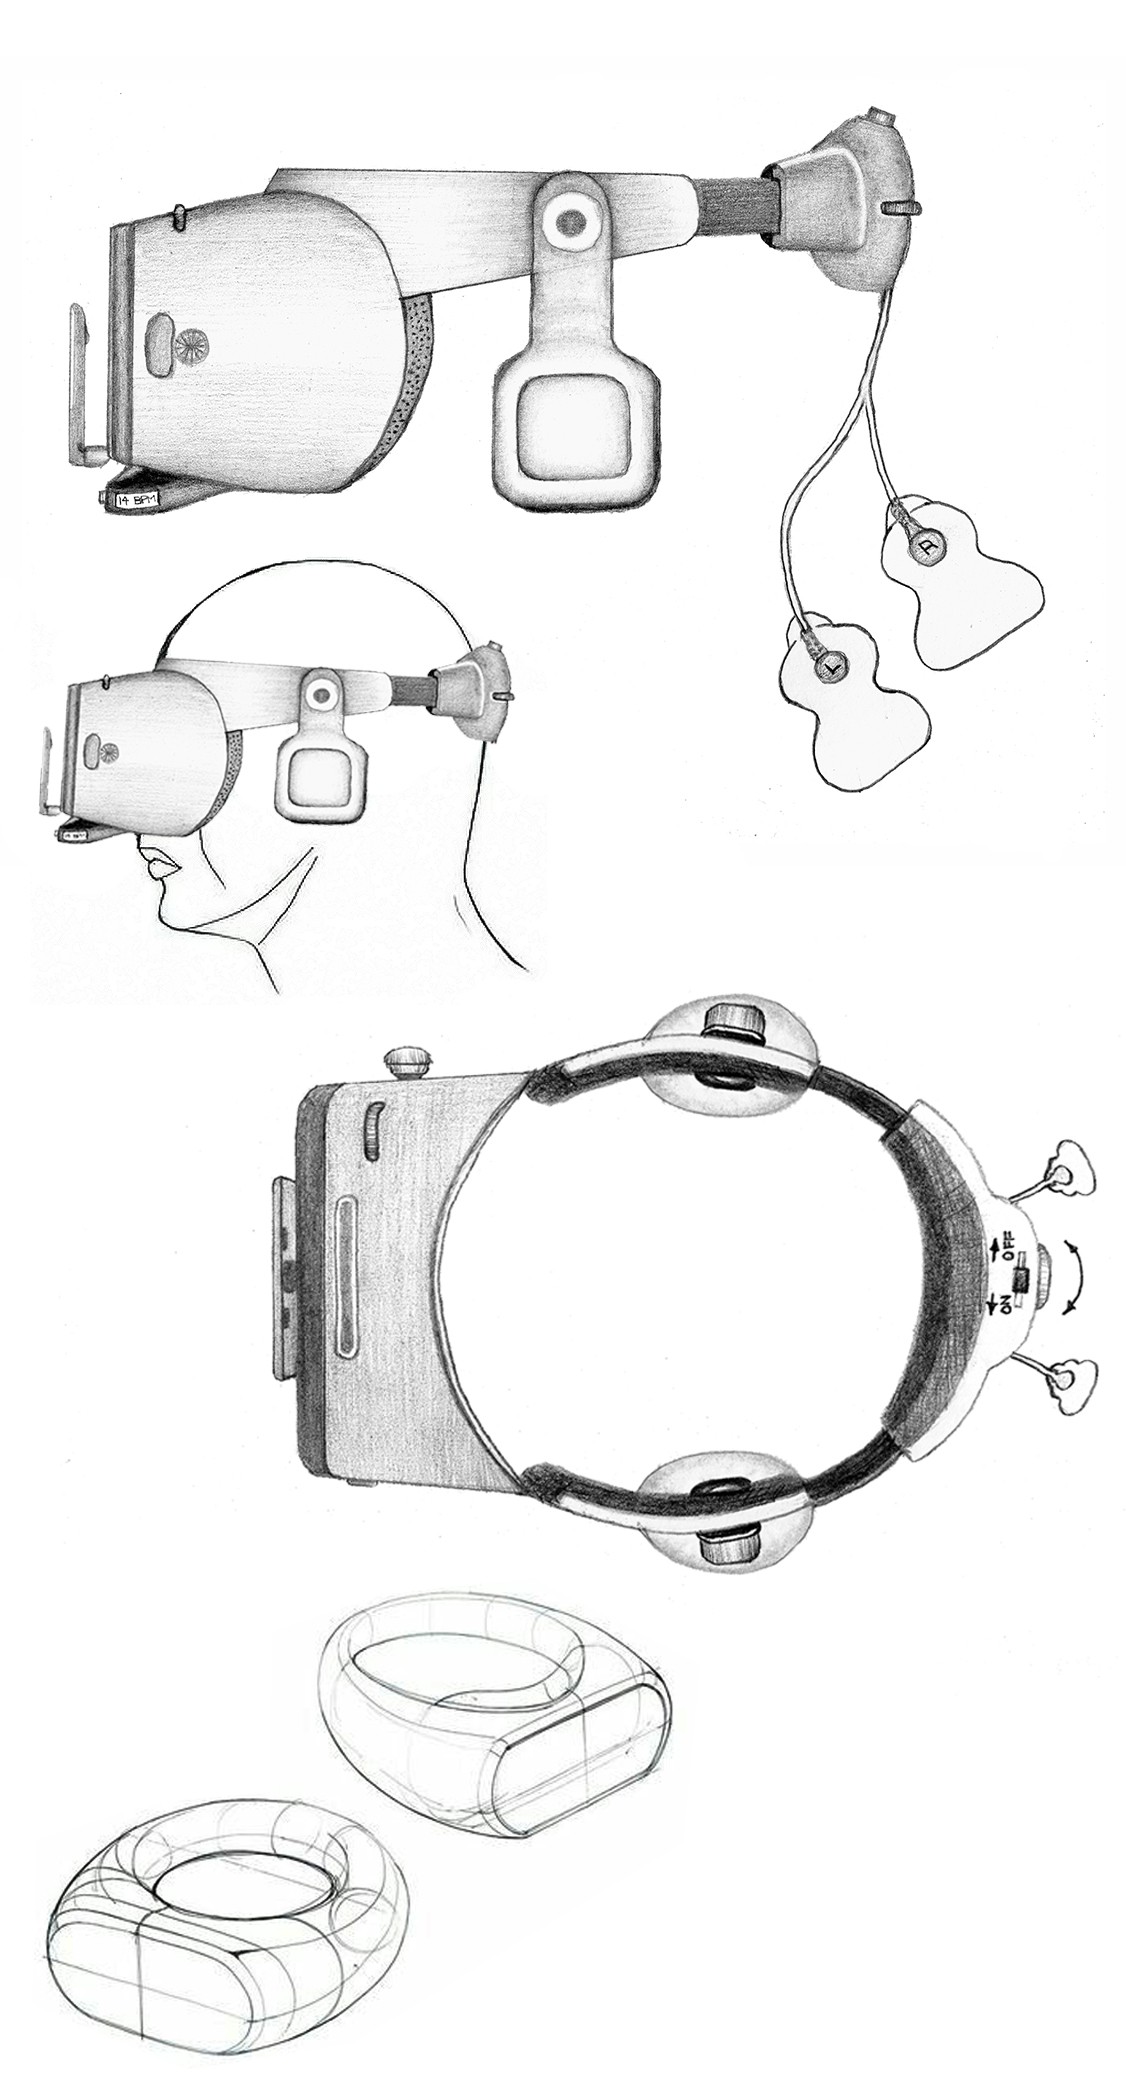
Existing research in the use of haptics for VR have explored various sites for thermal haptics and found that a significant amount of people preferred the neck as a site for thermal stimulation. Further the commonly reported pain point in people with work stress is in the upper back muscles. Thus making the ideal location to wear NeuroCuddl be in the neck. We thus envision NeuroCuddl being a neck worn wearable VR accessory that can provide multimodal stimulation.NeuroCuddl system should be designed to require only minimal modification to any compatible mobile based VR headset. The neck worn wearable have to have an appropriate coupling mechanism to adhere to the neck and ensure appropriate weight distribution. Further the system would need to be highly intuitive for a stressed user to use and require only minor user engagement to set up. The respiration sensor too would have to be housed away from the nose while still being able to sense the breathing parameters. Here is the design we hope to accomplish.
![]()
Below image shows the conceptual design of the neckband for sensing and feedback..
![]()
-
Designing and Testing a noncontact temperature breathing sensor
08/19/2018 at 15:51 • 0 commentsIn this log I want to expand on what I posted last time regarding regarding breathing sensing. While I documented most methods available and the ones we tried, I want to talk here about our trials and tribulations in building our respiration sensor using a noncontact temperature sensor.
We started off by using a standard MLX90614 noncontact temperature sensor which gave us good initial results.
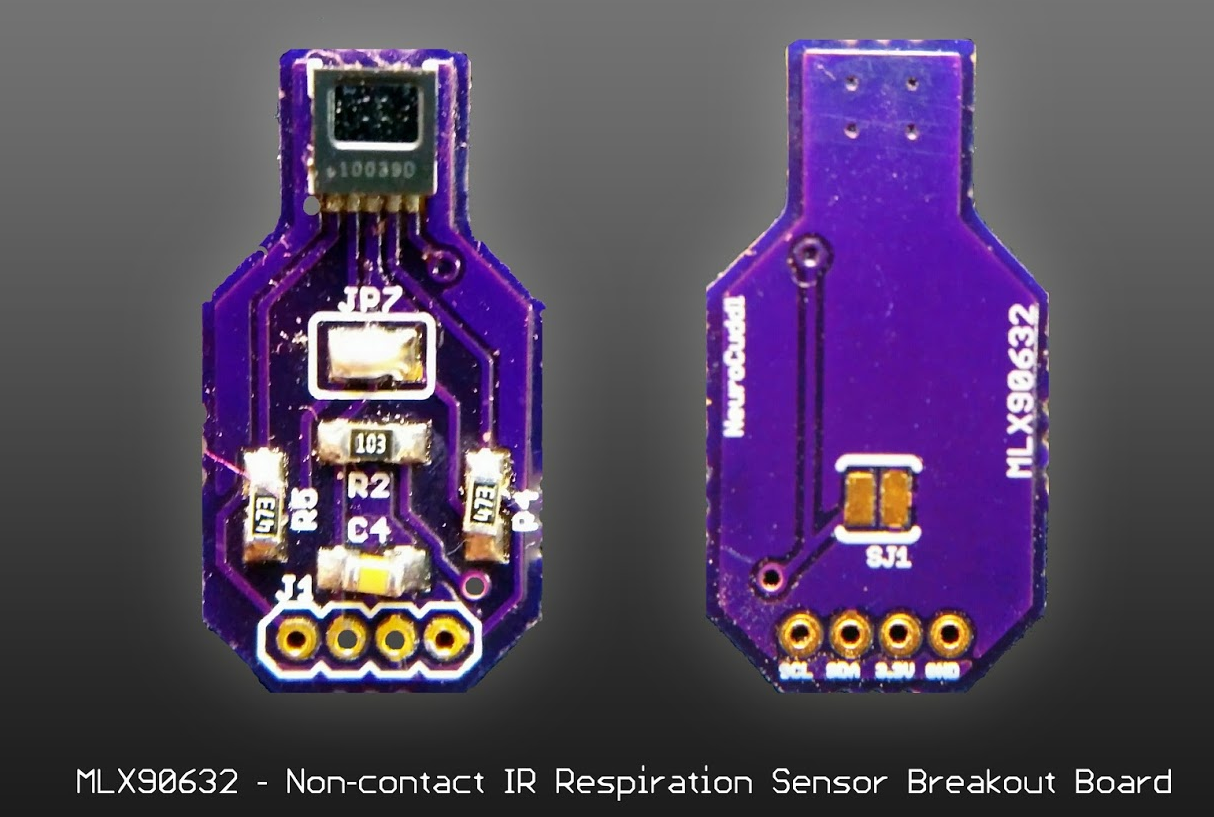
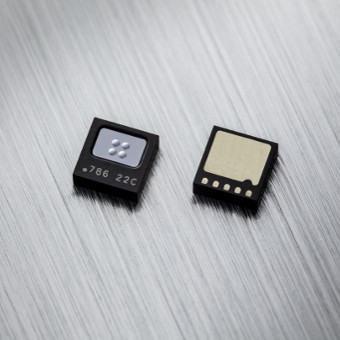
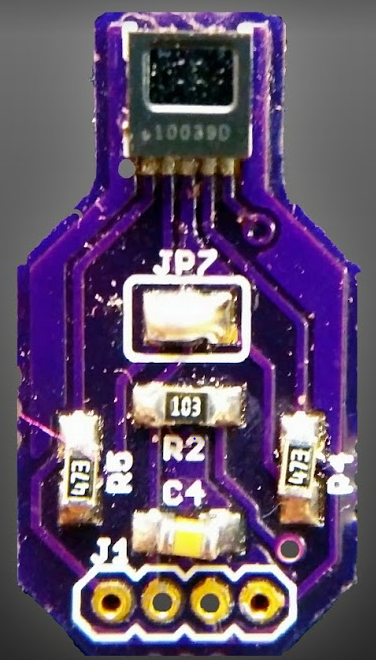
The sensor was reliable but a bit large for it's functionality. Melexsis, the company which makes these amazing sensors had a very compact SMD sensor (MLX90632) as a replacement to the MLX90614. This sensor according to their material is meant to be used in even high accuracy applications and offers 0.1 Celcius resolution and increased reliability. This sensor like it's bigger brother talked over the I2C bus.![]()
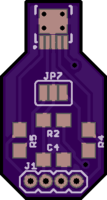
Sparkfun used to make a handy breakout board for it too for people are interested. The size and accuracy made us choose this sensor to use in our project. We quickly made an equally teeny breakout board for this sensor with 0.1" headers.
![]()
After a quick order on oshpark, we got the first board of this project.
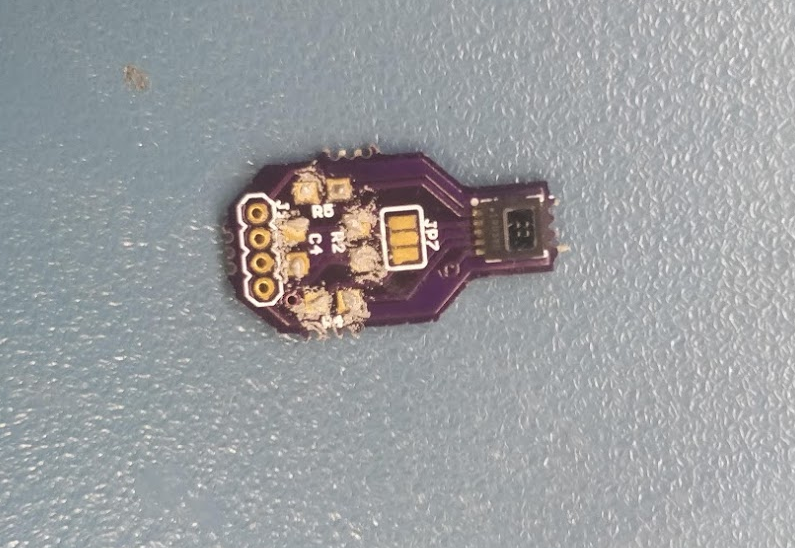
We got to assembling this sensor using my hot air gun using some solder paste.
Despite having some issues originally in getting the solder under the sensor to reflow a bit of kapton and preheating the board solved the problems.
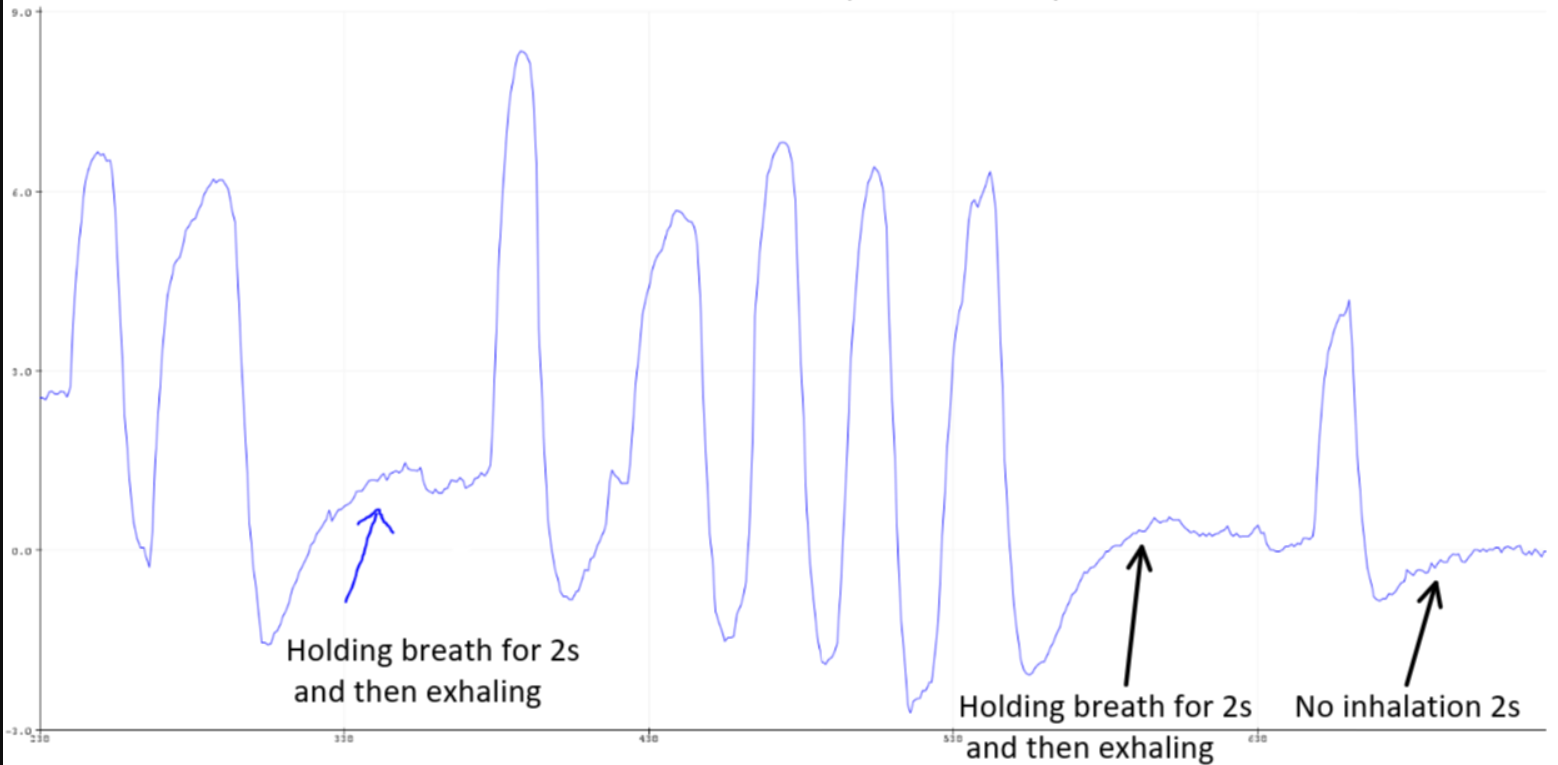
For testing I had this setup with the sparkfun library for MLX90632 and used the serial plotter tool to check how this sensor stacks up. Further to remove any issues due to environmental factors I normalize each value of temperature with the IC temperature to pick up only external changes that I was interested in.
While sensor is able to get the trends the sampling rate was a bit too low (2Hz) even though a fast mode exists in the documentation there is no reference to register values for enabling this. For starters this result looks good but there warrants an exploration into various noncontact sensors.
Next build log we'll talk about some Initial sketches and design constraints, form factor requirements of NeuroCuddl.Anyways, Happy Hacking folks.
-
Approaches to sense breathing
08/19/2018 at 12:21 • 0 commentsIn this log we aim to cover the importance of sensing breathing and the various ways we can go about and finally the way we have chosen.
Importance of Breathing in mental health:
Respiration has been studied and is used across different time periods and culture to improving health and well being. Pranayama is a breathing exercise followed by practitioners of yoga that originated in ancient India that is a core inspiration behind the project. Zen breathing techniques practiced by Buddhist monks in various asian countries from China to Japan is also a key influence in our work. It is all centered on deepening one's own breathing to enhance mental well being. Several breathing control technique have been used in increasing amounts to prompt self awareness and purge stress. We can even observe the link between emotion regulation and breathing through common expressions like 'breathtaking' to express suprise to “sigh” to show relief, these feelings transcends cultures and is common across all humans.
Studies have shown that a breathing rate of about 5 to 7 breaths per minute to be of particular merit to alleviate stress. While breathing rate is a good metric for assessing overall stress levels other factors like breathing depth, inspiration time, exhalation time were found to have significant effects in brain function and emotion regulation.
Breathing as an Input:
While many wearables and other devices to promote mindfulness use other physiological parameters like electrodermal activity, heart rate variability or EEG. We think the simple nature of breathing along with our unique ability to control and modulate or breathing makes it as a prime candidate to monitor through the NeuroCuddl system. We are looking to add more sensors (Brain activity:fNIRS & Heart Rate) in this soon but we want to make first revision as minimalist as possible.
This should give some rationale into the importance of monitoring breathing in our usecase.
Modalities to measure Breathing:
The sensors to measure breathing broadly follow two camps
1. Contact based sensors & Wearables
2. Noncontact sensors
1. Contact based sensors
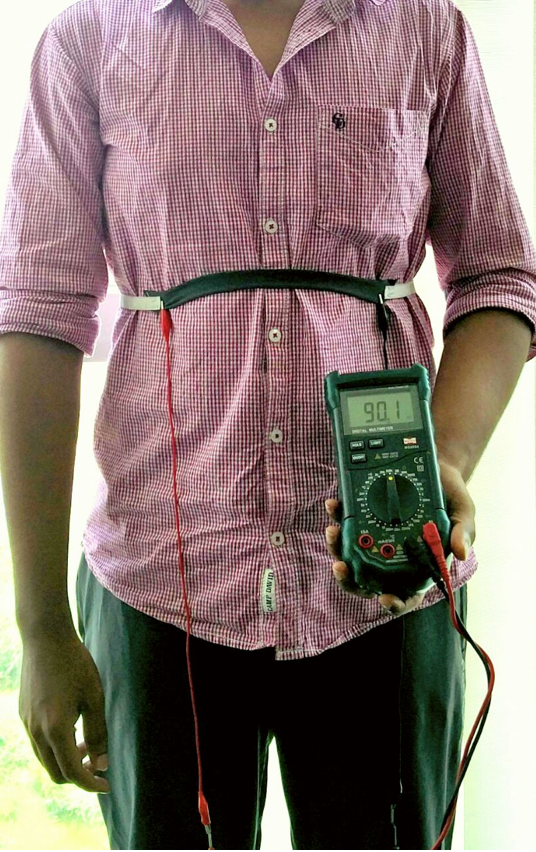
In contact based sensors we have Respiration Impedance Plethysmography which uses active electrodes to measure changes in bioimpedence caused during inhalation and exhalation. These methods while being highly accurate are complex and expensive. Another common contact based sensing techniques is the use of respiration effort belts, We were working on a project earlier called ADITI where we made our own respiration band using peizoresistive fabric sensors.![Piezoresistive respirational effort sensor]()
Piezoresistive respirational effort sensor While this approach gave us fantastic results we understand design constraints which come in when integrating this with a VR headset system. This approach still is open though and we would like your feedback on this matter. A similar approach involves using either an accelerometer or IMU to measure breathing. The standard of care for monitoring respiration in patients is through the use of nasal airflow sensors which can either look at pressure based flowmetry or use a nasal thermistor both of which are often very uncomfortable for monitoring respiration outside a hospital bed setting.
Another interesting method we were exploring to measure breathing involved using piezofilm based sensors to measure acoustic emissions in the neck during the breathing process. We tried this method by using a CM-01b contact microphone coupled to the neck. Due to some design issues in coupling the sensor to the skin we were unable to get any decent results. Just as we tried to give up a friend informed me about the Masimo RAS acoustic respiration sensor.I got access to one and found that it too was just a piezo film based sensor, The sensor couples to the neck using cloth tape and picks up the vibrations caused during breathing.
![Masimo RAS-125c sensor]()
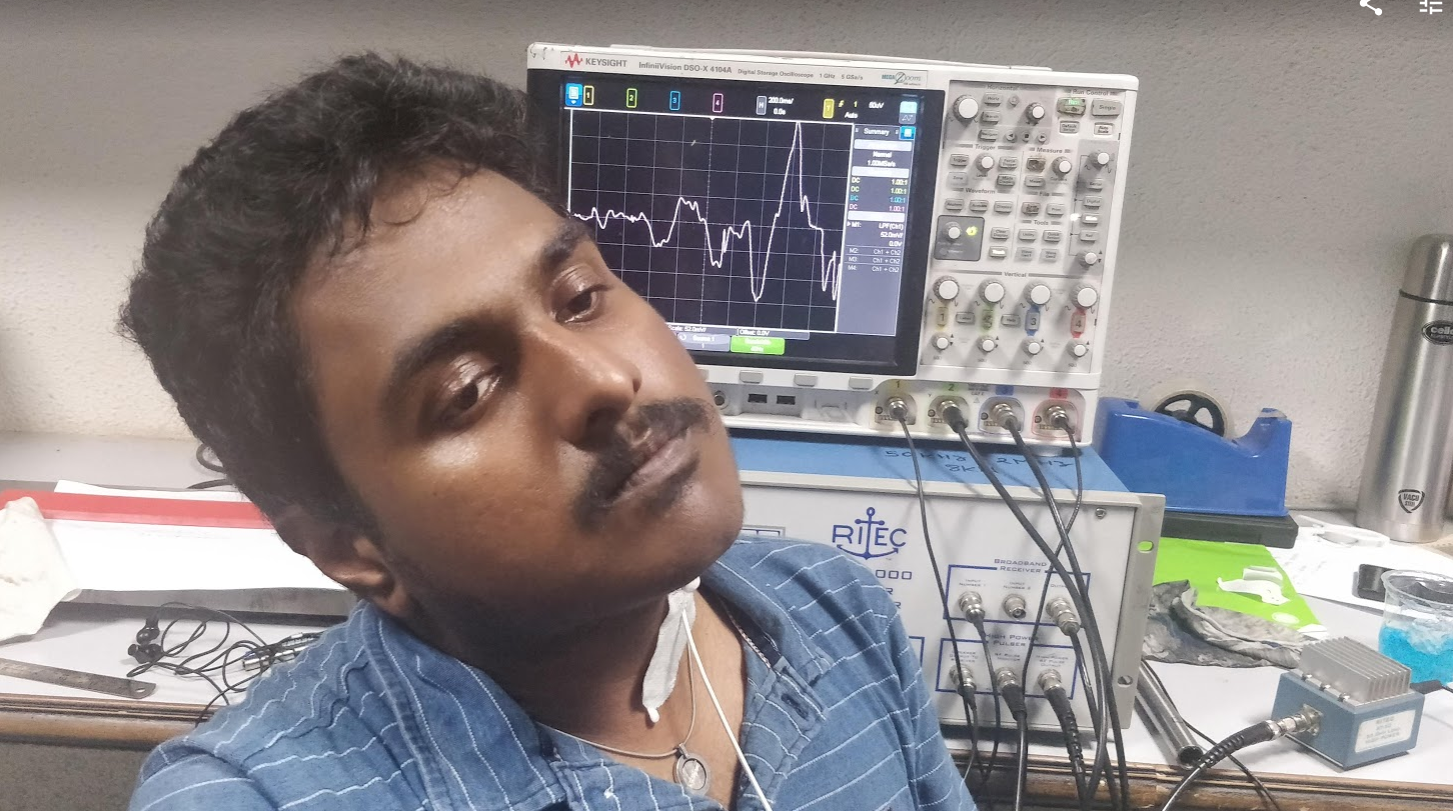
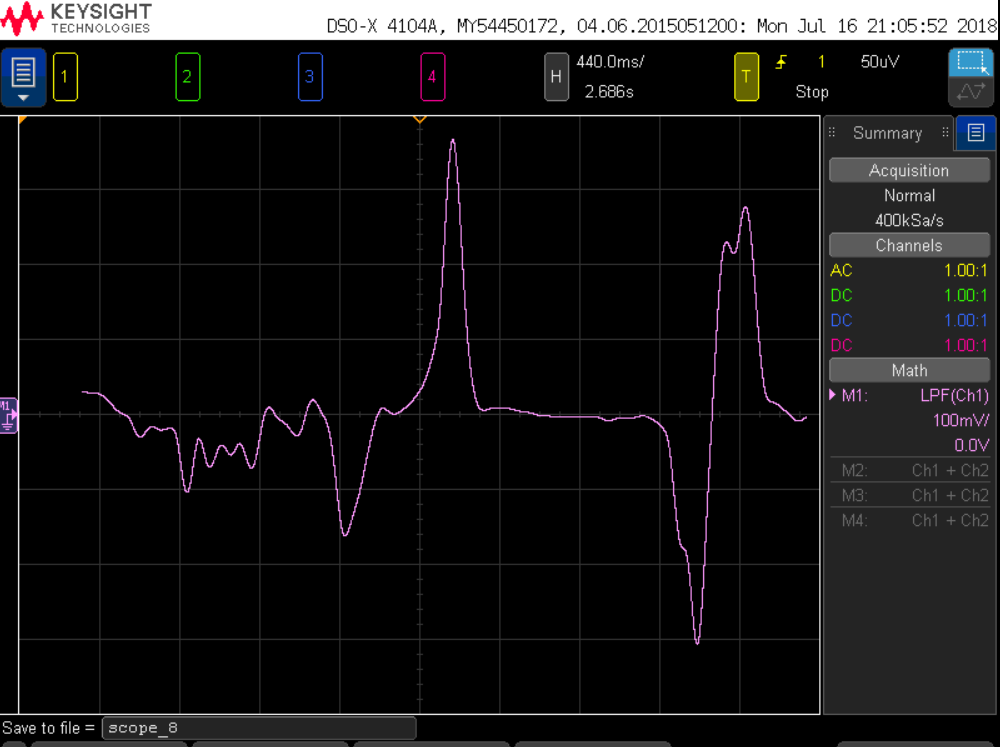
Masimo RAS-125c sensor in an enclosure We got one hooked up the scope and tested some patterns while breathing:
Me, Questioning my the nature of my reality whilst breathing.
The below graph shows the effects of inhalation and exhalation picked up by the sensor. The results are pretty impressive. We wanted to explore this more but I had to return back the sample and due to the status of this being a medical equipment, dealers were none to keen to sell us any. We reluctantly decided to park this idea at the moment and try again when we could make some piezoacoustic sensors of our own.2. Non-contact sensors
While all these contact measures were being developed there was a lot of interest from clinicians and people delivering neonatal care to explore noncontact modes of measuring breathing.
Advances in RADAR & Ultrasound in recent years has lead to the development of several RADAR & Ultrasound based approaches to monitor respiration such as Xethru and Raybaby which used this approach. This however involves heavy computation overhead is rather complex for us to implement.
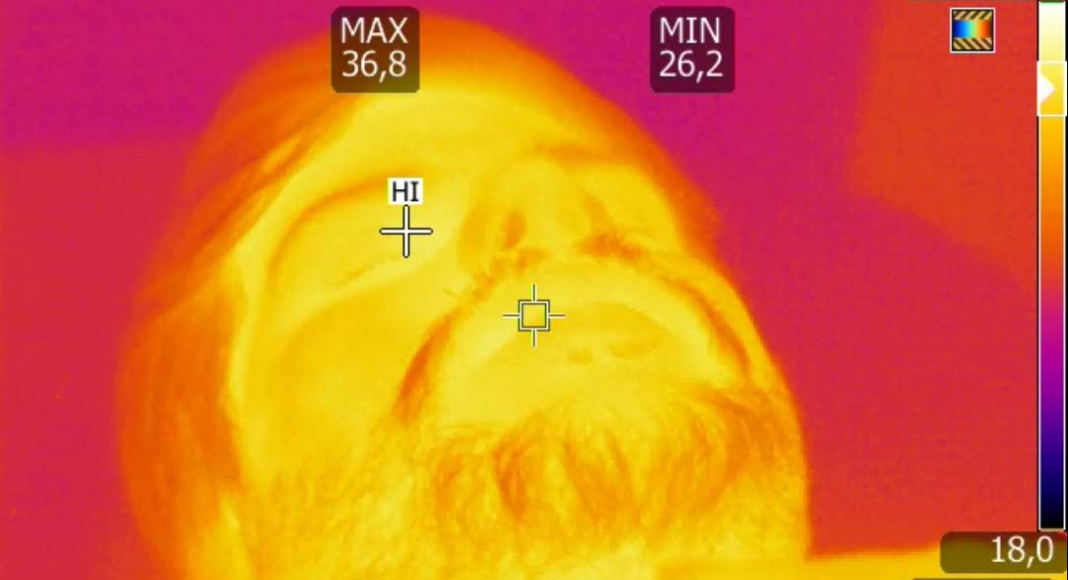
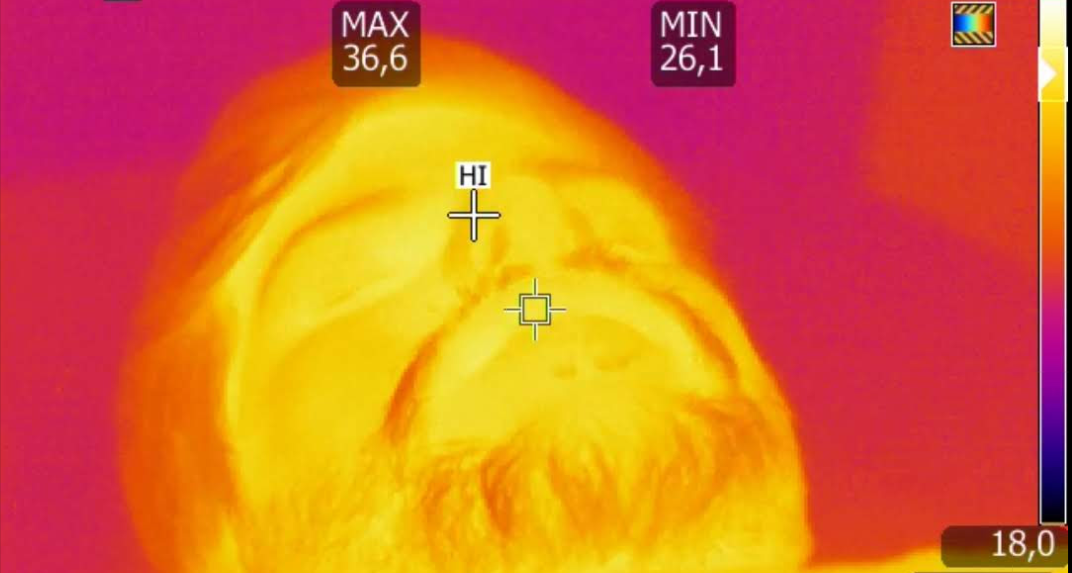
An alternative approach involves using thermography or non contact thermal sensing. Thanks to the recent progress in thermal imaging systems with the amazing FLIR Lepton, It is now possible to make thermal imaging based systems to pick up changes in the nasal airflow temperature to measure respiration. We had a chance to validate it ourselves by borrowing a Fluke thermal imager for a while to measure breathing effects in thermal images.Normal condition During inhalation During exhalation
Here is a GIF to see this happen in more detail.
![]()
Thermal cam footage of me breathing (Sped up to allow me to upload) As can be observed with the help of the images, when the person inhales there is a sharp drop in temperature in the nostril that can be observed. During idle state the temperature is higher in the nostrils. During exhalation however we notice an increase in temperature. These trends correspond to the ATP based energy generation process in the body. Now thermal imaging is being used by some researchers to monitor breathing in sleep comfortably but due to size & price limitations using a full blown thermal camera is not feasible in this project. We instead choose to use other inexpensive noncontact temperature sensors to get the same result.
Next log I will explain what sensor we are using and some results we had. Till next time :)
Happy Hacking folks! -
Problem Statement
04/22/2018 at 18:05 • 0 commentsThis idea was one of necessity more than anything. I found myself often stressed at work and quite short tempered at my home after returning from work.Sleep was scarce and "quality" sleep was nonexistent. My usual stress relief routine had consisted of listening to instrumental music and later playing some abstract games but they too did not have huge impact. It was while playing Subnautica A minimalist atmospheric exploration game set in an alien ocean on a friend's Oculus I finally felt a bit at ease. Despite it being a temporary effect I was able to clear things up in my head. Varun had also been using a TENS (transcutaneous electrical nerve stimulation) unit for his recent back pains and he was also working on making a custom muscle stimulation based on the OpenEMSStim project. Through our discussion we got to realize the immense potential a VR based relaxation system would have through use of biomedical sensing and muscle stimulation. Through some initial literature survey and research we came to understand basic mechanisms of biofeedback for stress and anxiety relief. We came to learn of approaches using respiration based biofeedback for relaxation training and another approach using Audio-Visual stimulation to provide deep relaxation and mindfulness. The audio-visual stimulation devices also known as Mind Machines had used a combinations of high frequency LED blinks along with auditory stimulli to constantly evoke sensory potentials resulting in a kind of resonant effect. It was further found that with low frequency visual stimulation resulted in effective biofeedback mechanisms. Combinations of these two powerful techniques along with muscle stimulation was the initial goal of NeuroCuddl.
Far too often pseudoscientific and vague therapeutic methods marketed to people suffering from mental ailments and there is no reliable metric that comes along with those methods which allow users to gauge their mental state. Zen based relaxation techniques and other eastern approaches to relaxation are hindered by lack of access to a proper trainer to provide feedback in home sessions. Our goal with NeuroCuddl is to create an open platform that can use validated and data backed approaches to aid themselves and be customizable to serve them better.
With a reliable base platform and support for expansion we believe the community can develop “experiences” or adding other sensors(Perhaps a RADAR based non-contact respiration sensor) or actuators(Heating pads mayhap?).
![]()
NeuroCuddl
Biofeedback based Virtual Reality system for mental wellness


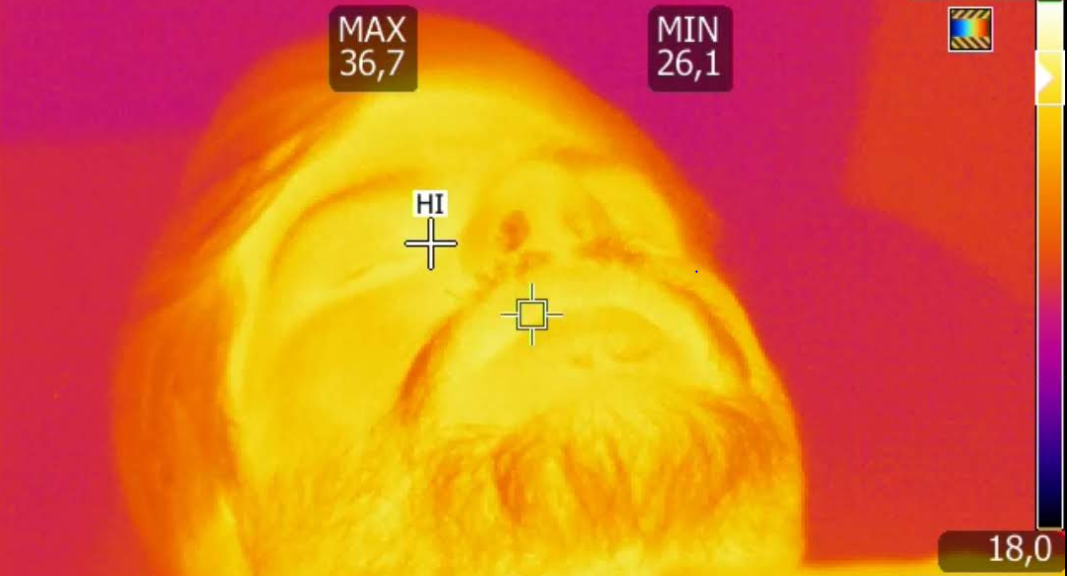
 During exhalation