 borazslo
-
Power Problems
04/19/2016 at 04:46 • 3 commentsAmong the notes of the first version of the circuit I mentioned that still I am using two different power sources. I use a 5V/2A for the RPi3 and another 5V/5A for the solenoid circuit. Unfortunately the circuit consumes all the 5A. So if I connected the whole project to the 5V/5A source, the RPi would not have enough stable power. :(
One solenoid needs 0.6A. So the step-up power converter needs to produce 0.6A (and 20V). For this efficiency the step-up converter consumes full 4.8A from the 5V/5A power adapter. Oh, and the step-up converter overheats fast, even though a solenoid works only for 0.1 sec / hit, so the consumption comes in strikes. (But what if I want to strike different rods in the same time?)
I see two possible solutions with my very limited knowledge:
- Should I change to capacitor from 1000 µF to something really big? With that I could buffer short notifications, but not longer ones. (1000 µF is enough for one strike.)
- Or should I change the main 5V adapters? I could use a 18V or 20V AC DC adapter. So the step-up power converter could work much less (or it could be eliminated). Then the RPi would be powered through a simple LM7805 voltage regulator. Would this be safe enough for the RPi?
Can you help me to find a solution, please.
-
Video
04/18/2016 at 03:50 • 0 commentsWould you like to listen how the clock works right now? Play it, it is only 40 sec.
-
Program Code v0.1 [outdated]
04/15/2016 at 14:32 • 0 commentsUPDATE: This log is outdated. See Program Code v0.2 for new version.
My python script is the /var/www/cgi/knockknock.wsgi. If you wan to run it, you can call http://your_ip_address/knockknock.
- You can send a pattern to make music. For example http://your_ip_address/knockknock?pattern=1-0.5-1-0.5-4-1. That means: hit the rod 1, then wait 0.5 sec, then hit the rod 1, then wait 0.5 sec, then hit the rod 4, then wait 1 sec.
- You can use the IFTTT's Maker channel to make a specific knockknock web request. So the chimes can be triggered when you receive in important email, or you wife comes home, or there is a new instagram photo, etc. etc.
# -*- coding: utf-8 -*-
from cgi import parse_qs, escape

def application(environ, start_response):
    output = 'Let\'s make some noise!'

    import RPi.GPIO as GPIO
    from time import sleep

    # Connection between the chime rods (0-4) and the GPIO pins
    GPIO.setmode(GPIO.BOARD)
    chimeRod2Pin = {0: 37, 1: 36, 2: 33, 3: 31, 4: 29}
    GPIO.setwarnings(False)
    for pin in chimeRod2Pin:
        GPIO.setup(chimeRod2Pin[pin], GPIO.OUT,initial=GPIO.LOW)

    #Get the chime pattern from the query string:
    parameters = parse_qs(environ.get('QUERY_STRING', ''))
    if 'pattern' in parameters:
        pattern = escape(parameters['pattern'][0])
    else:
        pattern = '1-0.5-1-0.5-4-1'
    pattern = map(float, pattern.split('-'))

    #The chimes should sound softly during the night.
    #The power is defined in seconds.
    import datetime
    now = datetime.datetime.now()
    output += "\n"
    output += str(now)
    if ( now.hour > 22 ) or (now.hour < 9 ):
        power = 0.02
    else:
        power = 0.09


    def hitRod( number ):
        GPIO.output(chimeRod2Pin[number], GPIO.HIGH)
        sleep(power)
        GPIO.output(chimeRod2Pin[number], GPIO.LOW)

    def hitPattern( array ):
        for i in range(0, len(array), 2):
            hitRod(array[i])
            if (0 <= i + 1) and (i + 1 < len(array)):
                sleep(array[i + 1])


    hitPattern(pattern)

    output += "\n"
    output += "We have done for now."

    status = '200 OK'
    response_headers = [('Content-type', 'text/plain'),
                        ('Content-Length', str(len(output)))]
    start_response(status, response_headers)
    return [output]
Important notes:
- The GPIO access needs superuser role (sudo). But the apache uses the www-data user who is not a superuser. One possible solution is to add the www-data user to the group pi as described here. (Or to add www-data to the root group.)
- Be aware of the security issues!
- As this code is run through the apache webserver, it is not easy to debug the code. You can continually check the last ten apache error log in the terminal with this command:
tail -F /var/log/apache2/error.log | uniq -c
Development for the future:
- The music get confused when there are two events in the same time.
- The webpage does not give a response until the pattern is finished. So a longer music pattern can run into a timeout.
- Anybody can make me crazy if he knows my public ip.
- It cannot hit more than one rod in the same time.
- API for switch off/on? It can be useful for an afternoon nap.
Do you have any other comment, idea, suggestion?
-
Preparing the Raspberry Pi [outdated]
04/15/2016 at 04:31 • 0 commentsUPDATE: This log is outdated. See the new Preparing the Raspberry Pi for new details.
A Raspberry Pi 3 is the brain of this project. The Pi needs a simple os, python, apache, and wsgi-python. I do not describe here all the necessary steps, but if you need to know more write a comment and I will offer more details.
- I installed the system headless (without screen, keyboard, and mouse). I downloaded the official Raspbian Jessie. I installed the image to the SD card with the dd command.
- Using a linux system I mounted the micro SD card, so I could see the linux partitions. Then I looked for the necessary files in the SD card to set the wifi ssid and password, and to force a static ip. This comment can help a lot. (It is important to notice the new /etc/dhcpcd.conf file.)
- So I wired up the Pi, and I could easily ssh to it. Remote control is completed.
- I installed Apache2 with all the defaults. (One could choose other webserver, but I got used to the apache.)
- Python is already installed in Raspbian Jessie, but the wsgi module is needed to make python and apache work together. After the easy install of wsgi module, the apache conf should have been changed. This is the configuration which works for me:
<VirtualHost *:80> WSGIScriptAlias /knockknock /var/www/cgi/knockknock.wsgi <Directory /var/www/cgi/> Loglevel info Order allow, deny Allow from all </Directory> </VirtualHost>- To use the notification with external system like IFTTT.com, the RPi needs a static IP, port forwarding in the router, static external IP / dynamic dns.
UPDATE:
- The Code v0.2 (coming soon) uses the pyzmq module. To install that you need python-dev also.
sudo apt-get install python-dev
sudo apt-get install libzmq3-dev
pip install pyzmq
If you need further information please comment here. About the python codes I will write an other log later on.
-
Circuit
04/13/2016 at 01:35 • 0 commentsUPDATE: GPIO to MOSFET without a resistor? Am I crazy? Yes, I am. See: How to Fry your Pi
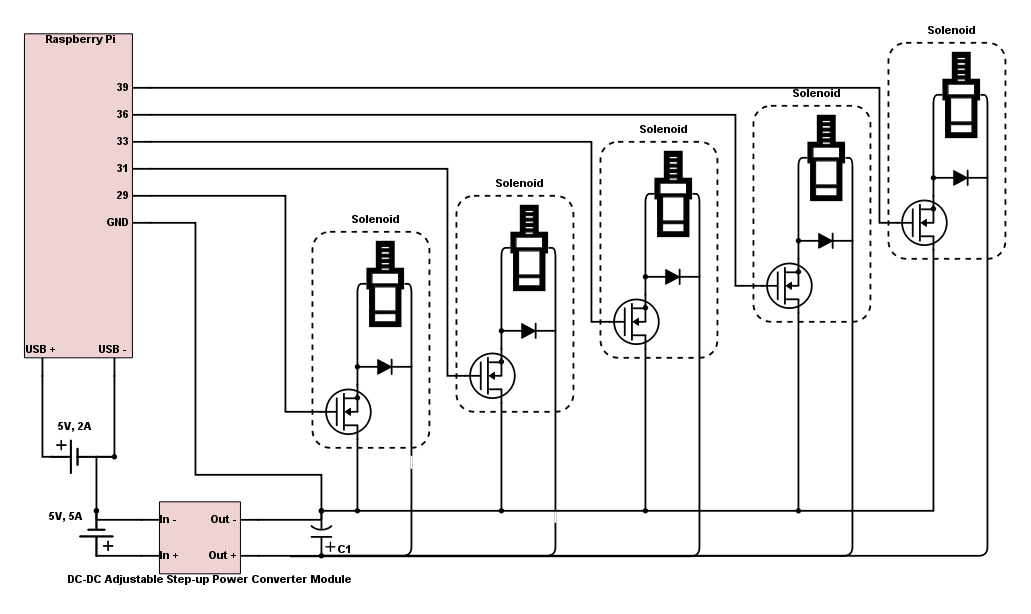
The circuit of this project is very simple. The Raspberry Pi's GPIO (out mode) switches on the power MOSFET which controls the high-consuming solenoid.
![]()
This is schematic of the current working circuit. There are important notes:
- I'm using power MOSFETs because the source-drain direction needs to handle up to 5A.
- Each solenoid has a bypass diode because otherwise the current can fall back when we switch off the solenoid.
- There is a capacitor in the circuit as well. The solenoids are switched on for a very short time, so that makes strong spikes in the consumption which can make the step-up power converter overwork.
- There are two independent power sources. The solenoids can consume up to 5A around 30V, even though it happens only for a half second. So the whole circuit needs 2A (RPi) + 5A (solenoids). This is not an ideal situation. I need your help to make it better.
- Be aware to connect all the grounds to the grounds.
This schematic is not perfect at all, but it works right now. I would really appreciate your help to make the circuit better.
-
Mechanics
04/07/2016 at 14:53 • 2 commentsSolenoids
My first attempt used very simple mechanism. I used small solenoids to hit the chime rods. I bought the chime rods (with their base) and I bought these very cheap and light-weight solenoids.
Problem 1: These solenoids are pull-in type, but I needed to hit the rods. The solenoids have a small spring to have the push-out effect, but those springs are very low-quality weak ones. So I built a plastic hat for the solenoids. The 3D printed small hats converted the pull effect of the front to a push effect of the back. Now I could hit the rods.
Problem 2: These solenoids are weak. When they hit the rods made very low sound only. So I glued a screw-head to the plastic hat to make the sound stronger. And I also overdrove the solenoids. I used up to 30 V (instead of max 12V). That made the solenoids overheat within minutes (I've burnt some of them), but to hit a rod I did not need to run a solenoid more than a half second. So the sound was much stronger.
Problem 3: The sound was very flat in quality. When a hammer hits a rod, the hammer should go back very-very fast, otherwise the rod cannot resonate. My high voltage made the hit very fast, but the hitter returned slowly as the original springs were weak. And the situation become more problematic: the place of the solenoid should have been very precisely adjusted (within 0.2-0.5 mm). When the solenoid was to close to the rod, the hitter pushed the rod, so the rod was silenced immediately. When the solenoid was to far from the rod, there was no hit at all.
So I gave up this mechanism and I began to work with the new one.
Hammers
I bought a grandfather’s clock mechanism from ebay. The mechanism had strong issues, but I needed only the hammers. I begin to dismantled the mechanism. Soon I found out that in the original clock the rods were attached to the back of the box, but the clock mechanism was attached to the front. As in my simple settings both became attached to one pinewood panel, I had to change the direction of the rods. The rods are made of brass, so it was easy and safe to turn those with a simple plier. The Clock Depot has good description about the right positioning of the hammers. (Do not bend the chime rods!)
I dismantled the original striking mechanism because I wanted to drive the hammers one by one. The shaft of the hammers of the melody was so good, that I could easily mount to the plate. I am not satisfied the with shaft of base hammers, so I will need to invent something to make their movement smoother.
The shaft has a kind of spikes. Special cogwheels moved the hammers using these spikes. A very short movement made a big strike. But my solenoids are to weak for this. So I use strings to attache the hat of the solenoids to the rods. The pull in method of the solenoid can pull in the string as well. And the string can pull the hammers far enough thanks to the impulse of the solenoids. And when those return to their original position (about 1/8’’ from the rods) the impulse force them to hit once the rods.
The mechanism works now. Even though it needs some fine tuning yet.
Audible notifications by a Grandfather's clock
Eight chimes can sound in different patterns whenever I receive a notification through IFTTT