Danny Caudill
-
Focusing on the unique aspects of the project
09/04/2016 at 05:01 • 0 commentsSince another cool (and related) project on Hackaday.io had trouble with patents (http://hackaday.com/2016/06/27/the-politest-patent-discussion-oshw-v-patents/), I did a few searches to find potential conflicts with my bubble Braille display idea. (My compliments to Paul and Vijay for handling this so well, and for independently working on really neat solutions to a problem!)
Unsurprisingly, I found some other teams with similar ideas. One team from the University of Michigan (http://www.gizmag.com/pneumatic-braille-tablet/41384/), and another from North Carolina State University (http://www.gizmag.com/full-screen-braille-display/14664/).
In the interest of not directly competing with those, I probably won't do any more work on that portion of the project. For the greater MBrailleW project, I may just incorporate something from Vijay or one of the other teams.
It seems like my one-handed keyboard design is still fairly unique, so I’ve been thinking about that again. Vijay is working on a keyboard too, (https://hackaday.io/project/10745-braille-keyboard-for-the-blind), and I expect our different approaches will appeal to different people.
I have a start to the software side of the keyboard, and I need to take the time to draw out my schematic for the hardware.
Have a great day!
-Dan -
More Research
05/25/2016 at 02:53 • 0 commentsI had to renovate a bathroom in my house this month, so progress on this has slowed, but I am still excited about this workflow-based approach to human machine interaction.
Lately I have been collecting info about how to monitor simultaneous key presses in various languages. Any introductory programming book will show how to get a single key press/key release at a time, but it can be tricky to get more than one.
In Javascript, the best scheme seems to use Event Listeners: http://www.w3schools.com/jsref/met_element_addeventlistener.asp. Java has a similar concept with KeyListeners (http://stackoverflow.com/questions/2623995/swings-keylistener-and-multiple-keys-pressed-at-the-same-time and https://community.oracle.com/thread/2133158?start=0&tstart=0).
One of those pages reminded me that many inexpensive keyboards only support one or two key presses at a time, and some high-end keyboards have various regions where only one or a few key presses can be registered at a time. Microsoft has a good article about this “Ghosting” effect: https://www.microsoft.com/appliedsciences/antighostingexplained.mspx. That makes me think that the best alternative is still to produce my own custom keyboard, since even the best software won’t overcome that hardware limitation.
I think it is time to pickup a Teensy (http://store.hackaday.com/products/teensy-3-2) and write some microcontroller code.
Have a great day!
-Dan
-
Initial Chord Map
04/29/2016 at 03:20 • 0 commentsHere is a first draft of the Chord Map, including all the English characters, the numbers 0 - 9, and the most common punctuation (I double-checked all of them, but there still may be errors). There are still lots of chords available, and it does not include any of the extended characters that include the 4th row of dots.
![]()
I had started writing code for a chording app that used a standard keyboard a few months ago, but I did not get very far. One of the challenges was finding a suitable way to detect simultaneous key presses and then detect when a chord was released. I came up with several algorithms, and I think I will end up implementing a couple of them.
In one scheme, I keep a list of key presses, and then when the first key is released, I note which keys are in the list. In another scheme, I ignore key presses, and keep a list of key releases that occur within a predetermined time interval. I am not sure which will be the most robust.
I would like the MBrailleW Chording Software to work on all the common platforms (Windows, GNU/Linux, Mac OS X, and maybe even Android and iOS). For the first implementation, I am thinking of making a web app. I have the start to that code from a previous project, but it is nonfunctional and incomplete. It may be a good starting point, or I may just start from scratch and use that only for lessons-learned.
Have a great day! -
Hardware Research
04/21/2016 at 03:58 • 0 commentsThere are several hardware components to this project, including two USB peripherals. And the embossing surface poses quite a few challenges.
For the custom chording keypad, I am planning to use either a Teensy board (http://store.hackaday.com/products/teensy-3-2 , http://www.pjrc.com/teensy/index.html), or something like an Arduino Micro (http://store-usa.arduino.cc/products/a000053) that can easily masquerade as a HID keyboard. I will also need some low-profile buttons to use as keys. I will probably get a few different sets of 4 to see how they feel. Most keyboards have about 19mm between the center of one key and the center of the next. These 16mm buttons may be about the right size: https://www.adafruit.com/products/1504. These Tactile buttons are fairly small for a keyboard, but the LED backlighting is rather neat: https://www.sparkfun.com/products/10440.
For the embossing surface, I am considering a Raspberry Pi 3 as the main controller. It doesn't really need that much processing power, but the integrated Wifi and Bluetooth would streamline development of a wireless version. (https://www.adafruit.com/products/3055). As far as the electrically controlled air valves, I found quite a few parts that won't work :-). Most of the options are more than an inch long, are rated for over 100 psi, and cost $20 apiece. I have started to plan out the 25 “4x2 arrays of tiny balloons”, and I have a few ideas that would use a thin balloon skin sandwiched between two pieces of plastic containing 8 holes. With a few 3D printing experiments, I should be able to prototype that portion. I think the big challenge here will be finding 200 small electrically controlled air valves…
Have a great day!
P.S. I am still writing out the Chord Map. It takes a while to lay out all the key combinations in a succinct and useful way.
-
Initial approach for the Chording System
04/19/2016 at 03:33 • 0 commentsI have found quite a few 1-handed chording keyboards, and I even built one a year ago to give it a try. My problem was almost always with finding the time to learn a new key layout.
So here is my approach for the first iteration of this project. It should be quick to learn by those that already know braille (and for those that do not, then they will by the time they’ve learned the chording patterns!).
Look at the U.S. Braille patterns (https://en.wikipedia.org/wiki/English_Braille#System). For the 26-letter alphabet, there are 3 rows of 2 dots. There is an extended version that includes a 4th row, which this chording system supports. The numbers 1 - 9 and 0 are produced with the letters a - j when they are preceded by a special # character (think of it as a ctrl or alt key). Similarly, the letters can be capitalized by preceding them with a Shift character.
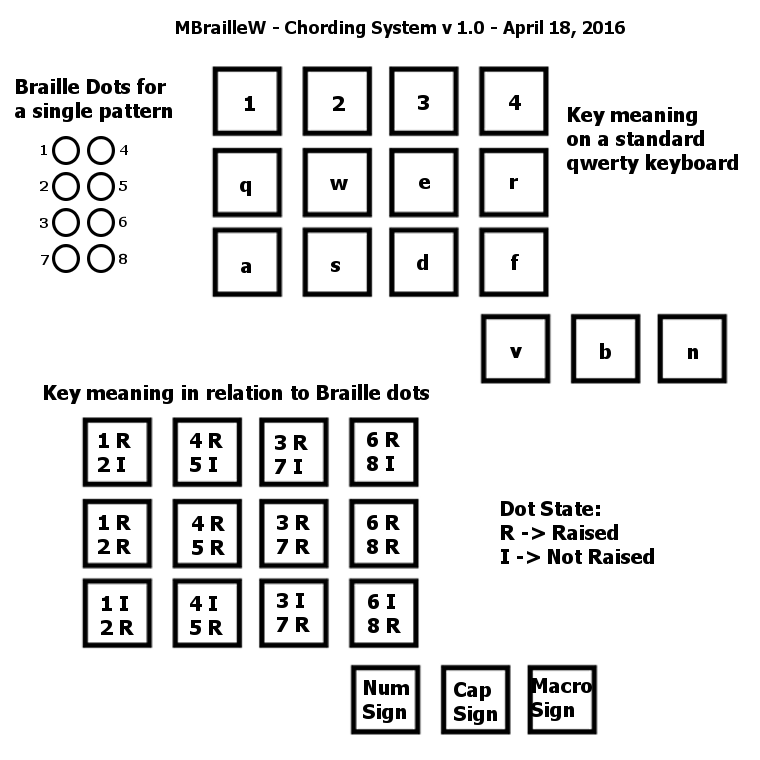
Now, consider how one hand rests on home row of a standard qwerty keyboard. Now shift the four fingers up by one row. There are 4 buttons under the fingertips (q-w-e-r), 4 buttons above (1-2-3-4), and 4 buttons below (a-s-d-f). Furthermore, notice that the thumb can easily access ‘v’, ‘b’, and ‘n’. These will be the primary modifier keys (number indicator, capitalization indicator, and macro indicator).
Here is a diagram of how I map the Braille patterns to those 12 buttons, so that one hand can type them all.
![]()
Here is an attempt to explain that diagram in words. The left-most finger specifies the state of the top 2 dots in the left column (either the top-only is raised (upper button), both are raised (middle button), or the bottom only is raised (lower button)). If no buttons are pressed, then neither dot is raised. The next finger sets the state of the top 2 dots in the right column. The 3rd finger sets the state of the bottom 2 dots in the left column, and the 4th finger sets the state of the bottom 2 dots in the right column.
So any combination of those 8 dots can be represented by only pressing 1 button (or no buttons) with each of the four fingers. Some readers may be thinking that there are only 8 “bits” here, so why do we need 12 keys. The answer is that only 4 buttons can (easily) be pressed at once (aside from the modifier keys, which the thumb controls). Since 2 bits can represent the numbers 0, 1, 2, or 3, a single button press can represent 2 bits at a time.
The first two thumb-controlled Modifier keys mimic the braille signs for numbers and capitalized letters. The third is used for user-programmable macros (a common feature of 1-handed keyboards).
The software will detect when a ‘chord’ of keys is released, and will translate that into the appropriate character/macro. Also note that the software will work for right-hand chording as well (using 7-8-9-0, u-i-o-p, j-k-l-;, and b-n-m for the thumb).
As anyone that just tried this out on their keyboard can attest, the ‘slant’ of a keyboard makes this feel a little awkward (and sorry if you are using an ergonomic keyboard, where the ‘n’ key isn’t exactly reachable). Hence the idea to make a custom chording keypad.
One of my next log entries will contain the entire chord map (or a new approach if I find holes in this plan once I start writing out the mappings).
Here is a good overview of the generalized 8-dot Braille patterns that Unicode includes: https://en.wikipedia.org/wiki/Braille_Patterns. Here is the official Unicode chart: http://www.unicode.org/charts/PDF/U2800.pdf
Have a great day!
Modern Braille Workflow
The Modern Braille Workflow provides an alternative way to interact with a computer, using modular components.