Trey German
-
Race Recap
05/31/2016 at 02:13 • 0 commentsAll I can say is "WOW"! The past week has been one of the most difficult of my life, and if I had the chance I would do it again in a heartbeat. Last Wednesday I drove up to Oklahoma and competed in the Icarus X race and WON! The race is a cross country powered paraglider race where pilots must complete the course completely unassisted.
![]()
After attending the race briefing on Wednesday, 6 other pilots and myself took off from Arkoma Oklahoma Thursday morning on a trip that what would become a defining moment in our lives. Before takeoff, I attached a Polymorphic Dot to my wing to provide me with flight instrumentation. As soon as I got in the air it was clear I had hit a home run. As I climbed the altimeter needle sprung to life and as I turned I could see my bank angle on the attitude indicator changing. It was incredible to see the hardware I had worked on so hard the past few months come together and have a real function.
Shortly after takeoff, however, it became clear this race was no joke. I normally fly down in Texas where there is no terrain and the weather is typically good. Oklahoma was quite a bit different. Instead of flat open land, I was flying over ridges and thousand foot tall mountains. The weather was something else too. Ceilings were capped at about 2000 feet by a layer of clouds, winds were blowing extremely strong out of the south, and we were surrounded by thunderstorms. As I tried to go over the terrain, I encountered down drafts that caused near crashes on several occasions. When I was able to gain some altitude, I would be tossed around like a sack of potatoes due to the turbulence. It was on the first leg I realized I wouldn't be able to safely take video footage of the Dot in action. I had to devote all my attention to flying in order to not die. In the coming week, I plan to get up in the air again (in more calm conditions) and get some video of the device and app in action.
The race itself was incredible. I flew from Akoma to Poteau where I landed at an airport to get fuel. It was pretty cool walking up to an aviation gas pump with my aircraft on my back. I even got to make friends with the airport's guard dog!
![]()
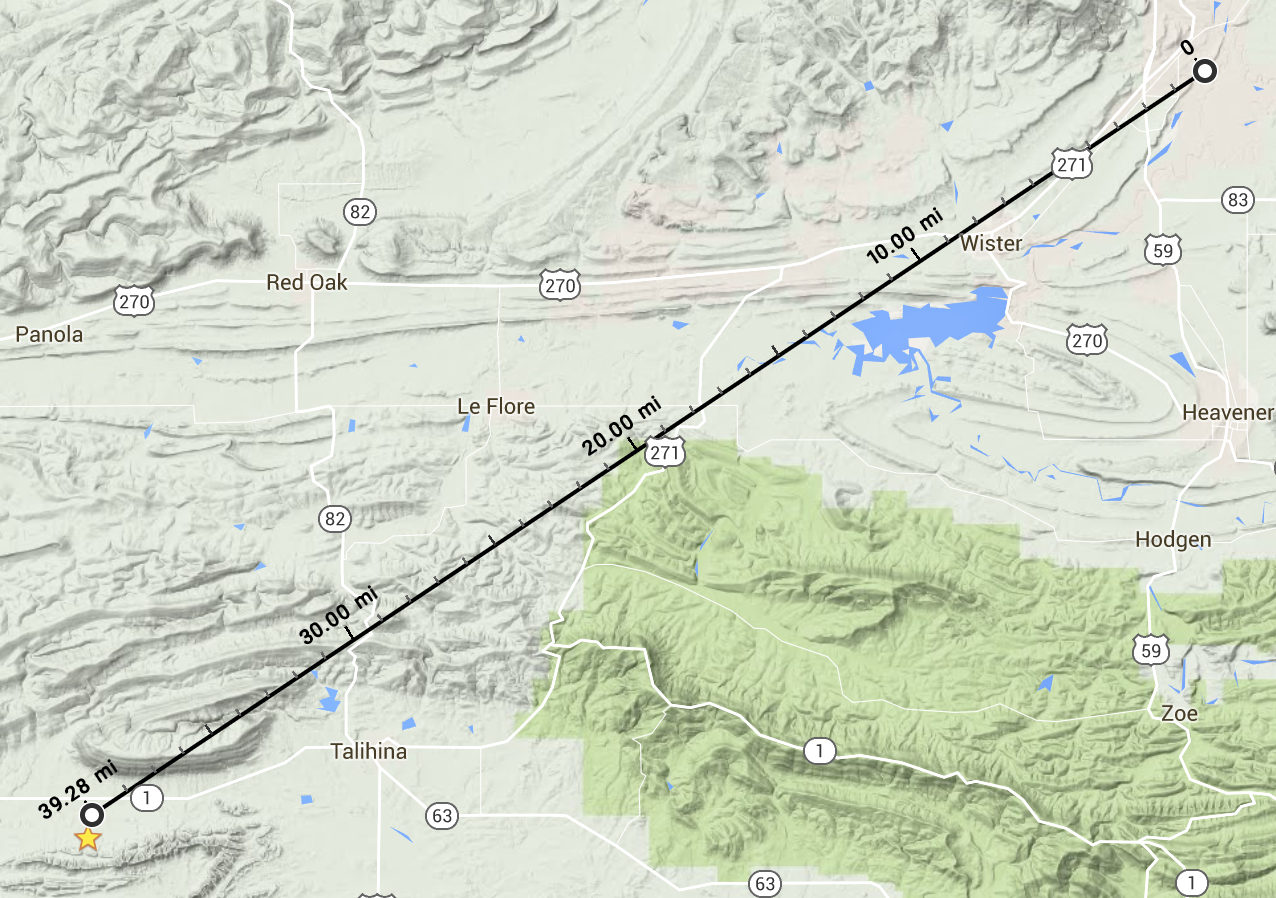
After Poteau, I was supposed to cross the most dangerous terrain of the race in order to get to the town of Talihina. During this leg, I was getting thrown around much more than the last as well as having partial collapses of my wing due to the turbulence. Just before crossing the mountains, myself and two other pilots elected to land in order to check the weather and make a go/no go call. After landing and making friends with the locals, we decided the conditions were just too strong to make a safe cross and elected to skip that checkpoint.
![]()
We took off from that random field, and headed to the town of Red Oak for gas. I circled overhead looking for the closest field to the gas station and landed in it. After stowing my wing and gear bag, I walked into town with my paramotor and got gas at the local station. I got lots of strange looks and questions as I sat on the curb eating a Lunchable I had purchased inside. I scarfed down some crackers with ham and cheese and sipped on my Capri Sun. Life was good.
![]()
It was at this point I realized I actually had a chance of winning the race. 5 of the 6 other pilots had already dropped out and my only competition had just landed in the same field as I and was having engine trouble. He elected to get a ride back to Arkoma and I though he was out of the race.
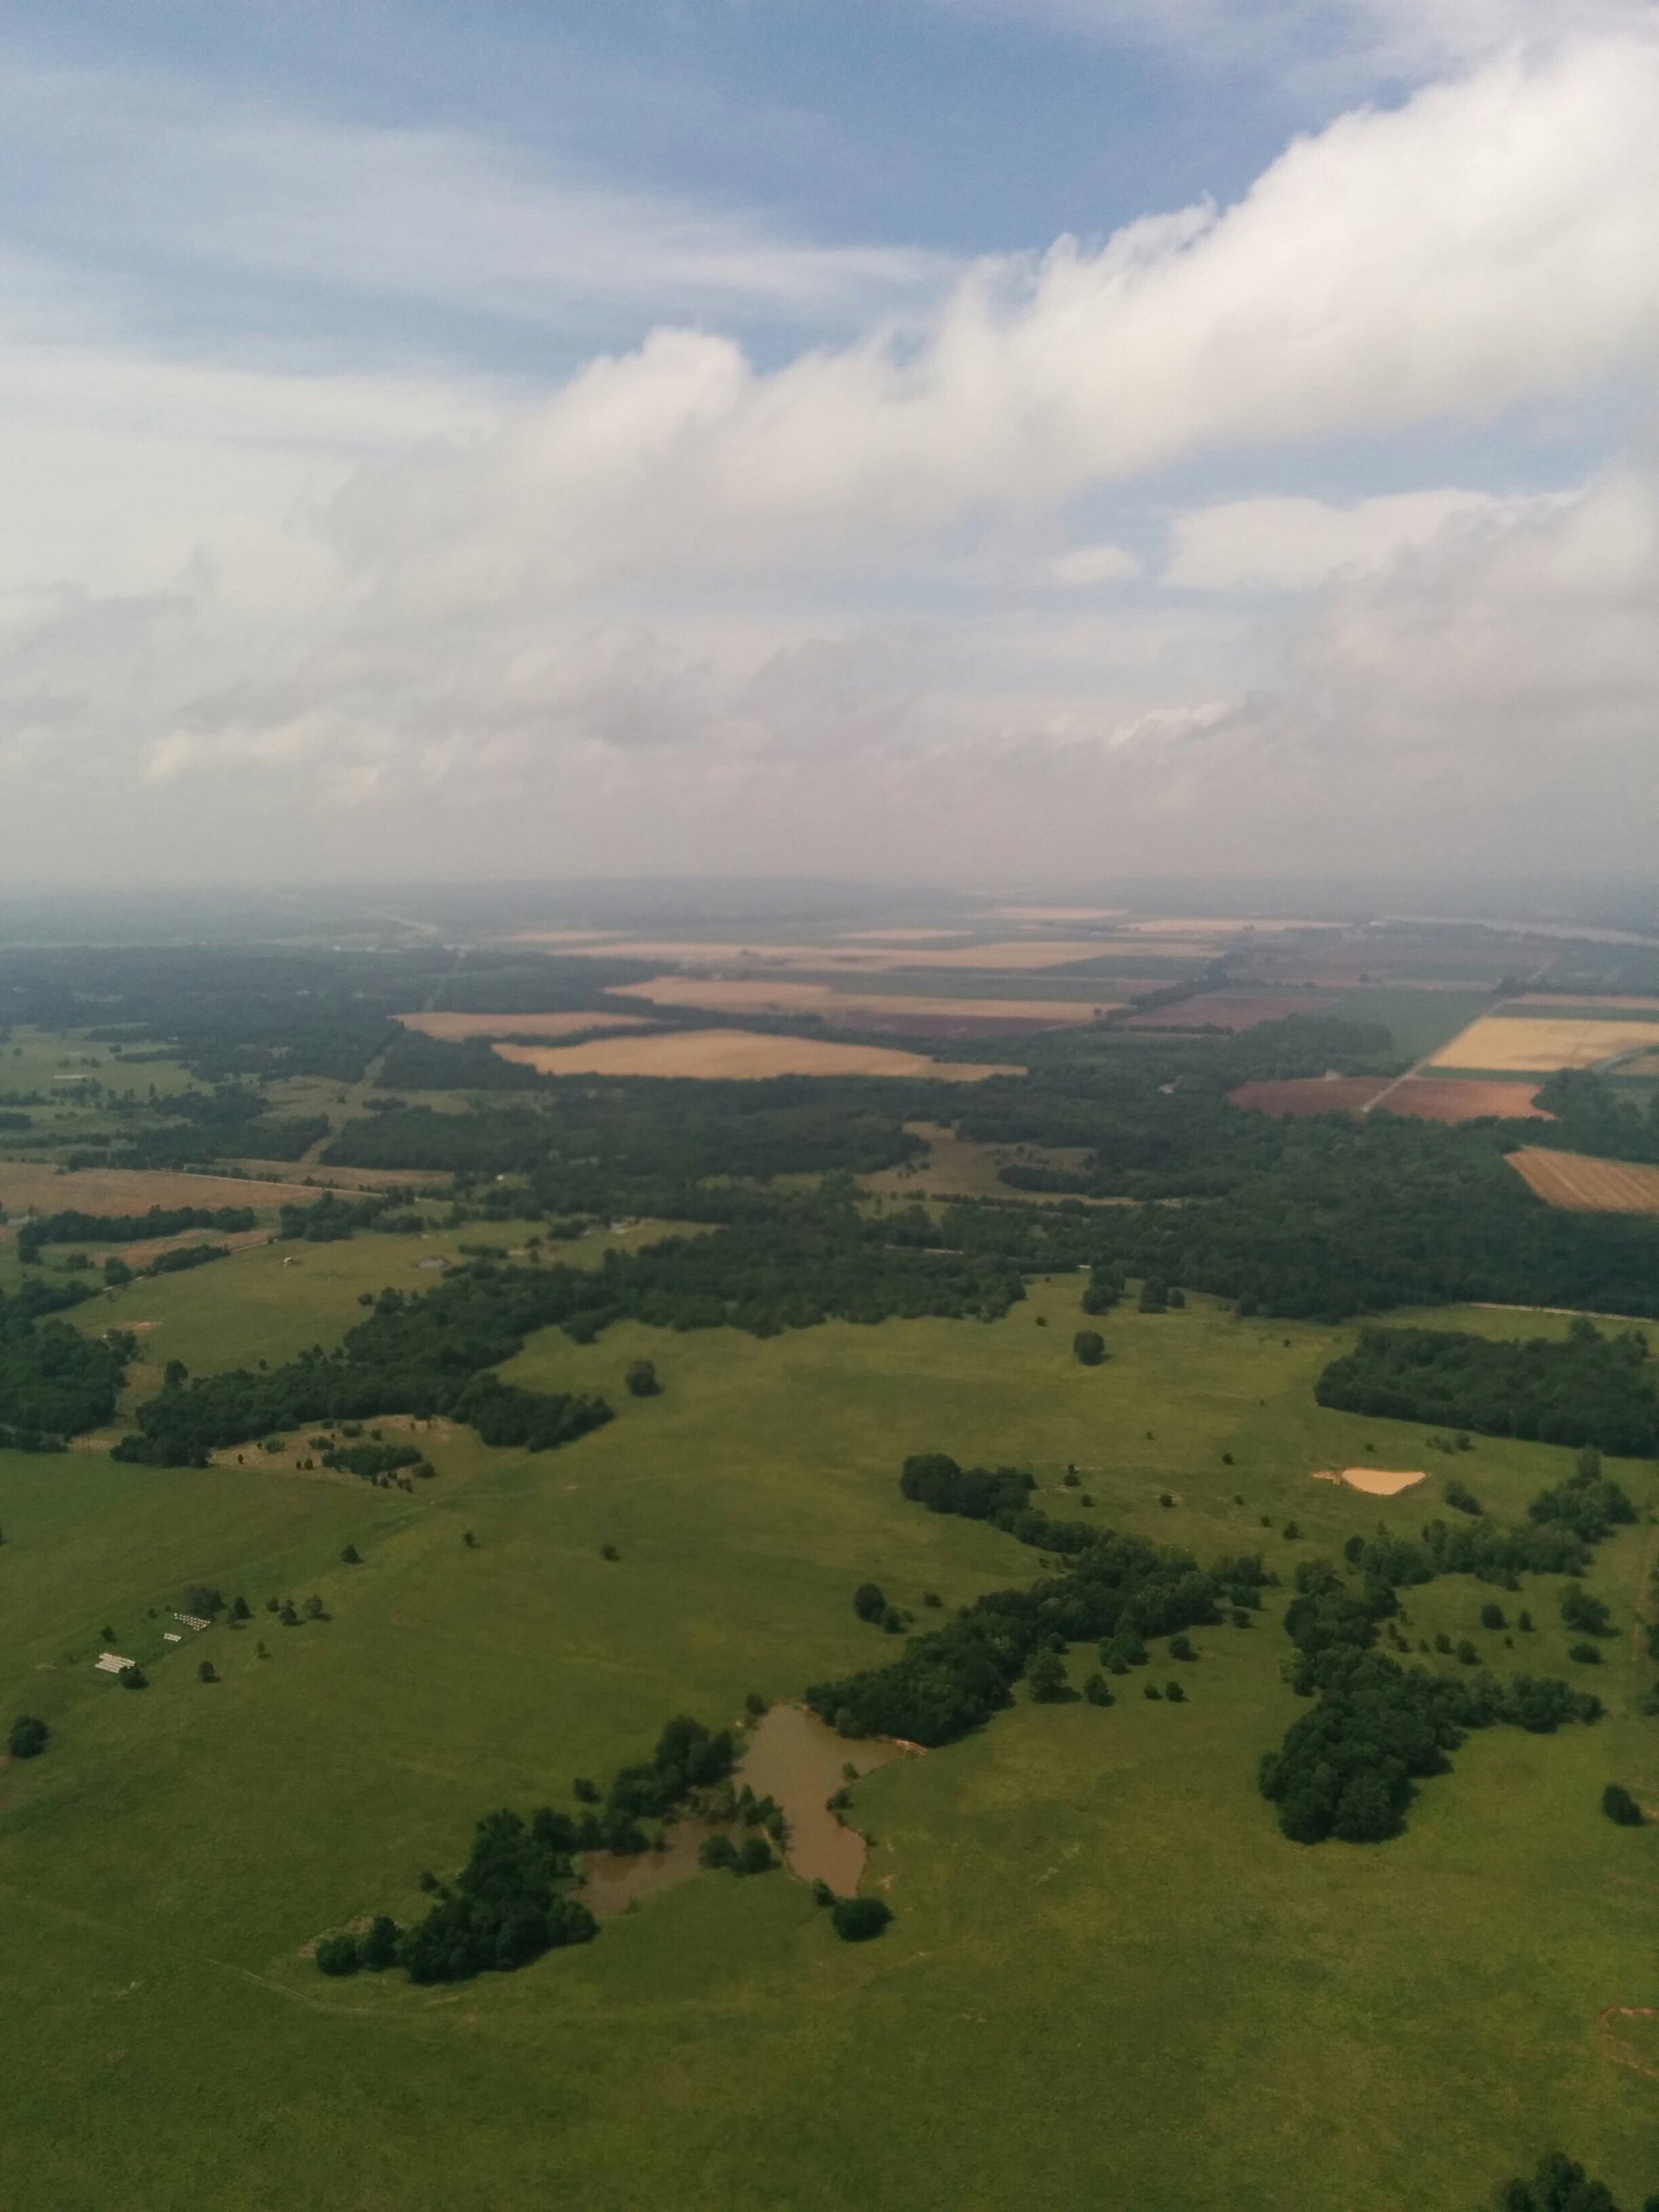
After eating lunch, I took off from Red Oak and pointed my glider towards Webber Falls. This leg was one of the longest in the race, but because I had a tailwind I made excellent time. I also had to cross some pretty tall hills without any good emergency landing areas. The views were spectacular though!
![]()
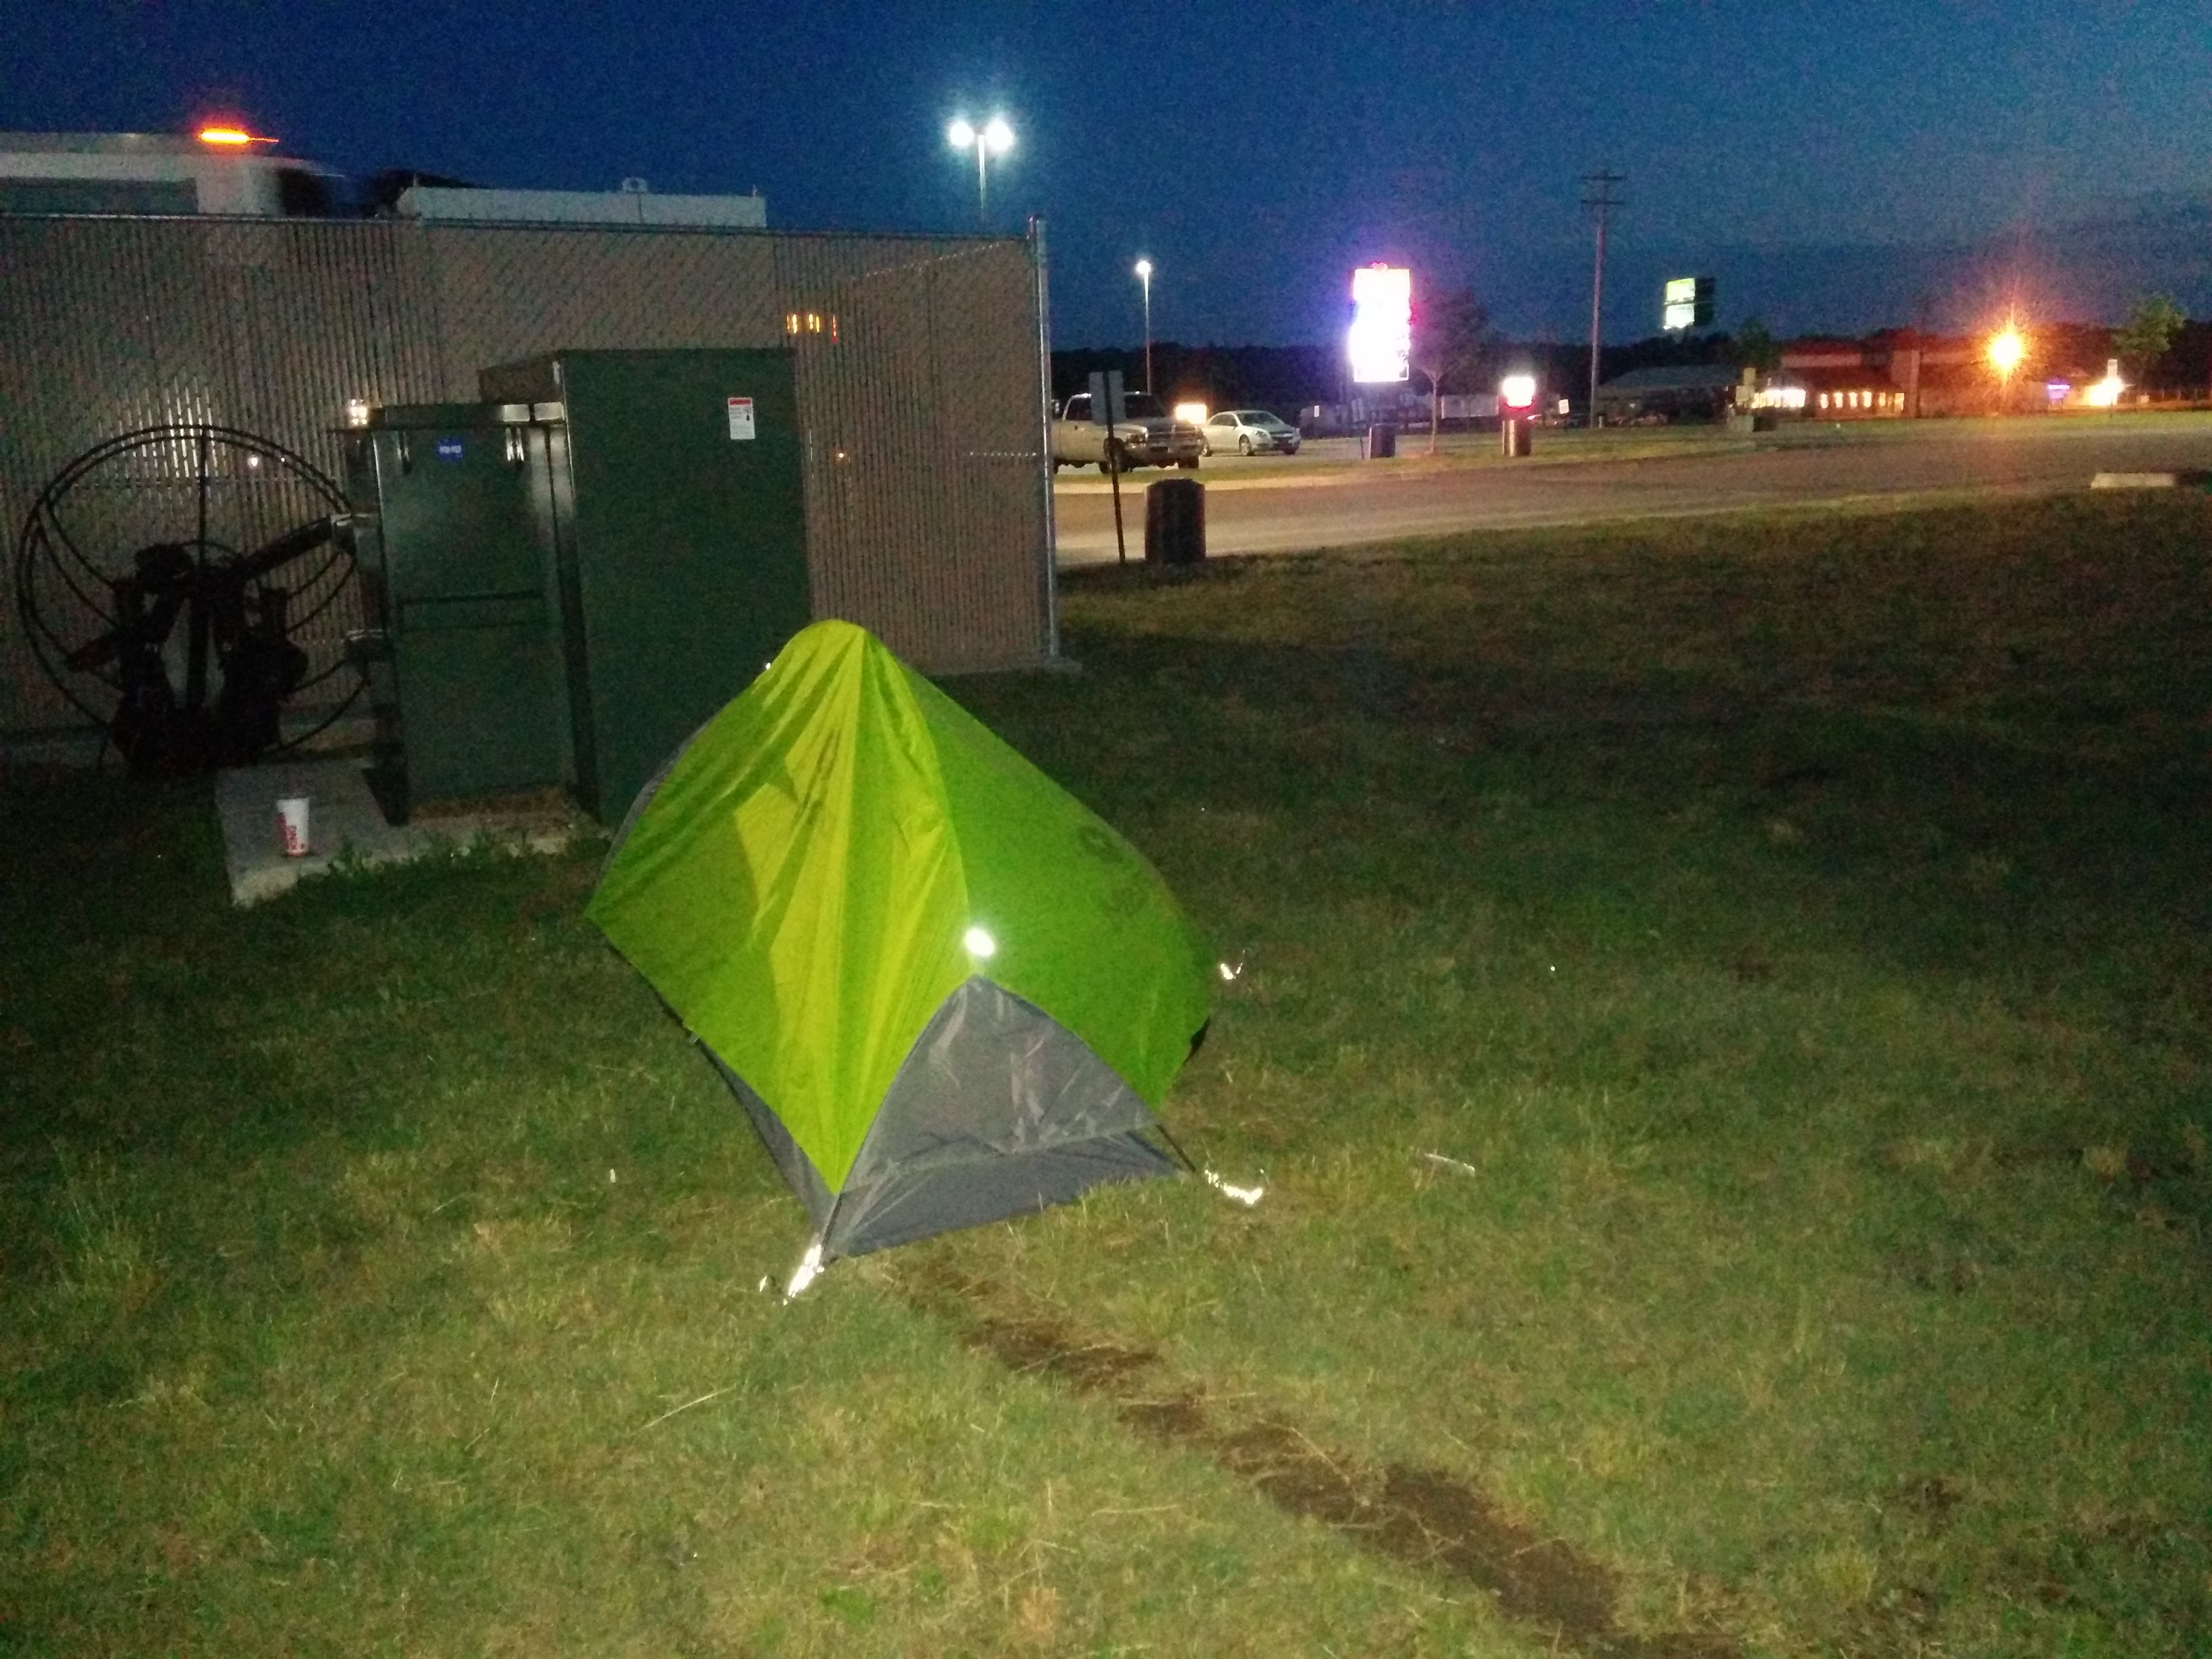
Webber Falls was definitely the most hilarious stop of the race. I landed in a field next to a Love's truck stop and decided to refuel the motor and myself. After chugging some water and nomming on some onion rings, I attempted to take off and head North to the next checkpoint at Talequah. This was definitely one of my less graceful moments... the strong wind was to much for me to handle in my exhausted state. The wing ended up pulling me off my feet and I landed on my back like an upside down turtle. I decided to call it a day and try to hitch hike to a town where I could get a hotel.
After two hours of unsuccessful hitchhiking, I decided to give up and setup the tent I had brought with me. I got everything put together, grabbed a beer from the truck stop, and nestled in for the night.
![]()
The next morning, I was up at 5am preparing for take off. I packed everything up, setup for launch, and headed toward Talequah. This leg was also very dangerous. Not only was I running away from a severe thunderstorm, there were also several points in this leg with no real emergency landing areas. Thankfully though, I had a tailwind which pushed me over the terrain in record time. I actually did 60 Mph over the ground on this leg. To put this in context, normally my glider flies about 20 Mph over the ground.
As I got closer to the town, I spotted the airport and setup for a landing. I flew the pattern and performed a perfect landing on the ramp next to the FBO. The pilots inside were all impressed. I hung out at the FBO for a bit drinking coffee and bullshitting with the other pilots before borrowing their courtesy car (a crappy old truck that had been confiscated by police) and heading to a hotel for a much deserved shower. I rested the remainder of the day in order to avoid any potential storms and recharge for the final day of the race.
I took off from the airport the next morning and was now on the final leg of the race. I headed south along the same route I had flow the previous morning. I was fighting a strong headwind and making slow progress, but I had plenty of fuel. Everything was going smoothly (other than being in a T-shirt and it being really f&@*^!$ cold), until disaster struck. I was about 1000 feet high over a forest without any emergency landing areas and my engine died. I adjusted the wing for best glide and started making a plan. My only possible option was to land on the road I had been following, but there was a catch. The road had a power line running on one side of it. As I glided down, I knew this could be it. If I botched this, there was a very good chance of serious injury or death. Since the power lines were certain death, I cheated to the side of the road that just had trees covering it. I hit a tree as I came in and fell from roughly 15 feet in the air. As I fell the wing broke branches off the tree slowing my descent and probably saving my life. I was also quite lucky that my frame hit before I did and absorbed most of the impact.
![]()
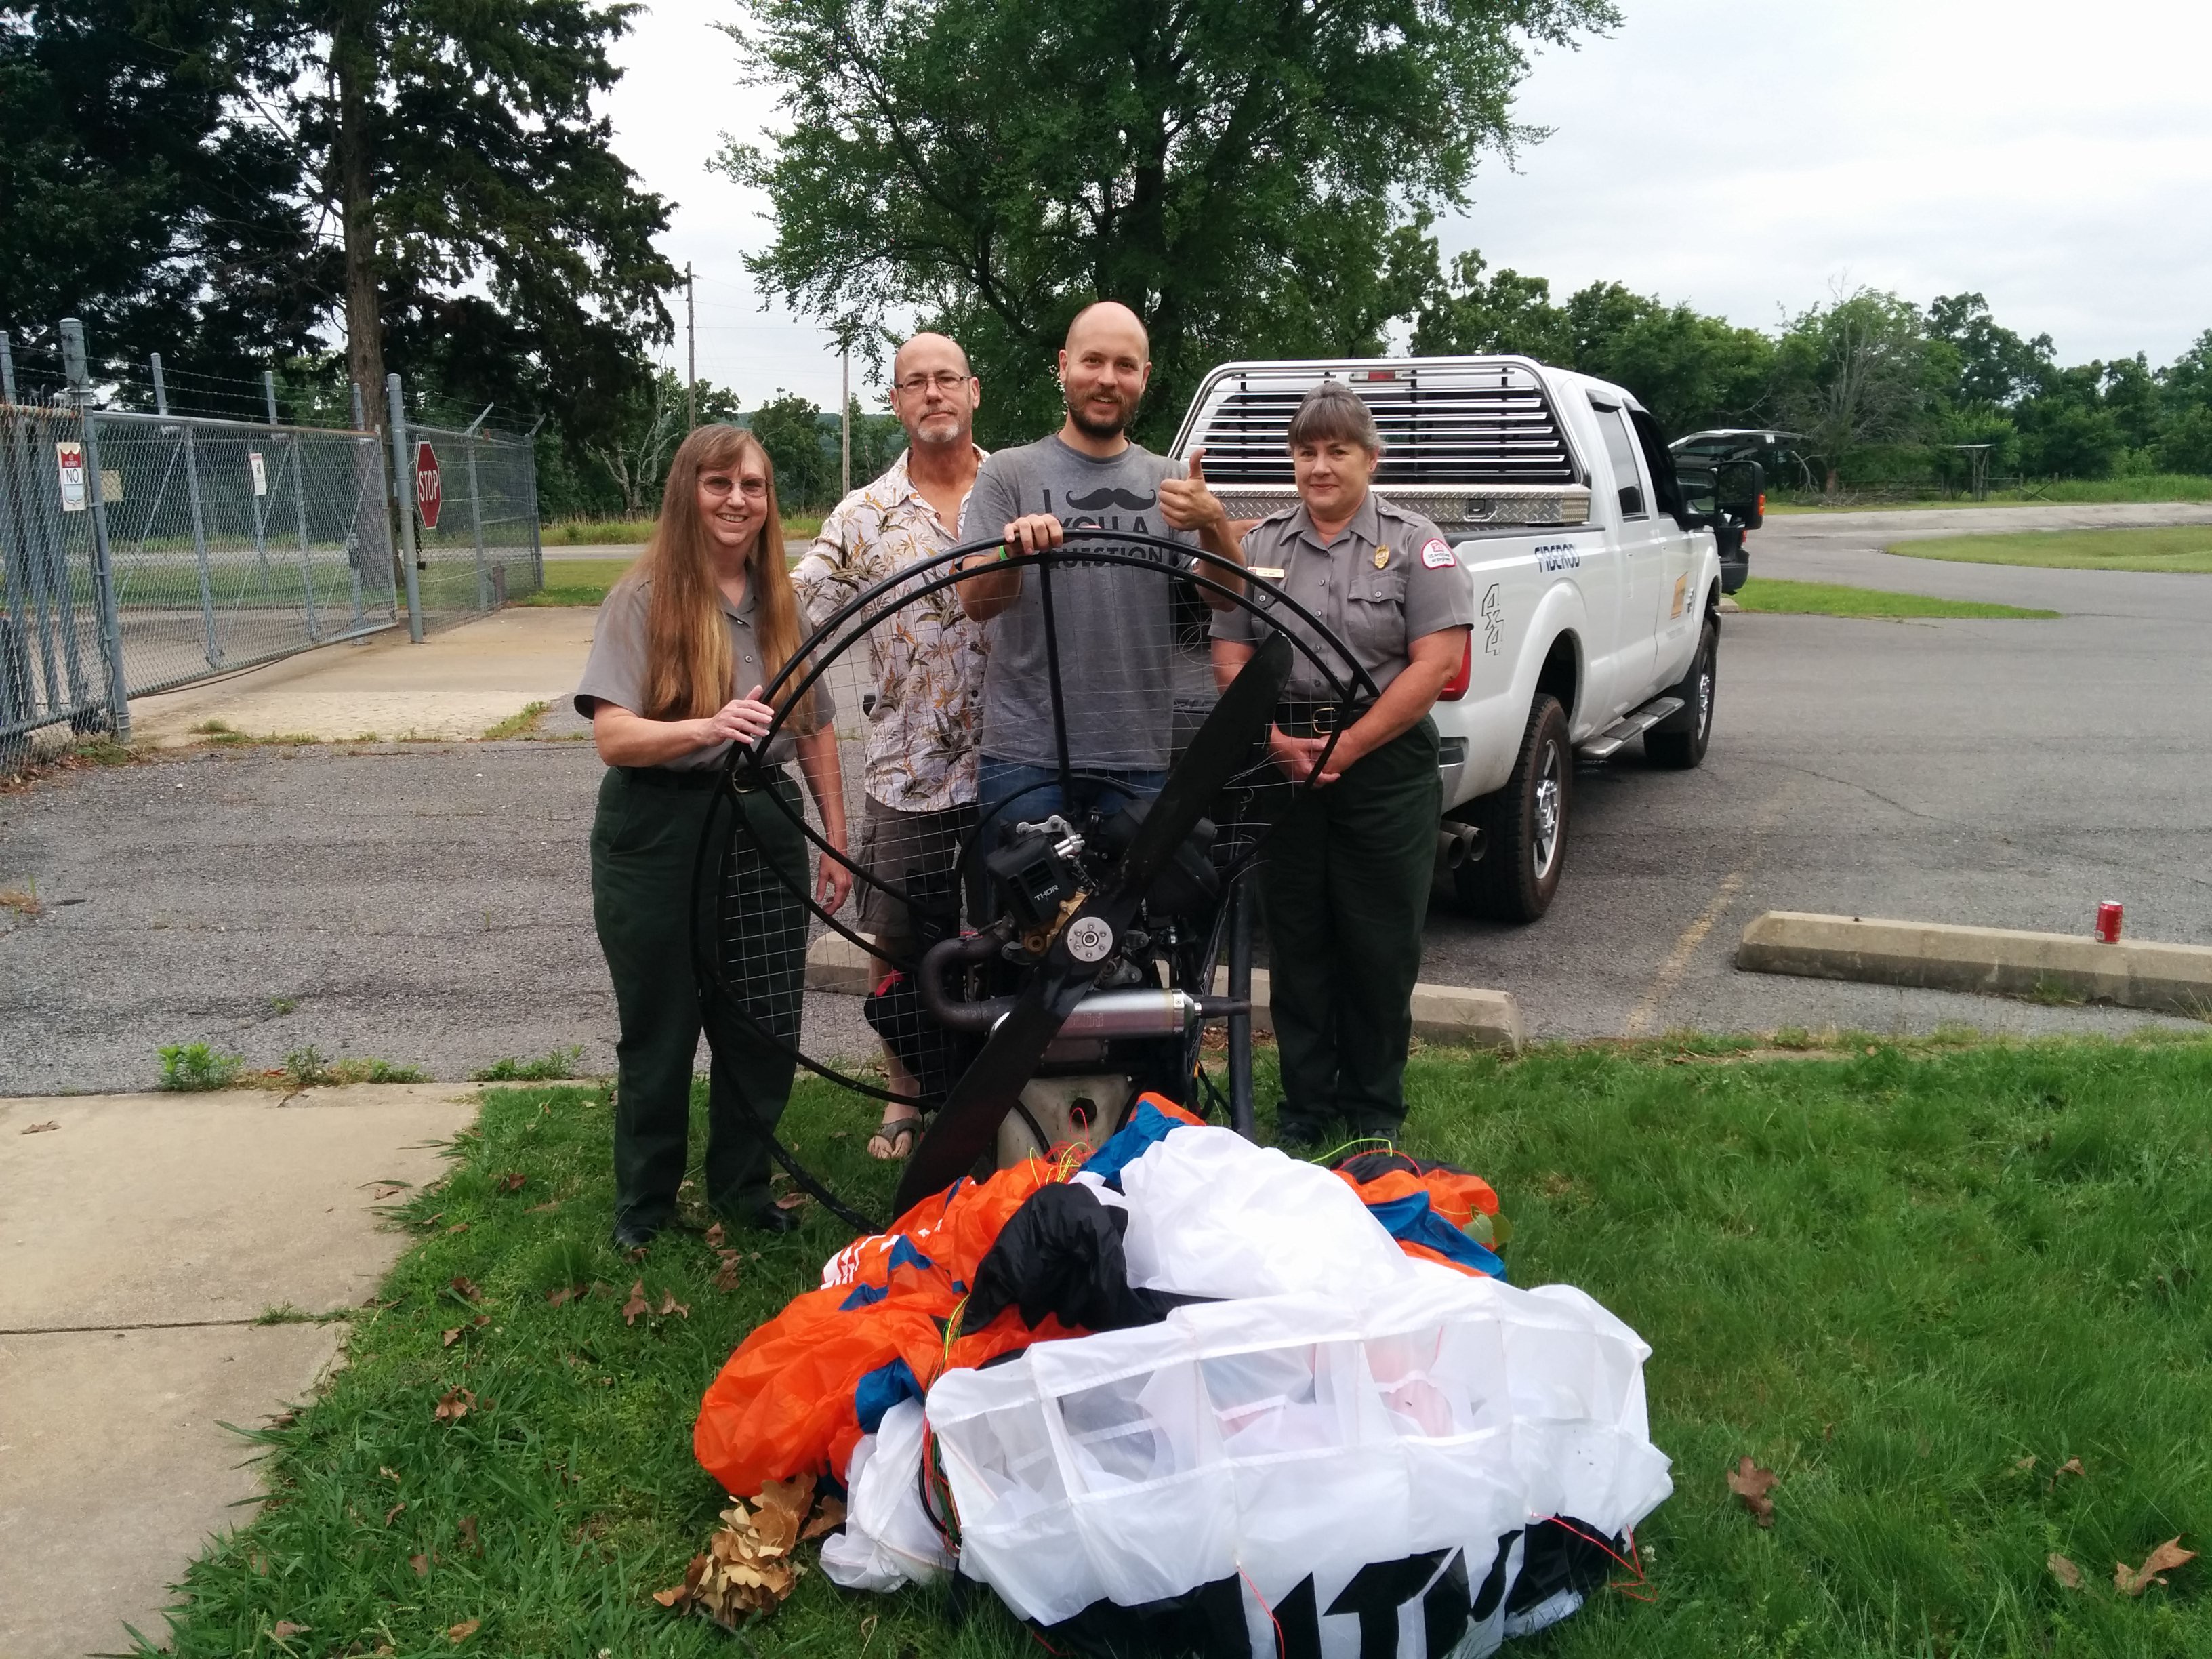
I expected to at least have a few broken bones, but as I evaluated myself I found I only had a small scrape on the palm of my hand. Soon after I got up, my first rescuer arrived and it couldn't have been a more appropriate person! Because Oklahoma has tons of dams, there are Army Corps of Engineers offices everywhere and it was none other than an Army Corps of Engineers Ranger that happened to be the first one driving by. They helped me clear the tree branches out of my wing as well as give me a ride to their office where they provided me with snacks while I waited for friends to come pick me up.
![]()
We drove back to Arkoma, but didn't go quite all the way to the finish line. Because I had put my all into this race, my friends let me borrow some gear (mine was completely broken in the crash) so I could fly across the finish line. Five other pilots setup with me in a field, and we took off and headed toward the finish line in a flying "V" formation. I crossed the finish line to cheers from from the entire event. It was an extremely cathartic experience.
3 days later @yertnamreg arrives at the #IcarusX finish line in style @IcarusTrophy #paramotor pic.twitter.com/Ww0TCQyEQQ
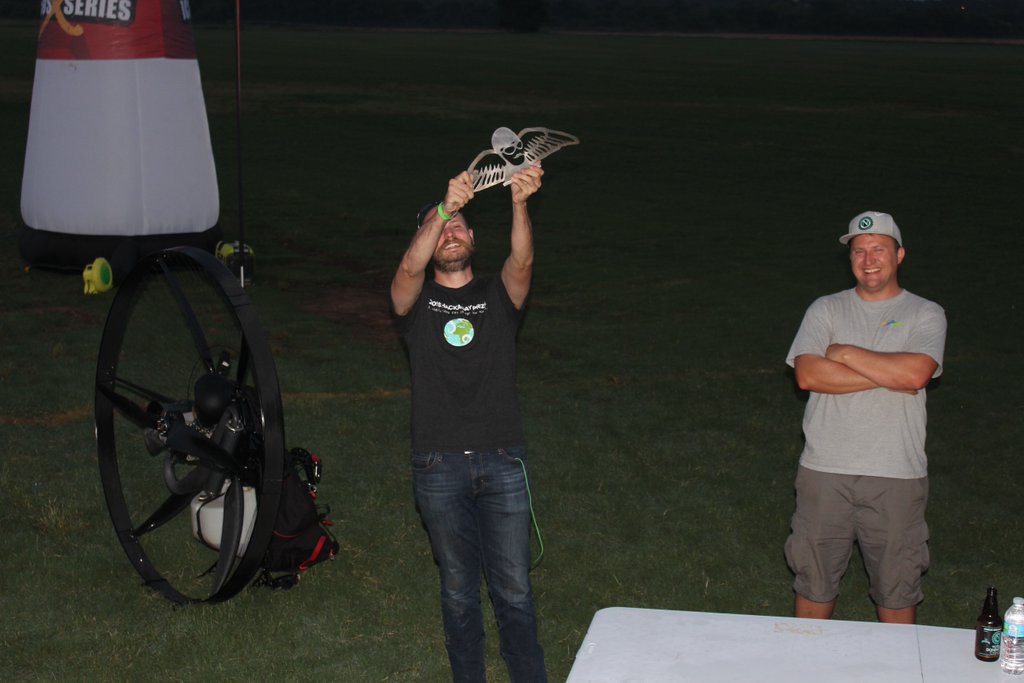
— The Adventurists (@TheAdventurists) May">https://twitter.com/TheAdventurists/status/736619873061605376">May 28, 2016Given that I hadn't actually finished the whole race I wasn't sure I would win anything, but later that evening I got the surprise of my life. I was awarded the adventure trophy for the Icarus X race. (Note the Hackaday Prize shirt LOL)
![]()
This race was the most challenging experience of my life. There were so many times that I wanted to quit, but somehow I managed to push through it and do things I never thought I was capable of. Have you ever hitchhiked, camped out at a truck stop, or flown 143 miles with a lawnmower engine on your back?
I think there are a lot of parallels between the race and the adventure of starting a business. I don't know what will happen with Polymorphic Labs, the Polymorphic Dot, or the Hackaday Prize, but I do know that if I try it will be the experience of a lifetime and that success will come one way or another.
-
Pre-Race Update
05/24/2016 at 01:02 • 2 commentsIn case you haven't heard, my secret plan for the "Anything Goes" part of the Hackaday Prize is to use the hardware I'm developing to instrument a Powered Paraglider. To the best of my knowledge this has never been done before! I've made a lot of progress, and I'm exited to share the results with you.
![Flying my powered paraglider!]()
Software:
Over the past week or two, I've been working hard to add an attitude/heading reference system (AHRS) to the Polymorphic Dot. If you're not familiar an AHRS provides a pilot (or autopilot) with yaw (heading), pitch (attitude), and roll (bank) angles which effectively tells you how a body is oriented in reference to the earth. AHRS algorithms are very complex, so instead of writing my own, I'm relying on one of the more popular open source algorithms which was written by Sebastian Madgwick as part of his Ph.D thesis. You can find it here:
http://www.x-io.co.uk/open-source-imu-and-ahrs-algorithms/
I started by finding a javascript implementation of this algorithm. This allowed me to easily test and make sure that the IMU data I was getting was solid. The code I borrowed for this can be found here:
https://github.com/ZiCog/madgwick.js/tree/master
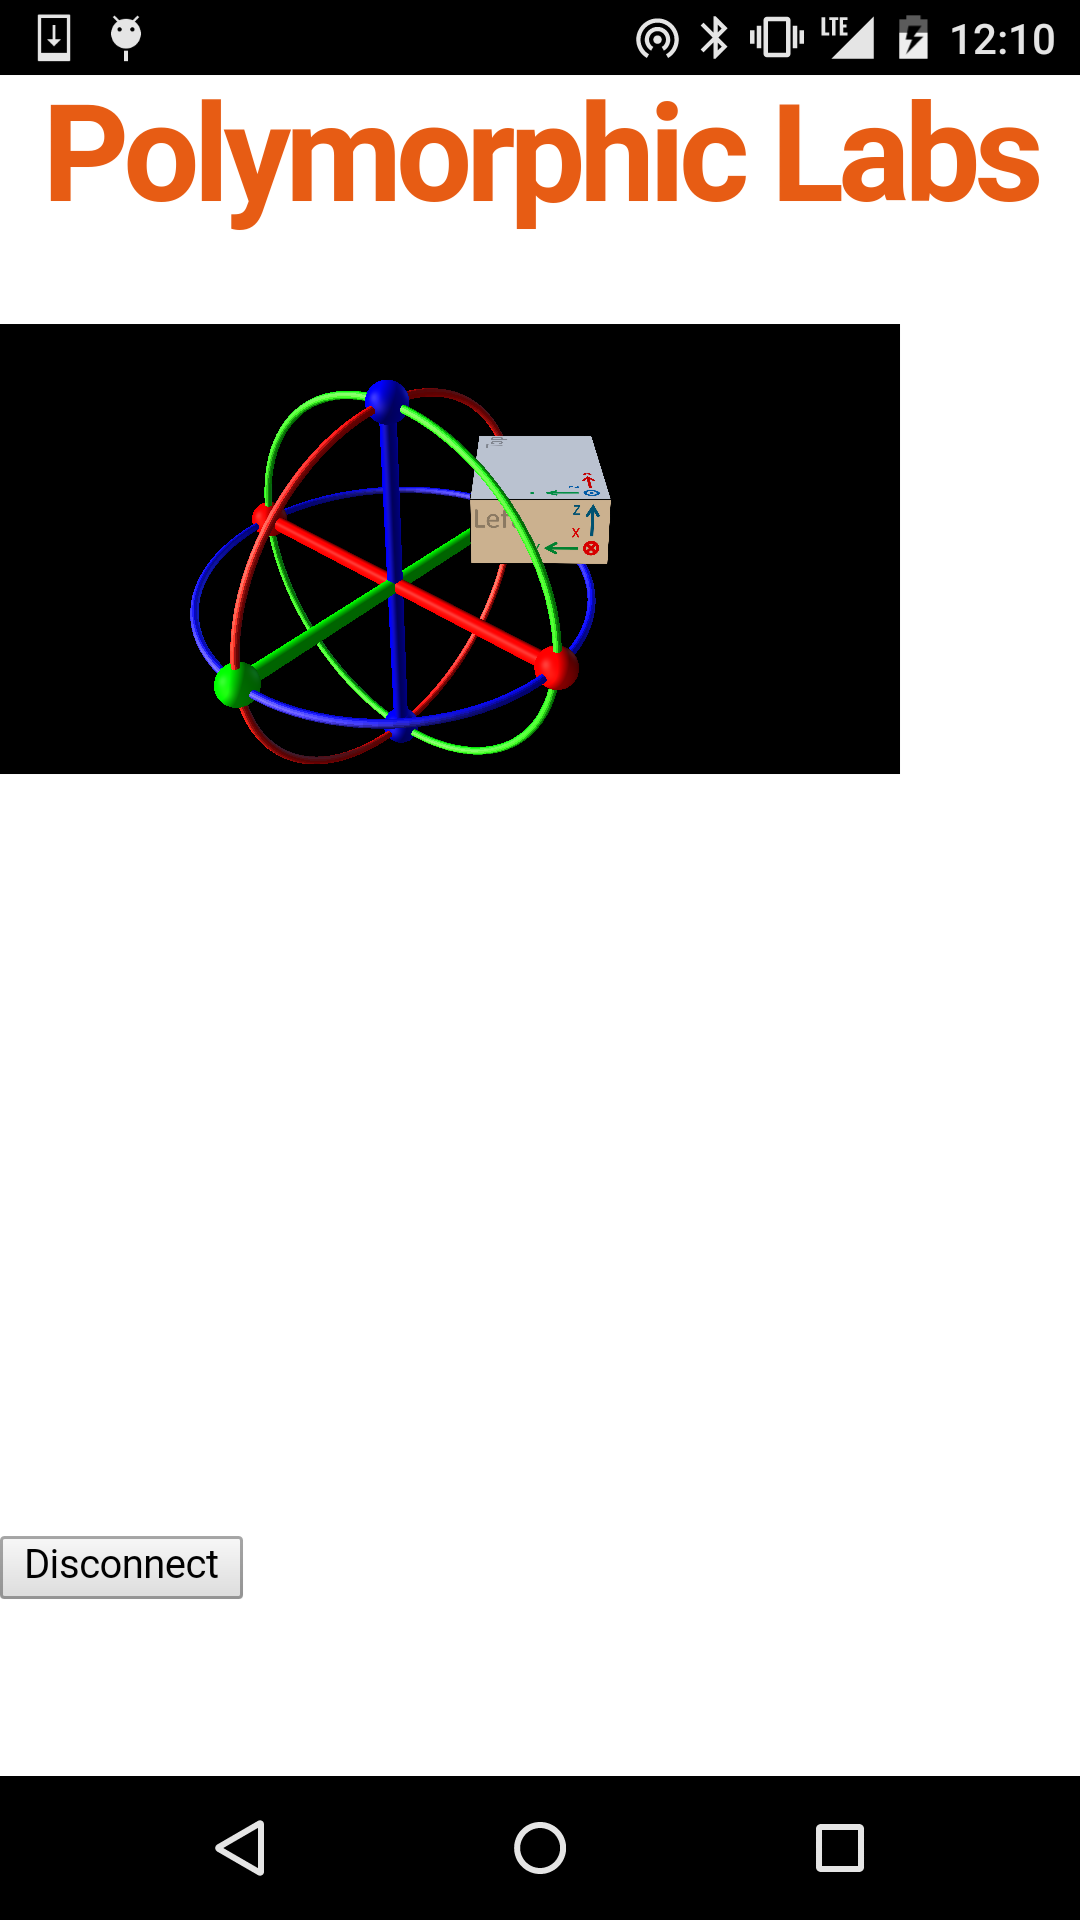
After a bit of tweaking to feed the bluetooth IMU data into the algorithm, I had a 3D model of a box moving around on my phone in the same way that I moved a Polymorphic Dot.
![]()
This really blew my mind! It shouldn't have been that easy, but thanks to open source software, I was able to get this working in days instead of months!
My next step was to try to move the AHRS processing from the smart phone app to the Polymorphic Dot. Why would I do this when I already had a working solution? Well, a responsive AHRS needs a lot (>= 100 samples/second) of IMU data. By processing the IMU data locally on the Polymorphic Dot there is less processing for the app to do (so it runs faster) and less data for the Dot to transmit (so it uses less power). To this end I added a service to the Dot that reports AHRS data when enabled.
The current implementation of the AHRS service is (in the spirit of Hackaday!) very much a hack. In the future I plan to convert the algorithm from floating to fixed point as well as port it to run on the low power sensor CPU present on the CC2650.
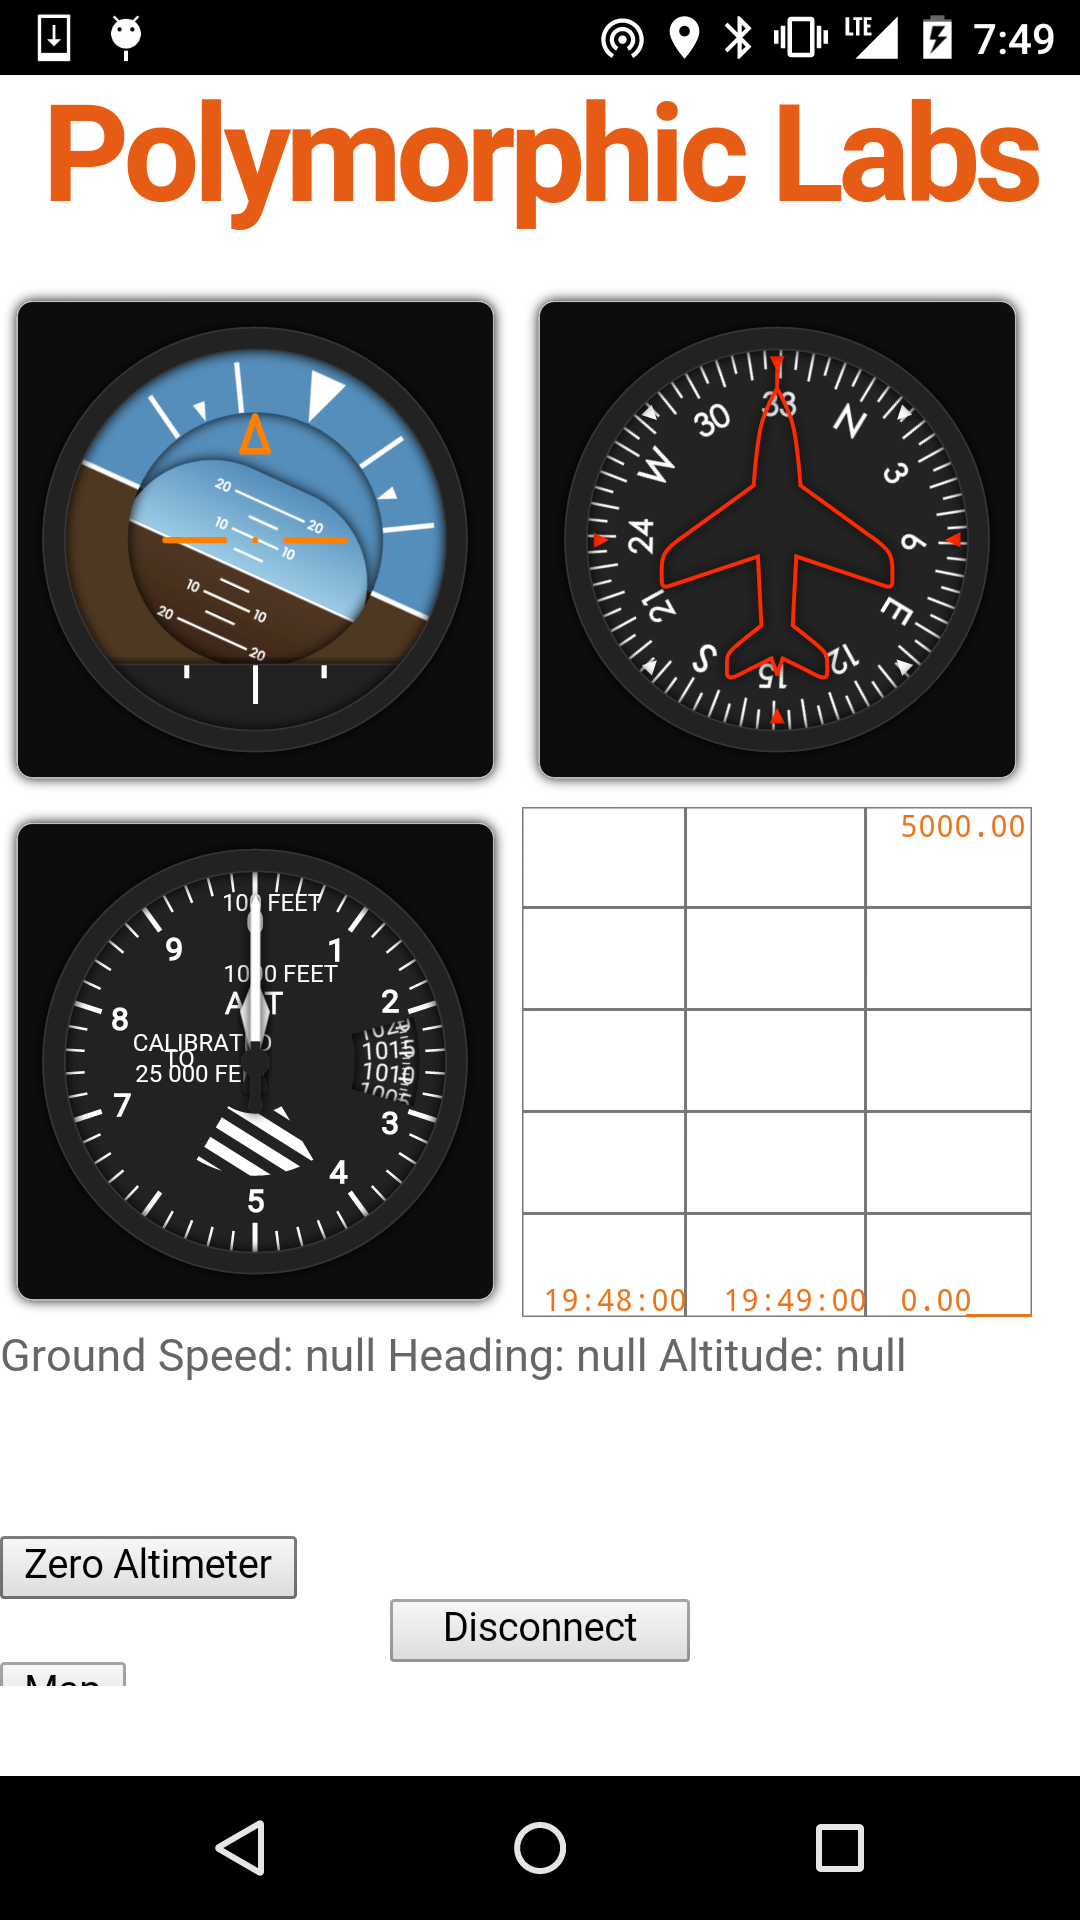
After I had the AHRS working, it was time to begin work on the app for the race. Once again time was a major limitation, so I looked for open source flight instruments and happened to get lucky! Another Sebastian (Sébastien Matton), developed some javascript flight instruments as part of his thesis:
https://github.com/sebmatton/jQuery-Flight-Indicators
After dropping the code into my app, I had attitude and heading indicators as well as an altimeter.
![]() The final piece I wanted to add to the app was a map. This would prevent me from constantly having to switch between my paragliding app and Google Maps. While I could use the standard javascript Maps API, I found a better solution for Cordova apps: the Cordova Google Maps Plugin! What makes this plugin special is that instead of opening google maps from the web, it instead loads the native Android/iOS Maps and embeds the view in your app. After adding the plugin to my project and adding a few lines of code to my index.js, I was able to display a map of the race area. A few more tweaks and I had the race course drawn out and icons added for gas stations.
The final piece I wanted to add to the app was a map. This would prevent me from constantly having to switch between my paragliding app and Google Maps. While I could use the standard javascript Maps API, I found a better solution for Cordova apps: the Cordova Google Maps Plugin! What makes this plugin special is that instead of opening google maps from the web, it instead loads the native Android/iOS Maps and embeds the view in your app. After adding the plugin to my project and adding a few lines of code to my index.js, I was able to display a map of the race area. A few more tweaks and I had the race course drawn out and icons added for gas stations.![]()
I've committed and pushed both the updated firmware and this new paragliding app to the github repos listed on this project page.
Enclosures:
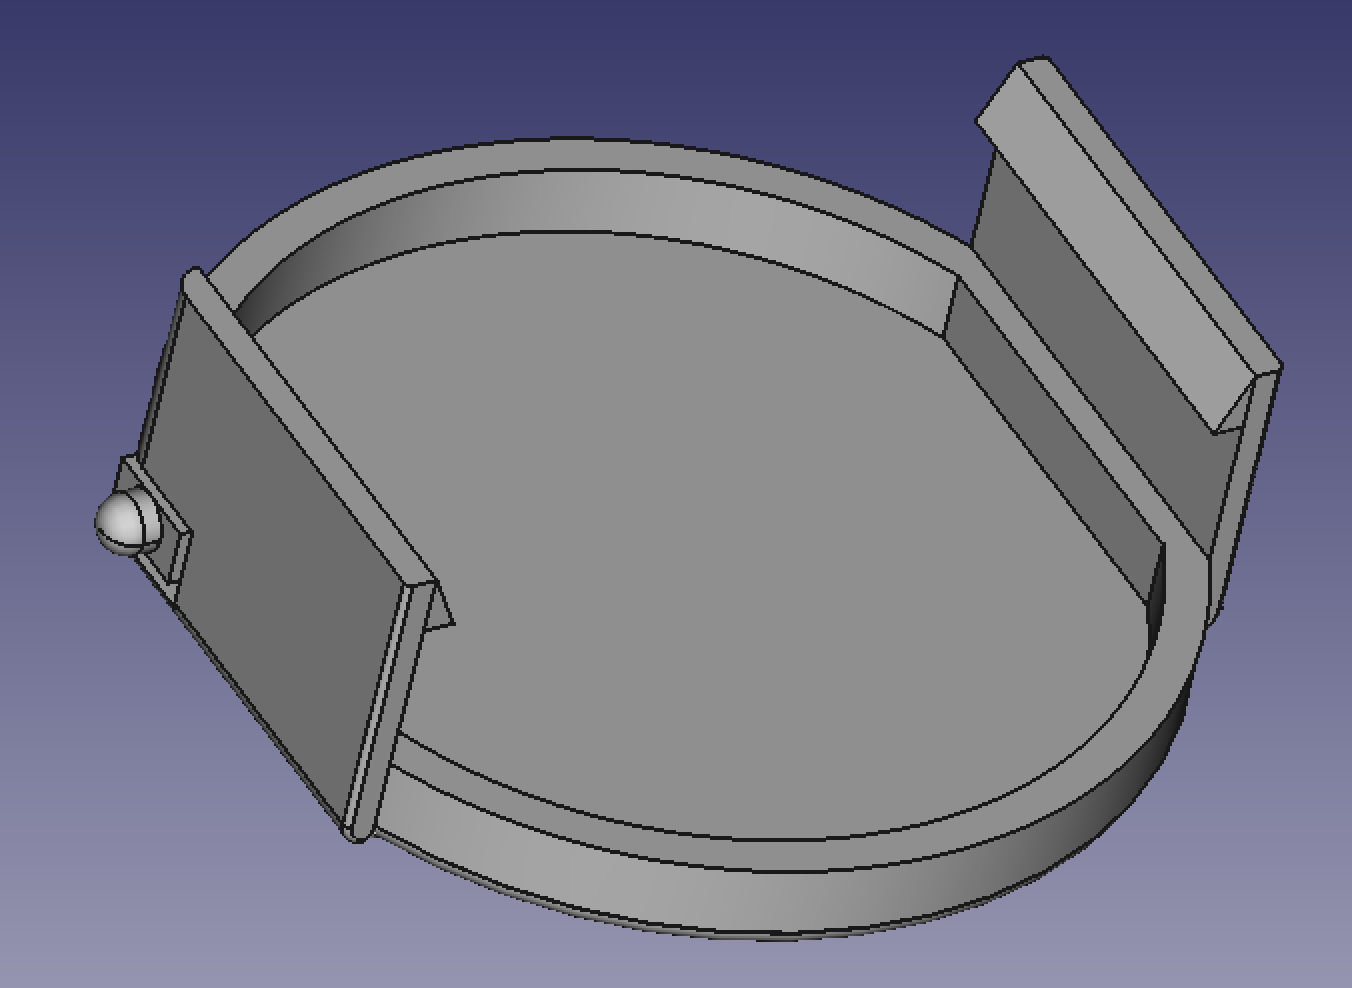
In one of my previous posts, you probably saw the magnetic mount cases I developed for the paraglider race this week. As you may have guessed, they won't work that great for this application because of the magnets!
In my rush to get everything done in time, I neglected to think about how the magnets would effect the magnetometer on the board. After I did some testing, I found that the pitch and bank angles weren't affected but the heading was. Because of this, I quickly designed a new mount for the Polymorphic Dot that would move the magnets away from the device.
![]()
I also tweaked the top of the case to make the snap together mechanism more robust.
![]()
I've placed an order for the parts and done everything I can to expedite it, but the parts may not arrive in time for the race. If this happens, I'll have to do without heading data from the Polymorphic Dot during the race.
Race:
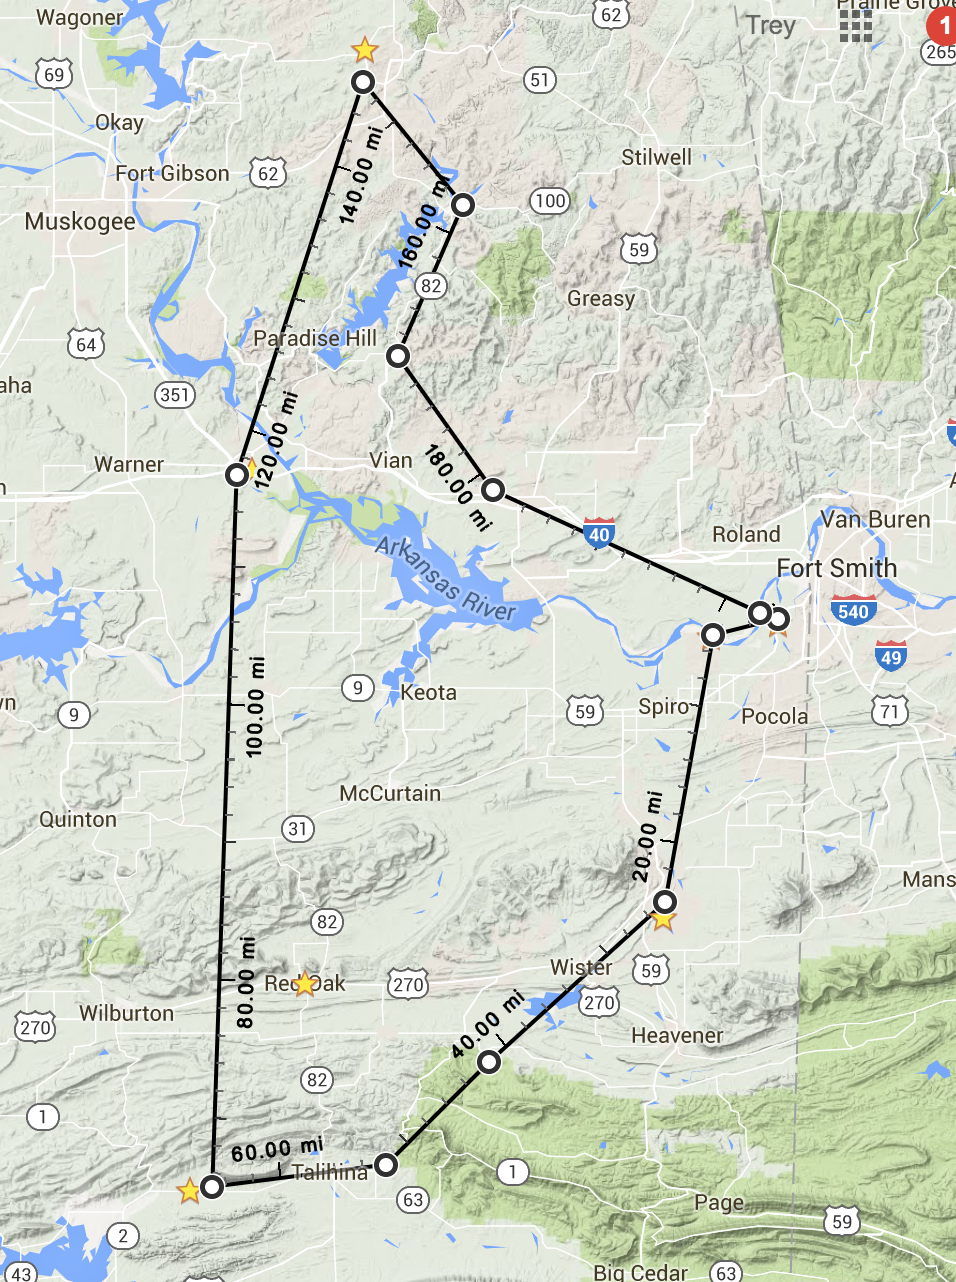
The race is an event put on by an organization called the Adventurists. They specialize in putting on outlandish old school adventure races all over the world. This week's race is called the Icarus X race and is just a sample of what the full Icarus Trophy race holds for me in October. In both races, I'll fly my paramotor for extended distances carrying everything I need to survive with me. This means I'll have a tent, sleeping bag, food, water, 2 stroke oil, and much more. If I need gas, I have to land at a gas station or get a ride from a local to one.
Thursday morning (May 26th), I'll set off from a field West of Fort Smith Arkansas to start on a roughly 200 mile circular route through Oklahoma. As I type this, weather for the race looks marginal at best. A stationary front and a low are positioned just West of the course and storms are predicted all three days of the race. If nothing else, it should make for one hell of an adventure!
![]()
Stay tuned to my hackday.io project page and my twitter (@yertnamreg) for updates during and after the race as well as inflight demos of the app!
-
Meet Trey!
05/18/2016 at 17:00 • 0 commentsWhile I've been around the electronics industry for a hot minute and know quite a few of you, there are even more of you I've never met! To fix that, I've made this video introduction where I reveal what my secret plan is for the "Anything Goes" part of the 2016 Hackaday Prize.
-
Hardware Development Pt. 2
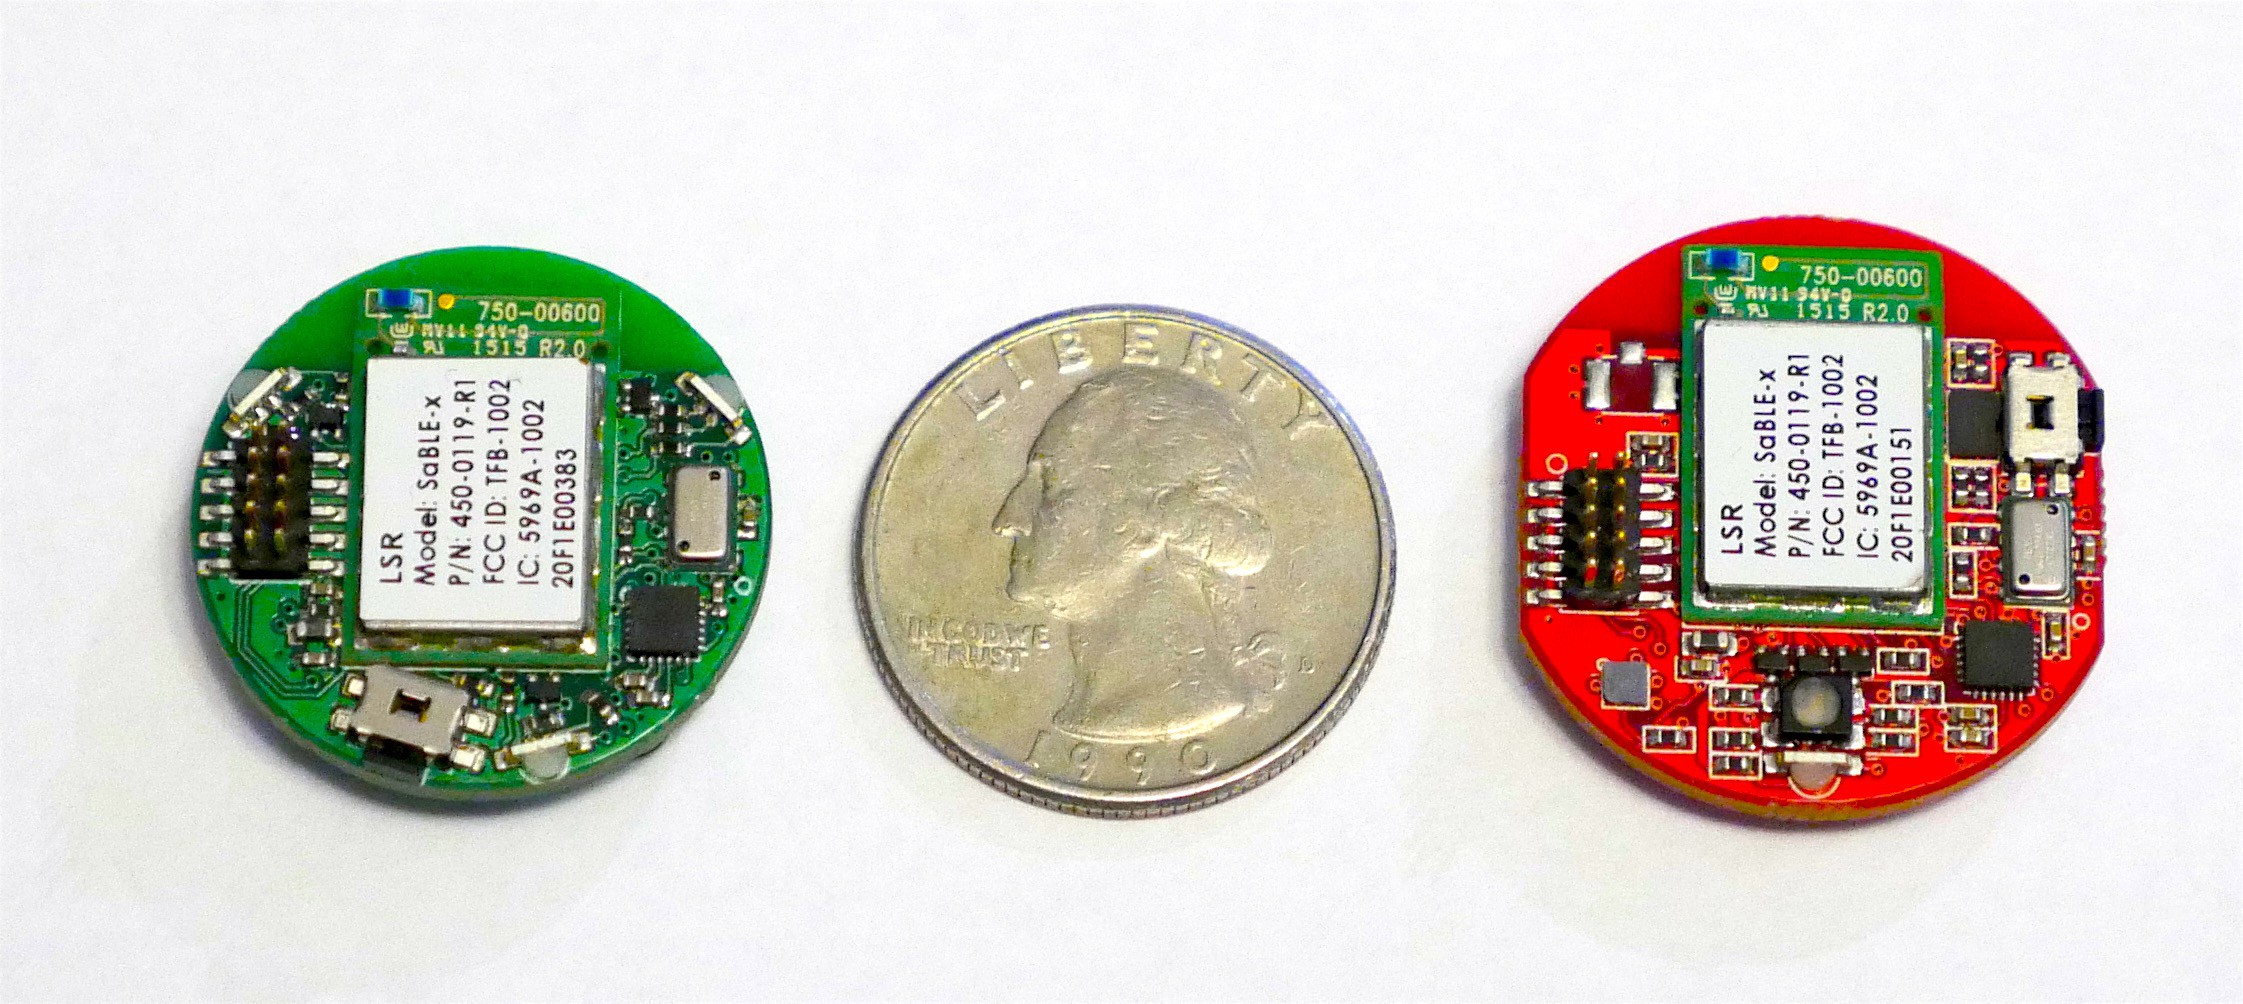
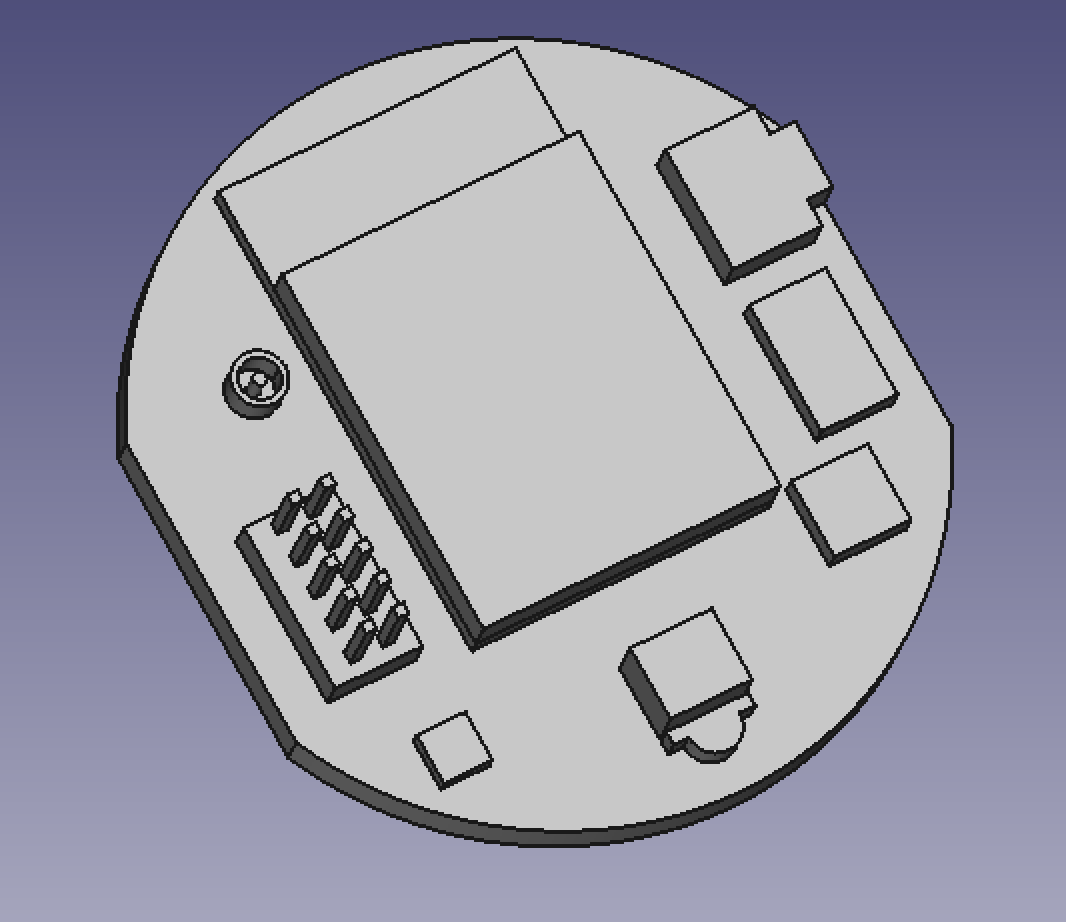
05/17/2016 at 17:08 • 0 commentsAfter posting all that info on the enclosures, it occurred to me that I owe you an update on hardware. Previously, I've covered the development of the little green board, but since then I've posted a bunch of pictures of a red version without any explanation!
![]()
I was able to successfully bring up the first version of the board (the green one) and retrieve data from each of the sensors over bluetooth using the SDK I've been developing. Everything was going great until I started trying to update the firmware over bluetooth. Clearly I didn't RTFM enough because as I quickly found out, firmware updates require an external memory in order to buffer the application image.
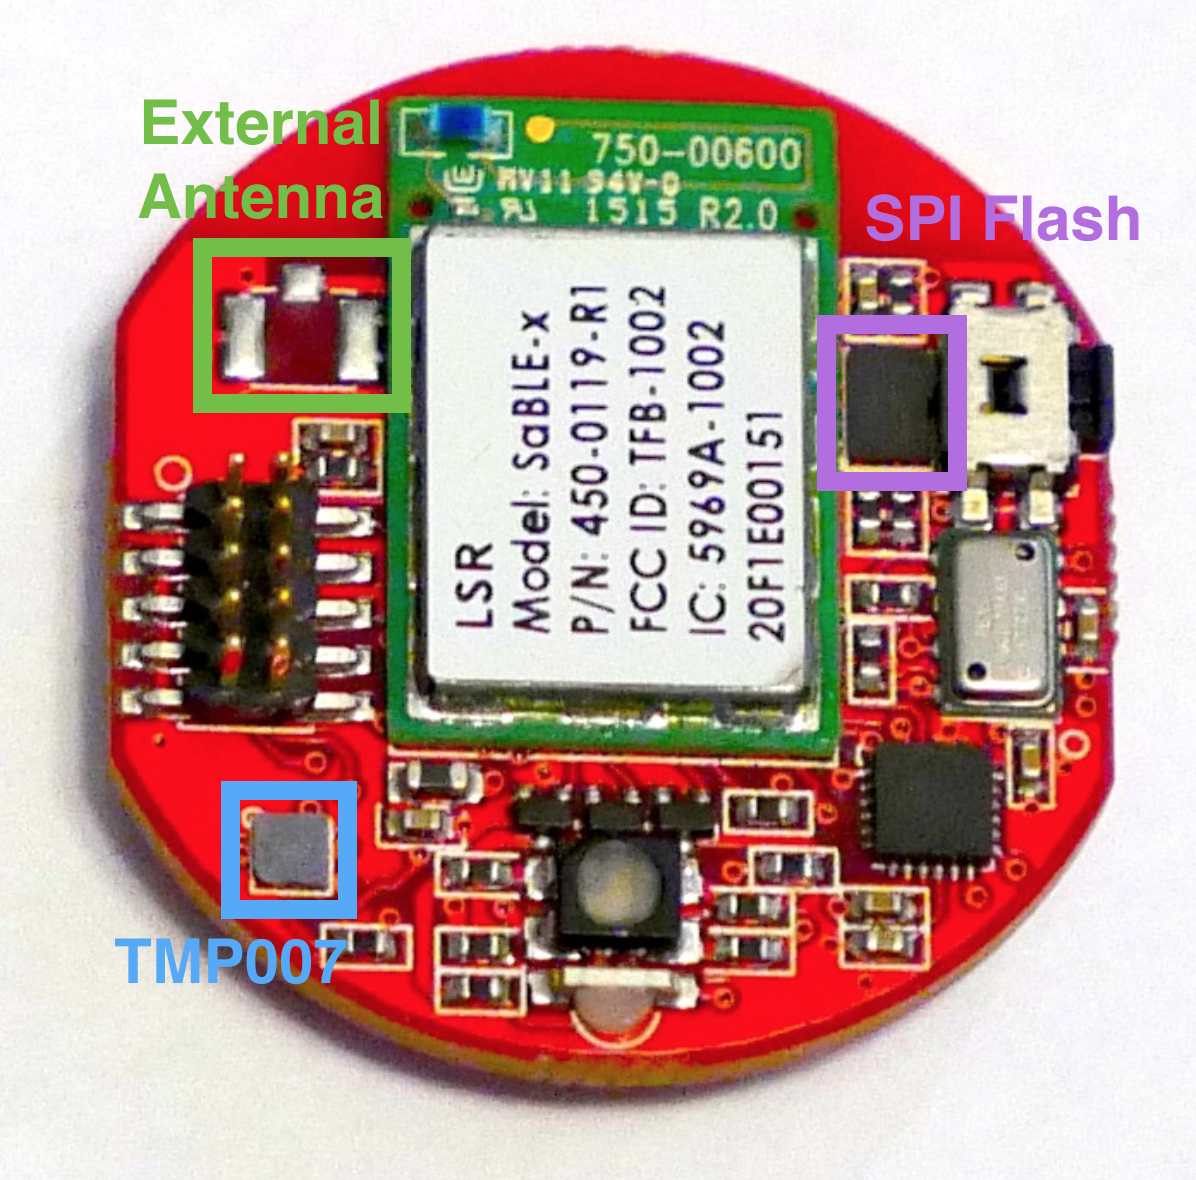
It was this shortcoming that led to the redesign of the board. I added the SPI flash to enable over the air firmware download (OAD), as well as a TMP007 IR temperature sensor. Finally, the CC2650 module I'm using comes in two flavors: internal and external antenna. Because the range wasn't the best with the internal antenna, I decided to design the board such that it could be populated with either variant of this module. I've highlighted these changes in the following graphic:
![]()
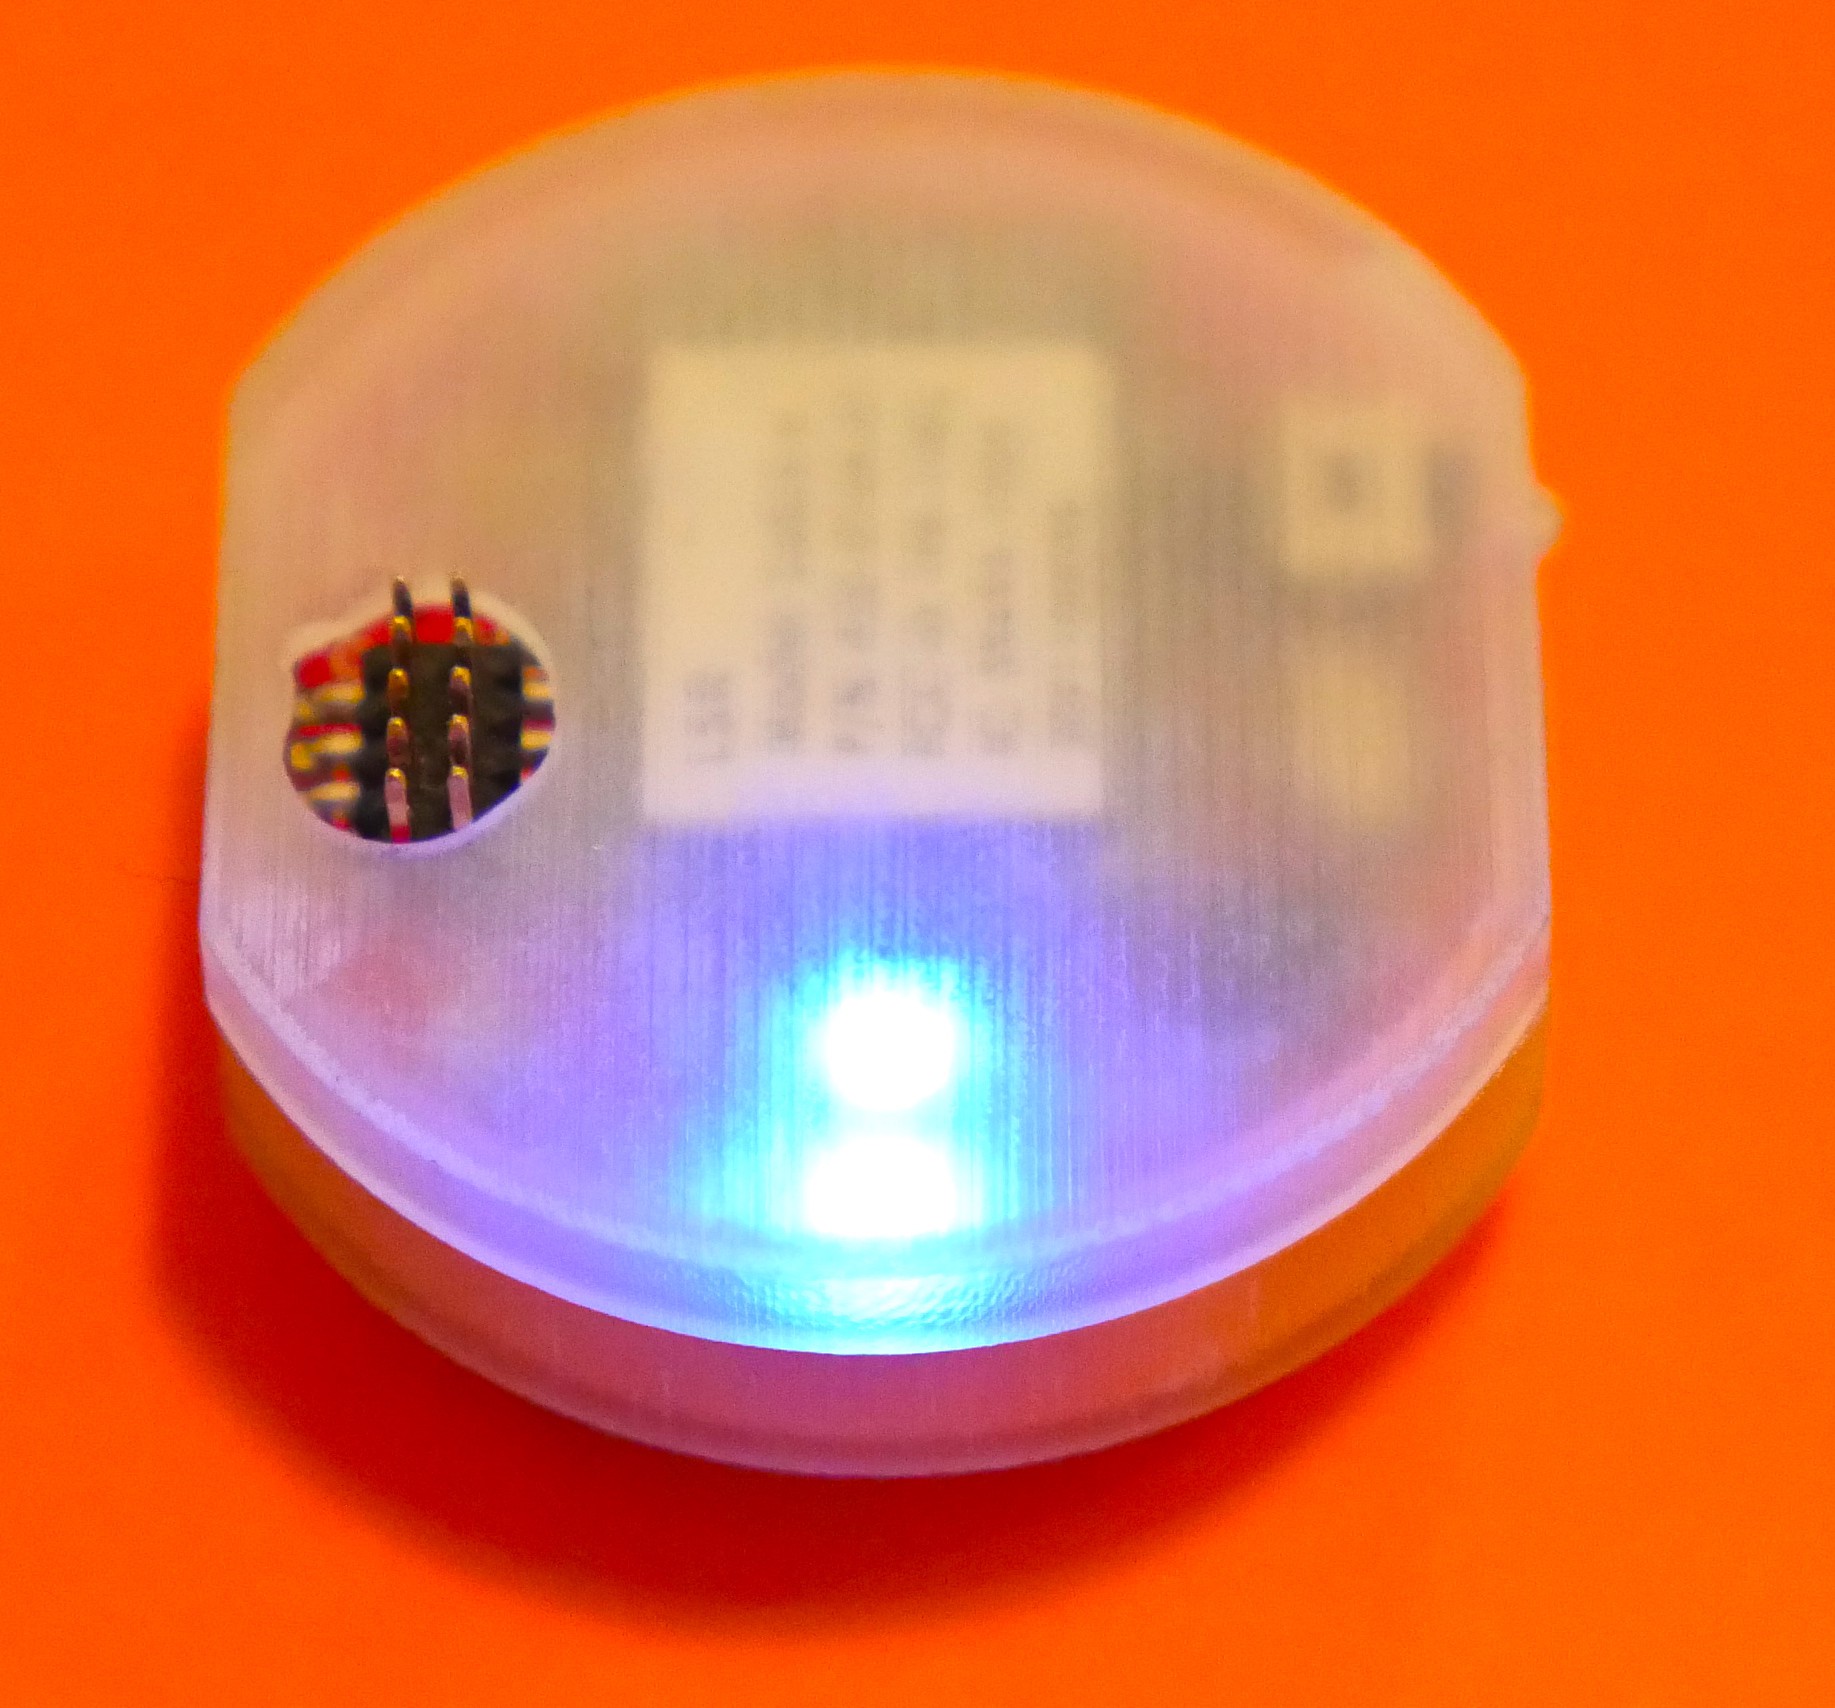
I've had these new boards for a few weeks now and they are working fabulously. Only minor changes were needed in order to get the firmware running on these new boards. I've also settled on a name for these. Meet the Polymorphic●Move (pol-e-morf-ic dot moov).
-
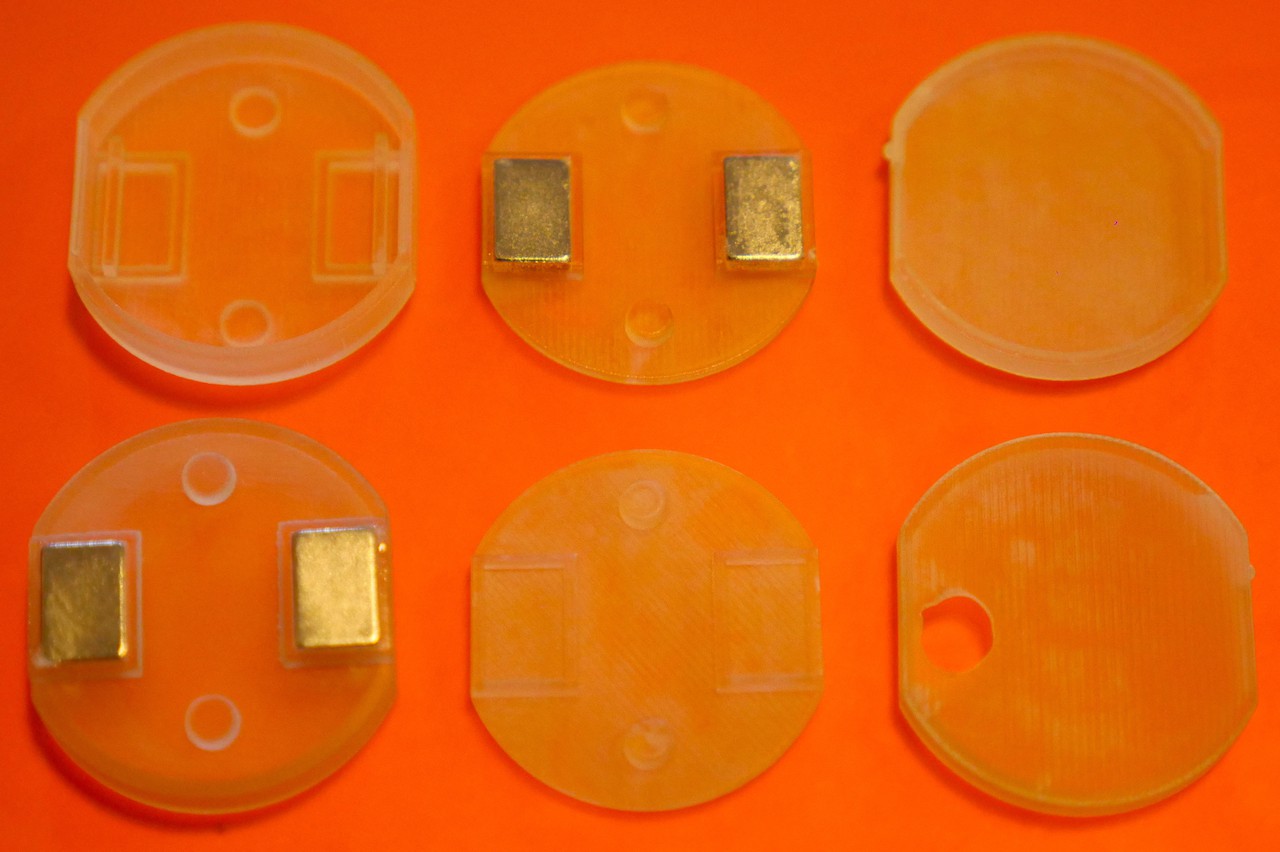
Enclosure Development Pt.1
05/13/2016 at 23:42 • 0 commentsIn my last post, I hinted that I will be strapping these things to some kind of moving contraption. I'm still not quite ready to tell you what that contraption is (Why ruin the surprise?), but in any case I'll need a case to hold the PCB as well as some method of attachment.
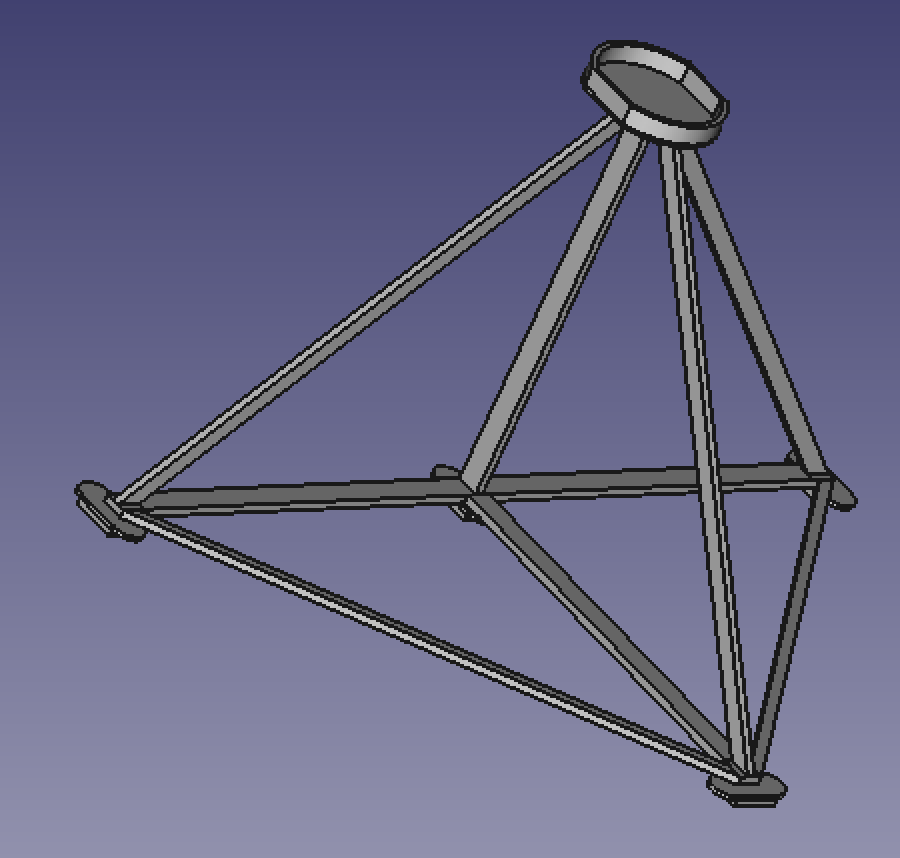
Thankfully we live in a world where there are open source 3D CAD tools and cheap 3D printing services. Previously, I've played around with FreeCAD so I started by building a 3D model of the board in this tool. While I don't explicitly need a 3D model of the board, it will help in the long run by ensuring that all of the enclosures I design fit the board before I ever send the enclosure out for printing. After playing around with FreeCAD for an hour or two I came up with this model.
![]()
While it lacks color and exact models of the parts, the overall model is dimensionally accurate, which will allow me to make sure the enclosure and board fit together without any interference.
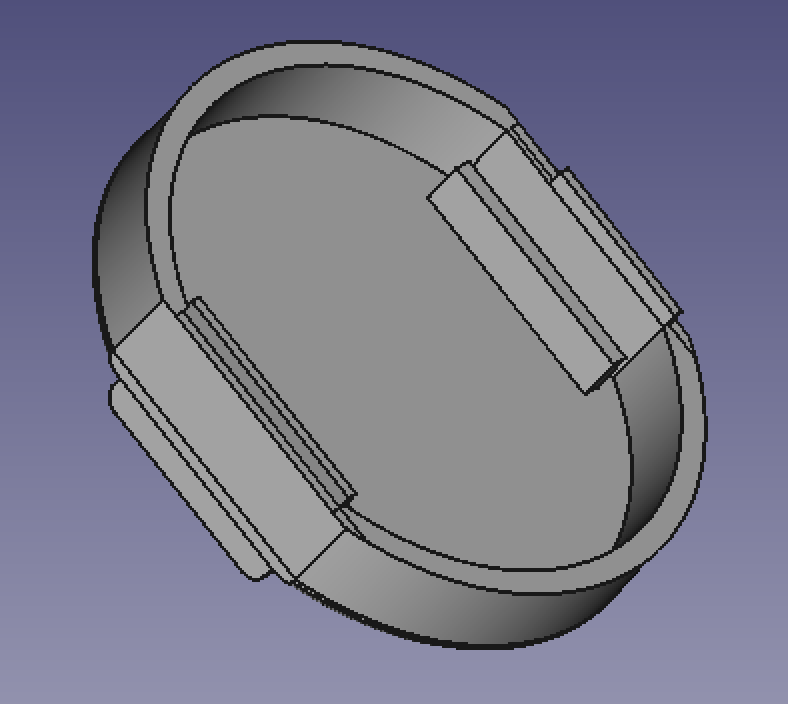
Once I had the model of the board, I started designing the bottom half of the case. I begun by stripping down the model of the board until I had just the outline of the PCB sketched. I then increased the size of the board a bit (for tolerance reasons) and extruded the board outline so I had a ring that was shaped like the board. I then added a bottom as well as some cutouts for magnets. The final step was to add some taps to the top side such that this half of the case could snap together with the top half.
![]()
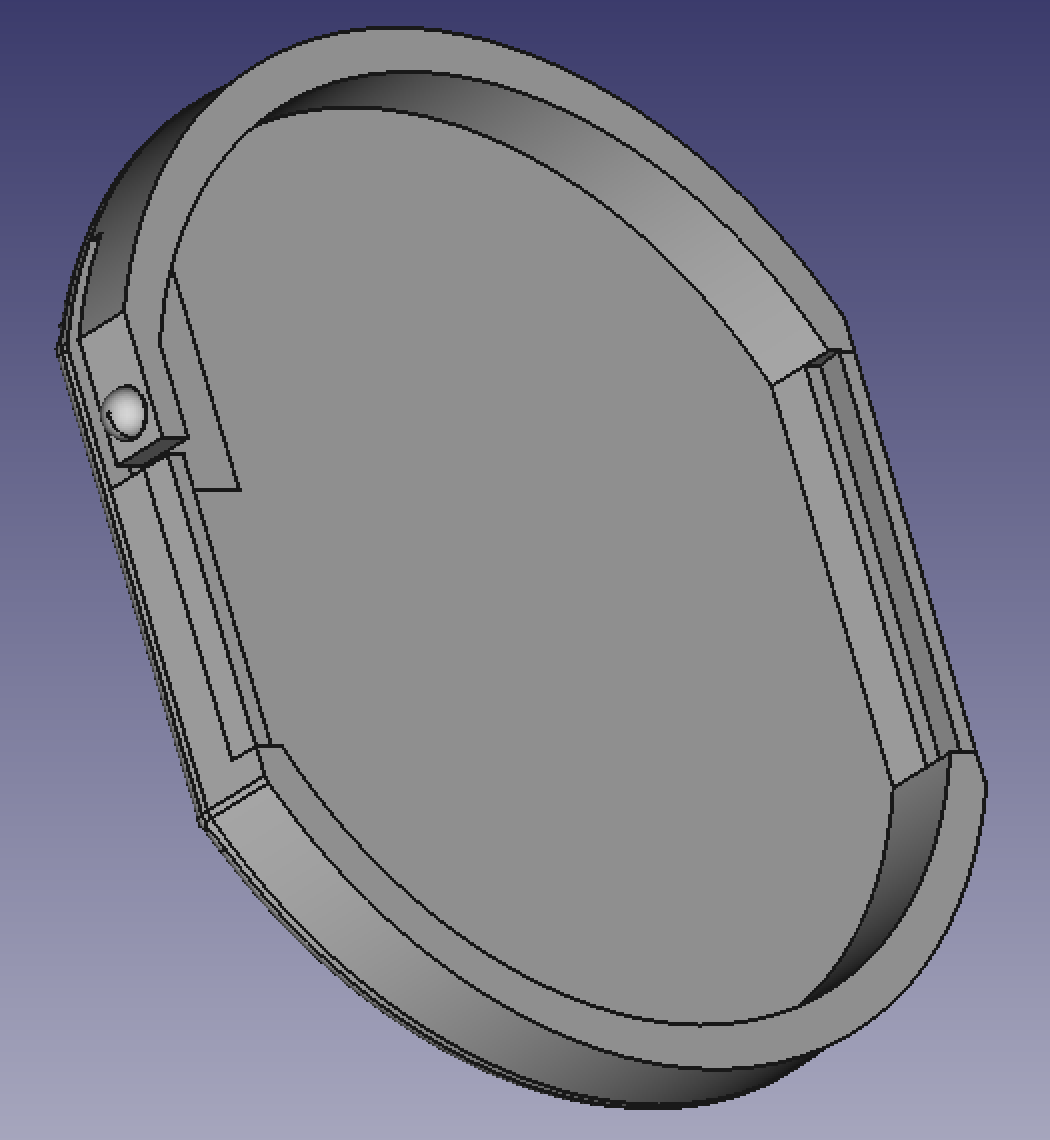
The top of the case followed almost the exact same design flow, but instead of including holders for magnets I added some strategic cuts such that the board's pushbutton could be pressed by squeezing the side of the case.
![]()
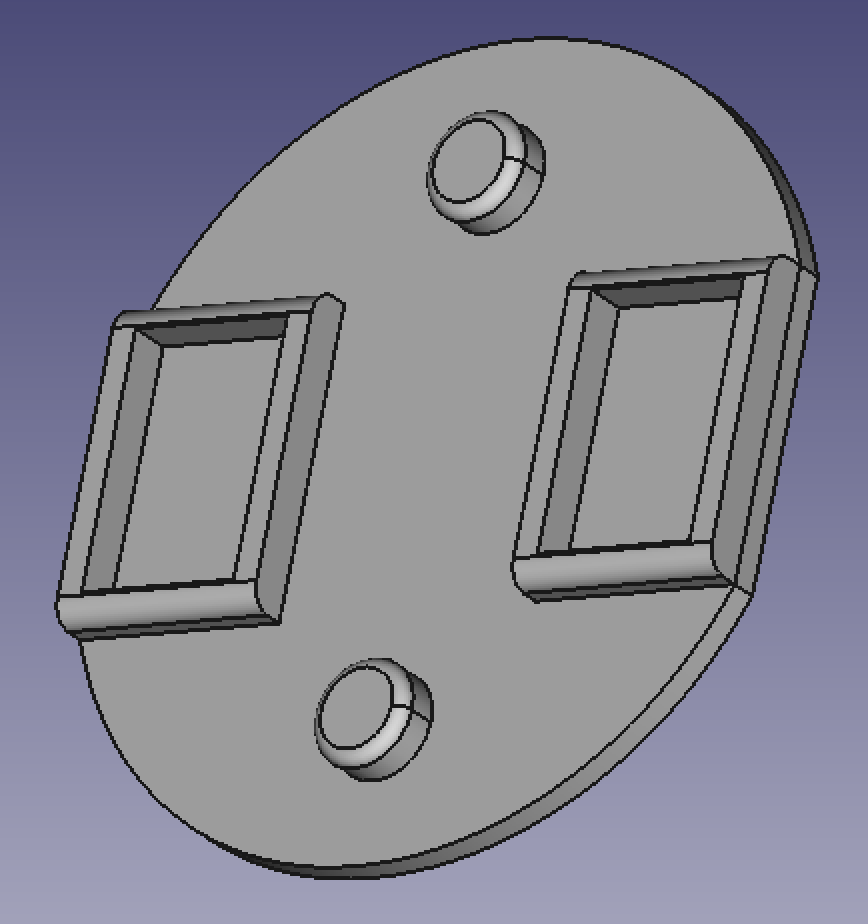
The final piece of the enclosure was the magnetic mount's back. This piece of the case will sit behind a piece of fabric and allow the case to clamp to the fabric using magnets. Design for this piece was straightforward. I started with the model of the bottom of the case and simply trimmed off everything but the bottom side that included the holders for the magnets.
![]()
Now that I had a model of my case, I needed to get it printed. Many of the details on these models are finer than the resolution of most consumer FDM printers so I elected to use a professional service which would give me access to industry grade 3D printers. I've used Shapeways in the past with great success so I chose to use their frosted detail plastic service.
Literally 3 days after uploading my models and placing my order, I have the finished parts in my hand! I have no association with Shapeways, but I've got to give them props on their quality and turnaround time!
![]()
After inspecting the finished parts and doing some test fits, I tried to snap together a case with a board inside. To my surprise, I couldn't snap it together! What had happened?
Remember that tall JTAG header in the model of the PCB (near the top of this log entry)? Well it turns out I had forgotten to cut a hole in the top of the case so these pins could stick out. Like any good hacker, I saw this as an opportunity to use power tools instead of a problem. A few seconds after the case met my drill, I had a hole big enough to squeeze the pins through.
The moment of truth was upon me. Would the board fit in the case? Would the case snap together? Would the pushbutton be push-able?
I snapped the case together and sure enough everything worked according to plan! The case snapped together and I was able to turn on the board by squeezing the case around the button.
![]()
With that said, there is some definite room for improvement. I will of course be adding a cutout to the top of the case so that it works out of the box without any modification. The other big issue I noticed was the snapping mechanism. While the two halves of the case and snap tabs fit together perfectly, the snap tabs are extremely small and prone to breakage.
In the coming week, I'll be revising the case to fix these two issues. It's critical I get this done quickly, so that I'll be ready for the 160 mile race I'm competing in in 2 weeks. Do you have any ideas on what I'm going to attach this to yet? Put your guesses in the comments and stay tuned to find out!
-
App SDK Development Pt. 2
05/09/2016 at 21:02 • 0 commentsOver the past few weeks, I've brushed up on my HTML and Javascript and have begun to write a javascript library in order to make getting started with the Polymorphic Dot that much easier. I started this process mostly by experimenting around with Cordova as well as reading tutorials and articles on javascript software architecture.
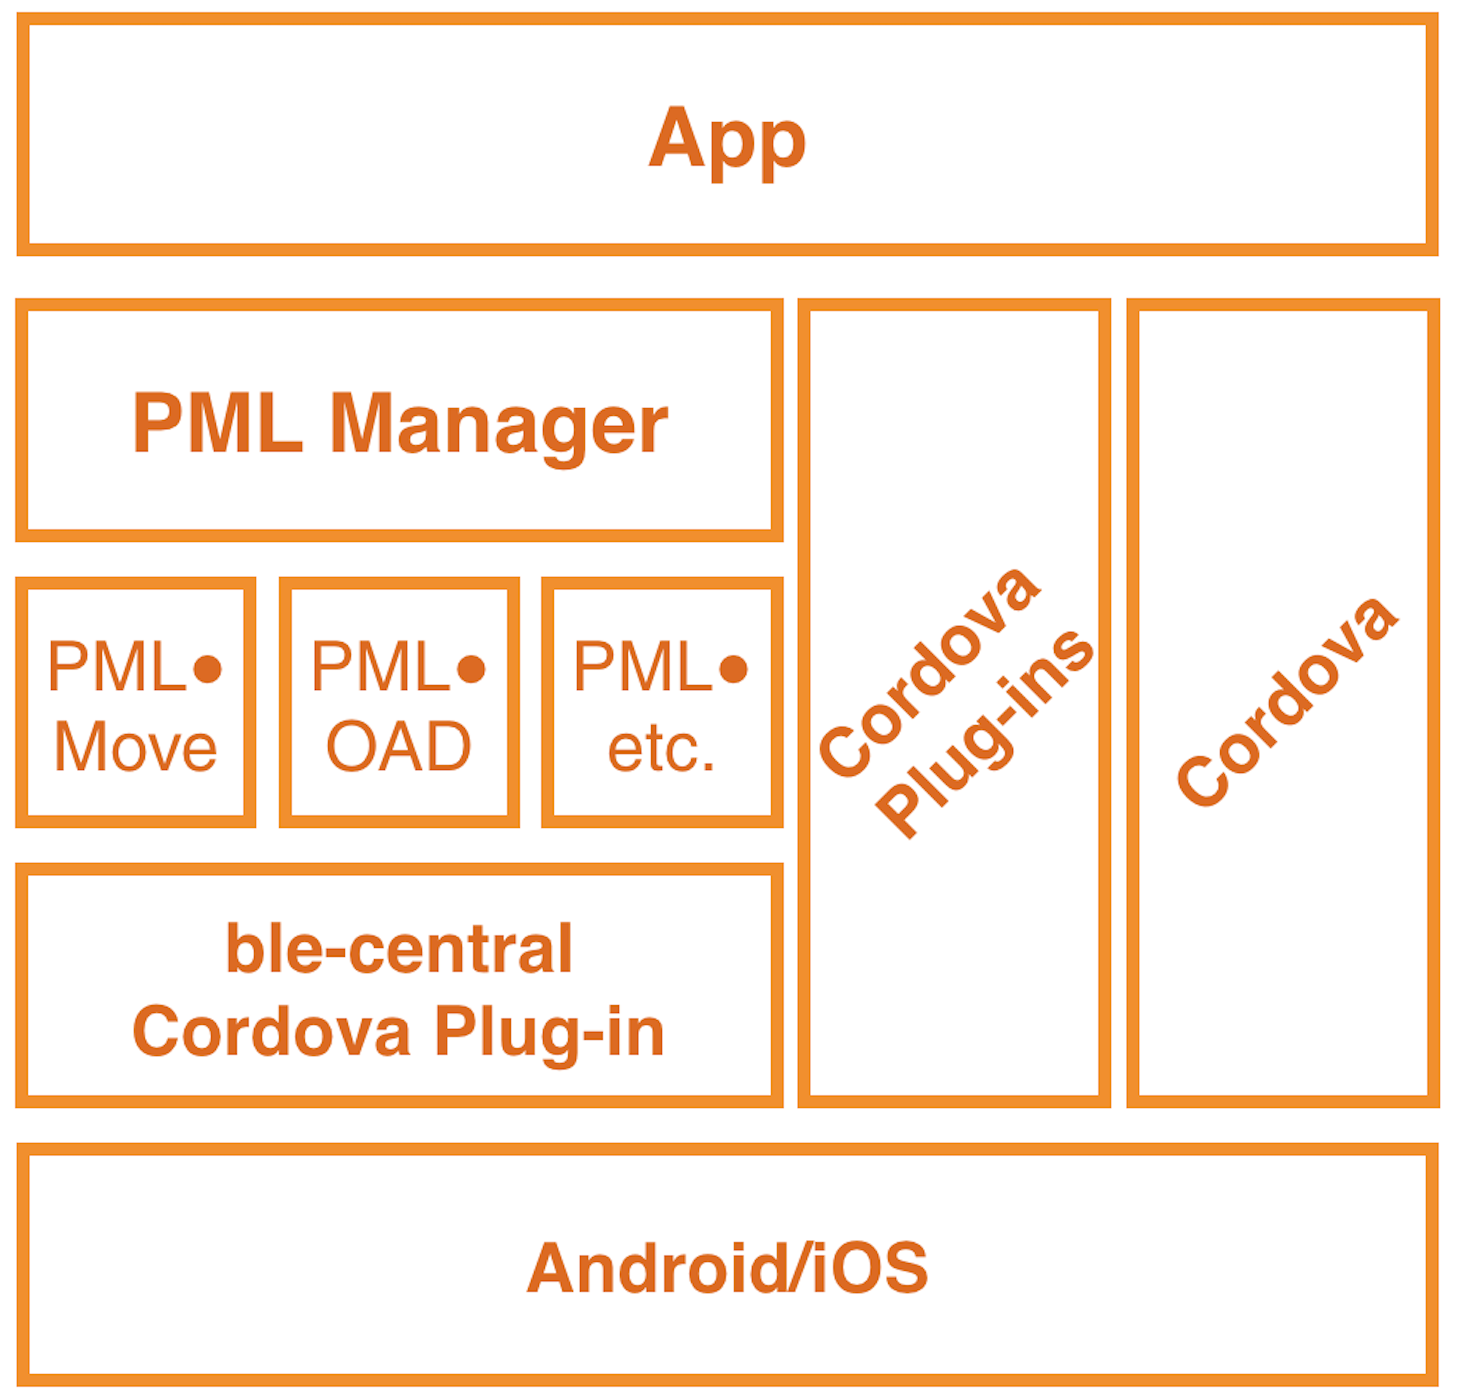
After going back and forth between brainstorming and testing, I came up with the following overall app software architecture:
![]() Just like any other piece of software, the SDK will be made up of a stack of other pieces of software:
Just like any other piece of software, the SDK will be made up of a stack of other pieces of software:- Cordova, the ble-central plug-in, as well as any additional Cordova plug-ins run directly on the host OS (Android/iOS) and expose Javascript APIs to higher layers.
- PML Manager is a Javascript library that manages connection to Bluetooth devices. Once a connection is established and a hardware match found, the manager loads the appropriate device library(pmlDotMove.js for instance) and exposes a user friendly API for accessing the hardware.
- App is the user application to be built with Cordova. This app will make calls to the PML Manager to interact with Polymorphic Hardware devices as well as any Cordova or plug-in APIs it may need.
Since I'm actually writing the PML Manager and its associated device libraries, let's focus on that. As stated earlier, the goal is to make this hardware as easy to use as possible. Of course, nowadays this means making the software as easy to use as possible. Let's walk through a typical connection scenario:
1) Application initiates BLE device scan:
pmlManager.startScan(app.onDiscoverDevice);
When devices are found, a callback function (app.onDiscoverDevice in this case) is called and passed a device object so the app can populate a "devices found" list for the user.
2) User selects device(s) to connect to. App stops scanning and passes device(s) to the connect API:
pmlManager.stopScan();
pmlManager.connect(app.selectedDevices, app.onDeviceConnect);
Note: pmlManager supports simultaneous connections to 8 devices.
As each device is connected to, pmlManager looks at its advertising data to figure out what kind of Polymorphic Hardware it is. If it finds a match in its hardware definitions library, pmlManager will load a software interface object that matches the device and pass it back to the application via a callback (app.onDeviceConnect in this case).
3) Now that the application has access to the software interface for a given device, it can configure the services and start receiving data:
var onMoveData = function(data){
        var a = new Int16Array(data);
	        //a[0] - Gyro X   a[1] - Gyro Y    a[2] - Gyro Z
                //a[3] - Accel X  a[4] - Accel Y  a[5] - Accel Z
                //a[6] - Mag X    a[7] - Mag Y    a[8] - Mag Z
	};
swInterface.registerMoveCallback(onMoveData);
swInterface.enableMoveCallback();
swInterface.setMovePeriod(0x0A);
swInterface.enableAllMove();
In this example I:
- Create a movement callback function to receive data from the Polymorphic Hardware.
- Register the movement callback and enable it.
- Configure how often I want to receive movement data.
- Enable all movement sensors (gyro, accel, mag).
The user application would then do something with the data received in the onMoveData function. I went ahead and put together a quick example app which shows how to connect to multiple sensors and graph the movement data from each sensor. You can find the example Cordova app here.
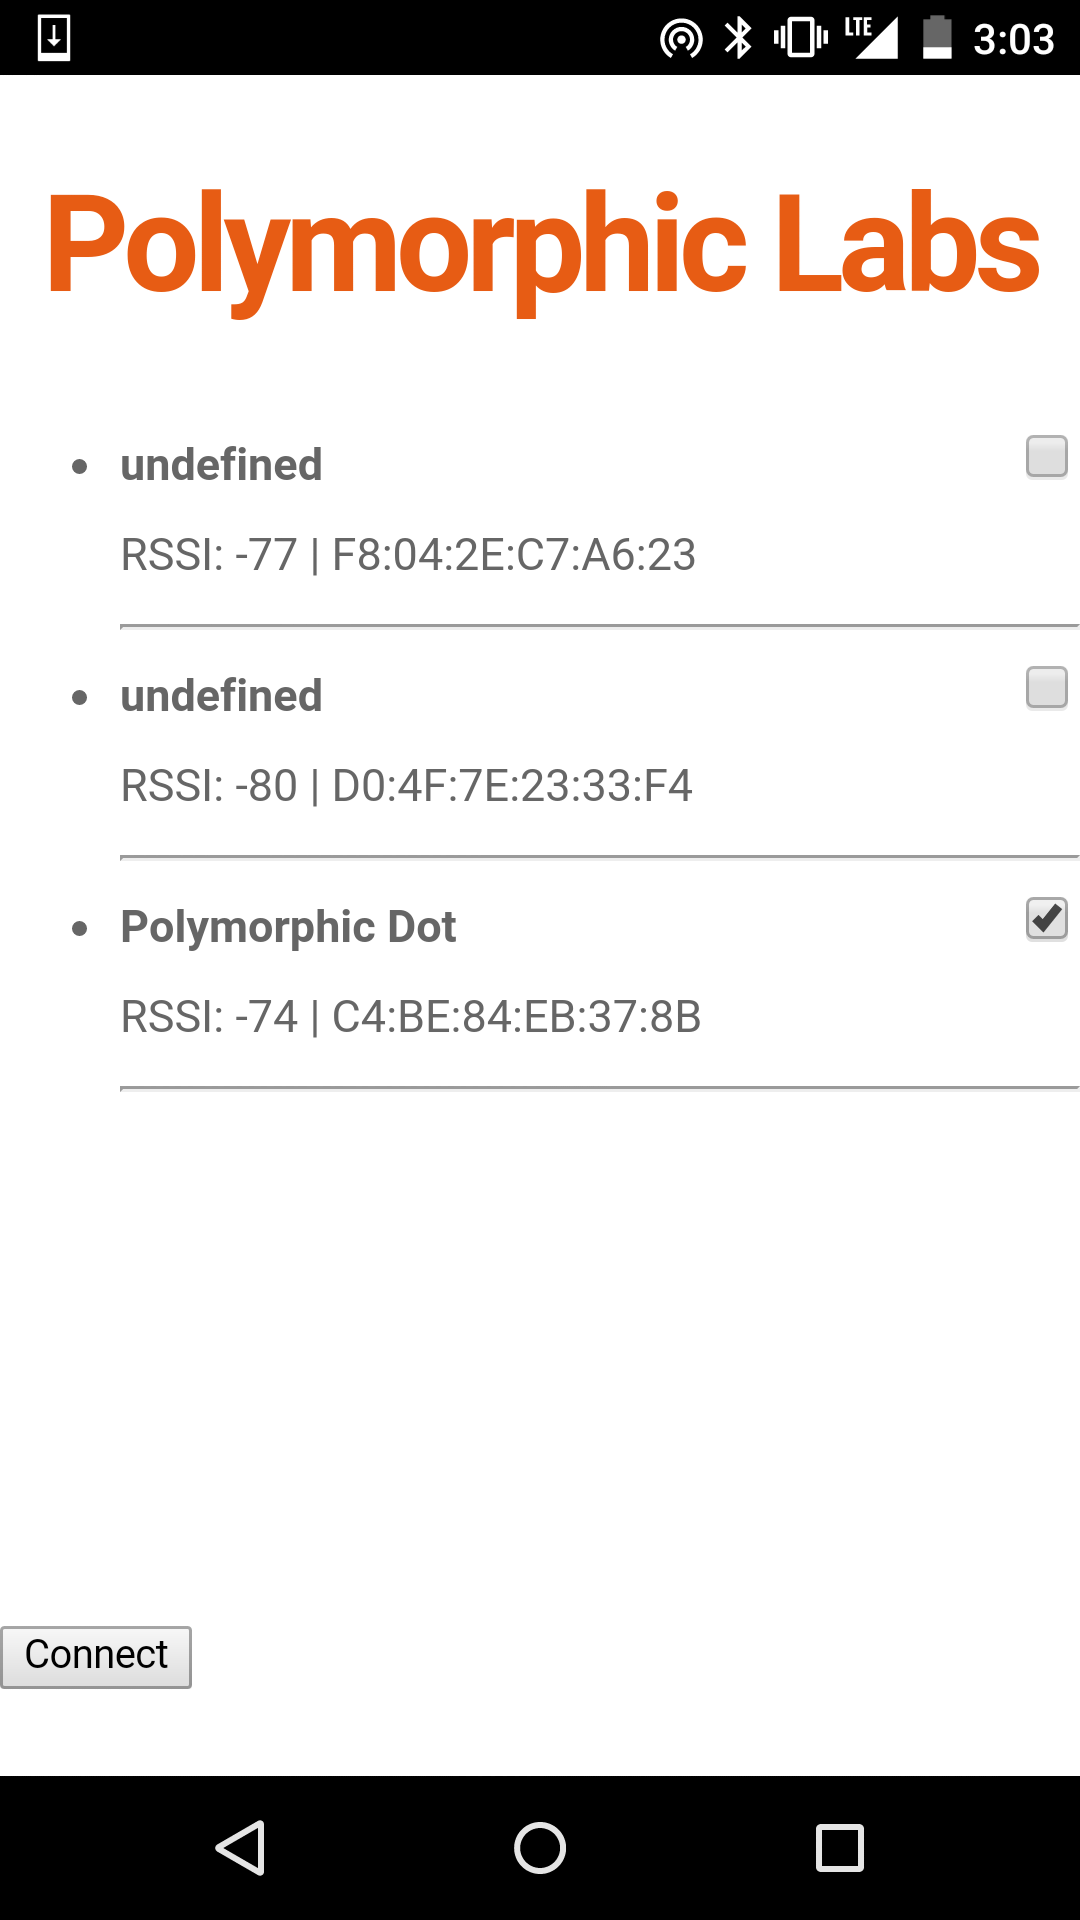
First the user selects the devices to connect to (user may select more than one):
![]()
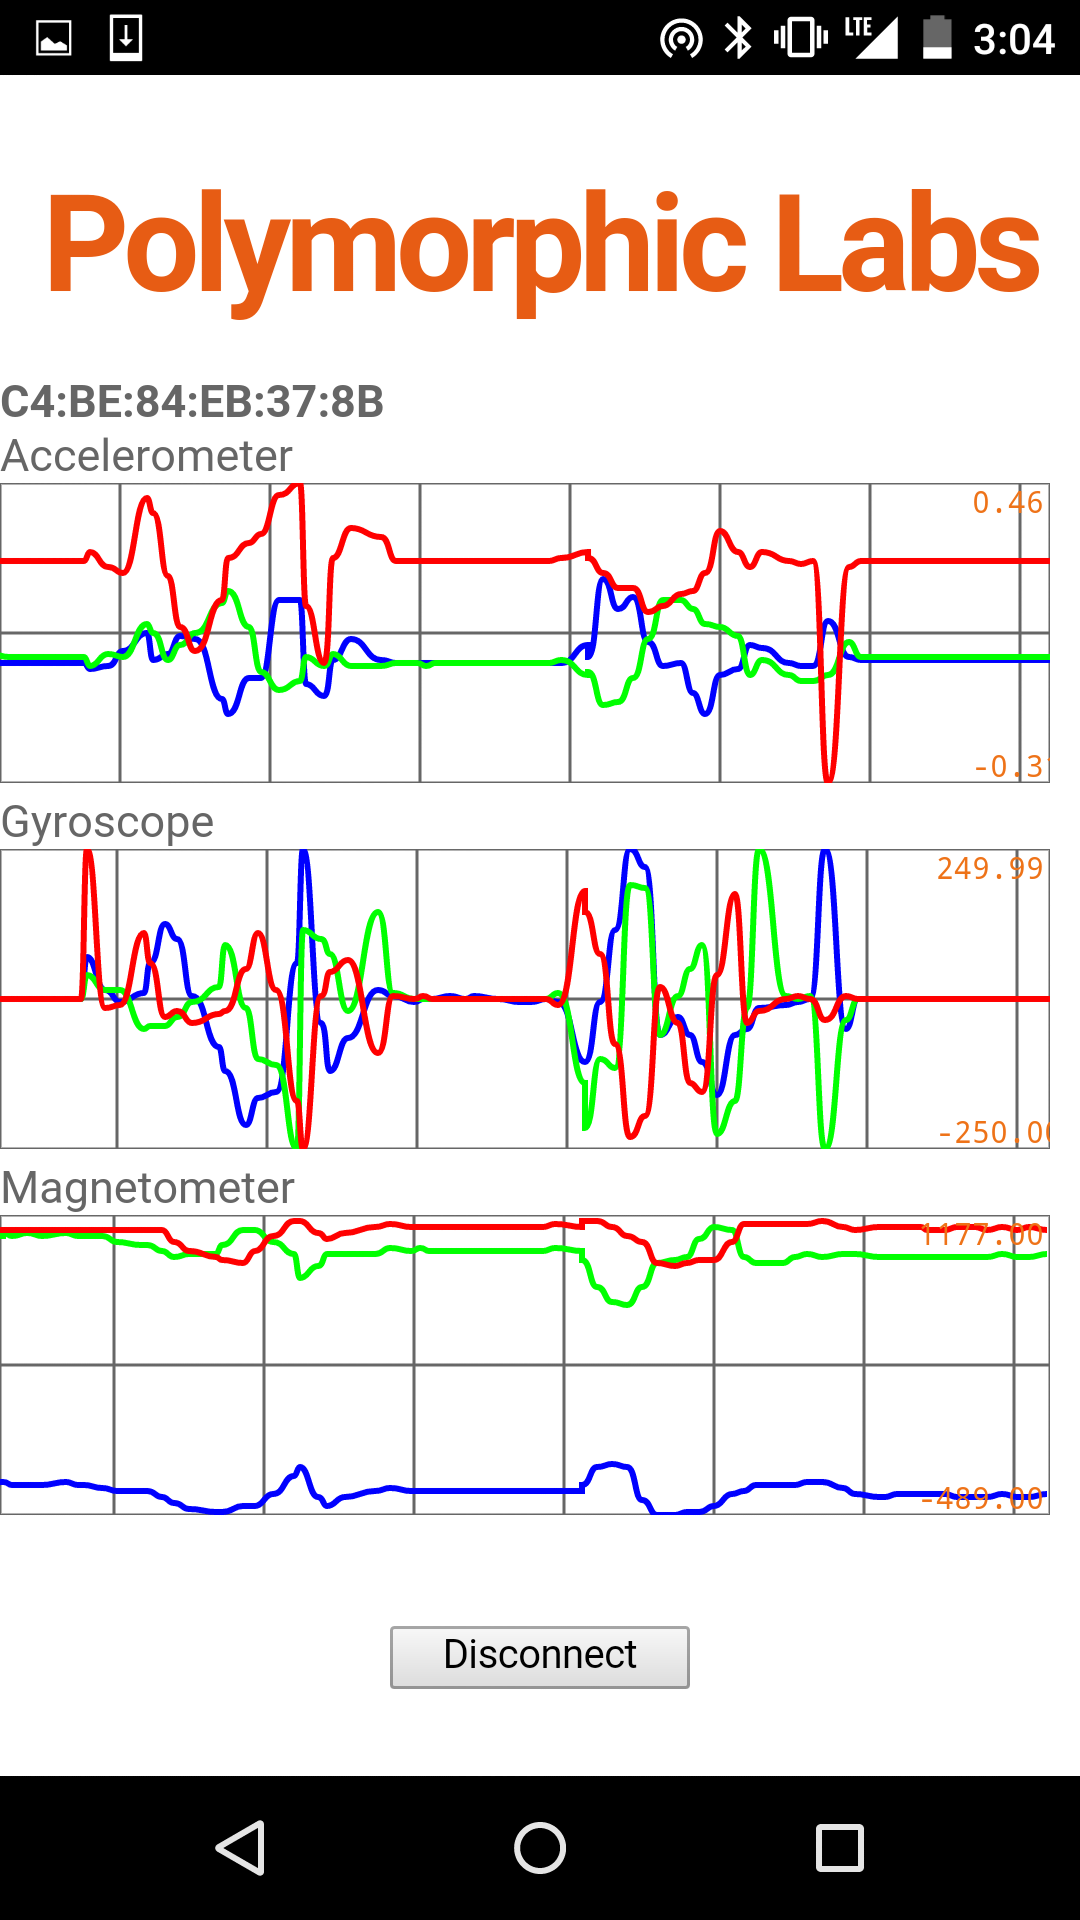
After devices are selected the user clicks on connect and the movement data is graphed:
![]()
As you can see, everything appears to be working well so far.
Graphing movement data is great, but without a solid sensor fusion algorithm its of questionable use. My next hurdle is to implement an attitude/heading reference system (AHRS) using this sensor data. In about two weeks, I'll be doing my first major field test of Polymorphic Hardware and having solid AHRS data will be critical to this test. Stay tuned for details. I guarantee you're going to want to see what I strap these sensors to...Colin Furze ain't got nothing on me...
-
Firmware Development Pt.1
04/30/2016 at 19:34 • 0 commentsDesigning and developing the complete ecosystem for a product in four months is no easy task. Hell, most people would struggle to get just the hardware to a production ready point in that time frame. This is why it is so important to make smart decisions about how you scope and design a product when you have very limited resources.
To this end, I'm starting with a working reference design's firmware and adding my special sauce on top. As mentioned previously, I'm using the TI SensorTag as my foundation. This board has a really great firmware that allows users to read all of the sensors as well as control IOs over a BLE link. You can find the original firmware in the BLE Stack from TI.
Since I'm using someone else's software, it's very important to understand how the software is licensed. Like much of TI's software, the BLE stack and it's examples are licensed under a "TI Commercial" license. Let's take a look at the meat and potatoes of it:
"The License limits your use, and you acknowledge, that the Software may not be modified, copied or distributed unless embedded on a Texas Instruments microcontroller or used solely and exclusively in conjunction with a Texas Instruments radio frequency transceiver, which is integrated into your product. Other than for the foregoing purpose, you may not use, reproduce, copy, prepare derivative works of, modify, distribute, perform, display or sell this Software and/or its documentation for any purpose."
If we boil this down to normal english, it basically says "as long as you're using this software on a TI device, you can do whatever you want with this code". Since, I'm building an ecosystem of software designed to run on a single device (which uses TI silicon), I should be OK. Additionally, any code I write myself on top of this code base I can license with a more standard open source license.
To finish up this first post on firmware, I've renamed the project, configured the board.h file, trimmed down the BLE stack package, and thrown it on github for everyone's enjoyment. You can find it here.
Please note that while this code was originally written for a TI SensorTag I have since modified it for the Polymorphic Dot. If compiled and flashed this code will not work with TI SensorTag EVM.
-
Hardware Development Pt. 1
04/24/2016 at 23:10 • 0 commentsDesigning and building a bluetooth motion tracker will be no easy task, and to that end I've decided to stand on the shoulders of some giants instead of starting from nothing. TI has a great development platform that fits this projects needs almost completely. It's called the SensorTag and its a Bluetooth Low Energy reference design that includes several different sensors. Since I've already written some Cordova training material that works with this device, basing my hardware design off this device will make this training material reusable when my hardware is available.
The SensorTag though isn't 100% perfect for this project. It's a little larger than I'd like, has more sensors than are needed for this application, and has a discrete radio layout. The discrete radio could be a big problem later down the road. If the design takes off, I'll need to comply with FCC and other countries' radio rules. A discrete layout means expensive intentional radiator tests and certifications. There are other options though...
Because of the above mentioned problems, I'll be designing and refining my own hardware. In order to make the design as flexible as possible, I wanted the finished board to be as small as possible. To this end the board is round and I'm shooting to have the finished design an inch in diameter. Next, I need to find a pre-certified FCC compliant module that is as small as possible and uses the CC2640 device in the SensorTag. There are a few out there I found, but the Sable-x from LSR was the smallest, so I chose this device. Finally, I chose to keep the Invensense MPU-9250 while swapping the SensorTag's Bosch barometer for the MS5607 from Measurement Specialties.
After I finished drawing up all the parts in EAGLE and wiring up the schematic, I came up with this schematic.
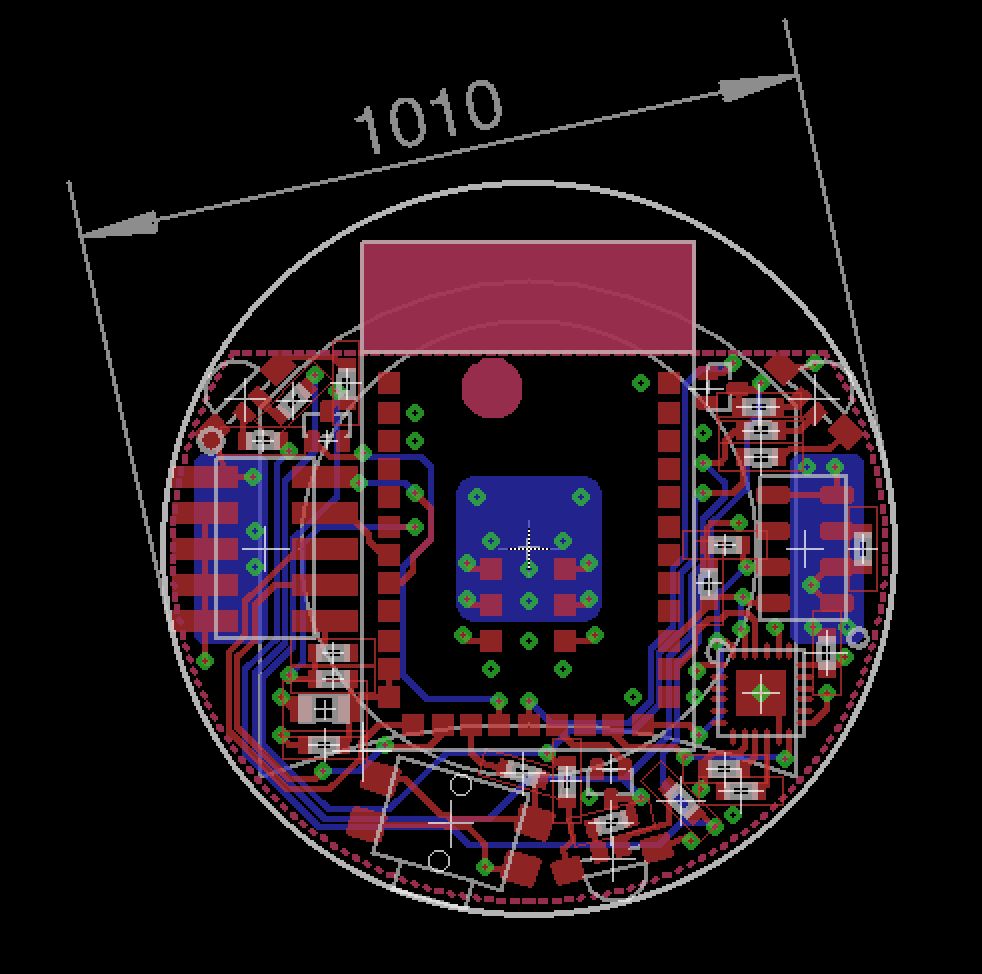
As everyone knows the EAGLE auto-router leaves a lot to be desired, so I layout and route all my boards completely by hand. It's a time consuming process, but if you want a board that is beautiful and routed efficiently there is no better way. After several cups of coffee I came up with this layout:
![]()
The board measure 1010 mils in diameter and includes:
- Sable-x Bluetooth Module
- MPU-9250 9 Axis IMU
- MS5607 Barometer
- 3x RGB LEDs
- Power/User Pushbutton
- JTAG connector
Now that I had a design I needed to get it manufactured. Traditionally, I would send the gerber files off to a PCB manufacturer, place a Digikey order, and assemble the boards myself, but I've opted for another route with this project. Because the timeline for this project is so short and this board is crazy high component density, I opted to go with a professional assembler. Thankfully, I have one just down the street from me in Houston called MacroFab. MacroFab is really cool because you can upload your whole design, pick parts, get a quote, and order boards all without ever talking to anyone. That said, the guys there are always happy to talk if you need help or have special assembly needs.
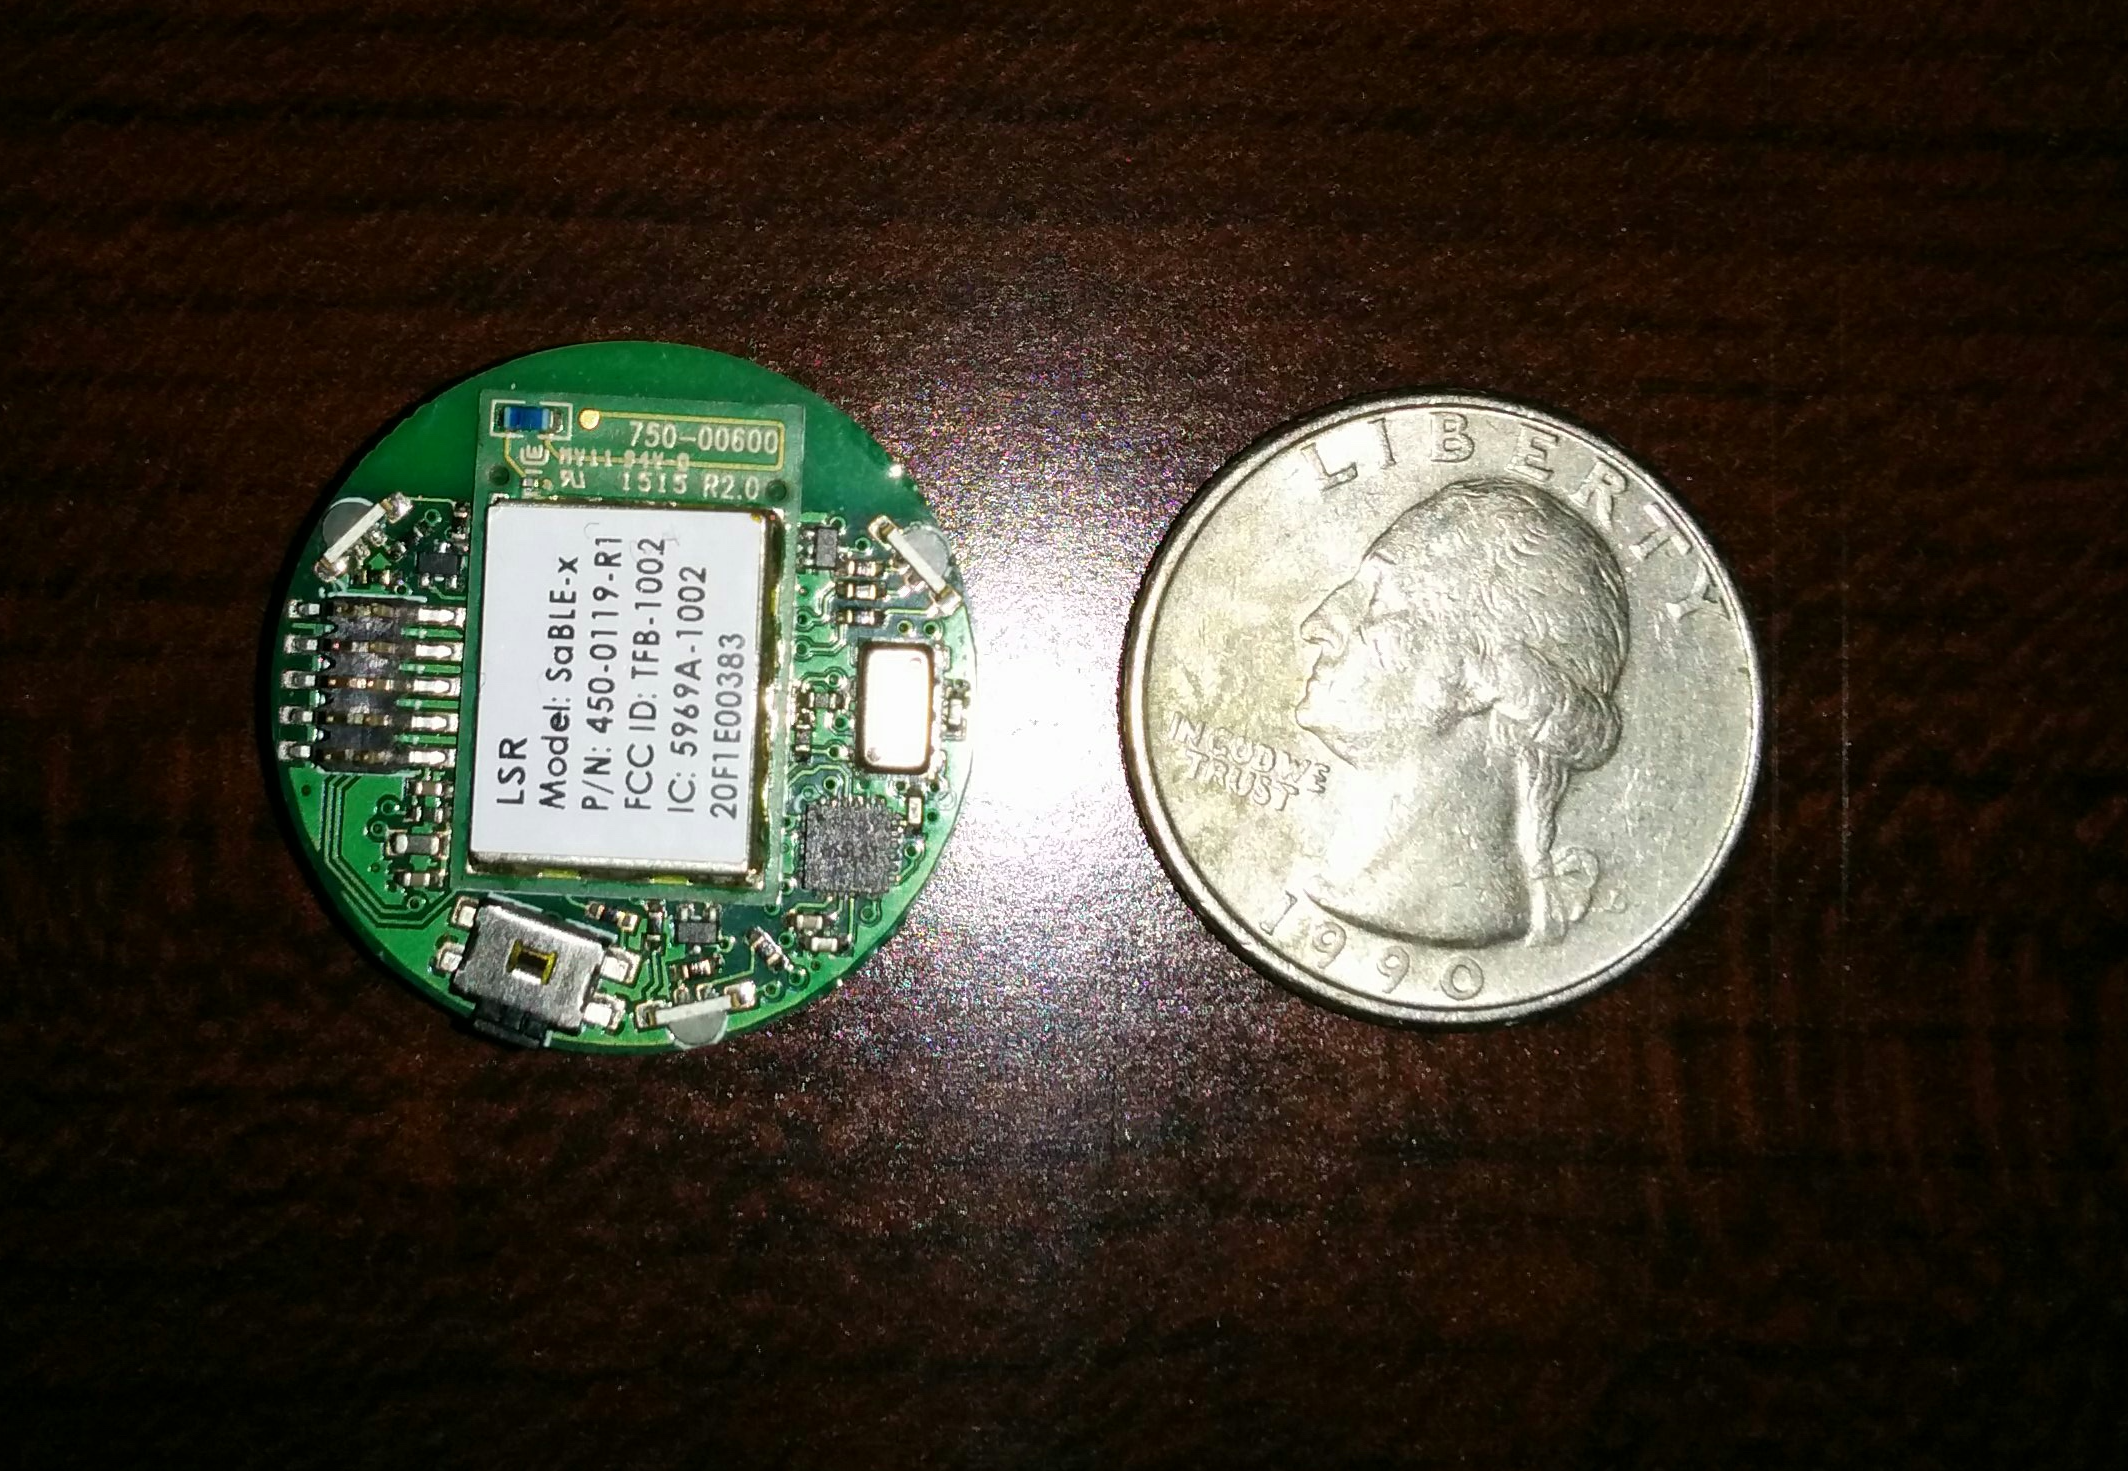
A few weeks after I placed my order, I went over to pick up the boards and I was blown away with how small they were in person. Check out this photo:
![]()
After getting the boards manufactured, the guy's at MacroFab invited me to appear on their podcast and talk about these boards. You can listen to it here.
In the coming weeks, I'll be testing the boards and starting firmware development. Stay tuned for updates and let me know what you think of the project this far! -
App SDK Development Pt. 1
04/24/2016 at 22:17 • 0 commentsAs mentioned in the details section, I'll be building a smartphone SDK using Apache Cordova. Cordova is a very easy to use tool that allows anyone to build an app using HTML5 and Javascript, the same languages that the web is built on.
Before I can build my SDK, I'll need to be an expert on both Cordova and HTML5/JS...and in my experience one of the best ways to become more skilled in a subject is to teach it. To this end, I've developed some training material for Cordova. This guide walks user's through installation, creation of their first app, app debugging, as well as how to add bluetooth connectivity to the app. You can find the guide here:
https://www.hackster.io/yertnamreg/getting-started-with-cordova-9a8ea1
To make sure the training material didn't have any kinks in it, I took a little road trip to Texas A&M University to teach some students how to build their first app.
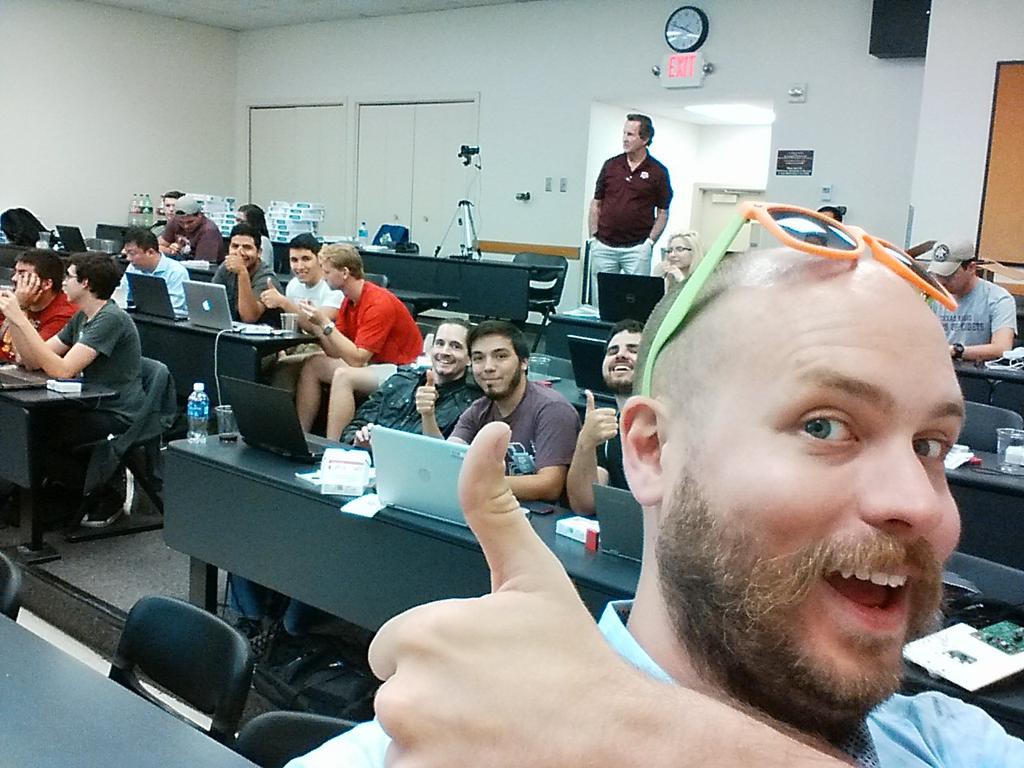
Overall the workshop went smoothly and ~30 students were able to build apps that graphed accelerometer data coming in over a bluetooth link.![]()
Polymorphic Hardware
Applying polymorphism to hardware enables users to do more with their devices while avoiding IoT pitfalls.


 The final piece I wanted to add to the app was a map. This would prevent me from constantly having to switch between my paragliding app and Google Maps. While I could use the standard javascript Maps API, I found a better solution for Cordova apps:
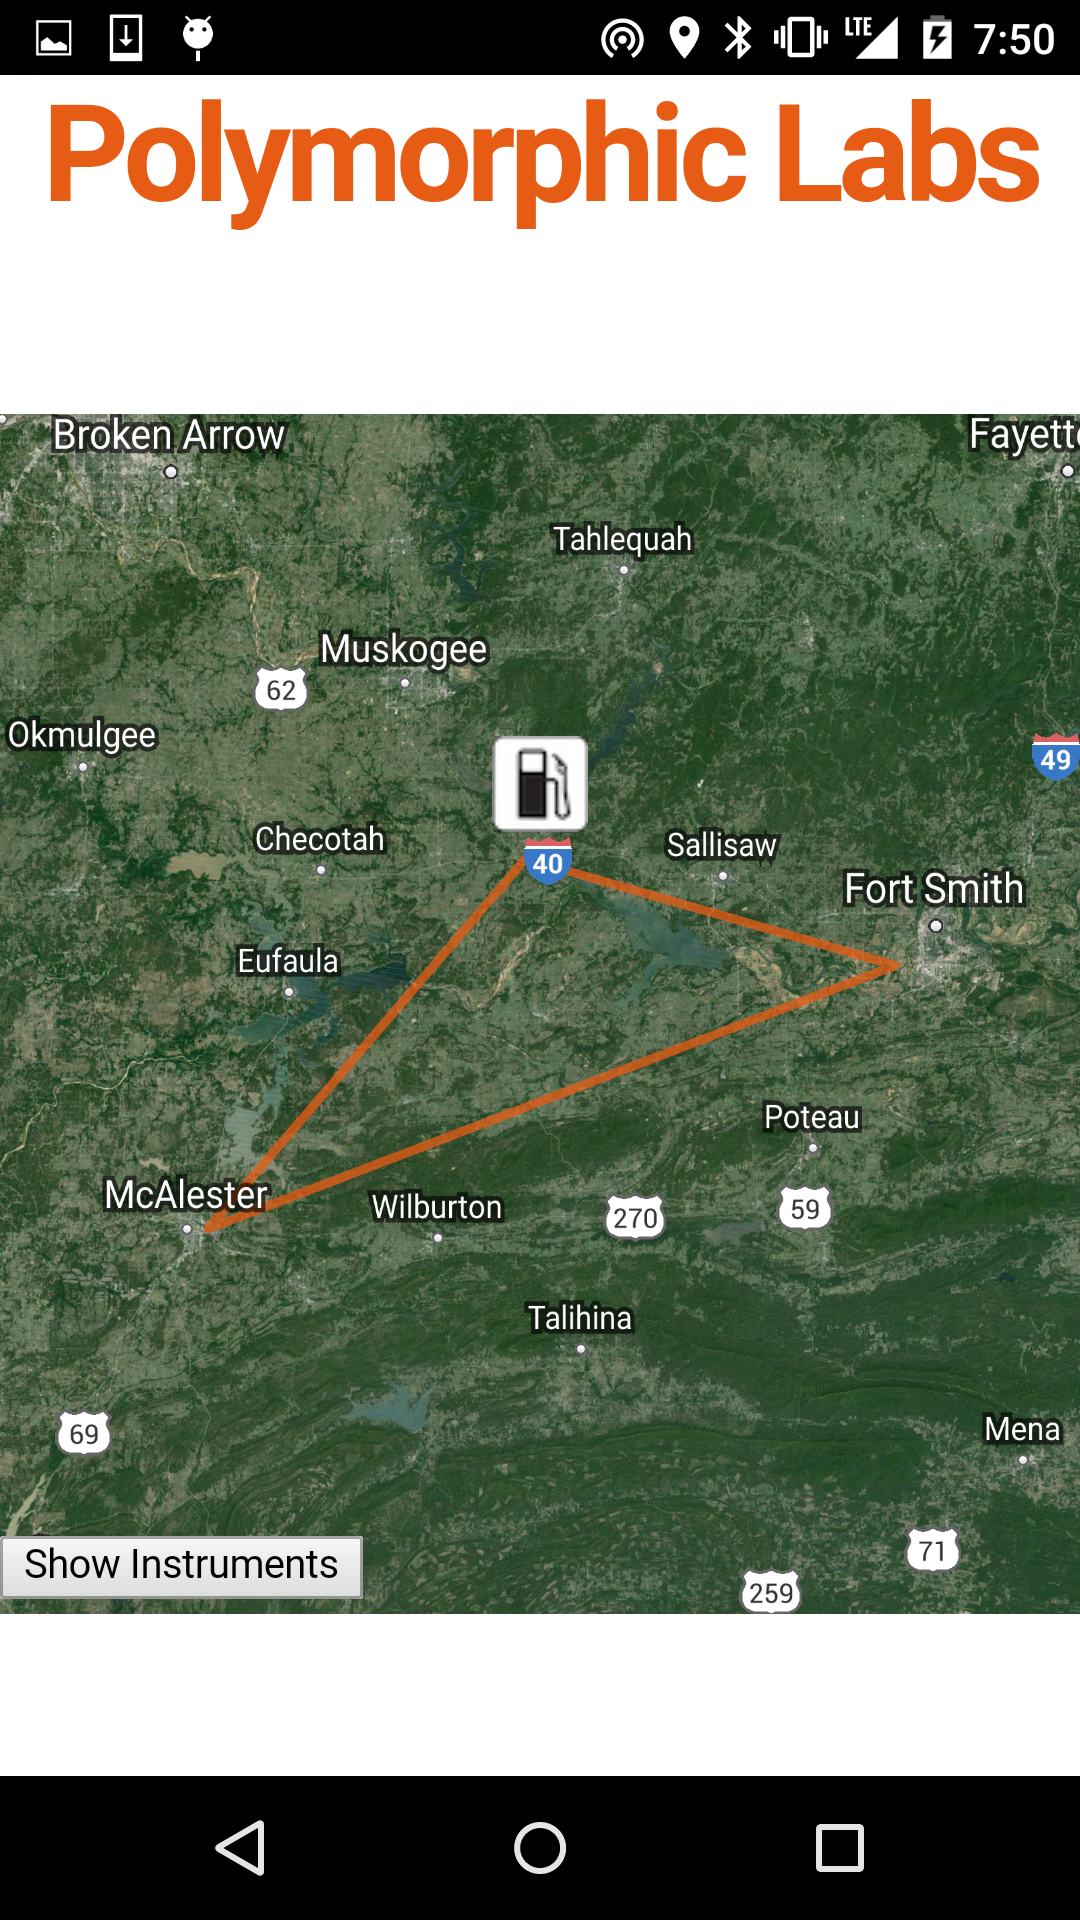
 Just like any other piece of software, the SDK will be made up of a stack of other pieces of software: