Close
0%
0%

MIDI Hi-lites

MIDI controllable LED strips that attach to your MIDI keyboard to light keys for music education and entertainment.

Similar projects worth following
Learning to play music on a piano keyboard is HARD. Let's put lights on the keys to tell you which keys to play!
- OR -
Pressing buttons on stage is boring. Let's put lights on the MIDI keyboard keys that light up when you play so that your performance will be more interesting looking!

So, for the Hackaday World Create Day 2016 meetup, I wanted to create a useful project that anybody could build that involves music and electronics. So I came up with the idea of using widely available individually addressable LED strip technology with MIDI to make lights that go under the keys on a MIDI keyboard (and above the black keys) to show what key should currently be played.
By playing a simple MIDI file to the device, the keys that should be pressed would light up .

Possibly, custom PC software could be created that could show the required keys in advance of their the need to play, and judge the user's performance in hitting them at the correct time.

For the working musician, the lights could be attached directly to the MIDI output of the keyboard being played to simply light the keys that are currently being played. Playing the notes could trigger light animations that could make the performance more interesting.

  • 1 × Arduino Arduino Uno or better
  • 1 × 6N139 Optoisolator / Optocoupler For MIDI circuitry
  • 3 × 220 Ohm Resistor For MIDI circuitry
  • 2 × 1.8k Ohm Resistor For MIDI circuitry
  • 1 × 100nF Capacitor For MIDI circuitry

View all 8 components

  • Interfacing the LED strip to the Arduino

    T. B. Trzepacz04/24/2016 at 07:53 0 comments

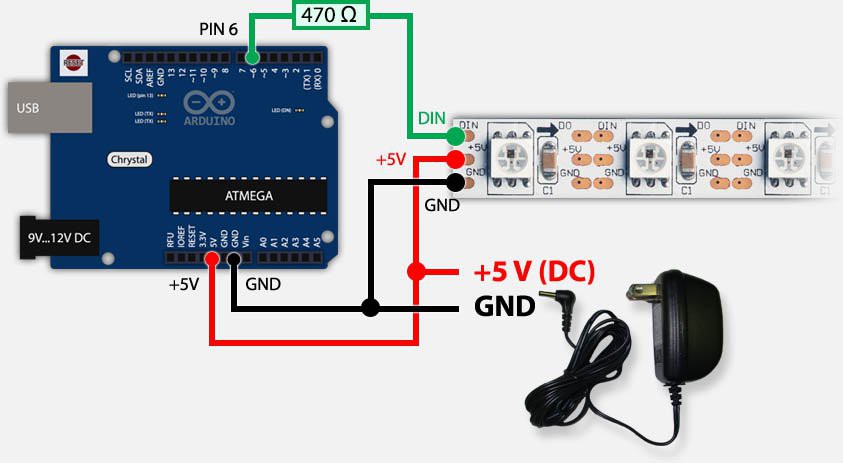
    So the WS2812 LED controller is a very standard part, and it is well supported in the Arduino ecosystem. Tweaking4All has a very pretty page all about it, and the interfacing couldn't be simpler.

    One 470 Ohm resistor and a 5 volt power supply, and you've got an LED strip!

    But how to control it? Well, it uses a bit of a timing dependent method of clocking out the bits that I haven't bothered to learn, so I just use the lovely NeoPixel library from Adafruit. They even have a great PDF manual that gives you all of the technical details you need. Again, there are plenty of examples on how to use it, so I greatly suggest trying a few of those.

    I guess I've done about as much research as I need to do at this point, so the next step is for me to actually order some parts and stick them all together so that I can start writing some code!

  • Adding MIDI to the Arduino

    T. B. Trzepacz04/24/2016 at 07:40 0 comments

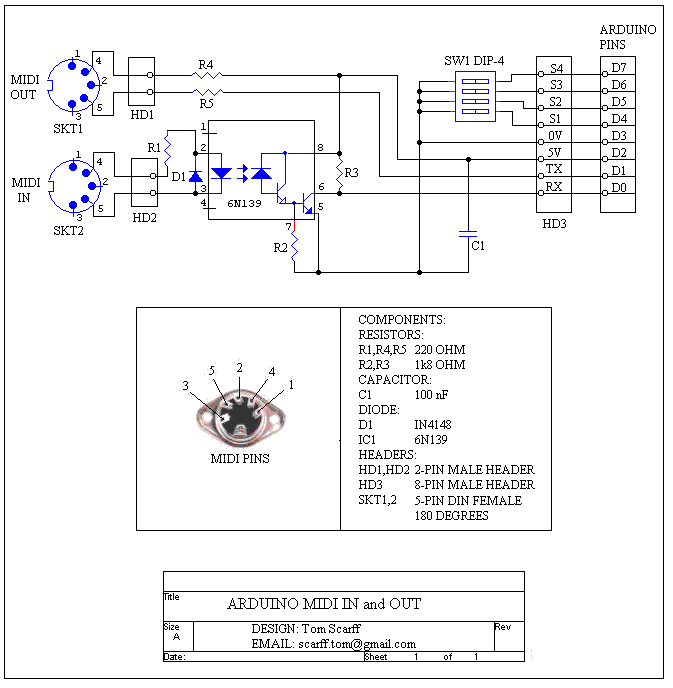
    Tom Scharff at MIDIkits.net has made a lovely board available, so one could either purchase that or else just build one from the schematics for Arduino MIDI board he kindly makes available.


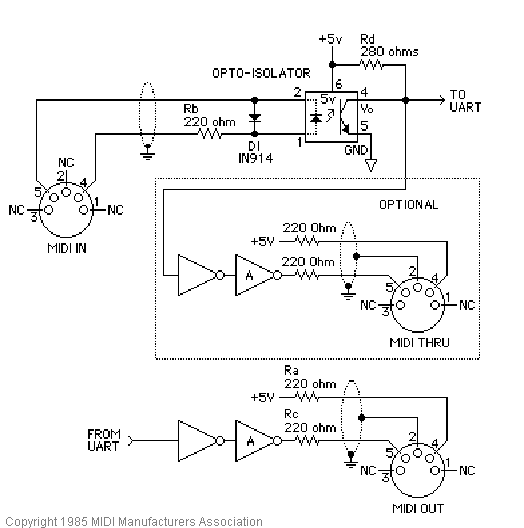
    One can ignore the DIP switch in the design. It is also not so dissimilar from the schematics on the official MIDI.org MIDI electrical specifications site.


    Although this project only needs the MIDI in, I would probably include the MIDI out in order to pass thru the MIDI signal for chaining. Or I might try to implement it as per the official MIDI spec above (it it in the OPTIONAL box.)

    Now, as far as software goes, there is a very nice MIDI library available from Fourty Seven Effects and included in the Arduino Playground that you can very easily use. It has recently been updated to use the MIT license which makes it available even for commercial, non-open source projects! There are plenty of examples that come with it to show you how to use it.

  • Will it fit?

    T. B. Trzepacz04/24/2016 at 07:12 0 comments

    So the first question is: will a standard 60 LED x 1 meter WS2812 strip correctly align beneath the white keys on a keyboard and above the black keys? So I did some research/

    From http://music.stackexchange.com/questions/20290/is-there-a-standard-width-for-piano-keys :

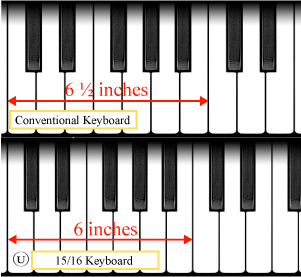
    Wikipedia describes the width of an octave on a modern keyboard as 164-165 mm.

    Piano Keyboard Dimensions at MIT College of Music

    I personally measured mine as about 6 3/8" or ~161mm
    An octave contains 7 notes, so each white key is between 23 and 23.57 mm apart.
    And 1 meter = 100 cm, so 100 cm / 60 LEDS = 1.67 cm, or 16.7 mm.

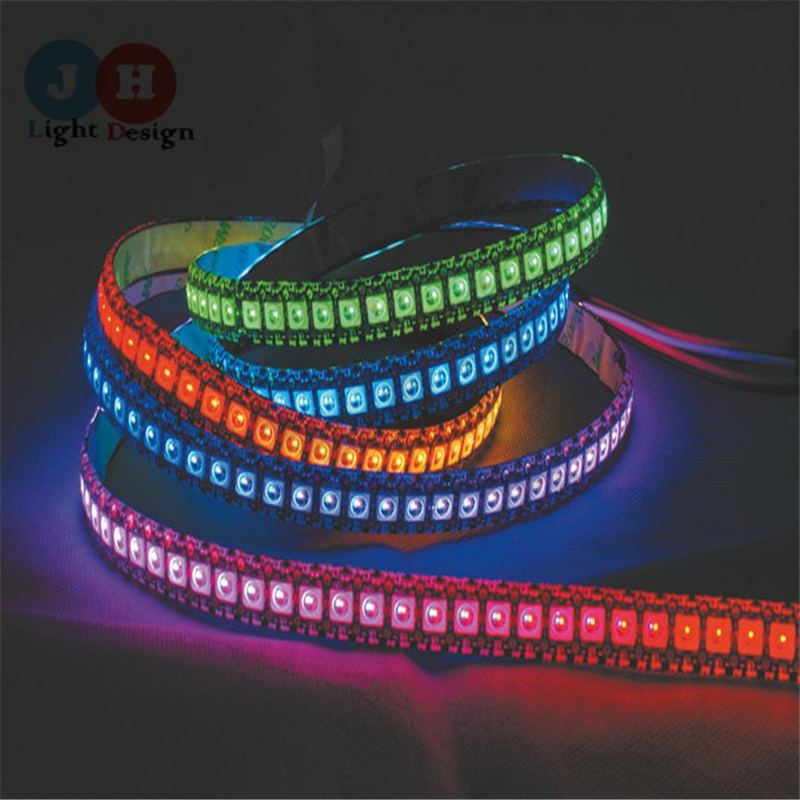
    So, it looks like we will need to wire spacers between each LED to get it spaced properly. There may be other (more expensive) LED strips with a higher or lower LED density. Ideally, it seems like about 43 LEDs / meter will give a 1:1 LED to key ratio, but that seems unlikely to find. I found a 144 LED/m strip on Alibaba for just $20, which gives roughly 3.3 LEDs per key so that would probably be the best bet. Just light the LEDs closest to the location of each key and save ourselves a lot of soldering!
    http://www.aliexpress.com/item/1M-WS2812-Led-Strip-144-pixels-m-5V-SMD5050-Epistar-Rgb-White-PCB-Rope-Light-IP65/32554751653.html

    144 Pixel/meter WS2812 light strip


    Or break out each LED and solder them. Be my guest!

View all 3 project logs

Enjoy this project?

Share

Discussions

wapata.31 wrote 04/25/2016 at 10:59 point

It seems to be cool ! Is it working with Synthesia software ?

  Are you sure? yes | no

Similar Projects

Does this project spark your interest?

Become a member to follow this project and never miss any updates