Features
- Shows date and time on serial monitor.
- Shows date and time on a mini LCD.
- Alarm clock - turn ON or turn OFF an IO pin.
- Settings can be set via serial interface or push button switches.
- Keeps time running after electricity failure.
- Using an Arduino UNO & a LCD Keypard Shield.
- Using a DS1307 RTC module.
Software Library
You need to download and install the following libraries before you can upload sketch to your Arduino.
- Time.h
The Time library adds timekeeping functionality to Arduino with or without external timekeeping hardware. This library is often used together with TimeAlarms and DS1307RTC.
- DS1307RTC.h
Allows you to access real time clock (RTC) chips compatible with the DS1307.
LCD Keypad Shield
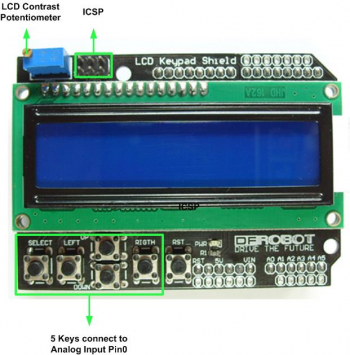
The LCD Keypad shield includes 6 momentary push buttons and a blue backlight LCD which can display two row of 16 characters. The buttons are connected to only one analog input (A0) in order to saving on input/output pins.
Pin Allocation
| Pin | Function |
| Analog 0 | Button (Select, Up, Right, Down and Left) |
| Digital 4 | DB4 |
| Digital 5 | DB5 |
| Digital 6 | DB6 |
| Digital 7 | DB7 |
| Digital 8 | RS (Data or Signal Display Selection) |
| Digital 9 | Enable |
| Digital 10 | Backlit Control |
DS1307RTC Module
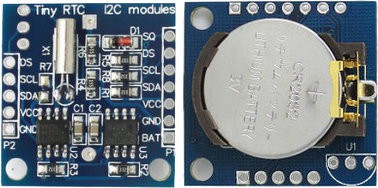
The DS1307 serial real-time clock (RTC) is a low- power, full binary-coded decimal (BCD) clock/calendar plus 56 bytes of NV SRAM. DS1307 works on I2C protocol which can interfaces to most microcontrollers.
A 3 volt lithium coin cell battery (CR2032) is connected to the DS1307 which keeps time running after electricity failure. The DS1307 has a built-in power-sense circuit that detects power failures and automatically switches to the backup supply.
The module also include a 24C32 32K I2C EEPROM which is not using in this project.
Source Code
This project includes three examples that shows how to display real time on a LCD display with or without using a RTC module.
- LCD Digital clock without RTC module.
- DS1307RTC LCD Digital clock.
- DS1307RTC LCD Digital clock with Alarm.
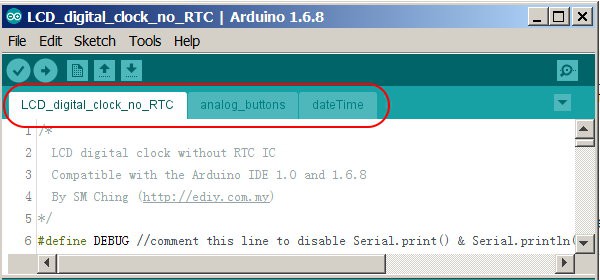
The Arduino code is breaking into multiple files which make it more readable and hence easy to maintain.
Key Functions
| Keys | Function 1 | Function 2 |
| Left | Set Time | |
| Right | Set Date | |
| Up | Set Alarm Time | Increase value by one |
| Down | Disable/Enable Alarm | Decrease value by one |
| Select | toggle between 12 or 24 hour format | Accept input |
Set Date/Time via Serial Interface
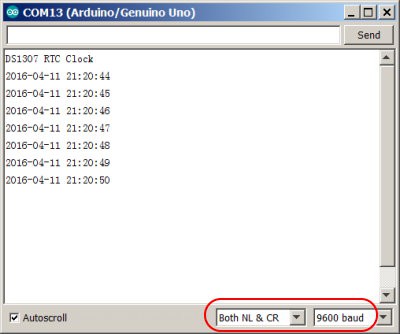
- Run the Serial terminal.
- Make sure you have selected the the correct COM port.
- Make sure the baud rate is set correctly at 9600 bps. You should see the following:
- To set the system date, send a string to the serial port with the following syntax:
Dyymmnn
E.g. D160415 will set the system date to 2016 April 15th - To set the system time, send a string to the serial port with the following syntax:
ThhmmssE.g. T012345 will set the system time to 1AM 23minute 45seconds - To set the Alarm time, send a string to the serial port with the following syntax:
Ahhmmss
- Push the Right button in order to change the system date.
- Use the Up/Down buttons to change the date.
- Push the Select button to accept changes.
- Timeout will occur after idle for 10 seconds, changes made will not save.
- Push the Left button in order to change the system time.
- Use the Up/Down buttons to change the time.
- Push the Select button to accept changes.
- Timeout will occur after idle for 10 seconds, changes made will not save.
- Push the Up button in order to change the alarm time.
- Use the Up/Down buttons to change the time.
- Push the Select button to accept changes.
- Timeout will occur after idle for 10 seconds, changes made will not save.
- Push the Down button to disable or enable Alarm.
- If Alarm is enabled, its time is shown on the right corner of the LCD.
- If Alarm is disabled, its time is hidden.
 eDIY
eDIY
 Chris B
 mircemk
Thanks for sharing this in such a clear and objective manner. I was able to clone the entire setup in less than 10 min with equivalent modules. Such a generous gesture. Thank you.