Close
0%
0%

FireCoates

Motorcycle jacket that mimics signals using input from motorcycle brake and turn indicators for additional visibility.

Similar projects worth following
The goal is to create a motorcycle jacket that can signal the turn and brake lights mimicking the signaling output of motorcycle indicators, manage to do it wireless so I am not tripping over cables when getting off the bike, and make it rechargeable yet able to last at least a days worth of ride time.

The idea has been expanded to a vest and a different source module that could tie into a bicycle brake lever[s] and include a left/right thumb switch to assist with visibility and signaling on a pedal bike, though that prototype has not been built out or documented at all yet.

If anyone would be interested in trying to expand the versatility of this project I would be happy to add to the team, I have a new addition to the family so my progress and researching funds are a bit sidetracked currently. I am still making progress with component and design upgrades but much slower than I prefer.

Coates is my last name in case anyone thinks I spelled it wrong.

I came up with this idea back in early 2012 and have been picking at it since.  Ive had a prototype working since spring of 2013 and have put over 3,000 miles on the prototype.  I was holding the concept back to try and patent and productize it but never really felt comfortable with the results of research on how interested people might be for such a product. I stuck with arduinos to encourage a hacker community but decided in the end releasing open source is the best way to encourage hackers, makers, and innovators alike.

My original main design goals were size, reliability, and cost.

Size is still a factor I am unhappy with and will continue to revise using different hardware.

Reliability comes from the use of the light pipe instead of flexible LED strips or EL wire/panels. Flexible LED strips and EL wire can only sustain so much flexing and stretching before failure and I didnt feel that was acceptable. The light pipe works amazingly well and limits electrical components to only 2 LEDs and the flexible stranded wire routed through the jacket to power them.

Cost has been kept down to around $100 total(I think currently I am actually closer to $80) for the project not including motorcycle jacket of choice, the end goal was to be able to mass produce the configuration including the jacket for $150 or less to allow for a 30% wholesale markup for profit, and another 15% to 20% at retail while still retaining competitive pricing with other jackets($300 motorcycle jacket is still considered middle of the road for many). Not that this information is particularly useful to anyone now that the project is open source, it at least shows that it can be built and implemented without breaking the bank and it is within feasible manufacturing costs if someone wanted to take that endeavor on.

View all 21 components

  • Differences in Light Pipe

    GearheadRed05/16/2014 at 04:17 0 comments

    My original prototype uses different LEDs(about half the MCD) and the 3.5mm light pipe in the parts list. Since that prototypes assembly I have experimented with different LEDs and larger diameter(6mm) light pipe. The parts list only shows the newer LEDs of choice, but includes both versions of the light pipe since that is to some extent a design choice.

    The 6mm diameter light pipe is far more visible and brighter than the 3.5mm, however it is stiffer and somewhat harder to work with.  Any future jacket prototypes I make will be using the 6mm diameter light pipe.

    The current prototype version I have made using the 3.5mm light pipe and dimmer LEDs is fairly difficult to see the actual signals during daylight, however at night it is quite apparent. Switching to the larger 6mm light pipe and doubling the MCD of the LEDs hopefully should help aide in that issue some, but I have not upgraded the prototype jacket for outdoor tests yet.

  • Idea for Miniturization

    GearheadRed05/16/2014 at 04:04 0 comments

    I have been looking for alternative hardware options to help with miniturization. Also to help with production costs attempting to re-use the same components. I came across a bluetooth bee style module with an arduino built into the same board.

    http://amzn.com/B0083DL0SW

    That will cut down on space requirements quite a bit. The header pins would allow for a secondary board of the same shape to plug right in, which could hold voltage regulators for the bike module, and could hold the LiPo charging circuit and a surface mount headphone jack or two for the jacket wiring connections on the jacket module.

View all 2 project logs

  • 1
    Step 1

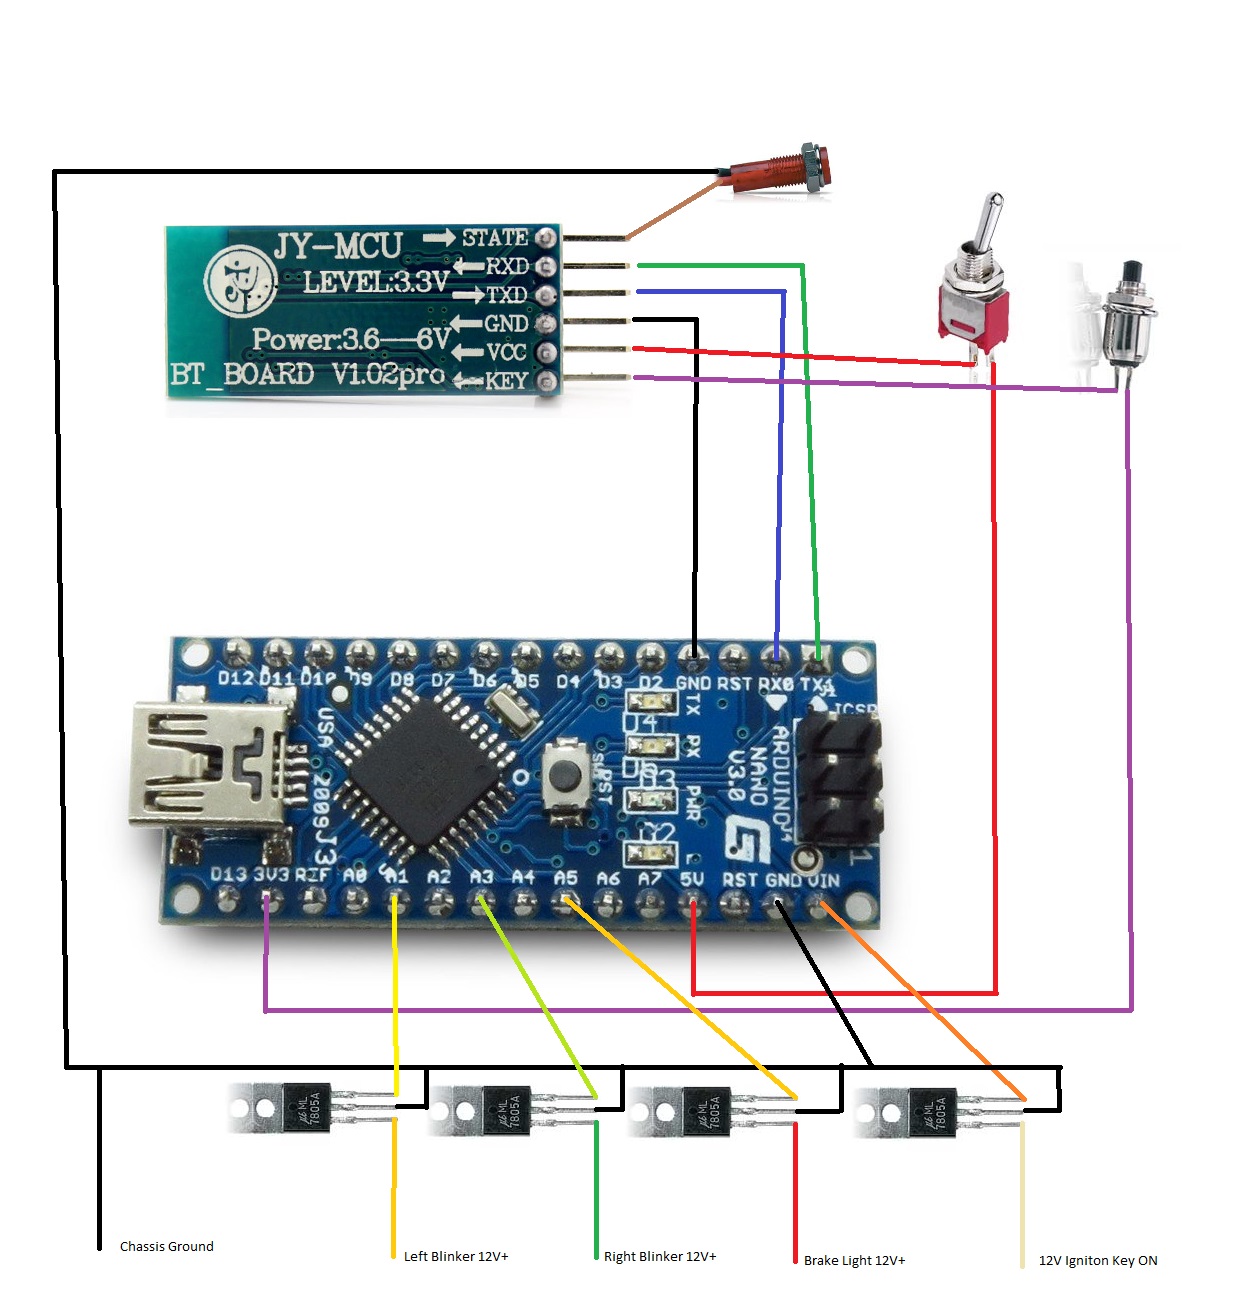
    Bike Module

    Wire up the bike side module. I made up a really straight forward picture for this:

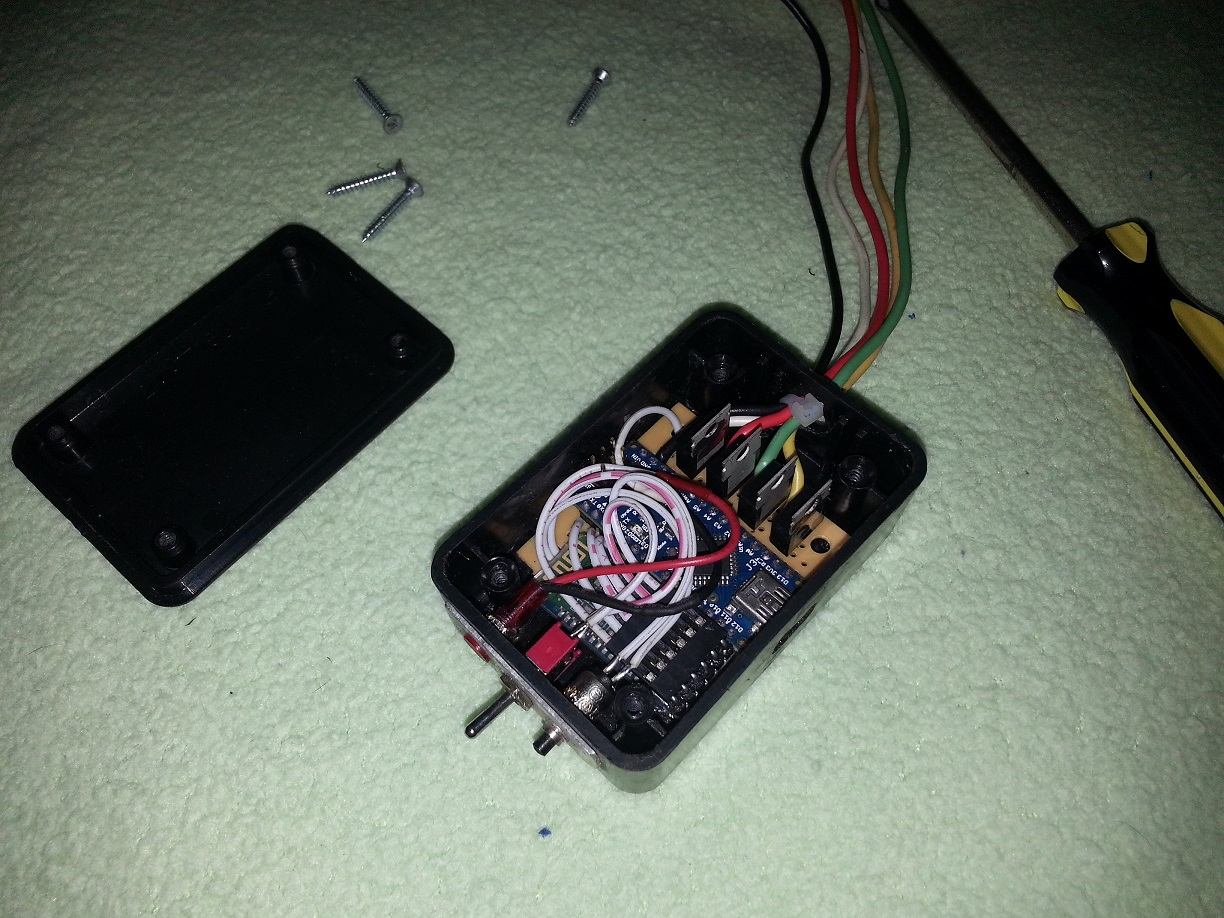
    You can solder everything down to one of the mini perf boards to hold everything solid and mount it into the project enclosure like I did, or design your own assembly method and enclosure. I was lazy and skipped designing a printable case or custom etched primary board for this part as design was not as large of a concern with it being mounted within a motorcycle chassis.

     [NOTE IMPORTANT: mount this module away from heat sources like exhaust or oil reservoirs on motorcycle chassis unless you enjoy melted stuff and fires.]

     Program the Arduino with the BikeModule.ino sketch from github.

    No changes to the sketch should be necessary provided you followed the wiring diagram above, but feel free to modify the wiring and sketch as you see fit for your particular design/needs.

    Operation:

    The mini switch turns off the Bluetooth module, which allows for the USB reprogramming of the Arduino. Turn on the mini switch and the indicator light will start blinking. This is the bluetooth module attempting to pair with a jacket module.

    If the module has already been paired the light will blink until a connection is established with the jacket module, and then the indicator will remain steady on.

    If the module has paired and you would like to release the pairing to pair with a different jacket module, press the SPST Momentary Switch to release the pairing.

    It is suggested to only have one jacket module turned on and within range of a bike module at a time during pairing operations.

  • 2
    Step 2

    Jacket Module

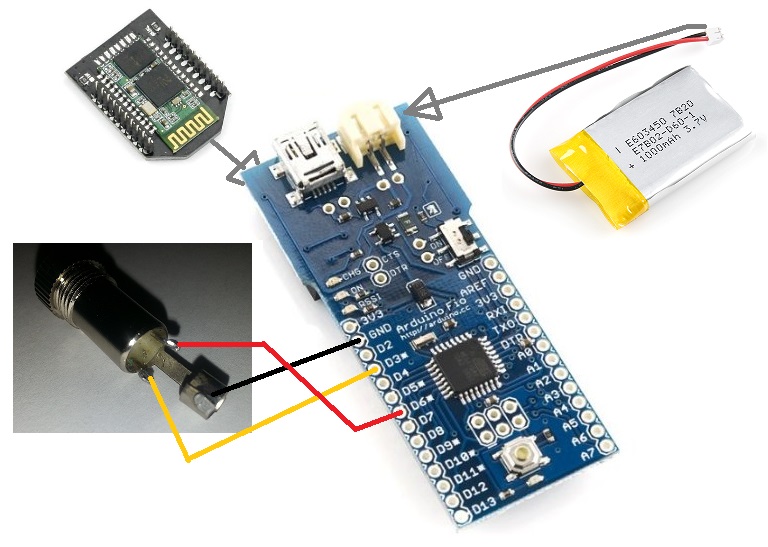
    The jacket module is even simpler to set up than the bike module. The image below is a diagram for the setup of the jacket module. It is extremely simple as everything is socketed aside from the headphone jack.

    You will need to hook up an FTDI module to program the Arduino Fio with the JacketModule.ino sketch from github. The USB port on the board is only used for charging the LiPo and powering the Arduino.

    No changes to the sketch should be necessary provided you followed the wiring diagram above, but feel free to modify the wiring and sketch as you see fit for your particular design/needs. A fair warning, if you intend on altering the coding often make sure you make considerations to easily access the FTDI programming pins.

    [I would include a picture here of it inside an enclosure but I have included an optional 3d printable case design and instructions down on step 4 and nobody likes redundant images.]

    Operation:

    Make sure the LiPo battery has been charged. The orange CHG light will light while the unit is charging. Once fully charged the light will go out.

    Plug the headphone jack from the jacket wiring into the jacket module.

    Turn on switch for the jacket module. The bluetooth module LED1 light will start blinking as it waits for the bike module to pair with it.

    When the bike module pairs with the jacket LED2 will light up steady. From this point any blinking from LED1 is indicating communication with the bike module.

    [INITIAL Testing: After first pairing, check communication by signaling both blinkers and triggering the brake on the active motorcycle to make sure the jacket matches the output. If something is backwards or not signaling on the jacket as expected check the bike module wiring to make sure the correct wires have been tied in with the correct bike light wires. If you continue experiencing issues feel free to comment on this project and Ill do what I can to help.]

    Stuff the module into an inside pocket on your jacket and you are ready to ride.

  • 3
    Step 3

    Jacket Wiring, LED Setup, and Light Pipe Assembly.

    I never took pictures of this process with the first prototype so I need to complete the second prototype and take pictures to use as visual aides along the way, I should have them up in another week or so. I may end up designing some nice 3d printed LED holders for mounting too.

    First off we need to get the Light pipe set up. Measure the length of the light pipe and cut it into two equal length pieces. Press one end of the light pipe onto a piece of tin foil and cut out a small disk using an X-Acto knife. This disk is placed between the two segments of light pipe to prevent the signals from bleeding into each other from the opposite end, and act as a mirror to help brighten up the end of the pipe that lacks an LED. [In the future there are plans to experiment with dual LED terminated segments, along with additional pipe segments that can be programmed to operate in a different manner].

    Cut an inch and a half length of clear heat shrink. Insert the Light pipe, aluminum foil disk, and other segment of light pipe. Center the aluminum foil disk in the middle of the heat shrink. Press both lengths of the light pipe and sandwich the aluminum foil firmly. Heat the heat shrink tubing with a blow dryer or heat gun(do not use flame as it could discolor the light pipe) to lock the light pipes and aluminum foil into position. Continue to apply pressure sandwiching the aluminum foil until the heat shrink has cooled.

    Lay out the pipe on the back of your jacket in the configuration you see fit, making sure to keep the heat shrink tube centered in the middle of the jacket. Curves are acceptable, just try not to have any tight radiuses so the light will continue down the pipe well. You can get a bit creative here. The only point to remember is the more light pipe used, the dimmer the pipe will end up becoming towards the middle when the segments are longer than around eight inches(depends on curves and LED brightness).

    Attaching the light pipe to the jacket is still a work in progress as far as trying to find the best method. Currently I am using some 100lb test fishing line and sewing it into the jacket about every inch and a half, then using super glue to lock the knot and seal the holes in the leather where the fishing line penetrates. This is not the easiest method since puncturing leather in general is a difficult process but it does work and I have not had any issues yet with it failing to keep everything together. I eventually would like to find either light pipe that has a sewable welt along the edge or some clear sewable hollow piping that the light pipe can be pressed into.

    Locate an inner pocket in the jacket where you would like to have the headphone jack come out at. Next locate the two points where the light pipe terminates on the jacket. Determine the best path from each end of the light pipe to the pocket. You will need to route a length of 24 gauge speaker wire from each light pipe end into the pocket, I found using a piece of stiff wire to push from one end to the other and then using it to pull the wire through the jacket saves a lot of time and energy. Leave enough length on both ends for trimming, and to pull the jack out from the pocket to easily plug in the module.

    At this point determine which legs of your LEDs are positive and negative to prevent issues and confusion as you solder up the wiring and resistors.

    If you have standard resistors instead of SMD resistors, it is easiest to solder them into the headphone jack. Cut them short and solder one each to the left and right leg. Slide the headphone jack cover up the wires. Next slide a length of heat shrink up the wire coming from the right side of the jacket and solder the wire to the right headphone jack leg. Do the same with the wire coming from the left side of the jacket on the left headphone jack leg. Finally solder both ground wires from each side to the ground leg. Slide the headphone jack cover down and screw it in place. At the light pipe ends solder the ground and positive wires to each LED.

    If you have SMD resistors it seems to be easiest to solder the wiring directly into the headphone jack, we will use perf board and create a mount for both the LED and resistor at the light pipe ends. Cut the perf board to approximately a 3x3 hole square. Solder the 4 legs of the LED in place, then solder the ground wire to the negative side of the LED. Next solder the SMD resistor down to the board at the positive LED end, and solder the positive wire to the SMD resistor.

    At this point it would be a good idea to plug the module into the headphone jack on the jacket and test to ensure the LEDs are lighting as expected. You can do this by either connecting with the bike module and pulling the break/using the blinkers, or by connecting the jacket module over bluetooth to a computer and using the arduino console to send "HH\n" to the module(excluding the quotes).

    Eventually I want to design some 3d printed LED holders for mounting that will hold the LED securely and capture the end of the light pipe, they will also provide some points for sewing down on the jacket as well. Until then I am using more heat shrink tubing. Cut an inch and a half length of black heat shrink tubing and slip it over the LED far enough to cover some of the wire as well, then slip the other end over the light pipe. Press the LED to the light pipe firmly making sure the pipe is centered on the end of the LED. Heat the heat shrink tubing with a blow dryer or heat gun(do not use flame as it could discolor the light pipe and damage the LED) to lock the light pipes and LEDs into position. Run a little superglue around the wire and heat shrink to ensure a watertight seal, the light pipe and heat shrink should seal up nicely by its self. Push any excess wire back into the jacket and then superglue around the wire to prevent it from pulling and damaging the LED and to seal the hole. Finally Run one last stitch of fishing line over the ends of the light pipe where the heat shrink is, and superglue from the fishing line back to the end of the LED within the heat shrink tubing. 

    I know the superglue concept does not sound as appealing on a motorcycle jacket as you would imagine, but it works extremely well with the leather. If you use a careful hand so as not to allow for drips the superglue is not noticeable in most cases. The fishing line can be seen slightly if someone is inspecting up close so aesthetically it is not the best but it works quite well without blocking any light emission from the light pipe.

    Again, sorry for lack of images on this section, I will work to get some pictures made and added soon.

View all 4 instructions

Enjoy this project?

Share

Discussions

thekeeper25 wrote 10/05/2015 at 18:01 point

so i'm really interested in this project and was wondering if you thought about using a textile jacket instead. Mounting the light pipe on the inside of the jacket instead of the outside. Would the light pipe be bright enough to shine through it?  The only reason i'm considering this is so i don't ruin my leathers with stitching. something about stitching into my 700$ leather jacket doesn't sound good.

  Are you sure? yes | no

Eric Evenchick wrote 05/19/2014 at 09:35 point
Looks like the next step in miniaturizing that is to build your own board for it. Maybe use a smaller RF module that mounts directly to that board... should be able to get it pretty small.

How do you sense that the break lever has been pulled?

  Are you sure? yes | no

GearheadRed wrote 05/19/2014 at 13:33 point
I had considered trying to design my own board and skip arduinos back when I was looking more at making it a patented product, but for the masses as an open source project it seems more accessible sticking with generally open source hardware that has already been designed and mass produced. That being said Im sure as I get the next prototype finished Ill end up making something custom to see how small I can actually make it, and if I do anything I designed to produce the board will end up on here as well.

The brake lever along with the left and right blinkers are sensed using the 12v+ lines running to the rear bulbs. You just tap into the brake light and left/right blinkers very similarly to how you would if you were adding a trailer wiring harness to your car. The bike module senses either high or low on those lines and sends that information to the jacket. There are other points on the motorcycle you could tap into for signal sensing but this is the simplest and most guaranteed functional method across all makes and models.

  Are you sure? yes | no

Similar Projects

Does this project spark your interest?

Become a member to follow this project and never miss any updates