nathan.andrew.williams
-
Use cases
08/19/2014 at 09:40 • 0 commentsSo what can you do with Iota?
Iota is a simple framework that is flexible enough to cover many different uses.
Home automation
Perhaps the most obvious use case is to automate your home.
Create rules based on the time, the light levels, temperature, humidity or anything else you can sense to activate lights, open blinds or even send emails.
- Put a sensor on your cat door and tweet your cat’s movements.
- Put a light sensor in the window and open the blinds when the sun is shining, close it when it gets dark
- Use temperature sensors in each room, and find which room is the coldest, use the information to improve that room’s insulation or heating
![]()
Air quality measurement
Using a CO2 sensor and particulate sensor, work out the air quality both in and outside of your home.
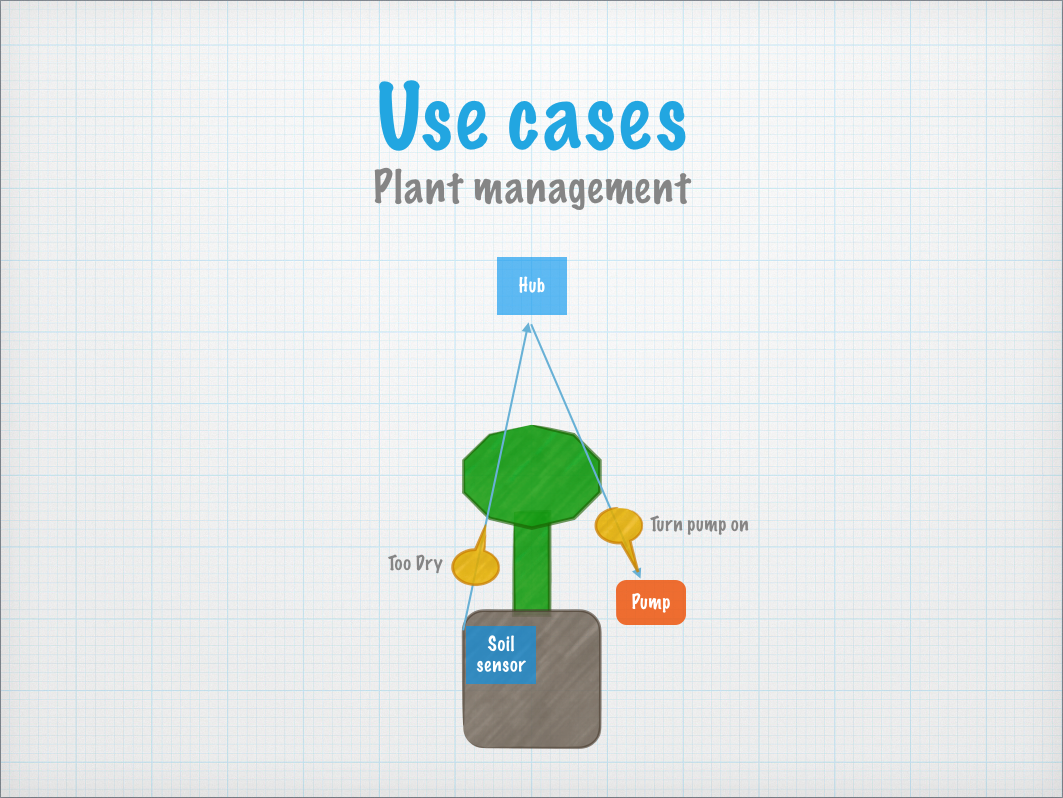
Plant management
Track the water level for your plants, turn a pump on to water them when they are dry and you have an automated garden.
![]()
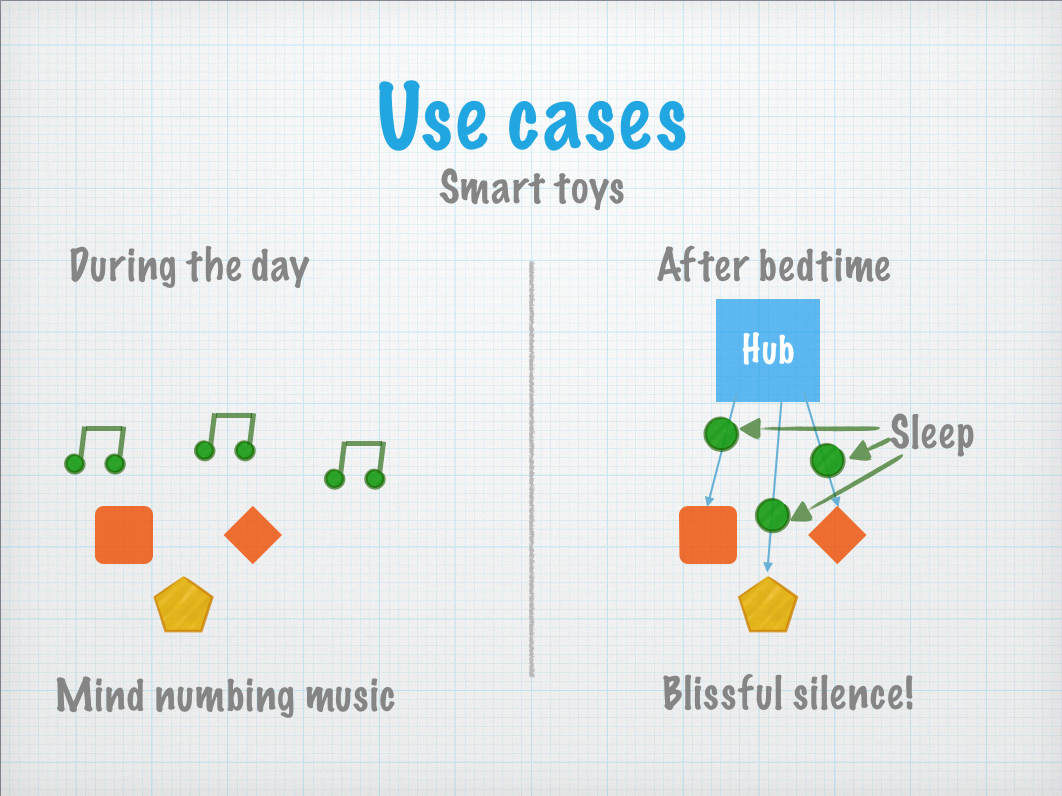
Smart toys
If you have young children, you probably have many toys that sing and flash, even when you trip over them in the middle of the night.
Add an Iota node to them and make a rule to turn them off after a certain time automatically, or even control them from your phone when play time is over!
![]()
Smart remote control
An Iota node with an IR LED can become a remote control for your TV, DVD player etc.
A few rules later and you can have sequences that turn your TV and DVD player on, wait a few seconds, switch to the DVD input and then hit play.
Now you can control it all from your phone, instead of juggling remote controls.
Iota isn’t limited to a set task, its simple design allows your creativity to be the decider in what it becomes.
-
MQTT-SN
08/19/2014 at 09:35 • 0 commentsThe difficulty with writing software to communicate between different systems is that each system needs to be able to understand the other.
If you send specific messages, the code on both sides needs to know how to understand those messages.
This causes a problem when you want to start sending new messages that you didn’t plan for before.
You would have to go and update the code everywhere before you can send it.
MQTT-SN
The solution is to provide a common messaging format, and Iota uses MQTT-SN.
MQTT-SN is a version of MQTT designed for sensor networks where nodes have limited processing and memory.
MQTT provides a “publish & subscribe” model and allows new message types to be created on the fly without needing special code ahead of time.
Publish & Subscribe
The Publish & Subscribe model is a flexible messaging design which allows nodes to publish (send) any message they like, and to subscribe to messages they are interested in.
MQTT uses a “topic id” for this which might look like:
/bedroom/master/temperature
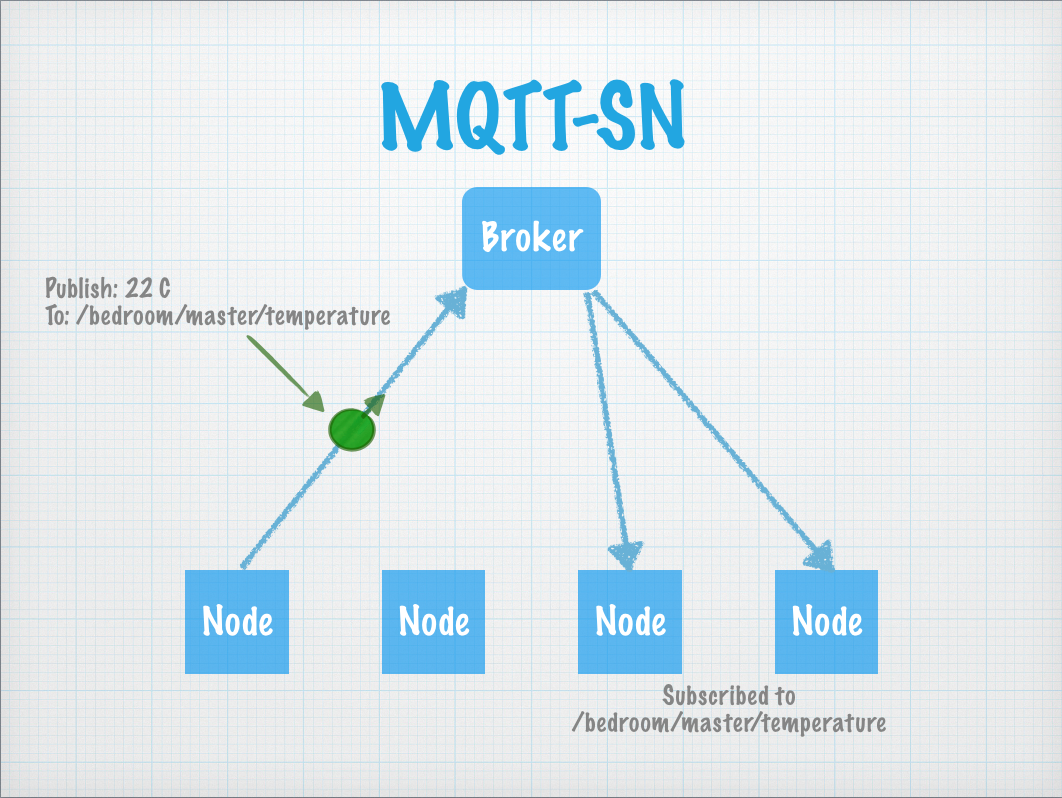
With the above topic id, a temperature sensor in the master bedroom would publish the current temperature, maybe every few minutes.
![]()
The sensor doesn’t know or care if anyone wants to know, it just keeps publishing.
These messages go to a “message broker” who handles receiving and sending of messages.
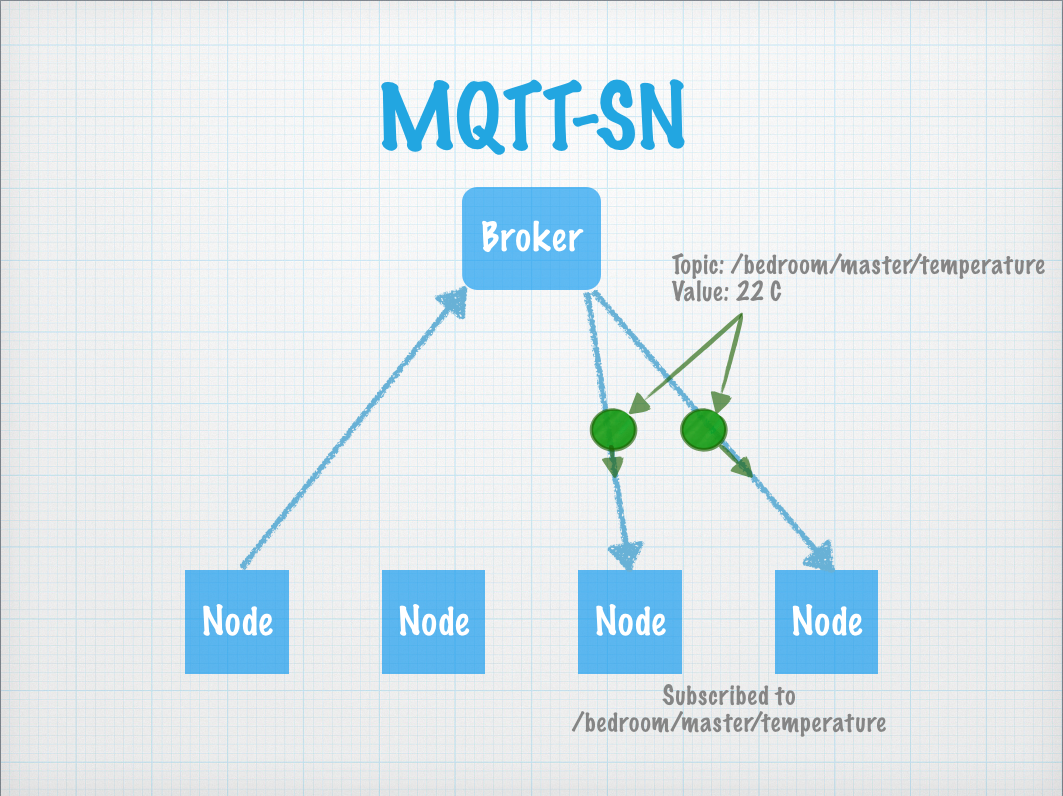
![]()
Other nodes might subscribe to the above topic id, and will get a copy of the message whenever it is published.
-
Security
08/19/2014 at 02:45 • 0 commentsSecurity is a big part of Iota, something I consider a critical component.
Iota is about more than sensors spread throughout your house, it can also control things and the last thing you want is for your neighbour to ‘accidentally’ control the lights in your home at 3am in the morning!
Iota also allows complex rules to be established, such as “if the room temperature drops below X after 8pm, turn my electric blanket on”.
With complex rules possible, all parts of the system need to be secured, otherwise an attacker could control things by sending fake temperature readings.
Security - Hard to get right
One of the strong motivators for including security measures into Iota, is that security is a hard thing to get right.
An attacker only needs to find one hole in the system, while the person writing the code has to try and fix all holes in the security.
By including security in Iota from the beginning, everyone benefits from the shared code and fixes made against it.
We won’t get everything right from the start, but as it is improved and strengthened, everyone benefits.
Security components
There are three main parts of Iota’s security design:
- Encryption
- Message IDs
- Key exchange
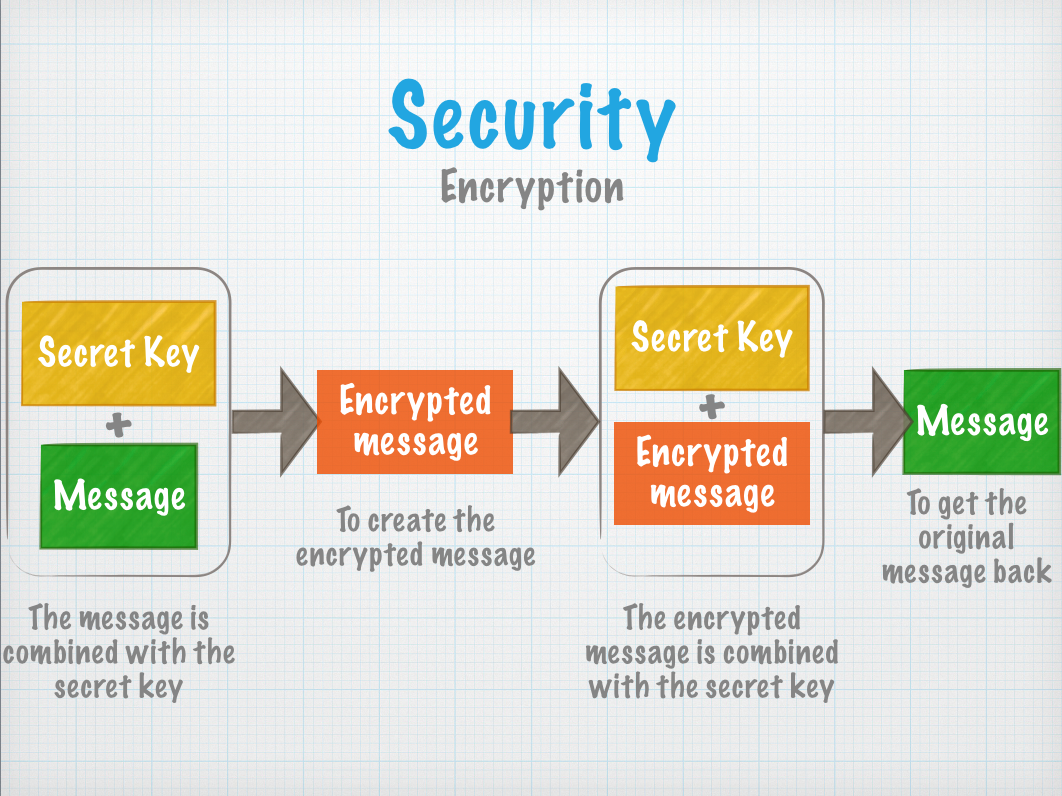
Encryption
![]()
As Iota sends messages over a radio link, anyone with compatible radio modules, or even a Software Defined Radio can listen in to the messages sent, resend them, or modify and resend them.
Encryption hides the contents of the message using a mathematical algorithm and a secret key that should only be known by the communicating nodes.
This prevents attackers from reading and modifying the messages sent and received.
Iota uses the AES encryption standard, which is quite strong whilst still being simple enough that it can be done on an 8-bit micro controller.
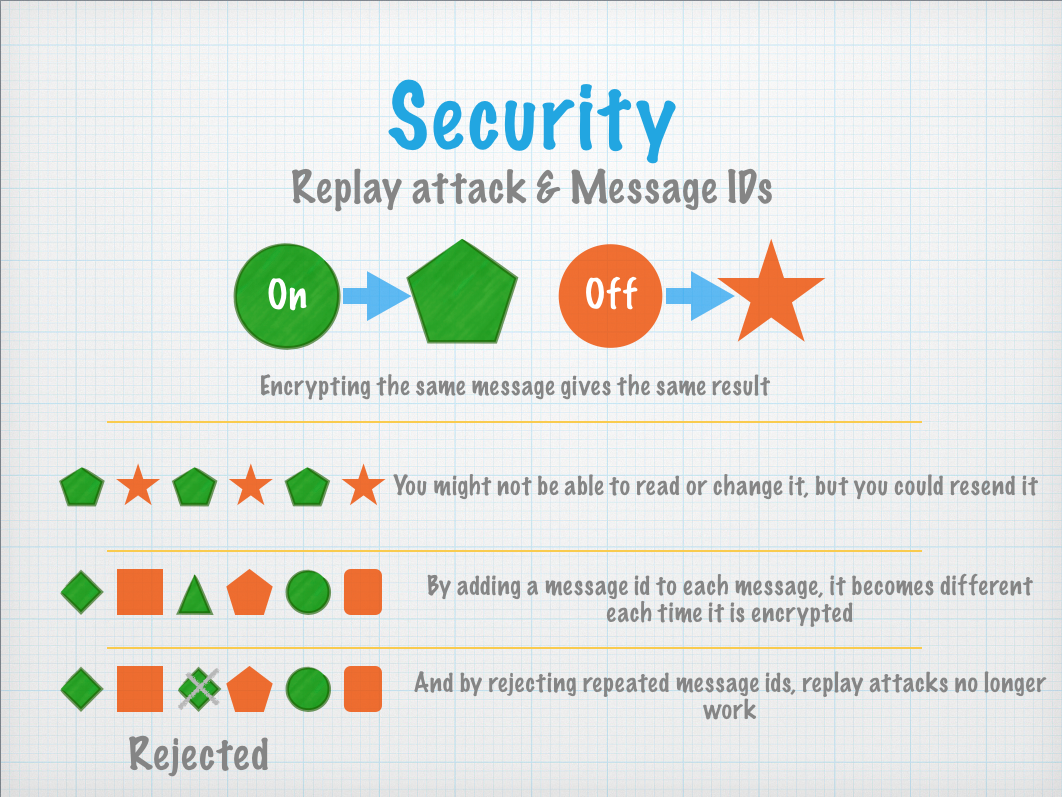
Message IDs
![]()
Encryption alone is not enough though.
If you send the same message repeatedly, it will look the same each time.
The attacker might not be able to read the contents, but they could copy and replay the message, and still influence your system.
This is known as a replay attack.
By simply adding an increasing number (the message id) to each message the encrypted message changes significantly each time, even if the rest of it is unchanged.
The receiving node knows what message ids it has already seen, and rejects repeated message ids, preventing a replay attack.
Key exchange
![]()
The last challenge is how to ensure the communicating nodes have the same key without an attacker getting a copy.
If you send the key over the radio link, it will have to be unencrypted, and during that time an attacker might be listening.
A better option is to send the key “out of band”, which means through a different mechanism.
Iota does this through a physical connection (such as wires).
When you want to add a new node to your Iota system, you connect it to the hub node.
The hub generates a new random key and sends it over the wired connection to the node and keeps a copy.
This prevents an attacker from listening in to the key, keeping it safe.
-
Curse of perfectionism
08/17/2014 at 23:20 • 0 commentsI haven't updated this project for a while, but it doesn't mean I haven't been working on it.
I confess, I have a problem. I am a perfectionist, and that is not a good thing.
I like the idea of explaining the design, and then quickly showing a completed prototype. I prefer to deliver than promise too much up front.
This has backfired on me though as I have been busy at work and let the project languish.
So it is time for an update about Iota, even without a completed system to demonstrate.
Goal of Iota
It isn't too hard to get two wireless nodes talking to each other, but once you go past a single node, with a single job, it becomes much harder.
The different nodes need to know how to understand each other, adding a new node means changing the code on all nodes that interact with it.
Iota is an abstraction that lets nodes talk a shared protocol that is flexible enough to add new nodes without rewriting the code on the other nodes.
Iota also brings security to your network of nodes, no one wants a script kiddie neighbour turning your lights on and off in the middle of the night!
This is a real problem, there is even another entry that does exactly this:
http://hackaday.com/2014/08/14/thp-entry-a-433mhz-packet-cloner/
Security is hard to get right, there are many ways to make mistakes that make it easy for someone to break.
By doing it once, as open source, only one set of security code needs to be checked and any improvements made get shared by all.
Long term vision
Ultimately I hope to get to a point where others are creating Iota hardware. I would love nothing more than to be able to buy nodes that I couldn't have come up with myself.
I want to see other people be creative with this so I can put sensors and actuators all over my home, automating everything, all without having to tell Google when I turn the heat up or down!
-
Designing the API
07/06/2014 at 05:02 • 0 commentsEarly on in this project I was set on delivering a lot consistently, but I just couldn't keep the pace up.
Somewhere in those early days I started hacking some "test code" together and it was a mess.
So ignore the code currently in GitHub, it is all being rewritten, but first I need to design upfront.
Iota API design
So this project log is about the design of the Iota API.
This is what I have so far:
Setup
Iota.begin(trigger_pin)
Publishing
topic_id = Iota.register_topic(TOPIC_NAME)
Iota.send(topic_id, data, len)
Receiving
topic_id = Iota.register_callback(TOPIC_NAME, my_func)
void my_func(uint8_t topic_id, uint8_t *data, uint8_t length) {}
The way you would use this is to call setup on the Iota module, and give it a trigger pin (more on that later, ignore for now).
Sensors
Now, if you are building a pure sensor, you would only need the publishing methods.
The first publishing method registers an MQTT topic name with the system, which gives you a numerical id for that topic.
From here you can have your code sit in a loop taking samples, sending them through Iota and maybe sleep a little while to save power.
Actuators
If your node is out to perform some action, such as turning something on, you would pay more attention to the receiving methods.
The first receiving method registers an MQTT topic name and a callback.
When the node is sent a message, Iota will decode the message and activate the callback function for that topic name.
The basic code structure here would be to register events you are interested in and provide a function to act on that event, and then sleep until Iota wakes you, saving battery power.
Mixed Nodes
Of course a node doesn't have to be just one or the other.
In some cases you might want to sensor something and react.
For a node like this you might set a timer to wake the node up, take a measurement, send the reading and go back to sleep. At the same time, you have callbacks registered which will also wake the node when an incoming message is received so you can act on it, and once again go back to sleep.
Now this is an early document and the design might change as it is being developed and tested.
I am open to suggestions if you see an area I am missing, or a better way to do something.
Or if you are wondering how you would do something, ask and we can check that it can be done with the above API.
-
Prototypes
06/18/2014 at 21:40 • 0 commentsI am back at work on Iota, working in the evenings after my little girl is asleep and during my lunch breaks at work.
It has been slow going, and I am not where I wanted to be at this point, but I have something to show at least.
I am now liberated from the breadboards!
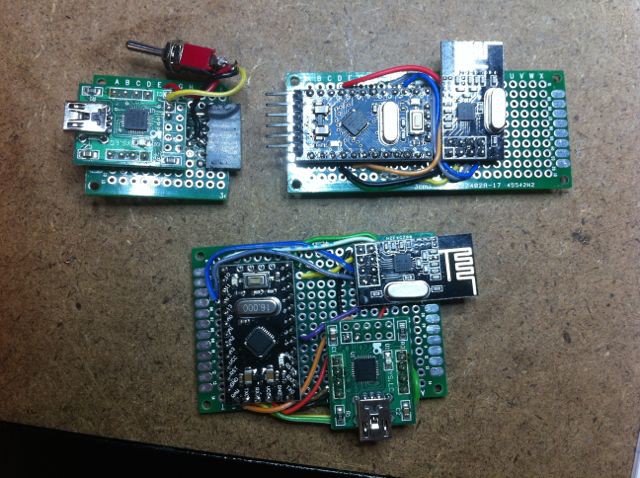
![]()
At the top right is a node without any sensors at the moment, and to the left of it a USB to serial adaptor to program it.
At the bottom is the bridge between the EeePC hub and the radio network.
The controller board in both cases is an Arduino Pro Mini clone based on the AVR ATMega328 chip.
It is running at 16MHz, and at that speed should be run from 5v, but as the radios need 3.3v, I am technically over clocking the AVR for the voltage, but so far it seems stable.
In hindsight I should have gotten the 3.3v version which has a slower crystal on board, but if the speed proves problematic, I can divide the clock through software, so it shouldn't be an issue.
Next steps
From here I need to get the EeePC updated and communicating with the other node over the radio.
From there I want to add sensors and LEDs to the node and continue developing the MQTT-SN software layer for communicating between the hub and nodes.
-
The Pi didn't make it
06/17/2014 at 11:33 • 0 commentsSorry to say, the SD card slot transplant for the Pi failed, and the poor thing never woke up from surgery.
(I should stick to through hole!).
So in its place, I am digging out this old little system to stand in for the hub for now:
![]()
It wasn't what I had in mind, but until I can replace the Pi, it should do the job well enough for now (and it has a built in "UPS"!).
-
Distractions, Setbacks and a little progress
06/17/2014 at 10:23 • 0 commentsSo I have been quiet of late, and I thought it was about time I explain myself.
Distractions
To start with, I have this little cheeky girl growing her first few teeth:
![]()
Which has been a bit more stressful than normal, with less sleep and less time to work on things.
Setbacks
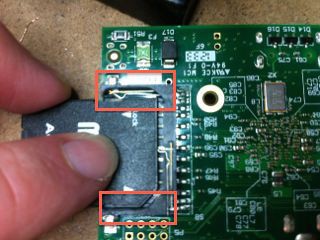
Along the way I also had my soldering iron break on me, which took a while to fix, and when I finally got it working again, I broke the SD card slot on my Raspberry Pi!
![]()
Not once, but twice!
First the side highlighted at the bottom, this wasn't too bad, it kept working if held at the right angle, but once the second part at the top went I could only boot the Pi by holding the card in place.
I have spent a lot of time trying to glue the microSD card adaptor down, and other quick hacks that just didn't do the job.
So I am going to tear apart an old SD card reader and see if I can do a transplant...
Progress
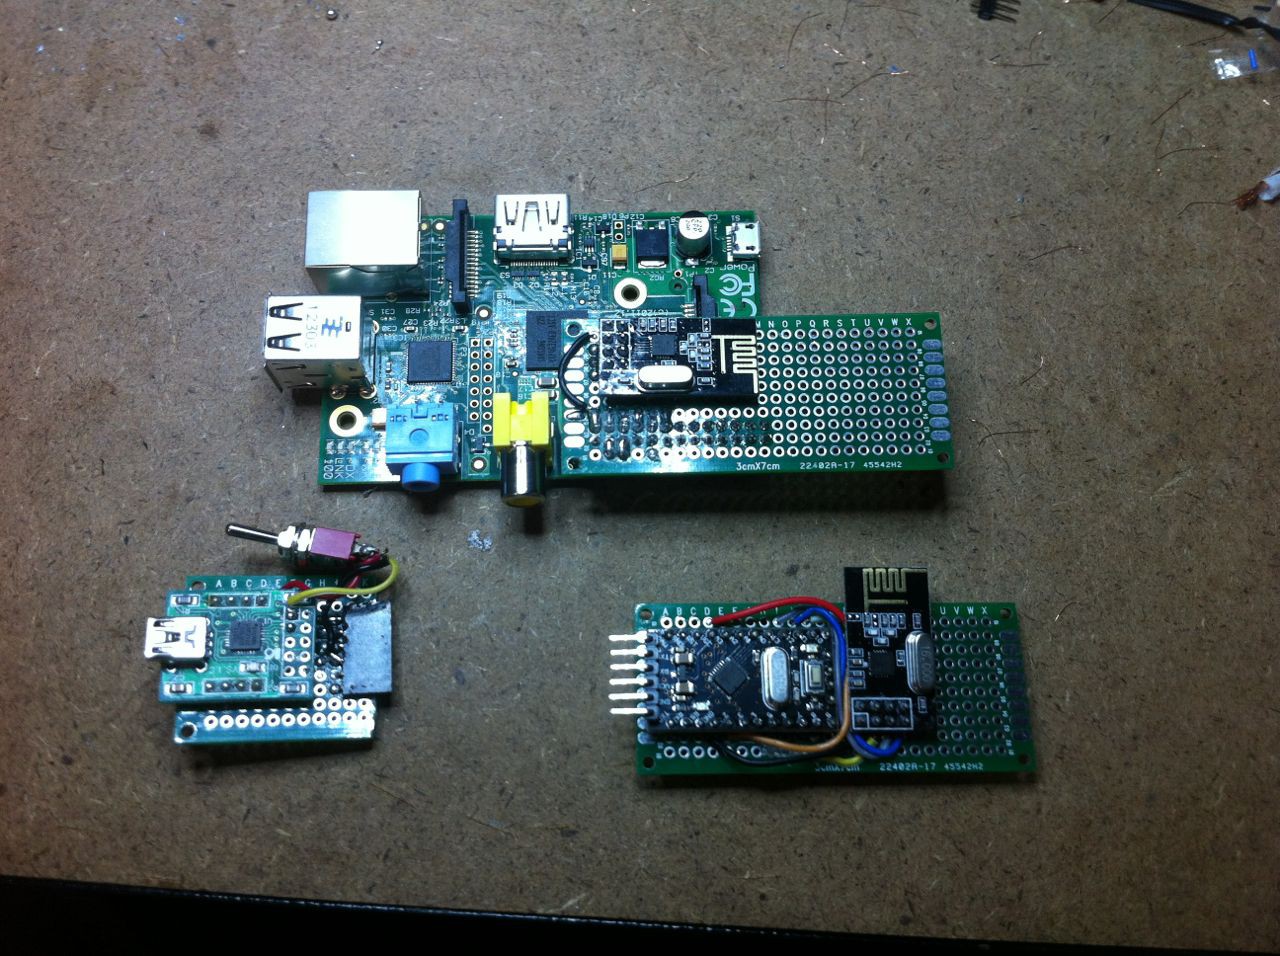
However it isn't all bad news, before breaking things I made some headway on some prototype boards, finally getting away from the breadboards:
![]()
At the top is a bit of a Pi plate for the Raspberry Pi (aka The Hub), bottom left is a CP2102 USB to serial adaptor with an FTDI socket layout and bottom right is the start of a node.
No sensors yet as I broke the Pi not long after completing the Pi plate, I was actually removing said plate and unknowingly using the SD card for leverage...
-
Tech Blog: MQTT-SN
05/27/2014 at 21:22 • 0 commentsIota makes use of a number of different technologies, and I wanted to explain some of them along the way.
This week will be about MQTT-SN, what it is, how it works and why it was chosen for Iota.
MQTT-SN & MQTTTo start with, MQTT-SN is simply a version of MQTT with additional considerations for sensor networks.
It aims to reduce the amount of data transferred and introduces the ability for nodes to sleep without being disconnected, an important feature for battery powered nodes.
MQTT was also designed to work over a TCP/IP connection, while MQTT-SN is targeted at wireless radio links.
A gateway allows nodes using the different protocols to communicate, acting as a bridge between the TCP/IP network and the radio links.
Apart from these differences, the protocols are largely the same, so the rest of this post will focus on MQTT.
MQTT
MQTT stands for MQ Telemetry Transport and was invented by IBM which has since made the protocol open source.
MQTT is a publish / subscribe protocol designed for Machine to Machine (m2m) communications.
What that means is that it has been designed for machines (e.g. sensors) to create information that is targeted at other machines to read and act on (computers, displays, actuators etc).
Publish / Subscribe
The publish / subscribe model lets you build a network of nodes that don’t need to know each other to function.
Instead, nodes only know of topics to publish or subscribe to.
For example, you might have a topic structure like this:
inside/bedroom/temperature
inside/kitchen/temperature
inside/bathroom/temperature
The various temperature sensors in your house would publish to their own topic, while a display showing temperatures in the house might subscribe to something like:
inside/+/temperature
The “+” acts as a wildcard, allowing a system to subscribe to a group of similar topics.
Topics and wildcards
As mentioned above, messages are addressed through the use of topics.
Topics are separated by a “/“ allowing topics to be grouped in a tree structure.
How you design your topics is important to allow efficient use of wildcard matching.
There are two wildcard characters “#” and “+”
“#” is the multi-level wildcard and matches zero or more levels. It can only be used at the end of a topic tree like so:
inside/bedroom/#
This would match topics such as:
inside/bedroom
inside/bedroom/humidity
inside/bedroom/temperature
“+” is a single level wildcard and can be used anywhere in the topic tree.
An example:
inside/+/temperature
Would match:
inside/bedroom/temperatureinside/kitchen/temperature
inside/bathroom/temperature
Wildcards can also be combined to create more complex combinations:
inside/+/#
Would match:
inside/bedroom/humidityinside/bedroom/temperature
inside/kitchen/humidityinside/kitchen/temperature
inside/bathroom/humidity
inside/bathroom/temperature
Brokers
To let nodes publish and subscribe to topics, without having to know about each other needs a broker.
Brokers act as a central point in a group of nodes and keep track of subscriptions and incoming messages.
Brokers do not need to know about possible topics ahead of time.
Nodes can subscribe and publish to new topics and the broker will start tracking them.
Brokers also provide a “Last Will and Testament” feature, where a node can specify a message and topic to publish it to if the node is disconnected.
You might use this to raise an alert that a node needs fresh batteries for example.
Conclusion
This post was just a quick skim over MQTT, but as you can see, it is a simple concept that allows a lot of flexibility in how you design your system.
If you want more details on MQTT or MQTT-SN, check out the protocol specifications, they are quite easy to follow.
MQTT Spec: http://public.dhe.ibm.com/software/dw/webservices/ws-mqtt/mqtt-v3r1.html
MQTT-SN Spec: MQTT-SN v1.2 specification
-
Prototyping
05/24/2014 at 02:20 • 0 commentsIota is based around cheap nRF24L01+ radios and the MQTT-SN protocol for communications.
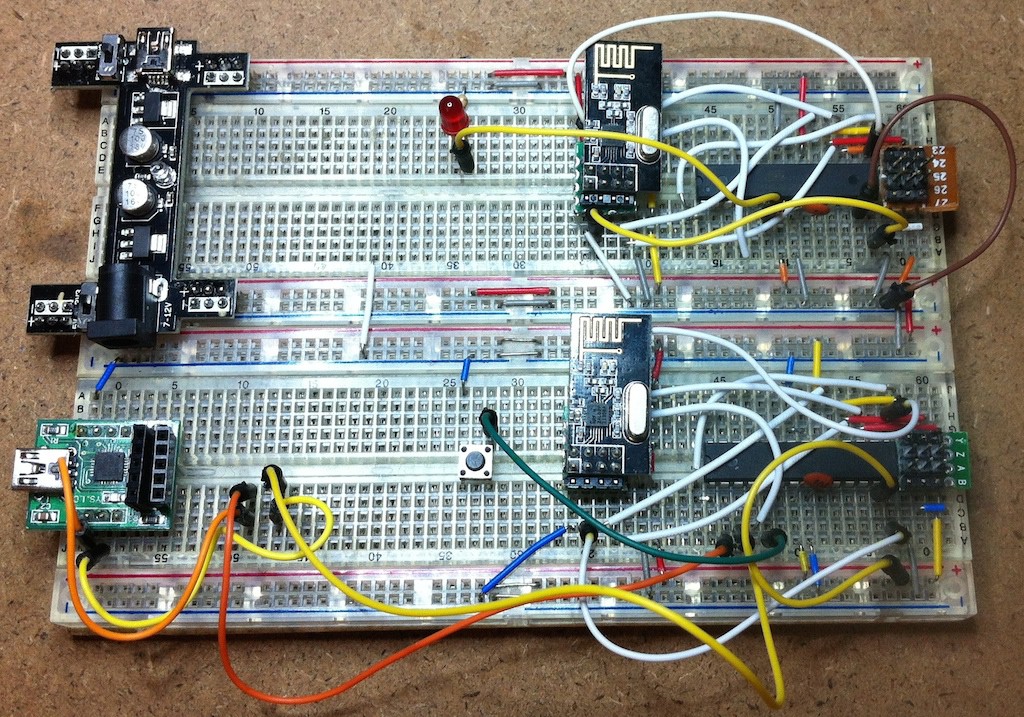
I have been busy doing a mix of hardware and software prototyping this week, with the first steps confirming that the radios work and that I can get them communicating with raw packets.
Code: https://github.com/NathanWilliams/iota/tree/master/prototyping
![]()
That was easy enough, my next goal has been to build a base set of libraries to communicate using MQTT-SN over these radios.
The problem is that the libraries I have been using so far (RF24, MQTT-SN Arduino) are designed for the Arduino platform.
Not that there is anything wrong with that, but my goals are to make as much of the code as platform independent as possible.
My goal was to reveal that work today, but things haven't gone completely to plan.
The problem is, I have a 6 month old daughter!
Having said that, I have made considerable progress, I just haven't gotten it working on hardware yet.
But in the interests of open development, I am putting the code up as is today anyway, just don't expect it to work yet!
Code: https://github.com/NathanWilliams/iota/tree/master/mqtt_rf24
Iota: Internet of things for all
A low cost Internet of things platform to build your own smart house