thjubeck
-
Mini Update
06/28/2016 at 07:17 • 0 commentsThis update covers power outages and what happens next. This code retains the last state of the relay and uses that as the initial value instead of the switch position. If you would rather have the light come on in the state of the switch on reset use the code in my other post.
#include <EEPROM.h> boolean FanStart = false; boolean LightStart = false; int LightRelay = 7; // pin the light relay is connected to int FanRelay = 6; // pin the fan relay is connected to int FanSwitch = 3; // pin the fan switch is connected to int LightSwitch =2; // pin the light is connected to int relayValLight = 0; // sets the lights initially to off int relayValFan = 0; // sets the fan initially to off char ser; // Serial character received int reading; // the current reading from the input pin int previous = HIGH; // the previous reading from the input pin int reading1; // the current reading from the input pin int previous1 = HIGH; // the previous reading from the input pin void setup(void){ Serial.begin(115200); pinMode(FanSwitch,INPUT_PULLUP); pinMode(LightSwitch, INPUT_PULLUP); pinMode(LightRelay, OUTPUT); pinMode(FanRelay, OUTPUT); digitalWrite(FanRelay,LOW); digitalWrite(LightRelay,LOW); } void loop(void){ if (Serial.available()) { ser = Serial.read(); if (ser == '1') AllOff(); else if(ser == '2') toggleFan(); else if(ser == '3') toggleLight(); else if(ser == '4') Serial.println(digitalRead(LightRelay)); else if(ser == '5') Serial.println(digitalRead(FanRelay)); } reading = digitalRead(FanSwitch); if (reading == HIGH && previous == LOW || reading == LOW && previous == HIGH){ toggleFan(); previous = reading; } reading1 = digitalRead(LightSwitch); if (reading1 == HIGH && previous1 == LOW || reading1 == LOW && previous1 == HIGH){ toggleLight(); previous1 = reading1; } } void toggleFan() //Function for fan { if (FanStart == true) { relayValFan ^= 1; // xor current value with 1 (causes value to toggle) digitalWrite(FanRelay, relayValFan); EEPROM.write(0,relayValFan); // Serial.println("NoEEPROM"); } else { relayValFan = EEPROM.read(0); digitalWrite(FanRelay,relayValFan); FanStart = true; // Serial.println("EEPROM"); } } void toggleLight() // Function for light { if (LightStart == true ) { relayValLight ^= 1; // xor current value with 1 (causes value to toggle) digitalWrite(LightRelay, relayValLight); EEPROM.write(1,relayValLight); // Serial.println("NoEEPROM"); } else { relayValLight = EEPROM.read(1); digitalWrite(LightRelay,relayValLight); LightStart = true; // Serial.println("EEPROM"); } } void AllOff() //Function to turn all lights off { relayValFan = 0; relayValLight = 0; digitalWrite(LightRelay, LOW); digitalWrite(FanRelay,LOW); EEPROM.write(0,relayValFan); EEPROM.write(1,relayValLight); } -
We Have Wireless
06/23/2016 at 08:00 • 0 commentsI have been working on wireless programming using the esp8266 and finally have a way that works very well even in windows. That's for a later post so be looking for that to come your way soon.
-
Arduino Time and Making Sparks Fly
06/01/2016 at 05:40 • 0 commentsAlright so maybe I was kidding about the sparks part but still.
For the control part of this project, I decided to use an arduino.
My first order of business was to choose a communication packet (kinda). I decided to keep this project simple.
1 = all off
2 = lights toggle
3 = fan toggle
4 = lights status
5 = fan status
I have updated the code below if you downloaded the code already you may want to look at the new changes.
int LightRelay = 7;  // pin the light relay is connected to
int FanRelay  = 6;  // pin the fan relay is connected to

int FanSwitch = 3;   // pin the fan switch is connected to
int LightSwitch =2;  // pin the light is connected to

int relayValLight = 0; // sets the lights initially to off
int relayValFan = 0;  // sets the fan initially to off

char ser;  // Serial character received

int reading;           // the current reading from the input pin
int previous = HIGH;    // the previous reading from the input pin

int reading1;           // the current reading from the input pin
int previous1 = HIGH;    // the previous reading from the input pin

void setup(void){
 Serial.begin(115200);
 pinMode(FanSwitch,INPUT_PULLUP);
 pinMode(LightSwitch, INPUT_PULLUP);
 pinMode(LightRelay, OUTPUT);
 pinMode(FanRelay, OUTPUT);
 }

void loop(void){
if (Serial.available()) {
   ser = Serial.read();
   if (ser == '1')
     AllOff();
   else if(ser == '2')
    toggleFan();
   else if(ser == '3')
    toggleLight();
   else if(ser == '4')
   Serial.println(digitalRead(LightRelay));
   else if(ser == '5')
   Serial.println(digitalRead(FanRelay));
  }

  reading = digitalRead(FanSwitch);
  if (reading == HIGH && previous == LOW || reading == LOW && previous == HIGH){
   toggleFan();
  previous = reading;
  }
  reading1 = digitalRead(LightSwitch);
  if (reading1 == HIGH && previous1 == LOW || reading1 == LOW && previous1 == HIGH){
   toggleLight();
  previous1 = reading1;
  }
}

void toggleFan() //Function for fan
 {
   relayValFan ^= 1; // xor current value with 1 (causes value to toggle)

    if (relayValFan){
      digitalWrite(FanRelay, HIGH);
    }
    else{
      digitalWrite(FanRelay, LOW);
    }
 }
void toggleLight()  // Function for light
 {
   relayValLight ^= 1; // xor current value with 1 (causes value to toggle)

    if (relayValLight){
      digitalWrite(LightRelay, HIGH);
    }
    else{
      digitalWrite(LightRelay, LOW);
    }
 }

void AllOff() //Function to turn all lights off
{
    relayValFan = 0;
    relayValLight = 0;

    digitalWrite(LightRelay, LOW);
    digitalWrite(FanRelay,LOW);
}
For the power wiring, I used a usb Power supply and tapped into the 5v and GND lines after I had disassembled it. I will not be posting a how to on this part as each power brick is different.
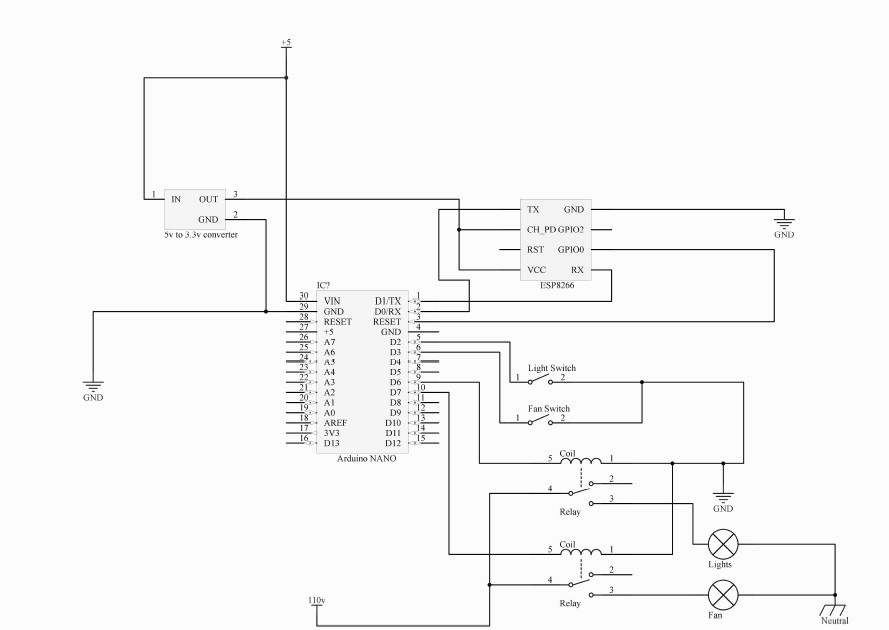
![]()
Please check the schematic before you use it as I have tried to be sure I made all connections correctly. I used 5v controlled relays so not exactly my schematic but close enough to understand the concept.
-
Getting your ESP on
05/28/2016 at 06:34 • 0 commentsWhen choosing the design of the system, I thought about the ways I could achieve my goal. At the time, my experience with arduino consisted of xBee's and serial communication and led's so I wanted something that was very similar.
Looking at the solutions available, I found a project called esp-Serial Bridge which fit the bill. This being said, the first thing I wanted was to get basic communications working.
Easier said than done. My first attempts I used windows to flash the firmware. There is a setting you have to pay attention to that sets your memory size and in windows this is not possible according to a resident esp8266 forum guru so after a few attempts, failed flashes and firmware resetting randomly, I finally gave up on using Windows and switched to my trusty Ubuntu computer and followed the guide located here. If you do have firmware resets check the size of your esp8266's memory and be sure your are flashing the correct version.
Under the current release you will see a several headings, use the one that says serial upload. I used an arduino uno without the chip as my flash tool like shown here (yes it would have been easier to use a serial adapter but the arduino has a supply of 3.3v and the serial adapter did not seem to keep up with the power demand).
To get WiFi working, connect to the access point that the esp creates and then go to the WiFi menu and select the network you would like to connect to.
To test if everything is running correctly you can use putty to connect to the esp8266 or use the built in uC Console.
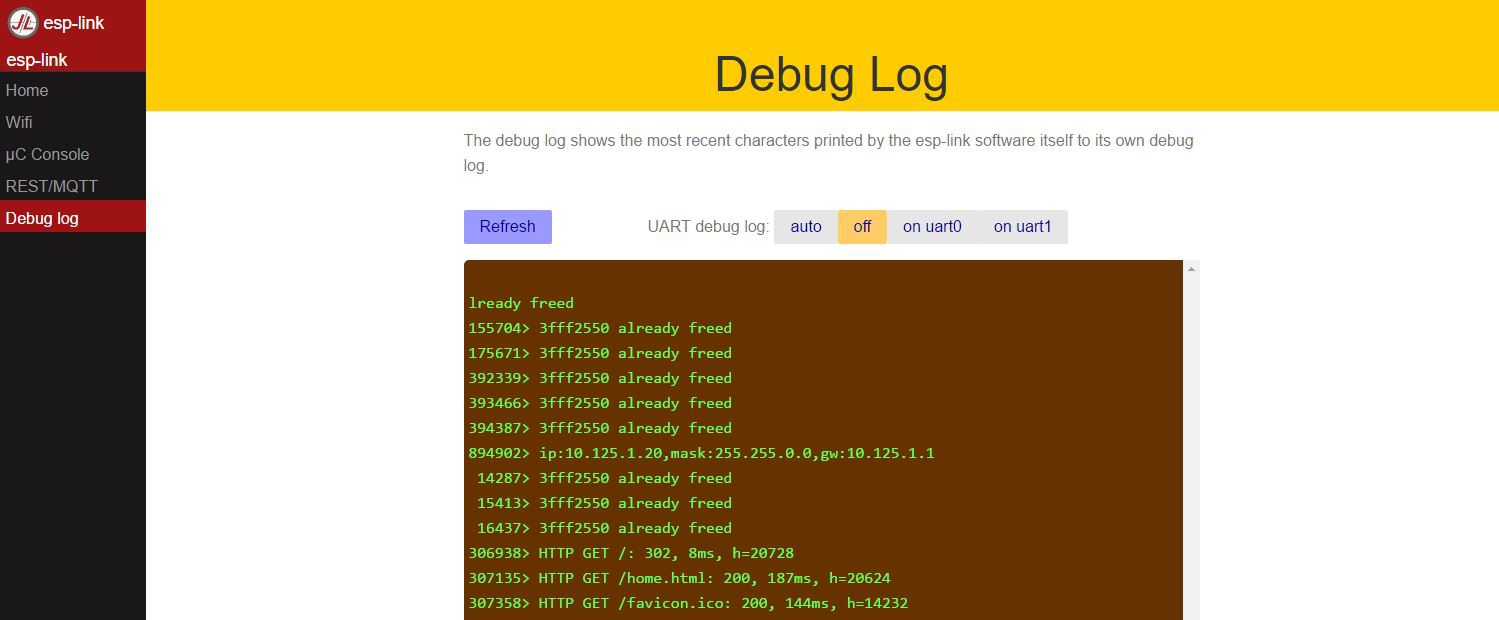
After flashing the software and getting connected, I ran across another problem. I'm jumping ahead a little here but while I'm covering the esp8266 stuff I'll go ahead and disclose this part now.
My control responds to a single number and for some reason the lights kept triggering randomly. The problem was that debugging log through serial was turned on and it was sending as stream of connection data for me to debug. To turn off the log, you have to turn it off using the web page as seen below.
![]()
Remember when you power the esp8266 using a good capacitor for filtering along with a decent source of power is recommended highly. I used some inexpensive 5v to 3.3v converters and they worked fairly well to power the esp8266.
So that about covers it for the esp8266 part. There are other options to consider such as REST and MQTT but Elliot Williams is doing a good job covering that one so that's for another day.
-
Initial log
05/27/2016 at 06:19 • 0 commentsHey, I'm Justin and this is my first project post on Hack-A-Day. I have been a reader for several years now so I thought it was time I contributed back to the community. This is a project that I started last year and now am publishing for anyone to use. There will be more logs to come so please bear with me as they do. If you you have any questions comments or concerns please feel free to pass them on.
Home automation on the cheap
Using an esp8266, arduino nano, a salvaged usb power supply, and a couple relays you can automate anything