thjubeck
-
Very Simple to set up MQTT
04/18/2019 at 05:01 • 0 commentsThis project is going to become a more professional project in terms of the protocol used.
I have been working on a MQTT controlled version of this project and am currently working on documenting the newest revision on a new page that I will link soon.
I currently have a version working with MQTT and as well as some big surprises planned stay tuned for more information in the next couple weeks.
-
V2 Updated Logs
04/14/2018 at 06:26 • 0 commentsI will try to keep the logs from version 2 posted here just for information but all further code development will be uploaded at version 2
State Machine Debouncing
thjubeck • 04/14/2018 at 02:00The state machine article posted a few days ago was really interesting so the debouncing technique has been added to the project as opposed to the timer debouncing that was there before. This also allows for more functionality in the future so reply with comments if you would like to see anything specific added and maybe it will be available in the future.
See the links below for the Hack a Day article as well as the creators GitHub page. Be sure to check out his video as it is very interesting and has a lot to learn from it.
https://hackaday.com/2018/04/06/state-your-intentions-more-clearly-with-state-machines/#more-302326
Initial Log
thjubeck • 03/19/2018 at 06:18This project is a continuation of the first home automation project https://hackaday.io/project/11922-home-automation-on-the-cheap with a few updates.
First is a web-page built into the esp8266 for displaying the temperature and controlling the light. You can access this page by entering the ip adress of the esp8266 in the browser and it should show the sensor and light control. Also the update page is located at http://youresp8266ip/update. It is also possible to update the esp8266 directly from the arduino IDE by selecting the ip/hostname as the port.
IMPORTANT!!!!!!!
FAILURE TO DO THIS WILL RESULT IN THE OTA UPDATE NOT WORKING!!!
AFTER UPDATING THE ESP8266 OVER SERIAL ALWAYS MANUALLY CLICK THE RESET BUTTON ON THE ESP8266 THIS IS BECAUSE OF A KNOWN BUG IN THE WATCHDOG FIND OUT MORE HERE https://github.com/esp8266/Arduino/tree/master/doc/faq IMPORTANT!!!!!!!
Second is the structure of the program. It is now broken up into tabs and individual programs / configuration files to make it a little easier to understand what is happening
Lastly, the web-page is now completely controlled through php without the need for scripts running on the web-server constantly. The handling of the updates is now much more streamline as the esp8266 triggers the php script directly on the update cycle set in the program.
All the files needed are included in the files list and there is a README file to get started. There is an update planned where the temp sensor is optional so watch for that in future updates. Also the webcam stream will be added in future updates as well.
-
Major Update
03/19/2018 at 03:49 • 0 commentsWell after a long thought process, I decided to do a major revamp of this project so webcam will have to wait for a future post.
I will be starting a new project as this one is a little cluttered.
You can find more information here: https://hackaday.io/project/94867-home-automation-on-the-cheap-v2
-
Webpage Update
03/15/2018 at 04:59 • 0 commentsSo after a long break from writing, this series of logs will once again get an update. After reviewing the webpage code which was hard to follow, I decided to clean it up a bit and leave only what is necessary to run. As seen below the code is much more manageable and should run much smoother if you only have one light. There is still some code that can be cleaned up or removed but some will be used in my next update on the topic of adding the streaming webcam to the page. Stay tuned as more updates will follow.
<?php if (isset($_POST["ON1"])) { $fp = fsockopen("10.125.2.1", 23, $errno, $errstr); // Replace the IP address with your own if (!$fp) { echo "$errstr ($errno)<br />\n"; } else { fwrite($fp, "2"); fclose($fp); } } $f_pointer2 =fsockopen("10.125.2.1", 23, $errno, $errstr); // Replace the IP address with your own fwrite($f_pointer2,'4'); $lampstat=fread($f_pointer2, 1); //1 is the character length to be read. arduino sends a char length data fclose($f_pointer2); if ($lampstat=='0') { $Source3="/images/offbulb.png"; $stat2 = "Off"; } else { $Source3="/images/onbulb.png"; $stat2 = "On"; } $verz="2.0"; ?> <html> <body> <center><h1>MY LIGHTS</h1><b>Version <?php echo $verz; ?></b></center><br/> <center><b>Lamp <?php echo $stat2?> <img src="<?php echo $Source3; ?>" alt="Light On" height="42" width="42" </a> </b></center> <form method="post" action="temp.php" > <center><h3>Bedroom</h3> <input type="submit" value="Lamp" name="ON1" action="temp.php" width=20% height=10% ><br/><br/> <!-- <br/></center> <!--<b><img src=temp_graphShort.png></a></b><br/> <b><img src=temp_graphtoday.png></a></b><br/> <b><img src=temp_graph.png></a></b><br/> <b><img src=temp_graphmonth.png></a></b><br/> <b><img src=temp_graphyear.png></a></b><br/> <center><b><img src="stream.php"></b><br/></center> --> </form> </body> </html> -
Mini Update Configuration Portal and Optimized Code
01/11/2017 at 08:46 • 0 commentsUPDATE: tested webpage update. It works really well.
For this update I tried to clean up the code a little and added a Configuration Portal for Wifi so no longer have to change the code to get this to work as long as you use the outputs and inputs the same as in the code. I may try to add the ability to enable setting the hostname from the Configuration portal as well but for now, still have to use the hardcode for that.
GPIO 12 is the light relay
GPIO 0 is the indicator light
GPIO 2 is the push button
New Creds:
To install new libraries see here
//Define all Libraries to be used #include <ESP8266WiFi.h> #include <ESP8266mDNS.h> #include <WiFiUdp.h> #include <ArduinoOTA.h> #include <EEPROM.h> #include <ESP8266WebServer.h> #include <ESP8266HTTPUpdateServer.h> #include <DNSServer.h> #include <ESP8266WebServer.h> #include <WiFiManager.h> //Define Outputs, inputs, and if started bit. Remember on the WEMOS board these are the GPIO numbers not what is on the board boolean LightStart = false; int LightRelay = 14; int Light = 0; int LightSwitch =2; static int relayValLight = 0; //Define relayValLight as 0 char ser; //Define the character ser that will be used later uint8_t i=0; // Define i. Used in a counter int reading; // the current reading from the input pin int previous = HIGH; // the previous reading from the input pin void toggleLight(); //Define the toggle light function //Set Debounce Time long lastDebounceTime = 0; // the last time the output pin was toggled long debounceDelay = 50; // the debounce time; increase if the output flickers //how many clients should be able to telnet to this ESP8266 #define MAX_SRV_CLIENTS 3 //Define hostname const char* host = "myesp8266"; // This value can be changed and should be if you use multiple devices //Define Port to start server on WiFiServer server(23); //Define Max Clients that can connect WiFiClient serverClients[MAX_SRV_CLIENTS]; //Needed for httpUpgrade webpage. Define server at port 80 ESP8266WebServer httpServer(80); ESP8266HTTPUpdateServer httpUpdater; void setup() { //EEPROM start. This is a function of the ESP8266 that is needed for EEPROM to work EEPROM.begin(512); //Begin Serial Serial.begin(115200); //Begin WiFi Manager WiFiManager wifiManager; /*include only one of the below functions. The first auto connects the second always creates a Configuration Portal*/ wifiManager.autoConnect("AutoConnectAP"); //wifiManager.startConfigPortal("OnDemandAP"); server.begin(); server.setNoDelay(true); //Setup Outputs and Inputs pinMode(LightSwitch, INPUT_PULLUP); pinMode(LightRelay, OUTPUT); pinMode(Light, OUTPUT); // WIFI OTA SECTION // Port defaults to 8266 // ArduinoOTA.setPort(8266); // Hostname defaults to esp8266-[ChipID] ArduinoOTA.setHostname(host); // No authentication by default //ArduinoOTA.setPassword((const char *)"123"); ArduinoOTA.onStart([]() { Serial.println("Start"); }); ArduinoOTA.onEnd([]() { Serial.println("\nEnd"); }); ArduinoOTA.onProgress([](unsigned int progress, unsigned int total) { Serial.printf("Progress: %u%%\r", (progress / (total / 100))); }); ArduinoOTA.onError([](ota_error_t error) { Serial.printf("Error[%u]: ", error); if (error == OTA_AUTH_ERROR) Serial.println("Auth Failed"); else if (error == OTA_BEGIN_ERROR) Serial.println("Begin Failed"); else if (error == OTA_CONNECT_ERROR) Serial.println("Connect Failed"); else if (error == OTA_RECEIVE_ERROR) Serial.println("Receive Failed"); else if (error == OTA_END_ERROR) Serial.println("End Failed"); }); ArduinoOTA.begin(); //Create UPDATE WEB PAGE this webpage will be at http://(host).local/update MDNS.begin(host); httpUpdater.setup(&httpServer); httpServer.begin(); MDNS.addService("http", "tcp", 80); // My switch has an indicator light so I blink it here to indicate setup done digitalWrite(Light,HIGH); delay(500); digitalWrite(Light,LOW); //Call toggle light function to set old value toggleLight(); /* //Uncomment this section to show the ip address in serial monitor Serial.println("Ready"); Serial.print("IP address: "); Serial.println(WiFi.localIP()); */ } void loop() { //Watch for update from http httpServer.handleClient(); //Watch for ota update ArduinoOTA.handle(); //check if there are any new clients if (server.hasClient()){ for(i = 0; i < MAX_SRV_CLIENTS; i++){ //find free/disconnected spot if (!serverClients[i] || !serverClients[i].connected()){ if(serverClients[i]) serverClients[i].stop(); serverClients[i] = server.available(); continue; } } //no free/disconnected spot so reject WiFiClient serverClient = server.available(); serverClient.stop(); } //check clients for data for(i = 0; i < MAX_SRV_CLIENTS; i++){ if (serverClients[i] && serverClients[i].connected()){ if(serverClients[i].available()){ //get data from the telnet client and push it to the UART while(serverClients[i].available()) //read data from client ser = serverClients[i].read(); //If input from client is 4 then run toggle light function if(ser == '2') toggleLight(); //If input from client is 4 then read the pin and give feedback else if(ser == '4') serverClients[i].println(digitalRead(LightRelay)); } } } //Take reading of switch reading = digitalRead(LightSwitch); //Check if debounce time has passed if ( (millis() - lastDebounceTime) > debounceDelay) { // Check reading against previous if (reading == LOW && previous == HIGH){ //if something has changed run toggle light function toggleLight(); } } //After checking if anything changed and setting output store reading as previous previous = reading; } //Toggle light function void toggleLight() { //Check if this is the first run if (LightStart == true){ //If it is not first run then toggle light value relayValLight ^= 1; // xor current value with 1 (causes value to toggle) digitalWrite(LightRelay, relayValLight); digitalWrite(Light, relayValLight); //set last debounce to the current time lastDebounceTime = millis(); //store the value to EEPROM address 0 and commit changes to EEPROM EEPROM.write(0,relayValLight); EEPROM.commit(); } //If this is the first run then set all values accordingly else { //Set relay variable from the EEPROM relayValLight = EEPROM.read(0); digitalWrite(LightRelay,relayValLight); digitalWrite(Light,relayValLight); //Set the start bit to true. This function is only ran once at startup LightStart = true; } } -
Direct Program
01/09/2017 at 05:42 • 0 commentsUPDATE: ADDED comments and updated EEPROM to work correctly after power off. Will be doing a mini update with an optimized version of the code that includes a auto-start hot spot for setting up connections on the fly
NOTE: I recommend using the EEPROM clear function in examples before uploading this code as I have had issues with this and other micro-controllers where I did not clear the EEPROM before using.
So I finally broke down and figured out how to program this without the additional micro-controller. I used a Wemos D1 mini (the esp8266 on a breakout) which allowed me to power directly from the 5v and program easier. Connect the inputs and outputs to the Wemos directly and power directly from the 5v. This sketch includes debouncing, telnet control, and OTA update abilities both with the IDE and directly to the ESP8266. This sketch uses a push button where all the other examples use a toggle switch so please keep that in mind if replacing the old sketch.
As a note I have not tried uploading using the web page so if anyone wants to comment on how that works please let me know.
To set up arduino to program the ESP8266 directly, please see this link.
CREDS: Debouncing
IMPORTANT NOTE!!!!: The pins on the WEMOS are referenced by the GPIO number not the D1 number on the board
You will have to update the SSID and Password but Should Work besides that.
//Define all Libraries to be used #include <ESP8266WiFi.h> #include <ESP8266mDNS.h> #include <WiFiUdp.h> #include <ArduinoOTA.h> #include <EEPROM.h> #include <ESP8266WebServer.h> #include <ESP8266HTTPUpdateServer.h> //Define Outputs, inputs, and if started bit. Remember on the WEMOS board these are the GPIO numbers not what is on the board boolean LightStart = false; int LightRelay = 14; int Light = 0; int LightSwitch =2; static int relayValLight = 0; //Define relayValLight as 0 char ser; //Define the character ser that will be used later int reading; // the current reading from the input pin int previous = HIGH; // the previous reading from the input pin void toggleLight(); //Define the toggle light function //Set Debounce Time long lastDebounceTime = 0; // the last time the output pin was toggled long debounceDelay = 50; // the debounce time; increase if the output flickers //how many clients should be able to telnet to this ESP8266 #define MAX_SRV_CLIENTS 3 //Define Wifi SSID and Password const char* ssid = "YourSSIDGoesHere"; const char* password = "YourPasswordGoesHere"; const char* host = "myesp8266"; // This value can be changed and should be if you use multiple devices //Define Port to start server on WiFiServer server(23); //Define Max Clients that can connect WiFiClient serverClients[MAX_SRV_CLIENTS]; //Needed for httpUpgrade webpage. Define server at port 80 ESP8266WebServer httpServer(80); ESP8266HTTPUpdateServer httpUpdater; void setup() { //EEPROM start. This is a function of the ESP8266 that is needed for EEPROM to work EEPROM.begin(512); WiFi.begin(ssid, password); uint8_t i = 0; while (WiFi.status() != WL_CONNECTED && i++ < 20) delay(500); Serial.begin(115200); server.begin(); server.setNoDelay(true); //Setup Outputs and Inputs pinMode(LightSwitch, INPUT_PULLUP); pinMode(LightRelay, OUTPUT); pinMode(Light, OUTPUT); // WIFI OTA SECTION // Port defaults to 8266 // ArduinoOTA.setPort(8266); // Hostname defaults to esp8266-[ChipID] ArduinoOTA.setHostname(host); // No authentication by default //ArduinoOTA.setPassword((const char *)"123"); ArduinoOTA.onStart([]() { Serial.println("Start"); }); ArduinoOTA.onEnd([]() { Serial.println("\nEnd"); }); ArduinoOTA.onProgress([](unsigned int progress, unsigned int total) { Serial.printf("Progress: %u%%\r", (progress / (total / 100))); }); ArduinoOTA.onError([](ota_error_t error) { Serial.printf("Error[%u]: ", error); if (error == OTA_AUTH_ERROR) Serial.println("Auth Failed"); else if (error == OTA_BEGIN_ERROR) Serial.println("Begin Failed"); else if (error == OTA_CONNECT_ERROR) Serial.println("Connect Failed"); else if (error == OTA_RECEIVE_ERROR) Serial.println("Receive Failed"); else if (error == OTA_END_ERROR) Serial.println("End Failed"); }); ArduinoOTA.begin(); //Create UPDATE WEB PAGE this webpage will be at http://[hostname as defined earlier].local/update MDNS.begin(host); httpUpdater.setup(&httpServer); httpServer.begin(); MDNS.addService("http", "tcp", 80); // My switch has an indicator light so I blink it here to indicate setup done digitalWrite(Light,HIGH); delay(500); digitalWrite(Light,LOW); //Call toggle light function to set old value toggleLight(); //Uncomment this section to show the ip address in serial monitor // Serial.println("Ready"); //Serial.print("IP address: "); //Serial.println(WiFi.localIP()); } void loop() { //Watch for update from http httpServer.handleClient(); //Watch for ota update ArduinoOTA.handle(); //initalize i for number of server clients uint8_t i; //check if there are any new clients if (server.hasClient()){ for(i = 0; i < MAX_SRV_CLIENTS; i++){ //find free/disconnected spot if (!serverClients[i] || !serverClients[i].connected()){ if(serverClients[i]) serverClients[i].stop(); serverClients[i] = server.available(); continue; } } //no free/disconnected spot so reject WiFiClient serverClient = server.available(); serverClient.stop(); } //check clients for data for(i = 0; i < MAX_SRV_CLIENTS; i++){ if (serverClients[i] && serverClients[i].connected()){ if(serverClients[i].available()){ //get data from the telnet client and push it to the UART while(serverClients[i].available()) //read data from client ser = serverClients[i].read(); //If input from client is 4 then run toggle light function if(ser == '2') toggleLight(); //If input from client is 4 then read the pin and give feedback else if(ser == '4') serverClients[i].println(digitalRead(LightRelay)); } } } //Take reading of switch reading = digitalRead(LightSwitch); //Check if debounce time has passed if ( (millis() - lastDebounceTime) > debounceDelay) { // Check reading against previous if (reading == LOW && previous == HIGH){ //if something has changed run toggle light function toggleLight(); } } //After checking if anything changed and setting output store reading as previous previous = reading; } //Toggle light function void toggleLight() { //Check if this is the first run if (LightStart == true){ //If it is not first run then toggle light value relayValLight ^= 1; // xor current value with 1 (causes value to toggle) //If the value is 1 then set the lights to ON if (relayValLight){ digitalWrite(LightRelay, HIGH); digitalWrite(Light, HIGH); //store the value to EEPROM address 0 EEPROM.write(0,relayValLight); //set last debounce to the current time lastDebounceTime = millis(); //Commit changes to EEPROM EEPROM.commit(); } //else covers if the value is 0 everything is set to OFF else{ digitalWrite(LightRelay, LOW); digitalWrite(Light, LOW); //store the value to EEPROM address 0 EEPROM.write(0,relayValLight); //Set the last debounce to the current time lastDebounceTime = millis(); //Commit changes to EEPROM EEPROM.commit(); } } //If this is the first run then set all values accordingly else { //Set relay variable from the EEPROM relayValLight = EEPROM.read(0); //Set indicator light and relay to the EEPROM value digitalWrite(LightRelay,relayValLight); digitalWrite(Light,relayValLight); //Set the start bit to true. This function is only ran once at startup LightStart = true; } } -
Wireless Programming
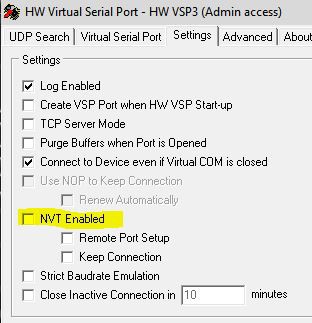
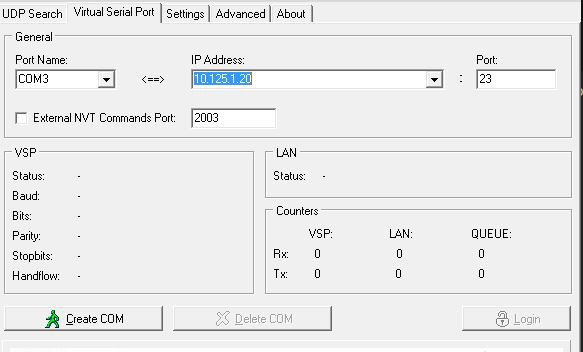
09/19/2016 at 05:15 • 0 commentsFor wireless programming/re-programming, I connect to the esp using hardware virtual serial port found here.
![]()
Be sure to disable NVT in the settings or you will not be able to program the controller.
![]()
-
Phone Time
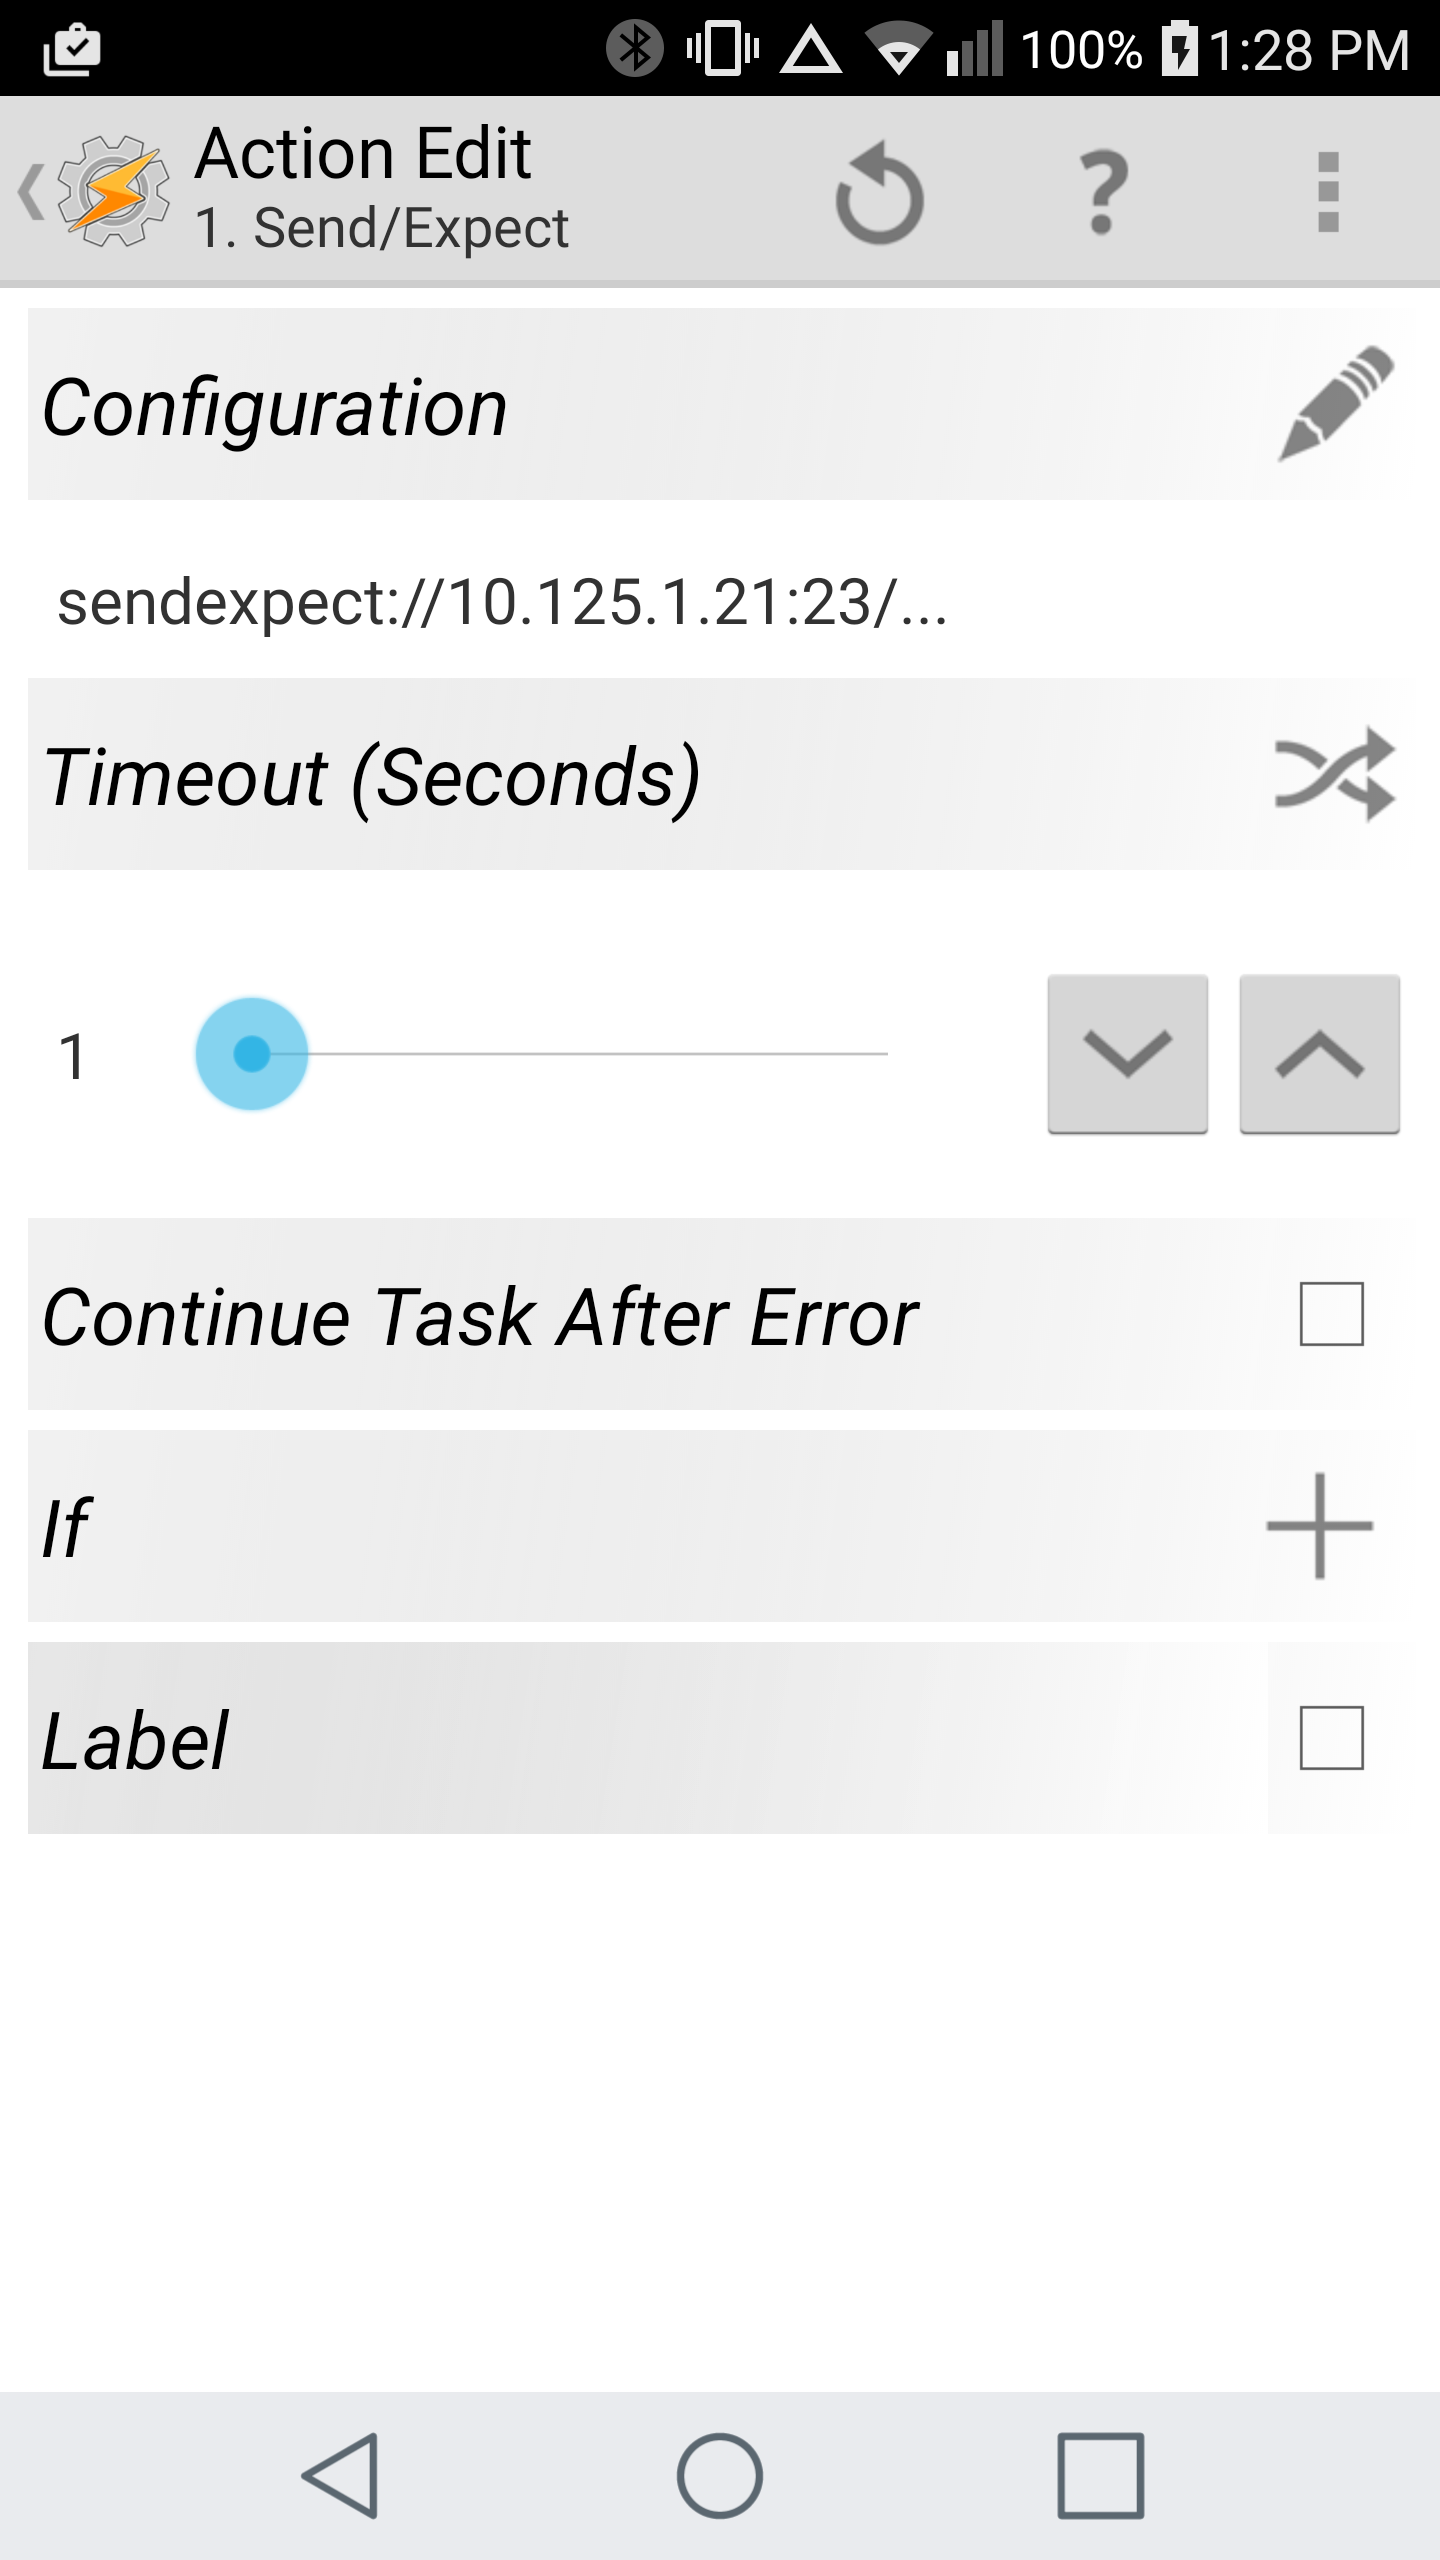
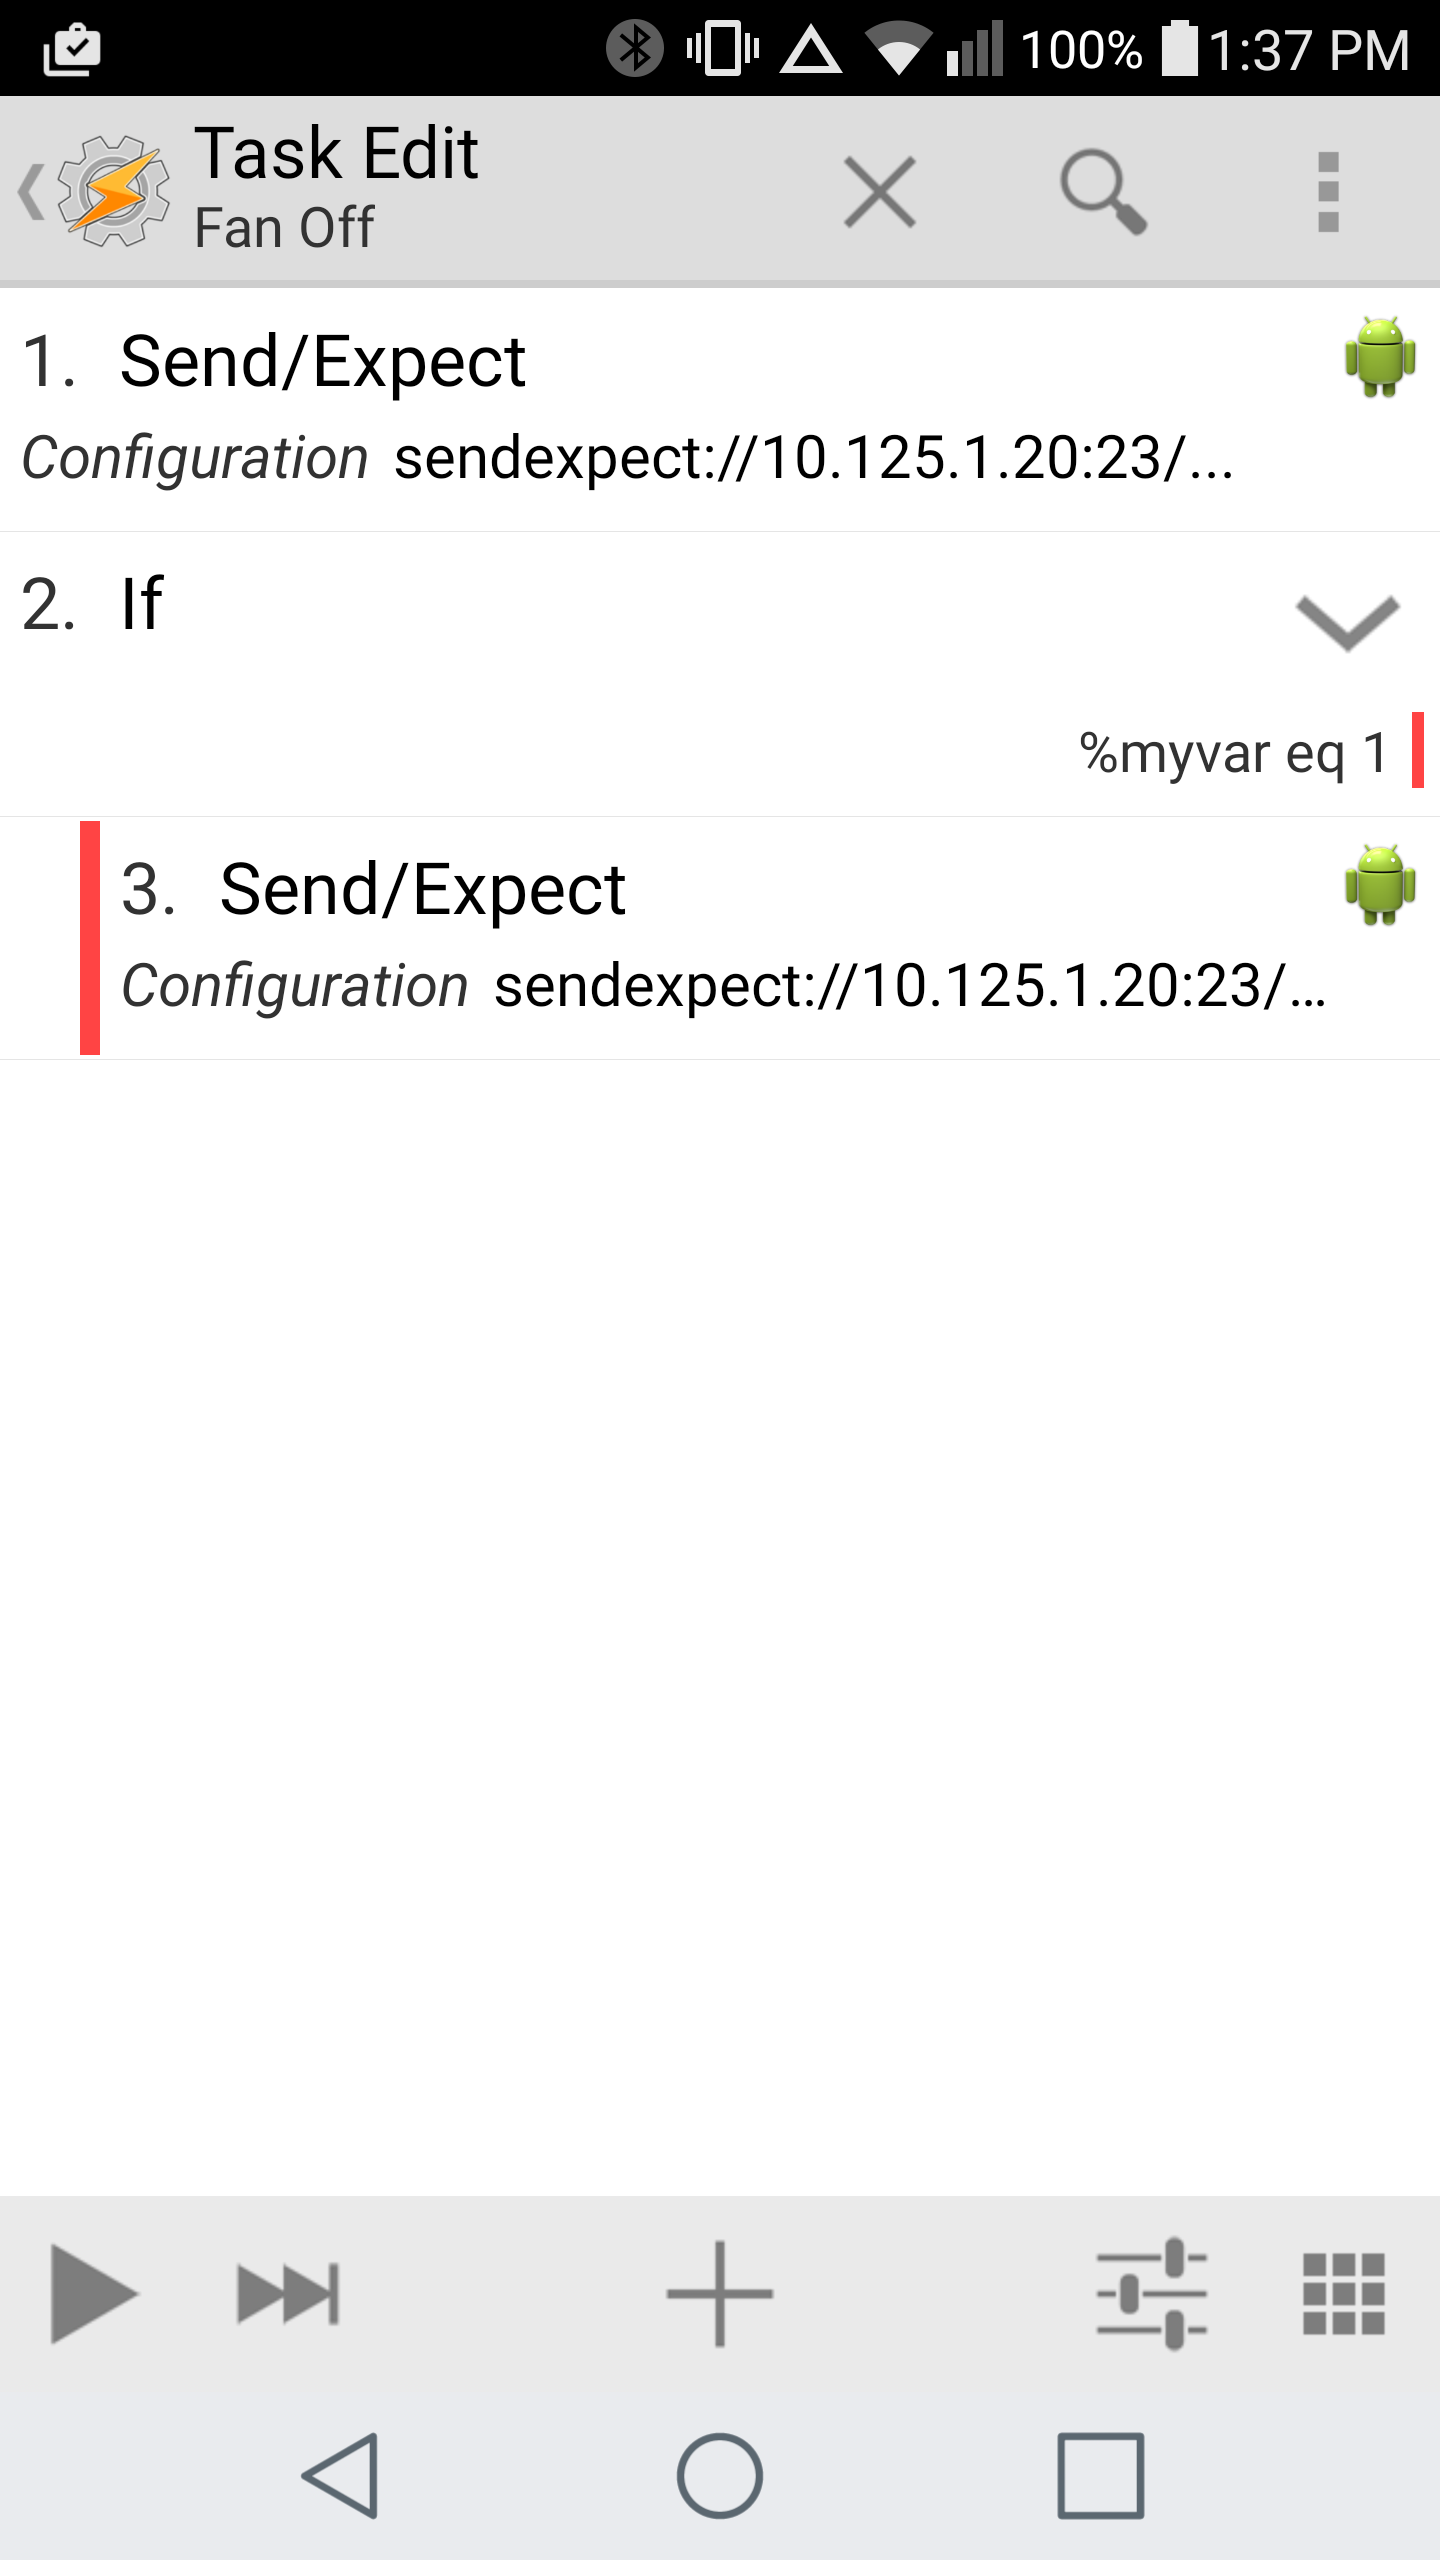
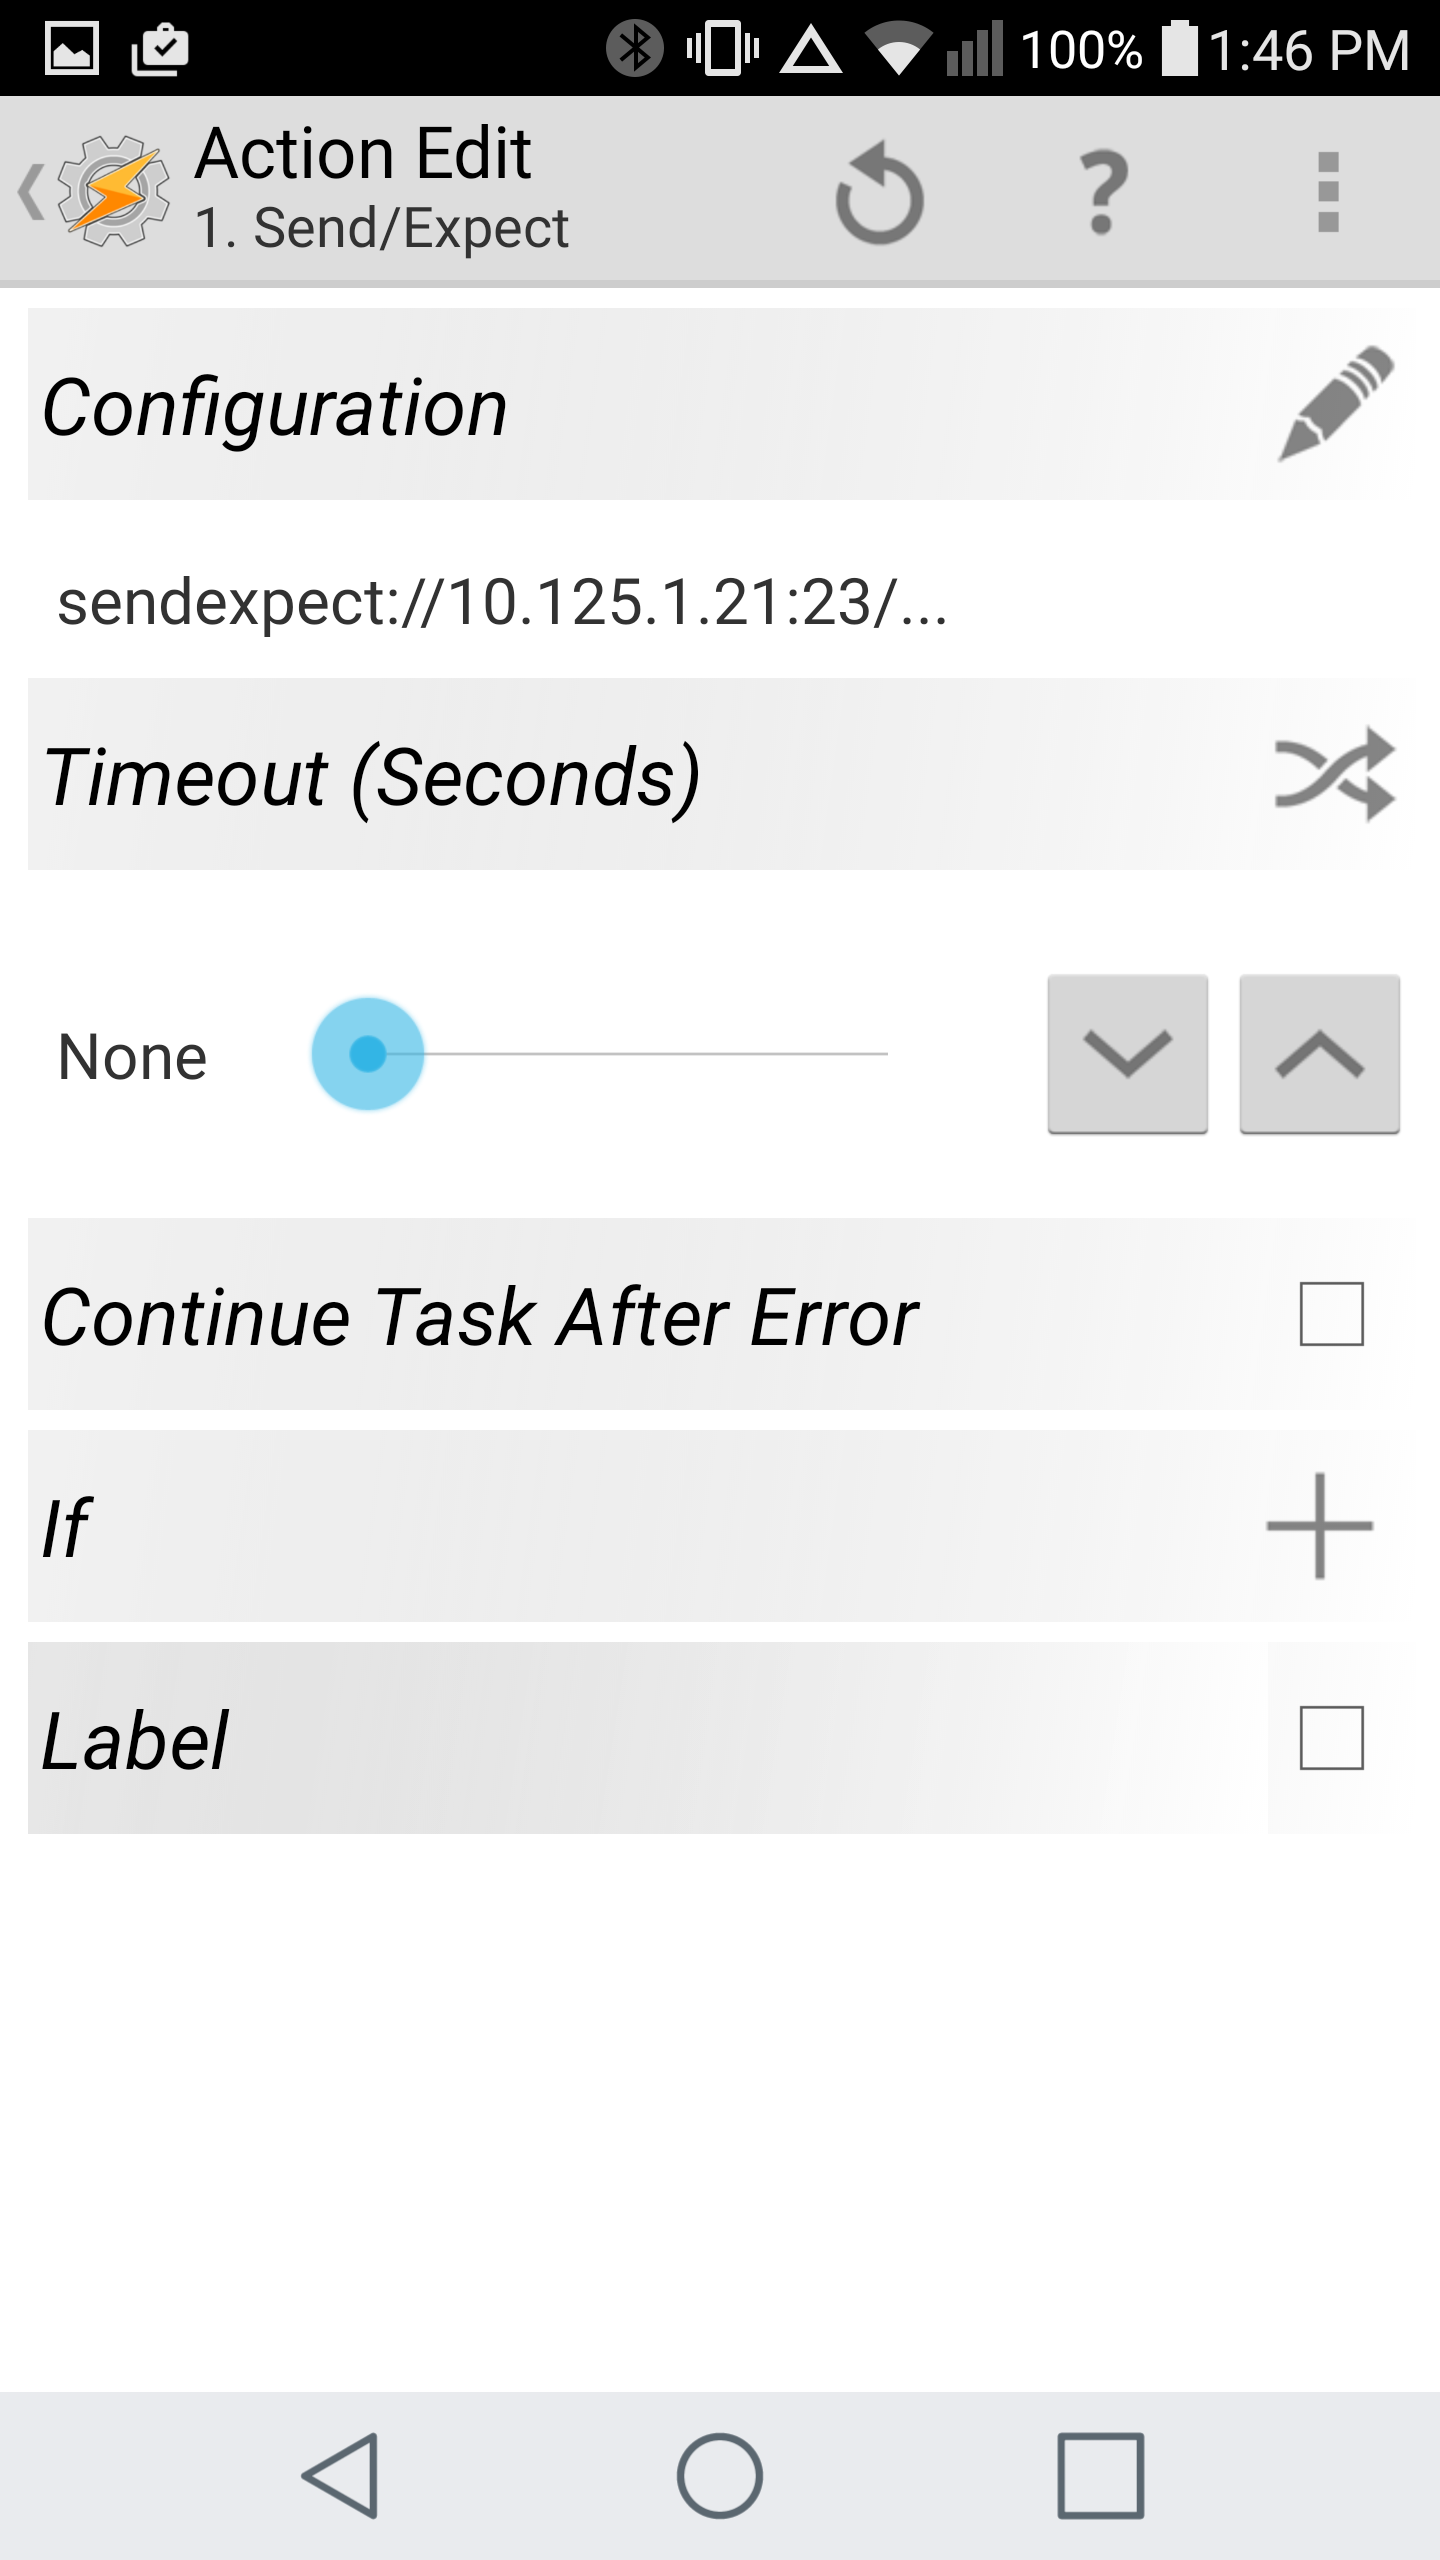
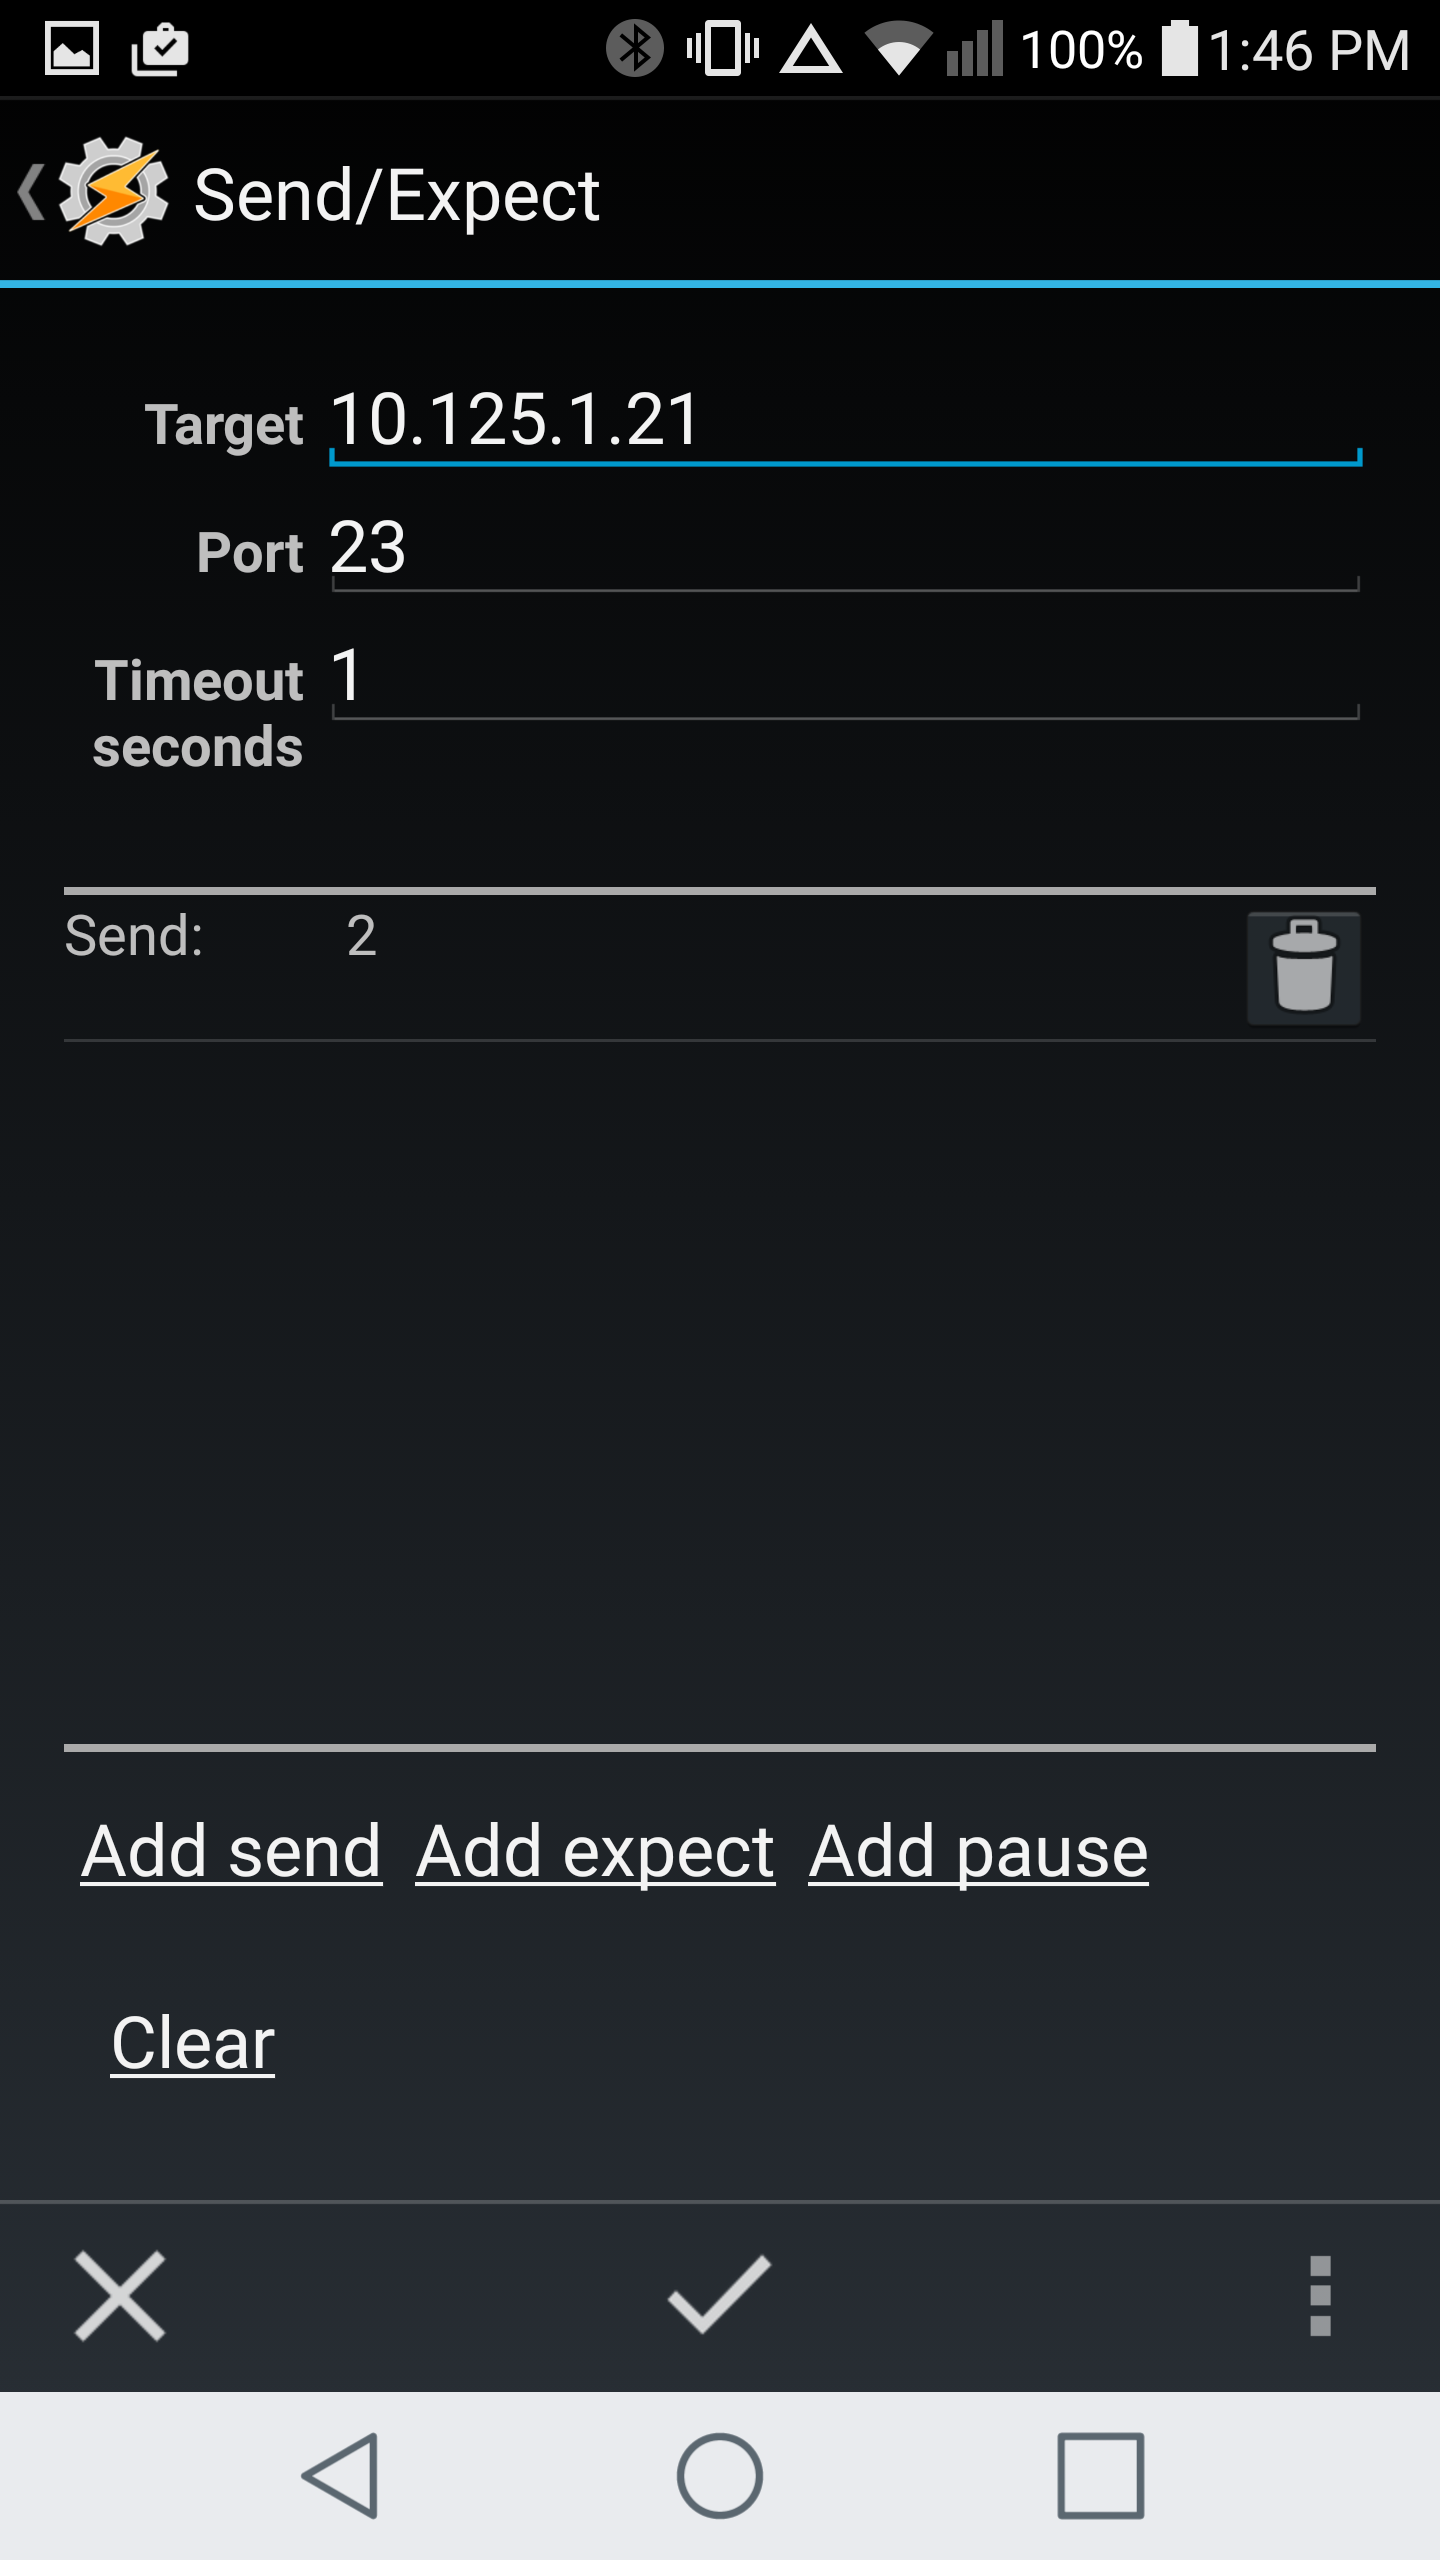
09/15/2016 at 17:51 • 0 commentsControlling the lights over a phone is relatively simple. I use two apps on my phone, Send/Expect https://play.google.com/store/apps/details?id=com.asif.plugin.sendexpect (Yes it is a paid app but there is a trial version available on their site for those just wanting to try it ) and Tasker https://play.google.com/store/apps/details?id=net.dinglisch.android.taskerm)
![]()
![]()
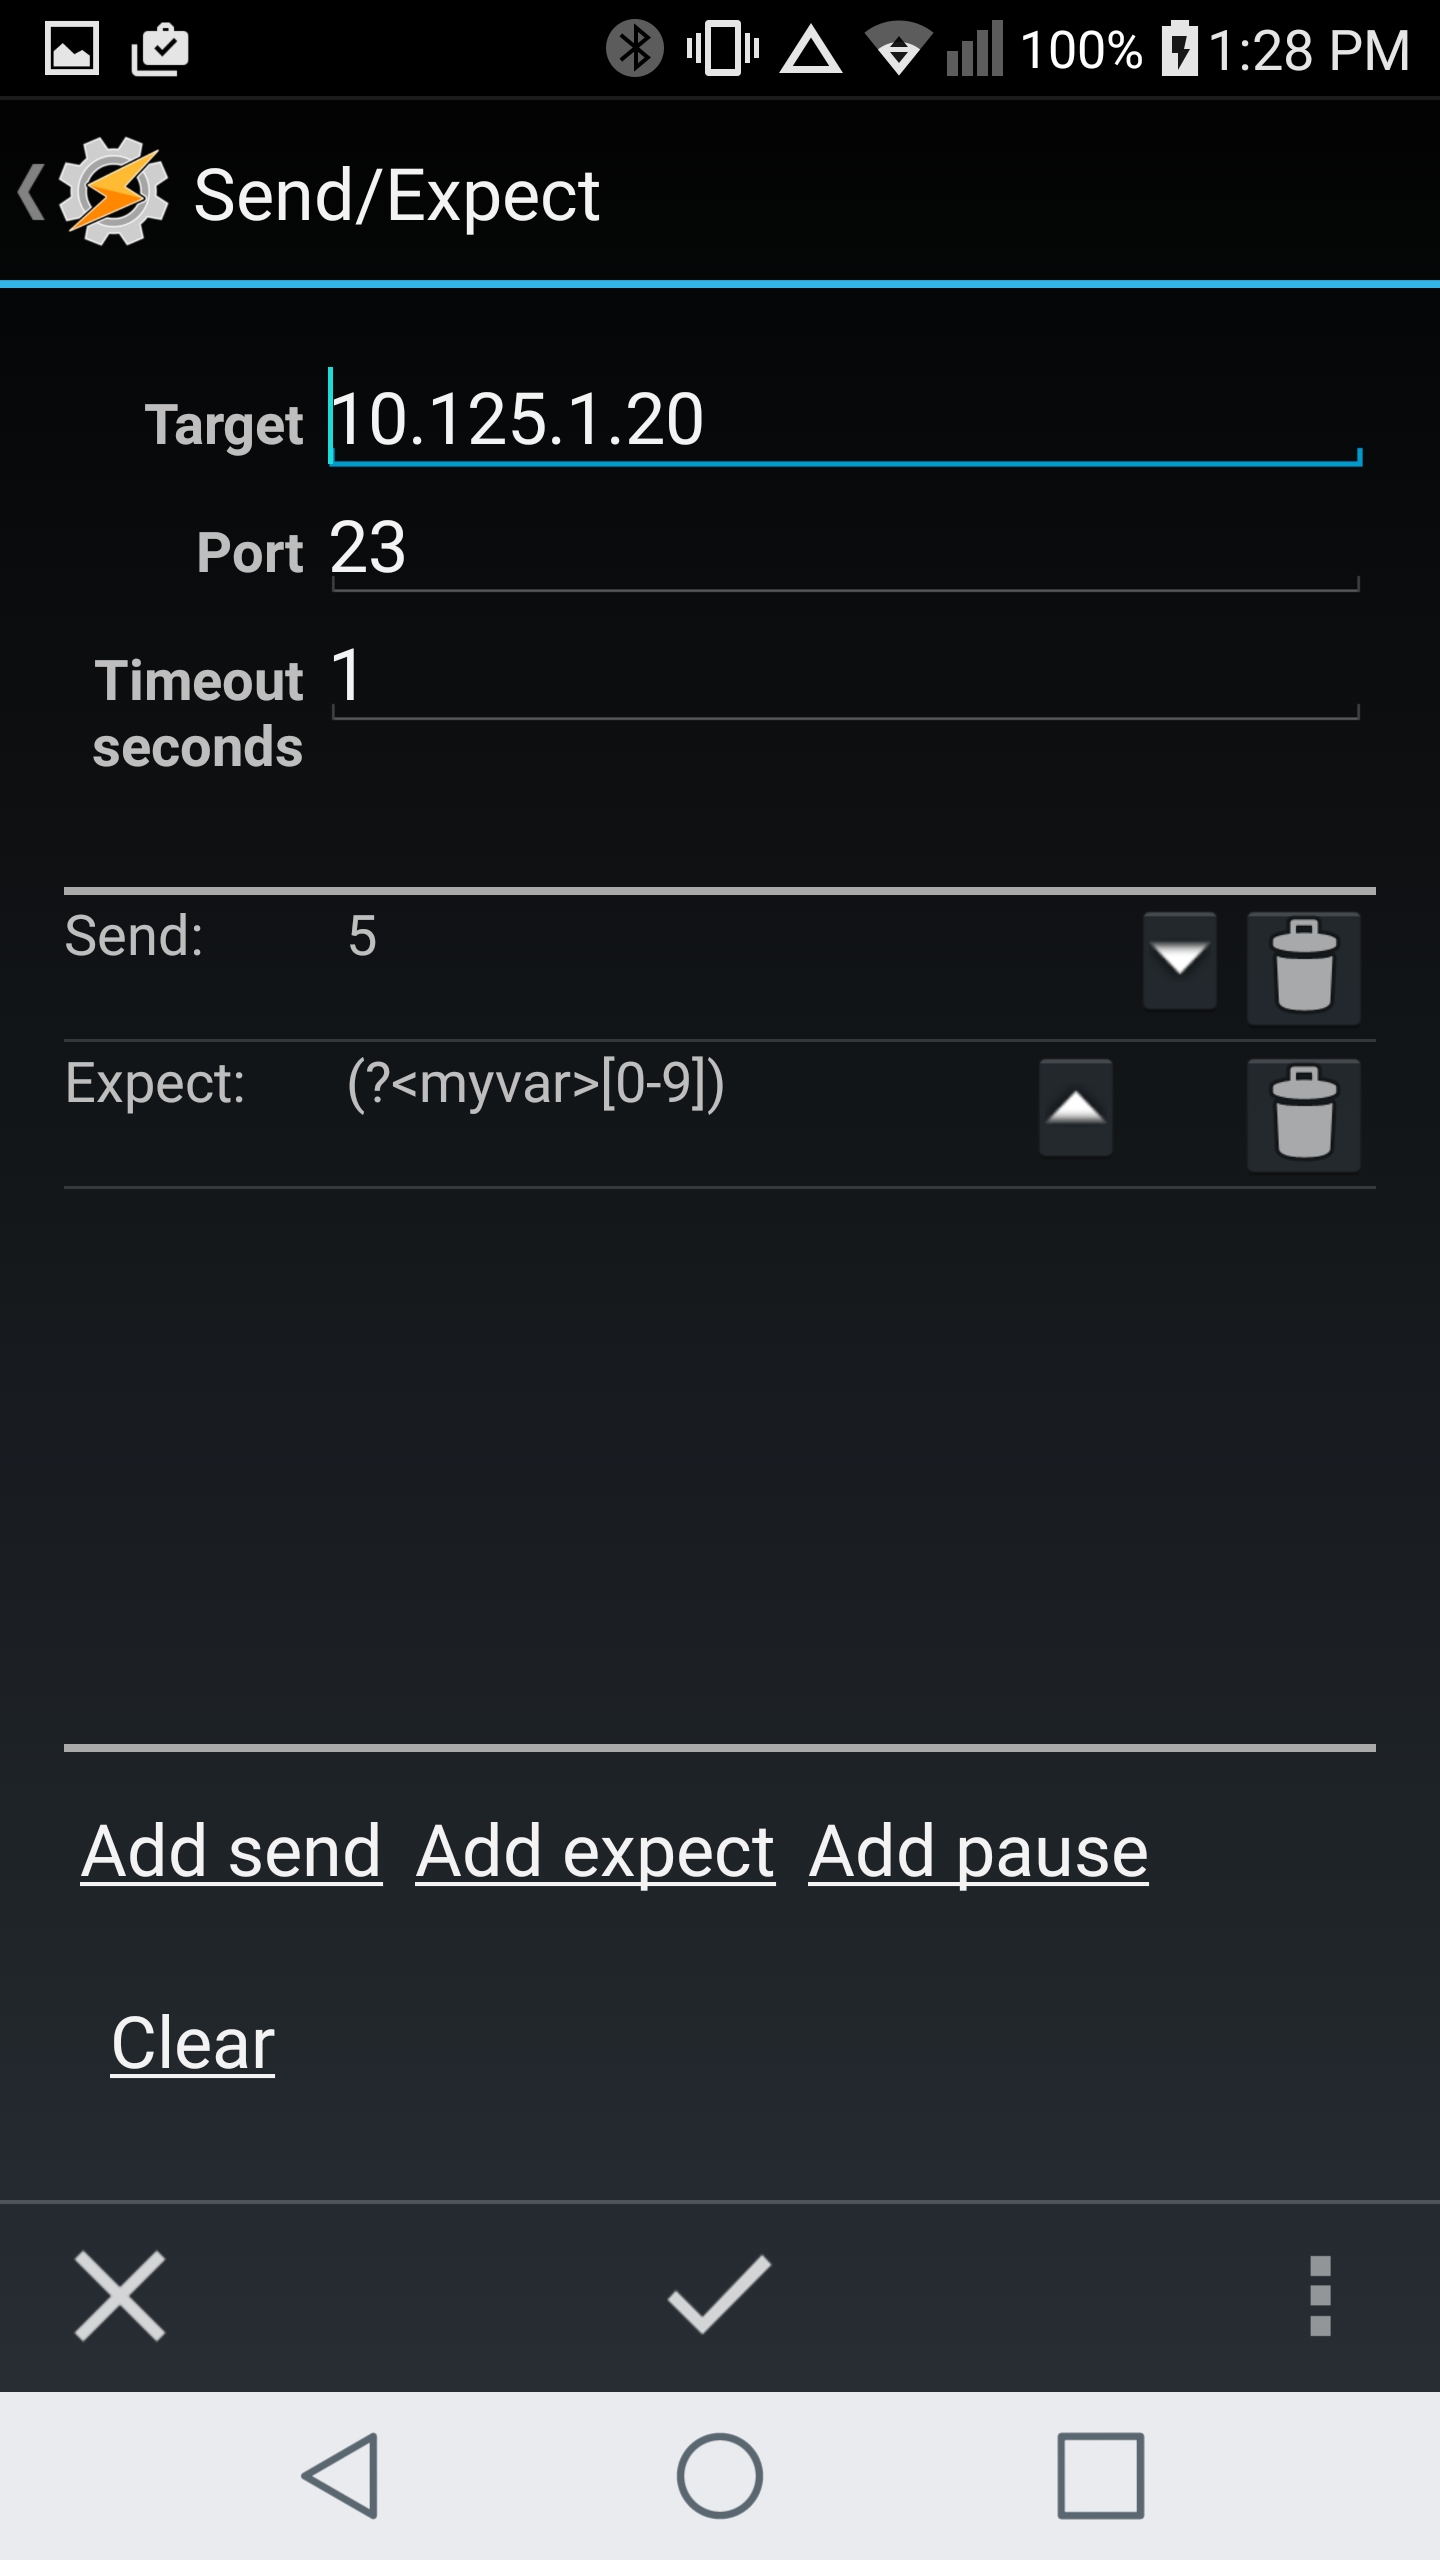
![]() The send variable is what controls the lights while the expect variable is how I am checking if the lights are on or off so if you just want a simple control, just use the configuration without the if or the expect as below.
The send variable is what controls the lights while the expect variable is how I am checking if the lights are on or off so if you just want a simple control, just use the configuration without the if or the expect as below. ![]()
![]()
![]()
-
Min Update
08/08/2016 at 03:25 • 0 comments
If everything is working correctly, this is how the webpage should look. Note the fan icon is animated when on and the lights have two states as well.![]()
-
Web Page
07/21/2016 at 05:03 • 0 commentsTime for the webpage. The page is written in php it is not the easiest way but I liked writing it. If you would like a tutorial on how to set up a Linux LAMP server please reply in the comments and I will try to get that up.
<?php

if (isset($_POST["ON0"])) {
 $fp = fsockopen("10.125.1.20", 23, $errno, $errstr);  // Replace the  IP address with your own
if (!$fp) {
    echo "$errstr ($errno)<br />\n";
} else {
    fwrite($fp, "2");
    fclose($fp);
	}
 }

else if (isset($_POST["ON1"])) {
  $fp = fsockopen("10.125.1.20", 23, $errno, $errstr);   // Replace the  IP address with your own
if (!$fp) {
    echo "$errstr ($errno)<br />\n";
} else {
    fwrite($fp, "3");
    fclose($fp);
	}
}

else if (isset($_POST["ON2"])) {
  $fp = fsockopen("10.125.1.21", 23, $errno, $errstr);  // Replace the  IP address with your own
if (!$fp) {
    echo "$errstr ($errno)<br />\n";
} else {
    fwrite($fp, "2");
    fclose($fp);
	}
}

if (isset($_POST["ON3"])) {


$f_pointer =fsockopen("10.125.1.20", 23, $errno, $errstr);  // Replace the  IP address with your own
fwrite($f_pointer,'4');
$fanstat=fread($f_pointer, 1); //1 is the character length to be read. arduino sends a char length data
fclose($f_pointer);

$f_pointer1 =fsockopen("10.125.1.20", 23, $errno, $errstr);   // Replace the  IP address with your own
fwrite($f_pointer1,'5');
$lightstat=fread($f_pointer1, 1); //1 is the character length to be read. arduino sends a char length data
fclose($f_pointer1);


$f_pointer2 =fsockopen("10.125.1.21", 23, $errno, $errstr);   // Replace the  IP address with your own
fwrite($f_pointer2,'4');
$lampstat=fread($f_pointer2, 1); //1 is the character length to be read. arduino sends a char length data
fclose($f_pointer2);


if ($lightstat == '1'){
	$nLightstat= 2;

}
else if ($lightstat == '0'){
	$nLightstat= 0;
}


if ($lampstat == '1'){
	$nLampstat = 0;
}

else if ($lampstat == '0'){
	$nLampstat = 2;
}

  $fp = fsockopen("10.125.1.20", 23, $errno, $errstr);      // Replace the  IP address with your own
  $fp1 = fsockopen("10.125.1.21", 23, $errno, $errstr);    // Replace the  IP address with your own
if (!$fp ) {
    echo "$errstr ($errno)<br />\n";
}
else {
    fwrite($fp, $nLightstat);
    fwrite($fp1,$nLampstat);

    fclose($fp);
    fclose($fp1);

	}
}


$f_pointer =fsockopen("10.125.1.20", 23, $errno, $errstr); // Replace the  IP address with your own
fwrite($f_pointer,'4');
$fanstat=fread($f_pointer, 1); //1 is the character length to be read. arduino sends a char length data
fclose($f_pointer);

$f_pointer1 =fsockopen("10.125.1.20", 23, $errno, $errstr); // Replace the  IP address with your own
fwrite($f_pointer1,'5');
$lightstat=fread($f_pointer1, 1); //1 is the character length to be read. arduino sends a char length data
fclose($f_pointer1);

$f_pointer2 =fsockopen("10.125.1.21", 23, $errno, $errstr); // Replace the  IP address with your own
fwrite($f_pointer2,'4');
$lampstat=fread($f_pointer2, 1); //1 is the character length to be read. arduino sends a char length data
fclose($f_pointer2);

if ($lightstat=='0') {
   $Source="/images/offbulb.png";
   $stat = "Off";
} else {
  $Source="/images/onbulb.png";
  $stat = "On";
}


if ($fanstat=='0') {
   $Source1="/images/fan.png";
    $stat1 = "Off";
} else {
    $Source1="/images/fan.gif";
     $stat1 = "On";
}

if ($lampstat=='0') {
   $Source3="/images/offbulb.png";
    $stat2 = "Off";
} else {
    $Source3="/images/onbulb.png";
     $stat2 = "On";
}


$verz="1.0";

?>

<html>
<body>

<center><h1>MY LIGHTS</h1><b>Version <?php echo $verz; ?></b></center><br/>
<center><b>Lights <?php echo $stat; ?> <img src="<?php echo $Source; ?>"  alt="Light Off" height="42" width="42" </a> </b></center>
<center><b>Fan <?php echo $stat1?>  <img src="<?php echo $Source1; ?>"  alt="Light On" height="42" width="42" </a> </b></center>
<center><b>Lamp <?php echo $stat2?>  <img src="<?php echo $Source3; ?>"  alt="Light On" height="42" width="42" </a> </b></center>


<form method="post" action="temp.php" >
<center><h3>Bedroom</h3>

<input type="submit" value="Lights" name="ON0"  action="temp.php" width=20% height=10%><br/><br/>

<input type="submit" value="Fan" name="ON1"  action="temp.php"width=20% height=10%  ><br/><br/>

<input type="submit" value="Lamp" name="ON2"  action="temp.php" width=20% height=10%  ><br/><br/>

<input type="submit" value="Night Mode" name="ON3" action="temp.php" width=20% height=10%  ><br/><br/>

<!--

<br/></center>

<b><img src=temp_graphShort.png></a></b><br/>

<b><img src=temp_graphtoday.png></a></b><br/>

<b><img src=temp_graph.png></a></b><br/>

<b><img src=temp_graphmonth.png></a></b><br/>

<b><img src=temp_graphyear.png></a></b><br/>

<center><b><img src="stream.php"></b><br/></center>-->


</form>

</body>
</html>
There is some code that is repeated but this is so the status will show correctly without reloading the entire page each time.
You may have to allow the script root / admin privileges to access the com port.
I have marked where to change the ip address. In this example, I am using two different nodes so there are two different ip addresses used.
Home automation on the cheap
Using an esp8266, arduino nano, a salvaged usb power supply, and a couple relays you can automate anything