-
Camera Considerations
06/05/2016 at 20:54 • 0 commentsThe RTI system I've designed and built has full control over turning lights on and off inside the dome. It can also turn the camera on and off in sequence with the lights, and do both in an automated, sequential fashion ... but only if there's a way to fire the camera automatically using the Arduino-based controller. There is a manual option, where you can turn a light on, press the shutter manually, then go on to the next light, but that requires you to sit at the system and push buttons for a few minutes at a time; automatic is much better. The following camera remote modes are currently supported by the control system:
- The control software uses Sebastian Setz's Multi Camera IR Control library, which currently supports cameras with IR remote capability from Canon, Nikon, Olympus, Pentax, Sony, and Minolta. Double-check that your camera has IR capability; for example, Canon DSLRs do but most Canon point-and-shoots don't.
- I've also built hardwired remote cables that work with Canon/Nikon cameras, using the pin out specs at this page. Basically, you use an optoisolator as an electronic relay to close a circuit and fire the camera. If your camera supports a hardwired remote, there should be a way to hack it to work this way as well.
- Most Canon point-and-shoots do not support a remote by default. But the Canon Hack Development Kit (CHDK) allows many Canon point-and-shoot cameras to be fired remotely through the USB connector, and this is the system I normally use for most of my RTI photography. Not all Canon point-and-shoots are supported, though; in particular, support for the most recently-released Canon point-and-shoots is spotty to non-existent. Check the list of supported cameras on the main CHDK page to make sure your camera is supported. I use the Canon S110 Powershot (not the Elph); not only does it support CHDK, it also has support for the RAW format. It's also very small and lightweight, perfect for a portable system.
- If your camera can be fired via computer software, the control code supports firing the shutter using the Adafruit Bluetooth HID module. I use this for automated control of microscopic RTI using USB microscope imagers, but it should work fine with Canon/Nikon PC software for controlling cameras, or any other computer-based camera controller.
After I've finished fully documenting dome construction, I may look at designing/building a simple mechanical system to fire a pushbutton shutter on any camera using a servo. No promises, though. And if you've seen plans for such a shutter servo online, please send me the link - I'd rather not re-invent the wheel.
-
More Dome Stuff
06/05/2016 at 20:20 • 0 commentsHopefully, after reading the previous log, you have enough info to figure out how big a dome you need. But there are a few more details you may need when ordering a dome.
- While you can use any dome-shaped object you like, like a styrofoam dome, I've always used acrylic domes. They're sturdy, and come in a wide range of sizes. My source for domes in the US has been EZ Tops Worldwide; they have a wide variety of sizes and styles, and prices are reasonable compared to other sources I've seen online. Outside of North America, you're best off finding a local supplier if at all possible; shipping costs for domes are high. If you're from outside North America, and find a good dome supplier, please let me know in the comments and I'll add them to a list.
- Speaking of which: the prices at EZ Tops are for the domes alone. Shipping costs can easily increase the cost by a factor of 2 or more - the larger the dome, the higher the factor. I'm guessing this will be true for any acrylic dome vendor.
- When spec'ing the dome, make sure to specify the following dimensions:
- Flange dimension. This is a rim on the outside of the dome, useful for handling the dome as well as attaching it to a stand. 3/4" flange size is fine for domes up to about 15" diameter, above that I'd spec 1". No need to go larger than 1", even on a big dome.
- Dome diameter. This is the size you choose based on the previous project log entry. This diameter does not include the flange.
- Dome height. This should be half the dome diameter, so that the shape of the dome is essentially a uniform half-sphere.
- Material thickness. Thinnest available thickness is fine - the dome isn't going to bear any significant amount of weight, and the material is quite rigid. Thinnest is also cheapest.
- EZ Tops domes come in several acrylic colors: clear, white, tinted, and black. You're going to be painting the interior of the dome to minimize intrusive lights, and light scatter, so any of these would be usable. Clear is the cheapest option, and will have a cool shiny black appearance after you paint the inside of the dome; this is best for any domes you will only be using indoors. For a dome intended for outdoor portable use, I'd recommend white, since that color will help keep it cooler in the sun. I'd stay away from tinted or black; not only are they more expensive, but they make marking the positions to mount LEDs more difficult (you'll see why in the first instructions section, coming soon).
- Domes need to have a hole in the top for the camera to look through. I have manually cut holes in acrylic domes several times for this purpose, but I will never do it again. Acrylic is very tough to drill through - melts when you cut, the bits catch on the edges, and it cracks/breaks all too easily. When you choose a dome supplier, make sure they offer the option to cut a hole in the top. Costs a few bucks, but it's definitely worth it in ease and peace of mind. The size of the hole will depend on the size of the camera lens/aperture you plan to use with the system. 2.5" is a good size for most point-and-shoots, and also for DSLR macro lenses that won't need to be lowered into the dome (e.g. for a 12" diameter dome, 6" hole to specimen distance, 6" lens working distance). If you do need to lower a macro lens into the dome a bit to get closer to the object, you'll need to specify a hole diameter that will allow the entire lens to fit inside. I think 3" should work for most macro lenses, but you'll need to check your lens size specs to make sure.
- Don't throw out the box they ship the dome in - it makes a handy carrying container.
-
Under The Dome
05/30/2016 at 21:48 • 0 commentsRTI requires you to take photographs from a fixed position above the object of interest, but at multiple lighting angles all the same distance from the center point of the object. All points at the same distance from a single center point => sphere. But you're only photographing one side of the object => dome. Attaching lights to the inside of the dome, pointing inwards, is probably the easiest way to handle the lights, and certainly the most common. There are alternate ways to get lights in an equiradial pattern without a dome, but those usually involve quite a bit more work and expense. Feel free to explore alternatives if you like, but from this point on, I'll only deal with domes.
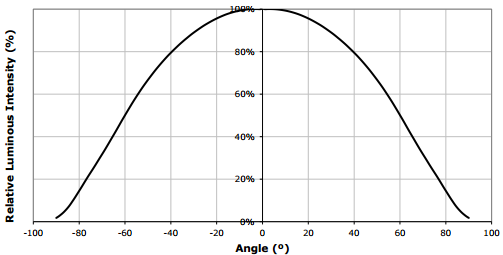
I'll talk more about the kind of domes I've been using in the next post, and what to look out for when ordering one, but for now the important question you have to ask yourself is, how big a dome do I need? To answer that question, you have to think about what an ideal light source would be for RTI. It would be at a constant incident intensity across the entire object you were imaging, and also all the light rays would be parallel. But unless your light source is infinitely far away from the object, that's virtually impossible to achieve. For a perfect point light source, the intensity will drop off inversely proportional to the square of the distance (the classic inverse-square law, describing how a spherical intensity changes with distance). But LEDs are not a perfect light source in that their output light varies with angle. For the LEDs I'm using, maximum intensity occurs at an angle of 0 degrees, and drops off essentially with the cosine of the angle ( the Lambertian distribution).
Lambertian distribution of light intensity with angle in one dimension (Source: ledsupply.com)![]()
The further away the light is from an object, the less important both of these effects become. The radius of the sphere of light becomes larger and flatter, so that the variation in light across the object decrease; the angular width relative to the light position also decreases, so you're up at the flatter part of the Lambertian curve centered around zero degrees. So, ideally, you'd want a dome of nearly infinite radius. Not only is this not practical, but then you have to increase the power of the light source so that some reasonable amount of it is still available to hit the object and light it up - also not practical. So you're going to have to live with some non-uniformity of lighting, but the bigger the dome, the relatively more uniform the light will be over a larger area.
Cultural Heritage Imaging says, based on their experience, that the maximum object size you can get good results from is roughly half the radius of the dome, e.g. a 12" diameter dome would have a radius of 6" and a maximum object size of about 3"; 18" dome has a 9" radius and a 4.5" max object size; a one-meter dome would have a radius of 50 cm, and a maximum object size of 25 cm (just shy of 10"). My personal opinion is that these are conservative numbers, and you can get useful results from objects that are up to 25% larger than these, but YMMV. I'm working on some ideas to extend these size limitations, but they're not ready yet.
So bigger is better? In terms of light uniformity over a larger area, yes. But there are trade-offs:
- Larger domes mean that the light intensity will be lower at the object, since it's further away from the light source. For my 12" dome, exposure times are typically on the order of 1/15th second, while they're about 1/5th second for my 18" dome. Extrapolate out to a meter-size dome, and you get a one second exposure. This is with a compact point-and-shoot at 3.1x zoom (f/5.6) at ISO 100, and you would get better results with a better camera using a faster lens, larger aperture, higher ISO, etc.. The camera is in a fixed, rigid position so you don't have to worry about camera shake limiting exposure. Still, at some size, the exposure times may become longer than you're willing to live with.
- Larger domes will cost more. I've bought all my domes from EZ Tops, and been very happy with them. If you check their website and price domes, the listed price of a 24" dome is only about $20 more than a 12" dome. But it's the shipping costs that will kill you - they're about $35-40 for a 12" dome, and over $100 for a 24" dome. Plus, a 12" dome only has room for 48 LEDs (15" minimum for 56 LEDs, 18" minimum for the maximum 64 LEDs supported by my controller design), so you'll save some money by not needing as many LEDs.
- Larger domes require larger stands and more space, and are less portable.
- If you want to do high-magnification RTI, working either with a USB microscope or a DSLR with a macro lens, you'll need to have a smaller dome for maximum magnification. Typical working distances for macro lenses are on the order of 6", as are typical lengths for USB microscopes, so a 12" diameter dome would probably be the optimum size for that application. Note 1: My controller can work with any size dome, so budget allowing, you could build multiple domes of different sizes, and run them with the same controller (not all at the same time). Note 2: Distances for macro lenses are often given as the distance from the object to the camera's focal plane, which is not the same as the working distance, the distance from the front of the lens to the object you're photographing.
All a long-winded explanation leading to some basic rules:
- If the most important factor to you is the size of the objects you want to image, measure the largest dimension of the largest object you need to image, multiply by 2 or a bit less, and that's the minimum dome diameter you'll need.
- If you need to do high magnification imaging with a macro lens or USB microscope, I'd recommend 12" diameter as the optimum size. I wouldn't go smaller, as you rapidly run out of room to install LEDs inside if you use domes smaller than that.
-
Beginning At The Beginning ...
05/29/2016 at 03:35 • 0 commentsSo this log isn't going to be just a description of my progress, though I will have posts that keep you up to date on where I'm at with my build. It's also going to include information about some basic decisions you have to make before starting your own build, and also explanations of why I've made the choices I did in designing and constructing my system (spoiler alert: making lots of mistakes helps refine your design). If you have questions about specific design choices, or if you think I should be doing things a better way, don't hesitate to post in the comments.
So, roughly speaking, there are three basic components to the system:
Controller/power supply - This system turns the LEDs on and off, and fires the camera shutter in sync with the lights to create a set of photos with multiple lighting angles that get processed into RTI datasets. The controller I've designed is universal, meaning that it will be the same regardless of how large a dome you build, and how you ultimately decide to mount the dome.
RTI Dome - This is the active part of the system. It has lights on the inside that the controller turns on and off, it has a hole in the top that the camera looks through; the object you want to image sits inside the dome, directly under the camera.
Stand - This is just a way to mount the dome to make swapping objects in and out easier. Its design will depend on the size of the dome, and how you want to handle placing objects inside for imaging.
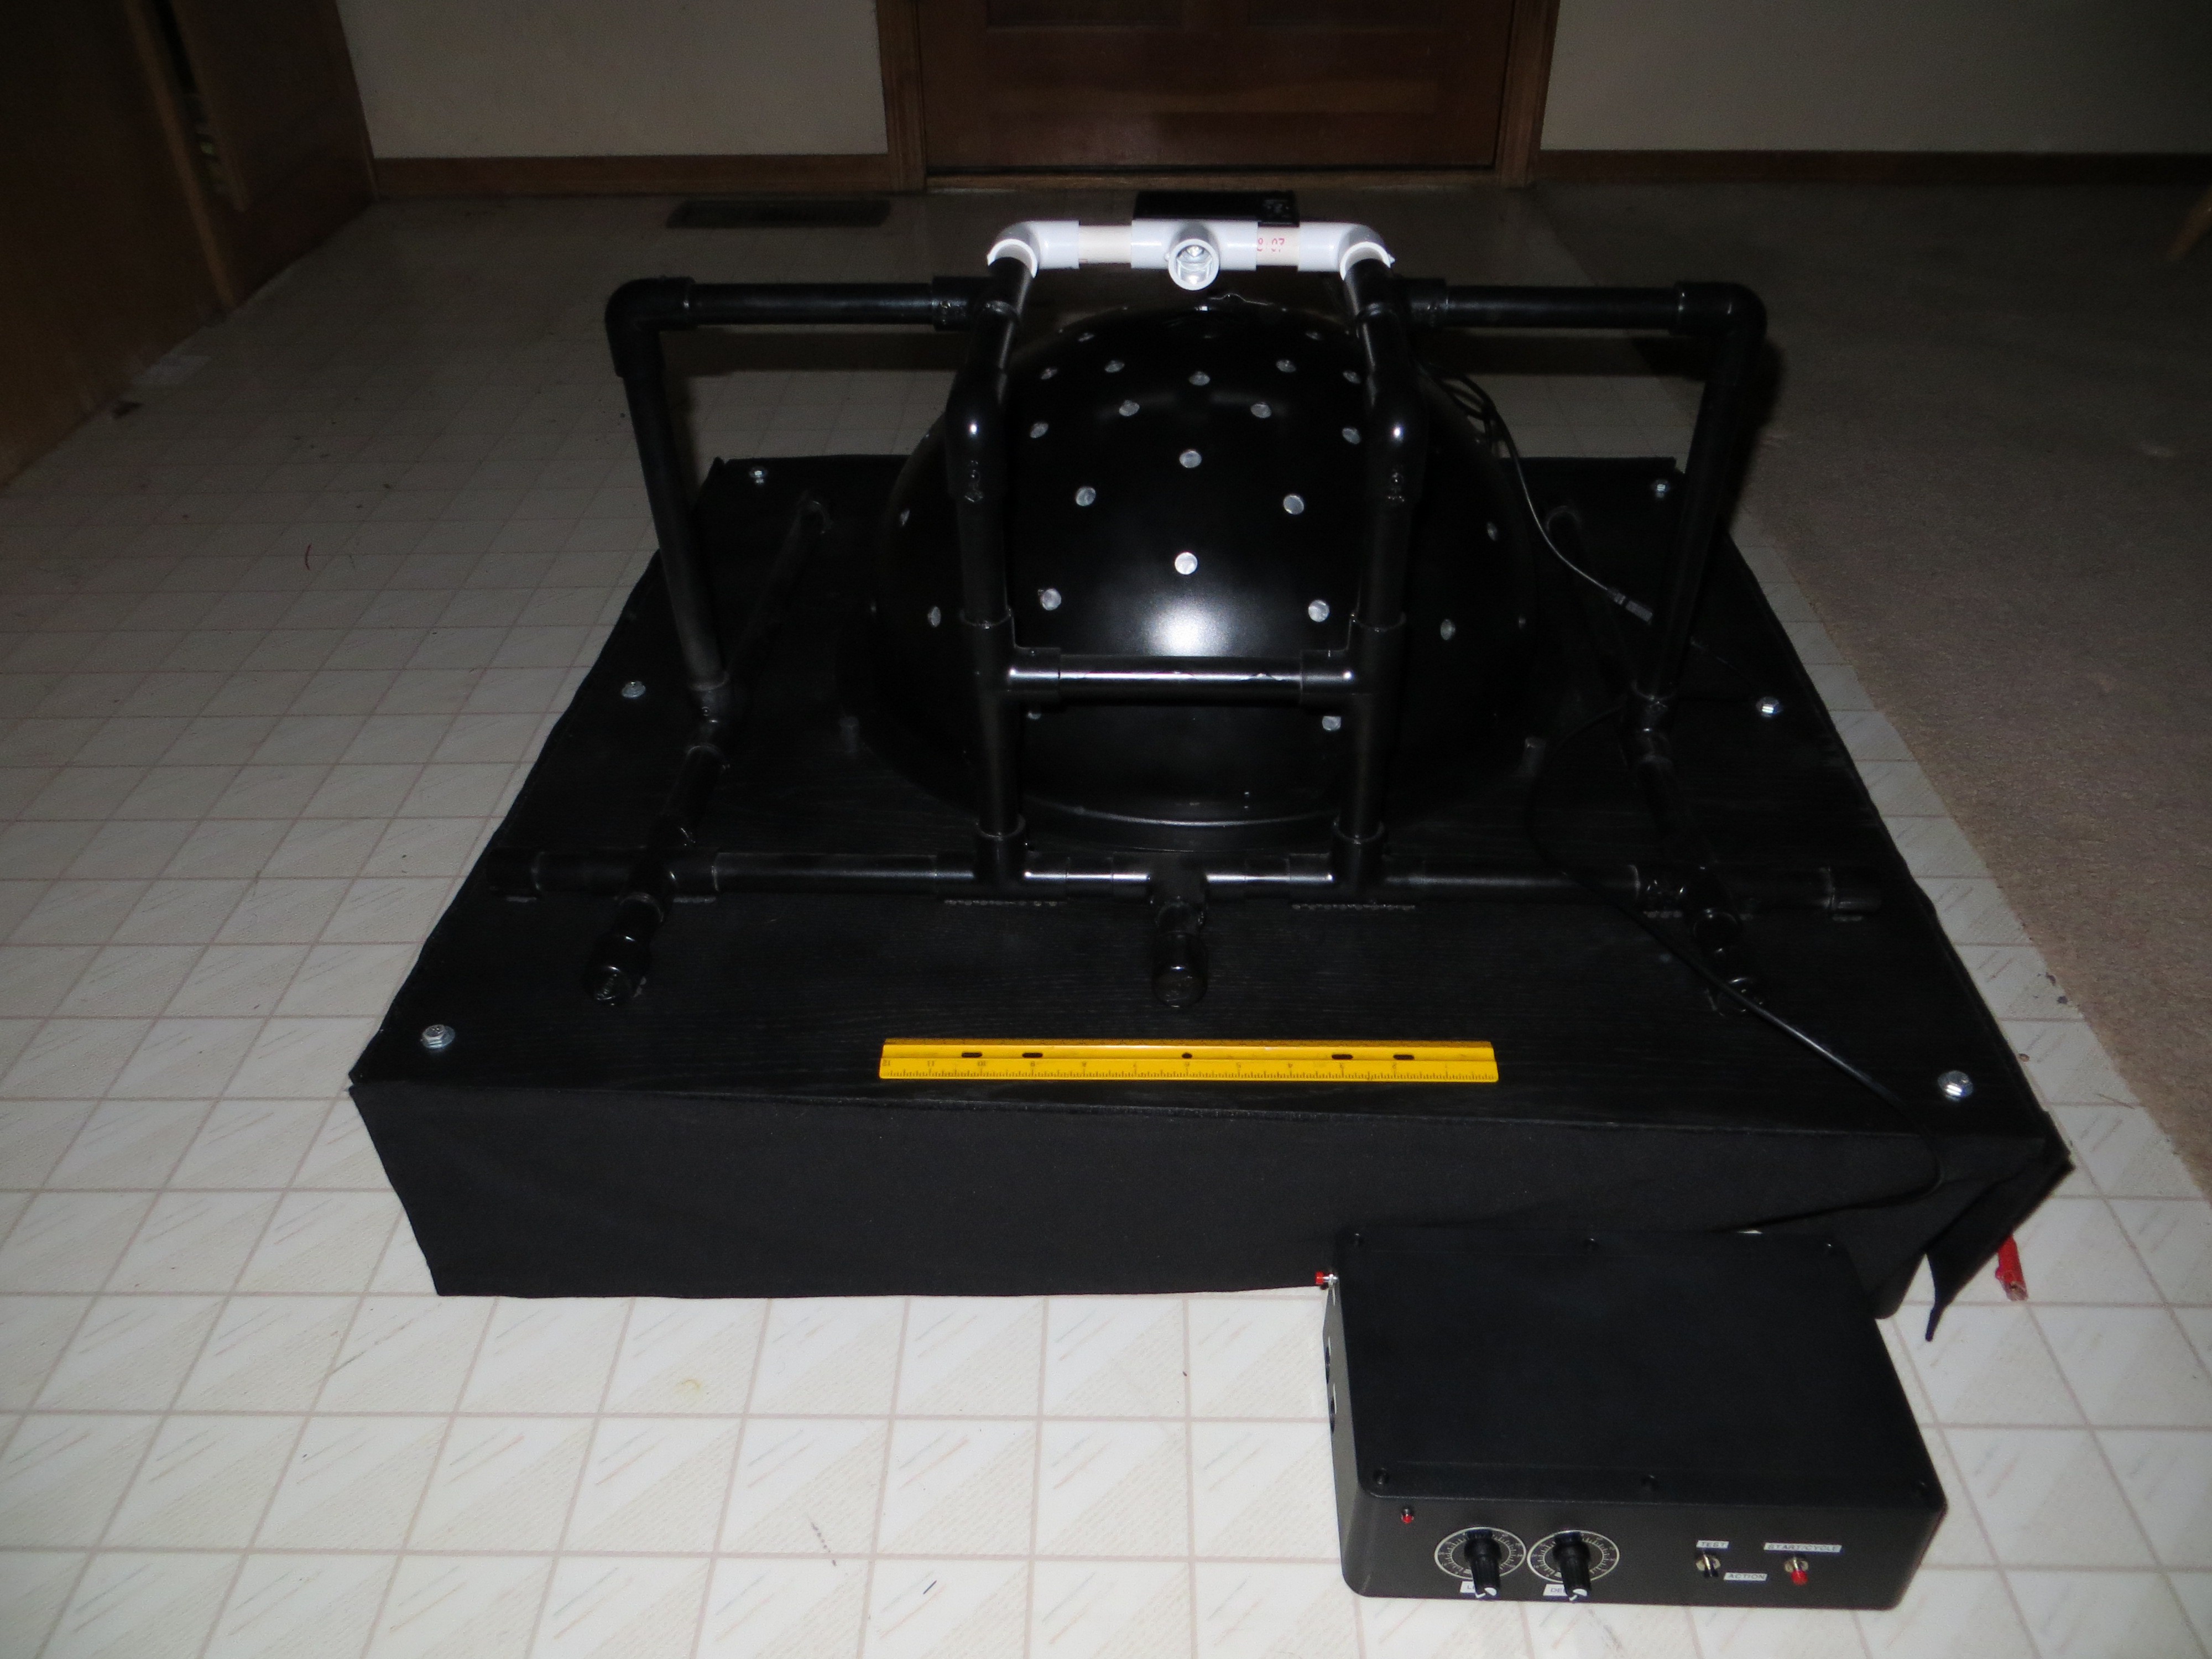
Here's a photo of my first dome, stand , and controller (after multiple rebuilds).
![]()
The 18"-diameter dome is sitting on top of a raised platform, so that I can slide samples in and out on top of a lab jack sitting directly underneath the center of the dome. The odd structure on top, with black and white piping, is a camera stand made out of PVC pipe, to hold the camera above a hole in the top of the dome; I've since come up with several better options. And the controller/power supply is sitting at the foot of the stand; two cables from the dome plug into the controller.
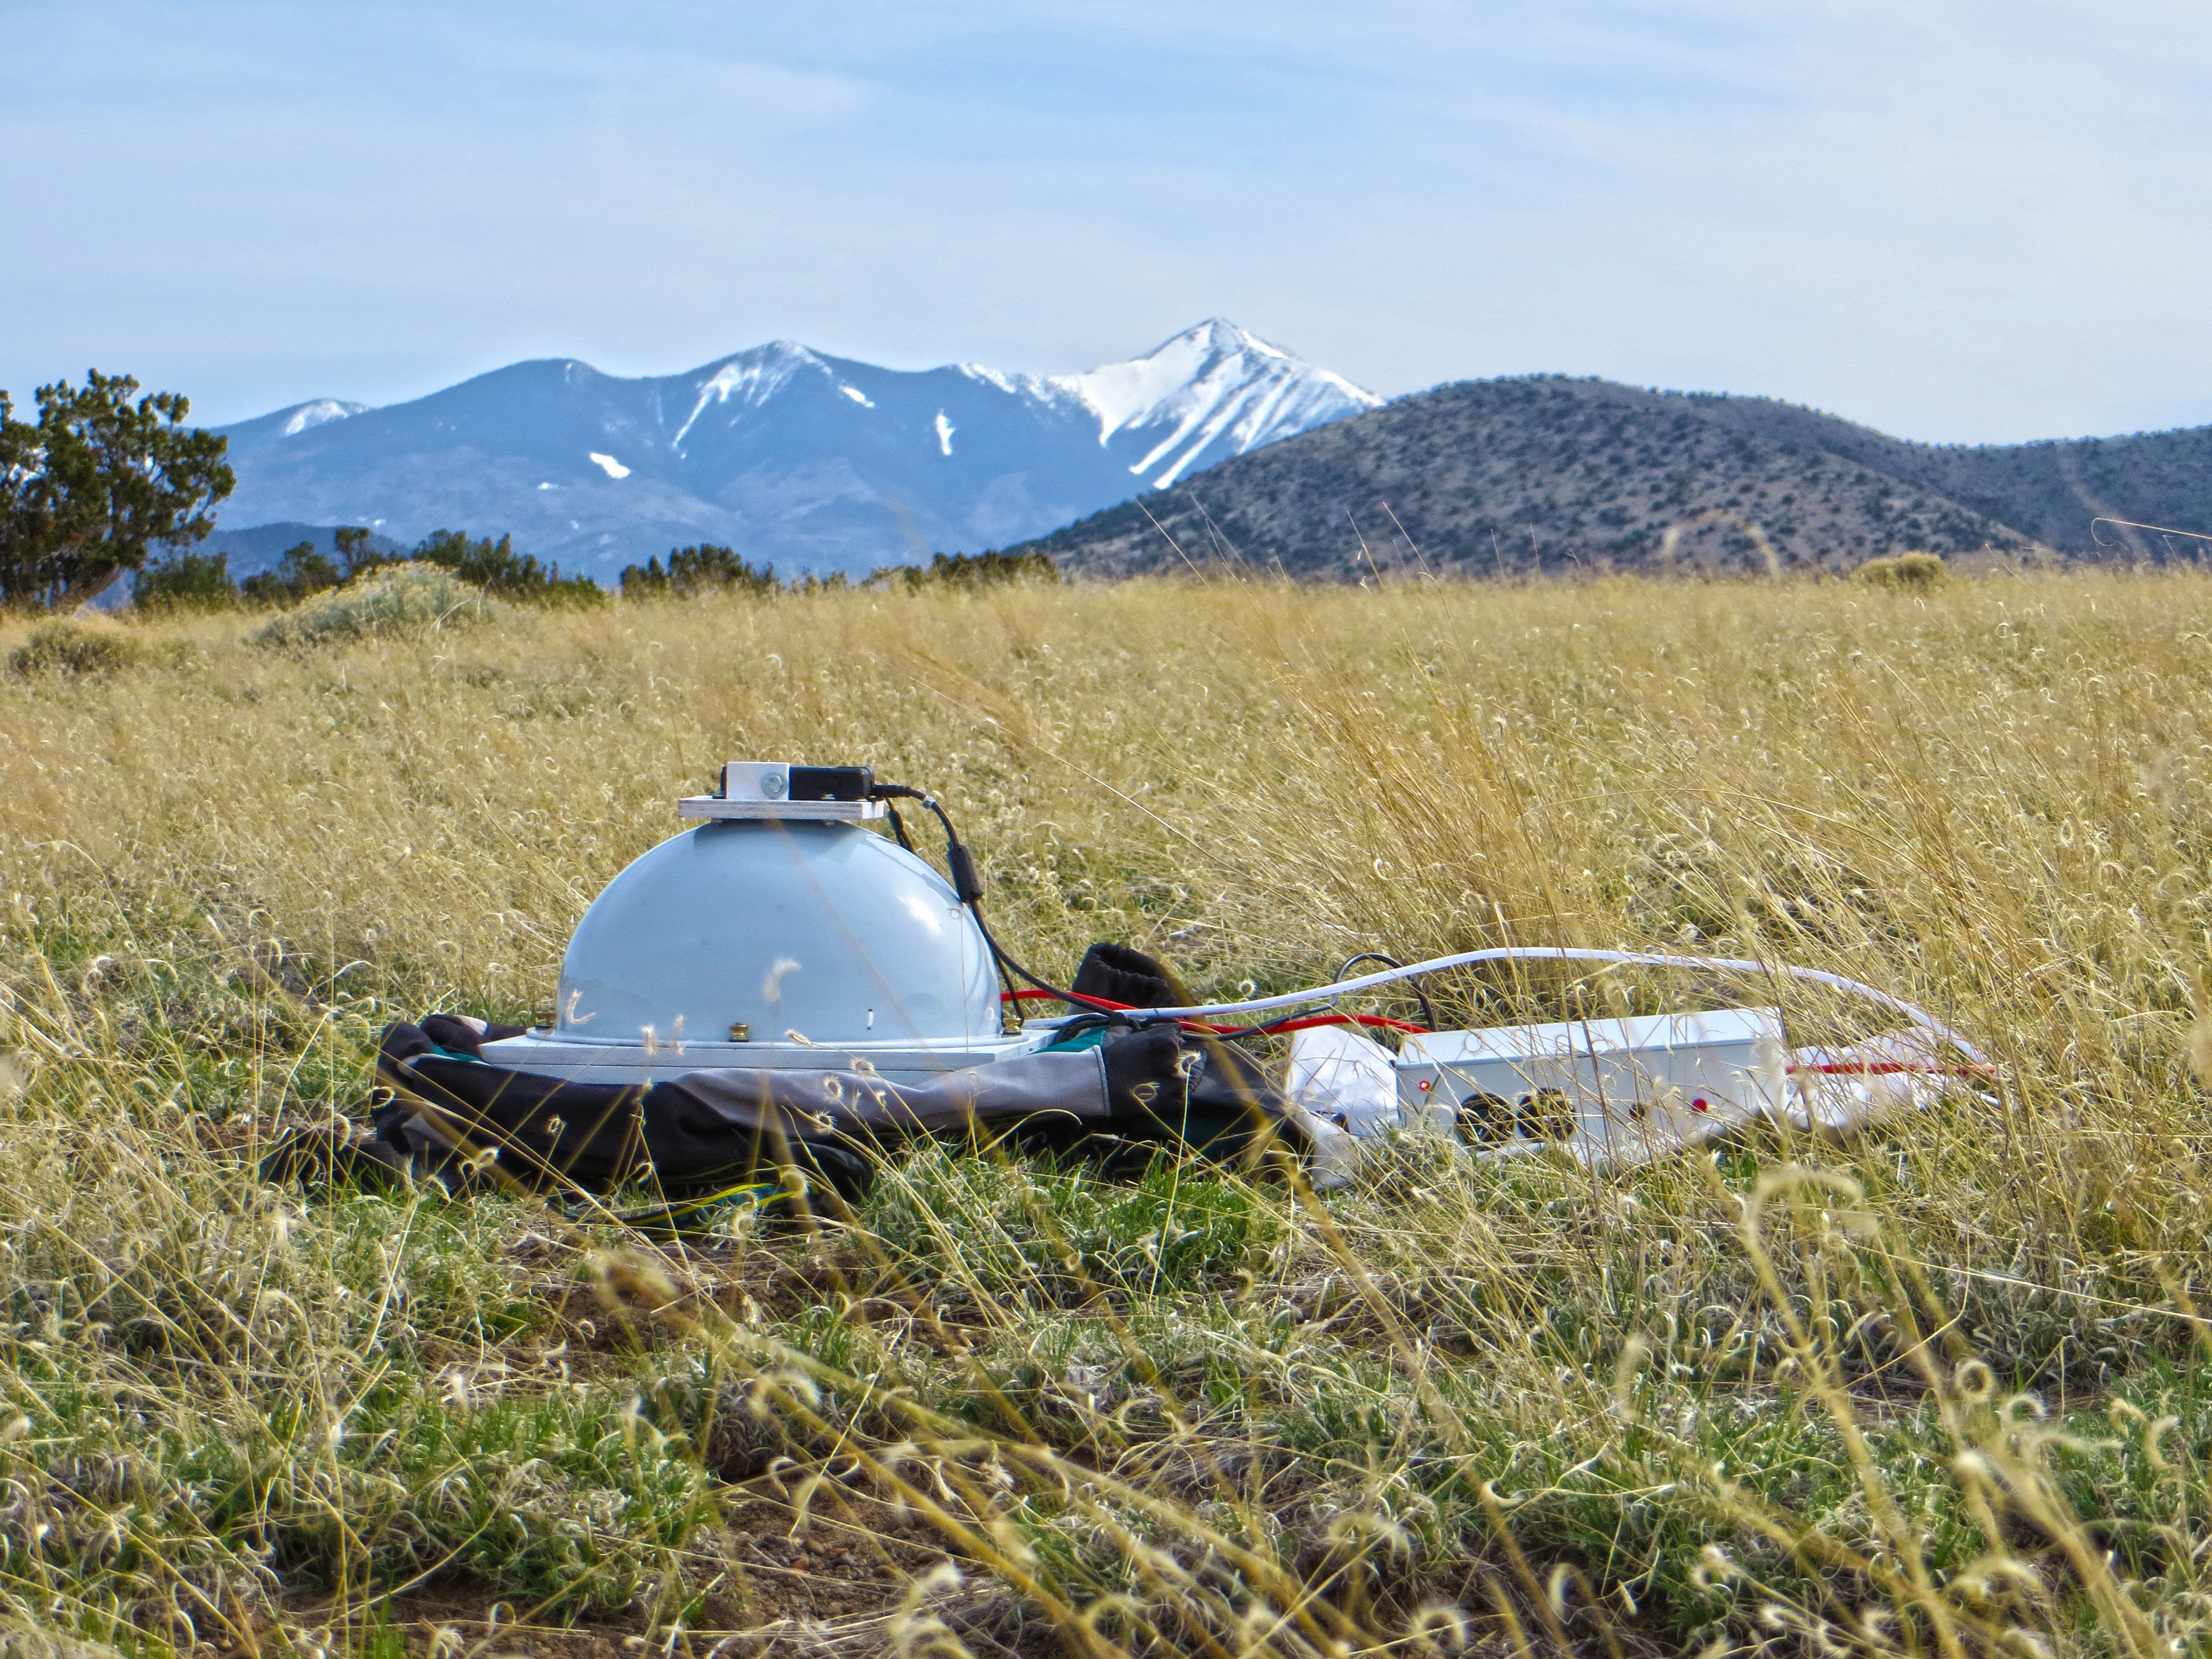
And here's my most recent dome, a smaller 12" dome that's fully portable and battery operated, along with the stand and controller, in a nicely-scenic setting:
![]()
In this design, the dome is on a hinged board that lifts up to allow you to place the object inside. And yes, it is fully functional out there - you can run any dome controller off a battery pack with 9-12V DC, as long as it has the proper jack.
And here's a short video that shows the action going on inside, lights at different angle positions on the inside of the dome going on and off, and the camera pointed at the object you want to image (though in this case, the camera was not firing):
So, the controller design is set, and there are no choices you have to make about it. The stand will depend on the size and use of the dome. The dome, and more specifically the size of the dome, is the big decision you'll have to make, and that will depend on what you plan to use the dome for. And that's a topic for the next log.
Affordable Reflectance Transformation Imaging Dome
A simple and inexpensive way to image and analyze subtle surface details on objects.