David H Haffner Sr
-
DH4 v4a Spectrometer_Absorption & Emission Experiments
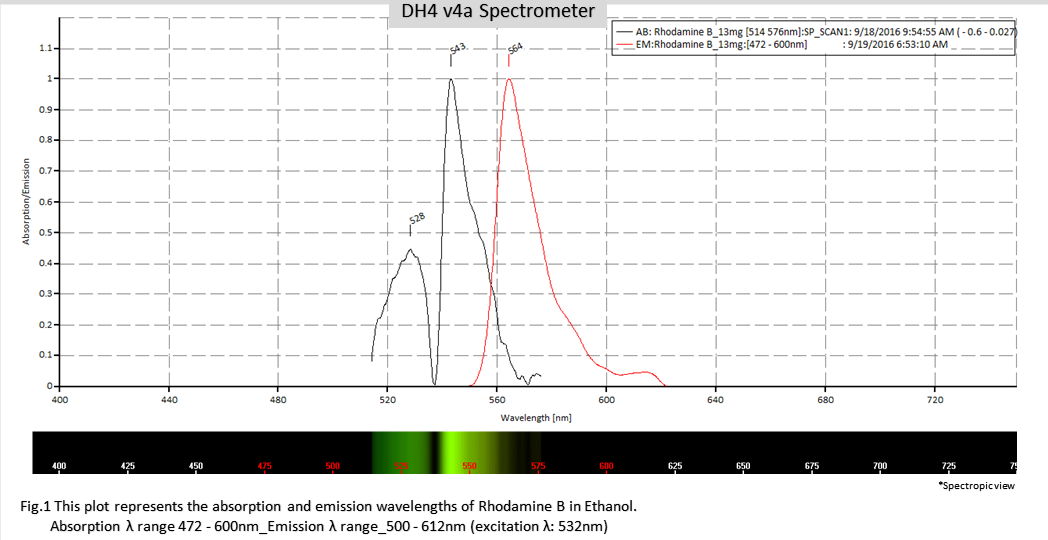
09/20/2016 at 15:32 • 0 commentsAbsorption and Emission plot for Rhodamine B in Ethanol Figure.1, using my DH4 v4a spectrometer and a Solux 4700K 12vdc 50W/36deg Lamp, for the absorption spectra:
![]()
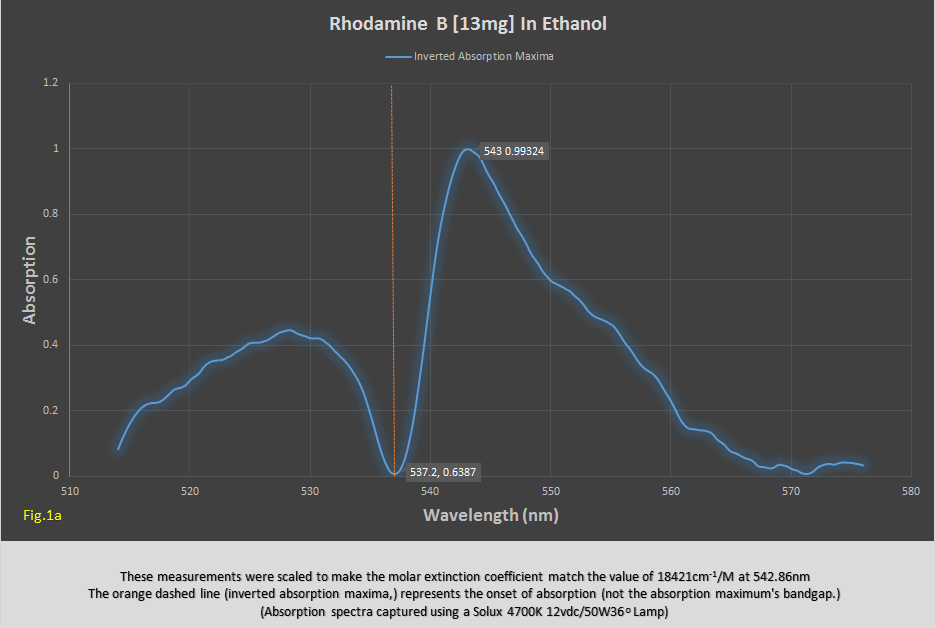
Fig.1a, shows the inverted absorption maxima along with the absorption spectra for Rhodamine B, usually you never see the inverted plot, but I found it to be educational for myself, because it is the onset of the actual absorption of the molecule itself.
![]()
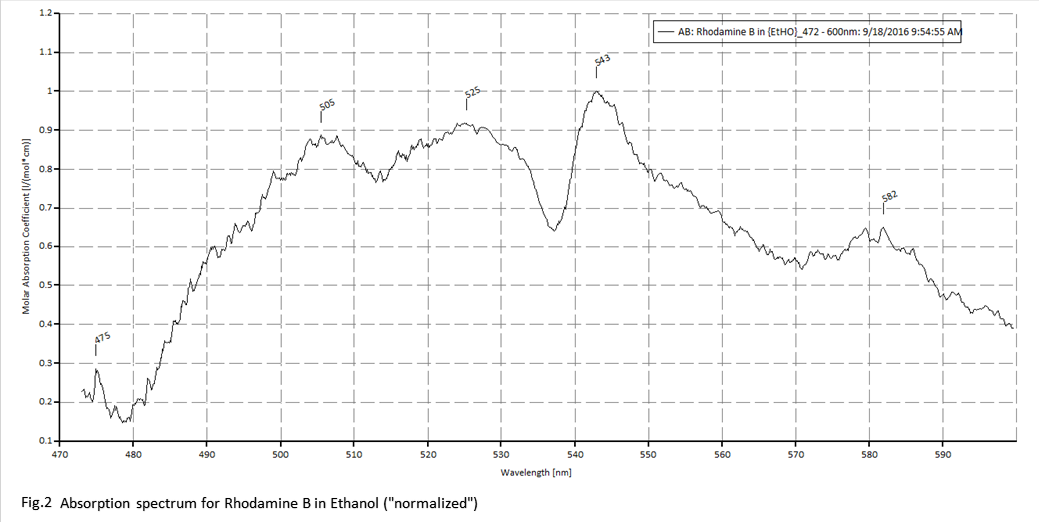
Fig.2 shows the absorption spectrum from 472nm - 600nm using the Solux 4700K 50W lamp. You an clearly see the inverted absorption band (537.2nm) and absorption maximum at 542.86nm.
![]()
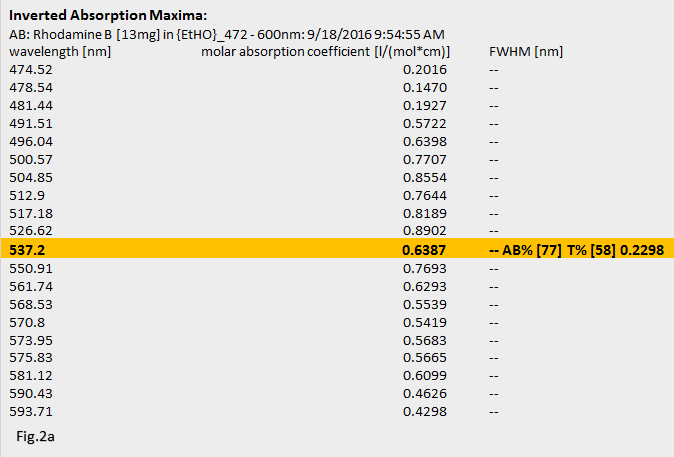
Fig.2a is the data table for the absorption spectrum, with the inverted maxima highlighted in yellow:
![]()
Also in Fig.2a, I included the absorption percent and transmission percent values on the right in yellow.
Emission scan was done using my Aries 150mW DPSS green laser, excitation @ 551nm.
-
Spectral Resolution Calibration for the DH4 v4a Spectrometer 9/17/16
09/17/2016 at 10:46 • 0 commentsI finally found a way to get all the purple film off of the DVD piece that I use as my diffraction grating for the spectrometer, so now it is as clear as glass! I re-did the resolution calibration to make sure the DVD piece is aligned correctly.
This is exactly how to remove that purple residue in less that 30 minutes without damaging the DVD piece, 100%!
I used a 30 percent solution of acetic acid (the substance that makes vinegar what it is) and filled a 150ml flask with about 20ml of the acid, put the DVD section in there and waited for 20 minutes and using latex gloves (acetic acid at this concentration, WILL cause severe chemical burns to your body!) removed it and rinsed it thoroughly under running water and it was perfectly clear and still operates the same.
I just thought I would share that little tricky hack with ya!
![]()
-
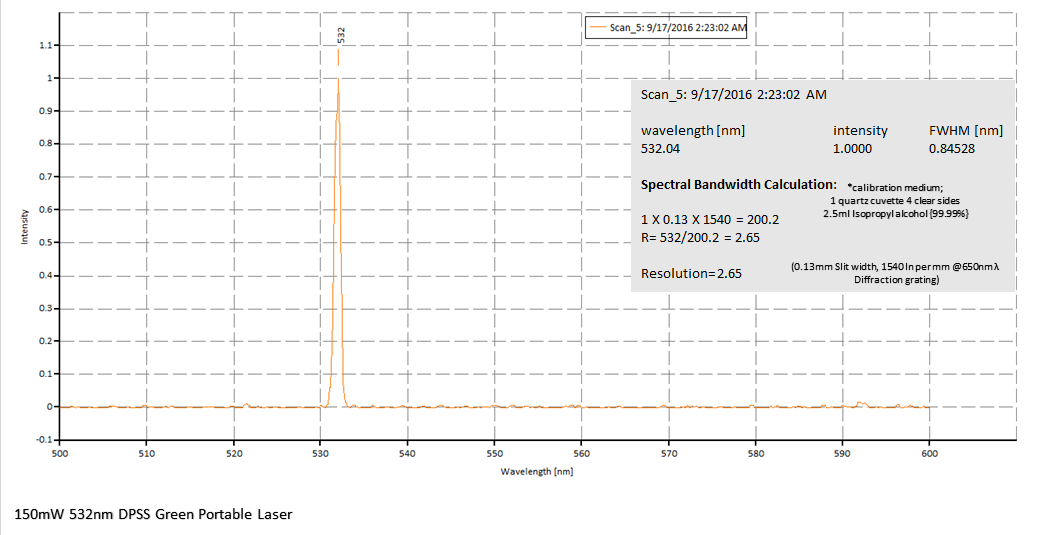
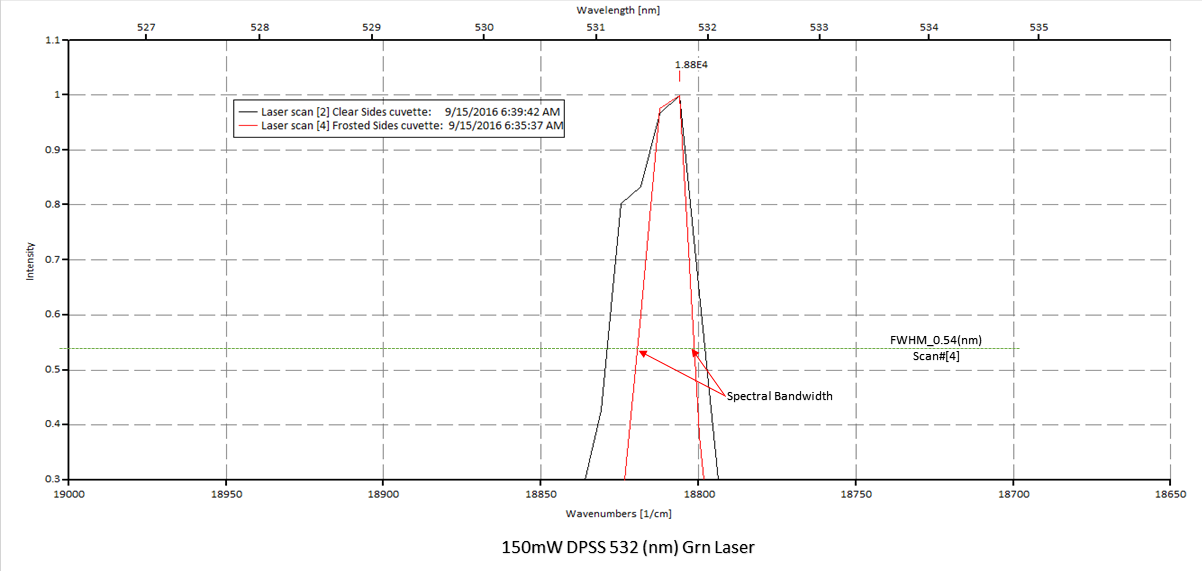
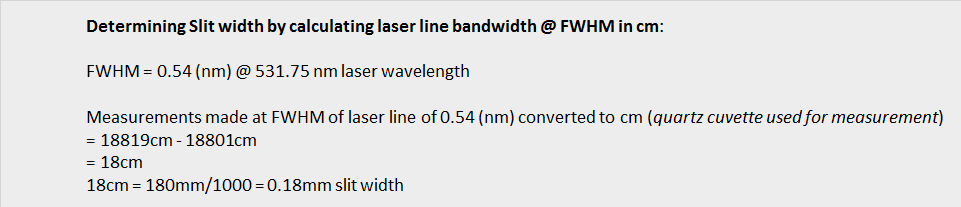
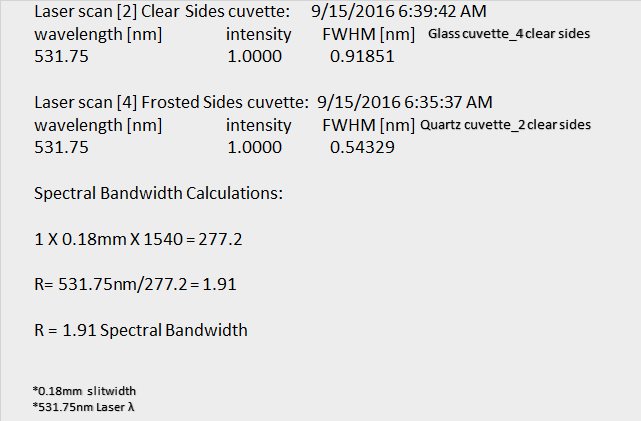
New Slit Width Calibration Using a 532 (nm) Green Laser
09/15/2016 at 14:37 • 2 commentsI re-adjusted my slit width after some experimental spectral scans, using Eosin Y in Ethanol and a reagent I am working on (distilled water {90%} + Methanol {10%}). Here I am determining my "actual" slit width by measuring the spectral bandwidth of the laser line at FWHM.
![]()
![]()
![]()
-
Laser Calibration (532nm) of New DVD Diffration Grating 4.7 GB
09/12/2016 at 18:07 • 0 commentsResolution and Calibration for the DH 4 v4a Spectrometer
I replaced the DVD diffraction grating for my spectrometer in order to get a more balanced spectral resolution that the JDEPC-OV05 cmos camera can easily process @ its pixel specifications, also I believe with further testing, it will help, since I cannot control exposure time, only gamma correction with Spekwin32.
The new ruling density for the diffraction grating is now; 4.7 GB = 0.74mm @ 1540 lines with a wavelength range of 650nm.
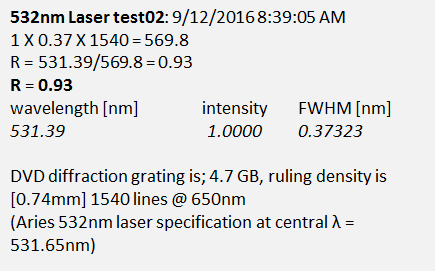
My Aries 532nm Green portable laser was used to calibrate the spectral bandwidth data table is given below;
![]()
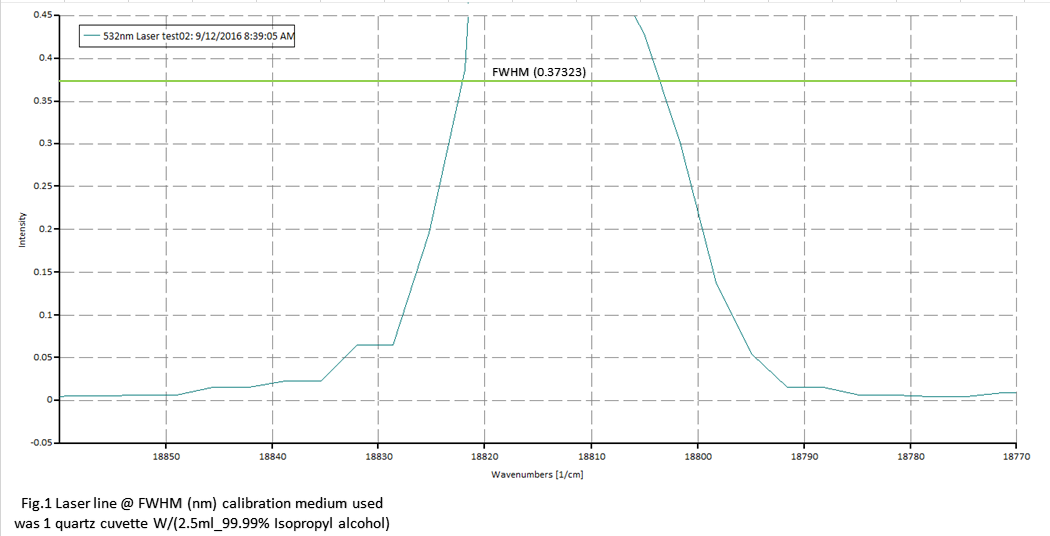
Figure.1 is the laser line at FWHM, shown on the plot with the horizontal green line at exactly 0.37323[nm]
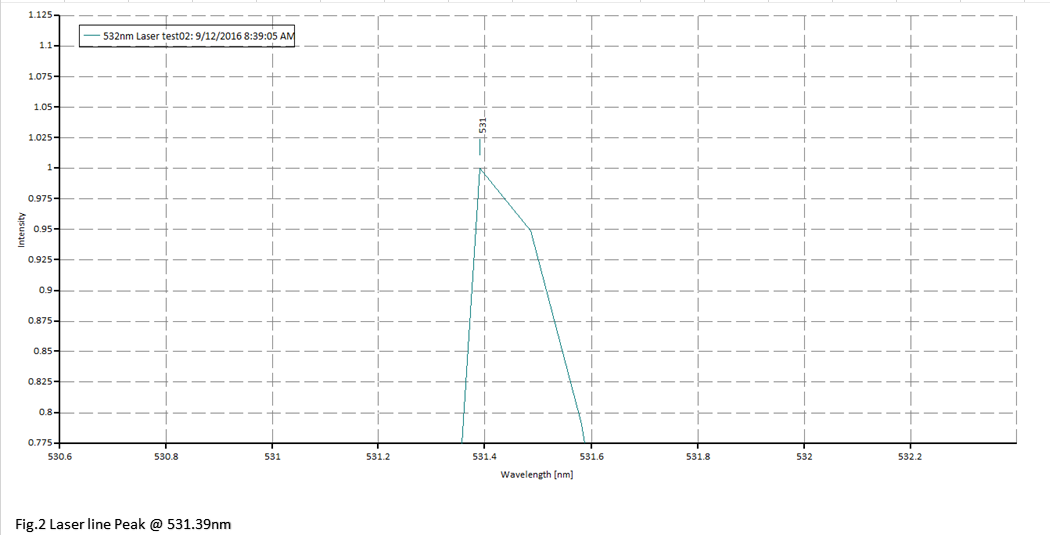
![]() Figure.2 is the laser peak at 531.39nm (laser allowed to warm up for 1 minute), just shy of the 531.65 central wavelength for this laser specified on it's specifications sheet.
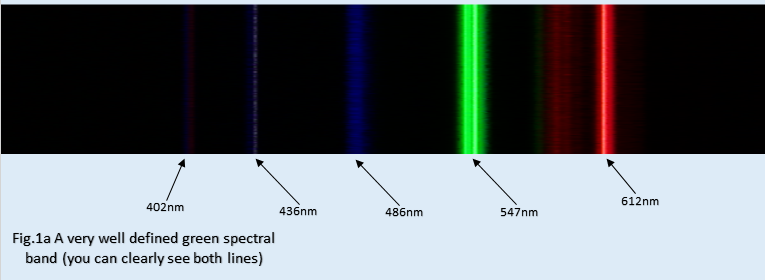
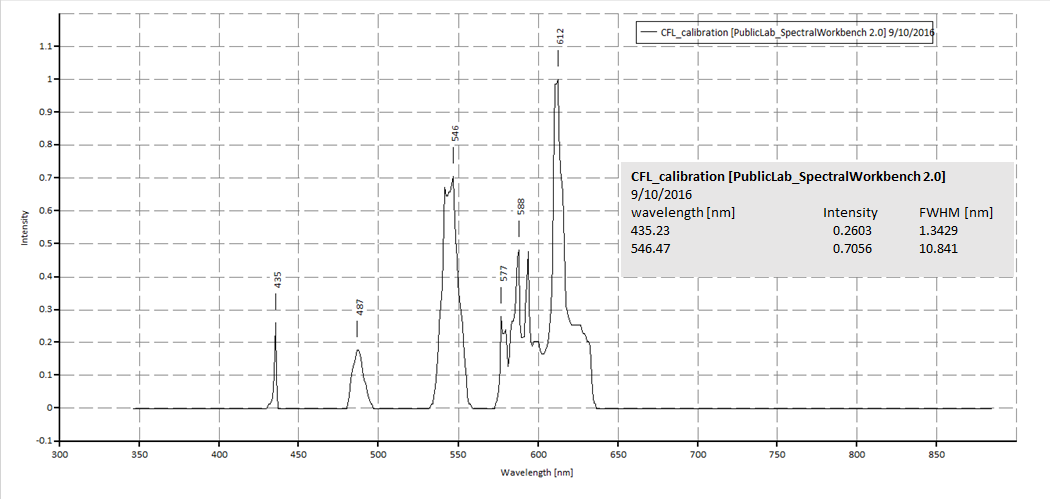
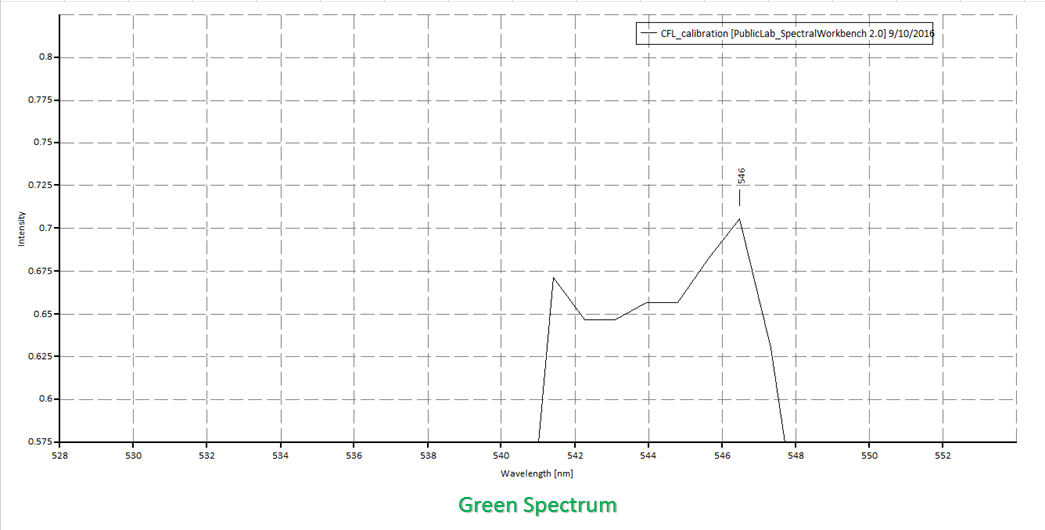
Figure.2 is the laser peak at 531.39nm (laser allowed to warm up for 1 minute), just shy of the 531.65 central wavelength for this laser specified on it's specifications sheet.![]() Figure.1a is the CFL calibration I did today using Plab spectral workbench 2, you can see from the title picture, that there is clearly 2 distinct green lines and a clear second blue line, I marked all the lines just for reference purposes.
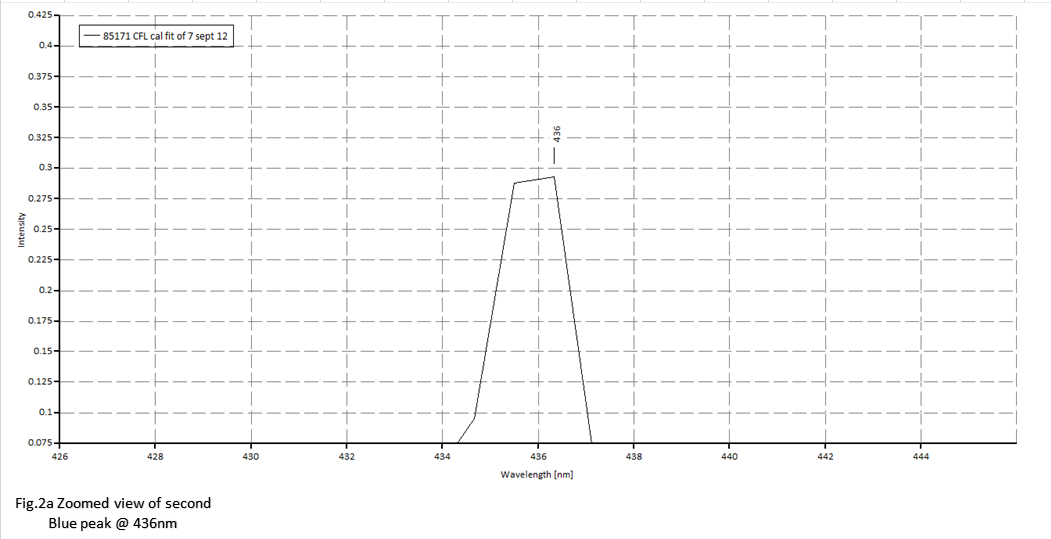
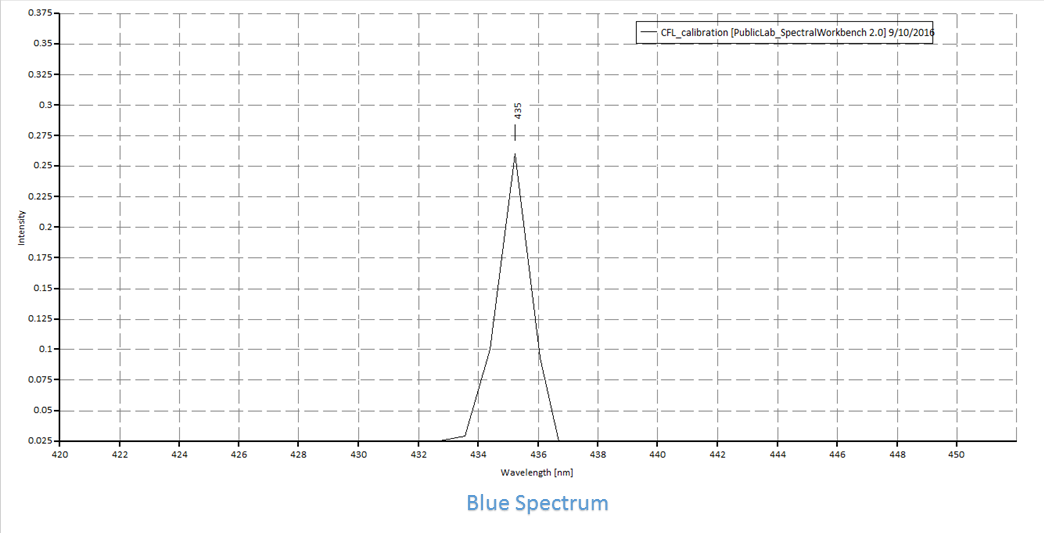
Figure.1a is the CFL calibration I did today using Plab spectral workbench 2, you can see from the title picture, that there is clearly 2 distinct green lines and a clear second blue line, I marked all the lines just for reference purposes.![]() Figure.2 is a zoomed in view of the second blue spectral line
Figure.2 is a zoomed in view of the second blue spectral line![]() Figure.3 is a zoomed in view of the double green peaks
Figure.3 is a zoomed in view of the double green peaks![]() Figure.3a is the full plot for the CFL spectrum with a quality "fit" of 7 using the 4.7 GB DVD diffraction grating
Figure.3a is the full plot for the CFL spectrum with a quality "fit" of 7 using the 4.7 GB DVD diffraction grating![]()
-
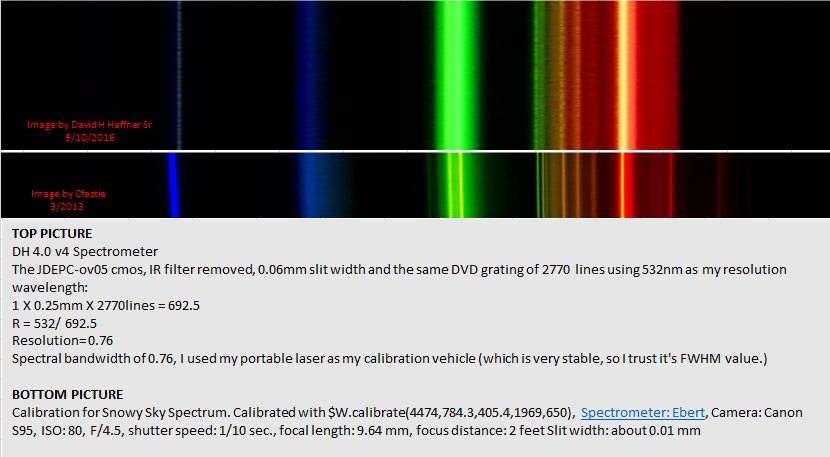
Comparing The Ebert CFL Spectral Image To the DH 4.0 v4 CFL Spectral Image
09/12/2016 at 08:19 • 0 comments -
A Near Perfect CFL (compact fluorescent light) Calibration
09/10/2016 at 09:47 • 0 commentsI had to run another slit width test verification, so I used Plab's spectral workbench 2.0 online to do a CFL calibration to get a resolution image of my 0.06mm slit width.
![]()
![]()
![]()
![]()
-
Empirical Verification Of 0.05mm Slit Width of DH4.0 v4 Spectrometer
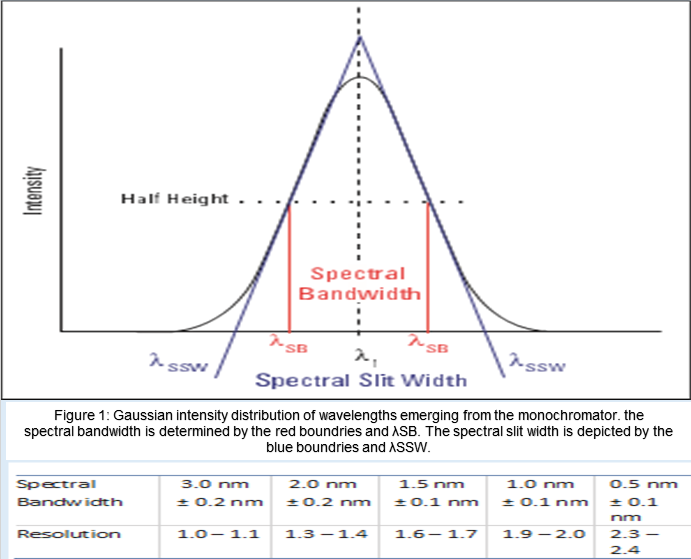
09/09/2016 at 19:22 • 0 commentsUnderstanding Spectral Bandwidth and Resolution in the Regulated Laboratory
![]()
Upon closer scrutiny of my microscopic view of the 0.05mm slit width, I realized that the edges did not meet. This caused me great concern, although the measurements are correct as far as pixels go, on the title picture, (measuring from the razor's edge to the shadow of the lights edge from the bottom razor blade,) I re-examined my plots for the two laser scans I did recently and decided to isolate the green laser, as I had used it for calibrating my spectral bandwidth.
My laser that I use, is NOT some cheap off the shelf type, I have given its specifications several times in detail before, it is highly reliable and very stable monochromatic light source. There are two graphics below, the first one, explains how to determine spectral bandwidth and slit width, the second plot is mine, from the other day when I scanned both of my lasers, the 405nm uv laser pointer and the 532nm green laser.
![]()
![]()
As is discussed in the data, I actually have a slit width of 0.5mm. I know what the problem is. I used construction paper to mount the two razor blades edge to edge, this is causing a slight bending effect, which can be seen in the title picture. The two edges are not meeting perfectly, so I am working on another one, where the mounting template will be more ridged and stable, and then I will re-verify that the edges do indeed meet and align.
Reference is below:
http://www.analiticaweb.com.br/newsletter/02/AN51721_UV.pdf - Understanding Spectral Bandwidth and Resolution in the Regulated Laboratory
-
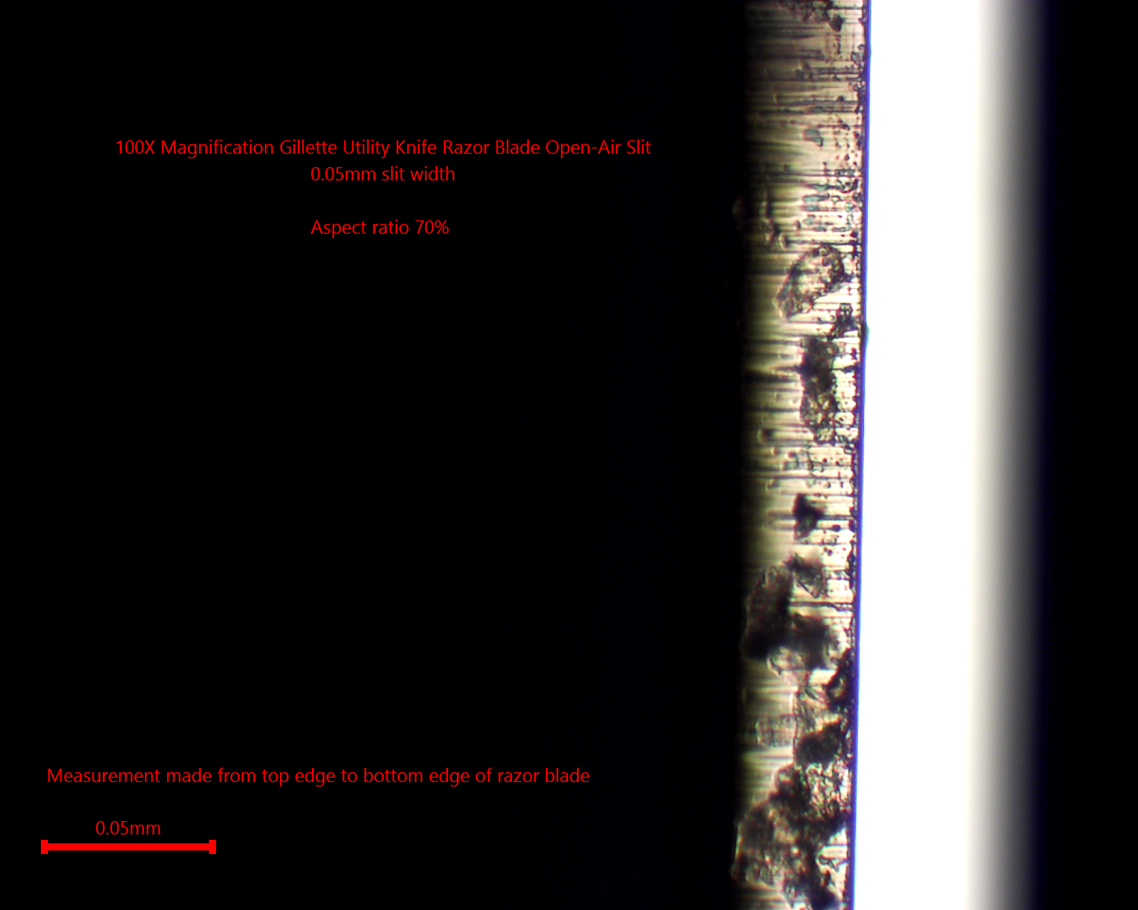
0.05mm Slit Gillette Utility Knife Razor Blade design 100X Magnification
09/08/2016 at 19:04 • 0 commentsThis is actually a follow up on my previous post on the two laser scans using the new 0.05mm slit width. I wanted to verify the width using my microscope, since the image capture program, AMScope has a pretty awesome measurement feature, also this is the first time I have used it with the measurement feature layered on the image itself, and didn't realize I could export it to Excel.
This made life a lot easier, because I couldn't figure out why it wouldn't let me save it as a compatible image file that would save the measurements, thank heavens for help files!
I will be remaking this image again with more measurement information on it, because over 90 percent of the length conformed to the tolerance expected of 0.05mm, only from a section at 0.29mm almost at center, did I measure a slight deviation at a slope of 0.0059653nm from a starting point of; 0.0207753nm.
This particular slit took me over 2 hours of very tedious work to get it just right and perfect, but it was well worth the effort!
![]()
-
New Laser Testing Using a 405nm UV laser Pointer and a 532nm Portable Green Laser
09/08/2016 at 12:18 • 0 commentsNew testing on a 0.05mm Gillette razor Blade Utility Knife Open-Air Slit (based on my previous design.)
I wanted to see just how much more resolution I could squeeze out of this spectrometer, so I remove the 0.09mm Gillette razor blade slit and redid the design with a pair of Gillette utility knife razor blades. This took me about two hours to get it perfect but I got it right, now I have a 0.05mm open-air slit width, pretty incredible I would say, I used the same testing method as I did in a previous post on the 0.09mm open-air slit.
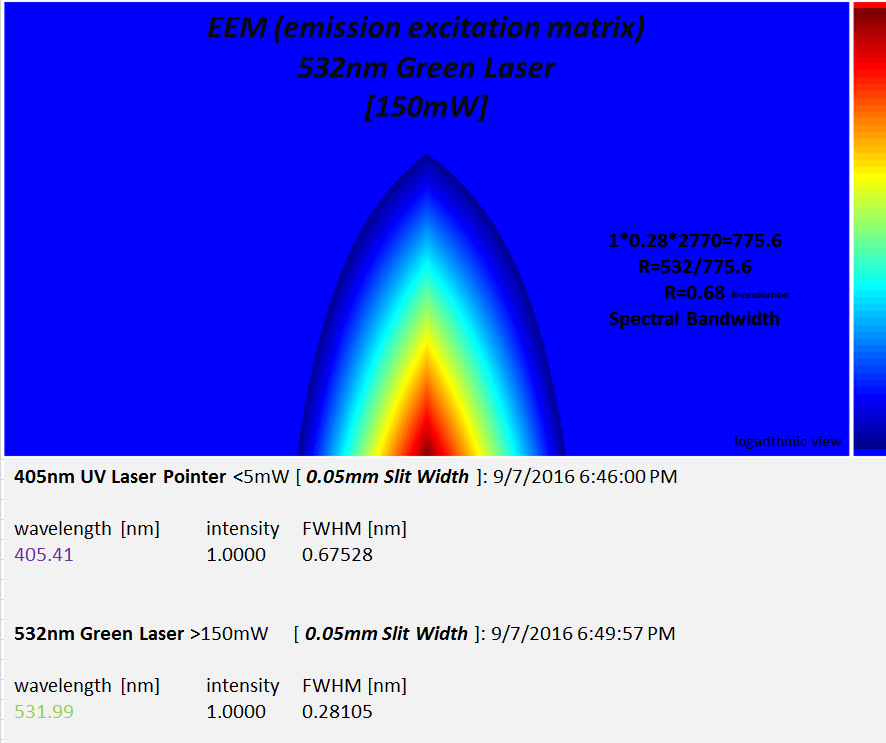
Now I have a spectral bandwidth of 0.68nm, and here is my proof;
![]()
An EEM (emission excitation matrix,) allows for a kind of 2 dimensional view that lets one examine in detail, an emission (X-axis,) and an excitation (Y-axis,) of your data.
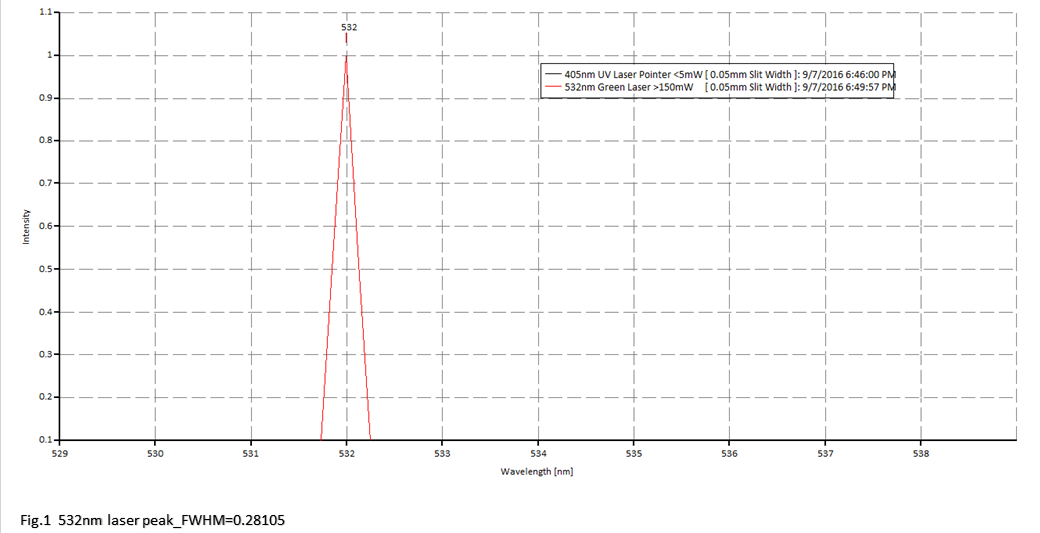
The next plot is Fig.1, which is the peak for the 532nm green laser;
![]()
Fig.2 is zoomed in 1X, to show full laser line (532nm);
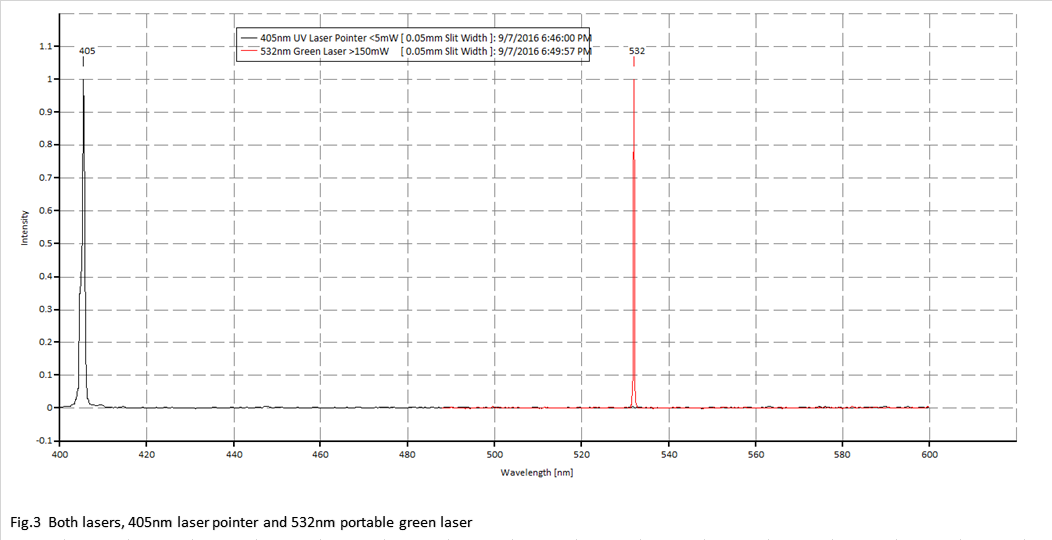
Fig.3 are both lasers together, wavelength range is 400 - 600nm;![]()
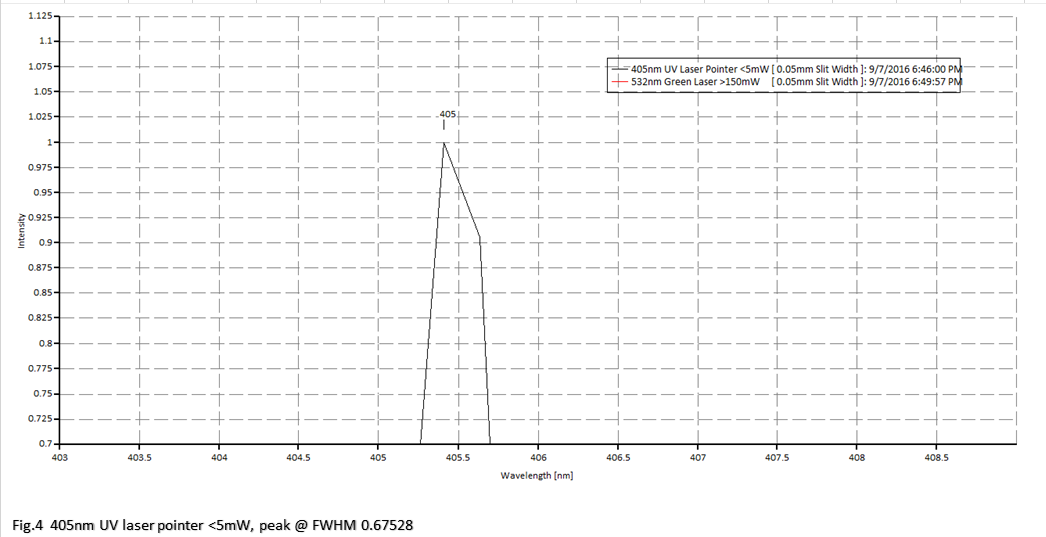
Fig.4 is the 405nm UV laser pointer peak;![]()
![]()
reference
-
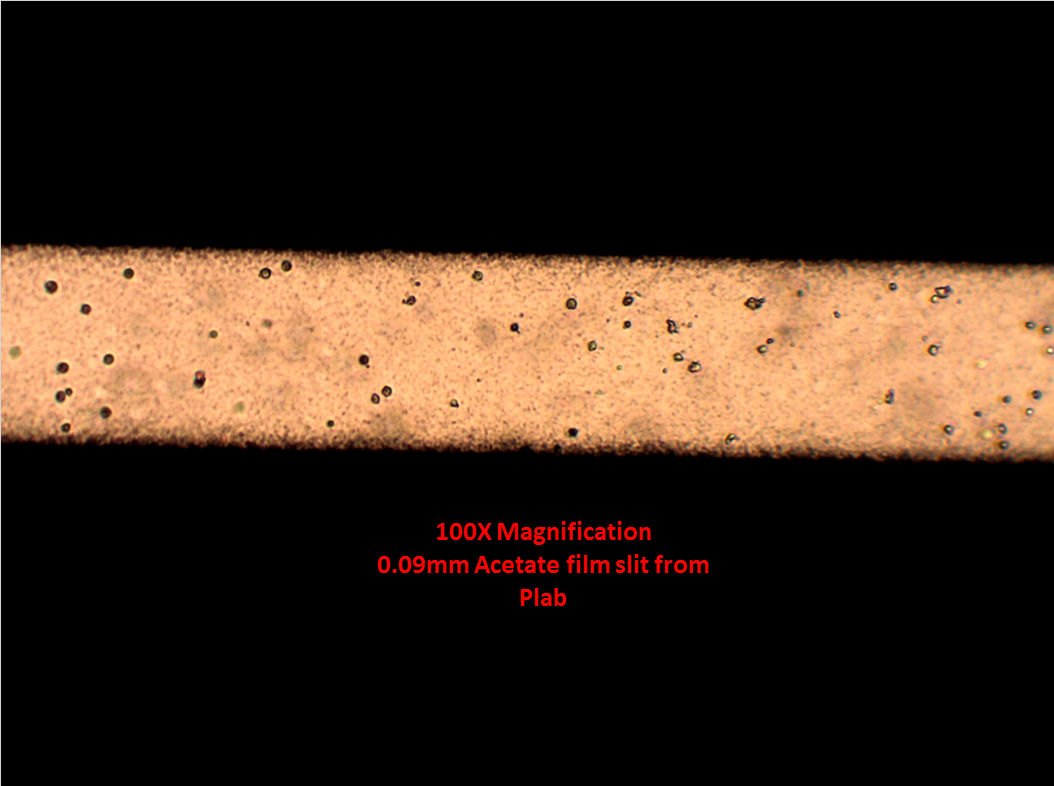
Microscopic View of Plab Acetate slit and My Gillette razor Blade Open Air Slit
09/06/2016 at 17:07 • 2 comments![]()
Using my Premiere professional binocular microscope (model - 3000,) and a new camera I got for it; an AmScope MD-500 5 megapixel HD cmos camera, I was finally able to image both slits at 100 X magnification with great clarity, here is what they look like;
I would rather use my open-air slit design...![]()
DAV5 V2.1 Spectrometer
The ZEN of simplicity Making the Complex...Seem Simple