-
Define a Minimum Viable Product and Ship it
10/16/2016 at 05:27 • 1 commentThe last few weeks have seen me fighting a communication problem between the Oak and the STM8S. As a result the development has slowed down a little to the point that the project was becoming frustrating. It was about two weeks ago that I was listening to a podcast and the presenter made a very pertinent comment. Some software start-ups fail because they fail to define the minimum viable product. This gives them nothing to aim for and most importantly no firm idea of what they have to deliver.
This felt very relevant as the weather station was stalling. With this in mind I decided to break the project up into a number of revisions.
Revision One - Basic Sensing
Although this revision is titled <i>Basic Sensing</i>, we will aim to get as many of the sensors working with the Oak, and only the Oak, as possible.
The Oak has an ESP8266 (ESP12) at it heart and this leaves a restricted number of IO pins available to communicate with the outside world. With this in mind it should still be possible to work with the following sensors:
- Wind speed and direction
- Pluviometer
- BME280 (air temperature, humidity and temperature)
- DS18B20 (ground temperature
- TSL2561 (luminosity)
An additional pin is also required to allow the Real Time Clock (RTC) module to generate and interrupt to let the Oak know it is time to take a reading.
One of the aims of the final system is to be able to run using solar power and batteries, however, for the initial version of the system this is not necessary. The main controller board can be placed inside to run on mains power with the rain and wind sensors outside. Some of the sensors would be inside so this would not give a good view of the weather but will allow testing of the software.
Clock Module Change
I came across a variant of the DS3234 RTC on one of my usual suppliers web page. The DS3231 module is similar to the DS3234 with four differences:
- Price - I can buy four of the DS3231 modules for the same price as one DS3234
- Interface - the DS3231 uses I2C rather than SPI
- No on chip memory for the DS3231
- Additional EEPROM on board
All of the main features that make the DS3234 desirable are also present in the DS3231. The major piece of work is the necessity to overhaul the DS3234 library created previously.
Schematic
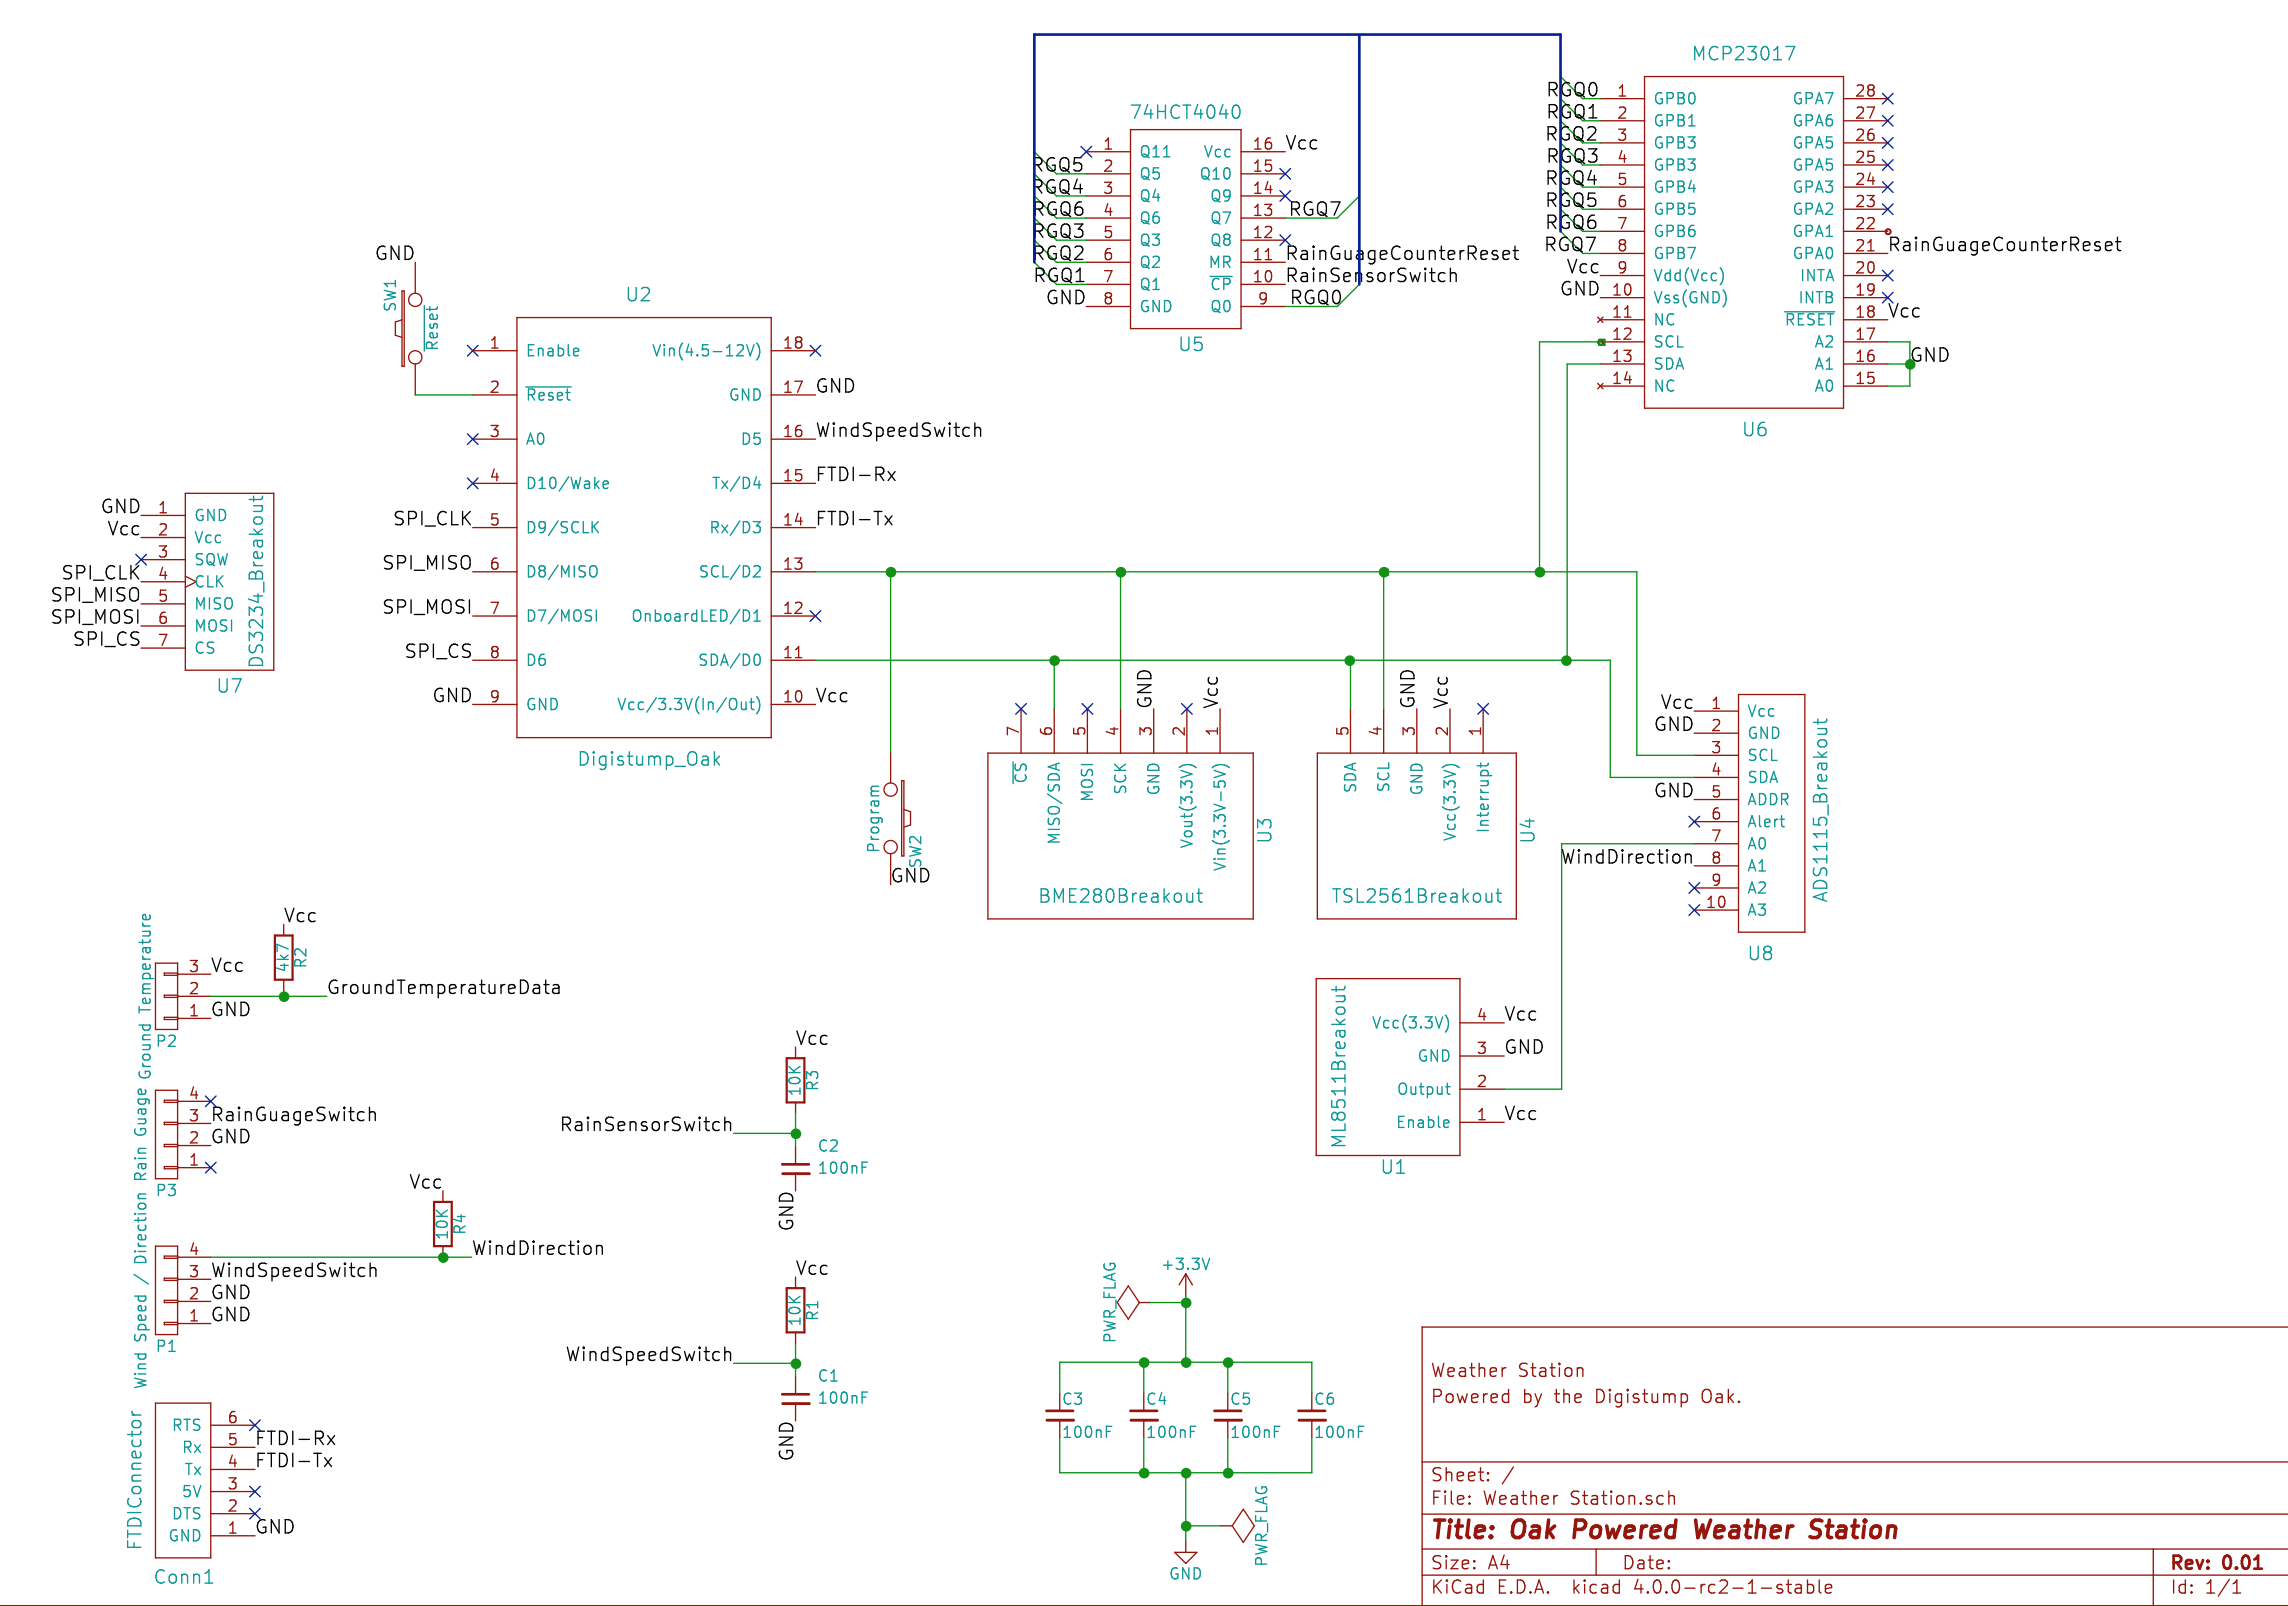
The main changes to the hardware design involve moving the connections to the various sensors from the STM8S to the Oak. This has been made possible by the change in the clock module from the DS3234 (SPI) to the DS3231 (I2C). This freed up the four pins that had been dedicated to the SPI interface.
The updated schematic is as follows:
![]()
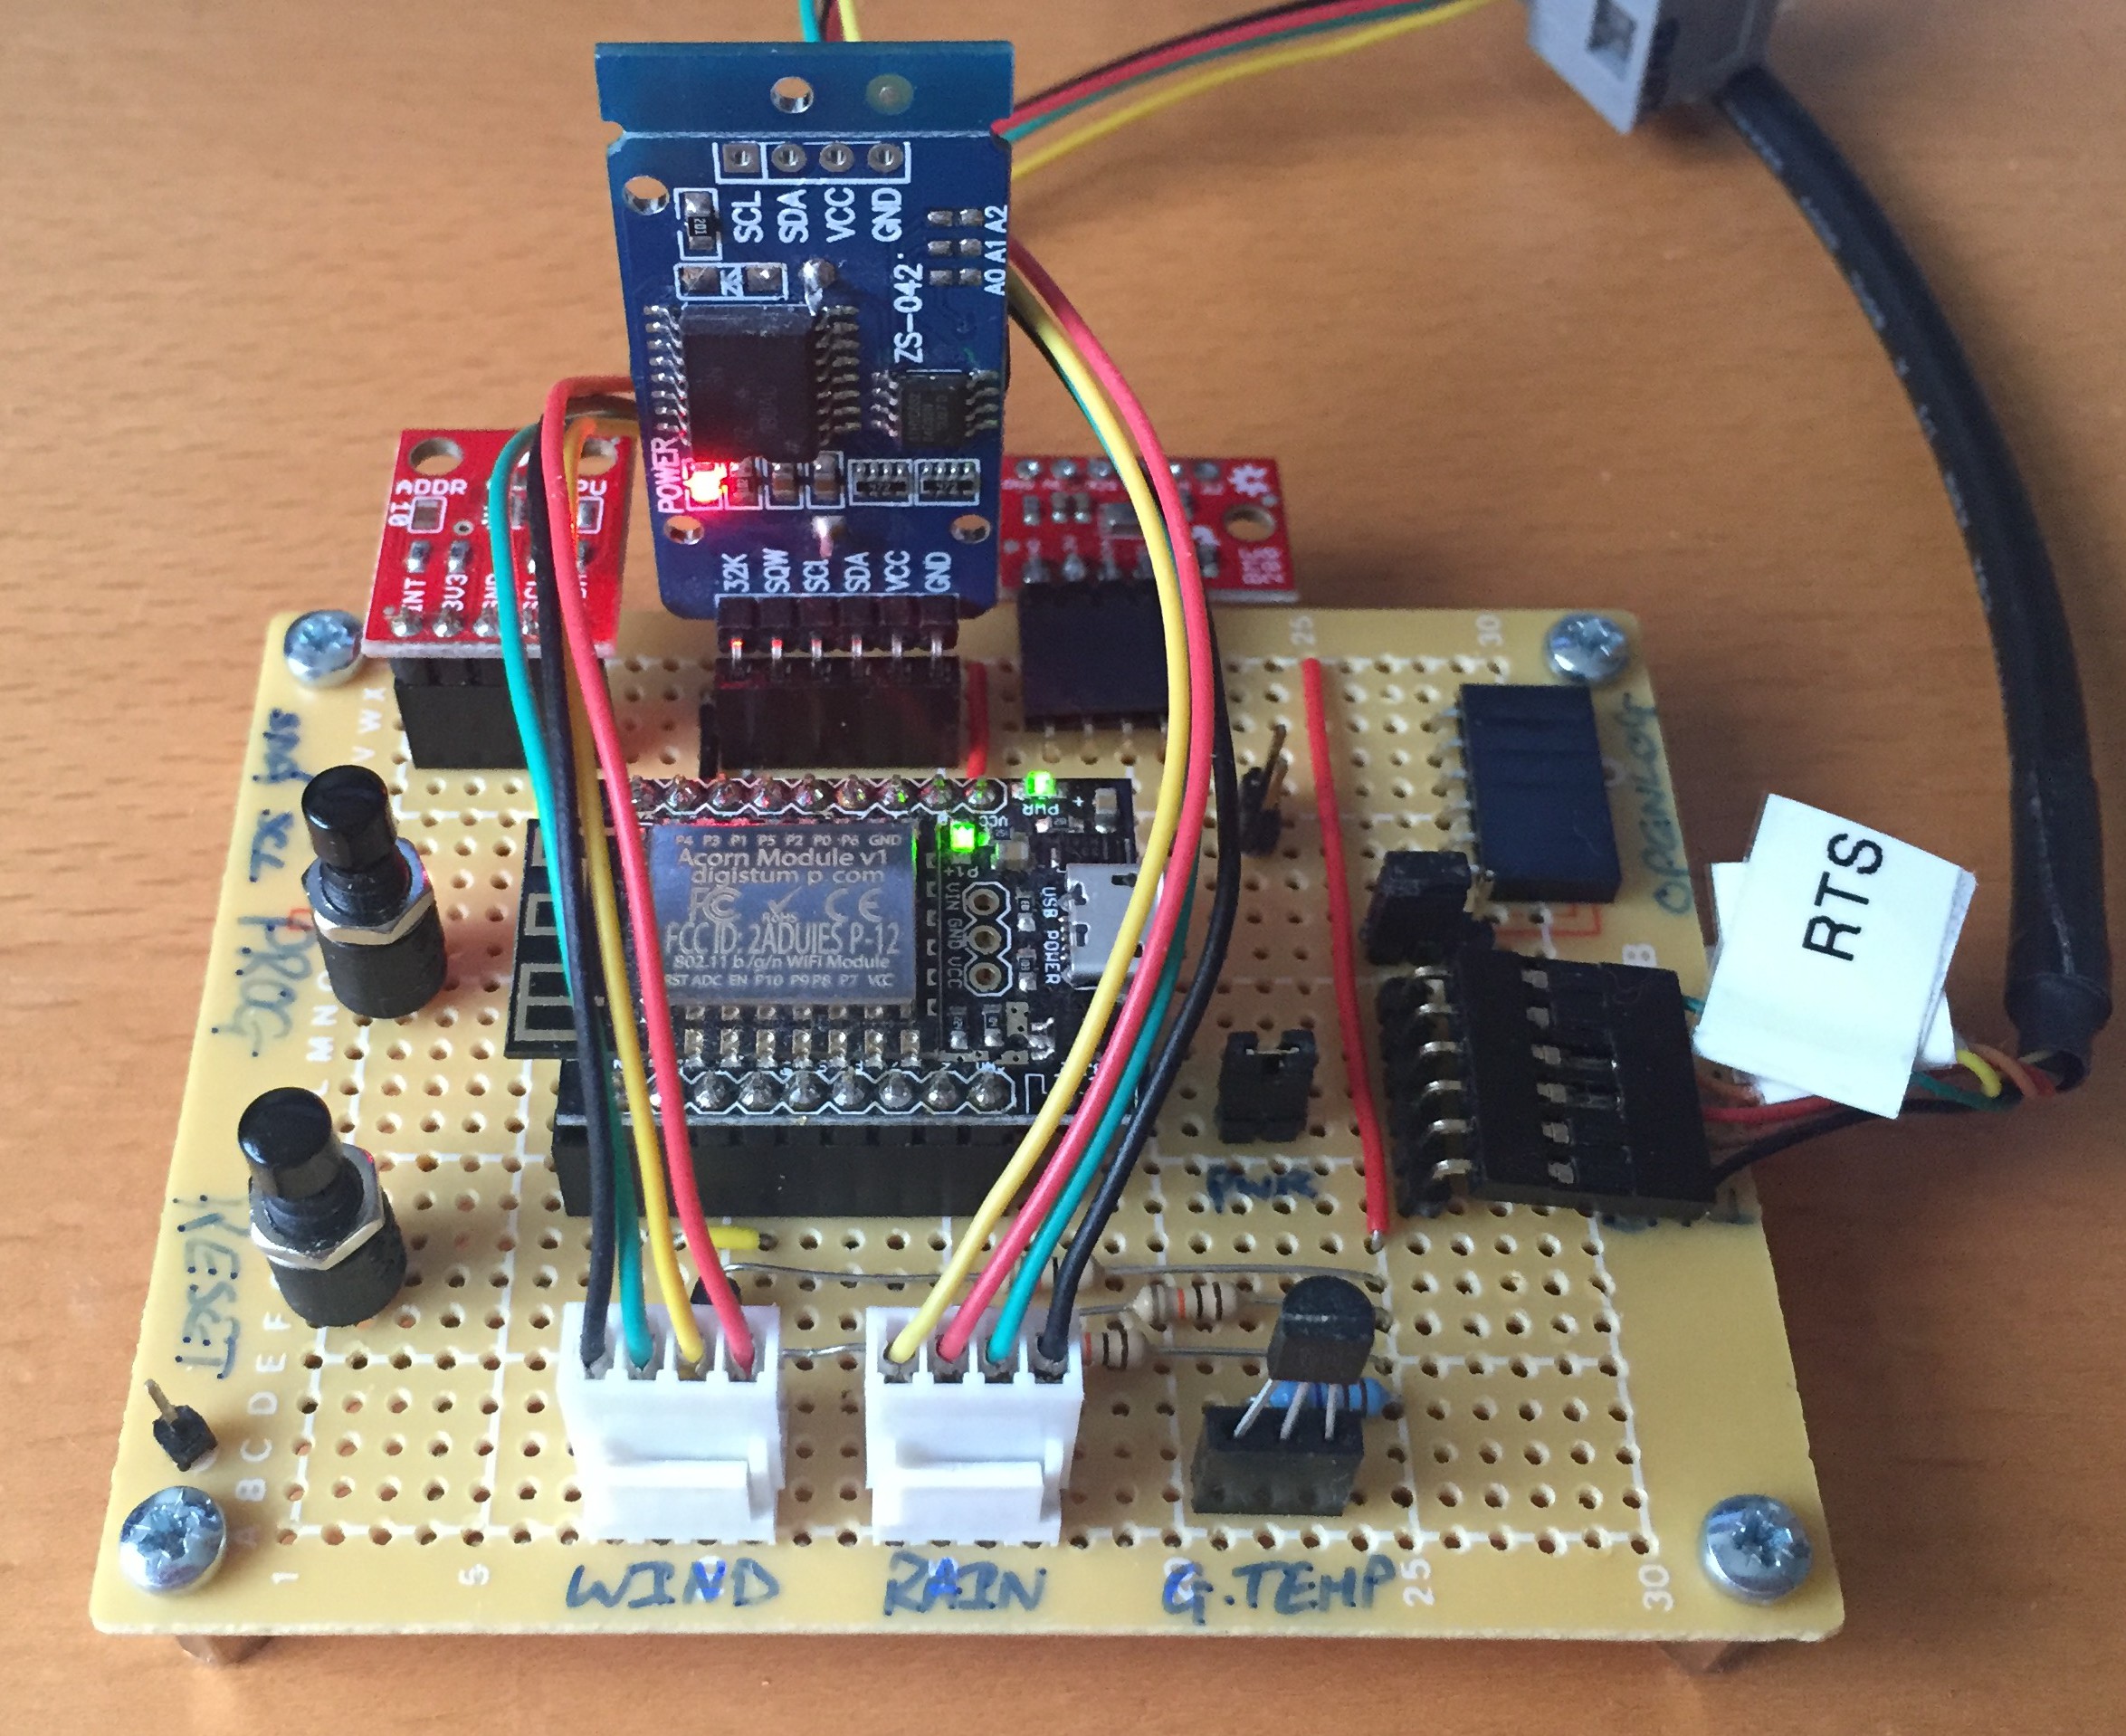
Translating this to hardware on a protoboard:
![]()
There are a couple of items on the hardware implementation that are not on the schematic:
- Additional connectors / jumpers
- Connector for OpenLog board
These items may or may not make it onto the final board and have been added to aid debugging.
Software
The software for this project has been placed on Github and is broadly speaking the same as previous versions in terms of design. The following are the most significant changes:
- STM8S code has been left in the project for the moment but this is not used in this initial working version.
- Interrupts for the pluviometer and the wind speed are now in the Oak code
- Logging to Phant has been implemented (public stream can be found
- DS3234 code has been abstracted and used to make a DS323x generic timer class and a DS3231 specific class
There are still some modifications required:
- Remove or convert to MQTT rather than Phant
- Look at exception handling
- Deal with network connection issues
- Clear the rainfall today counter when moving from one day to the next
One of the previous versions of this application used Adafruit's MQTT library to connect to Adafruit.IO. Recent changes to the site and to the library means that any attempt to connect the Oak to Adafruit results in an exception being thrown. A task for later is to correct this problem if possible.
An Internet connection may not always be possible so it would be desirable to collect data while offline and then upload this later. This may be facilitated by the EEPROM on the DS3231 breakout board.
The software is currently throwing an exception every 10-30 readings. This results in the Oak resetting itself so it does recover although there is a small gap in the data gathering. The source code has been reviewed an there are no obvious memory leaks or null references. This problem is being deferred as there is a workable solution in that the Oak does reset itself. Not satisfactory in the long term but liveable for now.
Conclusion
The definition of a minimum product has allowed the project to proceed to the point where something can be deployed and tested. There are still a number of items to be completed before the original aims can be realised including the resolution of some issues in the minimum product.
One thing I have learned along the way, don't try and use pin 10 as an interrupt pin on the Oak as this is not implemented.
The next steps, complete the initial code and deploy the external sensors.
-
Source Code Repository
08/21/2016 at 08:34 • 0 commentsThe source code has been added to Github and is being released under the MIT Licence.
-
Adding Another Microcontroller
07/09/2016 at 09:43 • 3 commentsI have moved from breadboard to perfboard. The schematic had a couple of components for the rain gauge and one additional ADC to compensate for the fact that the ESP8266 only has one ADC on board. These three components added a reasonable cost to the board and it was hinted that another microcontroller maybe added to the system to replace these components.
Enter the STM8S.
Hardware Modifications
The previous version of the schematic looked as follows:
![]()
Three components are being targeted for replacement:
- 74HC4040 - counter
- MCP23017 - I2C output expander
- ADS1115 - 4 channel ADC
These components come to several pounds (dollars) worth of components. It may be possible to replace these with the STM8S and a little software.
ESP8266 Low Power Mode
A long term goal of the project is to reduce the power consumed by the system in order to allow the system to work from a battery / solar energy source. In order to work towards this goal the system should be looking to shut off as much of the system as possible when they are not needed.
Initial thoughts are that the system should collect data every 5 minutes. This means that most of the system is only required for a few seconds (say 10 seconds) every five minutes.
One exception is the rain gauge. This needs to be counting all day, every day as a sample taken at a point in time is not representative of the rain fall for a full day.
Another exception is the Real Time Clock (RTC). This needs to be running all of the time for two reasons, firstly it keeps track of the current date and time. Secondly, the system can generate an interrupt to wake the system on a regular basis.
Adding Another Microcontroller
Regular readers will no doubt be aware that I have been a regular user of the STM8S. This microcontroller is available in packages starting at around £0.72 (about $1). Even the smallest packages have several ADCs and multiple digital input / outputs potentially reducing the system costs.
One other area that a microcontroller can help is with the chosen RTC, the DS3234. This RTC can generate an interrupt when an alarm time is reached. The interrupt generated is a simple high to low transition. The ESP8266 however requires a pulse. The STM8S can help by providing this conversion, detecting the falling edge and generating a pulse for the ESP8266.
Sounds perfect.
Updated Schematic
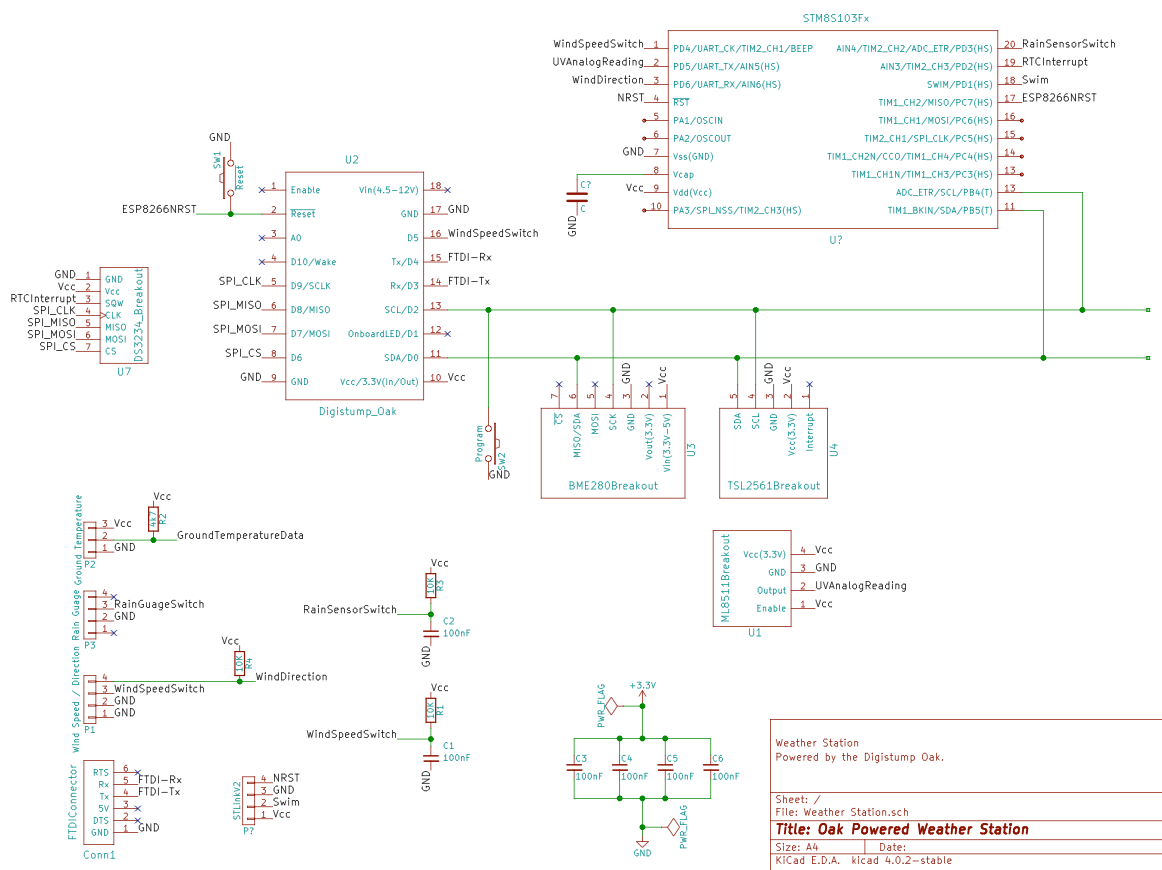
Several previous posts have shown that it is possible to perform analog conversions and also capture interrupts. This makes it possible for the STM8S to gather several sensor readings for the Oak and replace some components, namely:
- ADS1115 4 channel ADC - The STM8S has several ADC channels and the system only requires 2 so far
- MCP23017 I2C Port Expander - Several digital channels remain available even after using some pins for the ADC
- 74HC4040 Counter - This functionality can be provided through software and a digital channel
Another attractive feature of this microcontroller is the ability to act as an I2C slave device. This will work well with the other digital sensors as they all use the I2C protocol, one protocol to rule them all.
A few changes to the schematic results in the following:
![]()
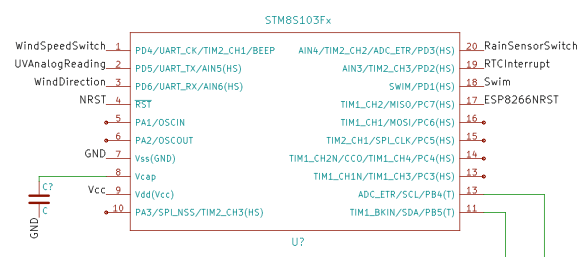
Focusing in on the STM8S:
![]() The STM8S should be able to take over the reading values from the following sensors:
The STM8S should be able to take over the reading values from the following sensors:- Ultraviolet light
- Wind direction
- Wind speed
- Rain Gauge
All that is needed now is some software. Time to break out the compilers.
Conclusion
Adding a new microcontroller adds some complexity to the software development whilst reducing the cost of the final solution.
Next steps:
- Putting the Oak to sleep and using the RTC to determine when to wake the Oak
- Reading the sensors on the STM8S
- Communication between the Oak and the STM8S over I2C
-
Rain Drops Keep Falling On Your Head
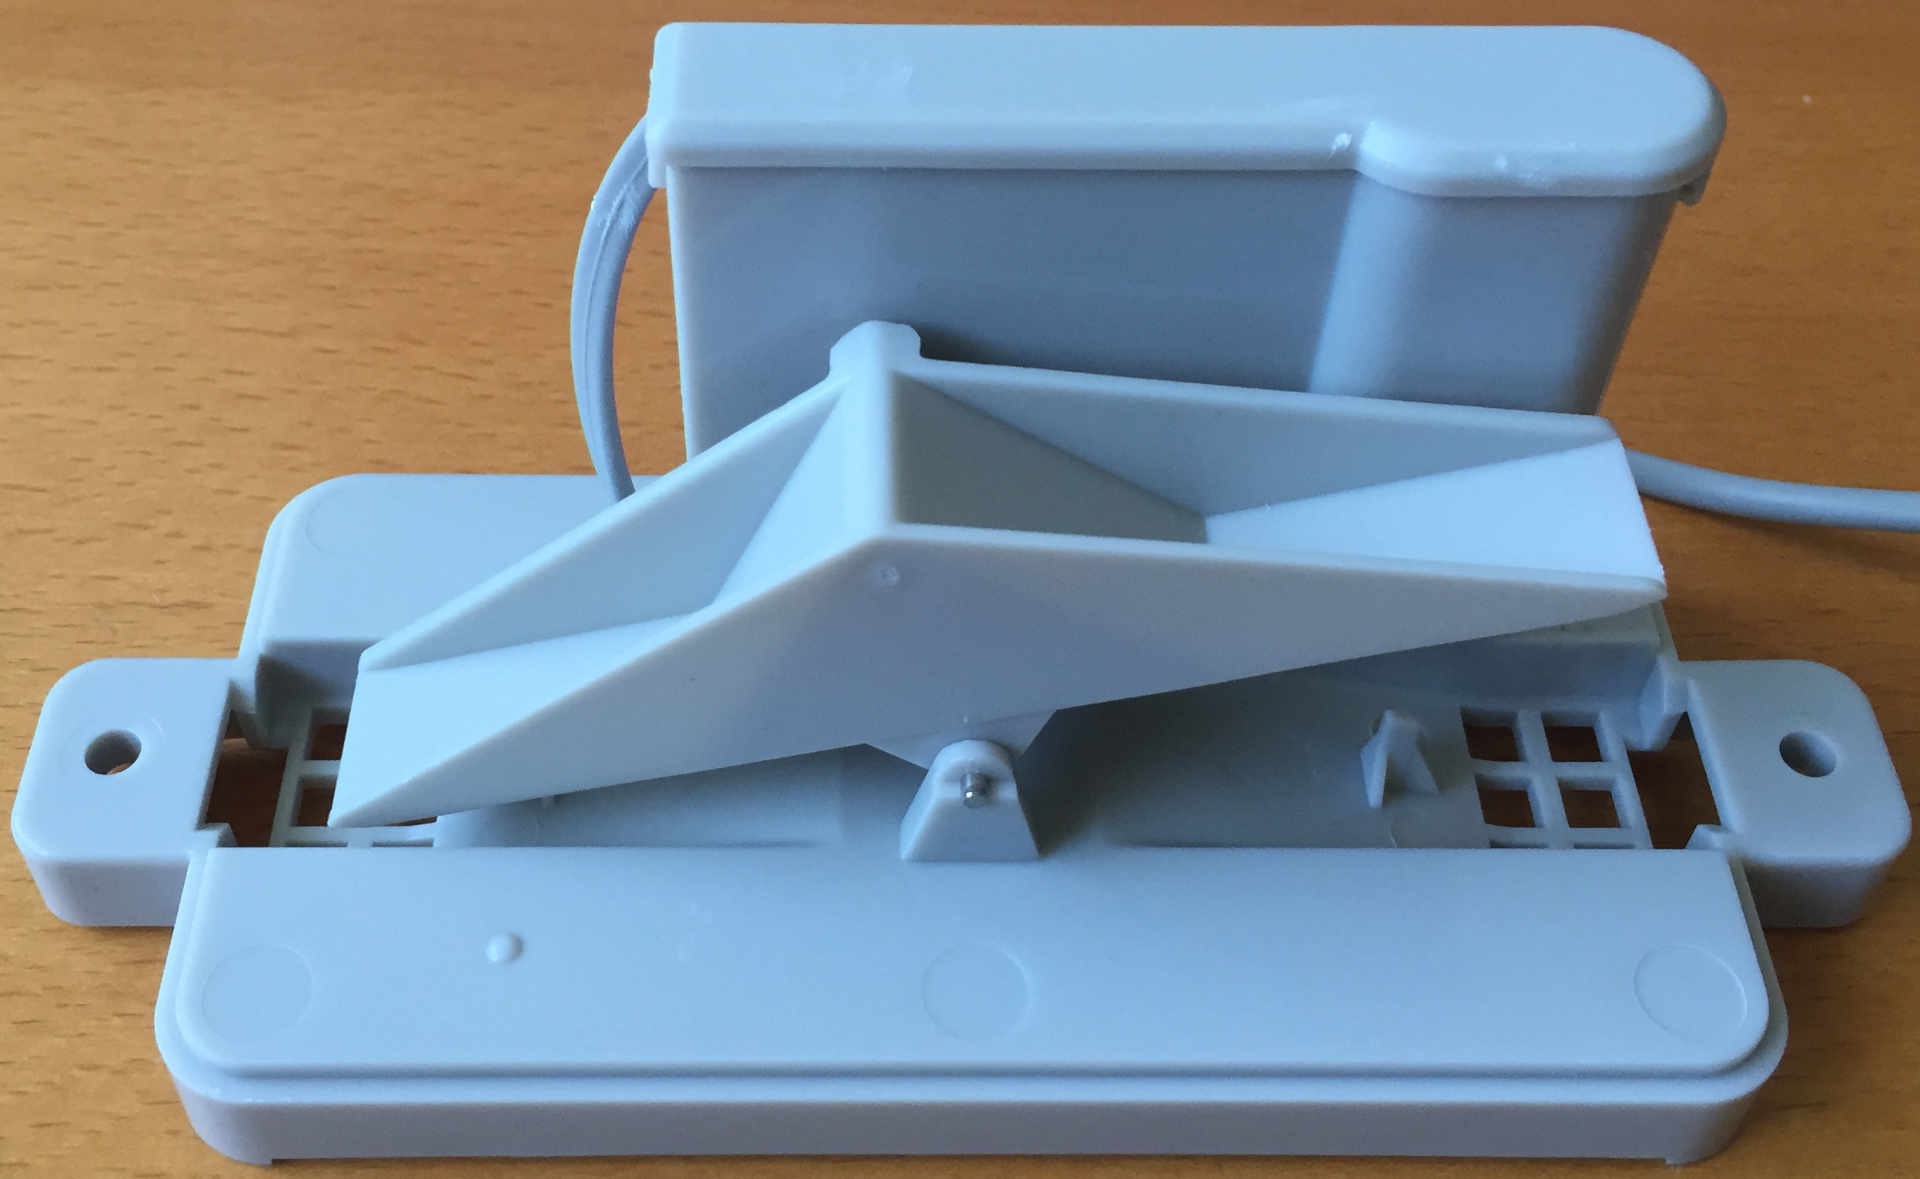
06/26/2016 at 07:47 • 0 commentsTime to look at the pluviometer, or rain gauge. This is a mechanical sensor that looks a little like a see-saw. A small plastic bucket is placed on each side of the fulcrum. The buckets are designed so that when a critical mass of water is in one bucket it tips the see-saw and the bucket on the other side starts filling. The process continues as each bucket is filled and emptied. A picture paints a thousand words, so here is a view of the inside of the pluviometer:
![]()
A small magnet is placed on the see-saw and a reed switch is behind the fulcrum. The tipping motion triggers the reed switch each time the see-saw tips, this in turn generates a single pulse.
Reading the switch becomes a seeming simple repetition of the wind speed problem, namely debouncing a switch and attaching an interrupt.
One long term goal has to take this solution off grid. This will make power consumption a critical factor in the design. Attaching an interrupt does not necessarily become an attractive option as the Oak would be running continuously and with the WiFi running this would consume a fair amount of power.
According to the specification for the pluviometer, a pulse will be generated for every 0.2794mm of rainfall.
Offline Counting
One possible solution to the power problem would be to put the Oak to sleep and wake it up every say 5-15 minutes to take measurements and upload them to the cloud. Doing this would reduce power but would also mean that no measurements would be take during the sleep period if interrupts were used.
A cheap solution in terms of cost is to use the 74HC4040 counter. This could be put into a circuit and kept active while the Oak is sleeping. The output from the debounced switch would then be used as a clock signal for the 74HC4040. This would allow the pulses from the pluviometer to be counted while the Oak is sleeping.
The downside is that eight pins are needed to read the output from the counter. With only a small number of pins, many of which have already been used, this will require some way of adding extra pins to the system. Fortunately there are a number of digital IO expanders on the market. A common series of chips is the MCP23x17 chips. These add an additional 16 inputs/output pins with communication to the chip vis I2C (X=0) or SPI (X=S). The I2S variation will fit the bill nicely.
One final connection that is required for the counter is a reset connection. Left to itself, the rain gauge counter would continue to count pulses until the counter overflowed and started from zero once more. From a design perspective there are a few options:
- Reset the counter each time it has been read
- Reset the counter once a day
- Let the counter overflow and detect the reset to zero
One consideration will be the amount of rainfall the system can detect before it resets to zero.
Maximum number of counts = 2^12
Which gives 4096 counts. However, for simplicity we will only consider the lower 8 bits, i.e. 0-255 counts. The system can always be expanded later should this be necessary (or if the system has the capacity).
Maximum rainfall = 255 * 0.2794 mm
Giving a maximum rainfall count of 71.247 mm per counting period. It is envisaged that the counting period would be somewhere in the region of 5-15 minutes. This would make an hourly average of 285mm assuming a steady rainfall and a 15-minute interval between counts.
This should be well within expectations for UK weather.
As an aside, the full 12-bits would allow for a rainfall of 1144mm per counting interval, or 4.5 metres of rain per hour.
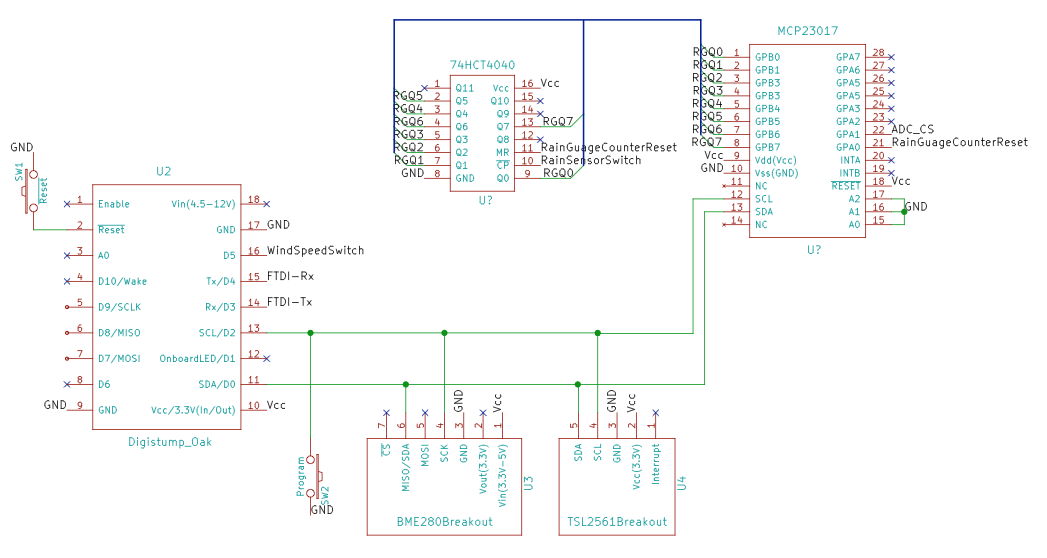
Schematic
With a little supporting hardware to be added, the schematic looks as follows:
![]()
Note that the BME280 and TSL2561 are also on the schematic.
The rain gauge counter bit values have been labeled RXQx, RG = Rain Gauge and Q is the standard notation for a bit in a logic design.
Software
The MCP23017 (I2C version of the IO expander) is sold by Adafruit. They have a standard Ardunio library for this component and so in the interest of code re-use, expediency and idleness this will be used.
So the first thing to do is to create an instance of the MCP23017 IO expander. Next up, the output expander needs to be setup. Looking at the schematic, the output from the counter is mapped to port B on the MCP23017. This maps to IO pins 8 to 15 inclusive. These bits should be set to inputs. One final piece of configuration is the reset pin, this needs to be set to output:
Adafruit_MCP23017 _outputExpander;      // MCP23017, I2C controlled 16-port output.

//
//  Set up the pluviometer, zero the counts and then attached and initialise the
//  counter to the output expander.
//
void WeatherSensors::SetupRainfallSensor()
{
    _pluviometerPulseCount = 0;
    _pluviometerPulseCountToday = 0;
    //
    //  Attach the rainfall counter to the output expander.
    //
    int index;
    for (index = 8; index < 16; index++)
    {
        _outputExpander.pinMode(index, INPUT);
    }
    //
    //  Attach the counter reset pin to the output expander and reset the counter.
    //
    _outputExpander.pinMode(PIN_RAINFALL_RESET, OUTPUT);
    ResetPluviometerPulseCounter();
}
As well as setting up the pulse counter, the above code resets internal counters for rainfall today and also resets the pulse count.
Reading the pulse counter is a simple matter to reading the state of each bit starting at 0:
//
//  Read the counter from the Rainfall sensor then reset the count.
//
void WeatherSensors::ReadRainfallSensor()
{
    byte mask = 1;

    _pluviometerPulseCount = 0;
    for (int index = 8; index < 15; index++)
    {
        if (_outputExpander.digitalRead(index) == 1)
        {
            _pluviometerPulseCount |= mask;
        }
        mask <<= 1;
    }
    _pluviometerPulseCountToday += _pluviometerPulseCount;
    ResetPluviometerPulseCounter();
}
The eagle-eyed amongst you will have spotted a small flaw in the above logic, namely that the pulse counter could increment whilst the system is reading the values. It turns out that this matters a great deal in some cases.This problem is noted and will be resolved at a later date.
-
Proof of Concept Software
06/25/2016 at 17:29 • 0 commentsThe weather station project is still at the proof of concept stage but the last few articles have run through the concepts for connecting several sensors to the Digistump Oak microcontroller. In this article we will look at the basic (and I stress basic) software required to connect the sensors discussed so far with the microcontroller and start to collect data.
Hardware - So Far
In the previous articles the following sensors have been discussed:
- Weather meter
- TSL2561 - Luminosity sensor
- BME280 - Air pressure, temperature and humidity sensor
- ML8511 - Ultraviolet Light Sensor
These sensors are currently connected to a piece of breadboard along with the Oak.
Now we have the sensors connected we need to add some software goodness.
Software Requirements
The first and most obvious requirement is to be able to collect data from the above sensors. In addition the proof of concept software should also permit the following:
- Test logging data to the cloud
- Serial debugging
- Setting the system time from the Internet
Data logging to the cloud will initially be to the Sparkfun Data Service as this is a simple enough service to use. One of the first things to do is to create an account / data stream in order to permit this.
Development Environment
The Arduino development environment can be used to program the Oak and it has the advantage that it is available across multiple environments. Digistump recommend using version 1.6.5 of the Arduino environment as there are known issues with more current versions.
Libraries
In previous articles it was noted that Sparkfun and Adafruit provide libraries for two of the I2C sensor boards being used (BME280 and TSL2561). An additional library is also required to support the third objective, setting the time from the Internet.
The additional libraries are installed from the Sketch -> Include Library -> Manage Libraries.. dialog. Open this dialog and install the following libraries:
- Adafruit Unified Sensor (1.0.2)
- Adafruit BME280 (1.0.3)
- Sparkfun TSL2561 (1.1.0)
- NtpClientLib by German Martin (1.3.0)
The version numbers are the ones available at the time of writing.
Software Walk Through
At this point the hardware should be in place and all of the necessary libraries installed. Let the coding begin.
This first thing we need is the includes for the libraries that are going to be used:
#include <ESP8266WiFi.h>
#include <ESP8266HTTPClient.h>
#include <Time.h>
#include <NtpClientLib.h>
#include <SparkFunTSL2561.h>
#include <Adafruit_Sensor.h>
#include <Adafruit_BME280.h>
#include <Wire.h>
#include <SPI.h>
The SPI library is not going to be used in this example but will be required in future articles.
Next up we need some definitions and global variables to support the sensors:
//
//  Definitions used in the code for pins etc.
//
#define VERSION           "0.04"
//
#define PIN_SLEEP_OR_RUN  7
#define PIN_ONBOARD_LED   1
#define PIN_ANEMOMETER    5
#define PIN_PLUVIOMETER   8
//
#define SLEEP_PERIOD      60

//
//  Light sensor (luminosity).
//
SFE_TSL2561 light;

//
//  Create a Temperature, humidity and pressure sensor.
//
Adafruit_BME280 bme;
float temperature;
float pressure;
float humidity;

//
//  TLS2561 related globals.
//
boolean gain;       //  Gain setting, 0 = X1, 1 = X16;
unsigned int ms;    //  Integration ("shutter") time in milliseconds
double lux;         //  Luminosity in lux.
boolean good;       //  True if neither sensor is saturated

//
//  Ultraviolet analog reading.
//
int ultraviolet;
#define UV_GRADIENT           0.12
#define MAXIMUM_ANALOG_VALUE  1023
#define REFERENCE_VOLTAGE     3.3
#define UV_OFFSET             1.025

//
//  Buffer for messages.
//
char buffer[256];
char number[20];

//
//  NTP class to provide system time.
//
ntpClient *ntp;

//
//  Wind Speed sensor, each pulse per second represents 1.492 miles per hour.
//
volatile int windSpeedPulseCount;
#define WINDSPEED_DURATION      5
#define WINDSPEED_PER_PULSE     1.492

//
//  We are logging to Phant and we need somewhere to store the client and keys.
//
#define PHANT_DOMAIN        "data.sparkfun.com"
#define PHANT_PAGE          "/input/---- Your stream ID goes here ----"
const int phantPort = 80;
#define PHANT_PRIVATE_KEY   "---- Your Private Key goes here ----"
Before we progress much further it should be acknowledged that some of the code for the BMS280 and the TSL2561 is modified from the Adafruit and Sparkfun example applications.
A key point to note from the above code is the definition of the windSpeedPulseCount variable. Note the use of the volatile keyword. This tells the compiler not to optimise the use of this variable.
Next up is some support code. Two methods are initially required, ftoa adds the limited ability to convert a floating point number to a char * for debugging. The second method outputs a debugging message. This has been abstracted to allow for possible network debug messages later in the project. At the moment the serial port will be used.
//
//  Output a diagnostic message if debugging is turned on.
//
void DebugMessage(String message)
{
    Serial.println(message);
}

//
//  Convert a float to a string for debugging.
//
char *ftoa(char *a, double f, int precision)
{
    long p[] = {0, 10, 100, 1000, 10000, 100000, 1000000, 10000000, 100000000};

    char *ret = a;
    long integer = (long) f;
    itoa(integer, a, 10);
    while (*a != '\0')
    {
        a++;
    }
    if (precision != 0)
    {
      *a++ = '.';
      long decimal = abs((long) ((f - integer) * p[precision]));
      itoa(decimal, a, 10);
    }
    return ret;
}
TSL2561 - Luminosity Sensor
The next group of methods deal with the luminosity sensor, the TSL2561. these methods are slightly modified versions of the example code from Sparkfun. It is envisaged that future versions of these methods will deal with saturation and low light levels by dynamically changing the way the sensor works. For the proof of concept the basic code should suffice:
//
//  Convert the error from the TSL2561 into an error that a human can understand.
//
void PrintLuminosityError(byte error)
{
    switch (error)
    {
        case 0:
            DebugMessage("TSL2561 Error: success");
            break;
        case 1:
            DebugMessage("TSL2561 Error: data too long for transmit buffer");
            break;
        case 2:
            DebugMessage("TSL2561 Error: received NACK on address (disconnected?)");
            break;
        case 3:
            DebugMessage("TSL2561 Error: received NACK on data");
            break;
        case 4:
            DebugMessage("TSL2561 Error: other error");
            break;
        default:
            DebugMessage("TSL2561 Error: unknown error");
    }
}

//
//  Set up the luminsoity sensor.
//
void SetupLuminositySensor()
{
    light.begin();

    // Get factory ID from sensor:
    // (Just for fun, you don't need to do this to operate the sensor)
    unsigned char id;

    if (light.getID(id))
    {
        sprintf(buffer, "Retrieved TSL2561 device ID: 0x%x", id);
        DebugMessage(buffer);
    }
    else
    {
        byte error = light.getError();
        PrintLuminosityError(error);
    }

    // The light sensor has a default integration time of 402ms,
    // and a default gain of low (1X).

    // If you would like to change either of these, you can
    // do so using the setTiming() command.

    // If gain = false (0), device is set to low gain (1X)
    // If gain = high (1), device is set to high gain (16X)
    gain = 0;

    // If time = 0, integration will be 13.7ms
    // If time = 1, integration will be 101ms
    // If time = 2, integration will be 402ms
    // If time = 3, use manual start / stop to perform your own integration
    unsigned char time = 2;

    // setTiming() will set the third parameter (ms) to the
    // requested integration time in ms (this will be useful later):
    light.setTiming(gain, time, ms);

    // To start taking measurements, power up the sensor:

    DebugMessage((char *) "Powering up the luminosity sensor.");
    light.setPowerUp();
}

//
//  Read the luminosity from the TSL2561 luminosity sensor.
//
void ReadLuminositySensor()
{
    unsigned int data0, data1;

    if (light.getData(data0, data1))
    {
        sprintf(buffer, "TSL2561 data: 0x%04x, 0x%04x", data0, data1);
        DebugMessage(buffer);
        //
        //  To calculate lux, pass all your settings and readings to the getLux() function.
        //
        //  The getLux() function will return 1 if the calculation was successful, or 0 if one or both of the sensors was
        //  saturated (too much light). If this happens, you can reduce the integration time and/or gain.
        //  For more information see the hookup guide at:
        //  https://learn.sparkfun.com/tutorials/getting-started-with-the-tsl2561-luminosity-sensor
        //

        //
        // Perform lux calculation.
        //
        double localLux;
        good = light.getLux(gain ,ms, data0, data1, localLux);
        if (good)
        {
            lux = localLux;
        }
    }
    else
    {
        byte error = light.getError();
        PrintLuminosityError(error);
    }
}

//
//  Log the luminosity data to the debug stream.
//
void LogLuminosityData()
{
    sprintf(buffer, "Lux: %s", ftoa(number, lux, 2));
    DebugMessage(buffer);
}
BME280 - Air Temperature, Pressure and Humidity Sensor
Dealing with this sensor is simpler than the luminosity sensor as can be seen from the code below:
//
//  Setup the Adafruit BME280 Temperature, pressure and humidity sensor.
//
void SetupTemperaturePressureSensor()
{
    if (!bme.begin())
    {
        DebugMessage("Could not find a valid BME280 sensor, check wiring!");
    }
    else
    {
        DebugMessage("BME280 sensor located on I2C bus.");
    }
}

//
//  Log the data from the temperature, pressure and humidity sensor.
//
void LogTemperaturePressureData()
{
    sprintf(buffer, "Temperature: %s C", ftoa(number, temperature, 2));
    DebugMessage(buffer);
    sprintf(buffer, "Humidity: %s %%", ftoa(number, humidity, 2));
    DebugMessage(buffer);
    sprintf(buffer, "Pressure: %s hPa", ftoa(number, pressure / 100, 0));
    DebugMessage(buffer);
}

//
//  Read the data from the Temperature, pressure and humidity sensor.
//
void ReadTemperaturePressureSensor()
{
    temperature = bme.readTemperature();
    pressure = bme.readPressure();
    humidity = bme.readHumidity();
}
This group of methods follows a similar line to the TSL2561 sensor methods, namely, setup, read and log methods.
ML8511 - Ultraviolet Light Sensor
This sensor is the simplest so far as it provides a simple analog value representing the intensity of the ultraviolet light falling on the sensor.
//
//  Read the ultraviolet light sensor.
//
void ReadUltravioletSensor()
{
    ultraviolet = analogRead(A0);
}

//
//  Log the reading from the ultraviolet light sensor.
//
void LogUltravioletData()
{
    char num[20];

    sprintf(buffer, "Ultraviolet light: %s", itoa(ultraviolet, num, 10));
    DebugMessage(buffer);
}
Note that this sensor does allow for an enable line. This can be used to disable the sensor and put it into a low power mode if necessary. This will not be used in the proof of concept will be considered when the project moves to the point where power supplies / solar power is considered.
Wind Speed Sensor Interrupt Service Routine (ISR)
This method looks trivial and it is:
//
//  ISR to count the number of pulses from the anemometer (wind speed sensor).
//
void IncreaseWindSpeedPulseCount()
{
    windSpeedPulseCount++;
}
The non-trivial thing to remember about this code is that the method changes a global variable. The <i>volatile</i> keyword used in the variable definition is necessary to stop the compiler from optimising the global variable as this can have side effects.
Data Logging to Sparkfun's Data Service
Assuming that we have a WiFi connection then we can log the data collected to the Sparkfun data service (this is based upon Phant).
//
//  Post the data to the Sparkfun web site.
//
void PostDataToPhant()
{
    String url = PHANT_PAGE "?private_key=" PHANT_PRIVATE_KEY "&airpressure=";
    url += ftoa(number, pressure / 100, 0);
    url += "&groundmoisture=0";
    url += "&groundtemperature=0";
    url += "&temperature=";
    url += ftoa(number, temperature, 2);
    url += "&humidity=";
    url += ftoa(number, humidity, 2);
    url += "&luminosity=";
    url += ftoa(number, lux, 2);
    url += "&rainfall=0";
    double uvStrength = (((double) ultraviolet) / MAXIMUM_ANALOG_VALUE) * REFERENCE_VOLTAGE;
    if (uvStrength < UV_OFFSET)
    {
        uvStrength = 0;
    }
    else
    {
        uvStrength = (uvStrength - UV_OFFSET) / UV_GRADIENT;
    }
    url += "&ultravioletlight=";
    url += ftoa(number, uvStrength, 2);
    url += "&winddirection=0";
    double windSpeed = windSpeedPulseCount / WINDSPEED_DURATION;
    windSpeed *= WINDSPEED_PER_PULSE;
    url += "&windspeed=";
    url += ftoa(number, windSpeed, 2);
    //
    //  Send the data to Phant (Sparkfun's data logging service).
    //
    HTTPClient http;
    http.begin(PHANT_DOMAIN, phantPort, url);
    int httpCode = http.GET();
    sprintf(buffer, "Status code: %d", httpCode);
    DebugMessage(buffer);
    String response = http.getString();
    sprintf(buffer, "Phant response code: %c", response[3]);
    DebugMessage(buffer);
    if (response[3] != '1')
    {
        //
        //  Need to put some error handling here.
        //
    }
    http.end();
}
he stream has been set up to collect more data than is currently collected, for instance, ground temperature. Any parameter not measured at the moment is set to 0.
Some other things to consider following the proof of concept.
- Error handling for network issues
- Possible offline collection of data
- Using a local version of Phant
Something to bear in mind after the project moved from proof of concept.
Data Collection
The majority of the sensor have a read method to collect the data from the sensor. The only exception at the moment is the wind speed sensor. The data collection is performed inside the main method for collecting and logging the sensor readings:
//
//  Raad the sensors and publish the data.
//
void ReadAndPublishSensorData()
{
    digitalWrite(1, HIGH);
    DebugMessage("\r\nCurrent time: " + ntp->getTimeString());
    ReadLuminositySensor();
    ReadTemperaturePressureSensor();
    LogLuminosityData();
    LogTemperaturePressureData();
    ReadUltravioletSensor();
    LogUltravioletData();
    //
    //  Read the current wind speed.
    //
    DebugMessage("Reading wind speed.");
    windSpeedPulseCount = 0;
    attachInterrupt(PIN_ANEMOMETER, IncreaseWindSpeedPulseCount, RISING);
    delay(WINDSPEED_DURATION * 1000);
    detachInterrupt(PIN_ANEMOMETER);
    //
    PostDataToPhant();
    digitalWrite(1, LOW);
}
Reading the wind speed is performed through the ISR described above. The algorithm is simple:
- Clear the count of the number of revolutions (pulses) from the sensor
- Attach an interrupt to the sensor (the interrupts increments the count every revolution of the sensor)
- Wait for a know number of seconds (in this case 5)
- Detach the interrupt to stop the count</li>
By using this method we can provide an average over a number of seconds and the wind speed can be calculated as:
Wind Speed = (Revolution count / number of seconds) * 1.492
This is the calculation performed in the PostDataToPhant method.
Setup and Loop
The final things needed by an application developed in the Arduino environment are the setup and loop methods. So let's start looking at the setup method.
//
//  Setup the application.
//
void setup()
{
    Serial.begin(9600);
    Serial.println("\r\n\r\n-----------------------------\r\nWeather Station Starting (version " VERSION ", built: " __TIME__ " on " __DATE__ ")");
    Serial.println();
    //
    //  Connect to the WiFi.
    //
    Serial.print("\r\nConnecting to default network");
At the start of setup we need to rely upon the Serial object being available and so there are no calls to the DebugMessage method as this may be modified later to use networking for debugging. The next step is to try and connect to the network:WiFi.begin(); while (WiFi.status() != WL_CONNECTED) { delay(500); Serial.print("."); } Serial.println(""); Serial.print("WiFi connected, IP address: "); Serial.println(WiFi.localIP());At this point the application will be either looping indefinitely until the network becomes available or we will have an IP address output to the serial port. In a more complete application this will start the logging process and periodically try to connect to the network when the network is unavailable. This is only a proof of concept after all.
There is currently no Real Time Clock (RTC) attached to the system and so we need to check the network time at startup.
    //
    //  Get the current date and time from a time server.
    //
    DebugMessage("Setting time.");
    ntp = ntpClient::getInstance("time.nist.gov", 0);
    ntp->setInterval(1, 1800);
    delay(1000);
    ntp->begin();
    while (year(ntp->getTime()) == 1970)
    {
        delay(50);
    }
This block of code loops until the network time is set correctly. At start up the year will be set to a default value of 1970, this is why the code loops until the year is something other than 1970.Next up, setup the sensors and take our first reading:
    //
    //  Set up the sensors and digital pins.
    //
    SetupLuminositySensor();
    SetupTemperaturePressureSensor();
    pinMode(PIN_ONBOARD_LED, OUTPUT);
    pinMode(PIN_ANEMOMETER, INPUT);
    //
    //  Read the initial data set and publish the results.
    //
    ReadAndPublishSensorData();
}
Everything is setup, only thing left is to continue to collect and publish the data, enter loop:
//
//  Main program loop.
//
void loop()
{
    delay(SLEEP_PERIOD * 1000);
    ReadAndPublishSensorData();
}
Example Output
Running the above code results in the following output in the serial monitor (note that some data (IP addresses has been modified):
-----------------------------
Weather Station Starting (version 0.04, built: 06:46:39 on Apr 3 2016)
Connecting to default network...........
WiFi connected, IP address: 192.168.xxx.yyy
Setting time.
Retrieved TSL2561 device ID: 0x50
Powering up the luminosity sensor.
BME280 sensor located on I2C bus.
Current time: 06:48:45 03/04/2016
TSL2561 data: 0x0373, 0x004f
Lux: 399.65
Temperature: 18.89 C
Humidity: 52.86 %
Pressure: 1006 hPa
Ultraviolet light: 307
Reading wind speed.
Status code: 200
Phant response code: 1
Next Steps
- How to handle two sensors requiring an analog conversion
- The project is running out of digital pins
- Real time clocks
- Offline data logging
All of this before even looking at the location and powering the project in the wild (OK, my garden).
Back right after this break...
-
Analog Sensors (Ultraviolet Light, Wind and Rain)
06/25/2016 at 16:50 • 0 commentsThere are a number of analog sensors in scope for this project:
- Wind speed
- Wind direction
- Rainfall
- Ultraviolet light
The Ultraviolet light and wind direction sensor will present us with a problem as they are both analog sensors and the Oak only has one Analog-to-Digital Convertor (ADC).
The rainfall gauge and the wind speed sensor both use a similar technology to generate a signal, namely a magnet that will trigger a reed switch. These two sensors also present an issue; while they are simple enough there are a finite number of pins on the Oak and they are being consumed at a fair rate.
ML8511 - Ultraviolet Light Sensor
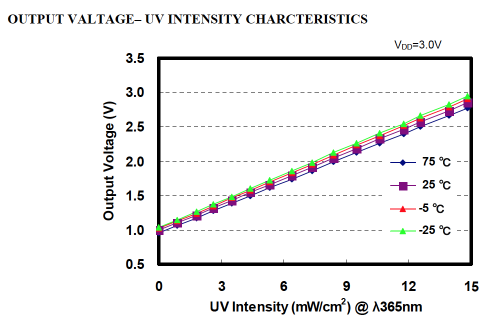
The ML8511 measures ultraviolet light at a wavelength of 365nM. This is at the top end of the UVB band, the band which is harmful to living tissue. The sensor generates a voltage that is linear and proportional to the intensity of the UV light. The intensity of the light measured is on the scale 0 to 15 mW/cm<sup>2</sup>. The following chart is taken from the data sheet:
![]()
The chart above is generated when the supply voltage is 3.0V but the system under development will be using a 3.3V supply. Some investigation is required to determine the output voltage when there is no UV present. After running the sensor under constant temperature conditions with no UV light present the ADC was generating a reading in the 316 - 320 range. This gives out output voltage for the sensor in the range 1.02V - 1.03V.
If we assume that the output characteristics of the sensor remain linear at 3.3V and the gradient remains the same then we can generate a formula for calculating the intensity of the UV light based upon the sensor output.
A little light mathematics results in the following formula:
UV Intensity = (Sensor output in volts - 1.025) / 0.12 mW / cm^2
There are some assumptions in the above work and the data sheet shows that the output voltage can vary but we have a method for calculating the intensity of UV light; accurate enough for a home project anyway.
Wind Speed
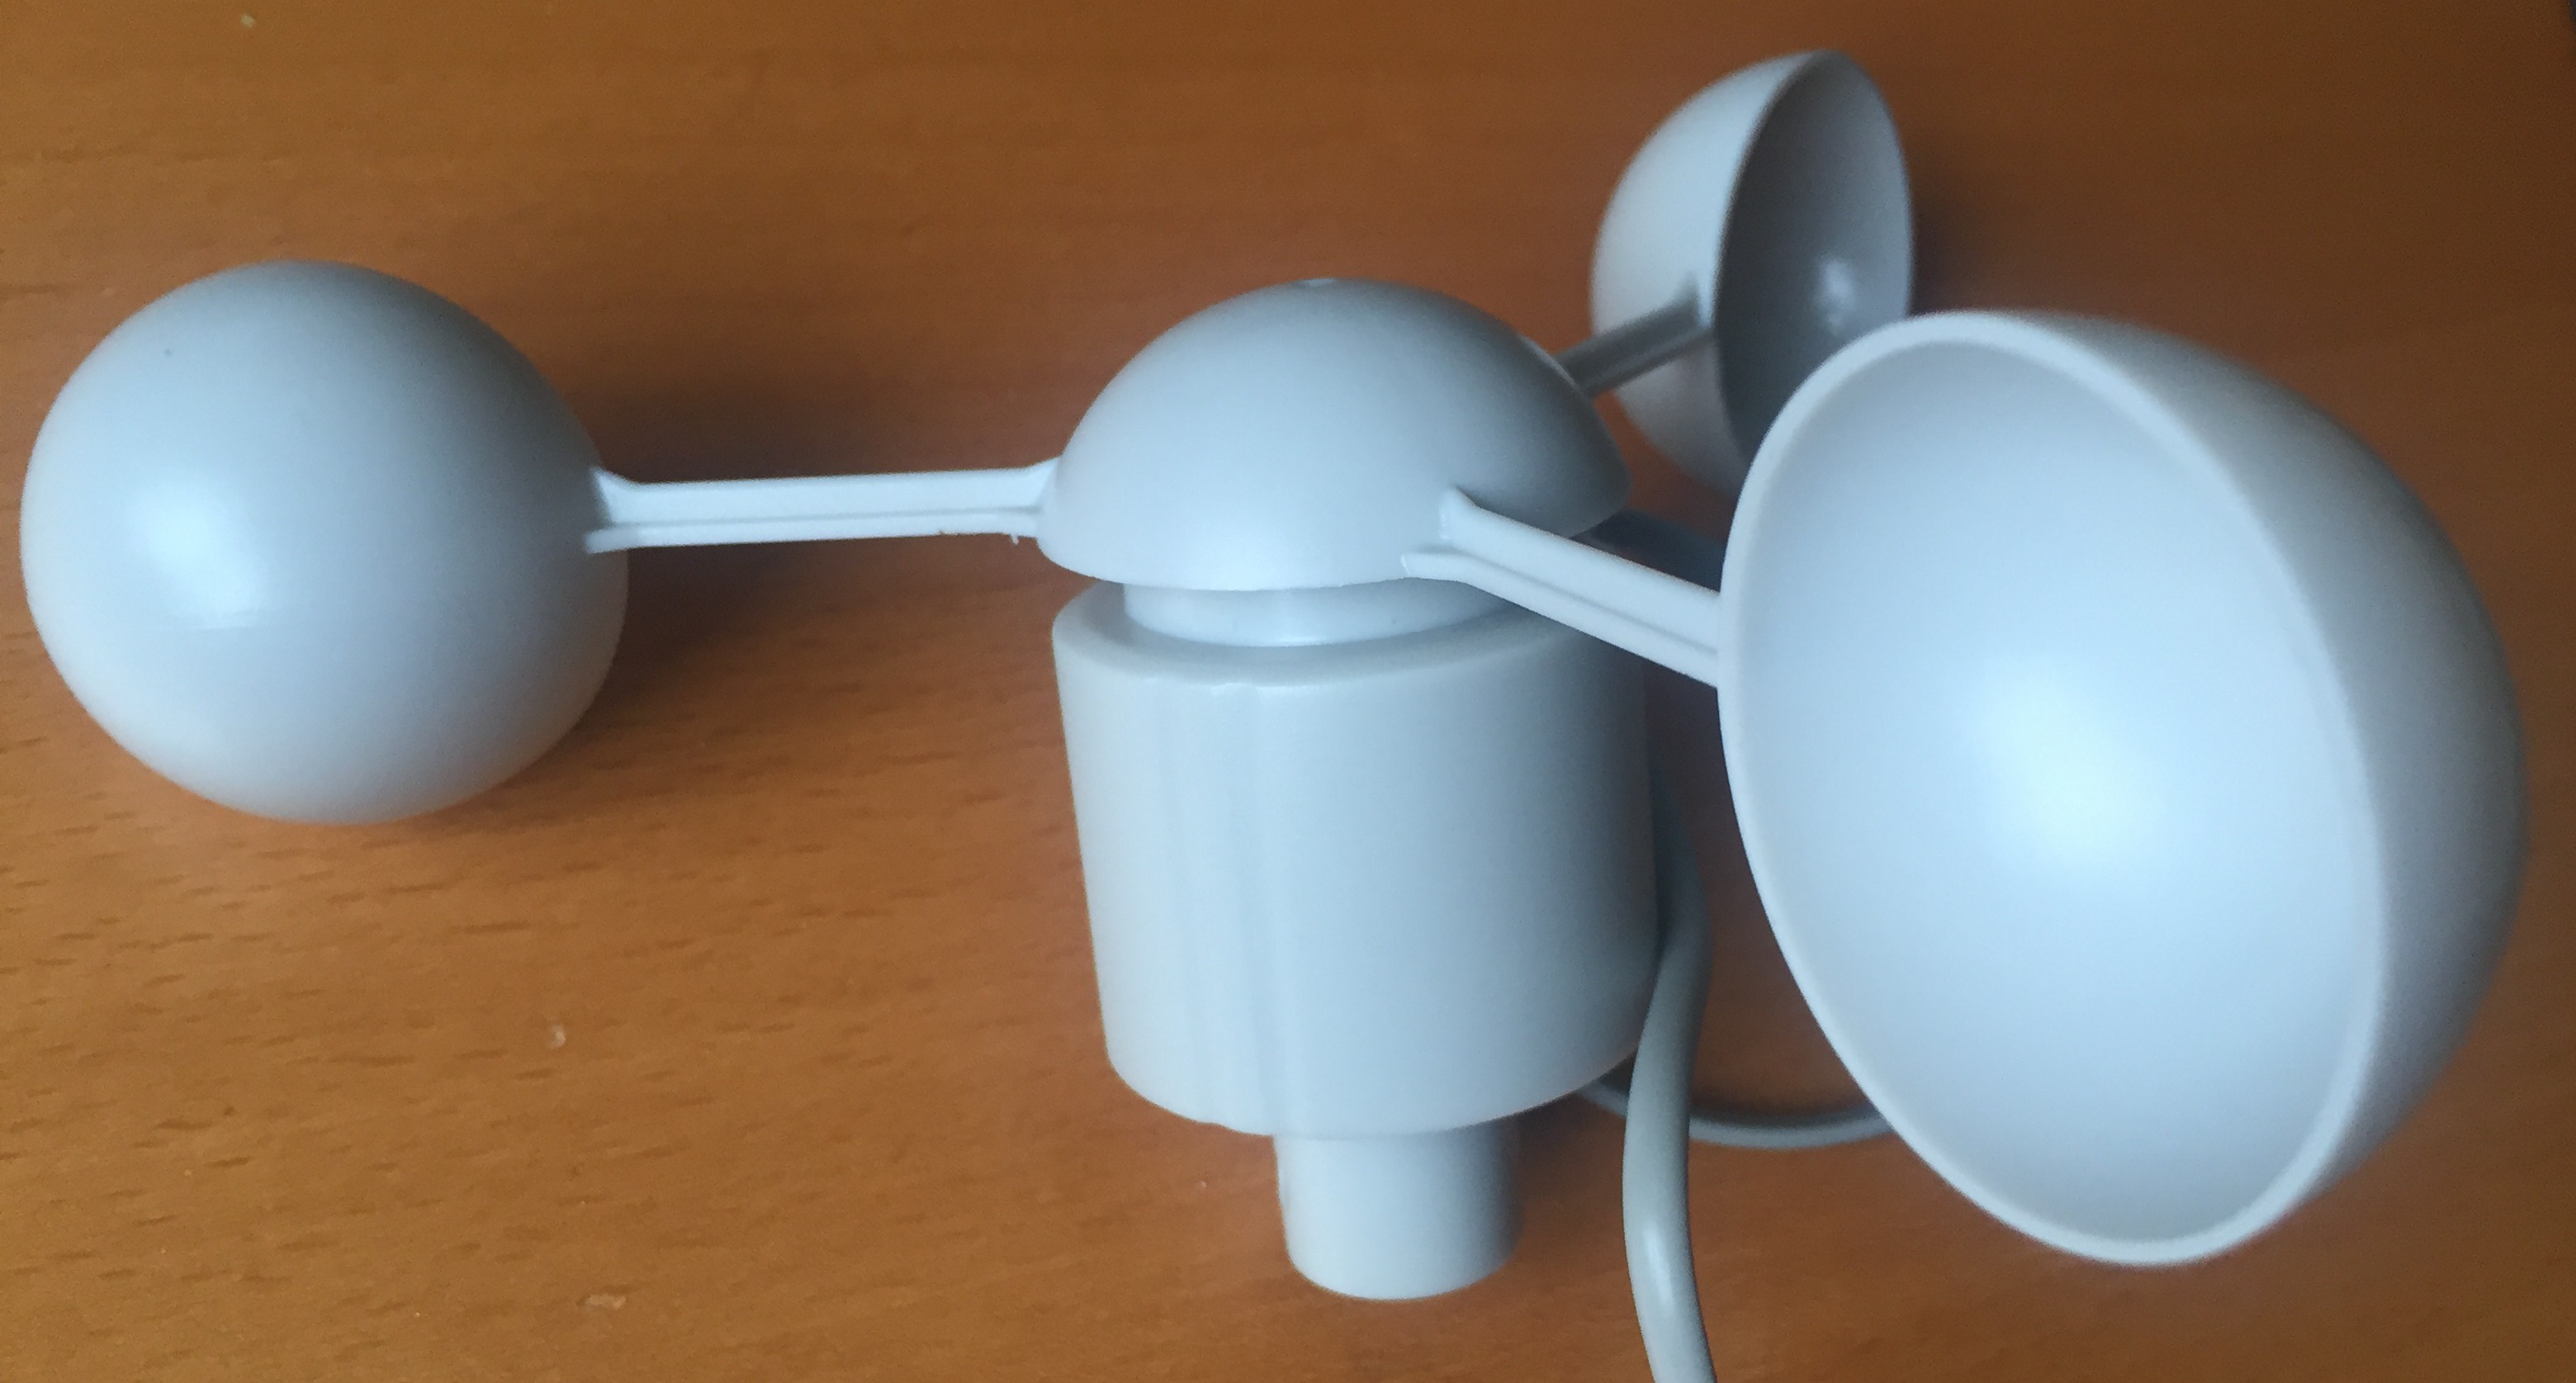
Wind speed is measured by an anemometer. The anemometer in the Weather Sensor kit is a cup anemometer:
![]()
This has a magnet on the spindle connected to the cups. The magnet closes (and opens) a reed switch each time it passes the switch. So one pulse is generated per full revolution of the spindle. Each full revolution of the spindle (per second) represents a wind speed of 1.492 miles per hour (mph) or 2.4 km/h.
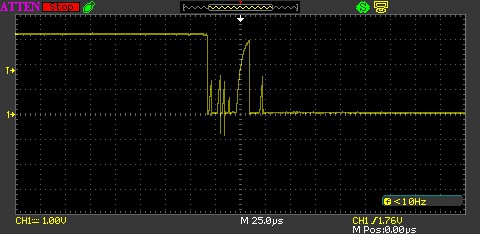
For the experienced, this sounds simple but we all know there could be a nasty shock in store for us, namely switch bounce. An easy way to find out, hook the output up to an oscilloscope.
The circuit is simple enough, connect one switch contact to 3.3V, one to a resistor and the other end of the resistor to ground. Connect the scope to the resistor / switch junction.
The scope was set up to have a trigger voltage of about 1.5V and to trigger on the falling edge of a signal. The cups on the anemometer were then position so that the reed switch was closed (a high output on the scope) and the scope setup in single shot mode (to capture and hold the trace when triggered). Spinning the anemometer gave the following output:
![]()
As you can see, the switch does bounce. Switch debouncing is a well known and documented problem, in fact I have written about it here so we will not go too deep into the problem in this article. The solution that will be used is a simple RC circuit.
The principle is that the RC circuit resists change and so filters out the glitch in the above trace. So we need a filter that is resistive enough to filter out the glitch but fast enough to respond in the minimum time between pulses.
The weather station is going to be located in the mainland UK, about 30 miles from the coast. In this location the wind speed is unlikely to rise above 60-80 mph unless in extreme conditions (tornadoes are known to occur in the UK). So assuming the maximum wind speed in 149.2 mph (this number is based upon the fact that 1.492 mph gives one revolution per second) then we have a maximum number of rotations of 100 per second. This gives a revolution time of 10 milliseconds.
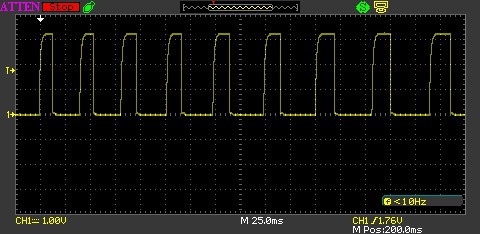
So we have a 10 millisecond window for the pulse from the sensor. The pulse will be low for the majority of the time as the switch can only close when the magnet is above the switch, so for most of the 10ms we will have a low pulse. You can see this in the following trace:
![]()
The signal appears to be high for 30% of the time. An accurate measurement could be made using the scope but it does not appear to be necessary. In our case, 10 milliseconds per rotation, the signal would be low for approximately 70% of the time, i.e. 7 milliseconds.
Going back to the first trace should the switch bounce it is observed that the switch bounce lasts for approximately 50-60 microseconds. Several observations of both the rising and falling edges showed this to be reasonable consistent. This final piece of information helps to define the parameters for this problem:
- The frequency of the pulses should be 100Hz maximum (i.e. 10 milliseconds between pulses)
- Duty cycle is 30% (high for 3 milliseconds, low for 7 milliseconds)
- Switch bounce can last 50-60 microseconds (assume 100 microseconds as a worst case)
- Trigger voltage is 2.3V with a supply voltage of 3.3V
There are plenty of online calculators for this type of circuit, Layada has one here that covers this type of scenario. We know the supply voltage (3.3V) and the trigger voltage (2.3V) so the only thing to do is look at the components available and calculate the delay time. After a few tries a 10K resistor and a 100nF capacitor were found to give a delay of 1.1939 milliseconds. This covers our case with plenty of margin for error.
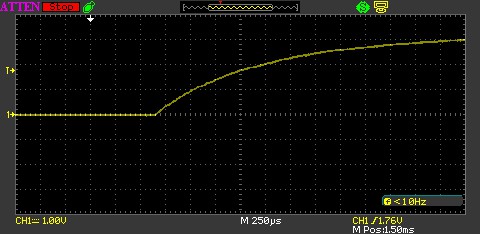
Putting together the circuit above where the anemometer is the switch and triggering on the rising edge gives the following output on the oscilloscope:
![]()
The rise time looks to be acceptable, smooth and slow enough to iron out the glitches but fast enough to allow a 10 millisecond duration with a 30% duty cycle.
-
I2C Sensors
06/25/2016 at 16:27 • 0 commentsThe weather station project will be bringing together a number of sensors, light, ultraviolet light, air pressure, humidity, wind speed, wind direction and rain fall. This collection of sensors falls into three groups:
- Electronic sensors on an I2C bus
- Mechanical sensors using switches
- Analog sensors
The current plan is for the weather station to use the Oak as the microcontroller running the show. The data from the sensors can then be uploaded to the cloud, destination to be determined, but let's start with Sparkfun's">https://data.sparkfun.com/">Sparkfun's data service.
The I2C sensors will require the least amount of work to get up and running so let's start with those. The two sensors operating on the I2C bus are:
- TSL2561">https://www.sparkfun.com/products/12055">TSL2561 - Luminosity sensor
- BME280">https://www.adafruit.com/products/2652">BME280 - Air pressure, temperature and humidity sensor
One of the great things about working with these two sensors is the fact that there are prebuilt drivers and example code for both breakout boards available from Github. What could be simpler, well head over to the Sketch - Include Library - Board Manager... menu in the Arduino IDE and you can download the library and have the IDE install it for you.
TSL2561 - Luminosity Sensor
This sensor allows the radiance of the light to be calculated in a way that approximates the response of the human eye. It does this by combining the input from two photodiodes, one infra-red only and one visible light and infra-red light combined. The output from the two sensors can be used to luminous emittance in lux (lumens per square metre).
The following table gives an idea of the lux values for typical scenarios:
Lux Typical Environment 0.0001 Moonless, overcast night 0.002 Moonless, clear sky 0.27 - 1.0 Full moon on a clear night 80 Office building hallway 320-500 Office lighting 1000 Overcast day 10,000 - 25,000 Daylight As you can see from the table above, the lux values for a "normal" human day can vary dramatically. The sensor copes with this by allowing the use of a variable time window and sensitivity when taking a reading. Effectively the sensor accumulates the readings over the time window (integration interval) into a single 16-bit number which can then be used to calculate the lux reading.
BME280 - Air Pressure, Temperature and Humidity Sensor
This sensor is produced by Bosch and is packaged in both I2C and SPI configuration on the same board. The accuracy of the sensor appears good, pressure and temperature both to 1% and humidity to 3%.
Libraries
Both Sparkfun and Adafruit have provided libraries and example code for the boards. These were easy to add to the development environment.
One caveat, the BME280 requires the addition of the Adafruit sensor library as well as the BME280 library.
Once added it was a simple case of wiring up the sensor to 3.3V and the I2C bus and running the example code.
They both worked first time.
Some Code Modifications (for later)
The light sensor has been show to work in low light conditions but not to any degree of precision. A possible modification to the example code is to look at the sensitivity and integration window settings to see if the precision can be adjusted to make the sensor return better readings in low light.
Some of the values when calculated use the fractional part of a floating-point number, temperature and humidity spring to mind. This meant adding a method to convert a double into it's string representation for debugging purposes. Trivially solved but an annoying omission from the implementation of sprintf.
Next up, the analog sensors.
-
The Sensors
06/25/2016 at 16:00 • 0 commentsTemperature, Pressure and Humidity
There are two temperatures we can measure here, air temperature and soil or ground level temperature. The air temperature will give an indication of how pleasant a day it is at the moment and the ground level sensor will give an indication of the progress of the seasons from the plants perspective. For this reason we are interested in both of these measurements.
Air pressure has long been used as a predictor for upcoming weather events.
Luckily we can get the air temperature, pressure and humidity sensor in one convenient package, the BME280. Ground level temperature will need a waterproof sensor. I think this would be best purchased as a unit rather than made so the DS18B20 with a 6 foot cable looks like it might be ideal.
Wind and Rain
All of these measurements come from the weather meter. The wind speed and rainfall sensors are simple switches that generate pulses whilst the wind direction is a resistor network.
Light
The two light measurements are the overall light intensity (luminosity) and ultraviolet light intensity. Luckily there are a couple of sensors for these two measurements, the TSL2561 and the ML8511.
The ultraviolet light sensor is an analogue sensor and so we will have to consider the stability of the supply voltage when making the reading.
The luminosity sensor uses a measurement window and a sensitivity setting to take a reading. This means that for given settings the sensor may be overwhelmed and simply give a maximum reading. The work around for this is to make the measurement window and sensitivity dynamic. So long, sensitive windows at night and short less sensitive windows on bright sunny days.
Cases and Location
The microcontroller and power etc. will need to be located in a case of some form. This will need to be weather proof as water and electricity are not the best of friends. It would also be a good idea to keep any batteries in an environment with a reasonably stable temperature. A little research into how the professionals do it.
The sensors on the other hand need to be outdoors in a suitable location for the measurements being taken.
Power Supply
The initial work can be done using a bench power supply but when the project moves outdoors it will need to either be mains or battery powered. The long term aim is to use a solar cell and rechargeable battery, as they say on Kickstarter, a stretch goal.
Data Logging and a Real Time Clock (RTC)
The Oak is a WiFi enabled board so the most obvious place to put the data is the cloud. It might be an idea to also provide some local storage in case the WiFi network is unavailable.
The RTC could have two uses, to wake the microcontroller and also provide a timestamp for the data items.
Modular Weather Station
Building a weather station using readily available breakout boards to deliver sensor data to the Internet
 Nevyn
Nevyn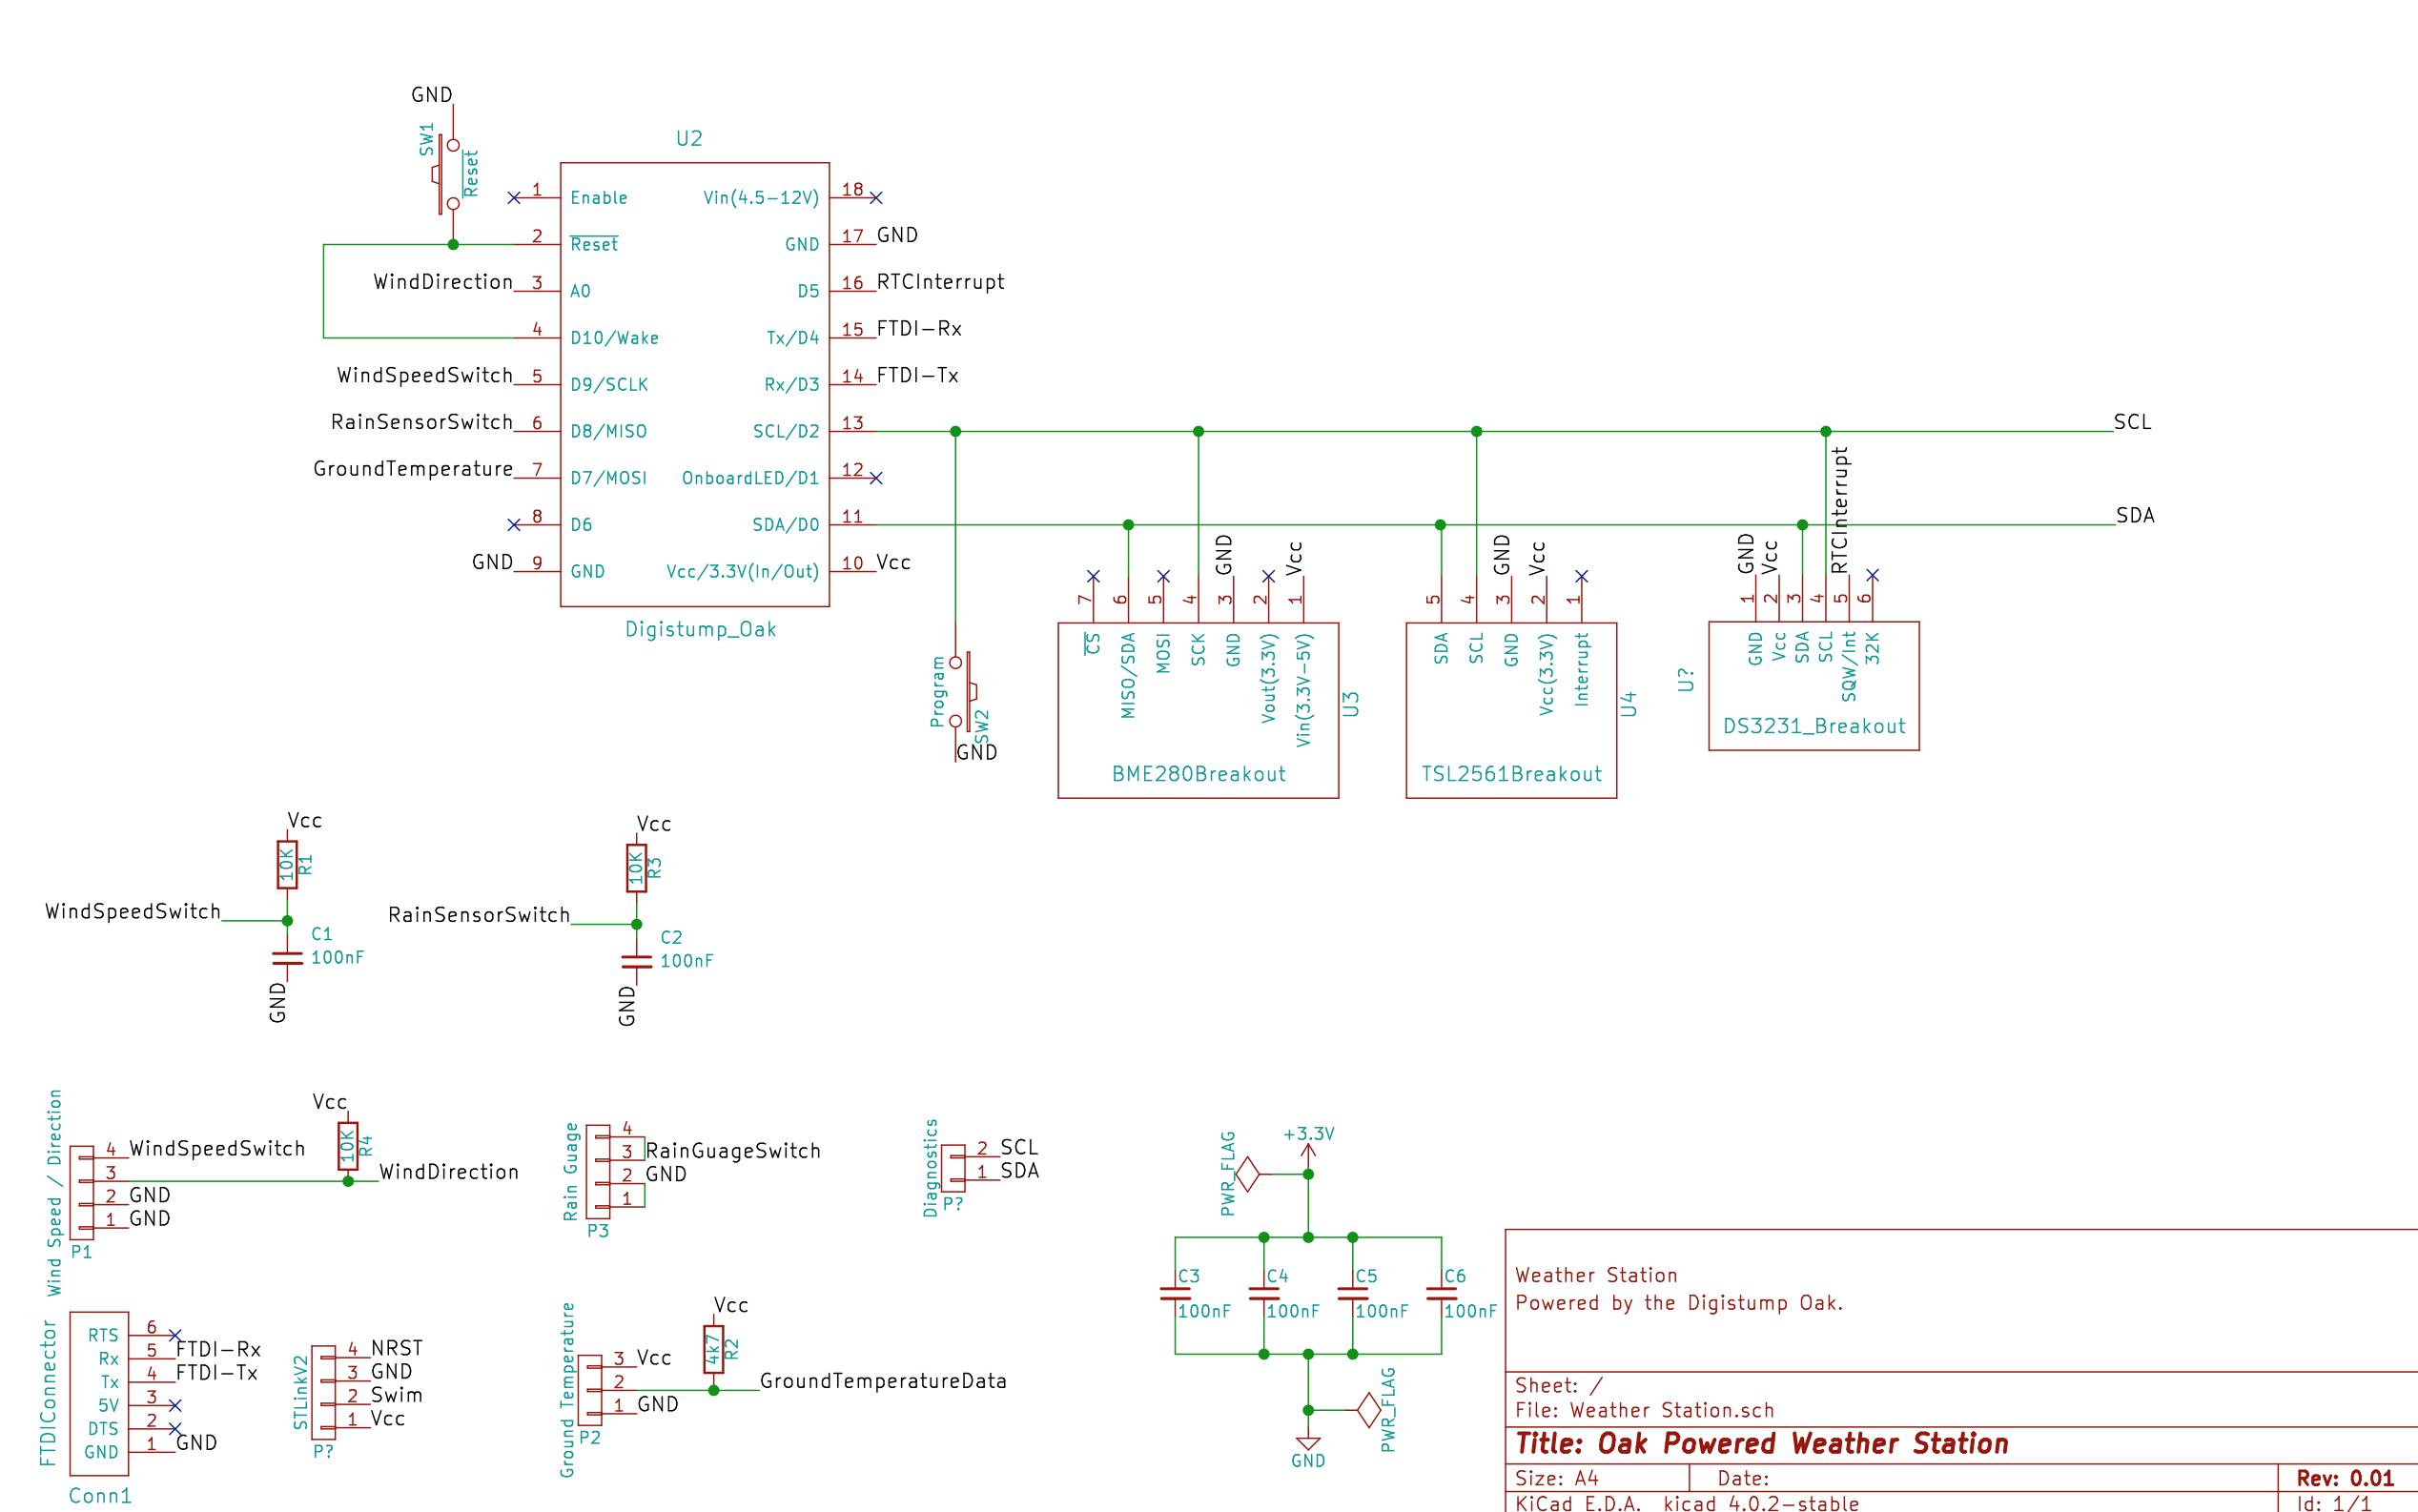
 The STM8S should be able to take over the reading values from the following sensors: