Maksim Surguy
-
Improving FPV UI
01/23/2017 at 01:31 • 0 commentsI am working on a better version of the user interface that is displayed on the FPV receiver.
Looking at the PiCamera Python package documentation, I found that I can create multiple overlays and control their precise dimensions and positioning. Not making overlays fullscreen allows to have clear central frame and information above and below the frame: http://picamera.readthedocs.io/en/release-1.10/api_renderers.html#picamera.renderers.PiRenderer
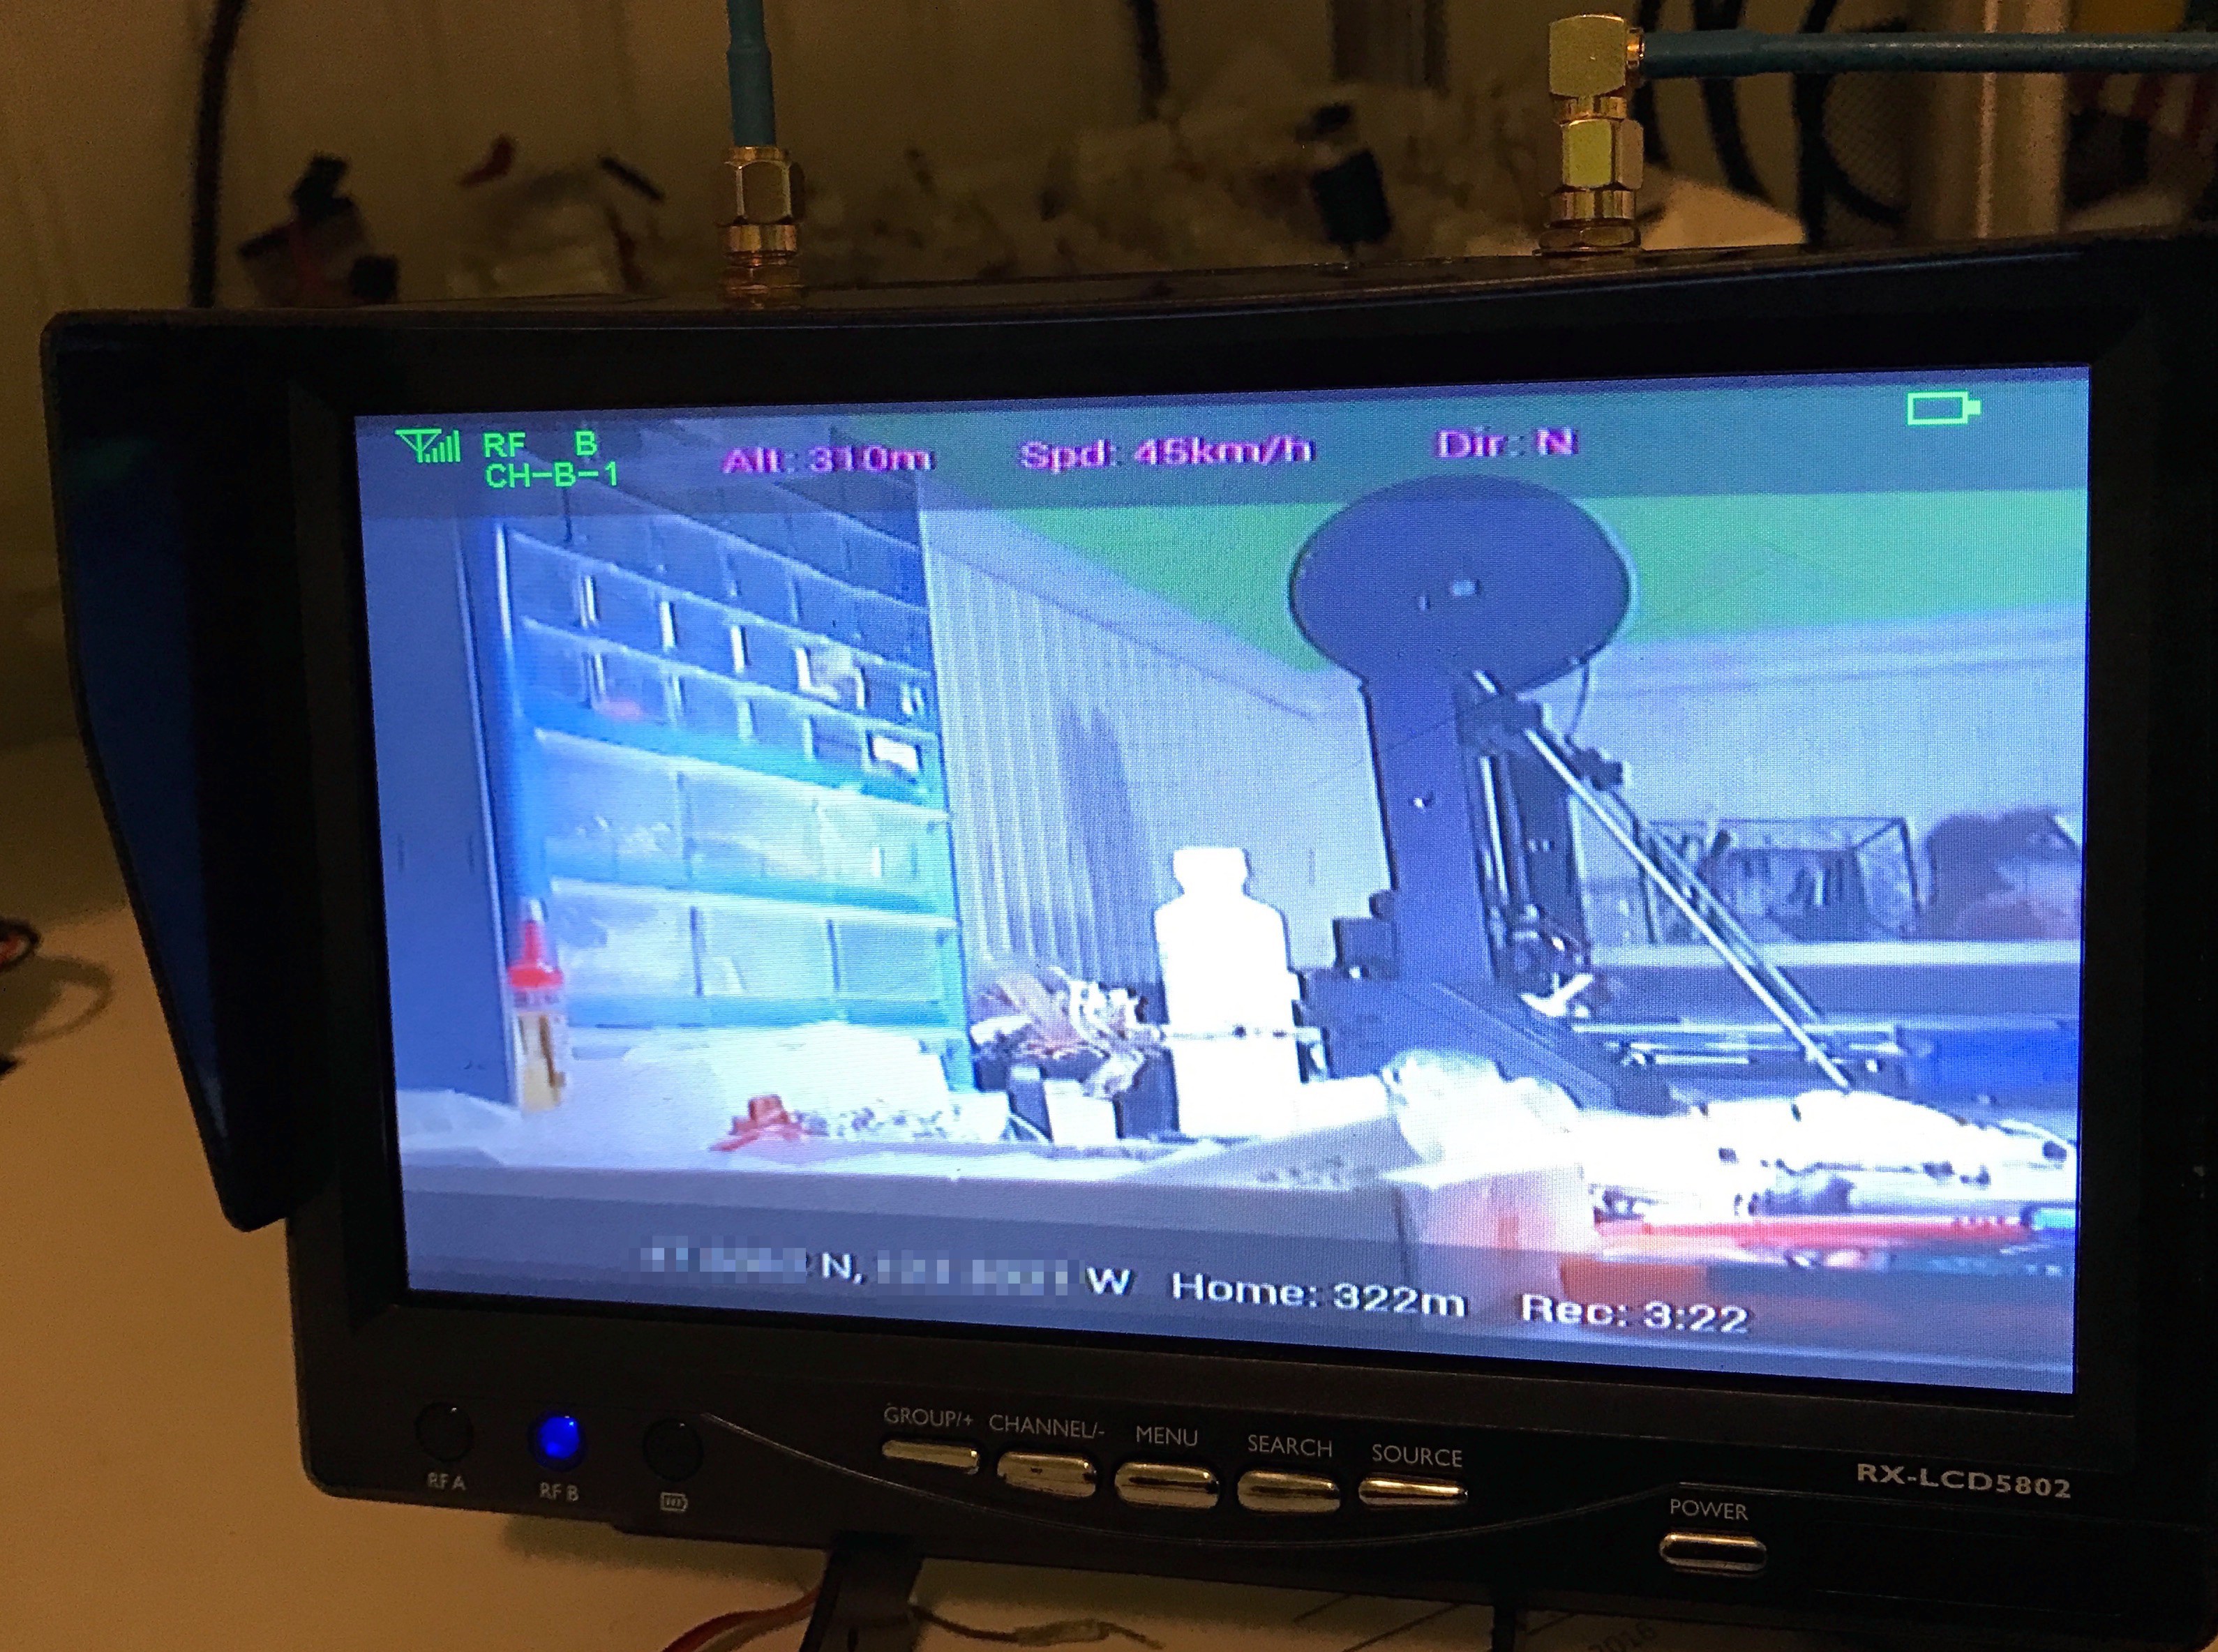
Using this, and also using a crosshair image, you can create a better looking UI for the display. Here's the code that I used to create display in the image below:
#!/usr/bin/python import picamera import time import numpy as np import string import random import os from PIL import Image, ImageDraw, ImageFont # Video Resolution for recording VIDEO_HEIGHT = 940 VIDEO_WIDTH = 1280 baseDir='/home/pi/osd/' # directory where the video will be recorded os.system('clear') # clear the terminal from any other text # Create empty images to store text overlays textOverlayCanvas = Image.new("RGB", (704, 60)) textOverlayPixels = textOverlayCanvas.load() # Use Roboto font (must be downloaded first) font = ImageFont.truetype("/usr/share/fonts/truetype/roboto/Roboto-Regular.ttf", 20) with picamera.PiCamera() as camera: camera.resolution = (VIDEO_WIDTH, VIDEO_HEIGHT) camera.framerate = 60 camera.led = False camera.start_preview() topText = "Alt: 310m Spd: 45km/h Dir: N" bottomText = "47.6062 N, 122.3321 W Home: 322m Rec: 3:22" topOverlayImage = textOverlayCanvas.copy() bottomOverlayImage = textOverlayCanvas.copy() # Load the crosshair image crosshairImg = Image.open('crosshair.png') # Create an image padded to the required size with crosshairPad = Image.new('RGB', (((crosshairImg.size[0] + 31) // 32) * 32, ((crosshairImg.size[1] + 15) // 16) * 16)) crosshairPad.paste(crosshairImg, (0, 0)) # Attach overlays topOverlay = camera.add_overlay(topOverlayImage.tostring(), size=(704,60), layer=3, alpha=128, fullscreen=False, window=(0,20,704,60)) bottomOverlay = camera.add_overlay(bottomOverlayImage.tostring(), size=(704,60), layer=4, alpha=128, fullscreen=False, window=(0,500,704,60)) crosshairOverlay = camera.add_overlay(crosshairPad.tostring(), size=(704,512), layer=5, alpha=10, fullscreen=False, window=(20,30,704,512)) try: while True: topOverlayImage = textOverlayCanvas.copy() bottomOverlayImage = textOverlayCanvas.copy() drawTopOverlay = ImageDraw.Draw(topOverlayImage) drawTopOverlay.text((200, 15), topText, font=font, fill=(255, 0, 255)) topOverlay.update(topOverlayImage.tostring()) drawBottomOverlay = ImageDraw.Draw(bottomOverlayImage) drawBottomOverlay.text((150, 20), bottomText, font=font, fill=(255, 255, 255)) bottomOverlay.update(bottomOverlayImage.tostring()) time.sleep(1) except KeyboardInterrupt: camera.remove_overlay(topOverlay) camera.remove_overlay(bottomOverlay) camera.remove_overlay(crosshairOverlay) print "Cancelled" finally: camera.remove_overlay(topOverlay) camera.remove_overlay(bottomOverlay) camera.remove_overlay(crosshairOverlay)![]()
Next steps would be to display information from the GPS sensor attached to the Raspberry Pi via serial interface.
-
Connecting FPV transmitter to Pi Zero
01/12/2017 at 07:18 • 2 commentsWiFi is not really suitable for real time video streaming unless you have powerful CPUs and strong connection. This fact alone makes it very hard to use Pi Zero and WiFi to get steady video stream over large distances. Perhaps there is another way?
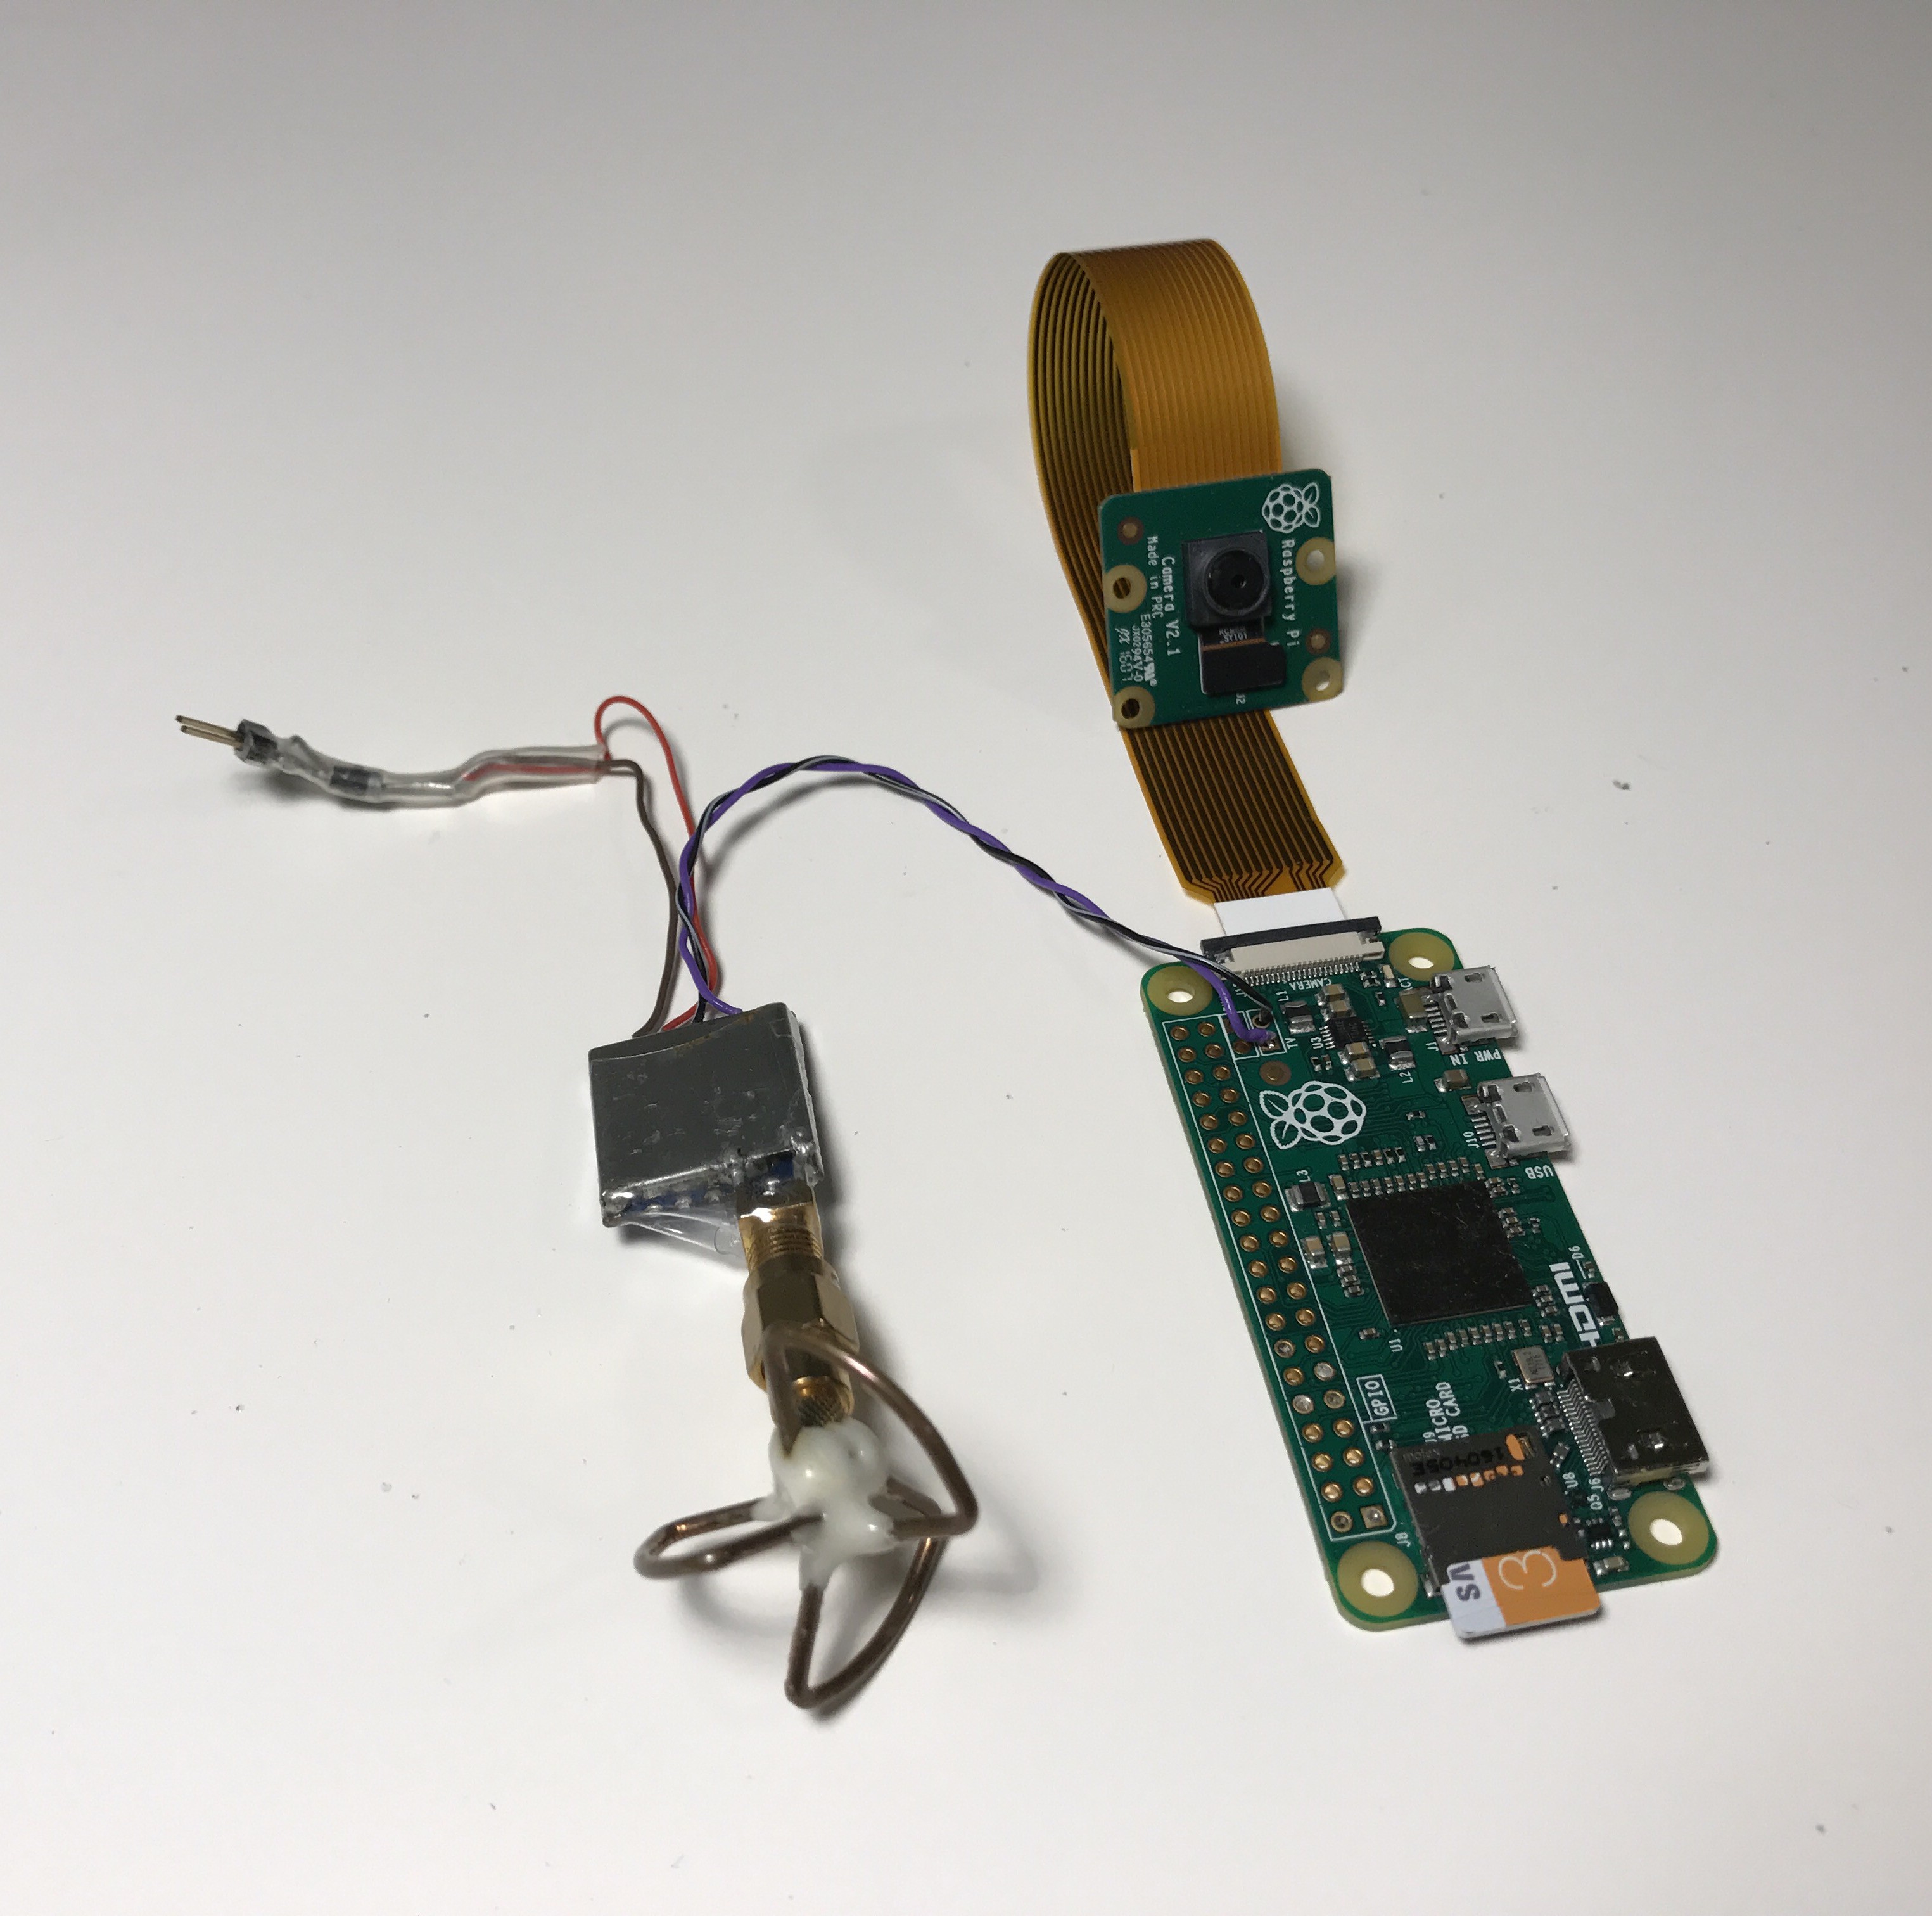
It is not widely known, but all Raspberry Pis have analog TV output on board (in addition to HDMI), even Pi Zero sports one! You can use that analog TV output to stream a video feed from the Pi Zero to a screen far far away via a hobby grade FPV transmitter.
For my setup I used a $15 transmitter from RangeVideo.com that is tiny, yet powerful enough to fly about quarter a mile away and still have clear signal.
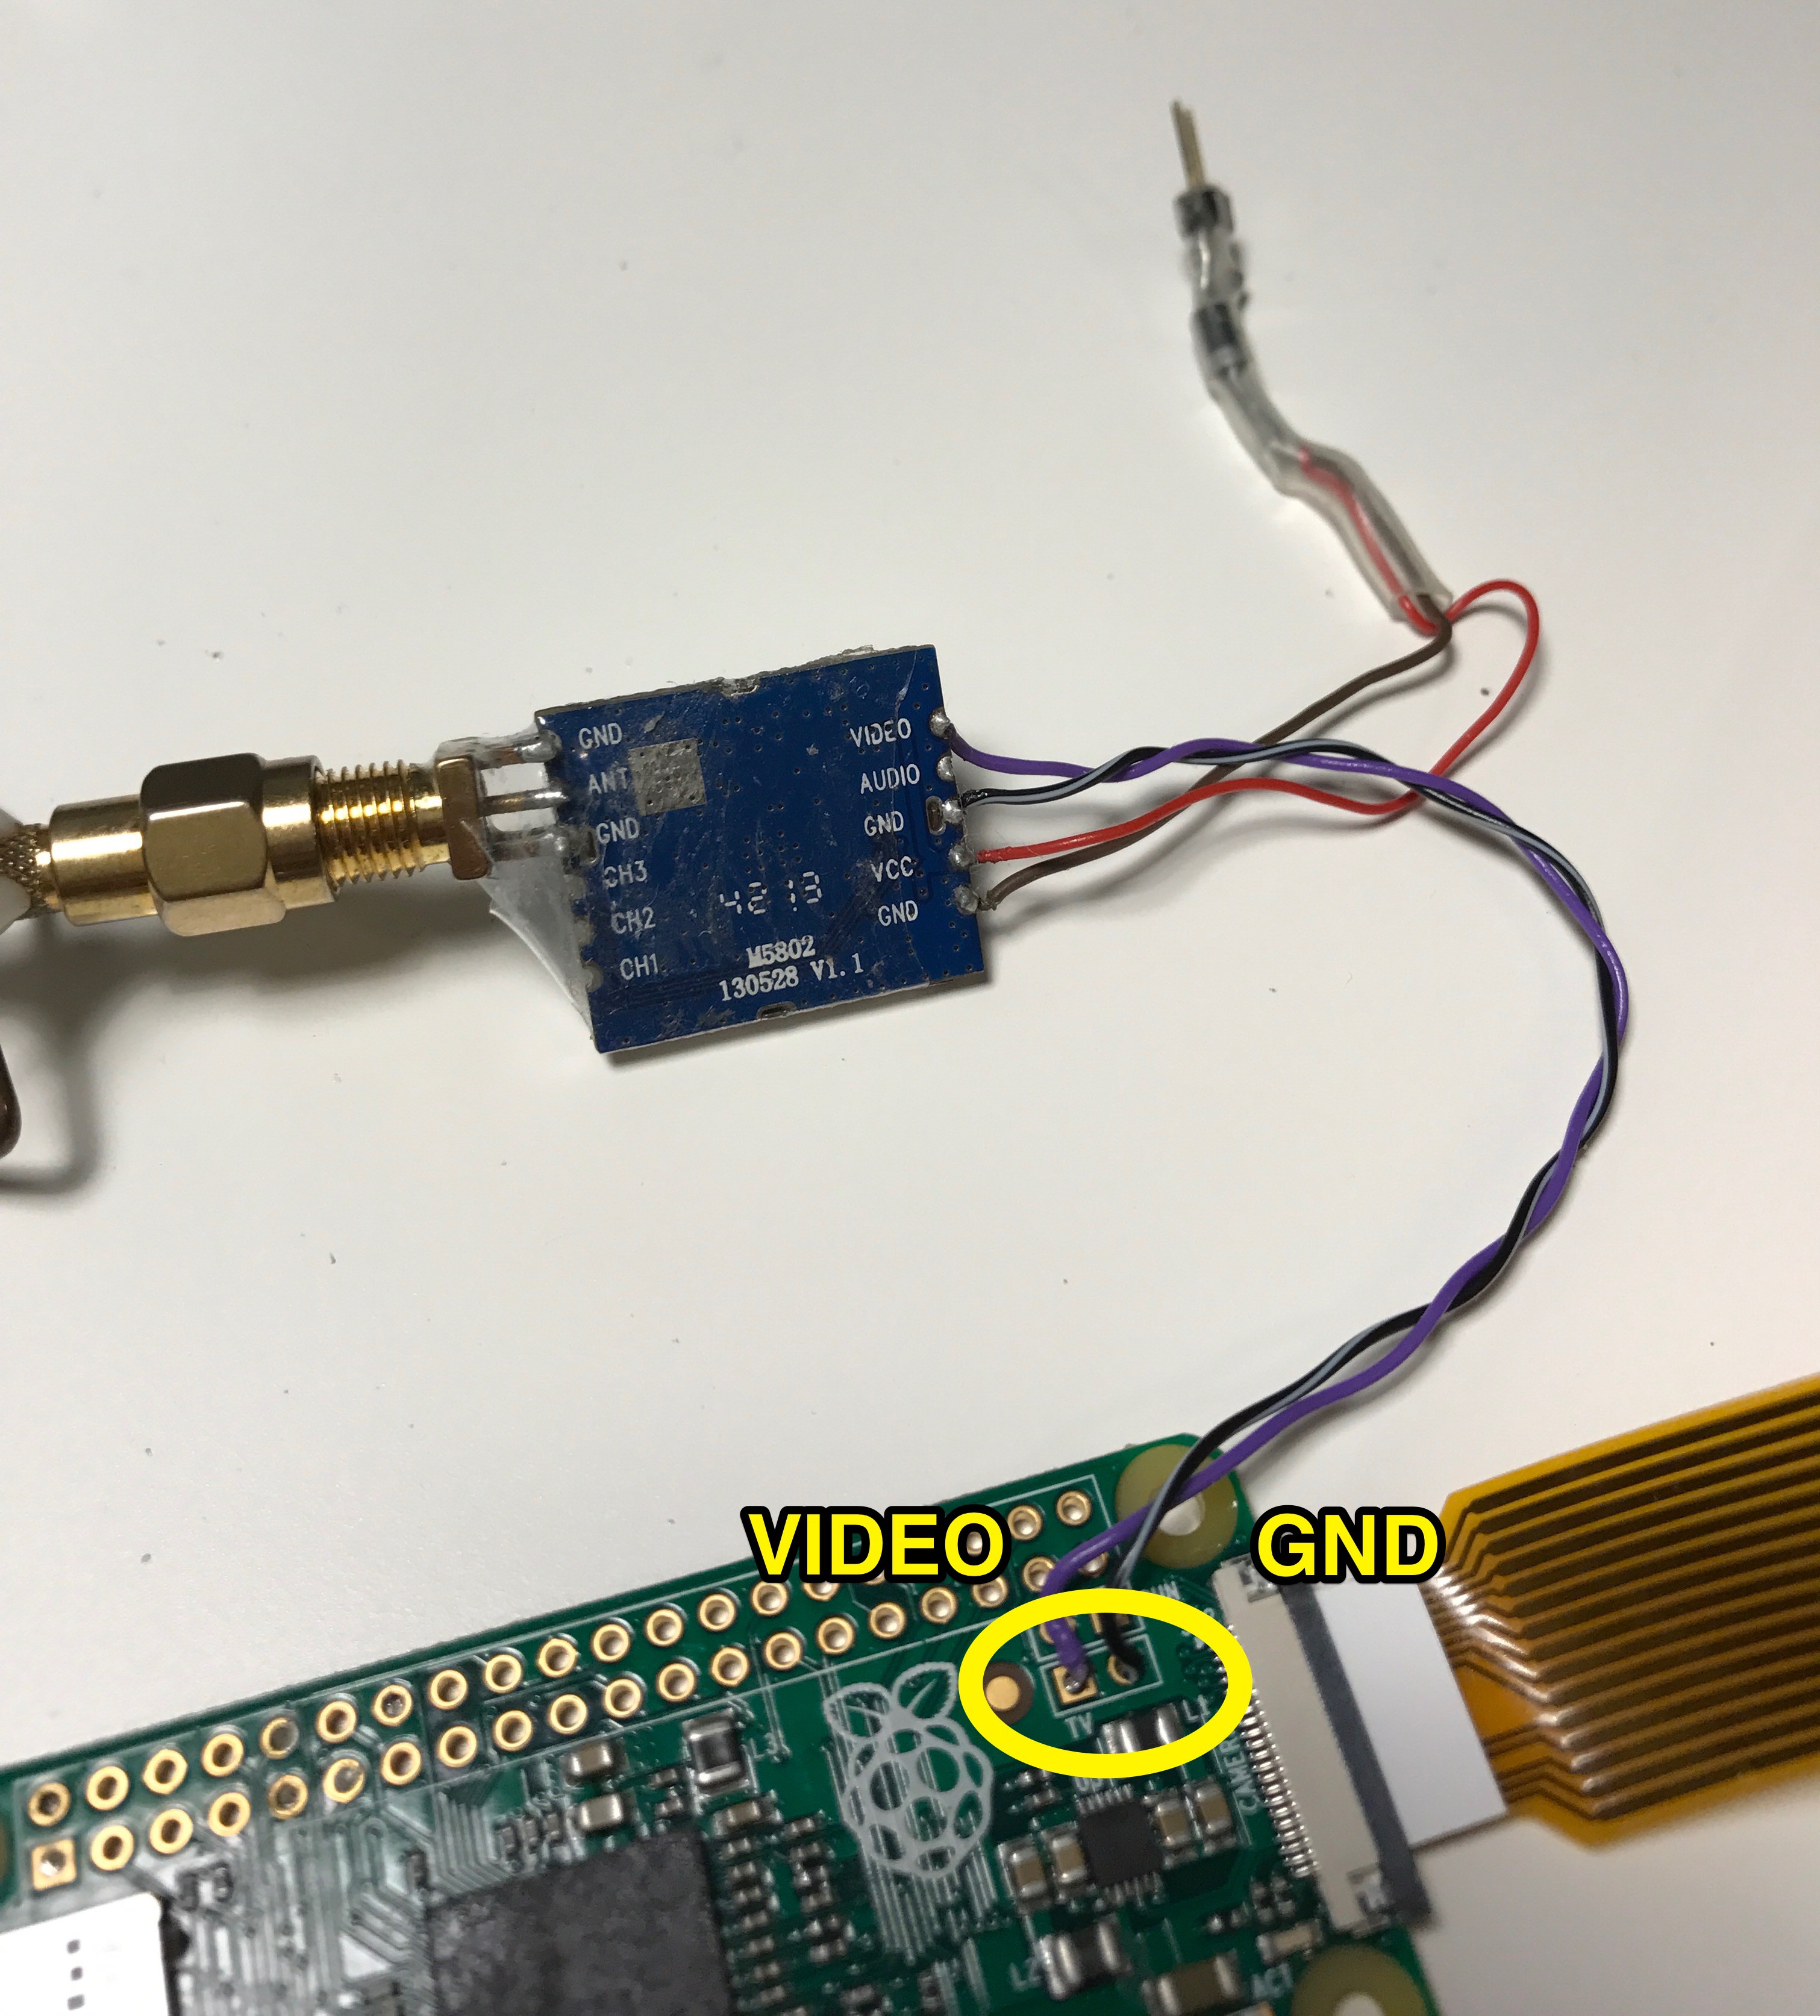
I connected the TV out on the Pi Zero to Video input on the FPV transmitter as you can see in the picture below:
![]()
This is all you need to be able to see your Pi Zero video output remotely! Simple enough (2 connections), but the biggest advantage of this system over WiFi streaming is that there is minimal latency because analog signal doesn't require handshakes, packet verification, packet reconstruction, etc. Analog output just streams video as it is output from the Pi Zero, in real time!
![]()
-
Connecting GPS sensor to Pi Zero
09/16/2016 at 23:34 • 0 commentsThere are many tutorials on connecting GPS to a Raspberry Pi available online so I followed some of them to connect a GPS sensor I had laying around to the Pi Zero.
The best resource I found for this was https://learn.adafruit.com/adafruit-ultimate-gps-on-the-raspberry-pi which has a full explainer on how to connect, configure and troubleshoot your GPS sensor.
I had to use 3.3V -> 5V logic converter to make sure there is not excess voltage from the sensor. When I got the GPS sensor to work on the Pi Zero, I was faced with a few choices on how to retrieve the data from it in my Python program:
- Run "gpsd" service in the background and grab nicely formatted data from it in Python application
- Read raw NMEA data from the serial interface directly and parse it in the Python application on the fly
I have tried both methods and because I do not have that much experience with Python and threading, I had plenty of obstacles with either one. The following code somewhat worked to retrieve altitude, position and ground speed from my sensor's serial data stream:
import serial
import pynmea2
import string

...
sentence = serialStream.readline()
  if sentence.startswith('$GPGGA') :
    data = pynmea2.parse(sentence)
    gpsLocationText = "TIME: {time}, POS: {lat}, {lon}".format(time=data.timestamp, lat=data.latitude, lon=data.longitude)
    gpsAltitudeText = "ALT: {altitude}, {units}".format(altitude=data.altitude, units=data.altitude_units)
  if sentence.startswith("$GPVTG") :
    data = pynmea2.parse(sentence)
    gpsSpeedText = "Speed: {speed} Kmh".format(speed=data.spd_over_grnd_kmph)
  if sentence.startswith("$GPRMC") :
    data = pynmea2.parse(sentence)
    gpsSpeedText2 = "Speed: {speed} Kmh".format(speed=data.spd_over_grnd)
One problem I had with this code is that it needs to run in a continuous thread that is separate from the application in which my camera overlay is being constructed and I just don't know how to work with Python to do that. Perhaps you have some pointers on how to continuously read serial data while sending that data to main application?What worked fine for me but made the RPi's CPU a lot more loaded was GPSD service with its Python bindings. I followed the tutorial here to get it to work: http://www.danmandle.com/blog/getting-gpsd-to-work-with-python/.
Adding GPSD as a service made the CPU about 20% more loaded for some reason but the Pi Zero was still OK with this kind of load and had another 40-50% to spare.
Another big problem I encountered was running my Python application that uses GPSD on startup instead of running it by SSHing into the Pi. I have tried a lot of different solutions but still couldn't make the GPS coordinates show up if I just restarted the Pi and booted into my application.
Short term solution was for me to SSH into the Pi and start the Python application from the console:
-
Latency tests
09/16/2016 at 23:16 • 0 commentsThere should be very little latency with this setup because I am not doing digital transmission here like using WiFi or similar wireless protocol.
The TV video output from the Raspberry Pi is directly fed into an analog wireless video transmitter, then analog wireless video receiver is used to get the video signal and display it on screen.
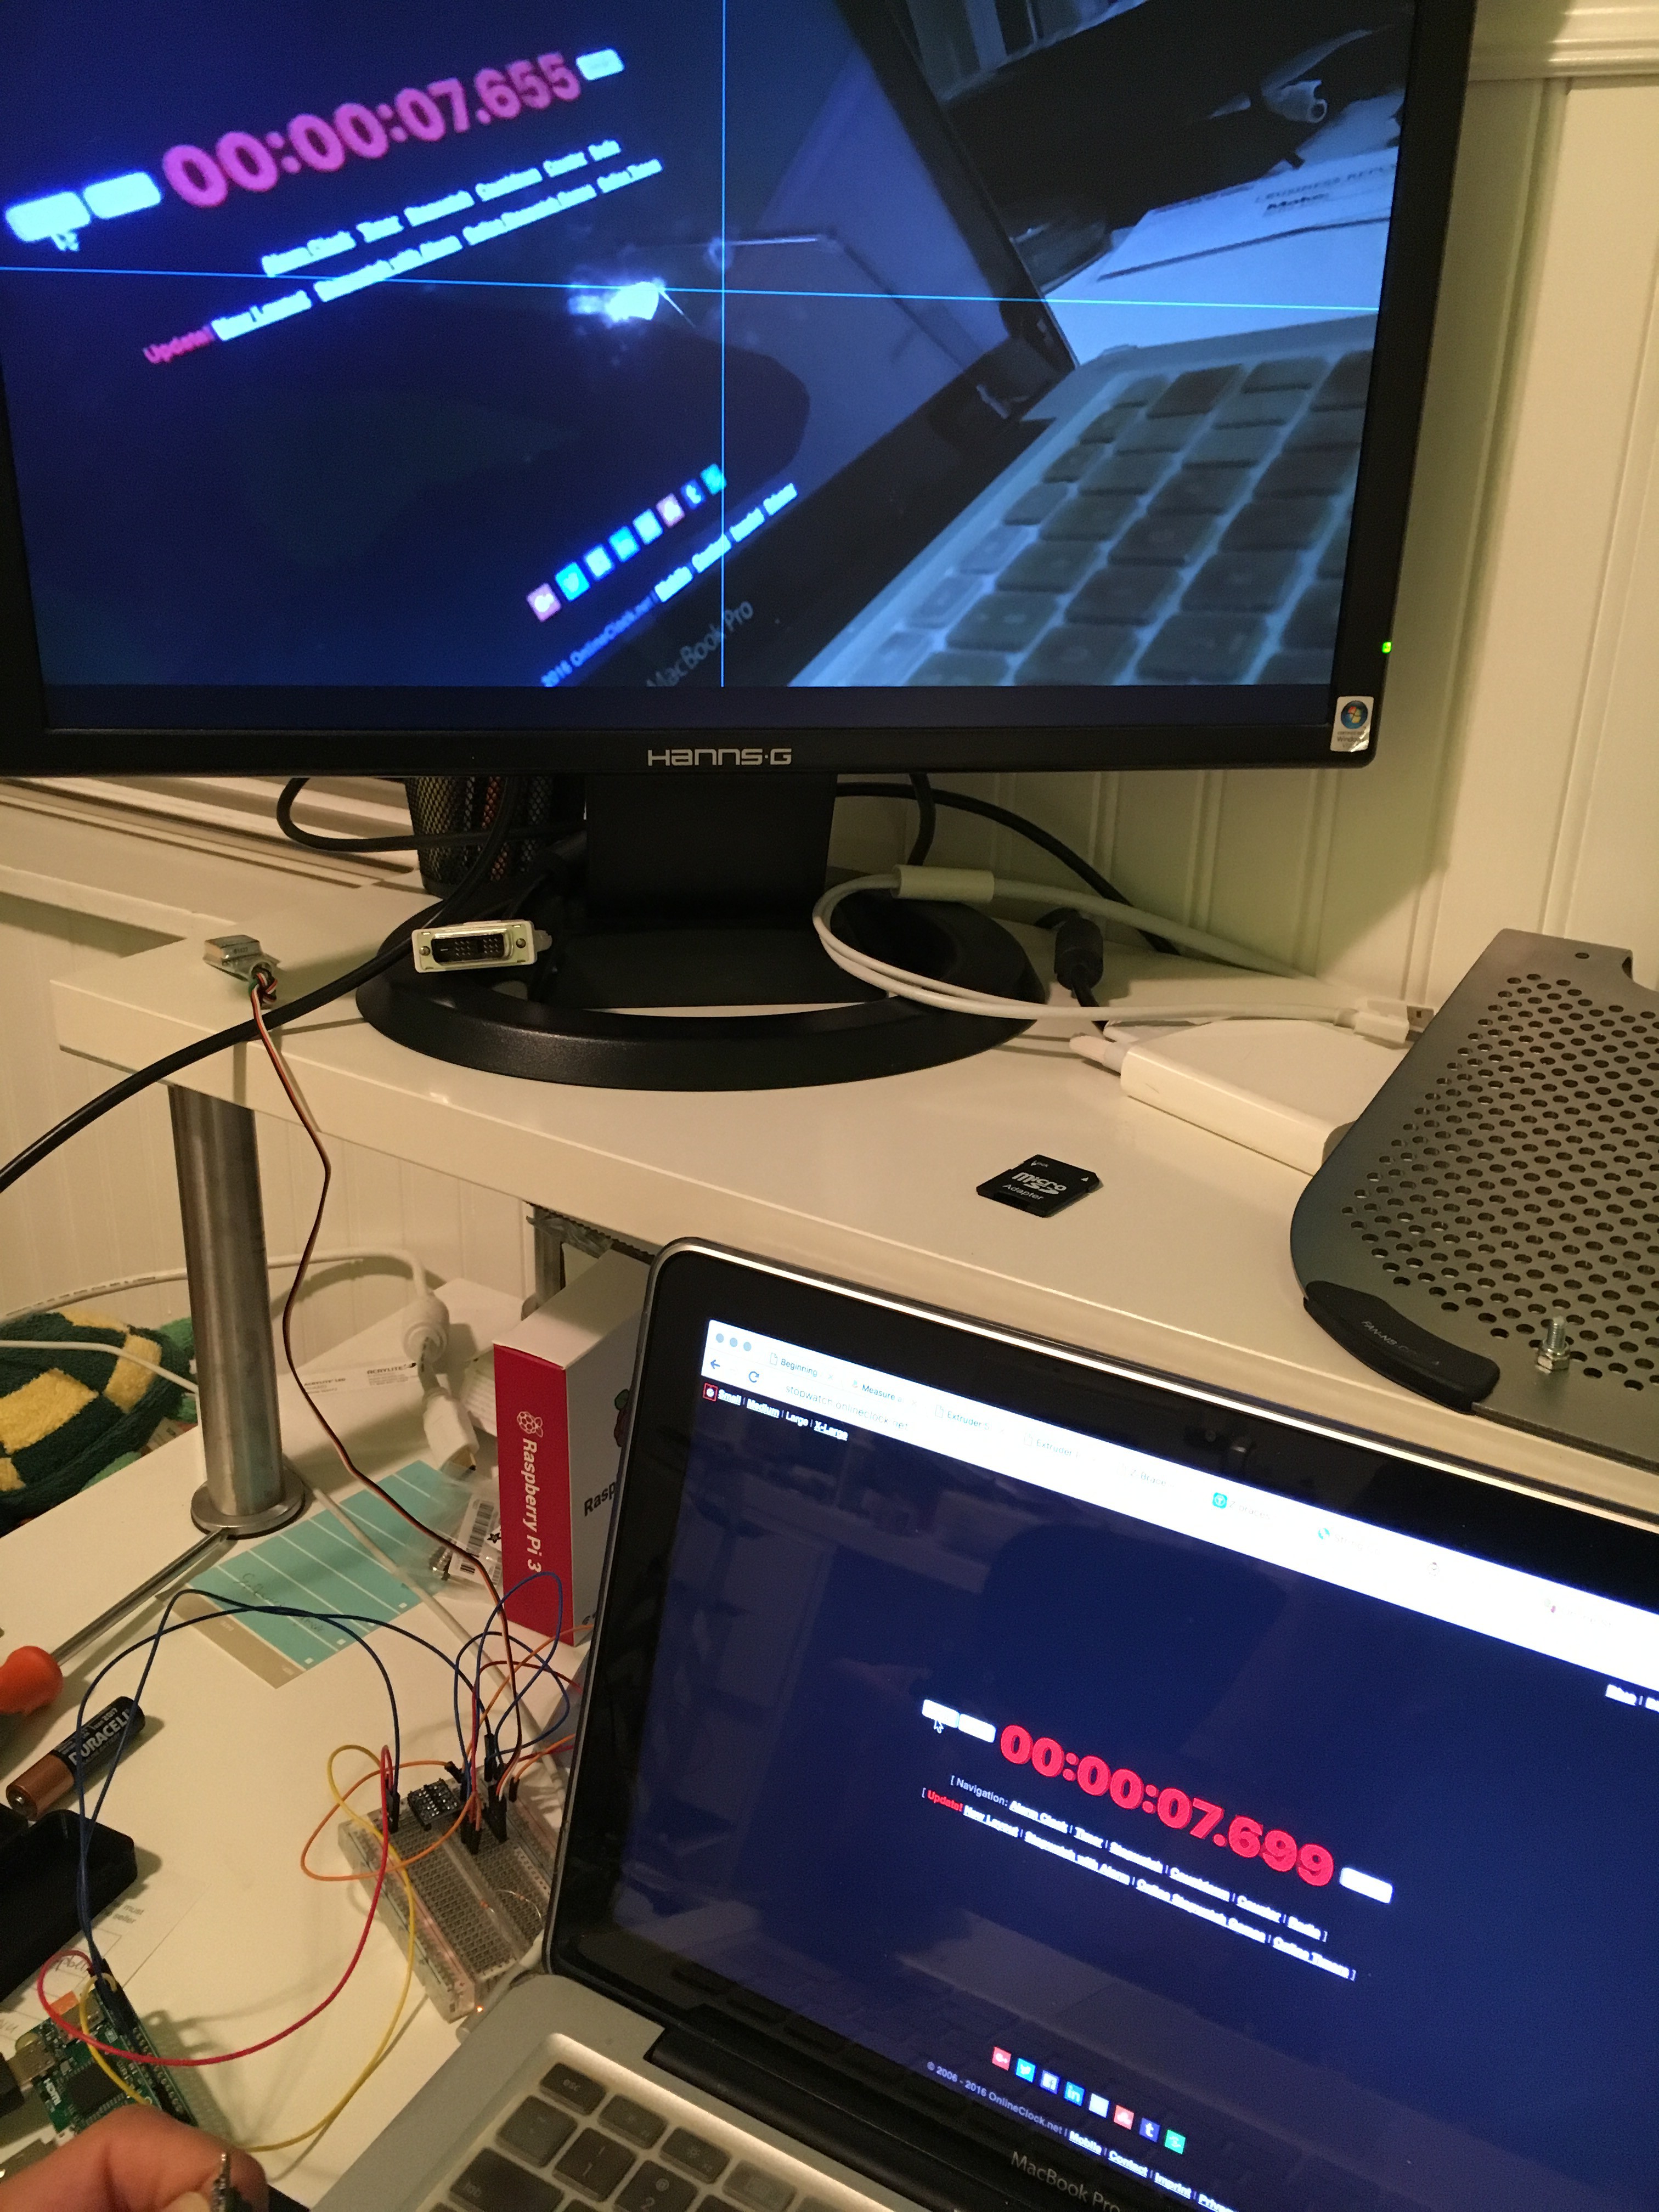
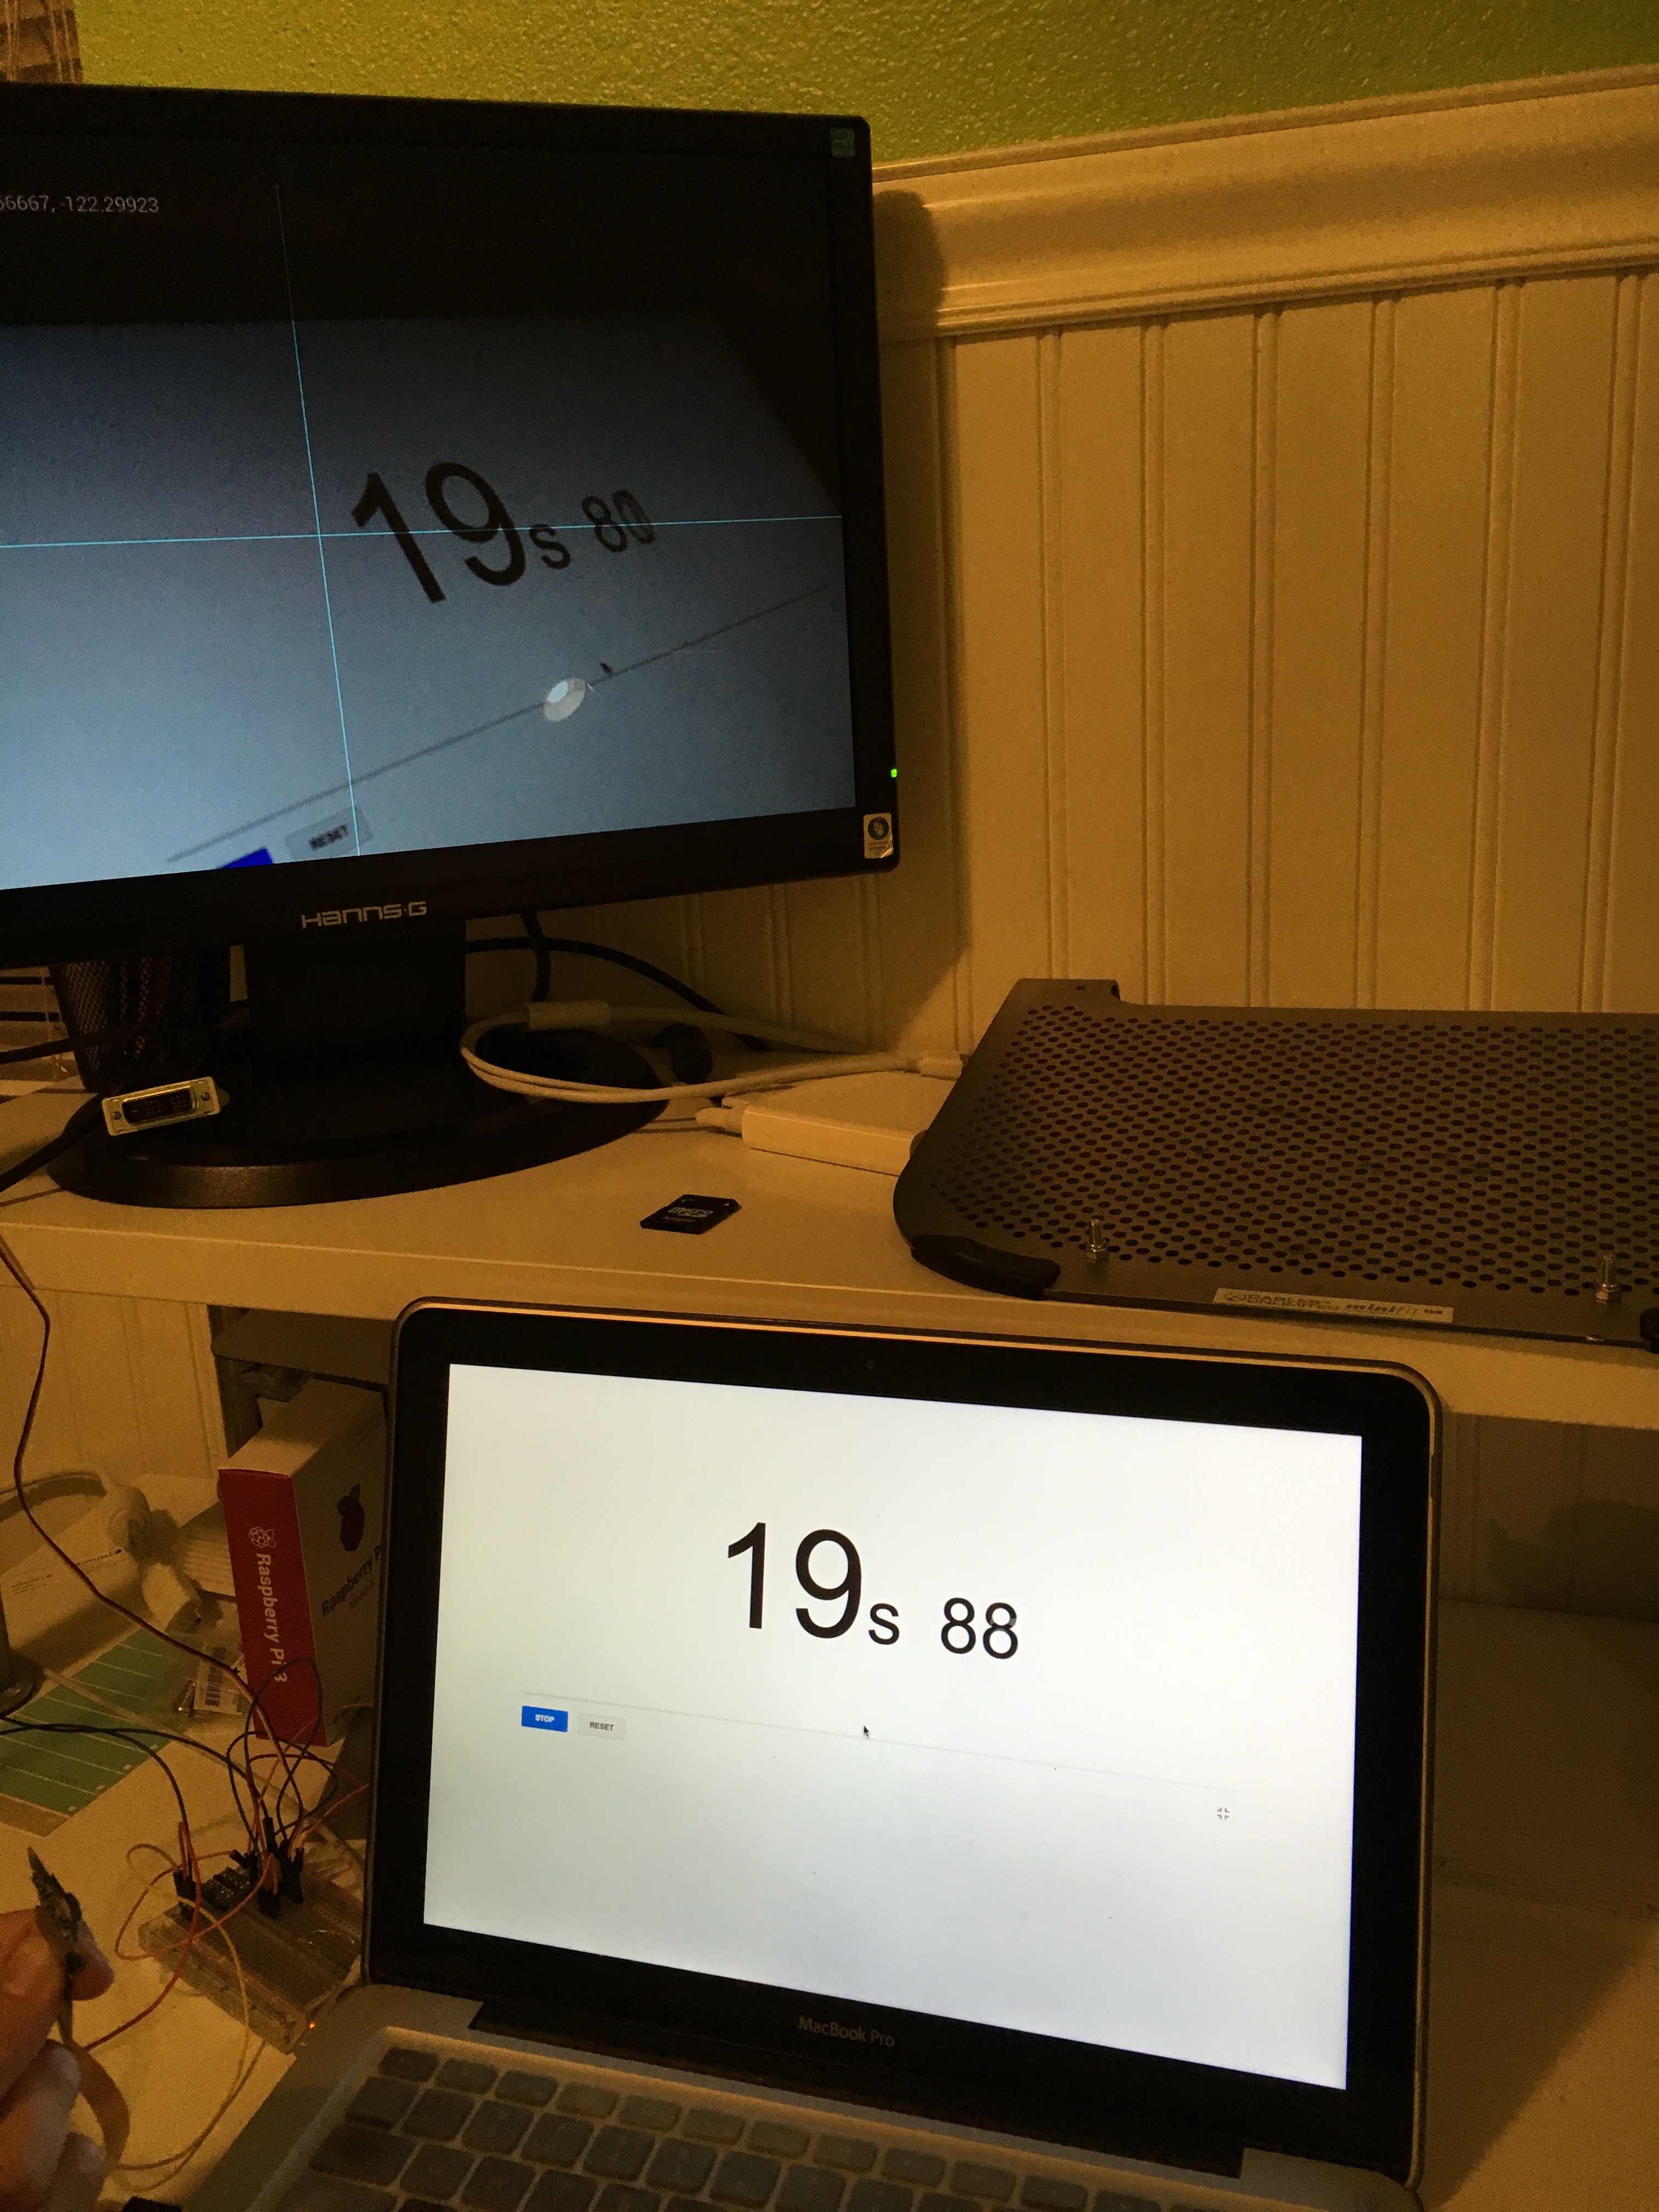
To check the latency of RPi FPV system I set up the Raspberry pi with a camera pointing at my computer and had a phone ready to take a picture. On my computer I started an online timer and captured a few photos to see how long it took for the whole setup to display the captured timer.
Here are some of the latencies encountered:
![]()
![]()
From a few other tests and from these images I was able to figure out that the delay was 8-60 milliseconds while recording video on Raspberry Pi. In my opinion that is good enough to fly a drone at low speeds and still be able to respond on time to avoid obstacles.
-
Getting overlay to work while recording
07/14/2016 at 16:30 • 1 commentI have researched various ways to achieve basic requirements such as having a preview with On Screen Display (OSD) that is streamed through FPV transmitter and recording unmodified video at the same time.
From my research I found a few ways of overlaying text and additional information while using the Raspberry Pi camera:
- By using UV4L library (www.linux-projects.org/uv4l/tutorials/text-overlay/ and chrome-extension://klbibkeccnjlkjkiokjodocebajanakg/suspended.html#uri=http://www.linux-projects.org/home/wp-content/uploads/2016/06/uv4l-overlay.cpp)
- By using OpenGL libraries, some of which are outdated and are hard to get started with
- By using PiCamera Python library and its feature of overlaying an arbitrary array of pixels in Preview mode (picamera.readthedocs.io/en/release-1.12/recipes1.html#overlaying-images-on-the-preview)
I settled on the third option as it is easy to program and has great documentation. I then searched Github for existing projects that use the preview overlay feature in PiCamera and found a single example that pointed me in the right direction. PiCamera library allows overlaying an array of pixels which means you can either create your own drawing library to create that array or use existing Python libraries that will do that for you based on your requirements. The project at https://github.com/darkcrash21/raspberry_pi uses Image and ImageDraw Python libraries to create a great looking HUD. Another example in the same project had a basic implementation that proved to be useful for my FPV OSD project.
Based on that find, here's the code I wrote that displays a crosshair and current timestamps in multiple positions on the preview screen while recording unmodified HD video:
import picamera
import time
import numpy
from PIL import Image, ImageDraw, ImageFont


# Video Resolution
VIDEO_HEIGHT = 720
VIDEO_WIDTH = 1280

# Cross Hair Image
crossHair = Image.new("RGB", (VIDEO_WIDTH, VIDEO_HEIGHT))
crossHairPixels = crossHair.load()
for x in range (0, VIDEO_WIDTH):
   crossHairPixels[x, 360] = (255, 255, 0)

for x in range(0, VIDEO_HEIGHT):
   crossHairPixels[640, x] = (255, 255, 0)

with picamera.PiCamera() as camera:
   camera.resolution = (VIDEO_WIDTH, VIDEO_HEIGHT)
   camera.framerate = 30
   camera.led = False
   camera.start_preview()
   camera.start_recording('timestamped.h264')

   img = crossHair.copy()
   overlay = camera.add_overlay(img.tostring(), layer = 3, alpha = 100)

   time.sleep(1)
   try:
      while True:
         text = time.strftime('%H:%M:%S', time.gmtime())
         img = crossHair.copy()
         draw = ImageDraw.Draw(img)
         draw.font = ImageFont.truetype("/usr/share/fonts/truetype/freefont/FreeSerif.ttf", 20)
         draw.text((10, 10), text, (255, 255, 255))
         draw.text((10, 100), text, (0, 255, 255))
         draw.text((10, 200), text, (255, 0, 255))
         draw.text((10, 300), text, (255, 255, 0))
         draw.text((200, 10), text, (255, 255, 255))
         draw.text((300, 100), text, (0, 255, 255))
         draw.text((400, 200), text, (255, 0, 255))
         draw.text((500, 300), text, (255, 255, 0))
         overlay.update(img.tostring())
         camera.wait_recording(0.9)

   finally:
      camera.remove_overlay(overlay)
      camera.stop_recording()
I have tested this code on the Pi Zero and was able to get consistent 30FPS recording while overlaying the text in multiple places on the preview screen. The CPU load was at about 23% because the overlay is updated once a second or so.
Now with this basic functionality working I can get to plugging in the sensors and reading the data from the flight controller that has serial interface.
My next steps are:
- Get GPS data and display it on the screen
- Get positional/rotational data from the Flight controller and display it on the preview screen
- Get battery status and display it on the screen
Raspberry Pi Zero FPV camera and OSD
Pi Zero and camera weigh 13 grams making it an ideal setup for data logging, HD video recording and custom On Screen Display for FPV.