Game Link Online
Play your good old multiplayer Gameboy games over the internet!
Play your good old multiplayer Gameboy games over the internet!
To make the experience fit your profile, pick a username and tell us what interests you.
We found and based on your interests.
It's been a long time since I worked on this project. In the end I got a more or less working board (the hardware was okay, but the software still needed some tweaking), based around an STM32F042F6P6. However, along the way I realised a few things. First of all, I didn't really like the STM32 SDK. It was nice to get a quick prototype working, but when you had to get to the nitty gritty, then I felt it was getting more in my way than helping me. Secondly and more importantly, I didn't feel that a USB adapter would be the right way to go, looking at the devices I usually interact with. I also noticed that I had to take another close look at the signals produced by different types of GameBoys (and known clones, like the GB Boy), to make sure the hardware could handle it all. Finally, I realised (as I often do) I have way to many personal/side projects going on to give them the attention they need.
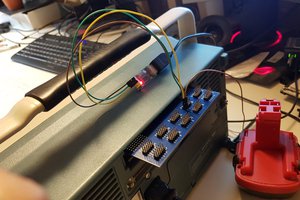
To analyze the signals, I made the board on the top of the pictures. It's simply a board that can be placed between two consoles or my adapter and a console. It has some loops to hook up a logic analyzer or oscilloscope to and a third EXT port to hook up my USB adapter. The third port was meant so I could dump the data in real time to the computer (by running a special firmware on the USB adapter), so that I could analyze the communication of other GameBoy games in the future.
The board on the bottom shows the latest revision I made of the board. As you can tell, it could have been quite a bit smaller, but I had an existing plastic case that would fit around it, so I stuck to these dimensions. You'll also notice some tape and wire on the left, because I swapped the data lines accidentally in the schematic around the isolator.
As mentioned earlier, I don't feel USB is the way to go. I actually want to make a board that supports Bluetooth Low Energy, given that this is relatively easy to use in smartphone apps and more and more browsers are also supporting Web Bluetooth now.
Anyway, the reason I'm posting this log, is because I'm thinking about picking this project up from the shelve again. There's a couple of reasons for this: several people have asked me about the project in the meantime; I've been playing some Gameboy games again recently; Espressif announced some new, cheaper chips/modules that also support Bluetooth Low Energy, which I'd like to play with.
Unfortunately, I still have other projects going on as well, so don't get your hopes up just yet. This project is still kinda on the shelve, but I'll be sure to post another log if/when I find the time to actually start designing a new board around the new ESP32 modules.
It's been a while since my last project log. In the mean time, I have successfully used my PCB edge connector/breakout and Sven Köhler's PokeDuino project to generate some cool pocket monsters for my Pokémon Yellow game. I really like the simplicity of this project. The embedded hardware is a mere "gateway" transferring data from the serial connection to the GameBoy link cable and vice versa.
As mentioned in the comment/discussion section of this project, the board edge connector (a.k.a. the breakout PCB) I designed previously wasn't perfect and I would recommend using a replacement connector for the GameBoy Advance, since these can be found on AliExpress for less than 0.20 EUR a piece.
I figured, since I would be using this connector for my project, it would be interested to search more information about the protocols used by GameBoy Advance games. Unfortunately I have not yet found the information I was hoping to find. However, I did find the Catskull Electronics website that linked to an EAGLE library containing a design for the GBA link connector.
As you might have also read in the discussion section, I already designed my own EAGLE part for the connector, but I was still working on fine tuning it. The library I found is already used for products sold by Catskull, so it is already verified by them. Guess I'll be throwing my own work in the bin.
I'm currently in the process of designing an initial USB-to-GameBoy-Link adapter PCB. I'm planning on using an STM32F103C8T6, which is an ARM microprocessor. It is way more powerful than what I need, but they are inexpensive and have USB connectivity built-in. This makes them even more interesting to use than an ATmega328 for example.
I'll try to keep you posted about my progress!
As you have read before, I received the boards quite a while back. In the mean time I also received a cheap Chinese logic analyzer which I wanted to try out. Being a software guy, I never really had to work with a logic analyzer, but I must say this first experience was very pleasing.
In order to analyze the data, I soldered headers to two of the boards. I wanted to put them on a breadboard and connect a Game Link cable to each of these boards, both connected to a GameBoy Color console.
It is well known that these Game Link cables have several wires twisted (Data in and Data out, for instance). To make sure that I wasn't "undoing" the twist by using two cables, I did not hook up the boards one to one. Instead I connected a single cable between them first, to figure out which pins where connected together by the boards. Using a multimeter I could easily "beep" out the connections and make sure that I recreated the twist correctly. I noticed that not only the Data lines were twisted, but that VDD (pin 1) on one end is connected to SD (pin 4) on the other end. I reckon this is used as a very basic detection mechanism.
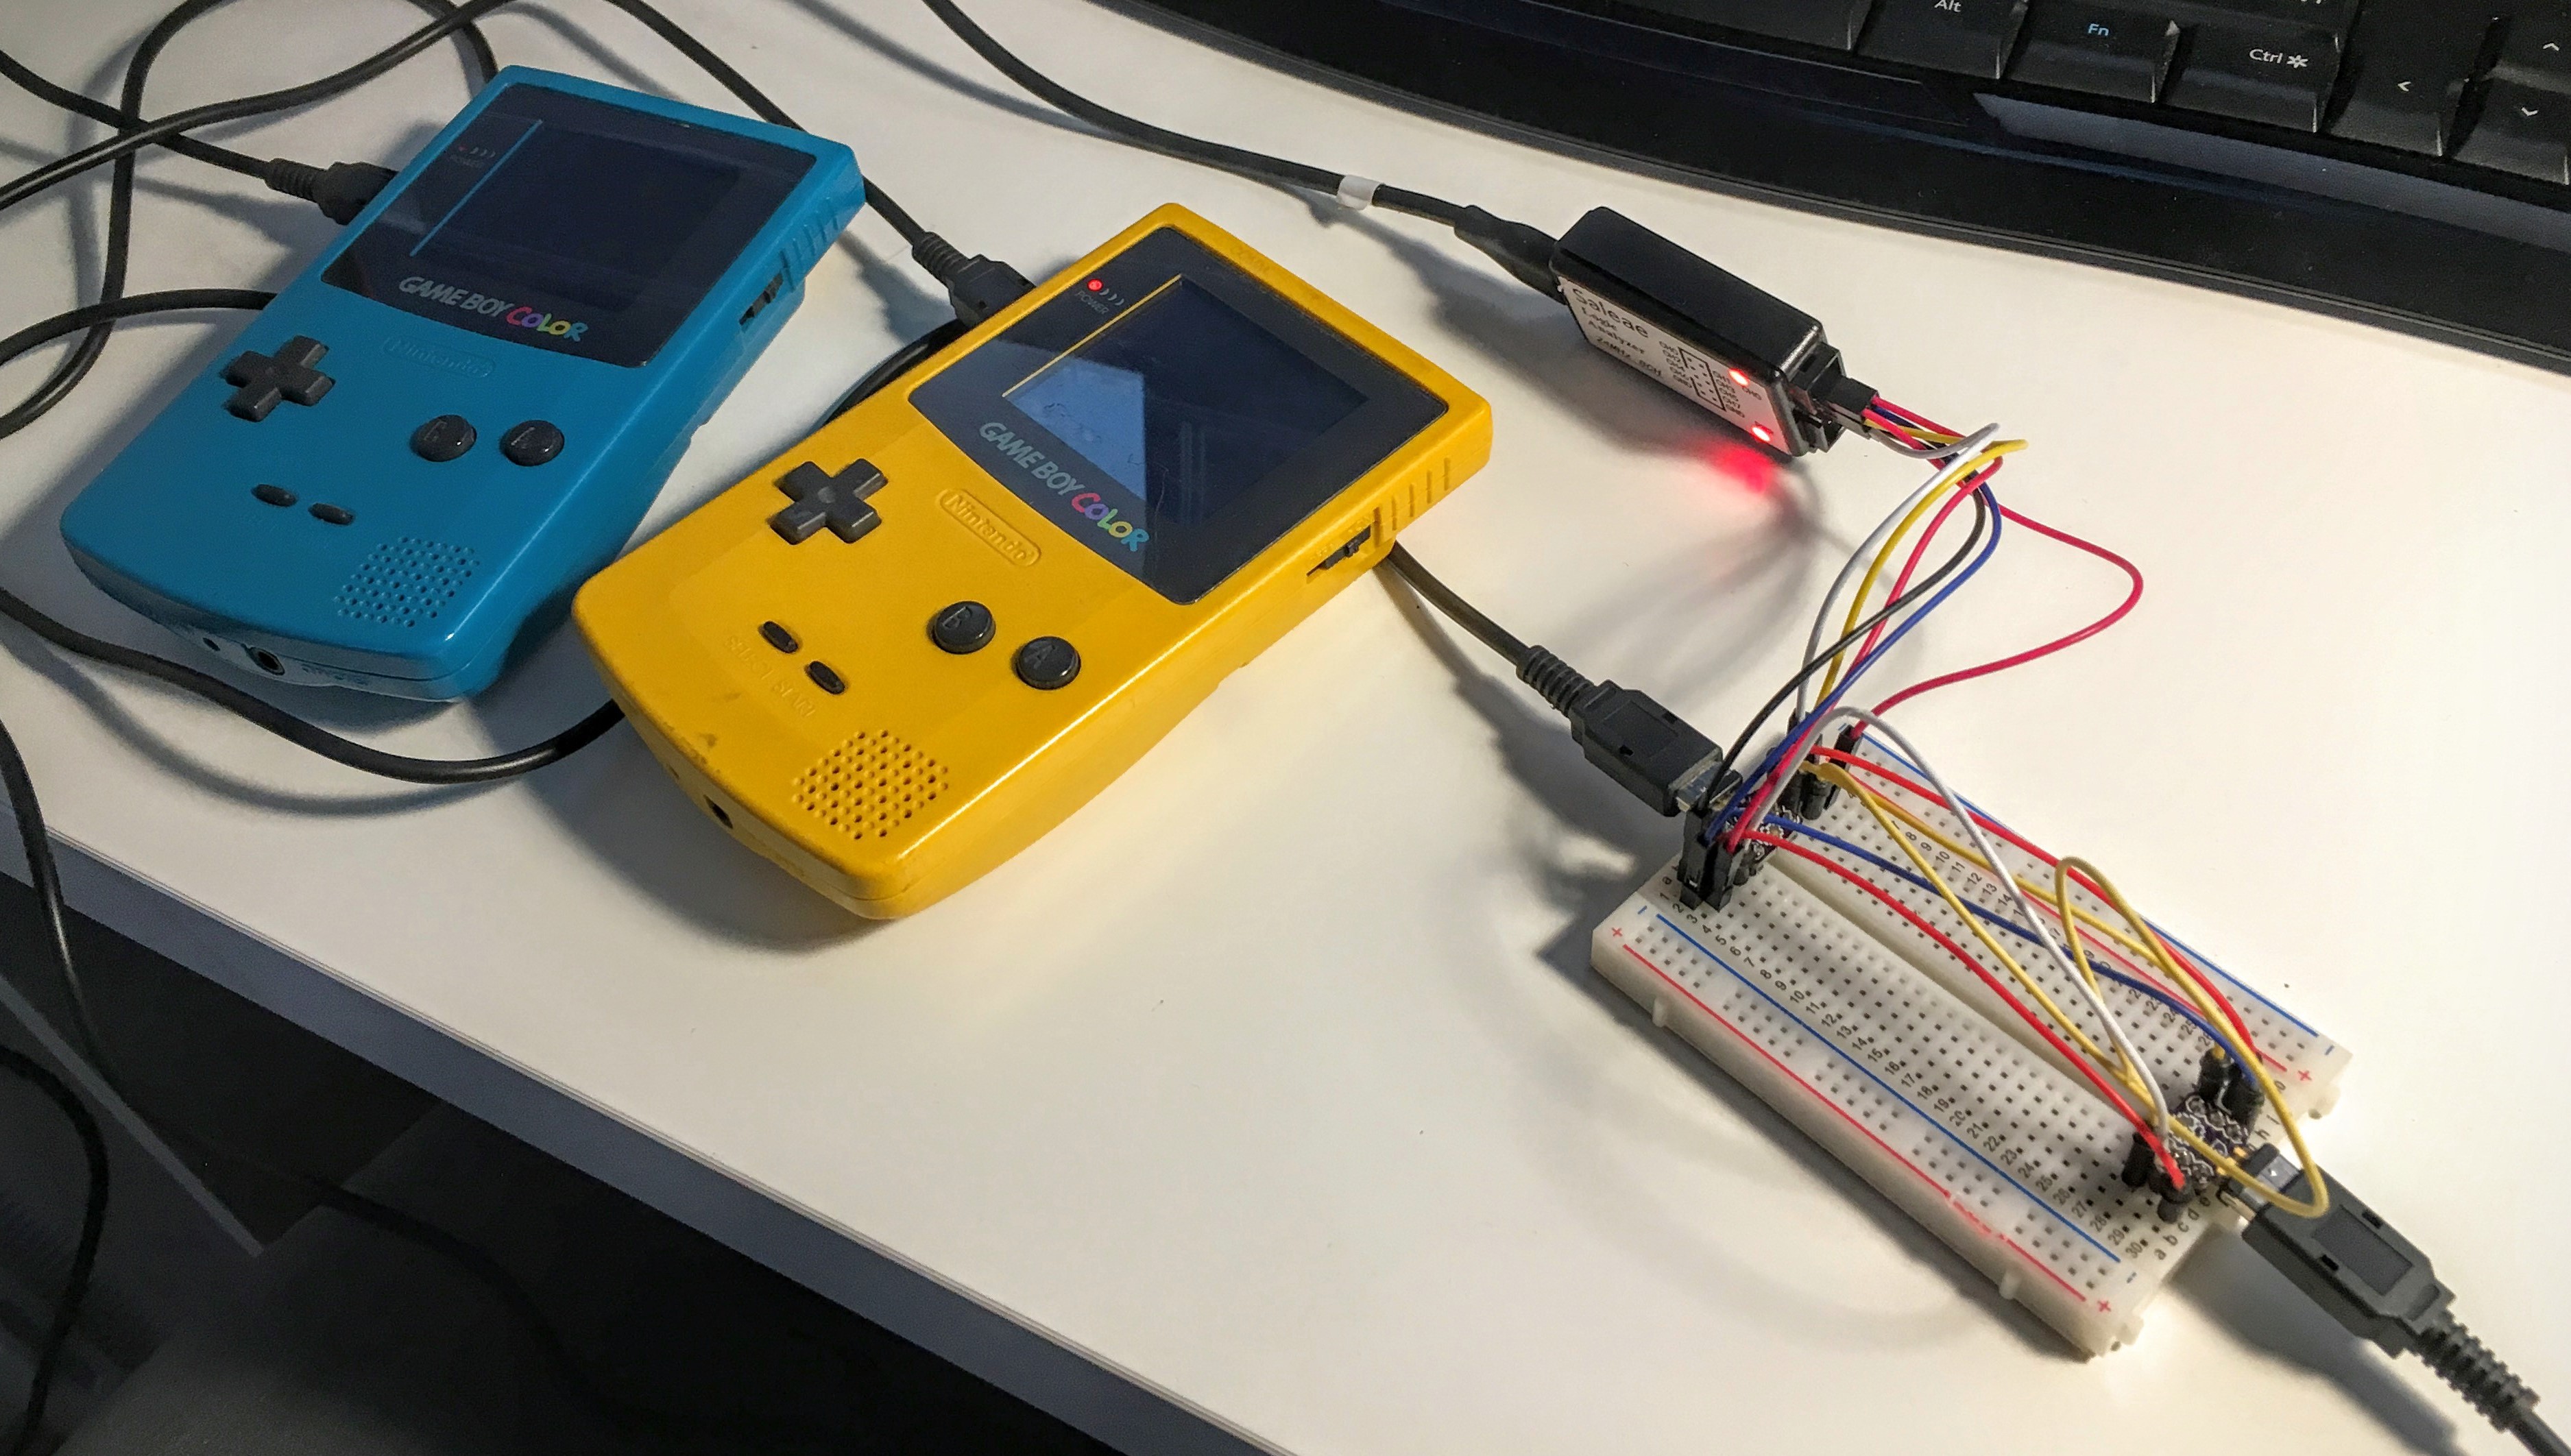
After that I hooked up some additional wires so I could connect it to the Logic Analyzer. Looking at the software that came with the Chinese device, as well as the sticker on it, it turned out to be a clone of a product by Saleae. As I mentioned before, the tool was very pleasant to work with and I'm actually considering buying the device by the original vendor after using this clone.
After some fiddling around with the SPI analyzer settings in the software, I was able to see the communication between the two GameBoys. They were running Pokémon Yellow and Pokémon Red, both in the trading center. The protocol for this has already been described on several places on the internet (on vaguilar.js.org, for instance). The data I saw on my screen, matched the structure described in those descriptions.

Above you can see a small part of the data that was transferred. The first few bytes appear to be preamble bytes (0xFD). After that the names of the players are transferred (up to 11 bytes, but both players had a name of only 4 characters, terminated by 0x50). The names are followed by the number of Pokémons in their party (6 for both players). The next 6 bytes represent the species of the Pokémon, terminated by 0xFF, and so on...
The logic analyzer also showed me that the clock was running at 8192Hz,, which is the "Non-CGB Mode" internal clock speed. This implies a transfer speed of about 1 kilobyte per second. For today's standards this is pretty slow and that's good news actually. Most internet connections nowadays are much faster, so the overhead of another communication protocol on the transfer speed will probably not be significant. Only problem I see now is the delay in the connection (talking over the internet will never be as fast as a direct connection between two devices).
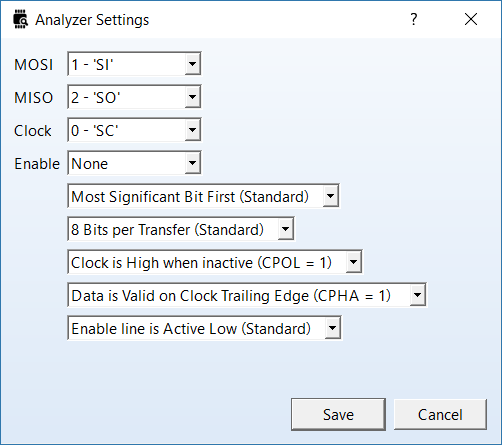
By the way, for those interested in the settings I used in the Saleae software, I've added a screenshot:
Till next time!
-Arno
I got the breakout boards that I've ordered from OSHPark in the mail today. Unfortunately, as you can see on the picture, the OSHPark panelizing process put "mouse-bites" on all sides of the PCB edge connector.
This is really annoying, because this means I need to get those off entirely before I can use the boards. So far, I quickly did this for one of the boards and it does seem to fit. However, I do think I will need to reduce the width of the connector just a little bit in a next iteration. Besides that I'm still unsure about the thickness of the PCBs. These are 1.6mm and, while they do fit in the connector, I need to apply just a bit more force than I would like to. This makes me think that the connector might suffer from it and perhaps it will not work that well anymore with the official connector on the Gameboy consoles.
Hopefully, in a next update, I will have sanded some of the boards, soldered headers to them and hooked them up to a logic analyzer. ;)
If I want to analyze the signals/data going over the link cable used by Gameboys, I will need some kind of way to connect a logic analyzer to the link cable. Now the easiest way to do that would probably be to cut a cable in two and solder the wires to some kind of header on a perfboard. However, the "cleaner" way would be to make an adapter. I decided to go with that last option.
When I bought a Gameboy Color a few years a go, my girlfriend also bought one. You can probably guess that it did not take long before I also bought a link cable, so we could battle and trade Pokémon. The cable I bought at the time has an option to plug another cable into it, so you can play with more than 2 players.
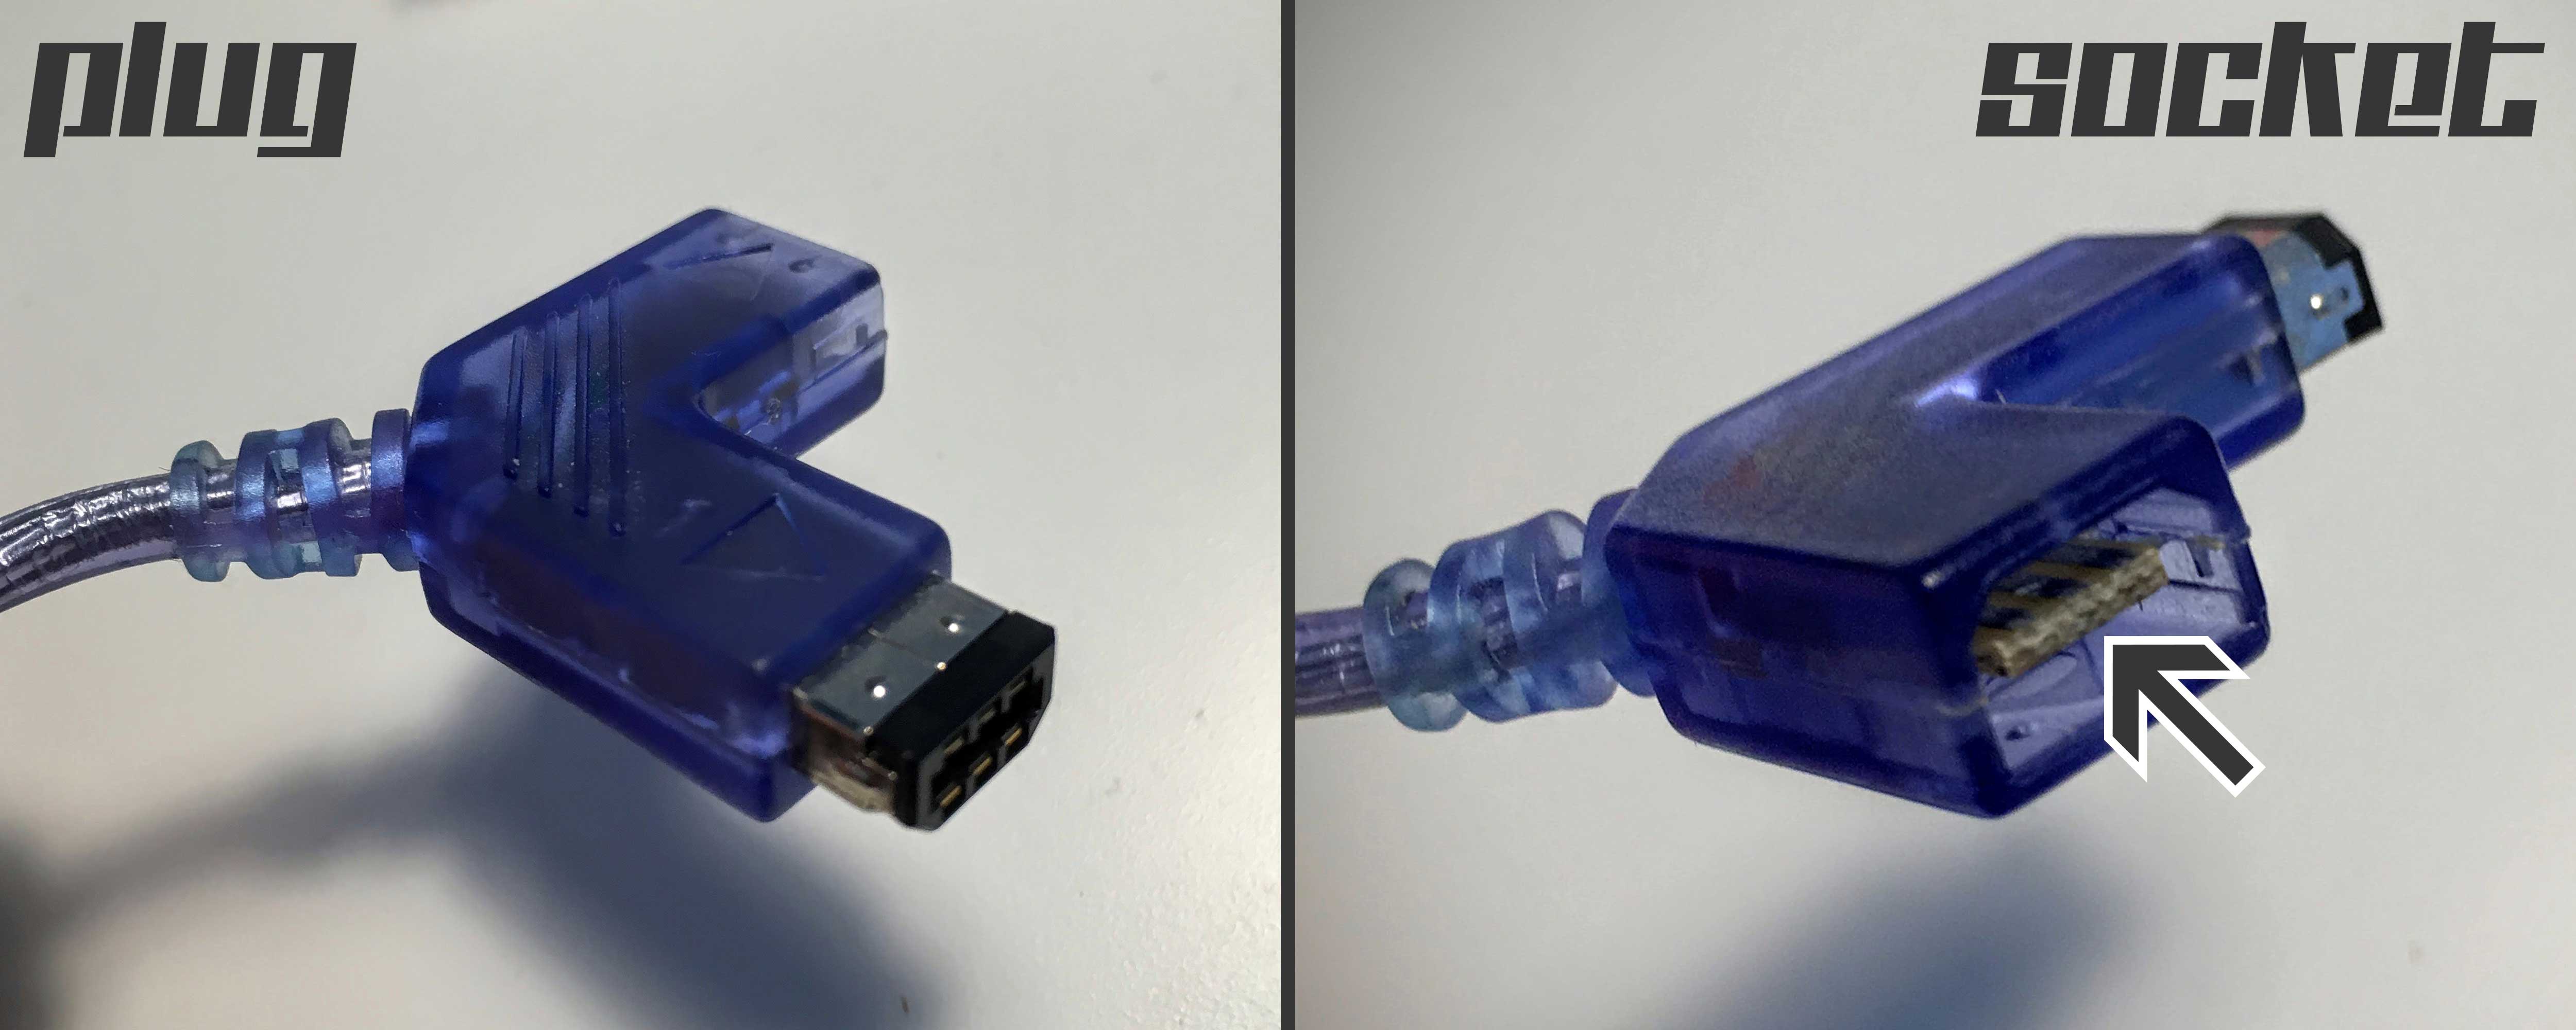
As you can see in the picture, the "socket" on the link cable I have is just a simple PCB with some three pads on each side. The PCB is about 1.2mm thick, but I checked and it looks like the plug will also accept a thicker PCB (1.6mm). I grabbed my caliper and roughly measured the PCB in the socket, as well as the connector that plugs in to it, and designed a part in CadSoft EAGLE. After that I designed a simple breakout board with two 3 pin headers, that should fit just fine on a breadboard. I looked on PCB Shopper, and since I only needed a couple of these boards, OSHPark was the cheapest option for this board.
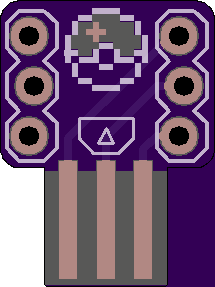 | 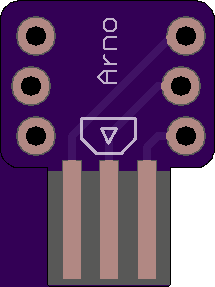 |
Apparently the combined render on OSHPark has some issues with the outline (the board outline layers looks fine when checked separately). Let's hope the boards come out fine (I'm also curious what the Pokeball looks like in real life).
As you must have heard, Pokémon Go was released recently, causing all kinds of crazy news (people finding death bodies, being robbed, being fired for playing it at work, making extra money... people going outside). I've played a lot of the Pokémon games when I was younger, on my Gameboy and my Nintendo 64. At one point in time however I decided to sell both consoles and games, but a few years back, I was looking on a classified ads site and came across a Gameboy Color in the exact same color as I had when I was younger. I just had to buy it and the hunt for the Pokémon games began. Unfortunately the console and games ended up in a box on the attic (but I did play newer Pokémon titles on my new 3DS).
All the buzz around Pokémon Go got me really pumped again, especially when I saw a post on Hackaday about Pepijn de Vos, who hacked a GPS based feature in to the Pokémon Red game. I thought it was really cool how he had used the Game Link cable and found previous projects of him using it. I figured, what if I could make an Game Link cable to USB adapter and started researching the information available about the protocol used on the link cable. When I already had a nice plan in my head, I stumbled on TCPoke (also something Pepijn created). TCPoke basically does what I had in mind: connect two Gameboys over the internet so they can exchange data (and thus battle or trade Pokémon). You might say I suffer from NIH, but I still decided to go on with this project, because it looks like a good learning experience.
A while back I bought a very cheap minimal STM8 development board (you can get them for around €1 on eBay) and the ST-Link V2 tool to program it (which is less than €3 on eBay). I got intrigued by the price, because the STM003F3P6 can be found on eBay for under €0,30 even for small quantities. As far as I can tell thus far, the protocol used on the link cable is rather simplistic, so this processor, combined with a USB-to-serial IC or a Bluetooth serial module, might be a perfect (and cheap) fit.
For the back-end I'm currently thinking of using the Google Cloud, because working with App Engine and the likes has been on my wishlist for quite some time now. Initially I think I'll use a simple client on the PC, but eventually I would like to make an Android app that interfaces with the Game Link USB adapter. That way the solution is a bit more portable.
That's enough rambling for this first log. I'll keep you updated.
Create an account to leave a comment. Already have an account? Log In.
I was inspired by your design and created this board here: https://hackaday.io/project/16188-game-boy-catridge-plus-programmer/log/53814-oops-i-did-it-again - I mixed up the pins, but I hope that the Layout will spare some of those mouse bytes. You don't know any source for a pcb plug (not port!) version by any chance?
Found a link to the board if anyone else is looking for it https://oshpark.com/shared_projects/xbg7q81x
I do not recommend to use these, nor to order them from OSH Park if you do. They work, but you have the hassle of removing the mouse bites, which will probably make them a bit lose.
I recently came across Game Boy Advance replacement ports that are compatible with the GB/GBC once. I'm still fiddling with the foot print (ordered some parts to verify it in real life, but the footprint I created seems to be a tad off).
Hopefully I have sometime to post another update soon. It's been very busy.
See this link for my verification boards for the GBA port: https://oshpark.com/shared_projects/fYf4Z353
Oh no I've ordered some of the first boards from oshpark. I also found some GBA link port adapters on aliexpress you will have to let me know how the new boards turn out.
What project are you using the Gameboy link ports on? I'm looking to make this so I can get my photos off a gameboy camera https://hackaday.io/project/10699-gameboy-bmp-printer-cable
Could you provide a link to the order the boards from oshpark. This will be perfect from my next project
This is really cool! I like the idea of making old hardware relevant again by incorporating it with newer technology.
Become a member to follow this project and never miss any updates
 Reiko
Reiko
 PMercier
Finding the best online gaming experiences outside the GamStop network can be a game-changer for players seeking more flexibility. Non-GamStop bookmakers provide access to sports betting, casino games, and other wagering options without the restrictions of the self-exclusion program. These platforms cater to international players, offering diverse markets, generous bonuses, and unique gaming features.
Many non-GamStop bookmakers operate under reputable offshore licenses, ensuring secure transactions and fair gameplay. They support various payment methods, including cryptocurrencies, for added convenience. Always research a bookmaker's reputation, user reviews, and licensing before placing your bets. Responsible gambling is crucial, so set limits and gamble wisely. Explore the vibrant world of non GamStop bookmakers and enjoy gaming tailored to your preferences.