Close
0%
0%

openSip+Puff

Low-cost, open-source "sip-and-puff" interface to enable new methods of expression for people with and without limited mobility.

Similar projects worth following
Commercial sip and puff devices have been available for quite some time but are generally prohibitively expensive, highly specialized, limited in expressivity, require poorly-written and restrictive software and rely on clunky, out-of-date hardware that makes it difficult or impossible to integrate with modern operating systems and even basic software.

Therefore the main objective of openSip+Puff is to provide a cheap, simple, open and modern alternative input method based on the breath of a user that can be easily mapped to a variety of common actions like mouse clicks and keypresses.

The ultimate goal of this project is to go beyond simple utilitarian functionality and provide a new modality for creative expression that is meaningful for people with or without limited mobility. For me this means musical expression and visual art applications, but you are welcome to take it in whatever direction you want!

Hardware

The core functionality of this project is built upon the capabilities of the ATmega32U4 microcontroller paired with an analog pressure sensor. Originally this board used the MPX12GP pressure sensor from Freescale, which requires an instrumentation amplifier in order to interface with the microcontroller. However, this sensor has proven to be hard to integrate into a manufacturable design, so I will be experimenting with another sensor very soon.

---------------------------------------------------------------------------------------------------------------------------------------------

Firmware

The Arduino Leonardo bootloader is burned onto the ATmega32U4 allowing for some really nifty functionality using the USB HID class. Using built-in Arduino libraries we can easily get the board to show up as a USB keyboard, mouse, game controller, musical instrument or other such device, allowing the board to associate data from the pressure sensor (or any other inputs) with real actions on the user's computer.

In early experiments I have had great success with triggering keyboard and mouse actions based on the presence and intensity of air pressure ("sips" and "puffs") on the pressure sensor. I hope to develop some more sophisticated and abstracted firmware that will allow me to easily and arbitrarily associate events from the pressure sensor with various common keyboard, mouse and other device behaviors. For example, making a single sip trigger the keypress of the space bar.

---------------------------------------------------------------------------------------------------------------------------------------------

Software

Right now whenever the end user wants to change how input events are associated with keyboard/mouse/etc behaviors they need to dive into the firmware code, make alterations and upload a fresh sketch. For developers this is pretty trivial, especially since I'm trying to rely on standard Arduino practices as much as possible.

However, I want this device to ultimately become accessible to a demographic where it can have a truly meaningful impact, which means creating a way for users who are not developers to reconfigure their openSip+Puff in a friendly and intuitive way without ever having to see a line of code.

My current plan is to experiment with various modern, cross-platform desktop application technologies to create a simple configuration interface that sends packets of data (e.g. instructions for the board to carry out internally) to the device over a serial connection. Since I have a strong background in front-end web development I will be focusing on using some sort of browser-based method of doing this, perhaps through a framework such as Electron. While the low-level serial communication layer is a bit tricky, this will at least afford me the ability to create a really beautiful and intuitive UI and UX that I don't feel would be easily achievable with existing native desktop application frameworks like Qt.

Arduino firmware (v1) .zip

x-zip-compressed - 4.53 kB - 08/15/2016 at 00:48

Download

Eagle schematic and board design (v1).zip

x-zip-compressed - 106.76 kB - 08/15/2016 at 00:48

Download

Bill of materials (v1).xlsx

sheet - 13.43 kB - 08/15/2016 at 00:48

Download

Relevant datasheets.zip

x-zip-compressed - 6.79 MB - 08/15/2016 at 00:48

Download

3D printed housing design and STLs.zip

x-zip-compressed - 660.82 kB - 08/15/2016 at 00:48

Download

  • 1 × J1 - 2x3 male header Used for ICSP. Optional if using staggered hole pattern.
  • 1 × J2 - 1x4 male header I2C port (not present in original prototype PCB)
  • 1 × J3 - 1x4 female header, right-angle Socket for MX12GP
  • 1 × CN2 - USB mini-B jack (SMD) Power Management ICs / Power Supply Modules
  • 1 × LED1 - green LED 0805 SMD

View all 21 components

  • Observations and issues with first prototype hardware design

    Jason Webb08/17/2016 at 00:21 3 comments

    Once my initial prototype board was assembled I was faced with everyone's favorite task - bug fixing! There were some problems that became evident right away, and others that took an embarassingly long amount of time to identify and fix.

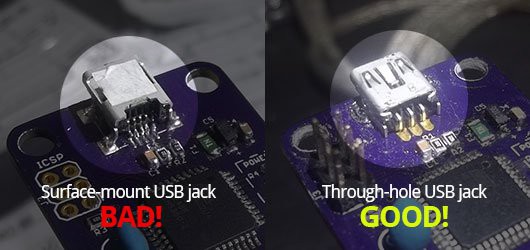
    1. Surface-mount USB mini-B connectors are HARD to solder!
      The first problem I found was that in reality, SMD USB connectors are extremely hard to hand solder without a hot-air rework station! I gave it a good shot, but I quickly realized that it was going to be way more difficult than it should be to manuever my soldering iron in the constrained space aroudn the connector's pins.

      Solution: for the prototypes and DIY-able version of this device, I should definitely stick with through-hole connectors so that more people can assemble and maintain their boards.
    2. Instrumentation amp didn't get connected to GND
      Once I was able to burn the Arduino Leonardo bootloader onto the ATMega32u4 and upload a basic sketch for testing I found that I wasn't getting any readings from the pressure sensor.. This was a bit frustrating to troubleshoot because it made me question just about every step of the process up to this point. Was the board design flawed? Are there defects in the board from fabbing? Is the bootloader or microcontroller somehow corrupted? Do I suck at programming more than I thought I did?

      Eventually I found that this was indeed a hardware problem and traced the cause down to the instrumentation amplifier. Either out of haste or inexperience, I neglected to connect the amplifier's reference pin to the ground plane, effectively preventing it from receiving power.

      Solution: I soldered a jumper wire from the reference pin to a known ground connection, and readings started coming in right away! I also updated the Eagle board design straight away to prevent future boards from having the same problem.
      .
    3. MPX12GP sensor connection is unreliable
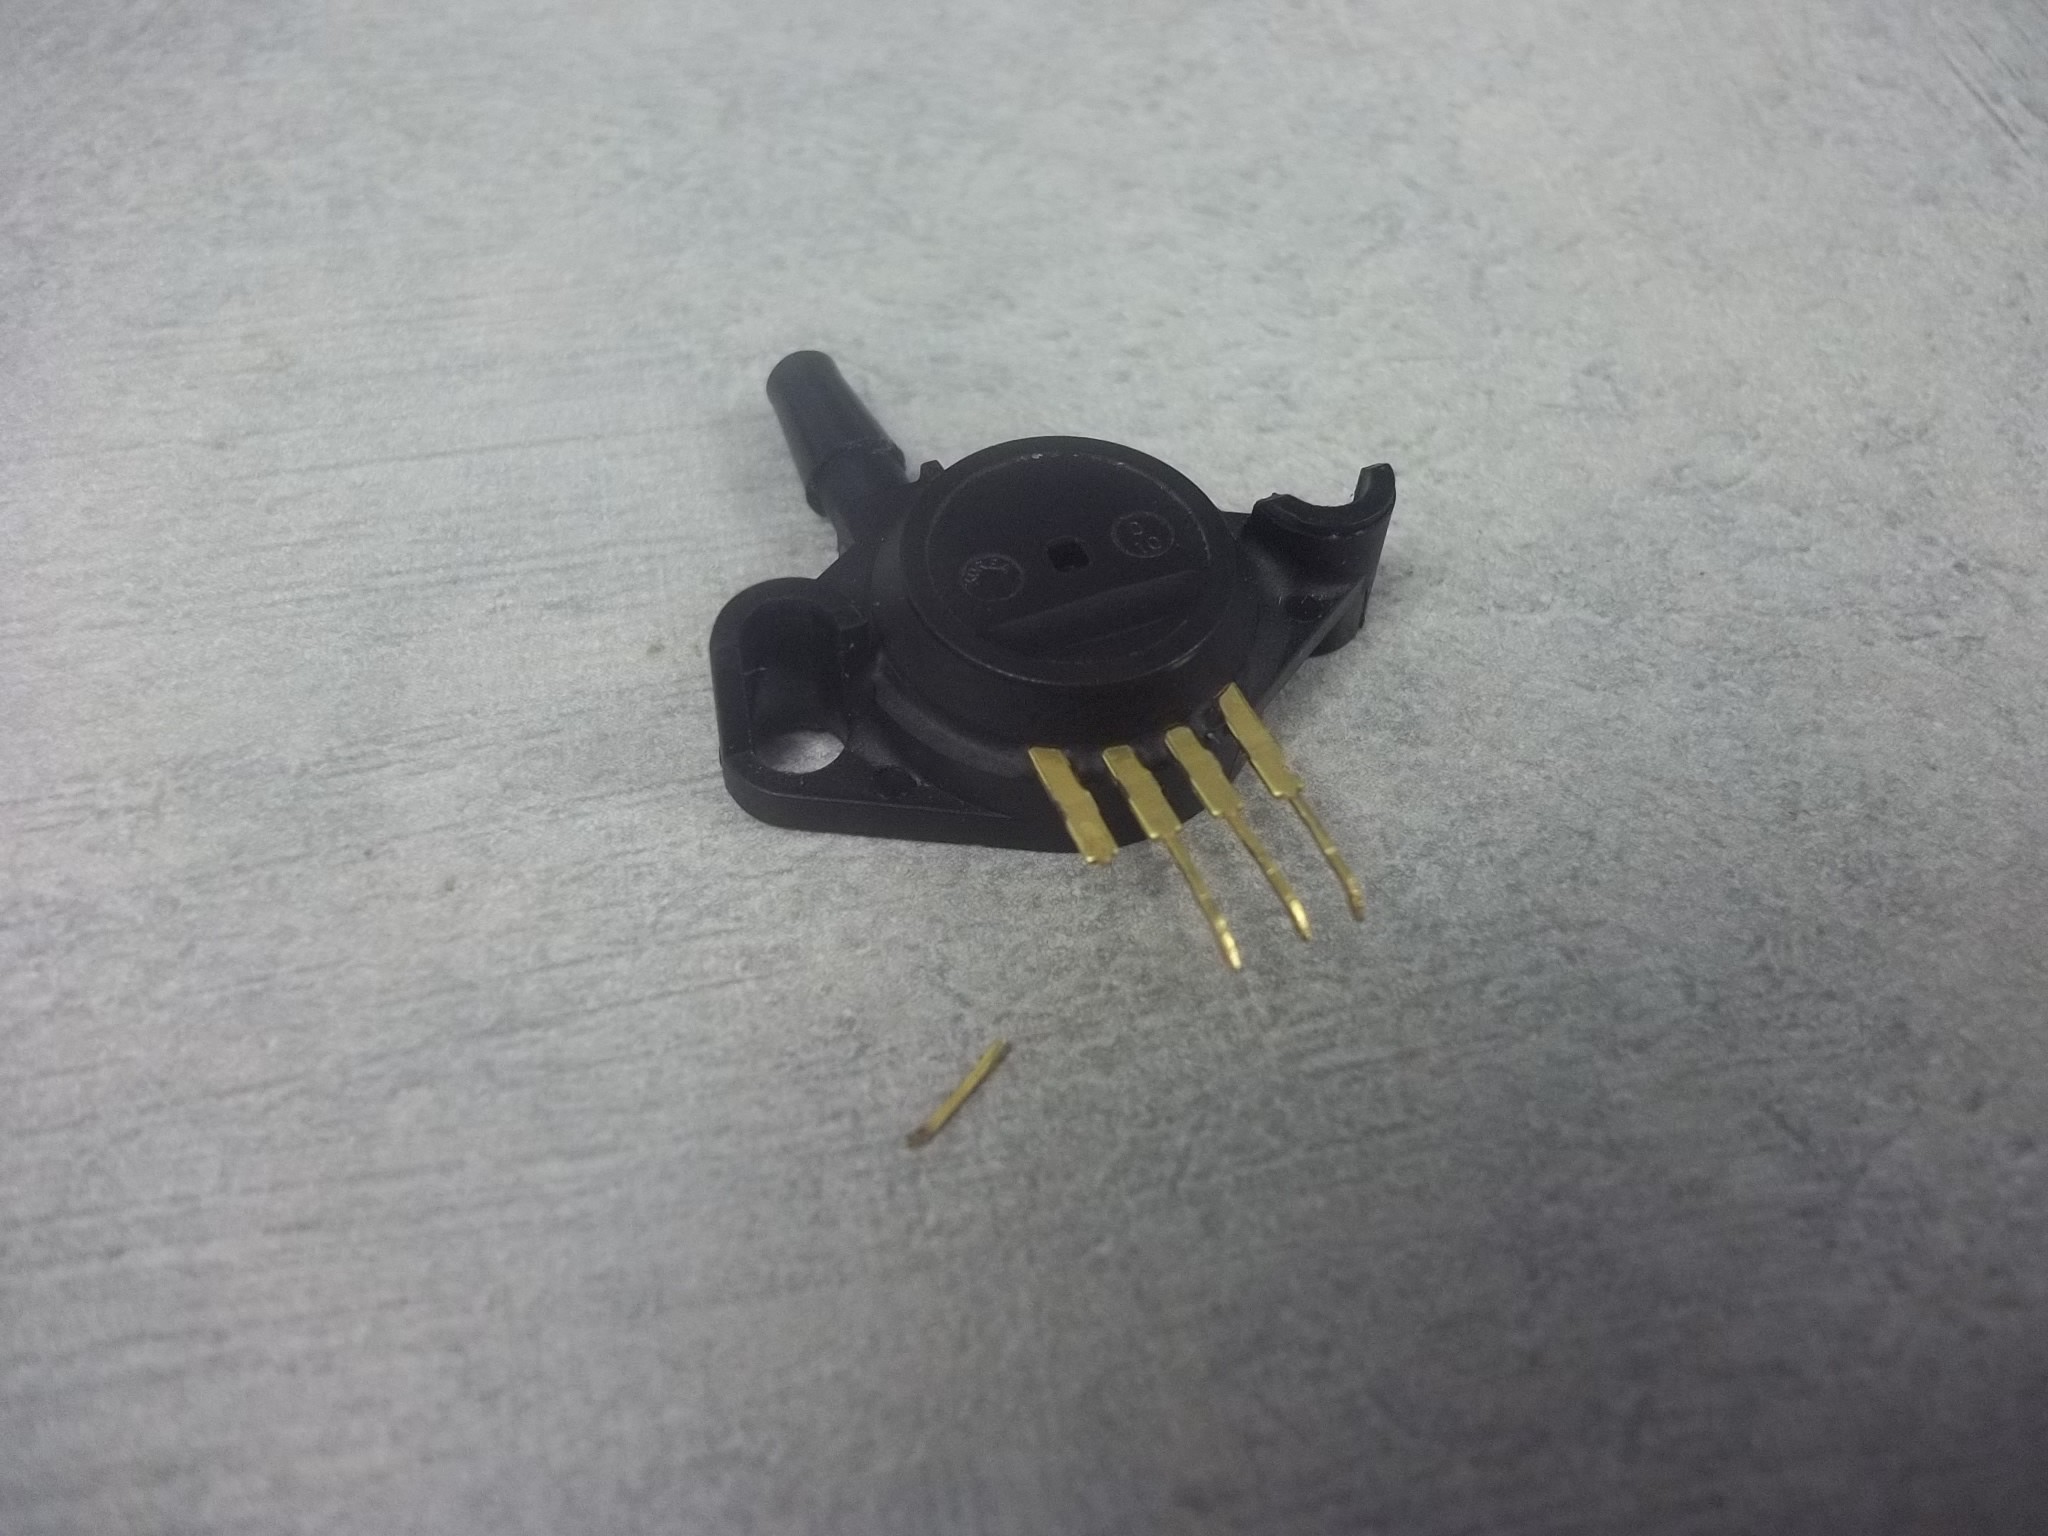
      When I initially specced out the MPX12GP it looked like it would be easy to interface with. It has long 0.1" pins which seems like they'd mate well with 0.1" female headers, allowing the sensor to be easily replaceable by users. In practice, though, this didn't work out so well for a few reasons:

      Firstly, the pins are actually a bit on the slim side, making them a little loose in the female header sockets. Not ideal for real-world usage.

      Secondly, because of how thin the pins are they break very easily at the slightest amount of torque or bending.

      Thirdly, the sensor is thick enough that the pins are elevated a bit too much when the part is mounted flat onto a board. This means that the typical right-angle female headers that I had in mind do not line up with these pins, making the fit even more sketchy than when they are aligned.. I considered using extra-long right-angle female headers, but they are hard to find (and therefore not cost-effective) and would not solve the other two problems with the sensor.

      Solution: given the strange mounting that would be required, and the build quality of the pins, I think the best thing to do is to find another sensor. I believe I have actually found one, just need to test it out!

  • First prototype PCB design, fabrication and assembly

    Jason Webb08/07/2016 at 15:33 0 comments

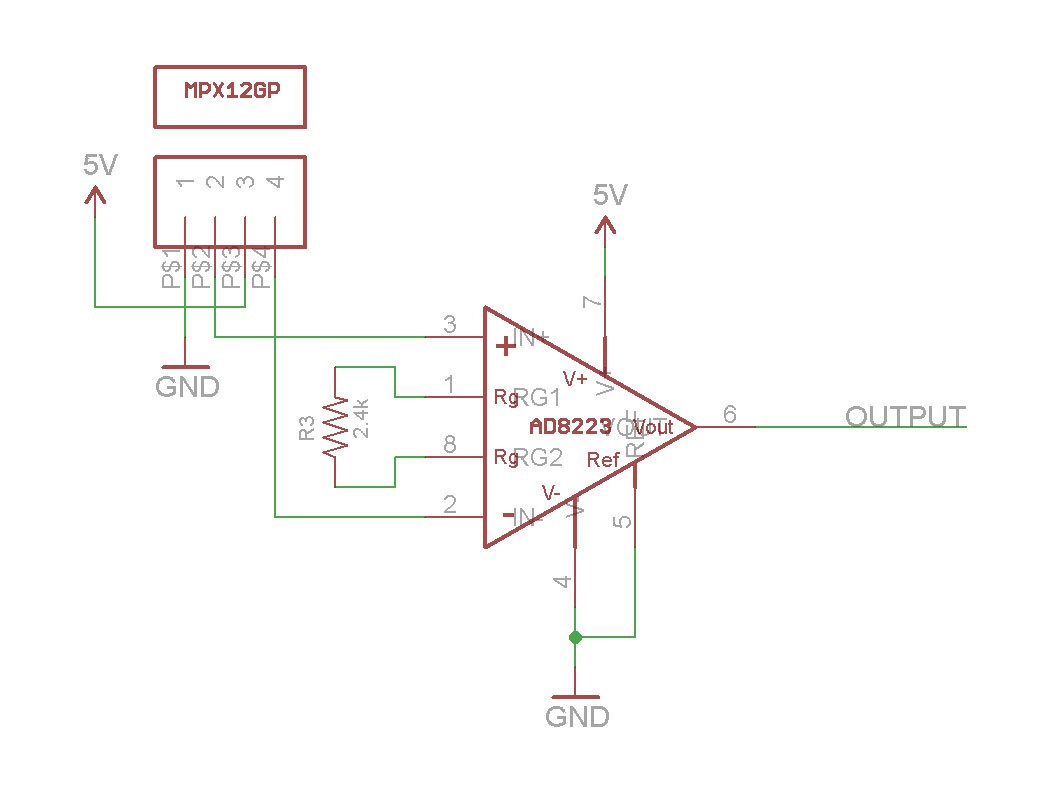
    Based on the results of my breadboard prototype I knew that my concept was solid and that the parts that I had chosen would give me the results I was looking for. In particular I knew that the pressure sensor worked great and that my instrumentation amplifier worked as intended to make the sensor's analog output "loud" enough for the Arduino ADC to read.

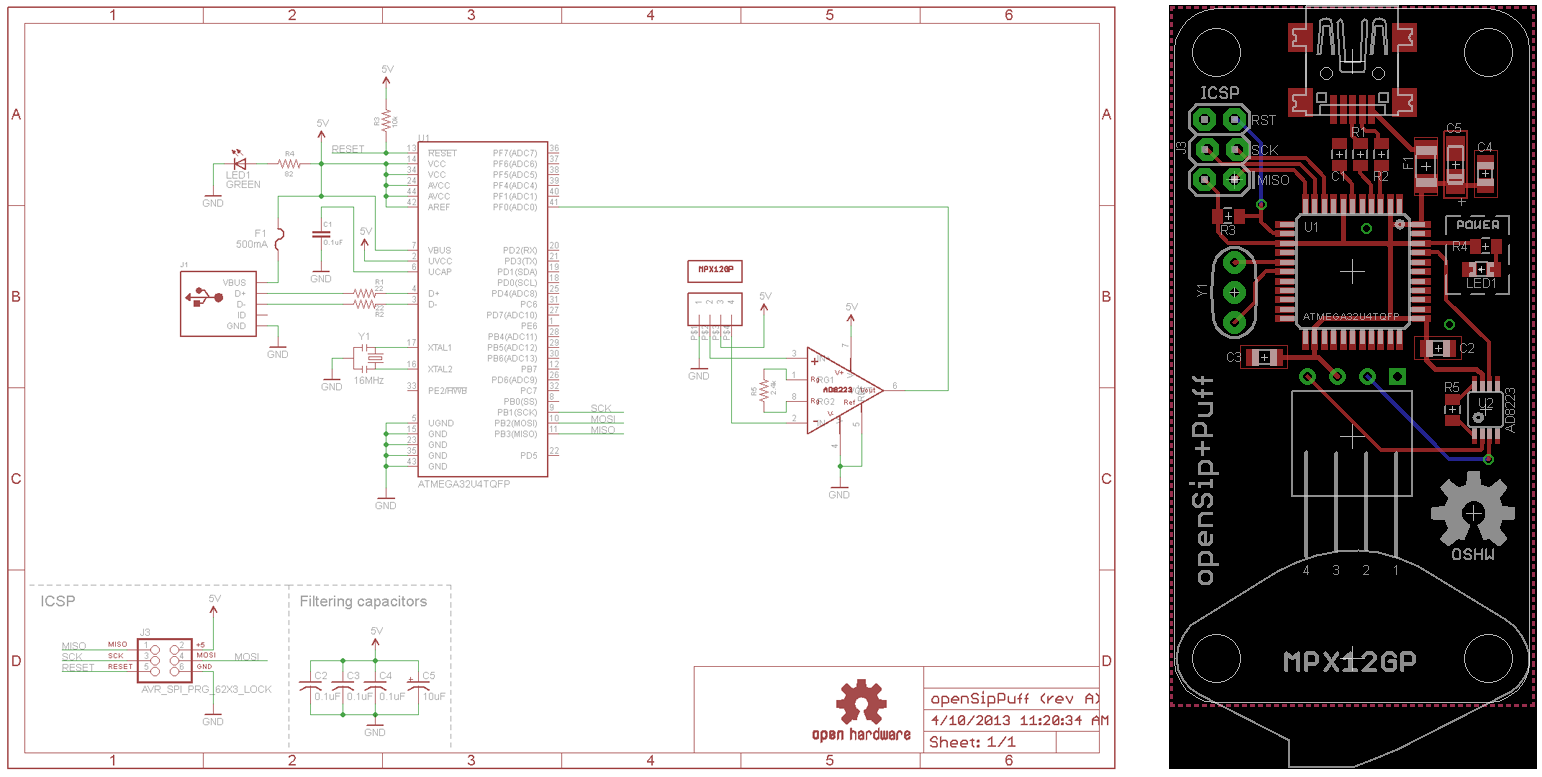
    For me the next logical step was to translate my design into a circuit board that I could have fabricated. I used Eagle CAD for this, and whipped up a custom footprint for the pressure sensor.

    Note: This is just the initial prototype design, and I have already made newer ones that I will upload and document in upcoming build logs! Just posting it here to share my process.

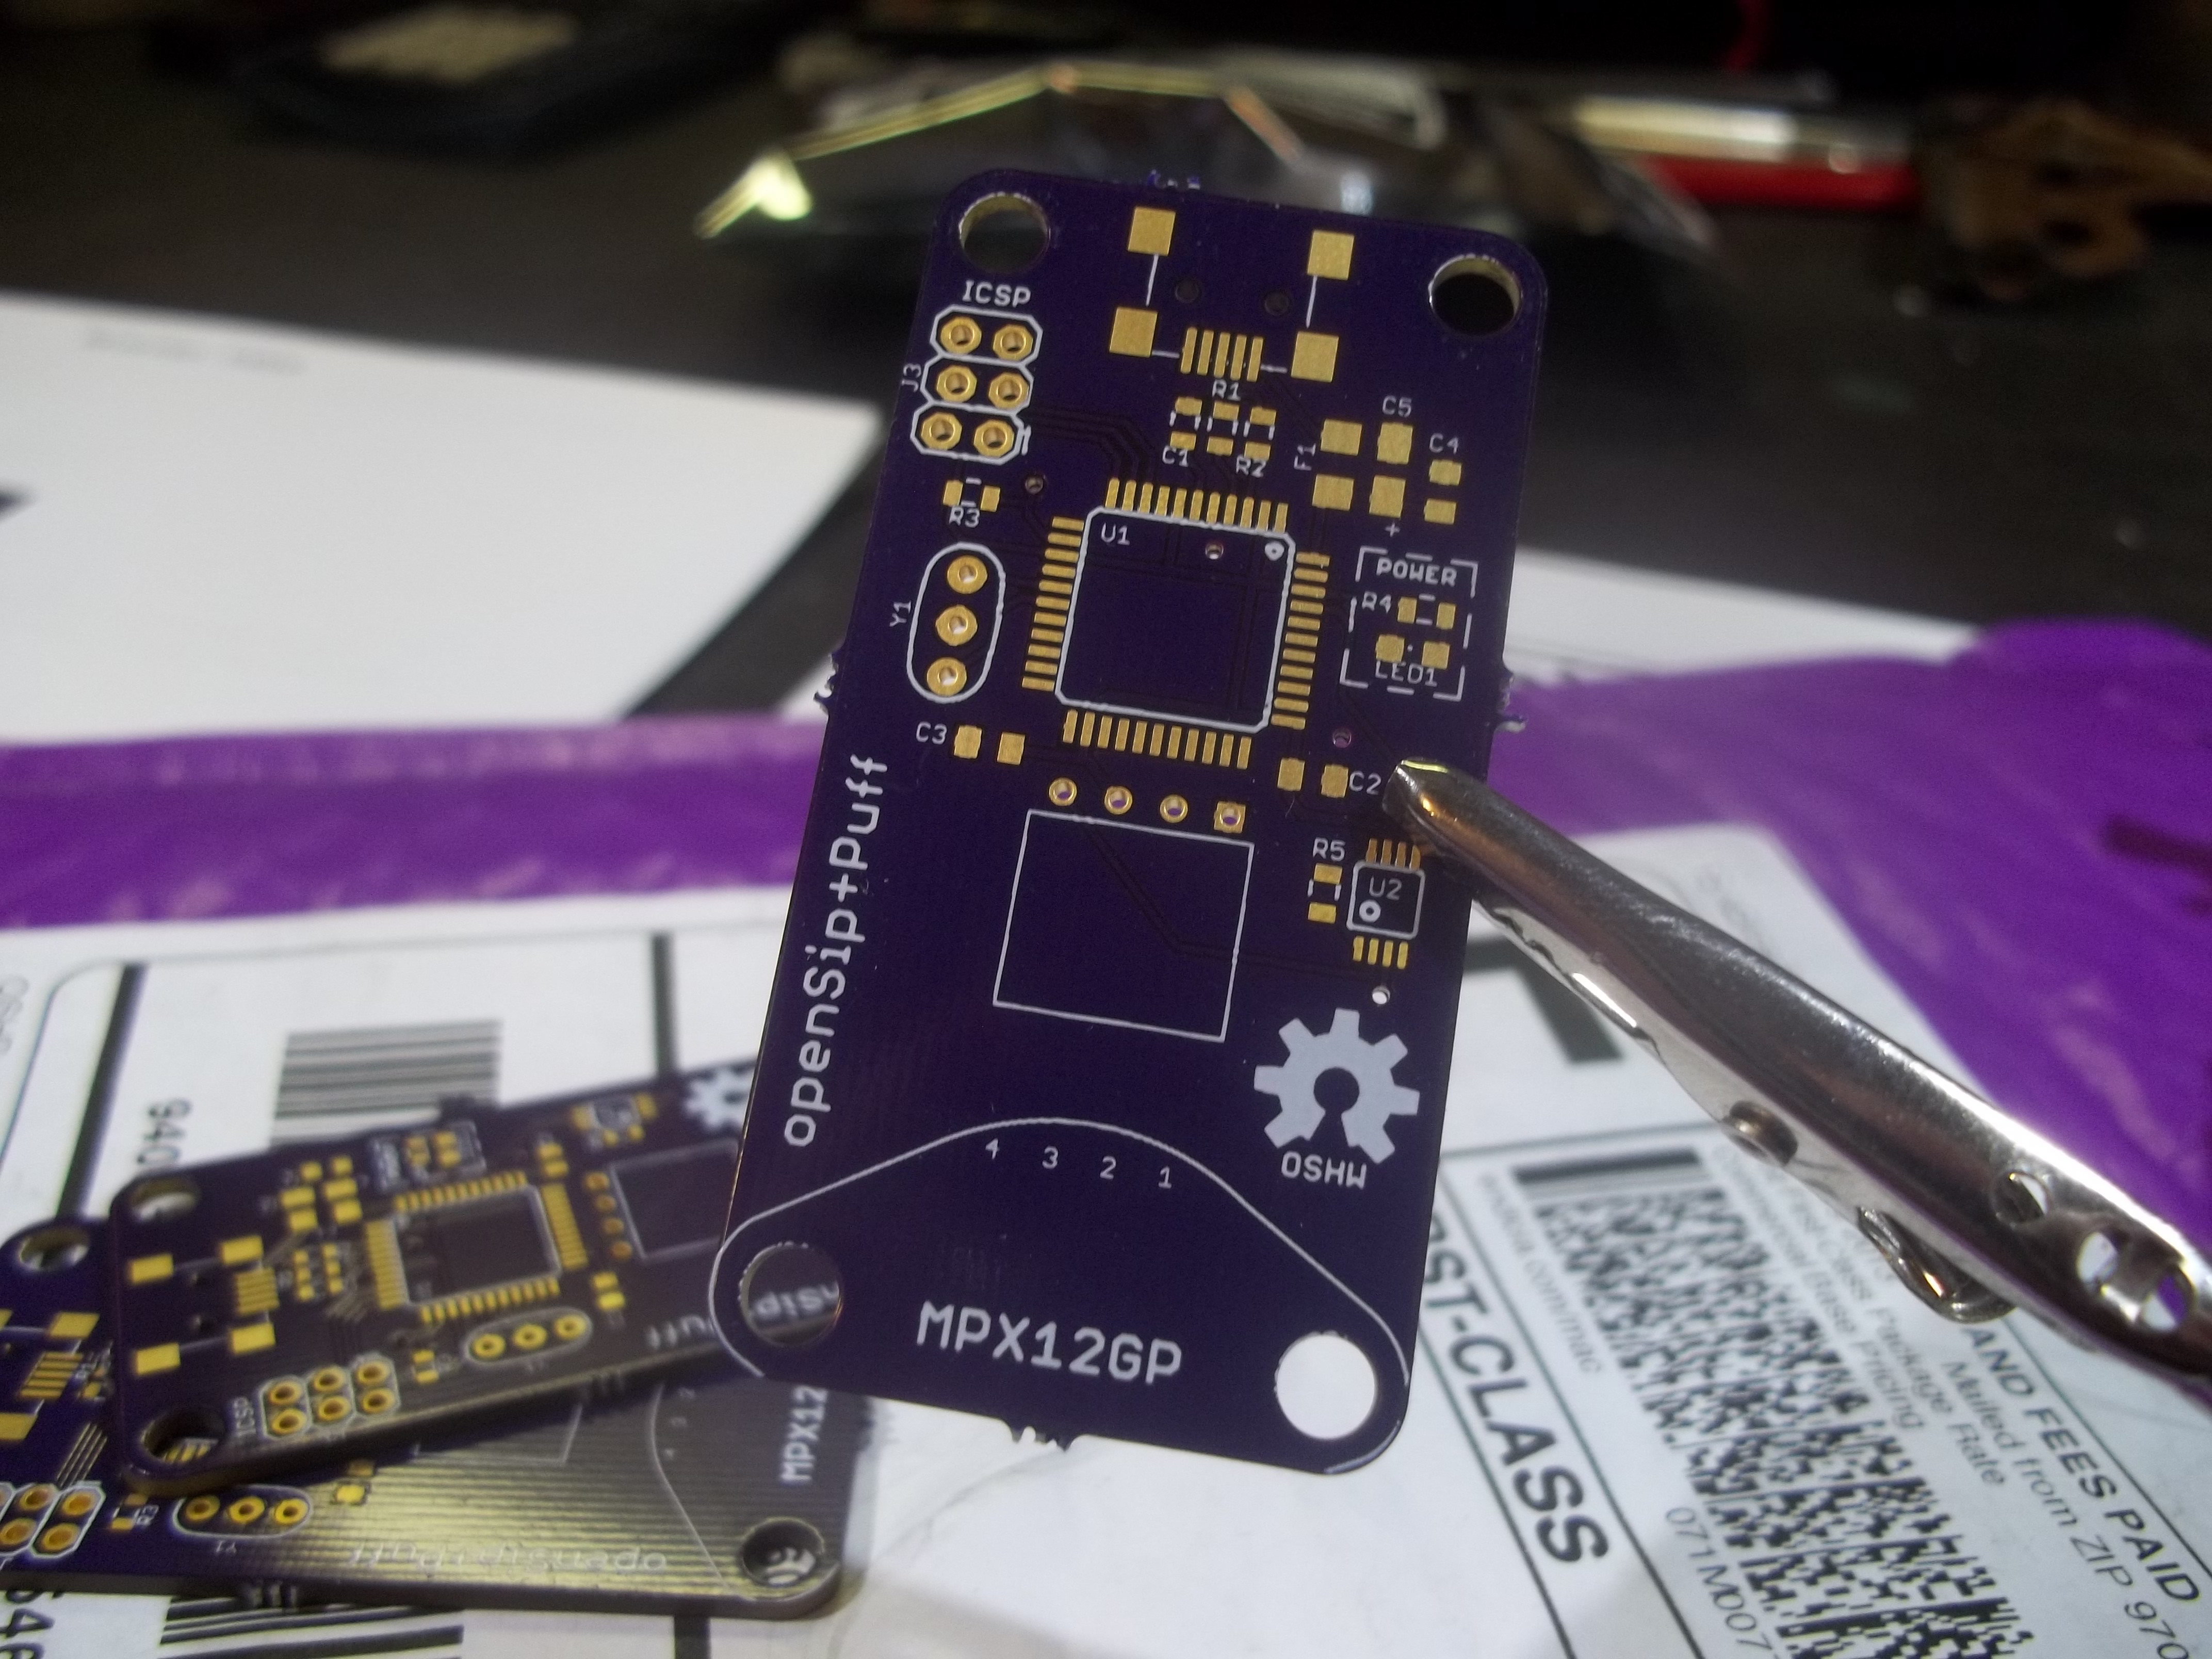
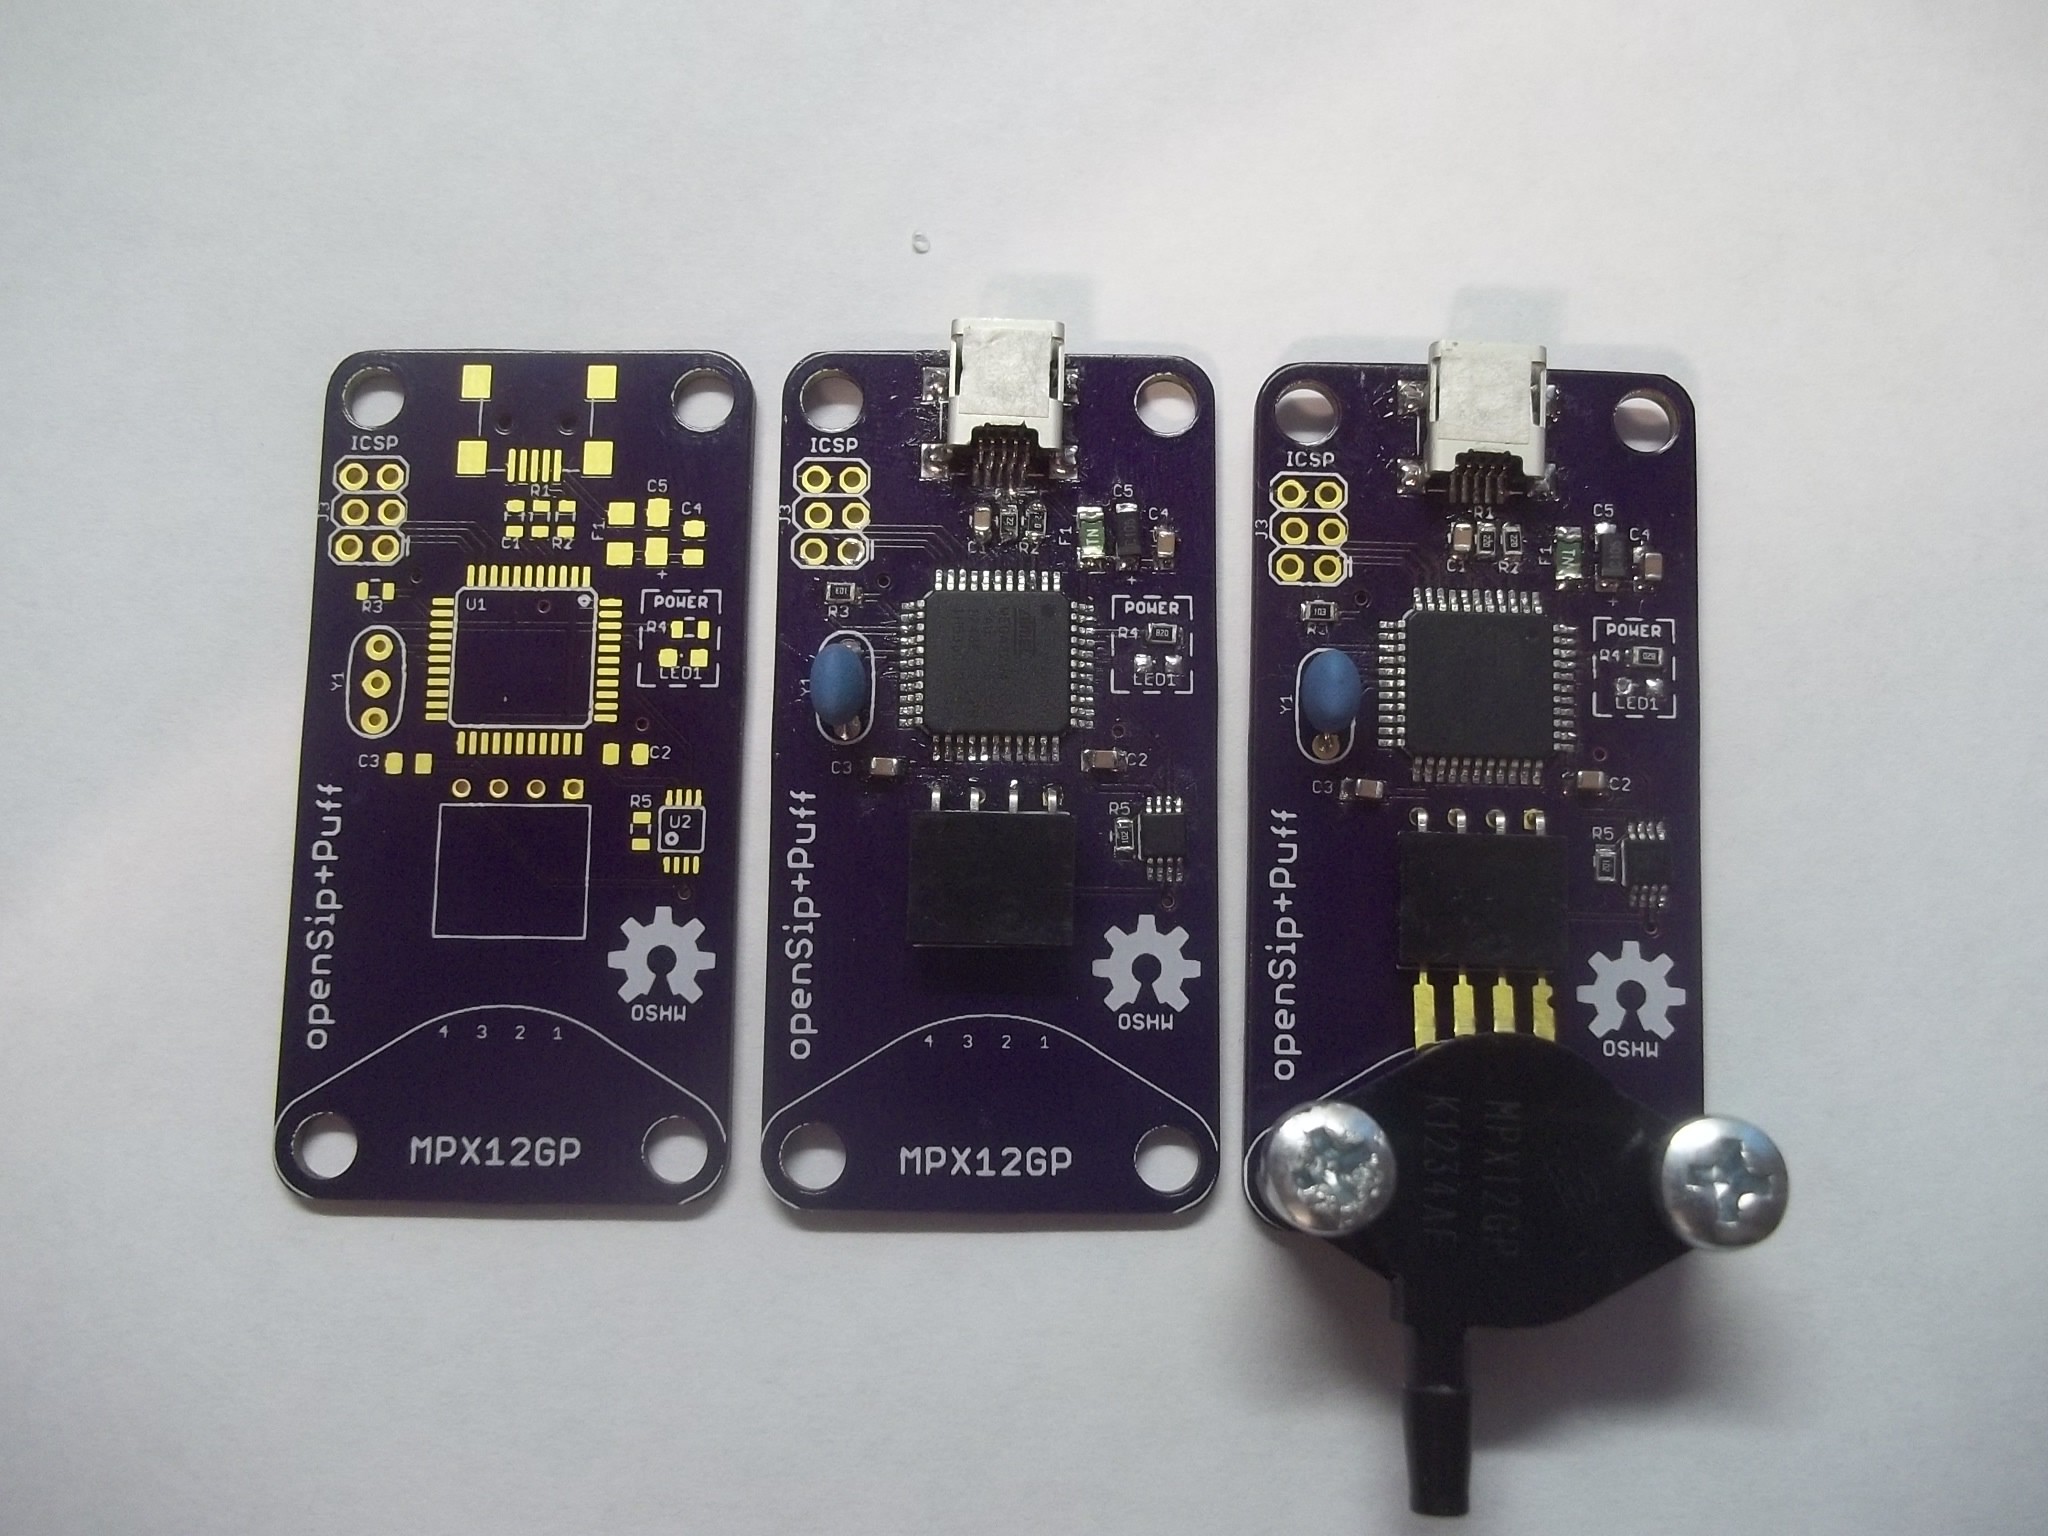
    I sent my board design off to OSHPark and ordered my parts from Digikey so that when the boards arrived I could get them assembled right away. Just a couple weeks later I received this package of 3 boards, all for a very reasonable $13.71!

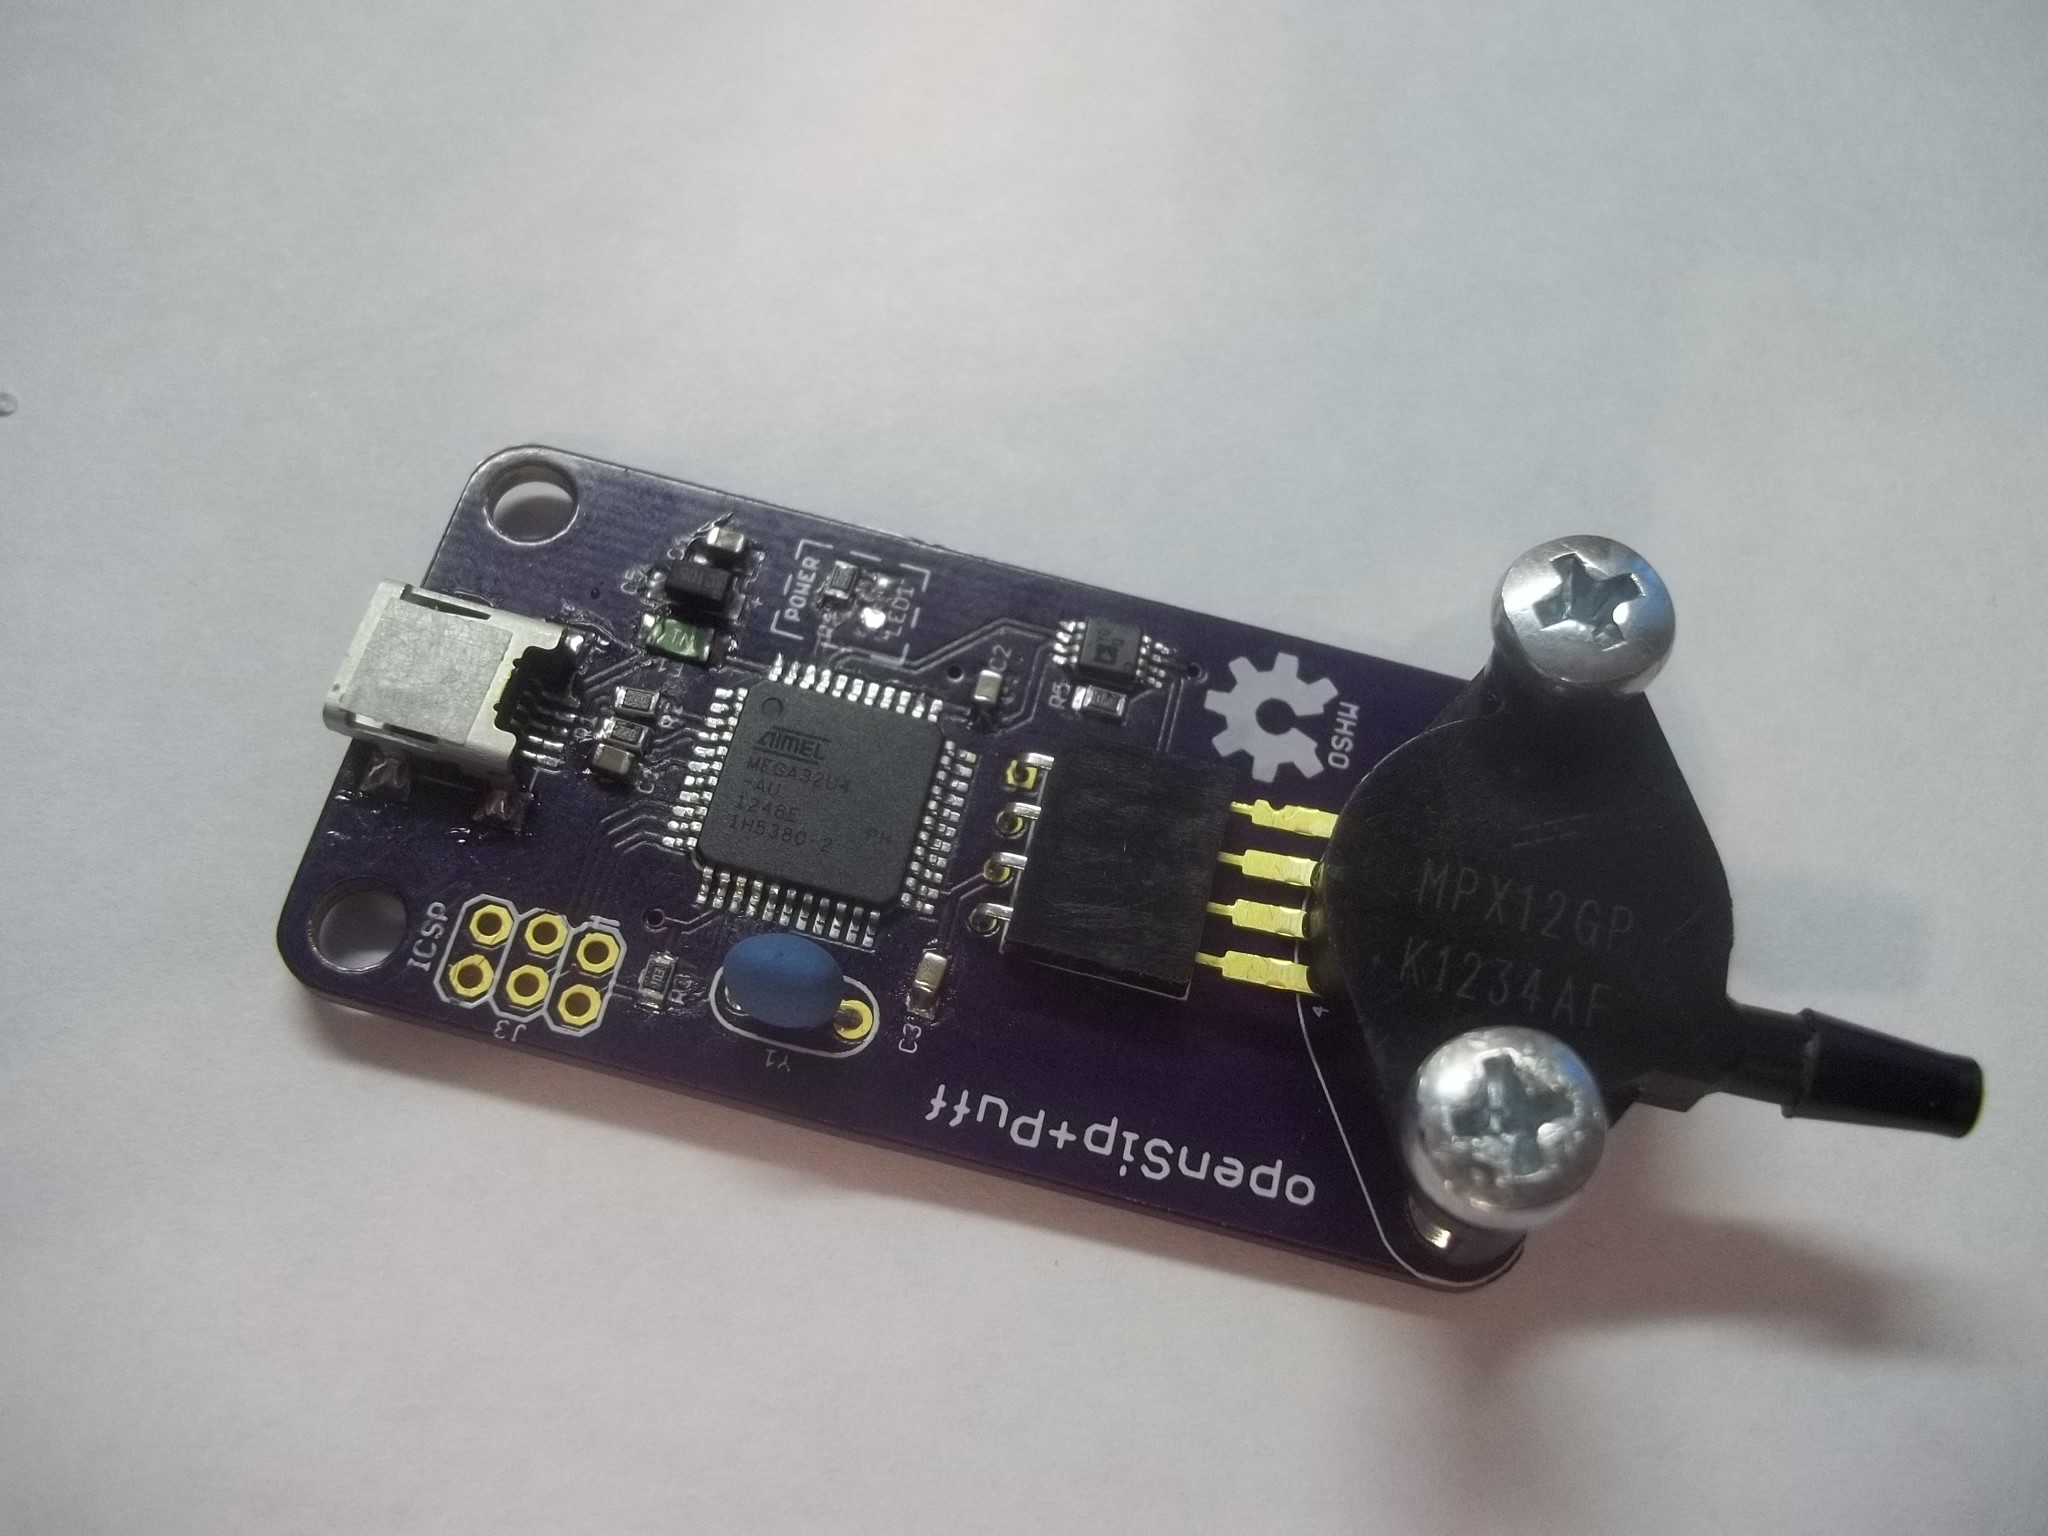
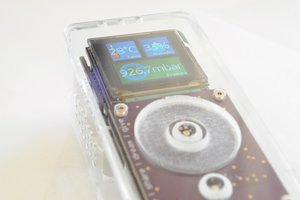
    I went ahead and soldered all the parts to the board and ended up with a pretty sweet looking prototype!

    With the hardware assembled the next thing to do is to burn the Arduino Leonardo bootloader onto the ATmega32U4 and start experimenting with firmware sketches.

  • Original breadboard prototype

    Jason Webb08/06/2016 at 20:55 0 comments

    When I first started this project in early 2013 I knew there were two main components at the heart of this system: the ATmega32U4 microcontroller and some sort of pressure sensor that I could attach a vinyl tube to.

    Through lots of googling and small insights gleaned from obscure forum posts, failed projects and random comments on other air pressure-based projects I eventually stumbled upon the MPX12GP pressure transducer from Freescale.

    I saw that it's output voltage was only between about 0-55mV (proportional to the air pressure on the sensor), which is below what the ATmega32U4 ADC can reliably read, so I needed a way to amplify the signal to be "loud" enough that the microcontroller could read it.

    To do this I used an instrumentation amplifier (the breadboard-friendly INA122) tuned to transform the tiny voltage (0-55mV) to be more in the range of 0-5V so that the built-in ADC could figure out air pressure based on the voltage read at the appropriate analog input pin.

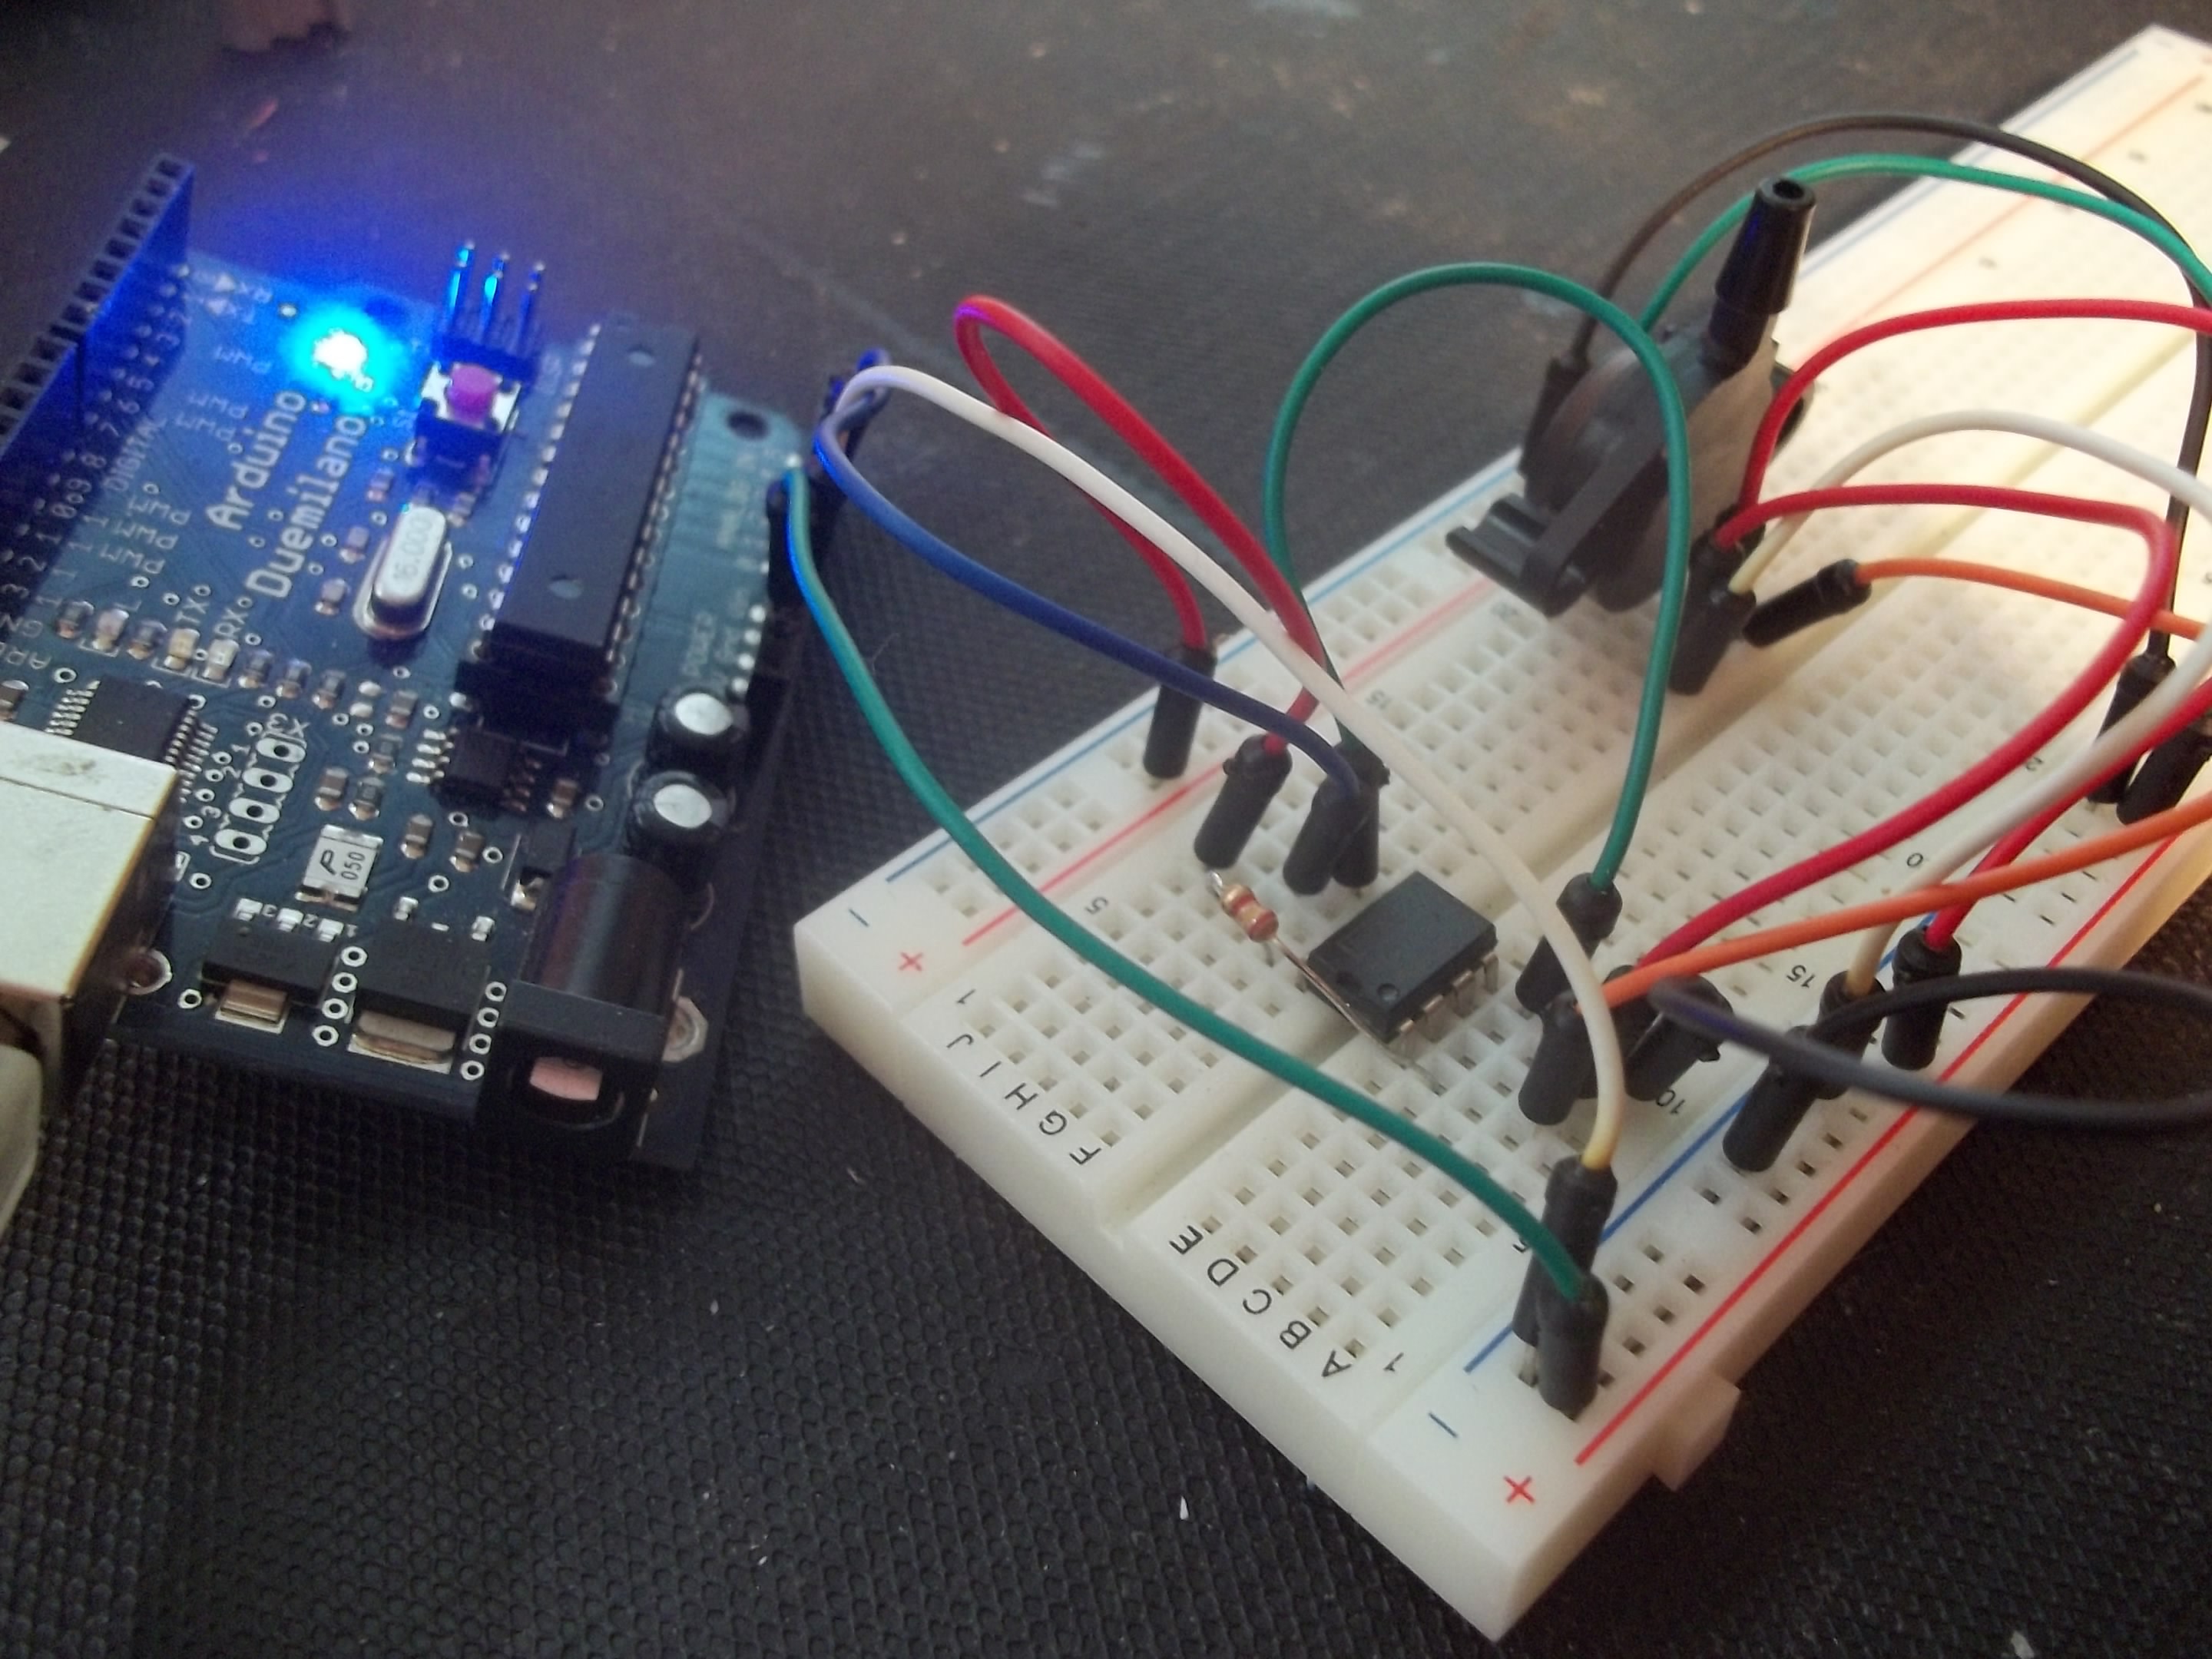
    I assembled my circuit on a breadboard and hooked up the output of the instrumentation amplifier to an Arduino's analog input pin, which was programmed to simply take a reading on the pin and send that value to my computer over serial.

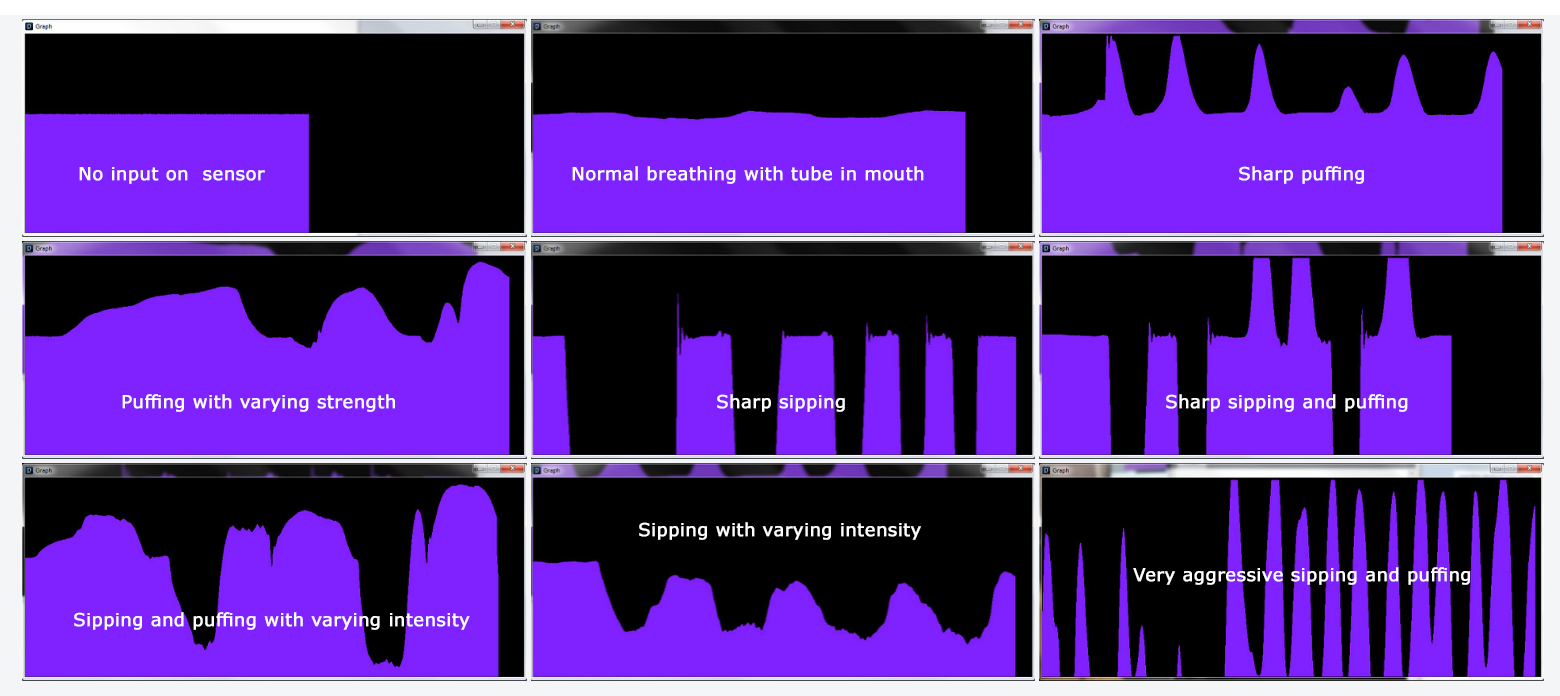
    I then put together a little sketch in Processing that plotted the values coming in from the serial connection onto a rolling graph allowing me to visualize the output of the sensor in real-time. I think the new Arduino IDE includes a serial graphing tool, but at the time I had to do it the "hard" way!

    What I found right away was that when there is no input on the sensor the output voltage hangs at around 1/2VCC, which in this case would be around 2.5V. By blowing air into the sensor (i.e. a "puff" or positive air pressure) the voltage went up in proportion to how hard I blew. Sipping on the tube (i.e. negative air pressure) made the voltage go down.

    For me this was a very successful experiment and motivated me to stop thinking about just simple keypresses and mouse clicks and start thinking about more creative and expressive uses for this system. The stability of the signal and the ease of varying the intensity of your sips and puffs really blew me away, so I knew I had to do some weird stuff in the future!

    Given how well the tests went I felt there were two obvious next steps: building out more robust firmware and putting together a prototype PCB. Both of which I will discuss more in future build logs!

View all 3 project logs

  • 1
    Step 1

    Get an openSip+Puff PCB
    PCBs and assembled boards will be made available once prototyping is finished and I can find some way to raise the capital needed. For now you can get boards made through OSHPark using the Eagle files supplied, but please contact me beforehand to confirm that the uploaded design is solid.

  • 2
    Step 2

    Order all the components from the Bill of Materials
    I get all of my parts from Digikey, but you are free to get them from anywhere. The ATmega32u4 and the pressure sensor are the most expensive parts of the project, and you can expect the total cost to be around $20.

  • 3
    Step 3

    Assemble the board by soldering all parts
    Be careful, be safe and be aware of all polarity and registration markings. A reflow oven may be helpful here, but I solder all the boards by hand using a standard soldering iron for now.

View all 5 instructions

Enjoy this project?

Share

Discussions

medo sonson wrote 02/06/2017 at 09:22 point

i intrested for this feld .. i I Benefit from this page

medosonson

  Are you sure? yes | no

Tom Neal wrote 12/25/2016 at 04:54 point

Would the 32bit STM F1 and F3 mcu's work for this? They're cheap and fast. You can get them with built in sensors. I use them for flight controllers. The barometer is all you really need. I pay $3 for the F1 mcu and $1 for the baro. It has serial bus and i2c. Plus the same type of bootloaders. The ARM Cortex chips are robust.

  Are you sure? yes | no

Jason Webb wrote 12/25/2016 at 15:43 point

I'm not familiar with the STM line, but if it has an ADC and an on-board USB interface then it should work fine! I do think that a 32-bit chip would be major overkill (the 32u4 already is), though the price is attractive!

I personally like that the 32u4 is supported by the stock Arduino IDE without any modifications needed. Being able to burn an official bootloader (Leonardo) and upload sketches without also having to install extra packages makes the whole process a bit more accessible to novice users, which is important to me.

  Are you sure? yes | no

Makers Making Change wrote 09/16/2016 at 05:55 point

This is a great project! We are using sip and puff controls on our device as well, its called the LipSync. Best of luck!

  Are you sure? yes | no

Jason Webb wrote 09/19/2016 at 19:56 point

Nice! Looking forward to seeing your project updates! Looks like we have similar thinking in the pressure transducers too - I'm going to be trying out the MPXV7007GP within the next week or so, which is very closely related to the 7002 you are using, just with one barbed port instead of two. Did you compare the two and find the 7002 to be better in some area?

  Are you sure? yes | no

Charles G wrote 09/23/2016 at 01:44 point

Jason, I've been working with Chad on this project and we chose the 7002 for two reasons:

1.  The dual barbs offered us more mounting options.
2. We found that +/- 2kPa was more than than enough pressure range to trigger the voltage outputs we desired.

The 7007 may work just as well for you.  These are the air filters we use by the way:

http://www.pall.com/main/laboratory/product.page?id=19988

  Are you sure? yes | no

Mark Croft 1975 wrote 09/13/2016 at 14:40 point

hi i am part of disability group here in england/uk. I would like to help test out your device. Any plans to make it worth raspberry pi? maybe even make it a bluetooth device and then the OS is not important , just appears as bluetooth mouse or on-screen-keyboard? I would like to help with the programming,testing,etc

  Are you sure? yes | no

Jason Webb wrote 09/19/2016 at 20:08 point

One of my goals is to keep this device as simple as possible to keep the focus on the novel modalities and to keep the costs and barrier to learning down. I also feel that using the KISS approach affords a greater degree of modularity and interoperability, which too many projects (especially in the AT world) lack.

Currently the device is completely OS-agnostic. Using Arduino Leonardo's drivers, the device shows up as a generic USB HID keyboard, mouse or whatever else you've configured it for with no special drivers necessary. It should work just swimmingly on RasPi, Mac, PC, Linux, whatever you want - so long as it has support for USB HID devices. 

I personally do not want to add any sort of wireless technology to this device, because that would (I feel) unnecessarily increase its complexity, which would have non-trivial impact on the user experience and the cost. By requiring the device to be tethered to a PC over USB we can eliminate the need for batteries (and thus all the trappings of battery management, charging, etc) and make the 

If you'd like to contribute to the main branch of this project, please shoot me a message with your portfolio (particularly code examples) and what you would like to do!

  Are you sure? yes | no

Alex Hunt wrote 09/07/2016 at 08:29 point

This is a great project!  I'm also impressed by your SMD soldering skills - my recent attempts have come out like a dog's dinner.  Can I ask how you made the white case?

  Are you sure? yes | no

Jason Webb wrote 09/07/2016 at 14:44 point

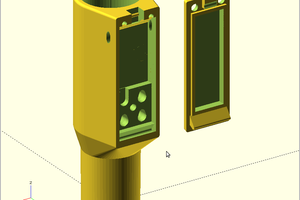
Thanks! The case was designed in openSCAD and 3D printed on an old Makerbot Replicator. I'll most likely be making an updated case once I've settled on a new sensor and board design.

  Are you sure? yes | no

Mark Croft 1975 wrote 09/13/2016 at 14:41 point

any chance it would fit into of the shelf case? are u planning to sell it as a complete kit with case included?

  Are you sure? yes | no

Jason Webb wrote 09/19/2016 at 20:16 point

@Mark Croft 1975:

I'm not quite sure what would be an "off-the-shelf" case - can you link to some examples of industry-standard cases out there that I should look into?

I'm still pretty on the fence about creating and selling kits for this project, because doing so requires a HUGE amount of unpaid work upfront on my part, which I'm just not in a place to be able to do. I might be able to leverage a service like Seeed Propagate in the future, but for now I'm just focusing on creating an awesome, well-documented project and helping people to make one themselves in a relatively painless process. For example, once a solid prototype is created I'd like to provide some instructions about how to order assembled PCBs, 3D print a case, gather other materials and so on so that novices can get somewhere without getting too into the technical side. First things first though!

  Are you sure? yes | no

miro2424 wrote 09/07/2016 at 01:07 point

Don't forget to put an air filter inline so not to contaminate the pressure sensor.


  Are you sure? yes | no

Jason Webb wrote 09/07/2016 at 01:20 point

I was thinking about such a thing, but didn't know they were available for purchase as products. Where can I get some, and what applications are they normally used in?

  Are you sure? yes | no

oshpark wrote 09/01/2016 at 17:44 point

Awesome!  We're very impressed by your project!

  Are you sure? yes | no

Jason Webb wrote 09/01/2016 at 17:55 point

Thanks, that means a lot! Your services enabled me to get started with PCBifying my work, and you're still my preferred fab house! Hoping to make it out to Portland for the OHS Summit this year - can't wait to come by your shop and distribute some high-fives :)

  Are you sure? yes | no

oshpark wrote 09/03/2016 at 01:26 point

that'd be excellent! hope you can join us on Open Hardware Summit eve: https://blog.oshpark.com/2016/08/19/join-us-on-open-hardware-summit-eve/

  Are you sure? yes | no

Gwendolyn Scogin wrote 09/01/2016 at 16:10 point

I am using a bmp180 air pressure sensor https://www.adafruit.com/product/1603 on my midi wind controller https://hackaday.io/project/6126-midi-wind-controller . It uses i2c as its interface and has seemed reasonably reliable so long as i keep moisture from the board (I use some double sided foam tape between the sensor and the mouth piece and I have it mounted so that it is not in the direct air flow) . It can easily read both puff and sip.  Let me know if you would be interested in my cad files for my mouthpiece that has a fitted socket for the adafruit breakout board. 

  Are you sure? yes | no

Jason Webb wrote 09/01/2016 at 16:20 point

Neat, I didn't know barometric pressure sensors could work in this application! I may have to give it a shot, but it looks like I would have to something like what you are doing - building a custom adapter to allow tubes to be connected to it. 

I have an MPXV7007GP pressure sensor waiting to be tested out, which has a built-in barbed pipe fitting, so hopefully that works. It's also normalized to roughly the range of pressure that a human can produce (+/- 7 kPa) and proportionally generates 0.5V-4.5V, which makes it pretty convenient for this application. But I don't know if it'll work until I try it, so its good to have other options!

Edit: It looks like the BMP180 sensor is built to measure pressure between 300-1100hPa (or 30-110kPa), whereas average human lung capacity is more in the neighborhood of 10kPa. So while it is apparently able to sense your breath pretty well, I wonder if there is a bit of precision that is lost by using only a small amount of the sensor's full range. I'd like to investigate further - can you maybe post your firmware and sample readings?

Also, I can't seem to find any info right now about how well the BMP180 handles negative air pressure (sips). Maybe some sample readings of those would be helpful too!

  Are you sure? yes | no

Gwendolyn Scogin wrote 09/01/2016 at 17:21 point

The barometric sensors are very sensitive.  They can measure the pressure change over just a couple of feet.  Since they are absolute pressure sensors and you would be using them in an assistive device, I would recommend using a second one to measure ambient pressure because storm fronts or traveling up and down could change your zero point.

  Are you sure? yes | no

Gwendolyn Scogin wrote 09/01/2016 at 17:27 point

I just saw your edit, right now all my stuff is in pieces, but i can try to breadboard it up and get you some sample data this weekend.

Sips are easy, the sensor reports absolute pressure, so a sip just lowers its a few kPa.

  Are you sure? yes | no

danjovic wrote 09/01/2016 at 14:45 point

Nice project! 

If a rugged USB connector is an issue I suggest you to use a common B female or even an A female connector instead of the miniature types, or maybe try another connector like 3.5mm 'audio' jacks (with 4 contacts of course). 

  Are you sure? yes | no

Jason Webb wrote 09/01/2016 at 14:59 point

Actually I'm pretty happy with the USB connector, since it is a pretty common convention for Arduino-like boards (Teensy, MaKey MaKey, various Adafruit and Sparkfun boards, etc). However, the basic 4-pin female header for the sensor turned out to be problematic for a few reasons, so I'll be trying out a new surface-mount version of the sensor that wasn't around when I first started this project. Got my fingers crossed!

  Are you sure? yes | no

Similar Projects

Does this project spark your interest?

Become a member to follow this project and never miss any updates