'Flea Ohm' FPGA Project
My attempt at making an FPGA experimenters board in a popular form factor :)
My attempt at making an FPGA experimenters board in a popular form factor :)
To make the experience fit your profile, pick a username and tell us what interests you.
We found and based on your interests.
Hello Everyone!
Well, it has been over a year since my last project update. My humble apologies for the very long hiatus between updates...
In summary, here is where my FleaFPGA 'Ohm' project is currently at:
- First run of production boards delivered successfully, albeit at a higher than expected unit cost and more difficult than anticipated production test cycle :-(
- Newest project I managed to successfully get working on FleaFPGA Ohm (and release on github): project Oberon to FleaFPGA Ohm
- I have (rather obviously) stopped all work on this hobby project until recently, mainly due to non-hobby matters. I am still waiting for my energy levels to return to normal so that I can devote more time to my hobbies wherever possible :-(
- I have received a ton of feedback (good and bad - thanks for both!) about my FleaFPGA Ohm. I have since used this information to design a new lineup of FPGA development boards starting with Ohm Mk2 pictured below - watch this space! :-)
- I've not yet decided on doing a second production run of Ohm boards (by me personally). However, I have received (and I'm receptive to) several submitted offers from interested parties to manufacture Ohm, so I am considering these offers going forward. In the event that all falls through, there is the option of putting the related Gerber PCB files up on Github for others to make more Ohm boards as they wish ;-)
Anyways, that's it for now. Thanks, as always, for reading about my slice of homebrew madness!
Regards Valentin
Seasons Greetings Everyone! :)
Just thought I'd post a quick update around my FleaFPGA Ohm production run...
Short summary: Indiegogo boards have been assembled and functionally tested! Furtner details (and pictures) may be found on my Indiegogo campaign page:
Well, that's all for now. More to follow soon...
Happy Holidays! :)
Hello Everyone!
Please forgive the delay in my latest Project log - life always getting in the way of the fun etc. etc...
I wish to start off this blog by extending my sincere thanks to those who backed my FleaFPGA Ohm project on Indiegogo! Without your support this project would quite likely have stayed a personal endeavor.
Now that the campaign is over, it's time to look forward to the production run. Parts have been ordered and should all arrive next week. PCBs have been fabricated and are already on-hand. Test and assembly plans devised and awaiting final review...
Assuming no major hold-ups, I expect to see the first assembled Flea Ohm boards roll off the assembly line in around two weeks time. Watch this space!! :-D
Cheers, Valentin
Hello Everyone!
First off, I want to give a huge thanks to everyone who liked or have been following my Ohm project with interest to date! I also want to thank those of you waiting on production news for your patience..
Now for the good news: I am pleased to announce the launch of my FleaFPGA 'Ohm' board as an Indiegogo campaign! Exciting times! :-)
Please do check it out (including the embedded video). Those of you who are interested in obtaining an 'Ohm' board, now is your opportunity to register your interest in my own take on an FPGA-based platform through the above link. Thank you!
Kindly stay tuned for further updates. Should you have any questions regarding the production run, kindly post those either here or over at Indiegogo. Thanks again!
Sincerely,
Valentin Angelovski
Hello again,
In last month's project update, I wrote about the redesign and testing of my 'Ohm' FPGA platform. This month, I am pleased to present some pictures of my first newly-assembled and tested (of what I now consider production-level) Ohm boards:
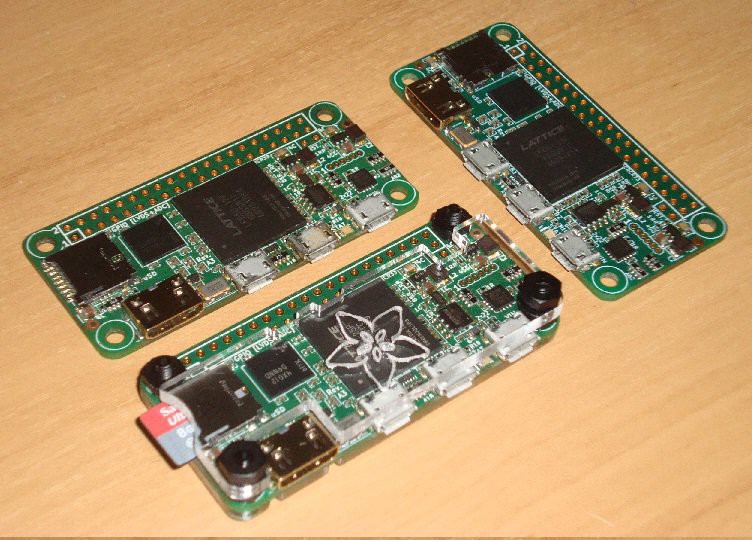
Here are a few close-ups of my Ohm in the rather slick-looking (in my humble opinion) transparent Adafruit case :)


So, this effectively concludes the (re)design and prototype test phase of my Ohm project (yay!). Things left to consider are:
1.) How many boards to make initially (which will in part help determine the final unit price)
2.) Finish off my User Guide for the Ohm platform (already begun, but not yet completed)
3.) Uploading of a new Youtube video of my re-designed Ohm board in action! :-D
Kindly keep an eye out for answers to the above in my next project update. Glad to finally get things to this point as it has been a long time coming. Thanks again for reading. :-)
Valentin
PS: Also last month, I hinted at the possibility of a releasing a second board based on my larger Ethernet-based variant. I have decided to create a separate .io project page for it in due course (time permitting)
Hello again :-)
Apologies for my late reply. Winter can be a challenging season for those with inept immune systems.. :-(
While I overcame my health hurdles, in my last blog update you may recall I was to make attempt at building Ohm pre-production boards? Well, turns out the PCBs that I had received were indeed of an inferior quality :-( So I am now in the process of moving my Ohm board design to another PCB house..
Now, while that was all going on, another major thing happened.. I basically had another crack at building a pi zero sized FPGA devboard again. Here's the result - (re)introducing my 'Flea Ohm' board! :-)
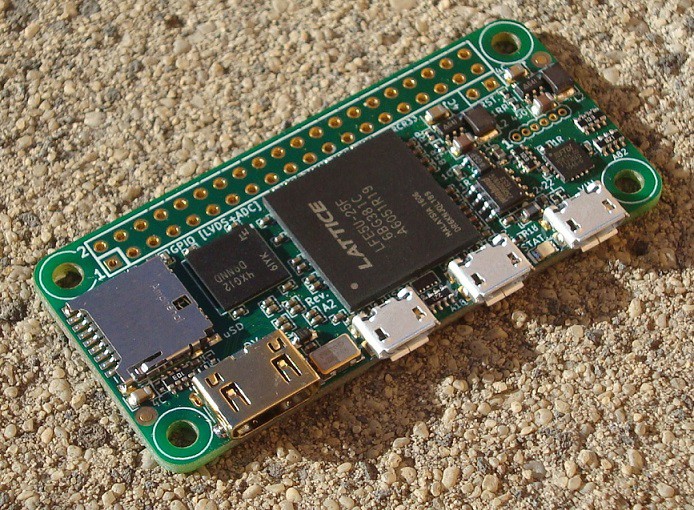
.. and here it is running a test configuration in the shape of the Minimig core:
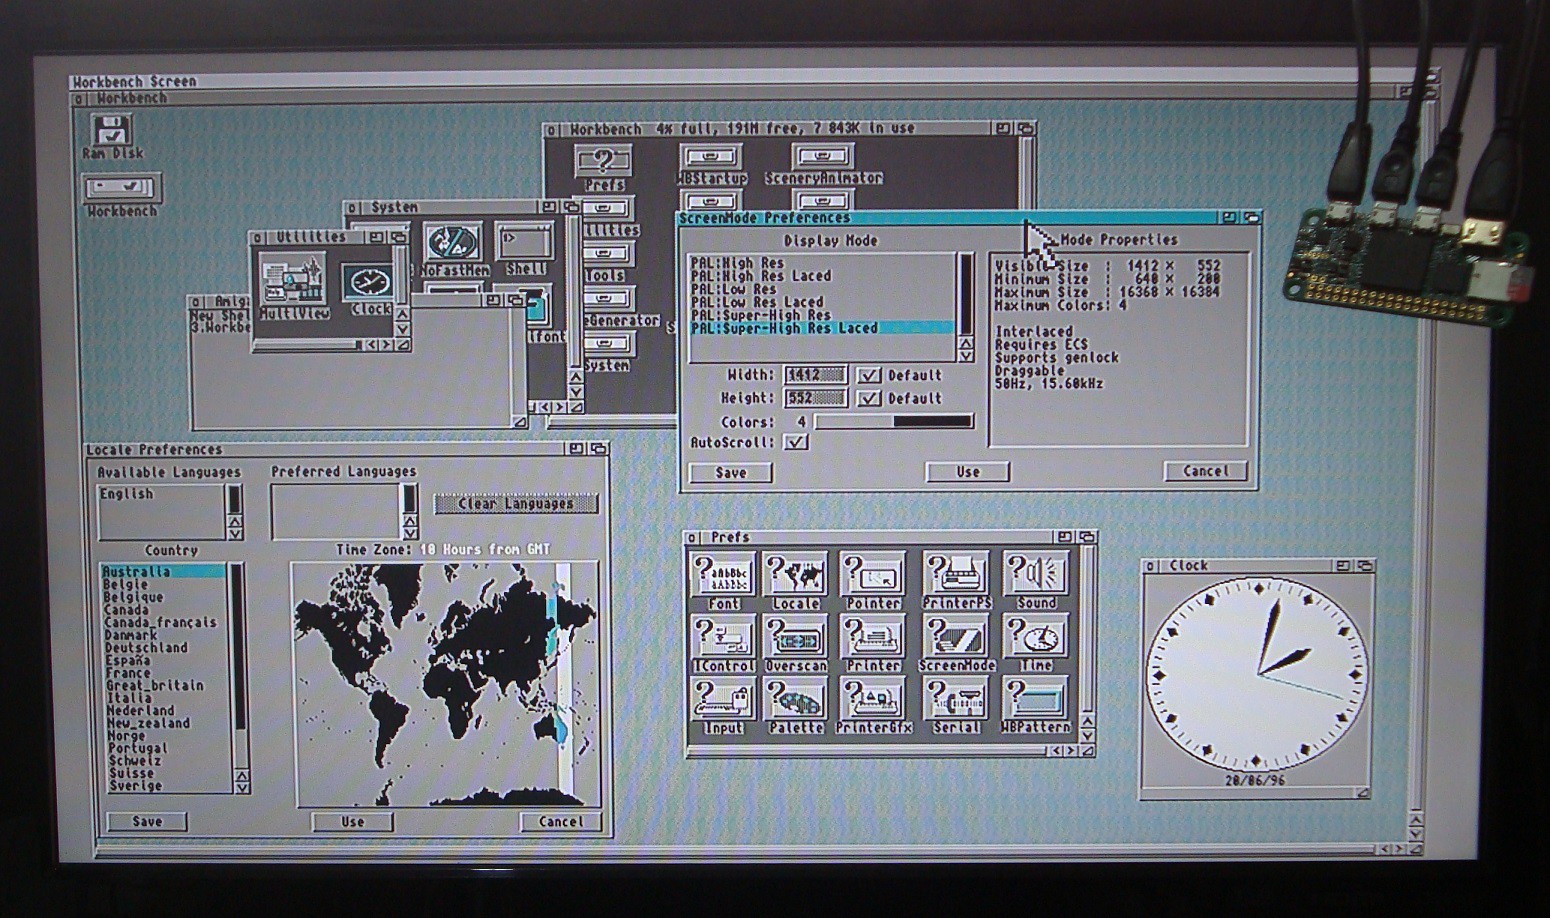
So.. now it looks as though I now have two possible designs to explore further (ie. Ohm and as-yet-unnamed Ethernet variant :-) Time permitting, I hope to do a small run of one or both boards (depending on interest) in the near future.
Thanks for reading! More to follow..
Valentin.
Hello again,
A fair lot has happened since our last blog post. Unfortunately that included getting a chest infection put me out for at least a fortnight - but I am feeling much better now :)
First attempt at assembly of pre-production Ohm PCBs:
So I received my Pre-production Ohm boards and had some fun assembling them. I say 'fun' because it seems I may need to tweak my soldering process for these pre-production ready PCBs. Following is a picture of a slightly overdone pre-production Ohm board (notice the slight charring along the top of the PCB near the main GPIO header):
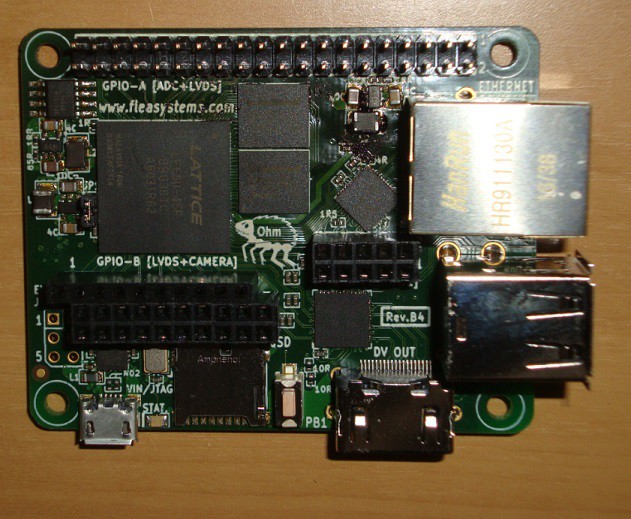
Luckily for me, this board wasn't a total writeoff (only one DRAM failed during functional testing), which is great because I've got a 45KLUT FPGA installed on it.. :) Illness forced me to 'take a break' from any further project work before I could attempt to make any more -
Hopefully I will be more successful in my 2nd attempt tomorrow :)
My first Ohm 'hat' (yay! :-)
Also, I managed to assemble my retro game 'hat' for Flea Ohm! Not 100% tested yet, but at least the PS/2 and Game ports worked fine with the overcooked Ohm board in the previous pic ;) There are even more interesting hats to create (and even the retro gaming hat can of course be improved on..) but hey everything has to start somewhere heh :-D
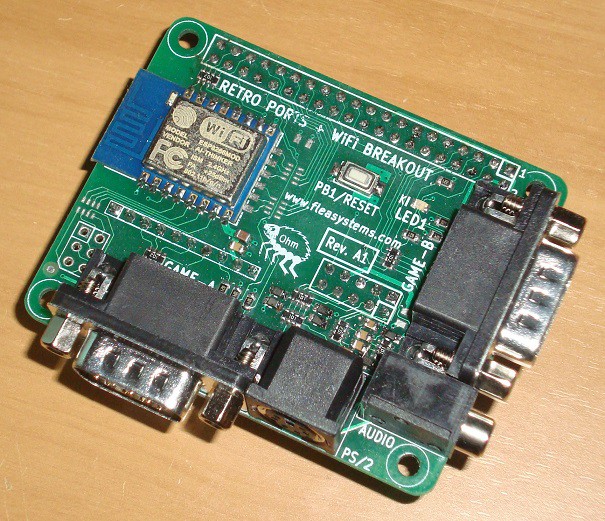
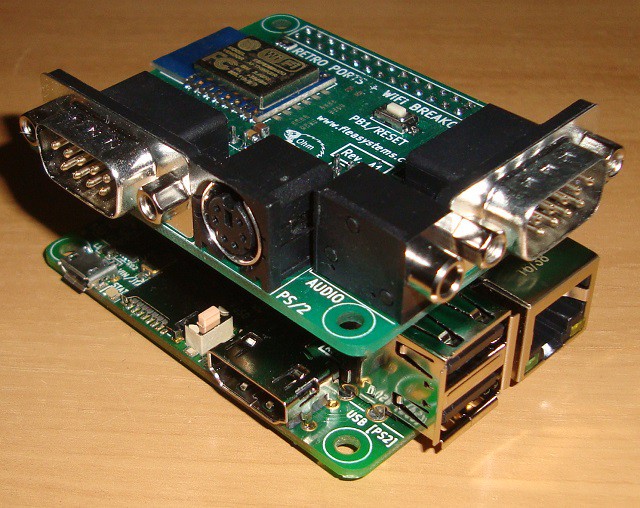
I did not have any ESP-12E modules on hand, so I slapped on a plain old ESP-12 instead. I will need the 12E variant if I want SDIO, but I may instead move on to an ESP-32 version as I previously wanted to - time permitting of course.
Re-rise of the pi zero variant??
Another thing that happened before I got sick: Now all of you may remember this project of mine started out as a pi zero sized board? Well I have definitely not forgotten about it! About a month ago I had decided I was going to have another go at making a zero-sized fpga board - this time using the physically larger FPGA package as used in my current Ohm:
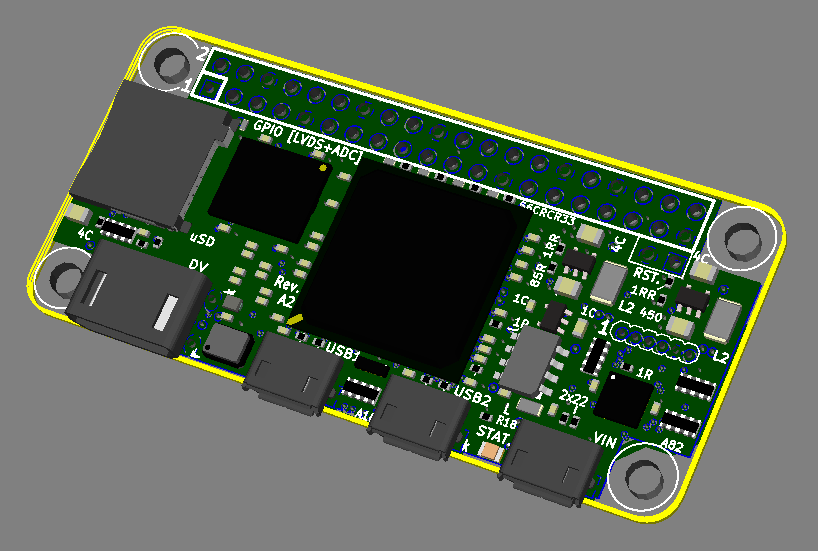
(To be continued.. :-)
Hello again! :)
While I eagerly await on (what I hope to be) the final revision of my Ohm board, thought I'd drop one more update here..
1.) OV7670 module testing went well :)
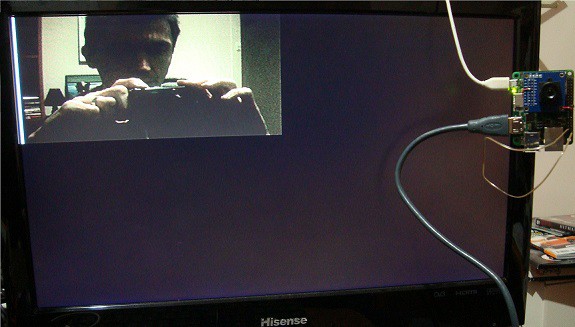
2.) Fixed a few more minor errors with the PCB, as well as tweaked the following specs:
3.) Started work on my very first (and relatively simple) 'hat' for the Ohm board - a 'retro ports breakout' hat containing:
Looking forward to seeing the final boards when they arrive (hopefully) by next week's end (I hope I've covered everything..) More to follow!
**** EDIT 09/06/2017: For reasons mainly relating to time, I have decided to use the ESP-12E module (ie. ESP8266) for Revision 'A' the retro breakout hat (and possibly move to ESP32 for later versions when I am in a better position to support it). I have the following interfaces wired up from the ESP to the FPGA:
Both expansion hats and pre-production Ohm boards are almost ready to be shipped back to me. Next week will be an eventful one.. ;-) ****
Hello again! :-)
Well a few things have happened since my last update. Since that time, I ended up having two second-round prototypes built: one with 10/100 Ethernet and another with Gigabit Ethernet. Pictured below is the Gigabit Ethernet version (with and without user accessory modules plugged in):
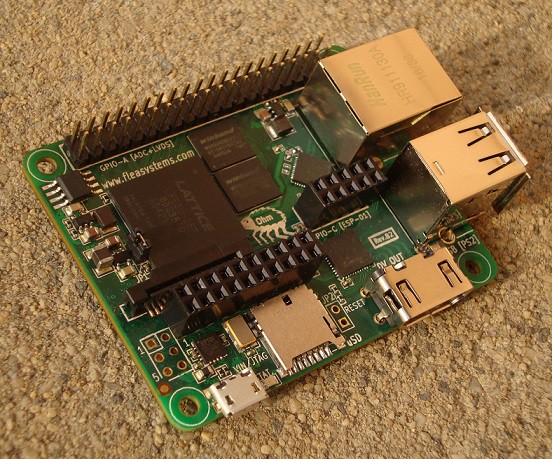
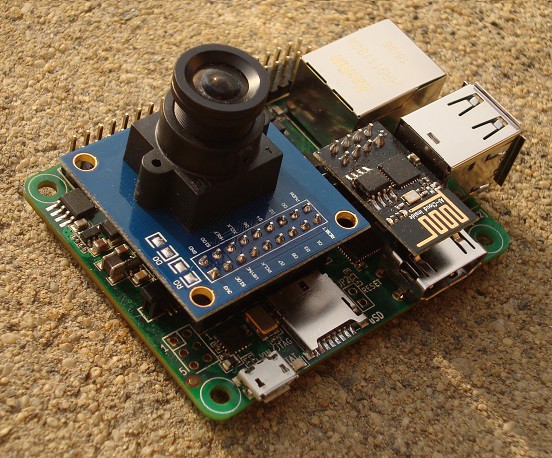
Ethernet tests: This one was a pleasant surprise - wasn't expecting my Gigabit variant to work (was still happy to release the 10/100 variant if it did not work..), but work it did! :-D Gonna do some more testing on it, but I have decided to upgrade the spec. to include it in the final board..
CSI port testing: Didn't go so well.. After finally getting around to diving into this in a major way, I discovered my solution to be unsatisfactory due to problems with shared i/o pins for csi and parallel camera support :-/ Therefore, I decided to delete the CSI port and instead focus on parallel CMOS camera module functionality (but with the possibility for CSI support via 'SLVS' configuration of suitable GPIO pins)..
Deleting the CSI header did free up more user GPIO pins (which are always welcome.. :-), so I added an extra single-row header strip above GPIO-B to access the extra GPIO (see below):
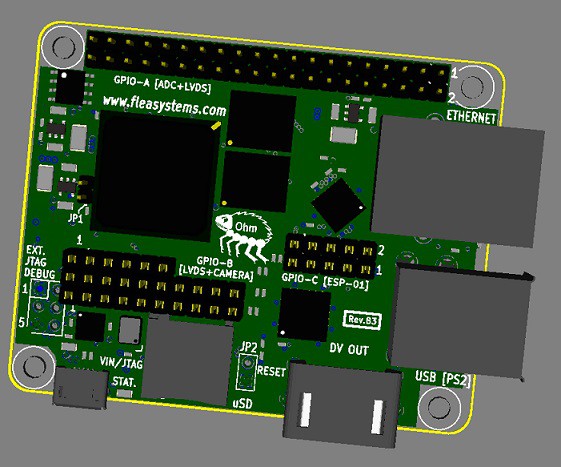
This now leaves parallel CMOS camera and some GPIO-related tests to carry out. To be continued.. thanks for reading! :-)
Hello again! :-)
Quick update on my Ohm project: Prototype testing is now almost complete. Only thing not tested to date was the CSI header, thanks to a silly error that slipped under the radar..
Based on these tests (among other things) I've updated my PCB design to include all fixes and/or tweaks arising from it:
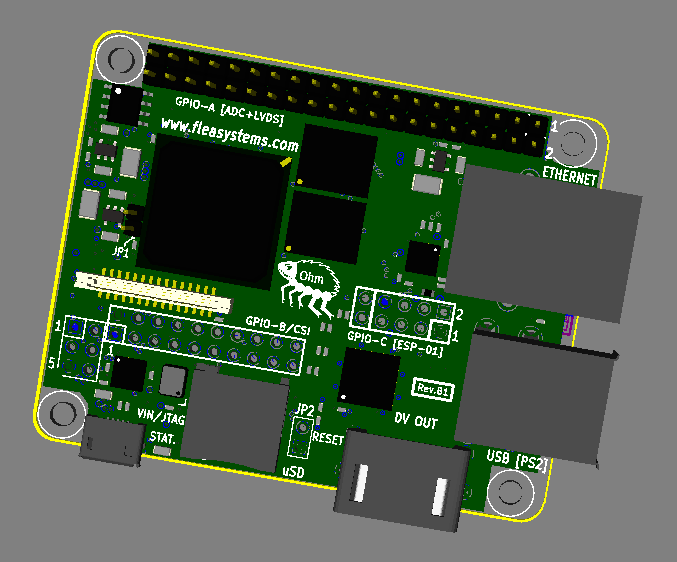 One of the things that really bothered me was the lack of user GPIO breakout. So I increased the GPIO count to 55 user pins total, thanks to the inclusion of a 20-pin 'GPIO-B' header, as well as increasing the pin-count of the 'GPIO-C' header :-D
There were also other changes and tweaks as well - I will write a more comprehensive list of the changes when I have more free time.
Next step: Review the above as soon as possible and see if I can knock one up quickly.. ;-) Thanks for reading!
Create an account to leave a comment. Already have an account? Log In.
Hello James!
Thanks for your positive comments and suggestion. Would be inclined to agree with you around a 'killer app'. Currently I have two possible candidates ported to Ohm: 1.) Minimig ECS (which could be later upgraded to AGA and '020 w/cache) and 2.) Next186 (now with OPL3 FM + Disney sound). Also ported (and extended) for fun were old builds of FPGA64 (C64) as well as my own Sweet32 CPU powered computer..
Regarding your question around the joystick inputs: That is what the GPIO is intended for, yes. Also, those two micro USB host ports are also designed to be PS/2 backwards compatible, allowing existing projects to run nearly unmodified on Ohm. Also cool to try would be adding USB joysticks/gamepads support for some future console project.. :-)
Cheers, Valentin
Do you have any more information on your Sweet32 CPU system? Sounds interesting
Also, any more information about your "giga" version? or is that waiting until after this one?
Regards
@Marq Watkin
Further details about my Sweet32 CPU can be found here: https://github.com/Basman74/Sweet32-CPU
As for my Giga project, I've decided to make a separate project page for it, time permitting (both 'Sweet32' and 'Giga' projects should have their own .io pages, really..). Cheers, Valentin.
Thanks. I'll keep my eye open for the other project pages :)
I'm gonna back the IG campaign... so we plug a micro USb to full USB adapter and a USB keyboard and mouse into the two micro USB ports. Where can we find specs for the GPIO pins needed for DSub9 joysticks x 2 to connect? And more importantly... are we definitely going to get 020/AGA Amiga out of this?
@James
Apologies for the late reply. Thanks for backing my Indiegogo campaign and also for your questions!
To clarify *exactly* what currently works on my board with respect to Minimig:
Minimig (as ported here) is a straight-up port of Minimig ECS with the 576p or 576i video converted to digital video (with audio) out. Minimig ECS uses PS/2 host interfaces for Keyboard and Mouse, meaning only composite USB devices (ie. peripherals that can also talk PS/2) or PS/2 devices (via an adapter) will work with Flea Ohm minimig. It implements an '020+ECS with 2MB chip and 8MB fast RAM, four virtual floppy and two HDD bays. I have run Gloom and ECS Doom successfully on this setup but both run slowly due to chunky-to-planar routine latencies and also the lack of a CPU cache..
I will release a pinout for the Minimig-specific Joystick + serial port from the GPIO header. These will be included when I release the binary bitfiles/sources of my minimig port up on github.
Regarding future improvements ie. AGA:
There is *a lot* of work that needs to be done to get Ohm Minimig up to the level of say, MiST board capability with respect to AGA and USB keyboard / mouse support. (MiST costs what it does for some good reasons, IMHO).
I suppose one current strength of my Ohm board (running Minimig) is the digital video output.
Do I think it is possible to add AGA and USB on FleaFPGA Ohm? Yes I do. Are they trivial matters to resolve? No, they are not.
Given my time is limited (this is a hobby project, after all), my plan is to finish the user manual for FleaFPGA Ohm (which is intended as a general-purpose FPGA development platform) and then get boards into the hands of as many people as possible (including those who know the Amiga hardware a lot better than I do..).
Regards, Valentin
Hello Valentin!
I'm glad your project is back and alive! It's amazing, thank you so much for it!
Do you intend to sell the Ohm Board anytime soon?
Thank you!
Hello Marcos!
Thanks so much for your interest and kind words :) Do check out my latest project log - if my latest PCB revision arrives working as intended I will consider that a production-ready board :)
At this point, I am considering doing an immediate limited run to see if there's some real interest - will reveal more details in the next project log. Thanks again!
Valentin
Hello Antti!
My 'Mk2' reference relates to the fact I moved away from a raspberry pi zero form factor (and towards something with a more readily available FPGA and also a bit more growth potential :-).
Cheers, Valentin.
PS: Interesting.. thought I had registered my 'like' for your C65 project but that doesn't seem to have occured - fixed! :-D
what's the max 8 bit input rate of the gpio on flea ohm? and where can i guy one?
Hello! Good question. I've not tested maximum *input* data rates via the GPIO header yet, but suspect it may be in the ballpark of 100MHz (or possibly more, need to test). This is assuming the following:
1.) Data transfer occuring via a direct board-to-board connection, not via a ribbon cable..
2.) Single-ended data only i.e. not using the available lvds differential signal pairs which are also available via the main header and should provide much faster data transfer rates (again, needs further testing).
As for buying an Ohm board: Unfortunately I've had to completely redesign my board, due to non-availability of the FPGA I had previously used in my initial prototypes :-/ Feel free to check out my latest blogs about it. Cheers.
How much data can you squeeze out of the HDMI?
FHD@60Hz?
FHD@90Hz?
...
Hello Lars and thanks for your question.
Highest screen mode I've successfully attempted with the Ohm's video output was 1080p30 (i.e. 30Hz progressive). Of course, this means that anything below that i.e. 480p, 720p, 1024x768@60Hz etc. etc. should also work as well.
I did make an attempt to output test video at 1080p50 (50Hz). Unfortunately the image quality did not appear entirely stable, presumably due to FPGA timing limits being exceeded by a significant margin.
A great project - two usage ideas
(a) use the board to recreate sound chips such as NES, SID or a OPL3 for distinctive sounds - attach a music keyboard to the usb or the io pins
(b) convert the cores from the MIST project (https://github.com/mist-devel/mist-board/wiki) for a wide variety of reimplemented consoles and computers
Two questions:
(i) can an audio jack be attached to the io pints?
(ii) Can it load HDL fpga cores from the sd card (for easy conversion to another project) or can it only be converted using a pc?
@D H
Thanks for your interest in my Flea Ohm project.
Regarding your suggestions: (a) I would love to see OPL3 added to Nicolae's Next186 SoC (alas I have not yet done it myself as I only know VHDL well). Apart from Amiga and x86, I did successfully attempt a port of an old build of C64 softcore (with SID) to my Ohm board. (b) My own personal free time is rather limited however, so any outside help in this regard would be welcome.
My answers to your questions: (i) You would need to add an RC (or LC) filter circuit between the GPIO pin and your proposed audio jack. (ii) Currently, the FPGA's config ROM can only be altered via an external PC. By PC I also potentially mean a Raspberry Pi (zero?). I *think* the flea JTAG utility app. could be recompiled for ARM but I would need to confirm that.
While it may be theoretically possible (assuming the user's hardware design allows it) to transfer a new config ROM image to the FPGA in "background mode" from the SD card, it would be somewhat tricky and cumbersome to implement. You would also need to cycle power to the FPGA in order for it to accept the new ROM configuration.
Cheers, Valentin
Hi,
Your board looks nice.
I want to design one myself using Xilinx FPGA. I want to use Spartan 6 xc6slx25 or some equivalent Atrix 7.
If you have any suggestions on what i should add on it, something that maybe you forgot and you wanted to add.
Best Regards,
Daniel
hello,
Love your work and need an FleaFPGA Ohm+ for a future Amiga projekt. Amiga in a joy (like the C64 in a joy butt WAY better).
Any ideas on what it will cost? I reeeeeealy whant one ;-)
Hello Fredrik!
Thanks for your interest in my project and question. I also like the idea of an Amiga-in-joystick, but instead I built an "Amiga-cube" ;-) Picture of my "Amiga-cube" can be found in the gallery.
Currently focussing on Ohm (not Ohm+) board production due to the following things it has going for it:
1.) List of working HDL projects already ported to it.
2.) Possibility exists for a "sub-USD$40" FPGA development board (still working this one out currently. More soon).
Cheers Valentin
Great project! A quick question on the assembly: if I understood properly you self assembled the boards, is that right? I am just wondering how you dealt with the BGA packages? I am planning to make an FPGA board, and it would be great to be able to use BGA packaged chips - but I suppose it means going to a 4 layer board... And I don't have a reflow oven...
4 layer is not much more than 3 layer. And this is already tough for BGA: Vias consume the space below the package on the bottom layer. Assuming the 2nd layer being GND, your 3rd layer is for at least two VCC-voltages that connect to various balls, need to be routed to the package and require decoupling. So, it is hard to have a reference plane for signals on the 4th layer (bottom), which leaves you with one good layer for signals: top layer.
Thank you for the comments! I guess I am wondering how many layers in practice would be required for a board like this - is it doable with 4 layers or you think one needs more?
Erik, this highly depends on how 'intelligent' the pinout of the BGA is and what you need. I don't know the ECP5. In theory, with a very good BGA pinout, it is possible to connect LPDDR... with 4 layers. However, with the ICs I used so far, it was a pain even with 6 layers. If you are also satisfied with SDRAM with a reduced pincount interface or with Hyperram, you are probably fine with 4 layers or even less. However, for both options (reduced pincount SDRAM and Hyperram), there are no Hard IPs on current FPGAs.
Hello Erik! You are correct in that I assembled my flea Ohm prototypes by hand, but not without difficulties associated with various things.. including placement skill. I found that accurate hand-placement of a 0.5mm pitch BGA package or type 0201 SMD capacitors requires taking into account things like hand tremors as well as one's own heart beat! Tricky stuff...
My advice would be to go with something like 1mm ball-pitch BGA imho. In addition to the easier assembly, these are normally a much cheaper option when you factor in the PCB tooling cost as well.
Also, Lars was fairly accurate with his reply. Anyways, best of luck with your project.
Cheers Valentin.
Hello Valentin, thank you for your comments! I think it is impressive that you we're able to put the boards together by hand. I guess difficulties are to be expected when dealing with those fine pitch parts. I was previously thinking that BGAs are pretty much out of the question for hand built hardware, but clearly that is not exactly the case. Anyway for my next step I will probably stick to TQFP parts, as the Xilinx part XC6SLX9 I'm planning to use is available in that package. Going to bigger parts would automatically mean going to BGA, hence the question.
Cheers, Erik
Excellent! Me want :)
When are you going to offer these on the market?
Hello and thanks for your question.
I plan on testing my newly updated boards when they arrive next week (as shown in the diagram on my 2nd project log). Once the boards pass their functional testing I will look at what it might cost to do a production run of Flea Ohm boards. Also note that I will ultimately be evaluating two board designs: FleaFPGA Ohm and Ohm+ :) Cheers.
Hello Valentin, you can count me in for a FleaFPGA Ohm+ :)
Didn't have much done lately with the FleaFPGA Uno, but I have some ideas in which the extra LEs and LPDDR RAM would come very handy
Oh and can you beef up the HDMI 5V output a bit? I had to add a wire from the USB connector 5V to the HDMI connector 5V out on the FleaFPGA Uno to get my HDMI2VGA adapter working with it
Hello Claude! It has been a while but good to hear from you! :)
Thanks for your suggestion - For the sake of compatibility it is a good idea. I was previously made aware of the issue through some recent online research (that unfortunately did not make it into these prototypes, but that is OK since there will likely be another PCB re-spin for various reasons). I will see to it that my next board revision have an auxiliary 5V feed to the video connector, among other incremental improvements. Cheers.
Hi, Valentin, about the ADC, is it build into the FPGA or it requires extrac ADC chip?
Bests!
Sounds like it is a sigma-delta ADC - probably single bit comparator using a differential input on the FPGA. The rest is DSP math to get more bit in return of lower conversion speed.
Hello Qiang! As K.C. has suggested, the ADC is sigma-delta based with nearly all of the ADC's logic implemented in the FPGA using VHDL. As I did with my previous FleaFPGA Uno project, I included the external passive components on-board needed to complete each ADC circuit. Cheers.
Interesting! 250M samples/second scares me. After second reading, it is for 1 bit but still impressive.
Just a reply to your comment about Flea Ohm's maximum ADC sample rate - my 250MSample/sec quote was purely theoretical (and not realistic in practice given the loop filter values used in the design - that's what I get for drawing my diagram late at night :-). I have since updated my diagram to provide more realistic possibilities with the ADC inputs.
Further, these ADC inputs admittedly won't be quite as accurate as a dedicated external ADC, but for a good number of applications they'll probably do just fine. Cheers.
Do you have a schematic for the board? I'm interested in how the HDMI port is wired.
Hello Tim! I've not yet released schematics for flea Ohm (soon though), but you will find the video out interface to be virtually identical to that found on my FleaFPGA Uno board. More information on FleaFPGA Uno (including schematics) can be found here: http://www.fleasystems.com/fleaFPGA_Uno.html Cheers.
Become a member to follow this project and never miss any updates
By using our website and services, you expressly agree to the placement of our performance, functionality, and advertising cookies. Learn More
This is brilliant...and if you can make it lower cost than the competition it will definitely sell out a production run. My suggestion would be to have at least one core fully optimized on release, with a plan (published) for more. Obviously the Amiga looks like that core but the AGA core and fast CPU should be there preferably. Q: With 2 micro USB ports (and one for power?) one would do keyboard, one mouse but what about joystick? From GPIO or from USB hub?