Introduction & Rationale
Modern Digital Oscilloscopes have amazing capabilities and budget prices, but it seems the user interface is never right. Adjustment knobs lag, and key front panel controls from the analog era may be buried many menus deep. What self respecting hacker doesn't regularly think "what I wouldn't give for a weekend with the source code to make this what it should have been!"
But what today's scopes typically do offer is a USB (and/or Ethernet) connection, which allows remote control via SCPI commands - basically GPIB tunneled over USB. These generally show up as a USBTMC peripheral, and while there are quirks there's a fair degree of capability to not only capture screen shots, but change or script settings - including from a variety of open source projects that work on Linux or the host of your choice. But a computer seems like overkill just to turn the trigger holdoff back off...
Embedded USB Host
Last summer I designed a small board around the Kinetis KL25Z, an ARM Cortex M0+ processor that can be either a USB Host or a USB device. That board never got beyond proof-of-concept in its original role, but it occurred to me that if the USBTMC protocol were not too complicated, I could use one of these little host boards to let buttons send custom SCPI command sequences to my scope.
Some testing with terminal-type USBTMC control programs confirmed that some (but sadly not all) of what I wanted to make the scope do could be accomplished with available commands. Wireshark showed the USB traffic to do so to be relatively simple, but ultimately it was the combination of a few captured transfers as examples, along with the USBTMC specification for reference, which got things going on the embedded implementation this past weekend.
Another great thing about the ARM Cortex architectures being so widely licensed is portability - along the way, I did some experiments running on an STM32F401 Nucleo as well - only the USB and low level drivers differ, the algorithmic code is the same for either.
A man with an oscilloscope walks into a bar...
With the Hackaday NYC party impending, I cleaned up the breadboard wiring, and wrote some basic functions as a demo:
| F1 | Preferred settings - 1v/division, channel 1 centered, channel 2 low on the screen, etc. Later this was modified to query the channel 2 display status, and toggle it on/off at each push. |
| F2 | Toggle trigger position between the default center of the screen and one division in from the left side. While anti-causal capture is indeed a useful capability, much of the time the interesting details are after the trigger so it's nice to displace it to the left. Some scopes offer a button to do that - this one only has a horribly laggy horizontal position knob. To accomplish this with a custom button, it is necessary to query the timebase, multiply by 5, and write it back as the time offset. |
| F3 | Cycle channel coupling through AC/DC/GND. I'll probably remove the ground option. |
| F4 | Cycle trigger edge through rising, falling, and both |
| F5 | Cancel trigger holdoff, or set it to a random guess of 4 screen widths (this definitely needs work). |
Unfortunately what I have not yet found a way to do is to display a message on the screen, cause a particular menu to display, or even beep (other than by setting trigger holdoff to zero, and letting it correct to 16ns). Looking an manuals of other models it seems this is possible on some - for example, on some older models the SCPI commands could be more virtual front panel buttons, and less a set of functional commands.
Details of Prototype
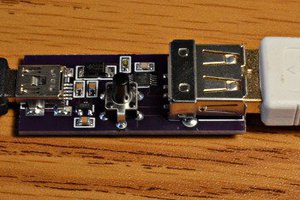
The small PCB on the left of the breadboard (yes, that's OSH Park purple) is my custom KL25Z64 circuit, assembled with a USB "A" socket soldered on the back side to host and control the scope.
An optional second copy of the board, seen on the right end of the breadboard, was assembled with a USB plug on the components side instead, to operate in USB device mode. Loaded with CMSIS-DAP firmware, it functions as an SWD adapter for flashing...
Read more » Chris Stratton


 Thomas Bladykas
 Paul Stoffregen
 worsthorse
Thanks RoGeorge! It is indeed too bad that my scope doesn't support the TEXT command.
On my near term to-do list are a 3d printed housing to sit on top of the scope, and somehow snap in under the handle for attachment. Probably I'll put the buttons on a surface at a 45-degree or so angle. Also, given the lack of TEXT capability I may include some sort of small LCD/OLED display, or perhaps RGB LEDs at each button.
It seems like the natural form of the idea would indeed be with open-source firmware - can't really imagine the prime audience for this kind of thing going for anything else (after all, such a gadget is only necessary because the scope's firmware is closed) and anyway it is hard to come up with a scripting scheme as ultimately flexible as modifying the source.
Presently though the code is a "hacked together under a demo deadline" mess, so I need to clean it up. Also, I'm trying to decide what USB host stack it makes most sense to base it on long-term, and toying with the idea of switching to an MCU with dual USB peripherals in the hopes of creating a pass-through mode.