Bradley Worley
-
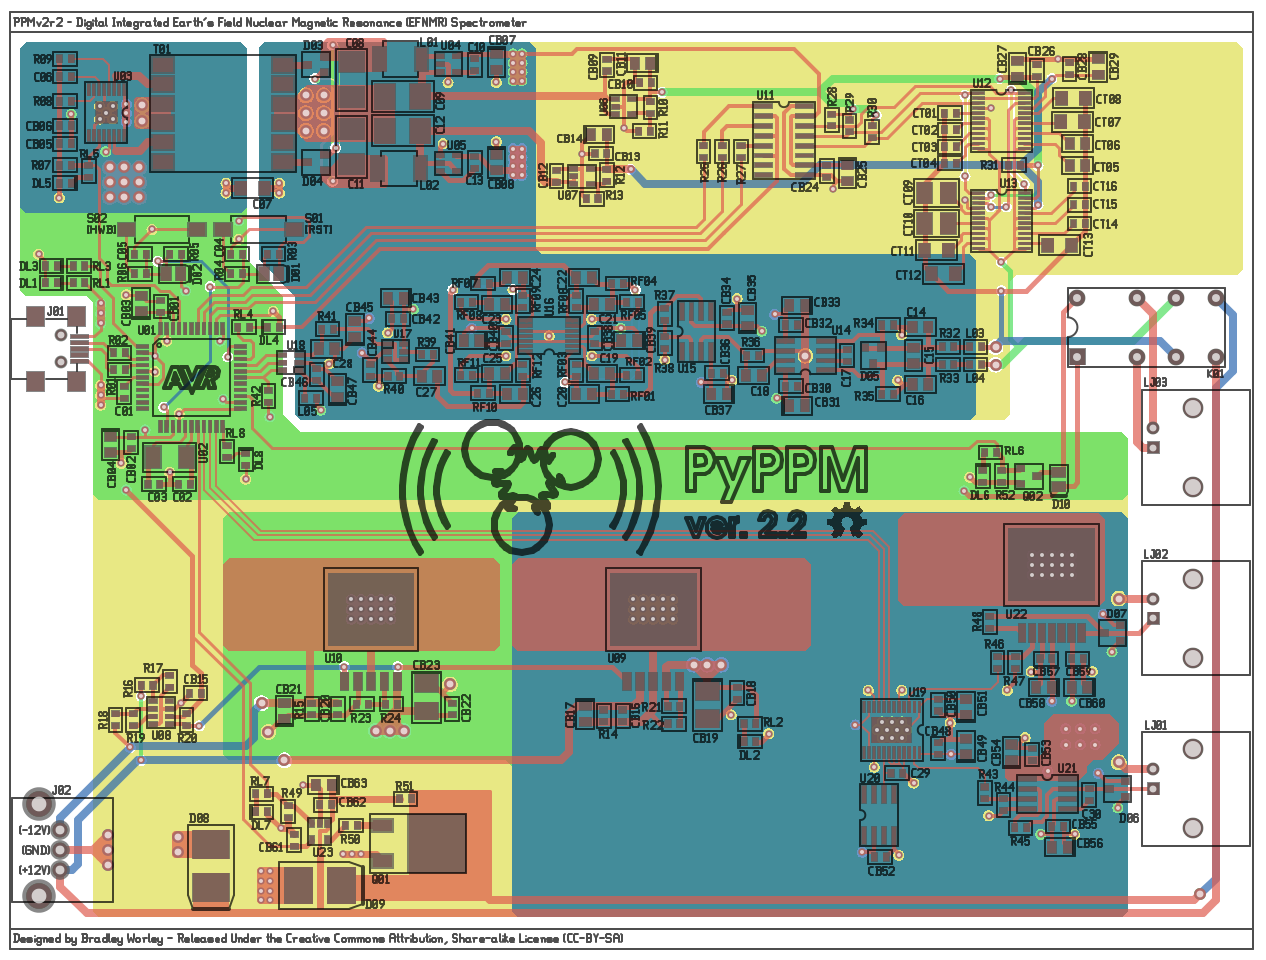
PyPPM 2.2 is born
10/06/2014 at 15:47 • 0 commentsThere's a crick in my neck from staring at these monitors too long yesterday, but it's the necessary pain from re-working the entire PyPPM 2.1 design into a new set of schematics and board files: PyPPM 2.2!
![]()
There are a few big changes and a smattering of subtle changes in the new design:
- Corrected -2.5V regulator pinout: I had screwed up the pinout on the adjustable version of the LT1964 low-noise regulator, and had to bodge in a fix on the PyPPM 2.1 board. This is fixed properly in the new design.
- Changed dual SD101A's to BAV199: The input protection diodes in the instrumentation amplifier section have been changed to lower-leakage, lower-Vf SOT23 parts to improve signal chain performance.
- Fixed part numbering scheme: This was driving me crazy, as I'd been continually adding and removing parts and renumbering in random ways. The parts now follow a logical ordering based on their appearance in the schematic.
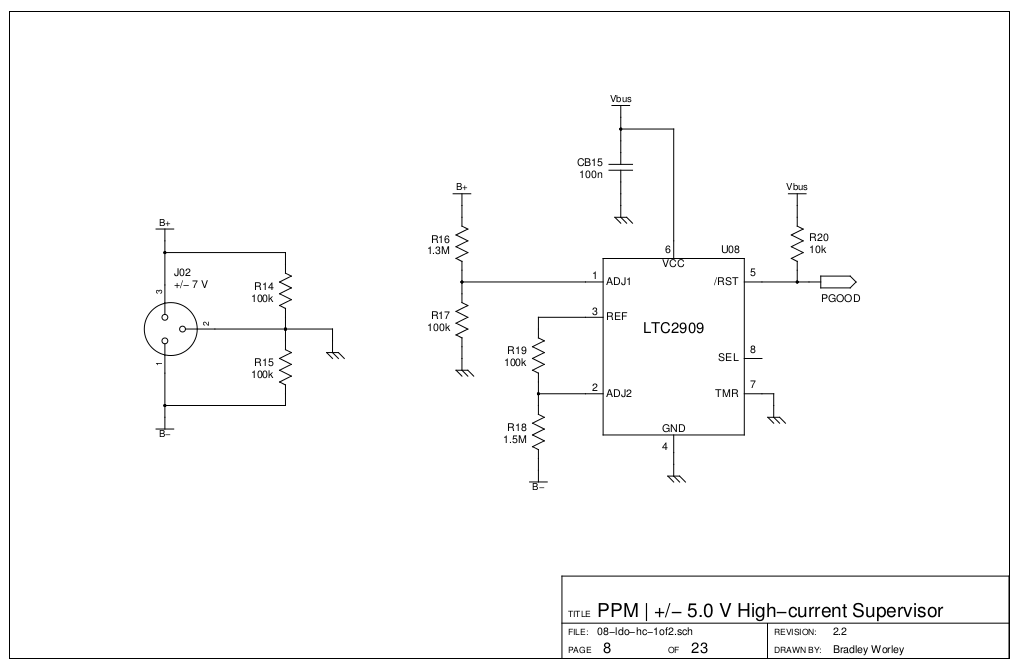
- Added +/- 5V rail supervisor: Now, the only way that the high-current +/- 5V regulators should start up is when (a) there is USB power and (b) there is at least +/- 7V applied to the regulator inputs. I was getting annoyed by the LT1763A "starting up" from leakage alone without an input voltage.
![]()
All the changes add up to a more robust hardware platform that's easier to build and maintain.
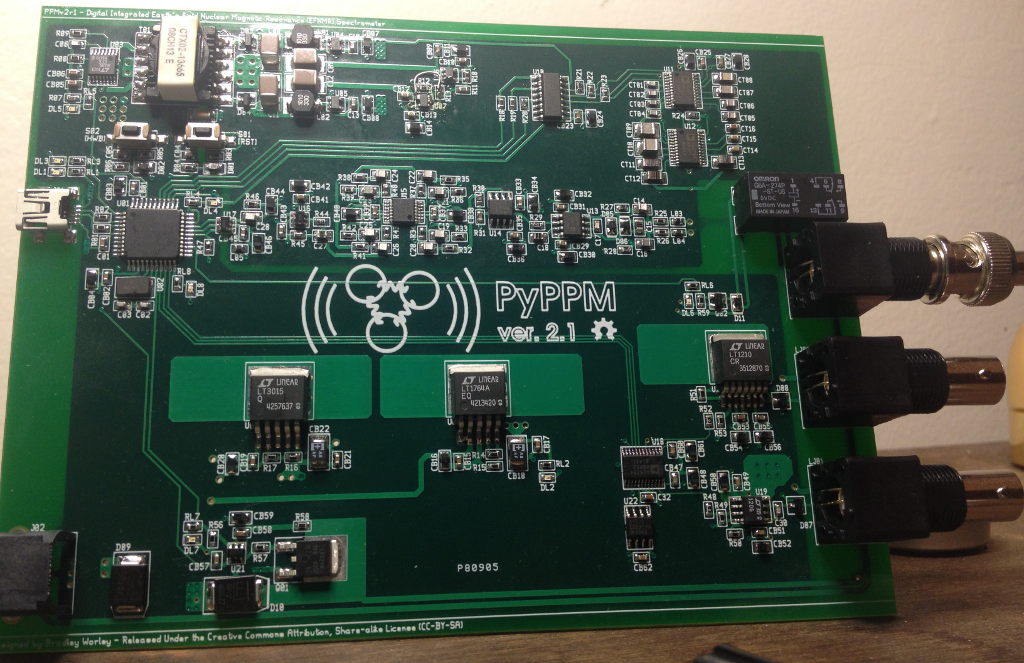
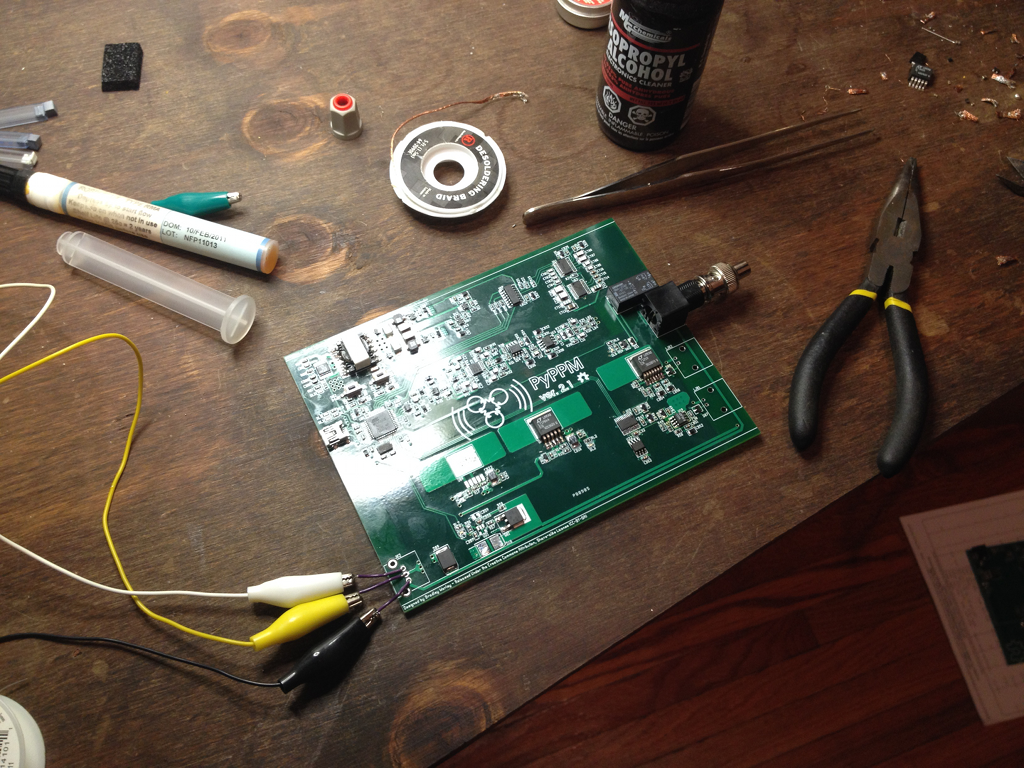
Oh! I also finally soldered everything onto the PyPPM 2.1 board:
![]()
Isn't she pretty? :)
-
Capacitive tuning is working!
10/05/2014 at 02:14 • 3 commentsAfter bodging in the correct connections to bring the -2.5V rail up (or down?) on the PyPPM 2.1 board, I finally got digitally selectable capacitive tuning working in the firmware and software.
The idea behind tuning is to place a capacitance in parallel with the sensor coil such that the resultant LC tank circuit resonates at a desired experimental frequency. Most devices have used manually adjusted capacitor banks or variable caps, but the PyPPM uses a digital control scheme that provides 64k unique capacitance values.
Check it out:
If everything goes well, I'll be able to run a field test soon of the non-adiabatic pulse program with and without tuning to show the performance in a real-world setting.
~ Brad.
-
The first data from PyPPM 2.1!
10/01/2014 at 15:11 • 3 commentsI've been ironing out the wrinkles in the new PyPPM firmware, and I finally have the assembly-based acquisition and delay routines working.
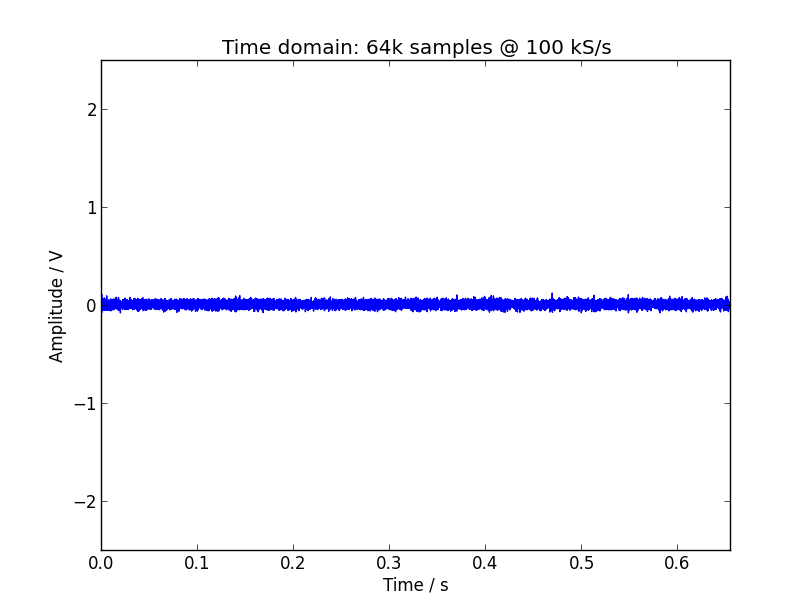
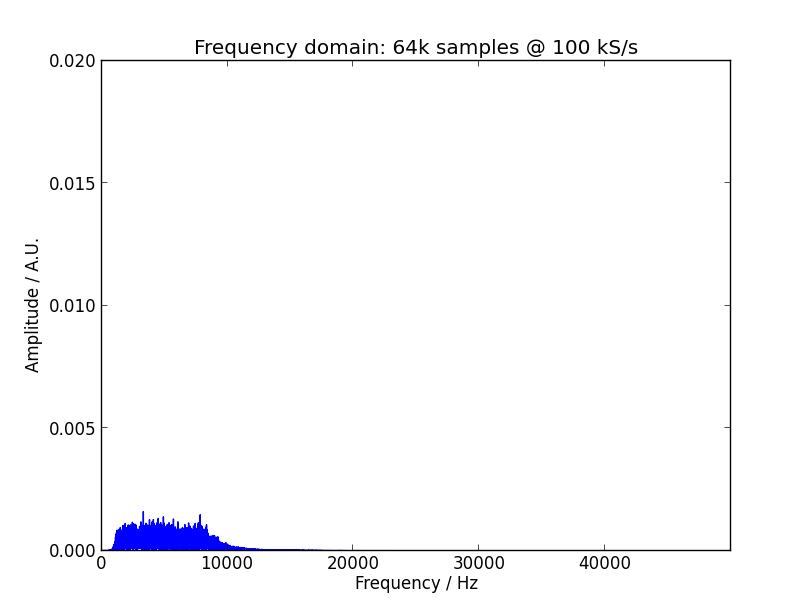
One nice thing about assembly is how fast I can read data from the ADC now: 100 kS/s and PyPPM2 doesn't even break a sweat! Check it out:
![]()
And now the frequency domain shot...
![]()
This is with a 50 Ohm terminator on the input BNC connector. I couldn't be bothered to get the real frequency-domain units. Maybe another time. :)
Until next time!
~ Brad.
-
PyPPM "Artist's" Rendition
09/29/2014 at 00:54 • 0 commentsOh boy, calling me an artist is rather charitable... :P
Nevertheless, here's a sketch of what the PyPPM should resemble once it's completed:
![]()
Since the bulk of the design is housed in a Hammond aluminum case, it's pretty basic. A box, a few inputs and outputs, a computer, and that's it!
-
Pulse programs are here!
09/24/2014 at 21:30 • 0 commentsHey everybody! I'm back from a 96-hour coding binge with some amazing new PyPPM features to give you, in the form of pulse program support.
Pulse programs are the software glue that brings all the new features promised in the PyPPM 2.1 hardware together in a powerful way. I've also back-ported them to older hardware/firmware versions, so you can write one pulse program on the v1r3 hardware, and then immediately run it on the v2 hardware if you choose to build it. Cool, huh?
Finally, because pulse programs are tricky little beasties, I'm starting to compile a library of known-to-work programs that can be used with PyPPM.
Let me know what you think!
~ Brad.
-
PyPPM 2.1 Speaks! :)
09/20/2014 at 19:29 • 0 commentsIt seems that I was a bit pessimistic when I said that the USB stack would need rewriting for the PyPPMv2. With one extra flipped bit in an AVR register, the PyPPM 2.1 sprang to life over the USB port, and even said its first words:
$ ./ver
VER: 2.1Aww, how cute!
Of course, while the new hardware is talking over the USB, it's still "broken" with respect to the traditional PyPPM version 1.x host-side software. It's all because of the new pulse programming features that will go into the new designs: while previous versions of PyPPM had a canned, hard-coded sequence of operations that was followed for every experiment, the v2 will be much more flexible, taking any user-defined sequence of commands and executing them. So, instead of having a short list of acquisition parameters, the board will take instructions that contain the required parameters.
The fun part? The host-side software wasn't written that way. At all. To remedy this, I plan on back-porting the pulse programming features of PyPPM 2.1 into the older firmware source trees, effectively doing away with acquisition parameters on all PyPPM devices and ushering in pulse programs for everyone!
It's definitely a long-term goal, and not something I plan to accomplish before the prize deadline. But still post-worthy, eh?
On that note, I'm planning on putting out a Part 2 video on PPM/NMR concepts this weekend, and also a final 'working product' video of PyPPM 1.3 that includes a complete screen cast of the host computer during the experiment.
~ Brad.
-
I'm on a Markdown rampage!
09/19/2014 at 20:59 • 0 commentsHey everybody! I've been writing README.md markdown files in the PyPPM GitHub repo for the past few days now, so hopefully everything in the repo will make more sense for the intrepid souls who choose to venture therein.
Every subdirectory of the main tree now has a README.md file that describes the contents of that subdirectory, and the main tree README details top-level details of the project.
Feel free to check out the GitHub repo for PyPPM, and please let me know what still needs more explanation. I'd really like the documentation to be useful. :)
~ Brad.
-
So I'm tagging PyPPM as completed...
09/15/2014 at 19:21 • 0 commentsHey everybody! I got the PyPPM v2r1 board assembled over the weekend, check it out...
![]()
Of course, I ran into several issues. For you schadenfreude enthusiasts, here's a quick rundown:
- Incorrect -2.5V regulator pinout: I had failed to notice that, while the LT1761-5 and LT1761-SD have the same pinout, the LT1964-5 and LT1964-SD don't.
- Swapped feedback resistors on high-current -5.0V rail: I chased my tail for an hour trying to figure out why I was getting -1.5V from the regulator. Turns out I had the feedback network backwards.
- ID10T: I managed to short the +5.0V high-current rail to ground with a bit of stray solder across a bypass capacitor, and ended up releasing magic smoke from an LT3015, several tantalums, a FAN3111 and two diodes. Good grief...
The good news is that everything has been fixed in the schematic and board layout, and the changes are already pushed to GitHub. :) However, I will need to perform some ugly solder hackery to resolve the footprint issue on the LT1964.
To make things even more interesting, the firmware I had prepared for the PyPPMv2 didn't even set up USB communication; the two AVR's are just different enough that I'll need to spend considerable time rewriting the new firmware.
Long story short, while work on the PyPPM project will live on in PyPPMv2, I'm calling PyPPMv1 a finished project, really just for closure's sake. :P PyPPMv2 brings several new and exciting features to the table, but if you're looking for a basic, working Proton Precession Magnetometer, PyPPMv1 is a perfect fit!
-
A quick vid of PyPPMv1 in action
09/08/2014 at 20:07 • 0 commentsHey everybody! I filmed a bit of video on the use of PyPPMv1 in real life. It's pretty impromptu, and the sun kept us from getting good shots of the computer screen, but it captures the main points of setting up PyPPMv1 to take measurements. Check it out...
Oh, and here's another! This one goes a bit more in depth on specifics. If you watch to the end, you'll see just how easy it is to use the Python API for PyPPM.
Let me know if there's anything about using PyPPM you'd like clarified, by the way. I'll be happy to make a new video!
~ Brad.
-
NMR/PPM Concepts - Part 1
09/08/2014 at 03:24 • 2 commentsHey everybody! I finally got around to making the first video on what will probably be a three-part set on the fundamentals of NMR, PPM's and PyPPM.
I tried to keep it as simple as possible, without clouding the waters with too many equations. Please let me know if you have any questions, comments or requests!
Also, I'll post a short demonstration video of PyPPMv1 tomorrow, so stay tuned!
~ Brad.
PyPPM: A Proton Precession Magnetometer for all!
A device for conducting Nuclear Magnetic Resonance experiments at Earth's field