This is really a simple hack; a few quick casemods and rerouting the ground and signal wires on each side. Nonetheless, it's a visible hack that gets quite a few kudos.
Wearing behind-the-ear hearing aids doesn't work very well with most headphones (and earbuds not at all). Wires get in the way, so even the cables made for hearing aids aren't an ideal solution. Creating an improvement over these issues is what this hack achieves.
I first completed this hack in early 2009. That initial pair
stopped working on one side 3 or so years later. I have three
functioning pairs currently, allowing for swapping if a battery runs out
(9 hours of battery life, or so).
One of the biggest perks is that my hearing aids can toggle to a
program that disables their built-in microphones. Thus I get music nice
and clear while effectively wearing ear plugs. This was particularly
great when I still had to mow the lawn during the summer! Or when using
public transportation. Having the audio in both ears is particularly
useful for phone conversations as well.
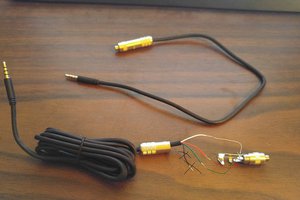
Some details from the first image:
1) A mono jack is added to each earphone. A short custom cable plugs into the jack.
2) The custom cable terminates in a "standard" (only extant in the HA industry) DAI cable. DAI stands for "Direct Audio Input."
3) The DAI connector plugs into an adapter on the battery door of my Phonak hearing aids.
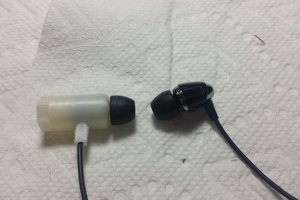
4) Modifying the DRT-BT22 headphones this way requires visible exterior modification.
5) The larger DRT-BT101 headphones allow for fully enclosing the jack. The added size does not work so well for wearing these around the neck, though.
The second image shows the simple wiring that is involved in the connection to the hearing aids. The resistor is important, otherwise stuff will be far far too loud. I generally use 270kohm, while 330kohm is used in the y-cable available from Phonak. Oddly, other suppliers often don't include the resistor. I can only surmise that the devices that DAI connectors are intended for are low power, since they don't need to drive speaker elements.
The third image shows after and before; electrical tape separates the PCB from the epoxied audio jack. On the other side, which contains the battery, there is more space to work with.
The fourth image models their usage...
The fifth image shows the wiring going through helpful pre-existing holes. Initially I preserved the original headphone capability (audio jacks are a physical switch that is opened when you plug in something), but I never actually used this mode. With later headphones, I saved some effort by just directly wiring the jack to the PCB.
The sixth image shows the epoxy holding the wire and chopped-off DAI connectors together. (See also: before, pre-epoxy) The DAI connectors are a PITA. I only have one cable for each ear
currently. DAI cables are generally $50+, thanks to low economies of
scale and perhaps being so close to being a "medical accessory?" Did I
mention that the wires are nothing more than insulated wire, a stereo
connector, and the nonstandard DAI connector? ($5 of parts tops...) I
have ideas for making the DAI pins myself, but have not gotten around to
it.
There is a lag in the connection, as with any bluetooth device. In practice this doesn't bother me in games or watching movies.
 Gertlex


 Matt Stanton


 Beto Green
Yes I like your thoughts I am also working on open back headphones blog that has a similar topic . In that case I learned so many new ideas from here.