Close
0%
0%

State-Based Nixie Digital Voltmeter

A digital voltmeter built without any microcontrollers or integrated ADC chips. Based entirely around discrete logic and comparator ICs.

Similar projects worth following
I want to build a digital voltmeter utilizing analog-to-digital conversion without any sort of microcontroller, using discrete logic and comparator ICs. Since we're going controllerless, I can't use an LCD. Since it's going to be classy awesome, I'd like to drive nixie tubes.

The purpose of this project is to build as diversely functional multimeter as possible, using as little digital electronics as possible. At times it will be required to use something like a single 555 or basic logic, but nothing with nested or combined logic will be allowed (except minimally where it might be required for latching states for a particular type of measurement, or to hold display outputs for readability). No microcontrollers will be used, no self-standing ADCs, no BCD converters, nothing. As much as possible what can be done with just analog circuits (opamps, etc) and discrete passive components (R, C etc) will be done with them only.

Don't even think about telling me to use an Arduino. You will be slapped.

  • First PCB test

    kittan07/02/2014 at 00:49 0 comments

    And it pegged out the bench supply. Why didn't anyone tell me the Vcc and GND lines were switched on ALL THREE 744066 chips? I was seeing a diode drop of 0.6V between 5V and GND so I went in a loop around the whole board cutting power traces until it went away; it wasn't until I was about to cut on the third 4066 that I realized it didn't make a lot of sense for the Vcc to come in pin 7 on a 14-pin logic.
    Somehow in the schematic layout the symbols got flipped for those switches, where the +V was on bottom and -V was on top, and I didn't catch it when connecting the Vcc and GND to everything in schematic layout. Oh well. At least that's only needed for the residual calculation, which I technically don't need until I have a second board - but which needs to be successfully tested. I'll reconnect those pins to the proper rails manually after successfully testing the divider ladder and logic output. More news soon.

  • Nixie drive voltage supply

    kittan06/25/2014 at 01:57 0 comments

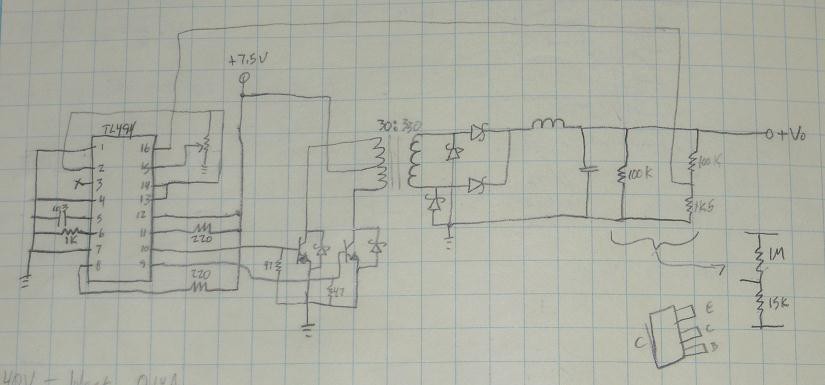
    Tail-end of last year we were working on a nixie tube clock project. It ended up getting stalled by some other stuff, but while Novak was working on the microcontroller code I was grinding out a power supply and drive circuits. For drive circuitry we started out with a Russian-made TTL logic chip made for driving nixie tubes from a BCD input, which turned out to not have enough voltage clamping (if any, some versions of the chip didn't have internal zeners) to actually work with our tubes. I ended up specking a SOT-23 NPN with Vcemax of 200V, more than enough to hold off our 150V nixie tubes with no external components needed. The Vcesat wasn't so great, but since each tube would only be pushing between 1 and 4 milliamps the power dissipation wasn't really a problem.

    The more fun part was figuring out how to get a reliable source of 150VDC efficiently. I hadn't worked directly with switching power supplies except conceptually and disassemblingly so I had to work in iterations. I wanted to use a push-pull topology because I wanted a transformer-based design to get the x20-x30 voltage multiplication we'd be needing, and push-pull is my favorite forward converter topology. I could have used a simple boost converter but extreme voltage changes make for crappy duty cycles which makes for lower efficiency.

    The workhorse of a lot of good push-pull converters is the TL494, which integrates an RC oscillator, dual error amplifiers and two undedicated (open-collector open-emitter) BJT outputs which can be configured to operate in parallel or alternating. Push-pull requires alternating outputs. I basically set up the drive transistors as approximately Darlington with some external NPN drivers better at handling high current and voltage, directly toggling the dual primary on my transformer. Schottky diodes provide current paths for the primary coils just in case. One thing to note with the push-pull topology is the drive voltage is delivered to the center tap, so when one side is driven to ground autotransformer effects pull the other side to 2Vct; in the case of our design parameters the center was at 7.5V so the BJT drivers had to handle at least 15V. Not difficult, but in higher-voltage applications the handling voltage can get pretty serious.

    I originally designed the secondary as center-tapped with a two-diode full-wave rectifier using some 200V schottkys. I somehow forgot, though, that when one side is conducting the other side is holding twice the voltage (because it's 180 degrees out of phase, so it gets the entire Vpp) and my 200V diodes were roasting from reverse 300V, which was shorting out the secondary and smoking my drive transistors. I rebuilt the transformer with a single secondary and used a bridge rectifier, so instead of 300Vpp I had 150Vpp and could use the parts I already had. Reworking the transformer also gave me chance to respool the primary with a slightly more favorable turns ratio that could allow the controller to operate at a lower duty cycle for nominal power (for a push-pull, 25% is about optimal). I think I ended up with something like 15+15:330 for a 22:1 ratio, making it easy to get from 7.5V to 150V output.

    Not sure where the numbers are anymore (for some reason I must have recorded the data on a computer instead of directly into my notebook, which is atypical) but I rigged up an active load and tested efficiency up to well past 25mA (I do have numbers for up to 20mA), which the maximum draw from one of the tubes we're using was 4.2mA at 150V. I was seeing between 82% and 85% efficiency between nominal and excessive loads, which I thought was pretty good. In any case the maximum draw from the seven tubes this meter will use shouldn't exceed 29.4mA (it likely won't exceed 25 but to be safe, worst-case 4.2mA x 7 tubes) the DC supply designed for the clock should be plenty sufficient for the voltmeter. I'm not sure what my DC rail voltage will be yet, the electronics will require 5V but I'll probably have an unregulated...

    Read more »

  • Initial ladderboard PCB design

    kittan06/23/2014 at 23:45 1 comment

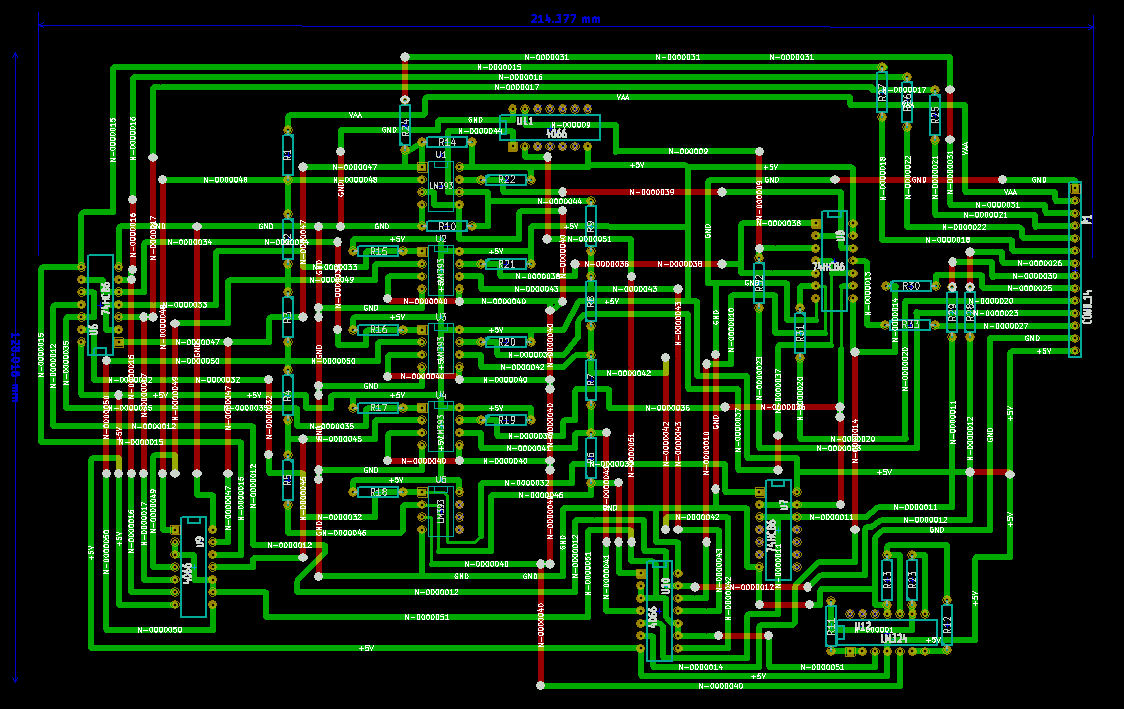
    Here's a rough PCB design for the ladder divider board. I'm a prototyper, usually doing stuff on perfboard so I hadn't really ever designed a large-scale PCB like this (made a few small ones in mspaint for toner transfer) so it took a few iterations of crappy software to be mostly satisfied with KICAD. There's a few annoying things about it which I didn't find config options for, but once I got used to it the thing wasn't so bad.
    This is the first draft of the PCB and it's pretty huge for only having about 12 chips and 33 resistors, but honestly there's stuff routing all over the place in the schematic. A ten-way voltage divider into stacked comparators with stacked logic outputs looping back to analog switches off the ten-way voltage divider gets pretty busy. I'll probably spend a day and see if I can improve on the design by running the divider horizontally instead of looped vertically or something. Even a horizontal loop might be able to stagger logic above and below and then more easily bus outputs to the... I don't know. Maybe.

    In any case, here's a rough PCB layout theoretically optimized for through-hole single-sided board. Philosophically I should try to do everything with a through-hole single-sided board because the purpose is to do everything while dodging modern conveniences like combined logic, microcontrollers and, apparently, SMD components. Additionally if I end up making kits, through-hole is easier for n00bs to work with. Additionally if I want to prototype anything cheaply I only have single-sided copperclad to work with.

    Before going too much farther I should probably consider distributing some bypass caps on the comparators and especially the op-amps and precision voltage line. Beefing up 5V and ground traces will be a good idea too. But this is a start.

  • Additional Function Extensions

    kittan06/19/2014 at 01:15 0 comments

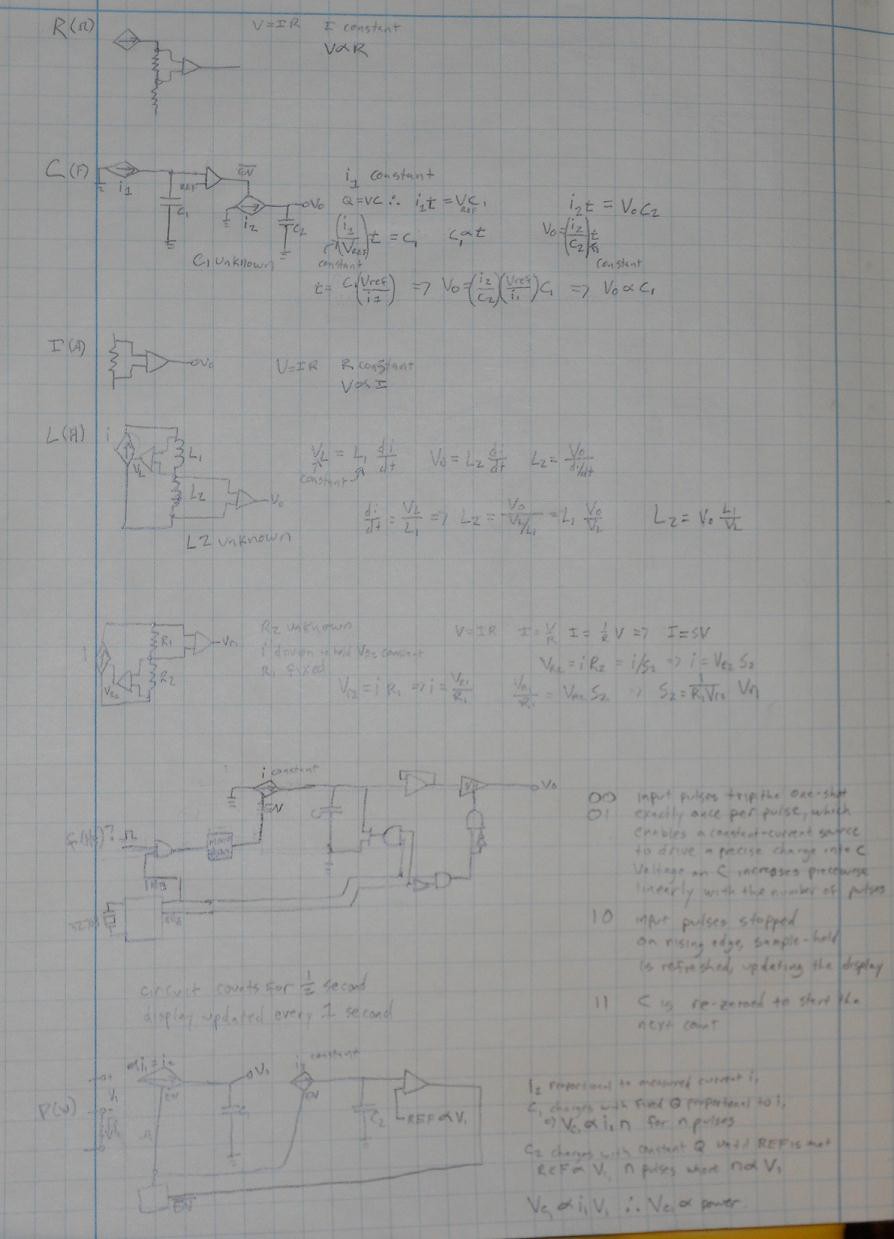
    So there exists the IN-15A and IN-15B nixie tubes, which are a pair of tubes designed for meters. The IN15A outputs unit scalars like +, -, u, m, k, M and the like. The IN-15B displays unit symbols W, F, Hz, H, V, S, A and an omega. So now I'm challenged to design entirely analog meters for all of these units. If I stick to my as-designed voltmeter as a base, all I need to do is conjure up entirely analog means of translating every unit into voltage, in a completely linear manner. Most of these were pretty straightforward but also pretty entertaining. I will leave out voltage measure because it's already described in the comparator-ladder section so that's taken care of. The rest we'll see what I got.


    First, resistance. A constant current is driven through the unknown resistor. Since V=IR, if I is constant, V ~ R. Done.

    Second, capacitance. This one gave me some fits. Use a constant current source to charge the unknown capacitor up to a threshold value. Since the voltage across a capacitor increases linearly with a constant current, the time required to charge the unknown capacitor to the preset value is directly proportional to the value of the capacitor. it=VC -> (i/V)t = C and if i and V are constant, t ~ C.
    At the same time - and for the same duration - we charge a second, known capacitor with a second constant-current source. The capacitance and current are constant in this case. it=VC -> V=(i/C)t so we have a voltage proportional to the time. Since the charge time is the same for both capacitors, and the output voltage is proportional to the time is proportional to the unknown capacitance, V ~ C. Done.

    Third, current. Run the current through a small fixed resistance and measure the voltage drop across it. Since V=IR, if R is constant, V ~ I. Done.

    Fourth, inductance. This one was also fun, and I'm not sure how well it'll work. For a nonsaturated inductor, V=Ldi/dt. If we push current through the unknown inductor in series with a known inductor such that we maintain a constant voltage across the known inductor, we have a constant di/dt. di/di = V1/L1
    A constant di/dt should induce a constant voltage across the known inductor. V2 = L2di/dt so V2 = L2(V1/L1) so V ~ L. This will only work for short current pulses because in DC the inductors will saturate, so some timing logic will be required but in general, Done.

    Fifth, conductance (siemens). This is basically the inverse of resistance, so one way to do it is calculate resistance and then invert it. But that's a division step which, in purely analog circuits, usually requires a log transform, subtraction, and antilog transform. Which is difficult and hard to keep precise. So instead we'll do something different. Starting with ohm's law V=IR -> V/R=I, and knowing S=1/R, I=SV. We run a current source through a known resistor R1 and unknown resistor R2, where the current source is keyed to maintain the voltage across R2 at a constant known value. We then measure the voltage across the known resistor R1. S2Vr2=i, and Vr1=iR1 -> i=Vr1/R1 so S2Vr2=Vr1/R1 -> S2=Vr1(1/R1Vr2) and since R1 and Vr2 are known constants, S ~ V. Done.

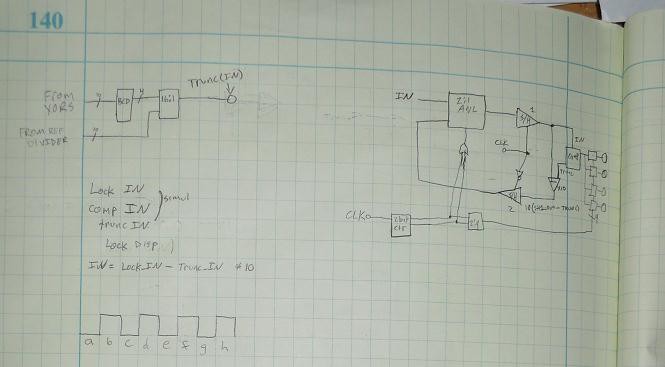
    Sixth, frequency. This one was pretty tricky. The obvious solution is to use a binary counter with a fixed duration during which to sample pulses, and an analog DAC in the form of a weighted summing amplifier. The problem with this is philosophical - it's heavily logic-based and not really an analog measure at all. Additionally, many ICs are required and the DAC might have precision issues? So we thought of something else, in the form of a state machine. The initial state is really what matters most, the rest is just there to make sure the input and output values are latched properly. So, here goes. We use a precision 32.768KHz RTC oscillator divided down into a 1-second timebase. This will have exactly 50% duty cycle, so a high pulse duration of exactly one half second. We AND this half-second pulse with the incoming measured pulsetrain and use that to trigger a one-shot...

    Read more »

  • Input and Decade ladder schematic

    kittan06/14/2014 at 19:37 0 comments

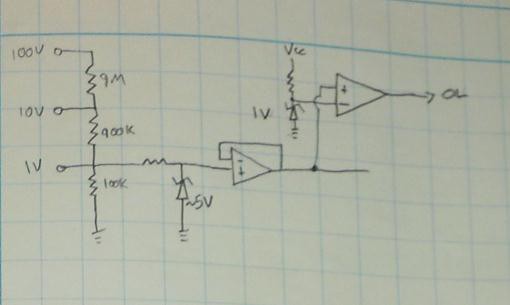
    Schematic for the input divider. The idea is to allow a range of input voltages but each input is divided down to a 1V scale. The zener protects the op-amp buffer input in case you grossly overvolt one of the inputs. A 1V comparator is tied to the output, which will trip an Out-of-Range flag if the input voltage exceeds measurable values. The output from the buffer op-amp is piped into the decade legs for measurement.

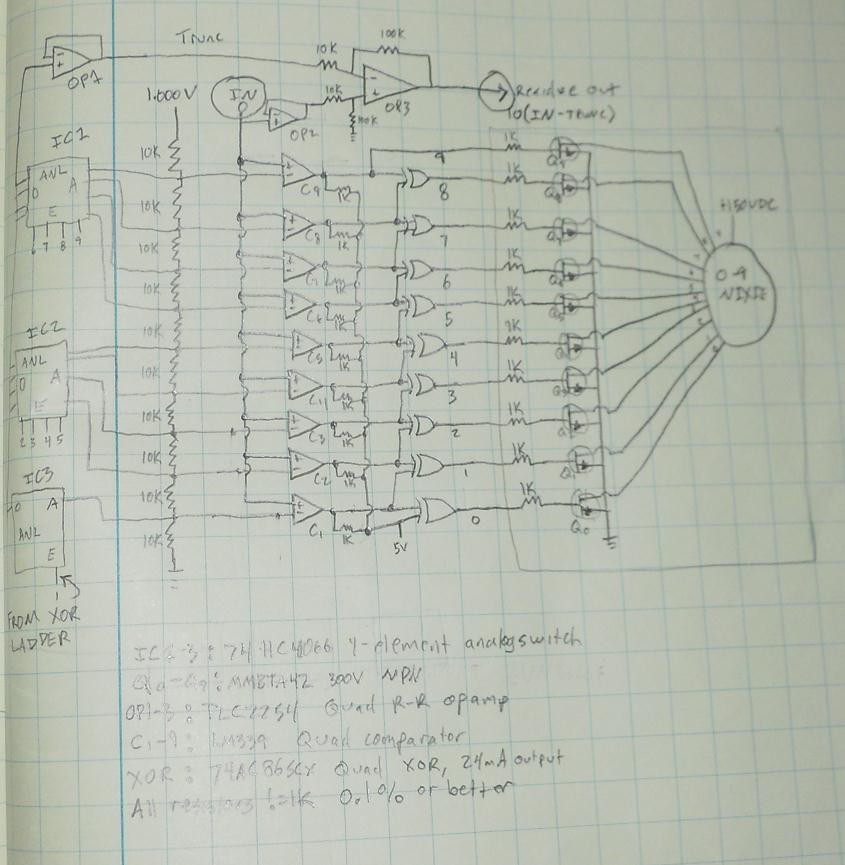
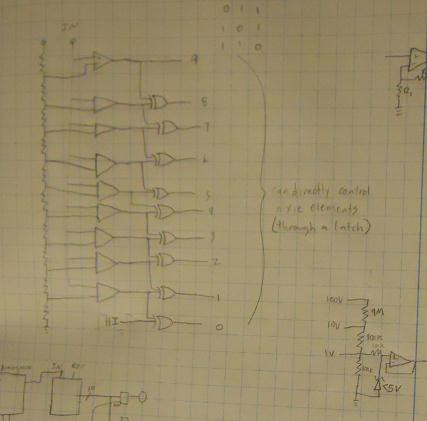
    Here's a rough schematic for a single ladder leg and nixie driver. A precision 1.000V is divided by 0.1% resistors into what should be just almost exacly 0.1V increments. The input voltage will trip comparators ascending. The XOR gates take advantage of the fact that if a comparator is tripped, then by definition all comparators below it are tripped; this allows them to selectively zero out every comparator output except the topmost tripped comparator, in effect isolating the truncated decade range of the input signal (so if we input 0.865V, all comparators from '8' down will be tripped, but only XOR output '8' will read HIGH). That gate output can directly feed an NPN cathode drive transistor on the Nixie tube, illuminating one filament at a time corresponding to the decade's measured value (in our example, the '8' will be lit).
    The XOR outputs are also fed into a stack of analog switches tied to the resistor ladder, each switch passing a particular voltage value from the ladder. Since only one XOR at a time is HIGH, only one value at a time is passed, corresponding to the decade measurement. The voltage passed I refer to as TRUNC as it's the input voltage truncated to one digit measurement (0.865V becomes 0.8V). This TRUNC value is fed into a difference amplifier with a gain of 10, subtracting it from the given input voltage. The output then is 10*(IN-TRUNC), which in our example would be equal to 10*(0.865-0.8)=0.65V; which corresponds to ten times the unmeasured residual voltage from our input. If that residue is piped into a second identical ladder stage, its display will read '6' and output 0.5V as its residue. The third stage will take in the 0.5V residue and output a '5' on its tube.
    There are cascading error issues with this, as the accuracy of both local and downstream measurements are dependent entirely on the precision of the reference voltage and ladder divider. All downstream measurements are dependend on the ladder precision, loss in the switches and accuracy of subtraction and gain in the residue amplifier. I'll probably have to alter the residue amplifier design (instrumentation amplifier maybe) to take bias currents more into account as first-stage inaccuracies will large effect on third- and fourth-stage measurements.
    Additionally the display readout will change in near-realtime (propagation delay of the entire system will slow this down from 'instantaneous' to 'near-instantaneous') so I'll have to use a switched sample-and-hold circuit on the input that updates the ladders every one or one-half second.
    What is likely to happen is building the nixie drivers and tubes on a separate board, into which the divider boards connect like a backplane setup. That'll make building the ladder boards separately easier and still have an efficient unified display board. Common signals (like the 1V precision reference, 5V and GND) can be fanned to each board from there or through a common cabling header of some kind.

  • Extending functionality, power concerns

    kittan06/13/2014 at 17:23 0 comments

    Additionally there exist a pair of nixie tubes more or less specifically designed for meters. One has units (like V, A, F etc) and the other scales (m, u, k etc) so you can pair them to do unit and range outputs. I could use a set of shunt resistors and low-side amplifiers to measure current, feed the output through the same voltage measurement loop and, depending on the range selection, have the tubes display the proper units. A simple latching overcurrent detector cutting out the relay making the range selection would prevent roasting shunts. I gotta say, I'm pretty excited about this project.

    One thing to consider though, is isolation. If I want to be able to measure stuff in circuit without the risk of explosions, I'll need an isolated power source. The nixies I've got to play with can pull around 4mA at 150V, so a 6-digit display (4 decimals, 2 units) could eat upward of 3.6watts continuous draw by themselves. Last winter I built a 150VDC power supply for driving nixies, designed for 7.5V input and runs above 80% efficient; that takes input power requirements to 4.5W to the drive supply.
    I hope the electronics don't eat too much, but assuming I run all 5V logic and amplifiers and burn half an amp, we're looking at needing at least 7W continuous. Say I stack two Lipo 18650s to get a nominal 7.4V 2Ah, we'd have two hours continuous runtime per charge. Not so great for bench equipment. Gonna need to find an isolated mains supply, either something simple with a transformer or an isolated switching supply.

    Thinking about it, if I used a switching supply I'd have to probably build it myself using either comparator PWM drive or something like the TL494 to make sure there's no controllers in it. Probably the easiest thing to do will be a rectified transformer output into a BJT linear regulator. It'd be totally wasteful but also really easy, unless I wanted to build a buck driver using only an LM339 - which actually wouldn't be that hard. I already have a PWM driver designed around it that I was using for 4-wire fan control; it'd be super easy to strap a high-side PNP (TIP42 anyone?) to the open-collector output and cook up a basic RC output stage good for ~8V/2A. I could even push relatively unregulated DC into the nixie driver and buck a flat 5V for my logic boards. Well heck why don't I just do that then?

  • Rough initial design

    kittan06/13/2014 at 17:10 0 comments

    Not sure how visible the schematic is, but it's a 10-step comparator ladder. The outputs are sequentially XOR'd together such that only one output will read HIGH, corresponding to the topmost triggered comparator. This can be piped into a nixie driver to illuminate filaments respective to the measured value. If the truncated output of this were subtracted from the input (so if fed 0.865V the truncated output would be 0.8, leaving 0.065V) and amplified by 10 (so, 0.65V) the result could be fed into another ladder for the same process on the next decimal down.


    If one could latch the nixie display and increment to the next display, latch the residue for the next iteration and pipe it back in, you could build a sequential state machine with only one comparator/logic ladder that iterates residues through and latches the measured values to respective tubes on each step. The only real concern with this design is the lock/unlock timings for the sample-and-hold circuits, because if they don't trigger in the proper order you'll end up feeding next-decade-residues back into the current-decade input and hosing up the measurement.

    Probably what I'll do initially is design a decade ladder with residue amplifier output. That board could be used for either the state machine or the multi-ladder design. I'll probably build the multi-ladder design first, even though the component count is much higher, because it's pretty simple repeated steps. There's a lot going on in the state machine.

  • Or maybe...

    kittan06/13/2014 at 01:55 0 comments

    Thinking about the decade driver. Instead of iterating I can use 40 comparators and use a separate ladder for each place. It'd still have a timing constraint from ripple because the rounded value would still have to be subtracted to accurately find the next place. I could either use 40 comparators, or a clocked state machine with sample-holds that loop back and bussed output latches. 40 comparators would honestly be easier to design because basically everything would be repeated. But clocked held latched would require quite a few fewer parts and a whole lot less board space.

  • I suppose...

    kittan06/12/2014 at 23:48 0 comments

    Technically you could do binary conversion with a single comparator, and subtract then recycle the residual with a halved reference each iteration. But then you'd basically have a slow SAR. And that's boring. Plus without stupidly high-tolerance components you'd lose precision with each iteration. If you use 0.1% components, after four iterations your cascading error would be as high as 0.4%, above the LSB precision of an 8-bit converter. At 8 iterations you'd be looking at 0.8%, invalidating your lowest two bits of precision.
    UNLESS - with each iteration you go back to the original signal and subtract the full binary measurement to date (probably using summing amplifier DAC would be easiest), which then the residue doesn't get obscured by cascading measurement error. I'd probably use a system like that on the tenths direct-driver nixie VRM because I'll probably want 3 or 4 decimals of display which means multiple iterations. Actually, that'd be pretty difficult unless I also held the divider value after each iteration to make summing easier. With each iteration grab the previous summed value and add to it the current order's value, then hold that for finding the current order's residue and for adding into the next order's absolute measure value. But that seems unnecessarily complex. A 3-digit display would only see 0.3% error which is probably good enough.

  • Conceptual idea for a nixie-specific conversion

    kittan06/12/2014 at 23:22 0 comments

    Using a decade flash ADC, which is to say ten comparators strung along a ladder voltage divider with equally spaced rungs (which is to say a divider with taps at 1/10, 2/10, 3/10 ... 9/10,10/10)... Okay, let's just say a bar graph driver with ten equal steps. If you use logic to isolate only the top active step, that can be fed directly to a nixie driver and activate one filament at a time corresponding to the peak measurement. If you latch that output, you can use your comparator outputs (either combined in a summing amplifier, or using the topmost output to switch its reference voltage) to drive a differential amplifier subtracting that sample value from the original signal value. That will leave a residue voltage corresponding to the decade below your 1/10 value, which feeding that residue back through the comparator network with a 1/10 reference (into the divider ladder) will yield a measurement of the next lowest order of magnitude. This can be latched to drive your next nixie tube, and then repeat with its residue.
    In this way you can successively measure orders of magnitude of a voltage value and directly drive nixie tubes as a voltmeter. With each iteration, however, component tolerance errors will cascade reducing precision.
    The logic-isolated comparator outputs can also be fed into a BCD converter for BCD outputs.
    If ten comparators are used in the ladder, the logic-isolated output would directly correspond to 4-bit binary. A second iteration would yield exactly an 8-bit ADC output.

View all 11 project logs

Enjoy this project?

Share

Discussions

Similar Projects

Does this project spark your interest?

Become a member to follow this project and never miss any updates