Close
0%
0%

3-In-1 Desktop, CNC and Laser Engraver

A heavier duty 3D printer that replaces 3 machines

Similar projects worth following
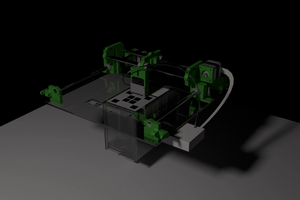
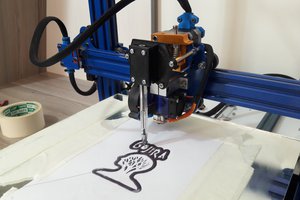
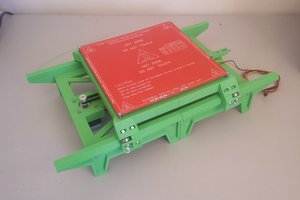
This is a remix of an existing printer that minimizes the plastic parts and is basically composed of aluminum. The printer has replaceable heads that allows it to function as a 3D printer, a CNC machine (using a Dremel flex-shaft) and a Laser Engraver (locking the Z axis). The prototype has been built twice, confirming that the build process is reproducible. We are working on getting it fully operational with an LCD Controller as well as *potentially* a metal printing head (using solder). At the very least, we will have self leveling heads for printing and CNC machining. We have been able to build it with different bed sizes, as small as 7"x7" and as large as 20"x19". The image you see here is mid build. However, the base's walls lend themselves to customization, including the use of acrylic walls (various colors) as well as 3mm aluminum walls.

For those of you who are interested, I have a short grainy smartphone video of a version printing on a large (very large) bed in PLA.  You will see that to accommodate the weight of this large bed, we put the edges of the bed on wheels.  That's really the only time you need it.  CNC-ing is meant for smaller objects and engraving doesn't really care because it's all 2D.  So the idea, as someone mentioned, is to be able to do 3 different things to an object, even leaving it on the bed and swapping the heads and doing what needs to be done.  I have used a dremel flex shaft on my Fab@Home Model 2 and that worked fabulously with 3/4" MDF.  Now the only remaining issue is to see if I need to support the cantilevered arm for the X axis and I imagine that would be needed if we choose to turn it into a true gantry, although for smaller objects, again, I think not.  Finally, we are trying hard to not re-invent the wheel with writing software than may not need to be written and instead use stuff like Repetier-Host.  Of course, ideally, we could put in 2 boards (one for printing, like RAMPS) and one for CNC/Engraving (like TinyG) but that should not be necessary.

  • Tying up loose ends

    samern04/12/2017 at 13:04 0 comments

    Since this project's inception I have gone a lot further in this arena, building several printers and CNC machines. I did learn that despite the obvious benefits of combining all of them, at best, a printer could double as a laser engraver/cutter, but as a CNC machine it will be very 'lightweight'. While the movements in X, Y and Z are common, the rigidity requirements for CNC vary greatly from 3D printing, and of course so does the weight of the head. While I could use my system as a 3-in-1, it is better to go 2-in-1 which is where I have headed. In the interim, a number of vendors have come up with 3-in-1 machines successfully, albeit, IMO, with limited utility in each arena. I have therefore flagged this project as done so that I can move on to the next iteration.

  • A frame is complete

    samern10/25/2015 at 14:05 0 comments

    I have built an all steel Prusa i3 frame to test its rigidity and to see if something like that is a suitable platform. However I find that it is better that the table does not move. It is clear I am better off building a ShapeOKO type frame using 80/20 extrusions and use RUMBA as the electronics. That gives me the ability to set up a single X carriage with the laser and extruder nozzle close together and the spindle on the other side. I will see about building a frame that way.

  • It's time to get started

    samern01/20/2015 at 20:21 0 comments

    I've seen a lot of traffic here lately and for all those following, thank you! I have been researching how to proceed next and have actually realized the answer was staring me in the face all this time. I have already built a viable machine, albeit out of acrylic that is very rigid. I will therefore begin by modifying my desktop CNC that you see in my other projects to add a printer head, spindle and laser. The idea here is that this machine already has gantry system that is supported on both sides in X, which means no flex when the head moves around as a CNC machine. My intention is to replace each piece of acrylic plate with a similar piece of aluminum sheet 3-4mm thick. I would tap all the holes so I would minimize the use of nuts. The net result should be a fairly small machine that fits neatly on a desktop and still have an 8"x8" bed. Of course I can scale the machine by increasing the length of the linear rods and leadscrews (no cables are in use here) as well as the size of the table. I feel that I would bite off too much if I were to design something that would be re-sizable (like, say, a ShapeOKO), although simply replacing the table structure with 80-20 extrusion would allow me to do so in X and Y. I would likely fix the max working height to no more than 10". So here are the other things I will add:

    1) Option 1: RasPi and GrblPi as the controller. I'd have to tweak the GrblPi to accept an extruder motor though. Nice thing about that is the RasPi is already a computer and so I can reach it remotely. I would run the thing using TeaCup. I

    2) Option 2: RAMPS or Sangui but run the system using either a Dell Venue 8 tablet (Windows 8, Repetier), or an Android Tablet (or phone) running Print3R.

    3) Option 3: RAMPS or Sangui and attach a RasPi to run the system using AstroPrint or OctoPrint. Again, it frees up the PC. I have a few small add-on LCDs I can use for a display to the RasPi too.

    I'll keep you all posted.

  • Time to start building

    samern08/25/2014 at 17:04 0 comments

    After quite a bit of delay, and a vacation, it's time to start building.  Just about all the parts to build V2 are here and so I am moving forward.  All metal extruder, all metal frame, all metal everything.  And....a Rasberry Pi running Grbl.  Oh yes.  Web accessible, fully networked AND a built in camera.  What's not to like?  It does look like I will be using Teacup though rather than Repetier.  I will be incorporating the GrblPi and either keeping the heatbed and hot end externally controlled, or make some changes to the GrblPi to control the heating elements.  In any case, the bed is stationary in V2 and everything else moves around it (flying gantry style).

  • Time to look at a production version

    samern07/11/2014 at 00:47 0 comments

    So far, I've had several requests to actually buy one of these.  And we have the printer working with a large bed but we definitely have to support that large a bed with a pair of small wheels.  So we are going to produce about 4 of these printers and make them available.  All of them will use RAMPS, although the original is a Sanguinolou based unit.  We will, on request also offer the printer like this:

    1) An all plastic unit that doesn't use metal for the plates

    2) A small table version (for 8x8 prints) that can be upgraded later

    We are looking at the flexshaft add-on although we think we will have the engraver head out first because Repetier will work just fine in 2D mode that way.  We would make use of the same stuff LittleBox is using.

    For the first 4 units, we will be having the X plate sintered instead of printed.  We get this done at ProtoLabs who do an amazing job.  They also can machine our Aluminum plates and if we can get a good quantity discount we will go through them, otherwise we will do the machining ourselves.

  • Thinking of a major re-work of the X axis

    samern07/08/2014 at 21:12 0 comments

    I am considering a MakerSlide based re-visit because while we have gotten this thing to print on a 22" bed, I'd like to revisit how the CNC portion works to use a flying gantry.  I might just do that.  I also am looking at 'printing' this printer and making it available as a large format 3D printer, made out of HDPE for the flat stock.

View all 6 project logs

Enjoy this project?

Share

Discussions

matt1313 wrote 07/06/2014 at 17:42 point
Samern, would love an update to how it coming together. Are you seeing any issues with dust after doing a CNC cut and then doing 3d printing?

  Are you sure? yes | no

samern wrote 07/06/2014 at 23:05 point
Hi Matt,

We got it printing just fine, especially on the big bed. We note that dust is going to require some sort of vacuum attachment, but the placement of the Y mechanism well under the larger bed and Z operating off a leadscrew helps mitigate things. But, we think the X end may be vulnerable so we are contemplating something over the X motor. We are also contemplating a support at the back of the X end rods to help counter torsional effects from the cantilevered arm that X is.

  Are you sure? yes | no

Adam Fabio wrote 06/19/2014 at 03:50 point
Hey samern - Thanks for entering The Hackaday Prize! It sounds almost like you've got the swiss army knife of machines there - printer, CNC, and Laser!

The community judging will start soon, so try to upload some more details about your project as soon as you can!

  Are you sure? yes | no

samern wrote 06/19/2014 at 04:15 point
Some gear arrived today, I will post more photos tomorrow. I also had a printed part professionally sintered (mostly for looks) and that arrives Friday so I will install it over the weekend. I am hoping to have it largely done this weekend.

  Are you sure? yes | no

Similar Projects

Does this project spark your interest?

Become a member to follow this project and never miss any updates