 georg ottinger
-
Thoughts on PayAsYouWish-OpenSourceHardware
07/26/2014 at 08:05 • 0 commentsThe OggStreamer-Device started as a Hobby-project and evolved over time – it is an ongoing Experiment so to say – and it was never really cost optimized. Design decisions were taken to take the "simple route" and to satisfy quality requirements. A pilot run of 12 devices was accomplished with the generous support of many friendly people and our supporters. And in the End of 2012 the project got supported by the "Internet Foundation Austria" , who acknowledged the value of this Project and OpenSourceHardware in general. So the OggStreamer became part of the “NetIdee 2012″ sponsored projects. In detail this ment that some hours (lets estimate a quarter) of our work was paid and what is more interessting for this project we had the ressources to produce 54 devices - which put us in the fourtunate situation that we had some devices we could give away regardless what we would get back in return.
Inspired by PayAsYouWish restaurants were the client can decide what to pay for the meal - we came up with the Idea of PayAsYouWish-OpenSourceHardware, which was guided by the following thoughts:
1. We want to spread the device in the world
2. Every Radio/Hackerspace/Medialab/Developer should be able to get one if desired - and therefore recipient can choose an amount of money suiting his financial possibilities.
3. All the money collected from this PayAsYouWish campaign should spark further development at our CommunityCenter/MakerSpace the "Open Technology Labratory Vöcklabruck". Not necessarily Hardware-projects but all kind of developments in the in the technical/social/cultural domain.Till now we shipped around 40 devices, some of them we exchanged with other Hardware-Projects, in one case we gave them away for free and for the others we got PayAsYouWish compensations ranging from 5 to 350 Euros.
-
Switching to an OpenSource Compiler for STM8 microcontroller
07/26/2014 at 07:33 • 0 commentsThe first firmware for the OggStreamer was developed using the freely available Kickstart-Version of the IAR-Compiler which was a good for a quick start and good for debugging the Firmware, but - espacially for a OpenSourceHardware project - other alternatives would be more appriciated, features like OpenSource and Linux Support would be highly desireable - during the course of the OggStreamer Development the SDCC-Compiler Team choose the STM8 Platform to be included in the SDCC-Compiler. So it happend that OggStreamer was one of the first real-life projects relying on the SDCC for its firmware - I could provide feedback to fix bugs in early versions of the STM8-SDCC compiler - many thanks to Philipp Klaus Krause and Valentin Dudouyt aswell as the whole sdcc-team for the first class support on this OpenSource Tool and their quick fixes within days.
The first test of the SDCC compiler on the OggStreamer looked like this:
VID 20130529 172422 from Georg Ottinger on Vimeo.
-
(THT) Soldering the PCB
07/13/2014 at 13:32 • 0 commentsAs the PCBs contain both SMT and THT components there are two passes needed to solder the PCB. The SMT soldering is prefereable done by a pick'n'place and reflow process. If you need to solder the SMT parts by hand this is also quite easy doable as we restricted ourselfs to the use of 0805 as the smallest components. I soldered the first device completely by hand and it took my about 4 hours to do the job. For our run of the small series we asked a local electronic manufacturer to do the SMT soldering for us. Soldering the THT components remaind as a job to be done and I also documented the process with two videos - some of them are rather boring - so consider them for documentation purpose ;)
THT Soldering Part I
oggstreamer-solder-part1 from Georg Ottinger on Vimeo.
THT Soldering Part II
oggstreamer-solder-part2 from Georg Ottinger on Vimeo.
-
Video Explanation of the PCB
07/13/2014 at 13:18 • 0 commentsAn explanation of the PCB in more detail...
-
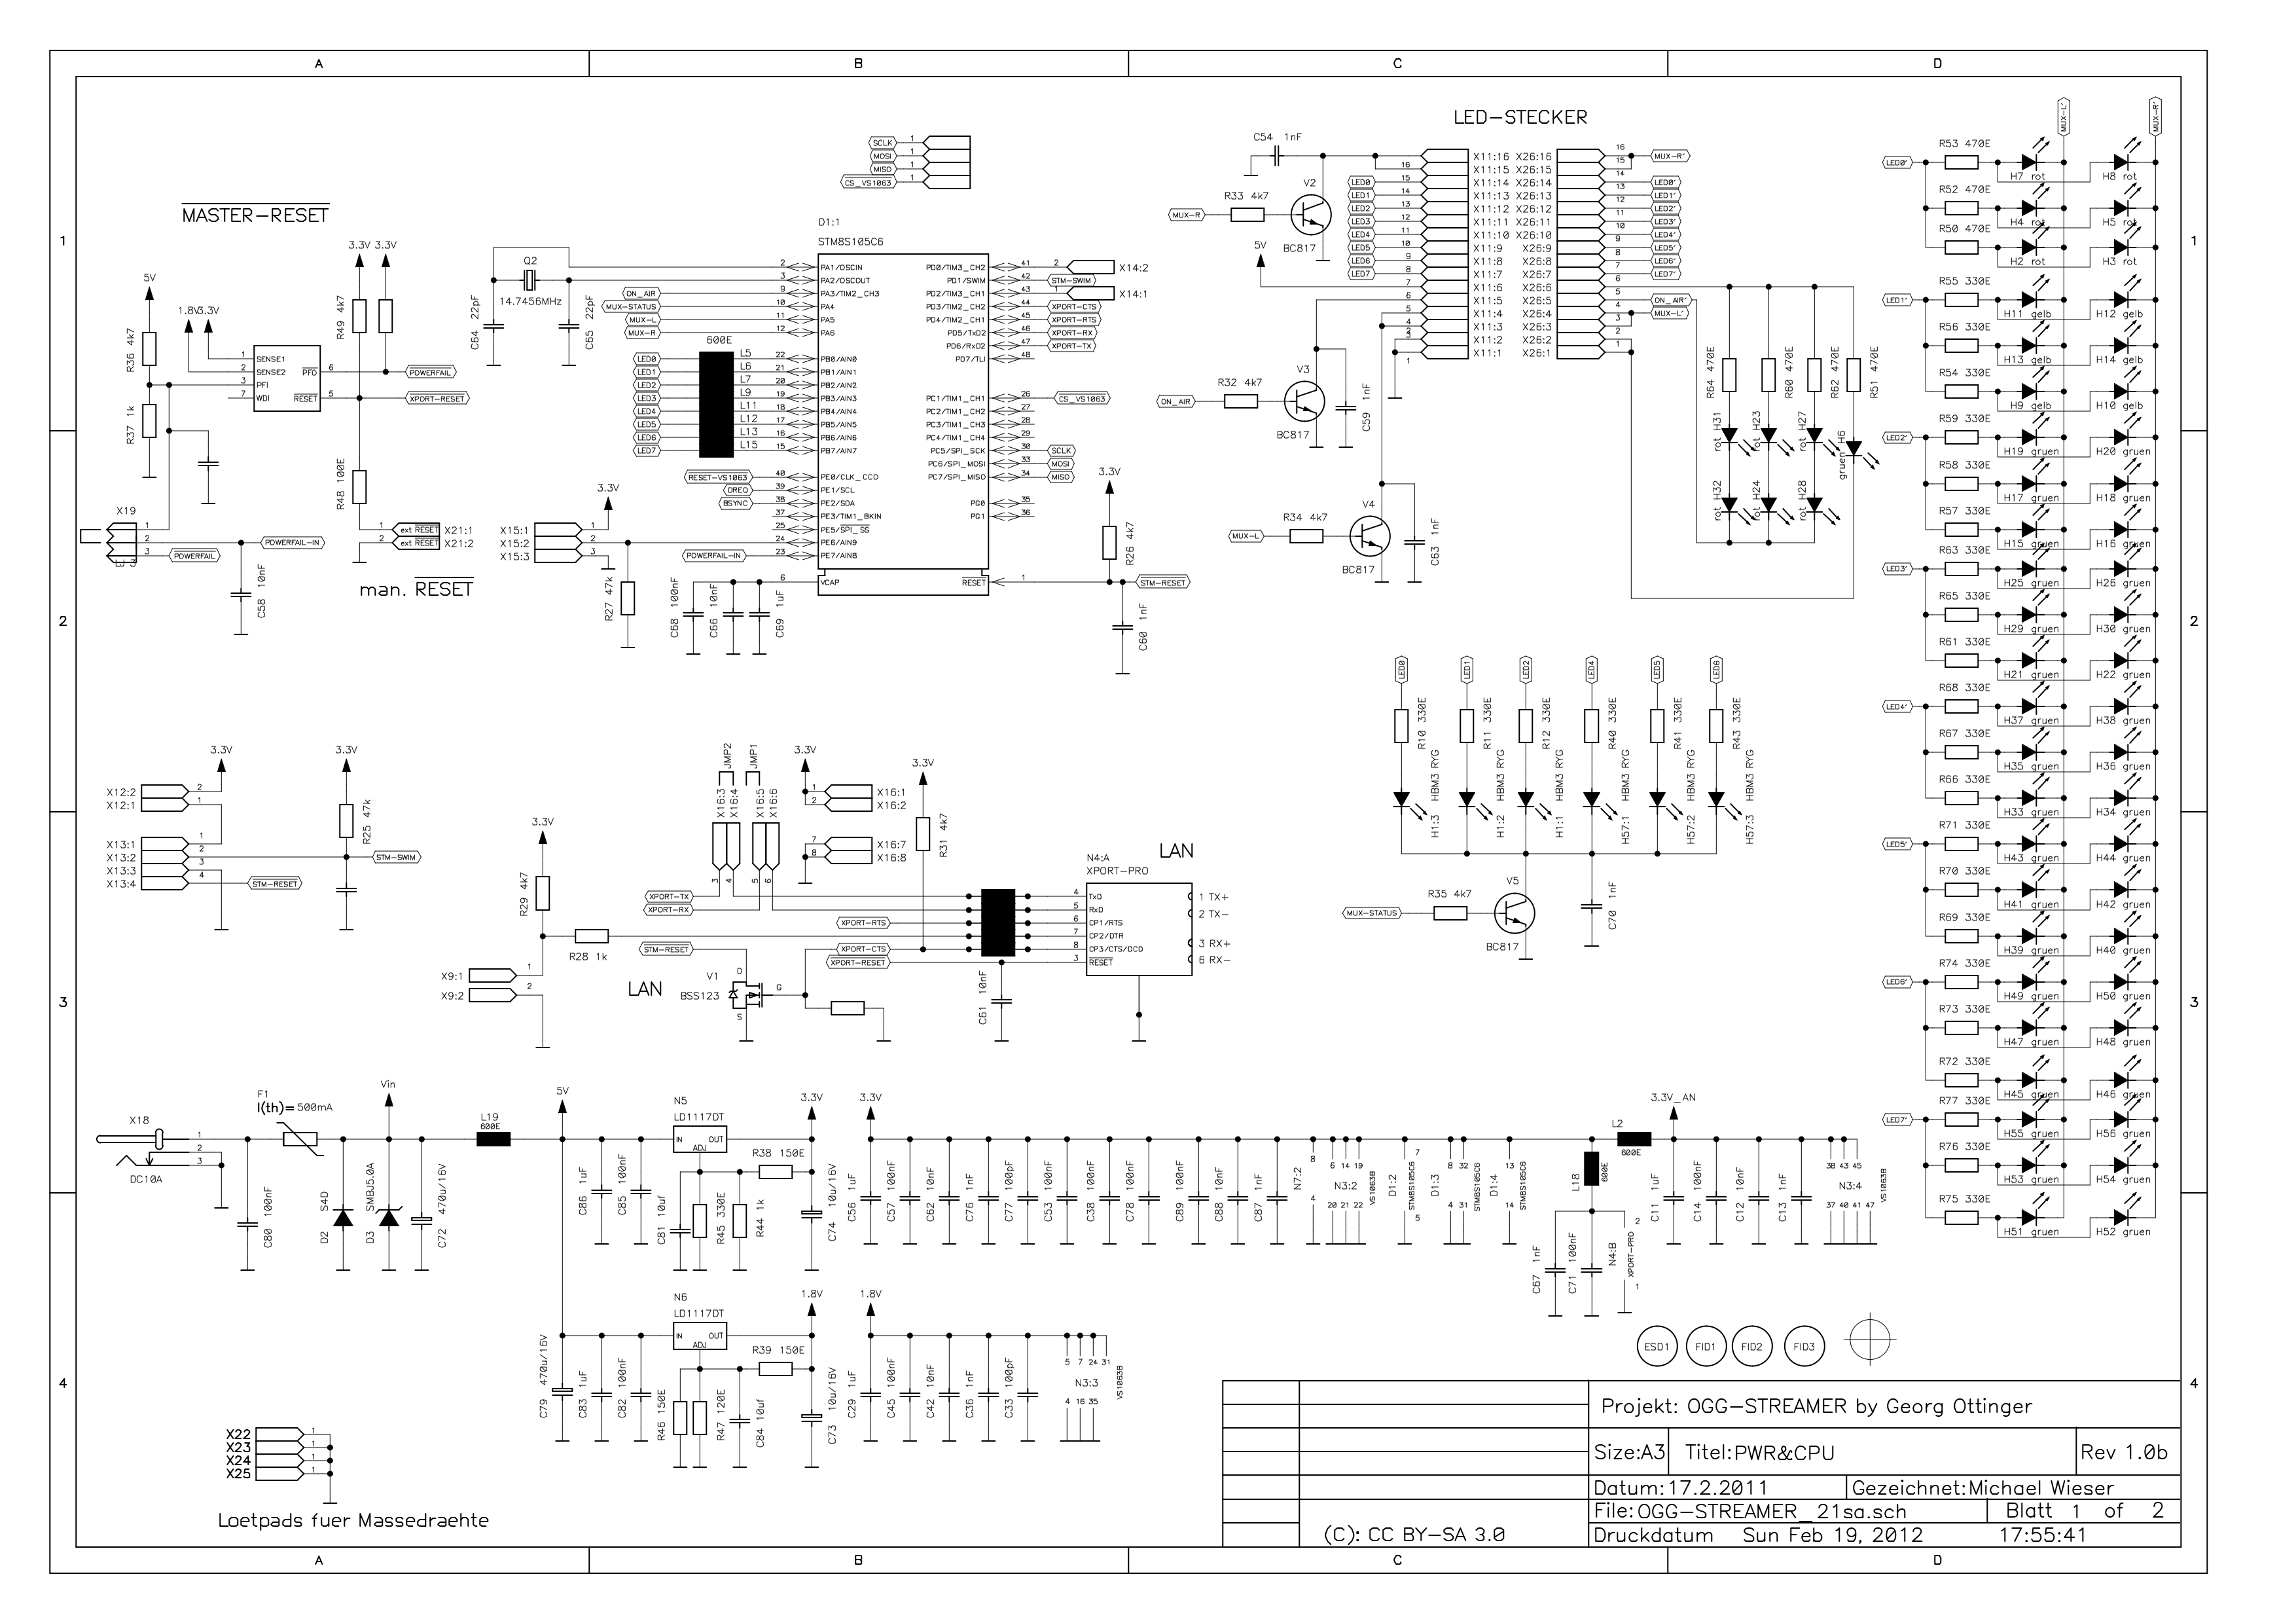
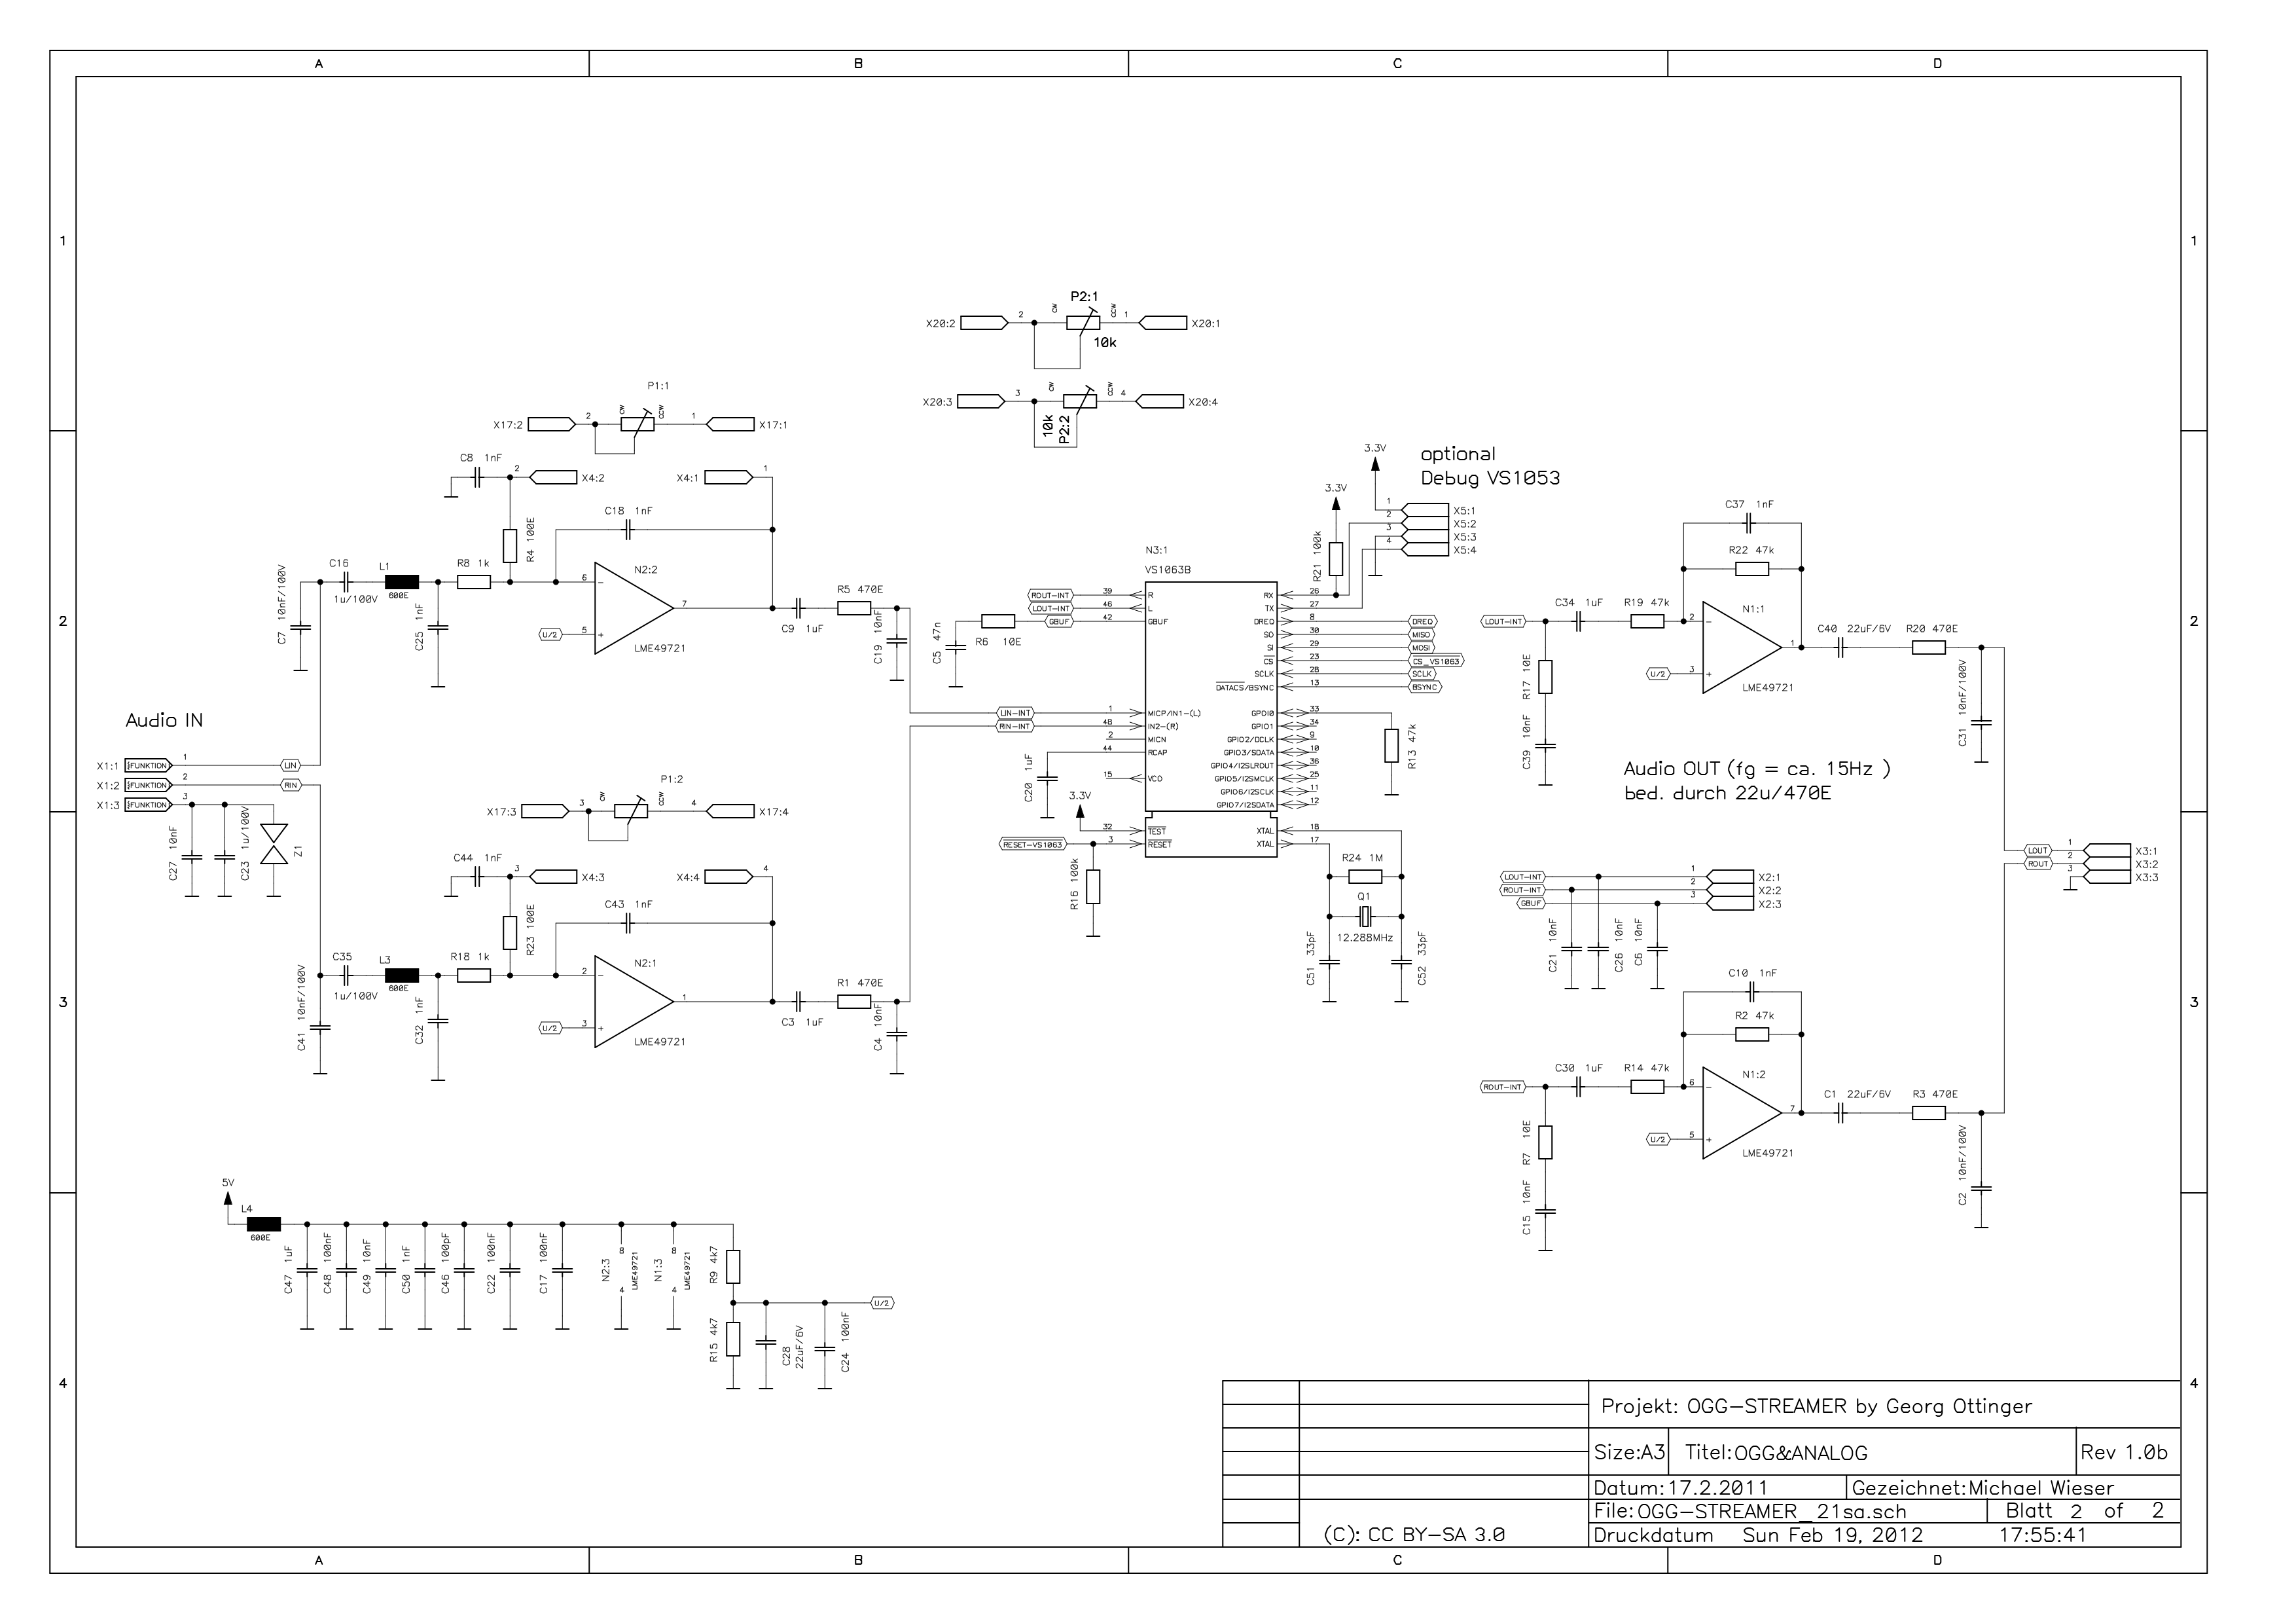
Schematics
07/13/2014 at 10:27 • 0 commentsHere are the schematics released under CC-BY-SA 3.0
The Power Section with LDOs, Linux Module and STM8 Microcontroller + UI (Leds)
![]()
We use a Poly-Fuse (500mA) to protect the circuit from any mal-function. Also a diode is added to protect against reversed polarity. As we really want this device to last long we also added a Transzorb-Diode which protects for Over-Voltage Spikes. There are two LDOs (3v3 and 1v8) - we used LDOs to keep the design simple and not to go through the strougle of makeing Switching-Buck-Converters EMC-Compliant. You can also note that we are using a lot of ferrite beads in order to cut high frequency components aswell on signal and on power lines - maybe this design already exeterates the use of ferrite beads :)
The XportPro Linux Module communicates via RX, TX RS-232 with the STM8 - The ResetLine for the STM8 and the Input-Button are also connected to the XportPro directly. We further added another controll Line from XportPro to STM8 which might be used in Future for more eleborated protocoll. You can find the details of the communication portocoll between XPortPro and STM8 here.
The STM8 drives the LEDs which are muxed and run at about 450 Hz. And in the upper left you can see some optional powermonitoring/reset circuits which are currently not populated.
The Audio Section with Audio DSP and Input- Output Amplifier
In the middle you can see the AudioDSP VS1063. On the left there are the Input Amplifieres. Once again you can note the ferrite beads that will cut off the (very) high frequency components - In order to reduce interference from for example cell phones that would introduce the well known ta-tat-tat-ta noise.
On the Output side we also added a Amplifier in order to add flexibility to the Output levels - May be the Output Amp is a bit too much as the VS1063 can drive moderate Loads on its own. But with this configuration it is possible to have Input and Output Signals approaching 5V Peak-to-Peak.
For the Amps we used high quality LME49721.
![]()
You can download the EDA-Source of this project here. (License: CC-SA-BY 3.0)
OggStreamer / LiveRadio Streaming
This project aims to create a production-ready, emc-compliant OpenHardware AudioStreaming-Product using OpenSource-Tools whenever possible.