Close
0%
0%

TS50 True Sine Inverter

50 Watt proof of concept inverter converts 12VDC to 110VAC @ 60Hz.

Similar projects worth following
This project documents an approach for the light-weight design of a true sine inverter and explores some of the key considerations & challenges.

The TS50 is a Frankenstein unit that is the amalgamation of three separate projects:  a DC-DC buck, a DC transformer, and a digital sine wave generator.

Being a power geek, it all began with my nutty interest in inverters - part of my mad scheme to build an ecosystem of off-grid energy management stuff.  Specifically, those that output a true sine wave without the use of a boat anchor 60Hz line transformer.

My working concept was a two-stage process:  first a DC-DC boost stage followed by a PWM-based sine stage.  This was all new for me so considerable R&D was necessary.

First I built a bare-bones full-bridge DC transformer.  I named it 'inv48', it's purpose was to boost 12VDC to 48V - multiples of the input voltage but still relatively safe.  I needed a platform to learn transformer core types and winding methods, trade-offs, and efficiencies.  Anyone that has designed & built transformers knows that designing them on paper is science but, building them is an art.

With this unit I trialed several transformers, mostly RM cores, with powers ranging from 50-100 Watts.  Multiple secondaries, both single & center-tapped and with various winding ratios.  Interleaved & polyfilar winding methods and their impact on leakage inductance & parasitic capacitance were explored.  Eventually the transformer designs exceeded the original 48V target and delivered a clean 170VDC with power delivery well beyond 100W.  The project's PCB & current sense machinery now became the limiting factors to what I could do.

I then moved on to generating a sine wave with a new project PCB.  I named it 'sd16f324' - Sine Demo and 16f324 for the PIC MCU I used to generate the PWM signal and control the bridge.  Like the inverter, this design employs a full bridge but instead of driving a transformer it's connected to an L-C filter much like a buck; it also functions much like a synchronous buck.  The sine wave is generated by applying a PWM signal across the bridge with the duty cycle representing the sine angle.  The bridge applies this signal in one direction, building from a DC of 0% @ 0˚ to ~ 99% @ 90˚, decaying to 0% @ 180˚ and, then reversing direction and repeating the cycle.

Like the inverter work, this platform proved very useful and allowed investigation in several areas:

  • The effects of resistive & reactive loads
  • Inrush current (one of the more challenging areas)
  • Distortion & harmonics in the AC current & voltage waveforms
  • Variations in PWM frequency, timing and duty cycle
  • The effect of higher & lower inductances in the output inductor

As you might guess I used inv48 to drive sd16f324.  This too proved very useful in investigating inrush, over-current limiting, and regulation.

Satisfied that I had learned enough to be dangerous I mothballed these projects and started a new one that brings it all together in an integrated design.  The TS350 is now underway and is intended to deliver 350W continuous with surge capability to 500W.  Eventually I'll post this work too.

It always saddens me to see old work, having served its purpose, abandoned & collecting dust.  So while waiting for the TS350's PCB to come back from the fab I got the bright idea to bolt inv48 & sd16f324 together permanently, connect to my 100W solar panel setup in the house, and use it to power the internet connection (cable modem & router/access point) - a whopping 12W.

But there was a problem with this.  Some of the components in sd16f324's sine bridge are only rated for 200V (it was intended as an R&D unit) and the DC output from the inverter is 170V with a DC input of 12V.  The MPP charger on PV system can drive the battery to ~ 14V and this would be dangerously close to component ratings.

Another mothballed project to the rescue!  I had a working prototype of a 12V->5V DC synchronous buck left over from another project.  That work...

Read more »
inv48_1-0d.X.zip

Eagle schematic & board files for full-bridge DC transformer module.

Zip Archive - 114.88 kB - 06/12/2018 at 13:17

Download

sd16f324.zip

Eagle schematic & board files for full-bridge sine module.

Zip Archive - 115.25 kB - 06/12/2018 at 13:17

Download

sine-24khz.xlsx

Digital sine model & pattern generator workbook.

sheet - 71.55 kB - 06/12/2018 at 13:17

Download

ts50_1-0.X.zip

MPLab project (source code) for full-bridge DC transformer module.

Zip Archive - 538.16 kB - 06/12/2018 at 13:11

Download

125vbuck_1-2.X.zip

MPLab project (source code) for 125vbuck project configured for 12V output.

Zip Archive - 232.15 kB - 06/12/2018 at 13:11

Download

View all 6 files

  • Waveforms

    Brian Cornell06/12/2018 at 21:20 0 comments

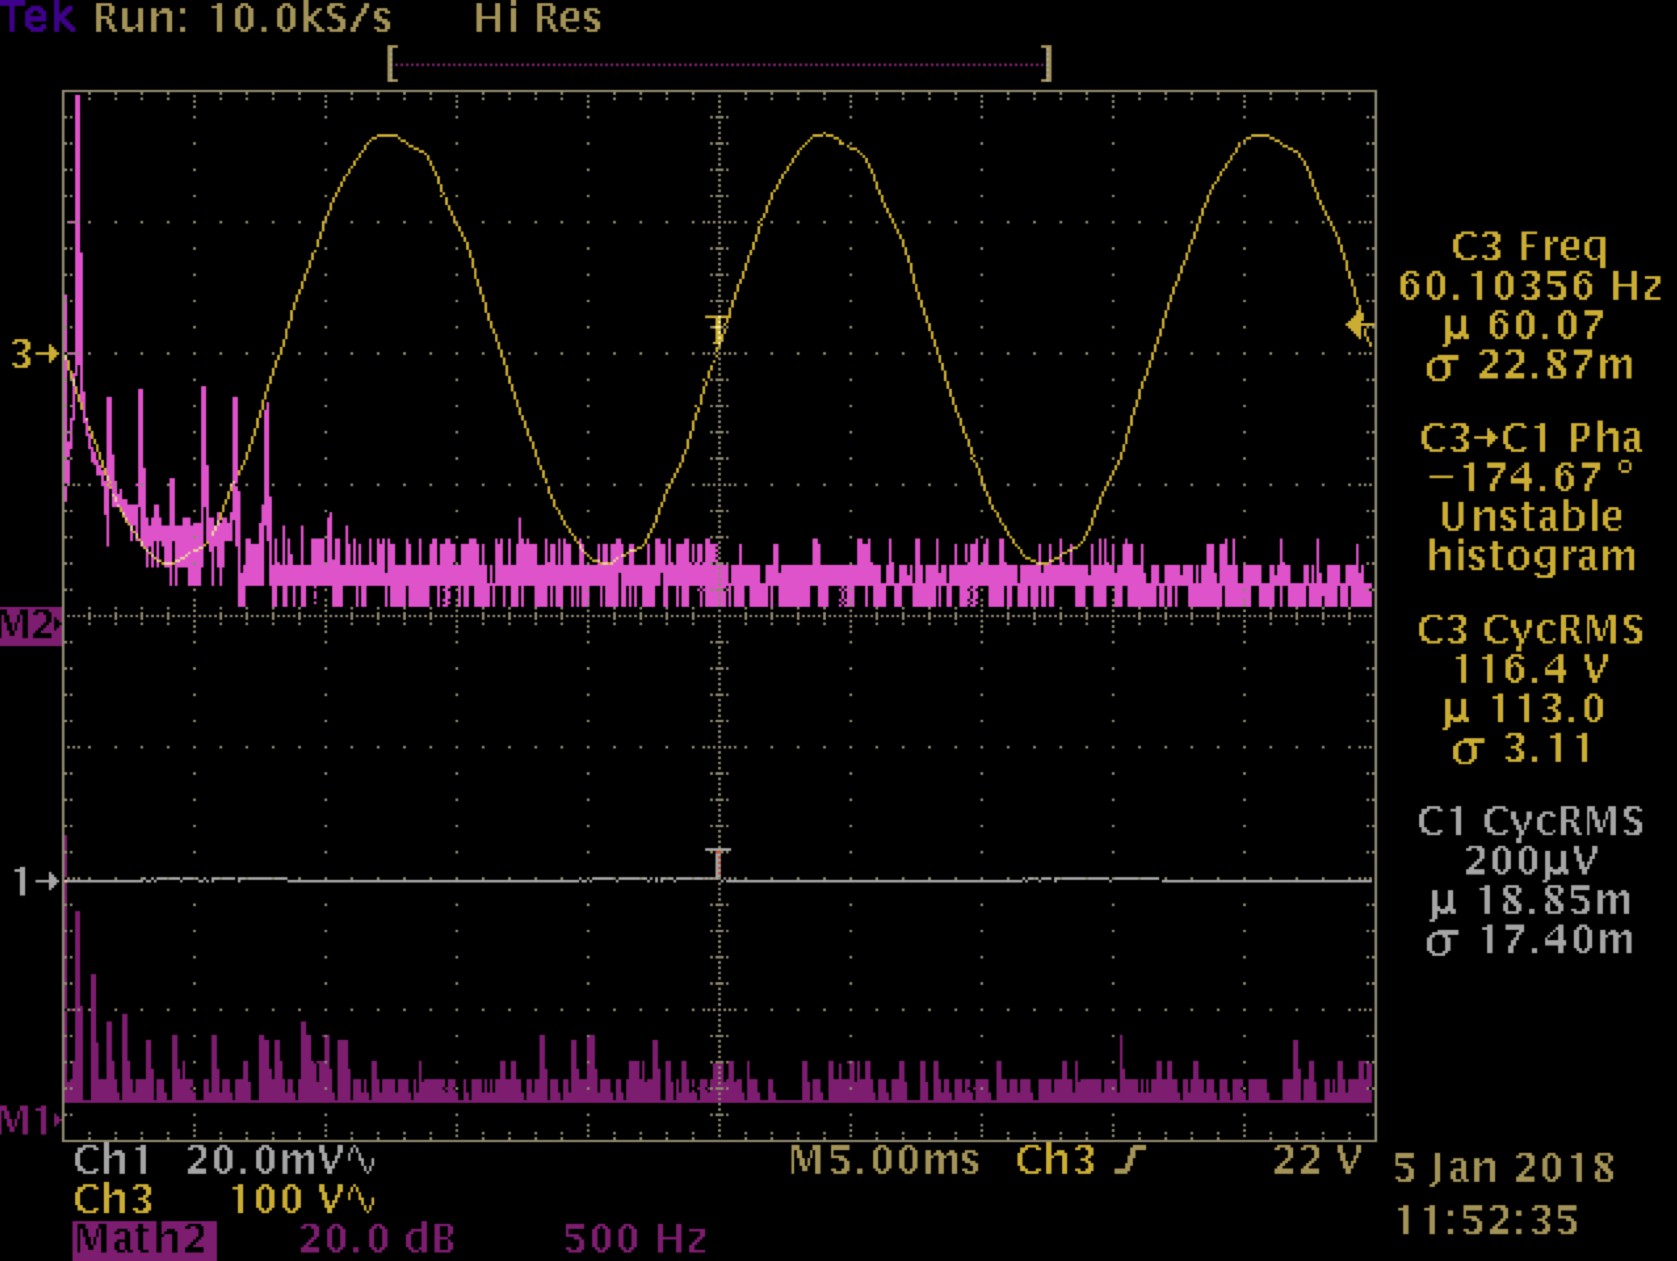
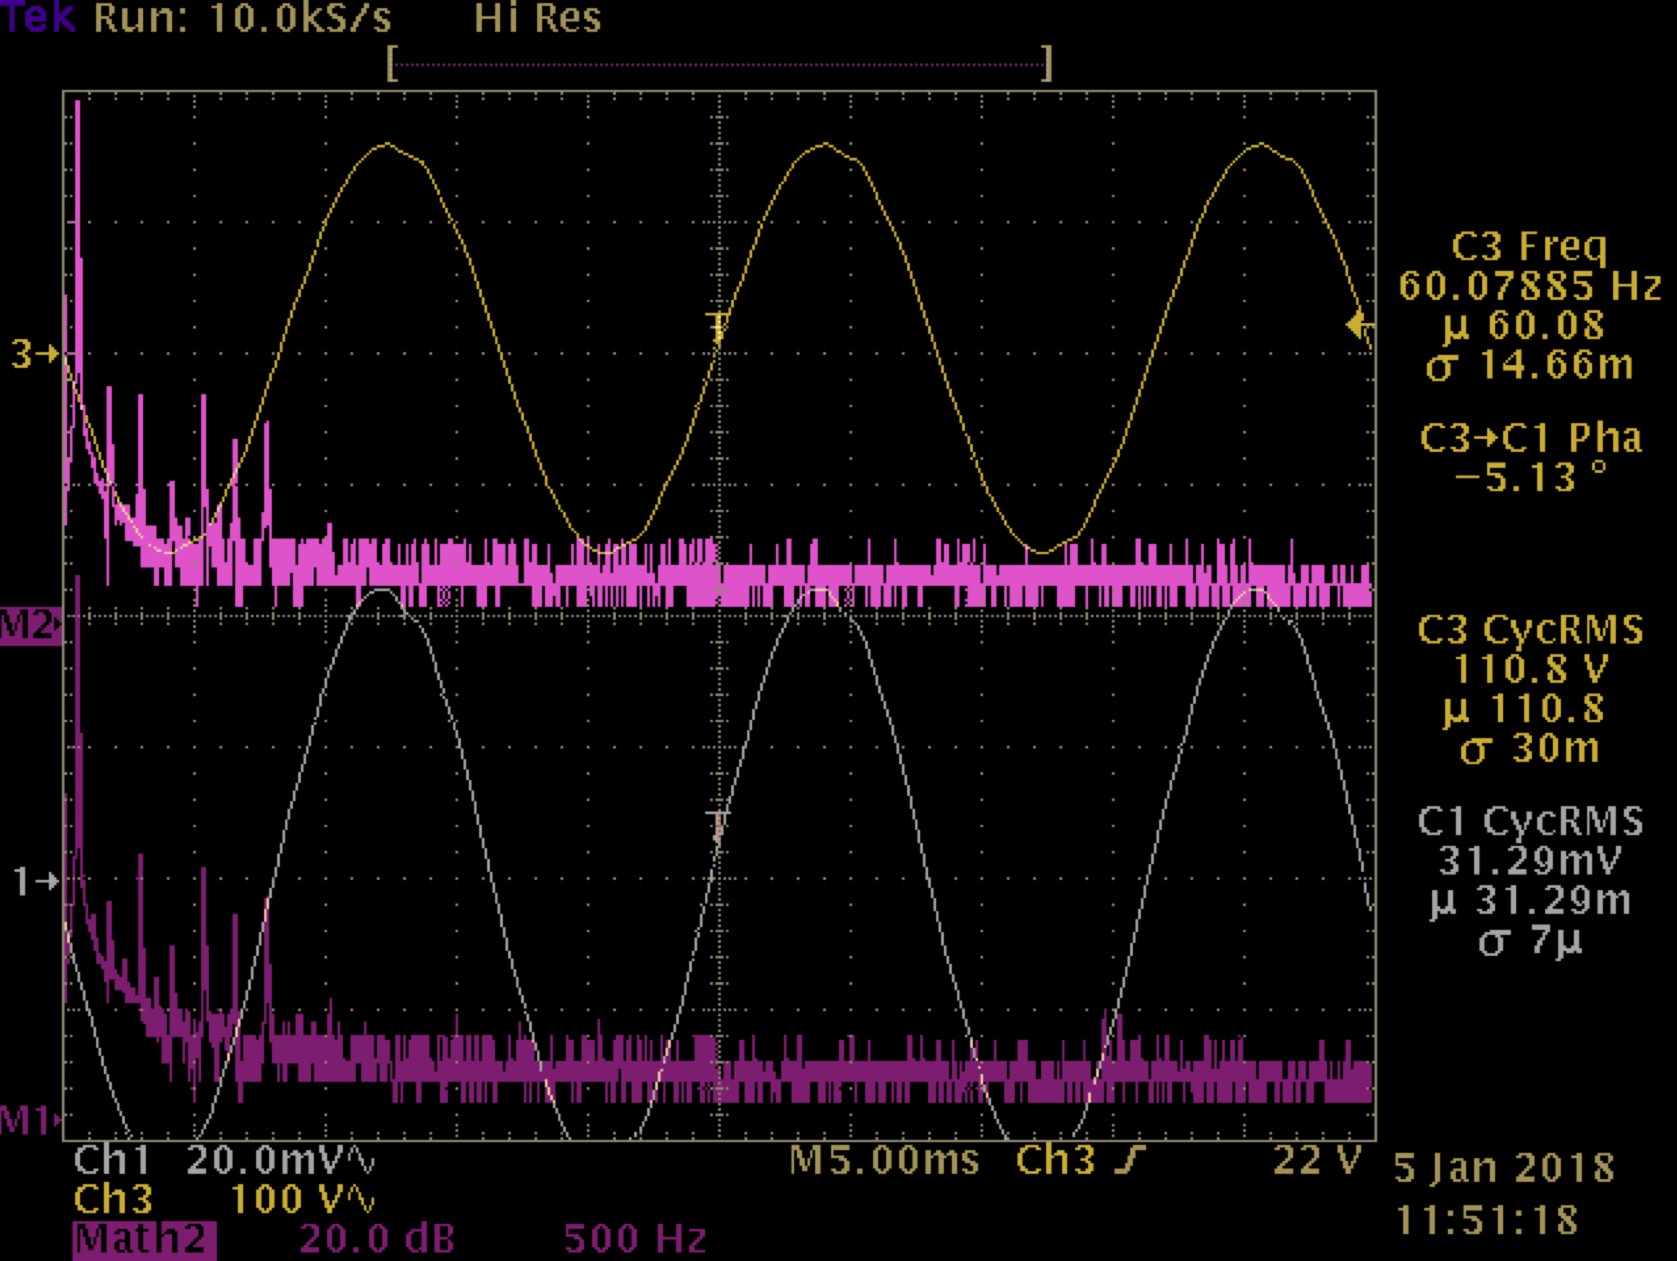
    Included here are a few wave forms of the TS50's AC output.

    First up is the output at no load.  Channel assignments:

    • CH1=current, 100mV/A
    • CH3=voltage
    • M1=FFT current
    • M2=FFT voltage

    Same setup but with 40W load (incandescent bulb).

    In both the harmonics are concentrated below 150Hz and, the three higher harmonics are likely aliases.  The FFTs I've taken of the utility power in my home have more harmonics than this.  Per the log covering the sine module's operatin, the reason that the FFT is not square is because the frequency isn't exactly 60Hz.

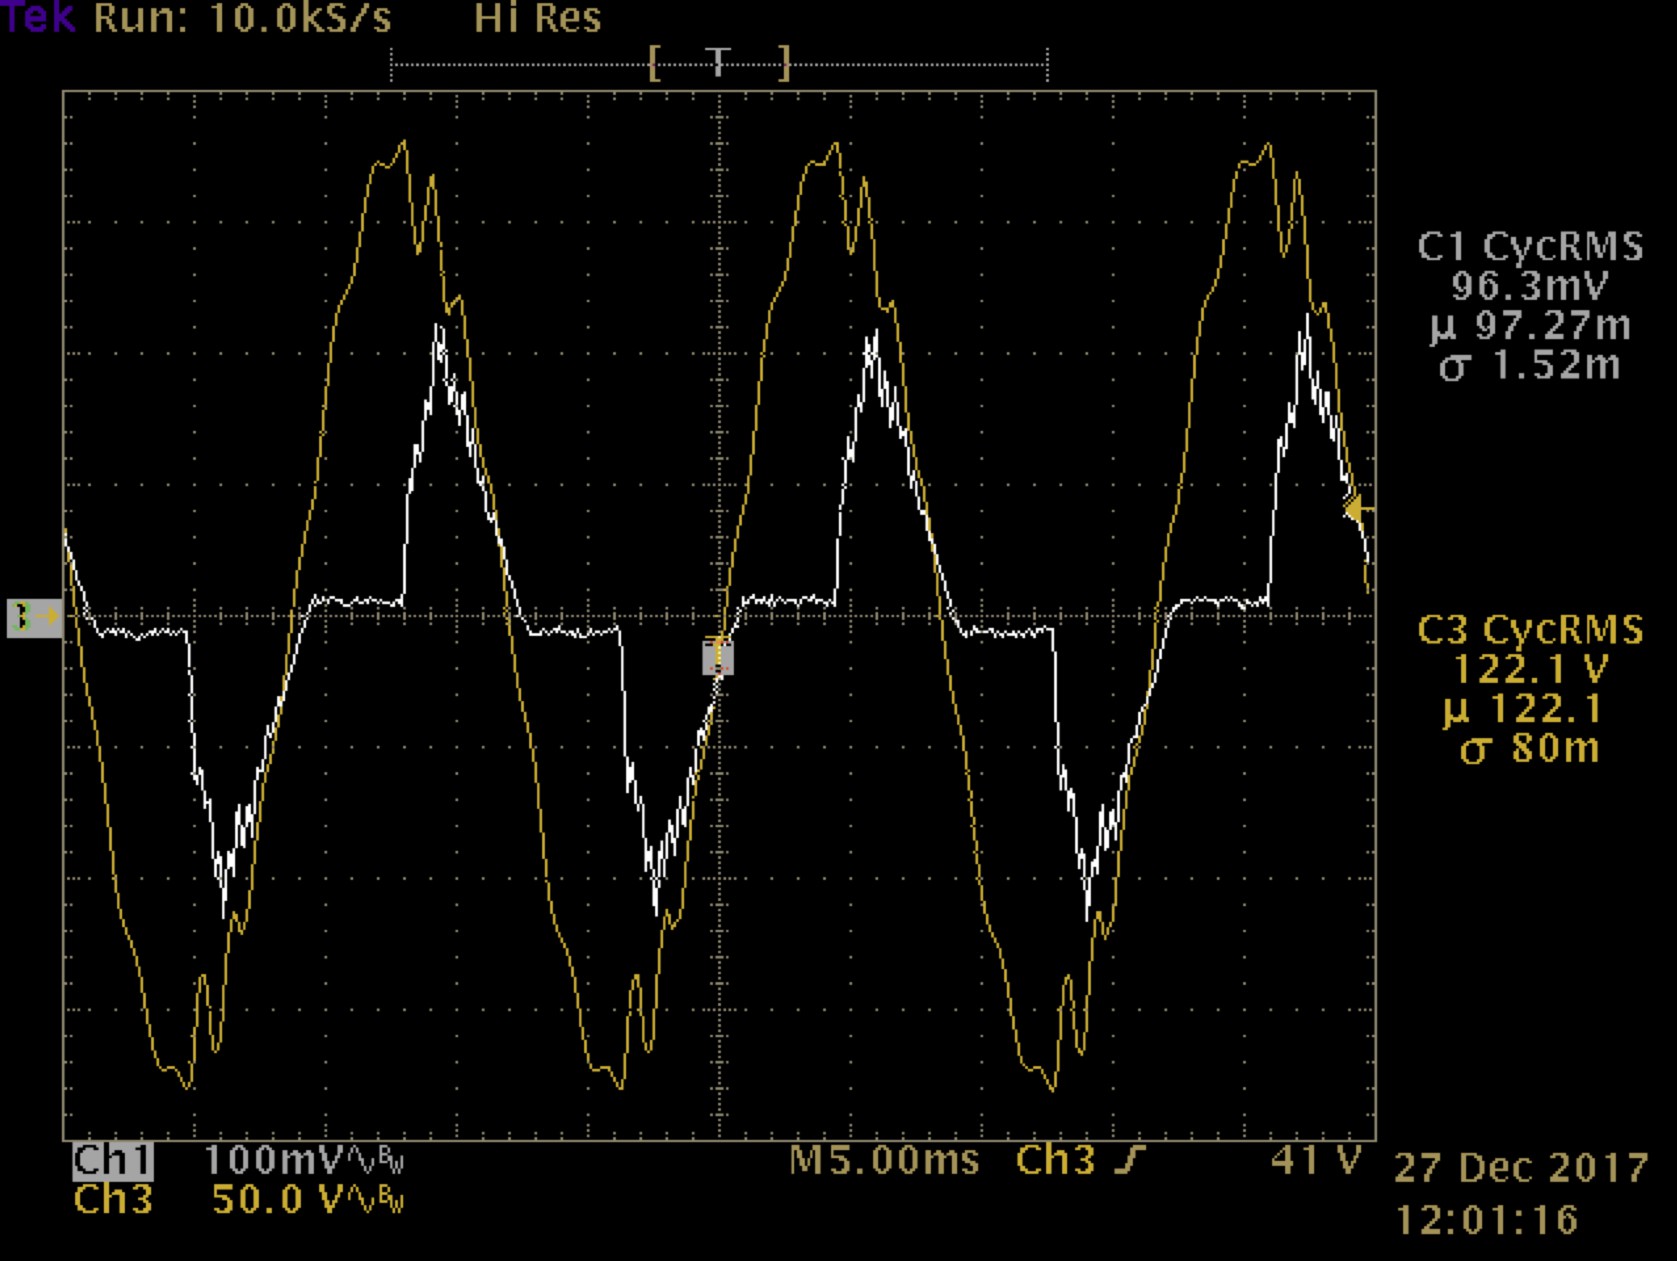
    Last one shows a higher power inductive load.  CH1=current (185mV/A), CH3=voltage.  The TS50 is powering a Dremel 3000 with the speed control at position 6 (out of 8) under no load.

    Visually estimating phase shift, peak current is ~ 1.2A which roughly equates to 192W peak and 64W RMS.  The distortion in the voltage waveform is due to the relatively high impedance of the inverter and not the sine generation / output method itself.  It's a good demonstration that regardless of an inverter's continuously rated output it must have a substantially higher peak output capability.

    Otherwise, the current waveform & phase shift match what was observed with the Dremel powered by the utility.

  • Sine Bridge

    Brian Cornell06/12/2018 at 00:50 0 comments

    The sine bridge section is a specific implementation of direct digital synthesis (DDS).  Theory first, then some details on the unit.

    A sine wave, or any time varying signal, can be represented by a set of discrete voltages representing the signal's amplitude at specific points in time.  The more discrete voltages representing the signal over a given time interval, the higher the resolution.

    At its core this is what the sine bridge does.  It uses a controller (MCU) with a fixed table representing the sine wave's amplitude at specific time points.  The controller 'plays' each of these values at a fixed frequency through an LC filter to obtain a fairly distortion free sine wave.

    The sine bridge achieves this through the use of a full [H] bridge and LC filter like that used in a flyback power supply.  In fact, some of its design & operation is very similar to a flyback.

    The controller contains a table with one hundred values.  Each of these represents the voltage of the sine wave at a particular angle.  It was previously mentioned that the values are related to time, which in this case is equivalent to angle because the unit is producing a sine wave at a single frequency.

    The MCU accomplishes this by the frequency used to 'play back' the values.  The frequency must be evenly divisible into the fundamental (output) frequency or it will be off and contain harmonics.

    It was also previously mentioned that the sine unit functions similar to a flyback converter.  More specifically, it functions like a flyback converter with the output inductor operating in continuous mode (this makes the math a bit easier).  Neglecting losses, the output voltage of a flyback operating in continuous mode is determined by the formula Vin * D = Vout where D represents the on-time, or duty cycle, of the PWM period.  So the table of values contained in the MCU are actually the on-times with which to vary a PWM's duty cycle.

    Bringing it all together.  The MCU uses a PWM to drive a full bridge at 24kHz.  At this frequency, exactly 400 periods will occur in the time required for a single 60Hz cycle (16.666667mS).  The MCU's table contains one hundred entries representing on-time (D) values for sine angles between 0 and 90 degrees.  Starting a 0, the MCU loads the first value to the PWM and starts the bridge.  During that period the second value in the table is loaded (it latches to the PWM at the start of next cycle).

    This process repeats until the end of the table is reached - 90 degrees.  The MCU then repeats the process in reverse, counting down from 90 - 0.  At this point half of a sine wave has been produced.  To complete the remaining half the MCU reverses the bridge direction and repeats the entire process.  Again at 360 degrees the MCU reverses the bridge and continues.

    Throughout this process the output of the bridge passes through LC filter to perform the voltage averaging function and presents a clean 60Hz sine wave.

    The PWM and bridge control are mostly handled in the MCU's hardware but, the loading of the table is handled in firmware and is time critical.  For this reason it's handled by a non-maskable interrupt handler.  This, along with some other characteristics of MCUs, presents considerations & limitations for this approach:

    • Sine wave resolution is dictated by table size which in turn is dictated by the MCU's processor speed.  The MCU must have sufficient execution margin to load the table and still perform other tasks (temperature monitoring, communication, etc.).
    • The table size should meet the Nyquist criteria.  The TS50 violates it (should be 200) but with a single frequency/waveform the LC filter masks most of it.
    • Even with the correct frequency set to drive the PWM there will be harmonics in the output.  This is because of the inherent drift & jitter present...
    Read more »

  • DC Transformer

    Brian Cornell06/12/2018 at 00:50 0 comments

    The DC transformer section started life as an R&D platform (named inv48) for transformer design.  Hence, it's very simple and beyond current limiting doesn't incorporate features to protect it from or manage its environment (e.g. no thermal management, regulation of auxiliary supply, etc.).

    It's unique feature is the use of a Bluetooth module to provide a primitive console that was used for control & data acquisition.  Through the use of a terminal emulator on a PC the unit can be start/stopped, operating parameters viewed & changed, etc.  Added benefits are galvanic isolation - very beneficial when working with high voltages - and no cable fuss.

    This section shares a common lineage with the buck:  both use the PIC16F1769 MCU, gate drive & switching MOSFETs, auxiliary supply scheme, and some firmware.  Pulse-pulse current limiting is provided by low side current sense resistors on each leg of the bridge.

    The bridge is a conventional H configuration using MOSFET transistors and bootstrap-based high side gate drives.  The original design included an output LC filter and opto-isolator based feedback for the voltage control loop.  The transformer primary used a single winding and the secondary a center-tap for full wave rectification.

    Eventually work began on the digital sine evaluator and a high voltage DC source was needed to power it.  Inv48 was adapted for this purpose.  The output LC filter and control loop were removed,  a new transformer (TDK/EPCOS RM10 core, N41 ferrite) was built with a single winding secondary that produced ~ 160V with 12V DC on the primary, and updates to the firmware.  This set the stage for its final transformation.

    As used in the TS50 project, inv48 functions as a glorified DC transformer.  It operates at a fixed frequency of 50kHz and fixed duty cycle of 95% for each side of the bridge.  In addition to the previously mentioned modifications, the opto-isolator was repurposed to issue a logic 'turn-on' command to the sine section once the DC transformer was running.

    To be of some value in the real world, the current sense needed some adjustment since the original design was for peak currents under 10A.  The TS50 supports 50W RMS loads, no problem.  But even a silly 40W incandescent bulb could generate primary currents in excess of 60A!  Note that the steady state current is ~ 333mA RMS.

    Here's the math:  the cold resistance of a 40W bulb @ 25C is ~ 25Ω.  120VAC RMS / 25 = 4.8A.  Reflected back to the primary of the DC transformer, with a ratio of 14:1, 4.8 * 14 = 67.2A.  The instantaneous currents could be even higher depending on where the sine voltage waveform is at the instant of turn-on (the peak of the sine wave @ 120V RMS is 170V).

    In practice, the primary doesn't see currents that high because the bulk capacitance on the HV supply sources it and it's of a duration measured in microseconds since the bulb's filament resistance increases rapidly (the impedance in the sine section's output inductor also limits instantaneous current).  It is still, however, high:  I've measured peaks exceeding 1.5A.  So again, reflected to the primary 1.5 * 14 = 21A.

    This peak demand will persist for several milliseconds, longer than the bulk capacitance on the primary can support, so the DC transformer must be able to support this for short durations (on the order of a few seconds).

    The MOSFETs used in the bridge are capable of handling 60A ~ 100uS.  The PCB is only 1 oz CU but for short durations not a concern, plus traces & ground planes are generous so that parasitic inductance doesn't cause glitches.  The current sense resistors where changed to 10mΩ and higher power ratings to handle the peak & RMS currents.

    The firmware was further modified for automated start (vs. requiring console input), input under & over-voltage limits, logic control of the sine section, and improved current limiting. ...

    Read more »

  • Buck Regulator

    Brian Cornell06/12/2018 at 00:49 0 comments

    The buck regulator is an adaptation of my synchronous buck project posted here: 125vbuck.  That design provided 25 watts at 5 VDC.  It's capable of handling more power (I've tested to 100W), transient response is good, and it can function as an LDO (Low Dropout Regulator) - necessary to support the boost stage of the inverter.

    Modifications:

    • Removed the output Solid State Relay (SSR) - not necessary and reduces conduction losses.
    • Removed PCB fuse F1.  Replaced with a thermal user push-to-reset 7A fuse mounted in the enclosure.
    • Added 4000uF of bulk capacitance to the output.  This aids transient response and supplies the current necessary to respond to the inrush currents of user AC equipment.
    • Adjusted the voltage divider for the control loop.
    • Modified the control loop RC network.  Changed from type 3 to type 2 filter given the addition of higher ESR filter caps.
    • Modified the MCU control program to support the higher output voltage and current.

    The low losses in the power & output section, along with the control program, allow it to function as an LDO.  It's actually configured for a 13V regulated output and can hold this with an input of about 13.5V, depending on load.  Below this the output will track the input with a maximum 1V drop.j

    The MCU will enter under-volt lockout (UVLO) around 11V by shutting down the regulator.  This turns the bridge & sine sections, and hence the AC output off.  The MCU will hold the unit in UVLO until 12V which allows for battery recharge in the PV system.

    The regulator can maintain its regulated output with input voltages up to 20V.  Above this the MCU shuts down the regulator and enters over-volt lockout (OVLO).  This is necessary to protect the gate driver & 5V logic regulator.  Beyond the MCU shutdown there's no circuitry to disconnect the input so higher voltages will damage it.

View all 4 project logs

Enjoy this project?

Share

Discussions

Similar Projects

Does this project spark your interest?

Become a member to follow this project and never miss any updates