Roger
Roger-
2022/12/15 Hangout and Nerdout
12/12/2022 at 22:23 • 0 comments"Hangout and Nerdout" will have a space-themed episode on December 15th 2022, and Sawppy will be one of the topics of discussion.
My presentation slides are here: 20221215 Hangout Nerdout
Event landing page: https://events.hackster.io/hangoutnerdout
-
Status Update, Perseverance Landing Edition
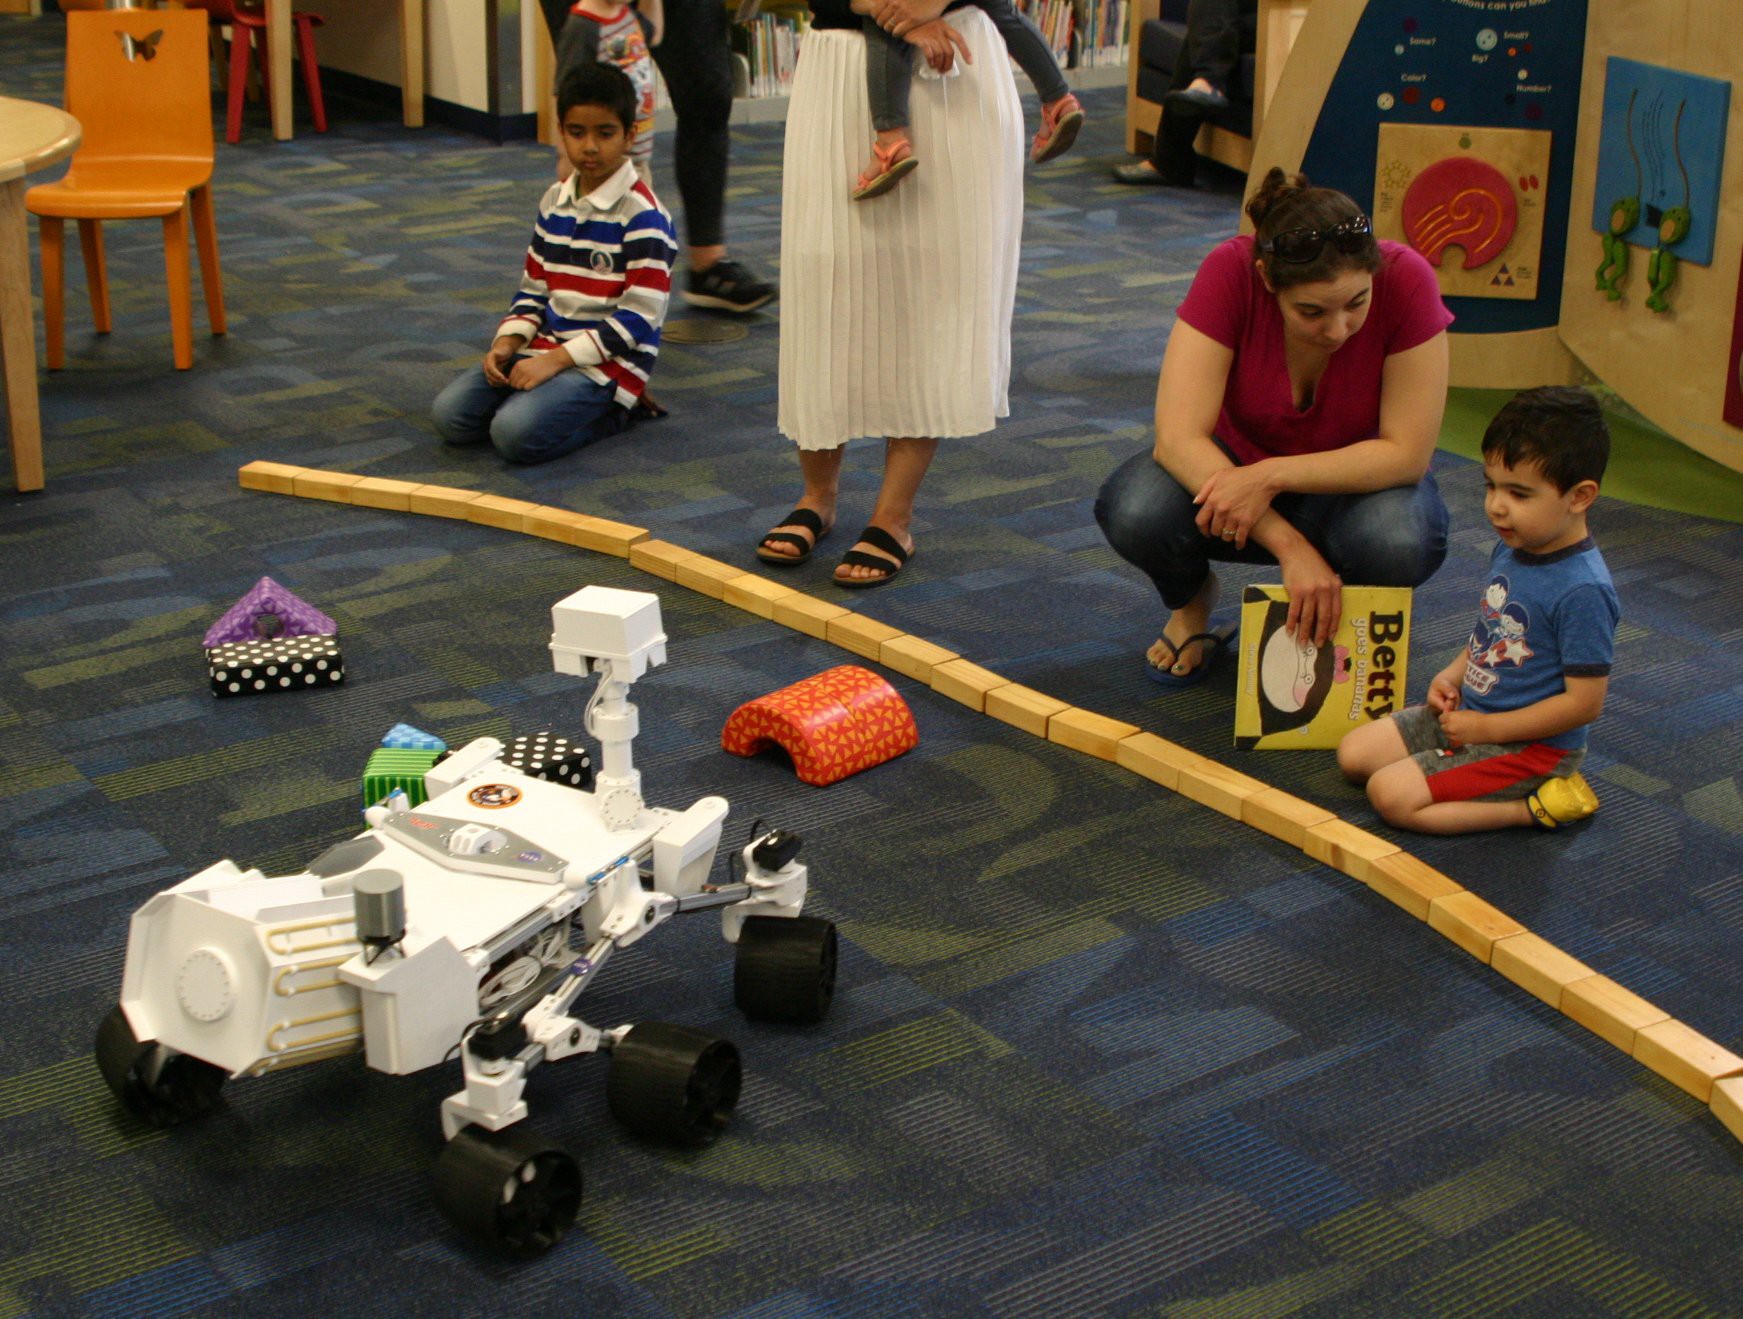
03/02/2021 at 02:07 • 0 commentsGenerating web traffic was never an objective of my Sawppy project so I hadn't kept an eye on the statistics, but I looked at it just now and noticed a distinct rise over the past two weeks. I guess the successful landing of Perseverance rover on Mars motivated a lot of people to think about 3D-printing their own rover here on Earth. Welcome, fellow rover fans!
Here's a quick summary past and future for fans new and old alike:
What you see on this project page is what I now refer to as "Sawppy V1". It was my first project that I documented with the explicit goal of helping others build their own. In contrast to most of my other projects which were just to show an example and/or notes to remind myself later. I was happy to see that many people have accepted my invitation and built their own rovers. (See "Sawppy Builders" log entries elsewhere on this page.) I appreciate constructive feedback submitted by Sawppy rover builders from around the world, and have been pondering how I can evolve future Sawppy versions to address feedback.
One persistent line of feedback was that Sawppy was still too complex and expensive for some rover fans, even though Sawppy was designed to be more affordable and simpler than the JPL Open Source Rover that inspired it. It is true I built Sawppy for myself and others with roughly my level of skill and budget. This translated to an audience of mostly adult hobbyists and some students of college and high school age who can drop $500 USD on a project.
To address the audience left out of the fun by Sawppy V1, my current step in Sawppy evolution is "Micro Sawppy". I am designing and developing a smaller, simpler, and more affordable rover. One that I want to be accessible to elementary school age students (with adult supervision) with a target parts cost of $100 USD. I also want to write the instructions to be more exact and prescriptive. Sawppy V1 instructions had several areas that were left open to builder preference, something I've learned is confusing to beginners who lacked the experience to have a preference.
Micro Sawppy also serves as my testbed for several ideas for 3D-printed rover construction that, if successful, I want to adapt and scale up to a "Sawppy V2". This future rover would be roughly the same size as Sawppy V1. But I want to make it easier to build, more adaptable to variations, and a lower base cost target of $400 USD.
For latest updates and/or more details, I post my development progress to the Sawppy category on my personal blog. (I used to cross-post them to this project page, but I've stopped doing that since it's a different rover project.)
-
Trying to Improve Sawppy Documentation
11/09/2020 at 07:11 • 0 commentsWhen I decided to release Sawppy to the world, I thought briefly about how to best organize all the information I want to convey for rover assembly. I quickly fell into a state of Analysis Paralysis and, as a path out of that state, decided that it was better to have something written down whatever the format. No matter how unorganized, is still better than keeping it all in my head.
I first tried putting it in the “Build Instructions” section, but that feature has some strange and unpredictable limitations that became annoying as the length of instructions grew. The final straw was when I noticed that images and instructions for earlier steps were disappearing as I added later steps. That made me… unhappy, so I went to something else.
The second attempt is what I have as of today: a loose collection of Markdown files on a Github repository. Edited in a code editor rather than a word processor, I struggled with typos and grammatical errors as I lacked the usual automated proofreading tools present in a word processor. Still, with a large helping of assembly pictures, it was just barely enough for people to build their own rovers.
I was painfully aware of the fact there is a ton of obvious room for improvement. This was just the “get it written down” first stage and at some point I need to revisit the various problems still open. The most significant of which is lack of structure beyond an index page with links to all the other pages. The index suggested a relative ordering that matched my personal assembly order, but that doesn’t necessarily work for anyone else. And worse, they would be stuck if they wanted to ask some specific questions my layout is unable to answer.
As an example of problems with Sawppy’s documentation, look at a single component: a Sawppy wheel axle. There are at least three entirely separate pages relating to the wheel axle:
- The page of parts list, telling a builder to buy 8mm metal shaft.
- The page for 8mm shaft modification, where I describe how to cut the long shaft into shorter segments. Followed by steps to turn these segments into wheel axles. Other segments were turned into steering shafts, plus those turned into rocker-bogie suspension pivots.
- The page for wheel hub assembly, which incorporates a single segment of the 8mm wheel axle shaft.
While these three files were all linked from the index page, there’s no obvious way to retrieve the relationship between them in the context of wheel axles. I can manually add links between them, but this is time consuming and perpetually incomplete. Even worse, as the number of relationships grew, it will quickly become a maintenance nightmare.
Thus I started my quest to find a system to document and track these types of relationships without losing too much of the advantages of my current system. This means every candidate system must meet the following challenges:
Challenge A: Easy to Contribute
When a Markdown file is hosted on GitHub, a potential contributor can click the “Edit” button to create a fork of the repository, make a quick fix, and create a pull request all via GitHub website. This presents an extremely low barrier to entry for contributors which is a feature I want to preserve. If contributors were required to install and learn some piece of documentation software, that would discourage many people from participating before we even talk about the learning curve for that software.
Challenge B: Easy to Manage
When using GitHub’s web interface to edit a Markdown file, visualizing the change is as simple as clicking over to the “Preview” tab of the editor. Sadly such ease can’t be matched by any system external to GitHub, but it would be nice to have some way to let a contributor see what the end results look like. Failing that, I must have a way to visualize the final impact of changes before I merge a pull request. It is unacceptable to not see changes until after merging into the main branch.
Challenge C: Easy to Query
The desired documentation system will take metadata written by document author and build an interactive presentation. This way rover builders can find information without being constrained by the current linear narrative. Here are some examples of questions I’ve received for Sawppy, rephrased in terms of wheel axle.
- (Easy: positive query) I’m on the wheel hub assembly page, and it needs the wheel axle which I guess I forgot to build. Where do I need to go?
- (Hard: negative query) My order of 8mm shafts got delayed. What can I work on now that’s not dependent on having these shafts?
- (Both of above) How can a teacher most effectively divide up rover tasks so multiple students teams can build the rover in parallel?
Challenge D: Free
It would be nice for the system to be free as in freedom, but at the very least it must be free as in beer. Design for Sawppy is given away at no cost to rover fans everywhere, there is no profit to cover monetary expense of a documentation system.
This was the problem statement I presented to the combined Write the Docs LA/SGVLUG meetup on the evening of October 8th. Sawppy’s current system of a loose set of Markdown files score highly on challenges A and B, but fall flat on C. What can I look into that helps with C without giving up the rest?
DITAFundamentally speaking, challenge C is not new, as it would be desirable in any large scale engineering project. The novel twist here is the desire to do it all with a system that is inviting for public contribution. As a general rule, documentarians for large engineering projects are professionals who have undergone training and have licenses for proprietary software tools.
Most such tools are excluded from consideration due to cost, but many of them deal with DITA, an open XML-based data model for authoring and publishing under the custody of the OASIS consortium. It is the standard answer to reassure customers wary of being locked in to proprietary file formats. And since it is an open format, there exists a DITA Open Toolkit to transform DITA data to desired output formats… HTML, PDF, even Markdown! There are learning resources at https://learningdita.com/
As a XML (and thus text) based format, DITA would be GitHub friendly for branching and merging. It is very flexible for creating any organization we want (creating a “Subject Schema” for DITA) but taking advantage of that power will take work. DITA Open Toolkit functions at a lower level relative to the other tools discussed here. A quick web search found many commercial offerings built on DITA (example: https://easydita.com/) but failed to find free open source counterpart.
Bill of Materials
Similar to documentation, the challenge of tracking parts and components is well-tread ground for engineering projects. People at the meeting with industry experience suggested a few terms. MRP or Materials Resource & Planning was one, plus several variants on BOM or Bill of Materials. This area is big business! Sadly free open source tools are scarce. Someone gave a pointer to OpenBOM.com but upon further research I was disappointed to find that despite the name, this tool is not actually open.
That leaves us with few choices between “use a spreadsheet” and big ticket enterprise software. Even if numerous choices were available, such tools are focused on a very small subset of the overall problem. I do want to set up some kind of parts management, but bringing in a full fledged BOM tool adds a lot of complexity I’m not sure is justified for a small scale project like Sawppy.
Model All The Things
I have the same concern about another series of suggestions. The idea is to fully model everything about Sawppy using a modeling language like SysML or PlantUML. I agree doing so will result in a complete picture, breaking down every part of the rover project. Such data could then feed into software packages that generate visualizations plotting dependencies between components. That sounds good, but the amount of work also feels disproportionate to the benefit it would bring to a project of this scale.
Static Site Generators
I’m glad I had the chance to learn about the tools listed above. They are great tools for their respective niches, but adopting any of them would require major changes and I prefer to take a smaller incremental step. Which brings us to static site generators. (SSG) This category of software tools see a lot of open source development, giving us many options to choose from.
Background: As input, SSGs take content in various formats. A set of rules and templates are applied to that content, generating as output a set of HTML and CSS (and maybe JavaScript) files that can be served by any web server. “Static” in this context means the web server does not have to run any code to modify the files, they are transmitted directly to users’ web browsers as-is. (As opposed to a server-side systems like PHP.)
A large number of SSGs accept Markdown as a text content input format, meaning Sawppy’s existing Markdown documentation can be used with very few changes. This also preserves the advantages of using Markdown, meeting most of challenges A and B.
Every SSG offers customization of the rules and templates that it applies to content. At the minimum there are themes for cosmetic appearance, but plugins and extensions allow more extensive functionality. This is where I hope to create something that meets my challenge C including a lightweight BOM tool. Around this point Eric spoke up that the JPL Open Source Rover documentation system has a script that generates parts list from document content, but the generated dependency tree is not exposed to the viewer. I want to build upon that precedent and also make this kind of information available to rover builders.
To be pedantic, Sawppy documentation is already using a SSG because GitHub does not display raw Markdown files. A simple transformation to HTML has been applied for display. However, the reason I started this investigation is because the simple GitHub transformation is very limited. GitHub is aware of this, and as an upgrade, has built-in support for a SSG called Jekyll for generating GitHub Pages.
As another example, most of us had experience reading technical software documentation on some subdomain of ReadTheDocs. All of these content were generated by a SSG. MkDocsand Sphinx are two popular SSGs for ReadTheDocs, and a lot of the default functionality (automatic indexing, references, etc.) useful for technical software documentation would be useful for Sawppy as well.
But features like a lightweight BOM tool would be outside the scope of software documentation, so there were several recommendations for investigating Hugo. It is apparently the current darling for flexibly transforming content (including Markdown text) into varying different presentations. Associated with Hugo is Docsy, a Hugo theme focused on technical documentation.
I plan to start with Hugo with the Docsy theme and expand my experimentation from there.
Preview Changes
But using a SSG also introduces the problem of previewing pages, because we’re no longer directly using the simple Markdown transformation. Contributors should not be expected to set up a SSG environment on their computer in order to see the results of their work, and asking maintainers to review every change on their own SSG environment would not scale.
The answer is to bring in tools from the continuous integration world, where tools exist to preview changes to a website before deploying live. Some use services like Netlify, which is not itself open source but there is a free tier available.
One example: look at the repository for Write the Docs website. Open one of the pending pull requests and click on “Show all checks”. One of them is “Read the Docs build succeeded!” and clicking “Details” will bring up a version of the site built with changes in the pull request.
At this point I ran out of steam, and the meeting ran out of time, but I have a big treasure trove of pointers to investigate and keep me busy for a while.Other notes:
- Project Tetra is a hardware project that has a documentation publishing system that uses Docsy and Hugo. It also uses PlantUML and Graphvis to render diagrams. https://tetrabiodistributed.github.io/project-tetra-docs/explanations/documentation-overview/
- Markdown is not the only lightweight markup language, here’s a list on Wikipedia: https://en.wikipedia.org/wiki/Lightweight_markup_language
- It is already quite clear Hugo is not the only documentation system out there, but Wikipedia has many more in a list: https://en.wikipedia.org/wiki/Comparison_of_documentation_generators
-
Rhys Mainwaring’s ROS Melodic Software and Simulator for Sawppy
01/31/2020 at 22:37 • 3 comments![]()
When I created Sawppy, my first goal was to deliver something that could be fun for robotics enthusiasts to play with. The target demographics were high school students and up, which meant creating a software stack that is self-contained and focused enough to be easy to learn and modify.
To cater to Sawppy builders with ambition for more, one of the future to-do list was to write the necessary modules to drive Sawppy via open source Robot Operating System. (ROS) It is a platform with far more capability, with access to modules created by robotics researchers, but not easy for robotics beginners to pick up. I’ve played with ROS on-and-off since then, never quite reaching the level of proficiency I needed to make it happen.
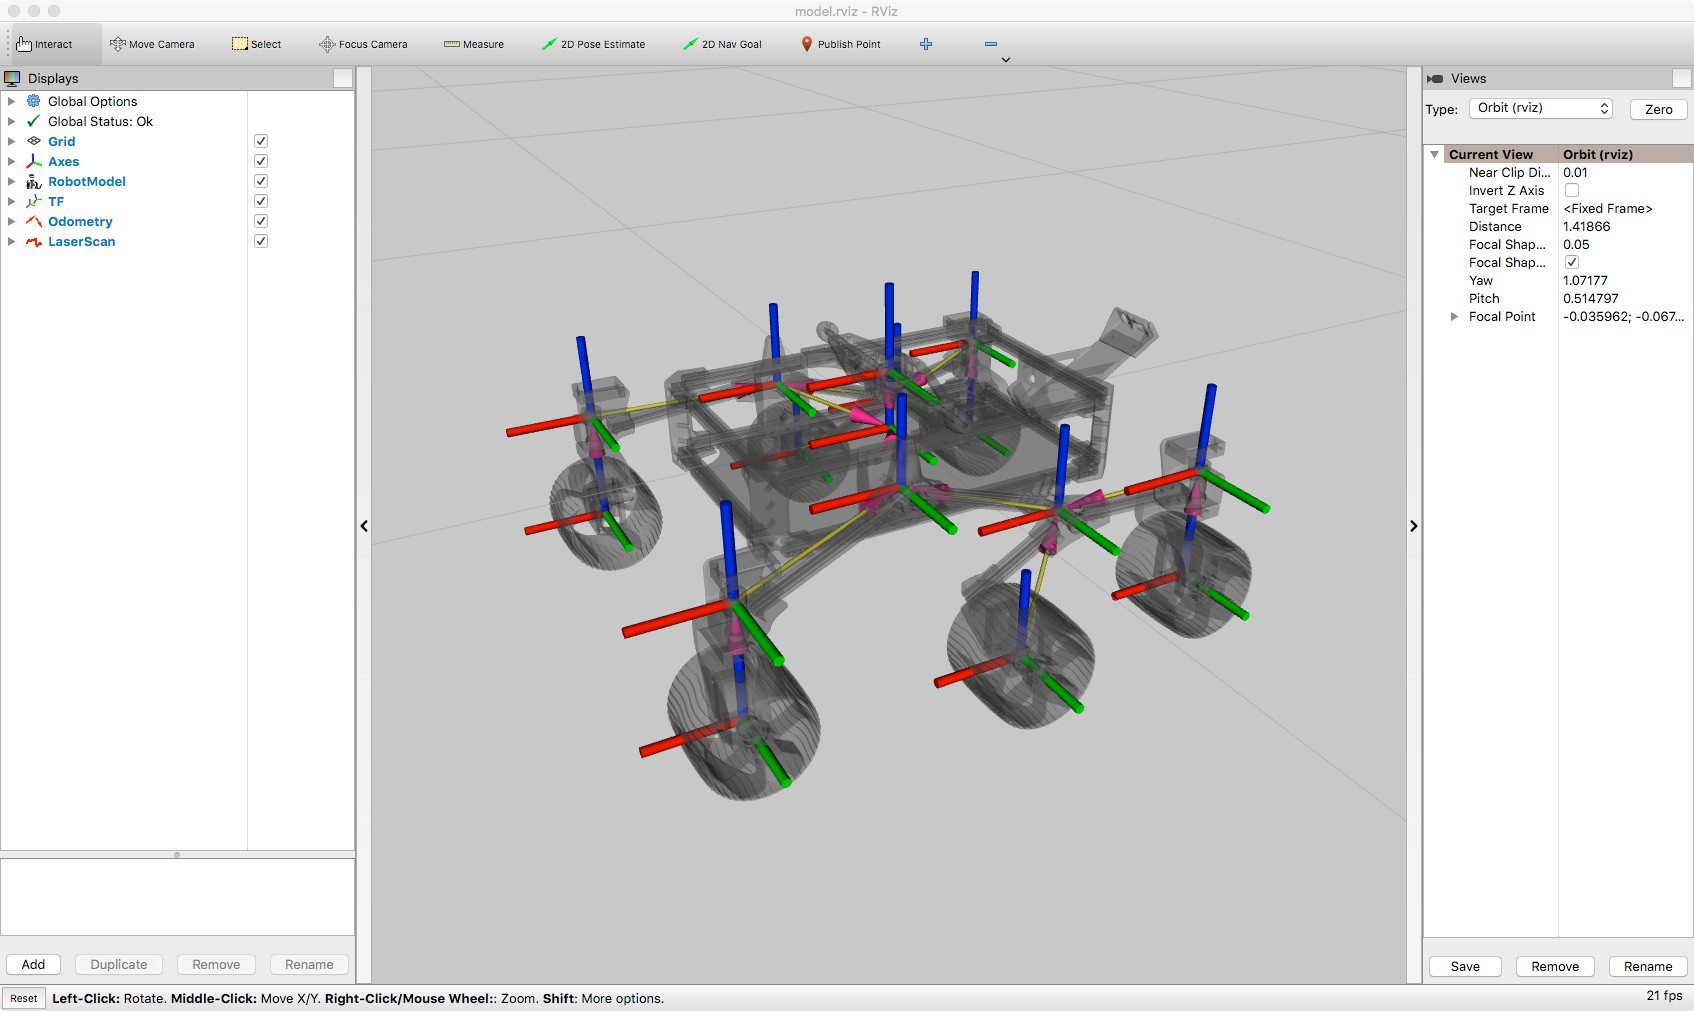
So I was very excited to learn of Rhys Mainwaring’s Curio rover. Curio is a Sawppy sibling with largely the same body but running a completely different software stack built on ROS Melodic. Browsing the Curio code repository, I saw far more than just a set of nodes to run a the physical rover, it includes two significant contributions towards a smarter rover.
Curio Rover in Simulation
There’s a common problem with intelligent robotics research today: evolving machine learning algorithms require many iterations and it would take far too long to run them on physical robots. Even more so here because, true to their real-life counterparts, Sawppy and siblings are slow. Rhys has taken Sawppy’s CAD data and translated physical forms and all joint kinematics to the Gazebo robot simulator used by ROS researchers. Now it is possible to work on intelligent rovers in the virtual world before adapting lessons to the real world.Rover Odometry
One of the challenges I recognized (but didn’t know how to solve) was calculating rover wheel odometry. The LX-16A servos used on Sawppy could return wheel position, but only within an approximately 240 degree arc out of the entire 360 degrees circle. Outside of that range, the position data is noisy and unreliable.Rhys has managed to overcome this problem with an encoder filter that learned to recognize when the servo position data is unreliable. This forms the basis of a system to calculate odometry that works well with existing hardware and can be even faster with an additional Arduino.
ROS Software Stack For Sawppy
Several people have asked me for ROS software for Sawppy, and I’m glad Rhys stepped up to the challenge and contributed this work back to the community. I encourage all the Sawppy builders who wanted ROS to look over Rhys’ work and contribute if it is within your skills to do so. As a ROS beginner myself, I will be alongside you, learning from this project and trying to run it on my own rover.https://github.com/srmainwaring/curio
(Cross-posted to NewScrewdriver.com)
-
Sawppy Builders (Page 2)
08/23/2019 at 07:48 • 2 commentsThis is the second page of Sawppy Builders, for Page 1 click here.
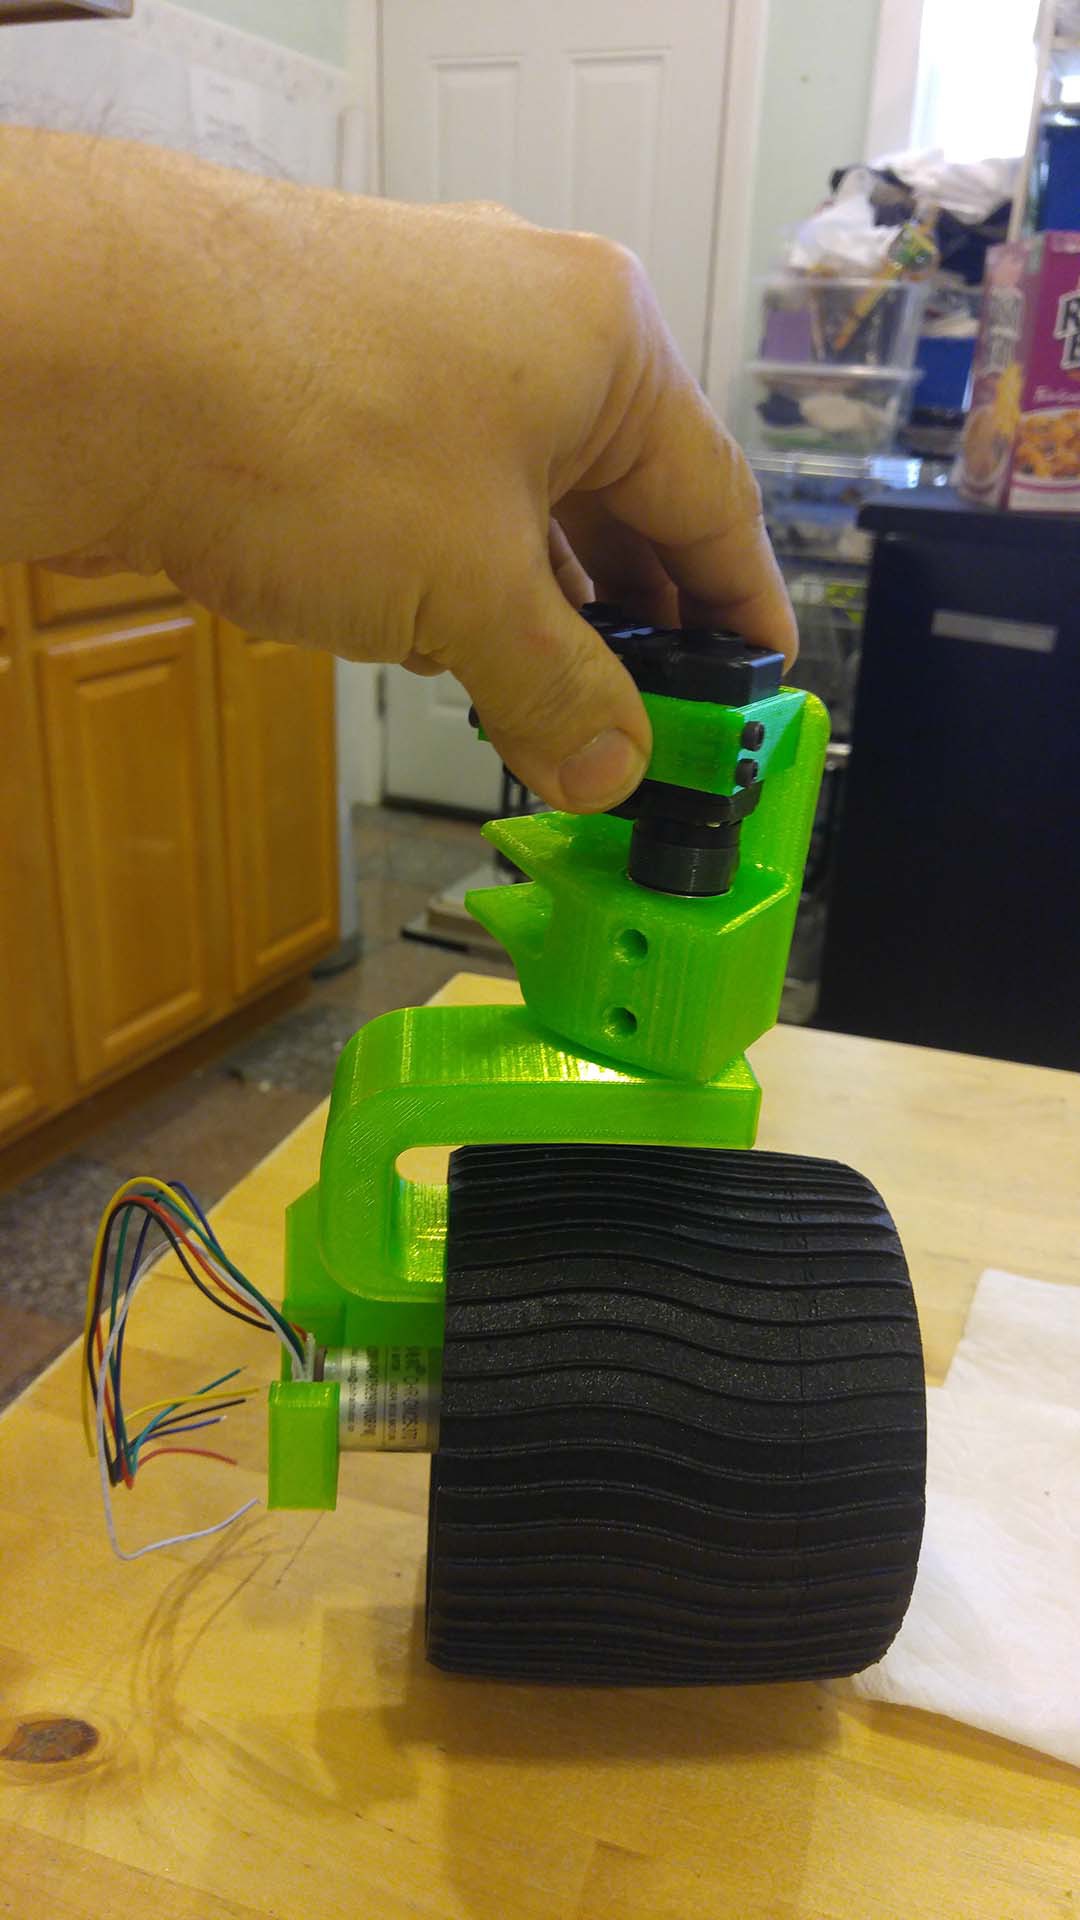
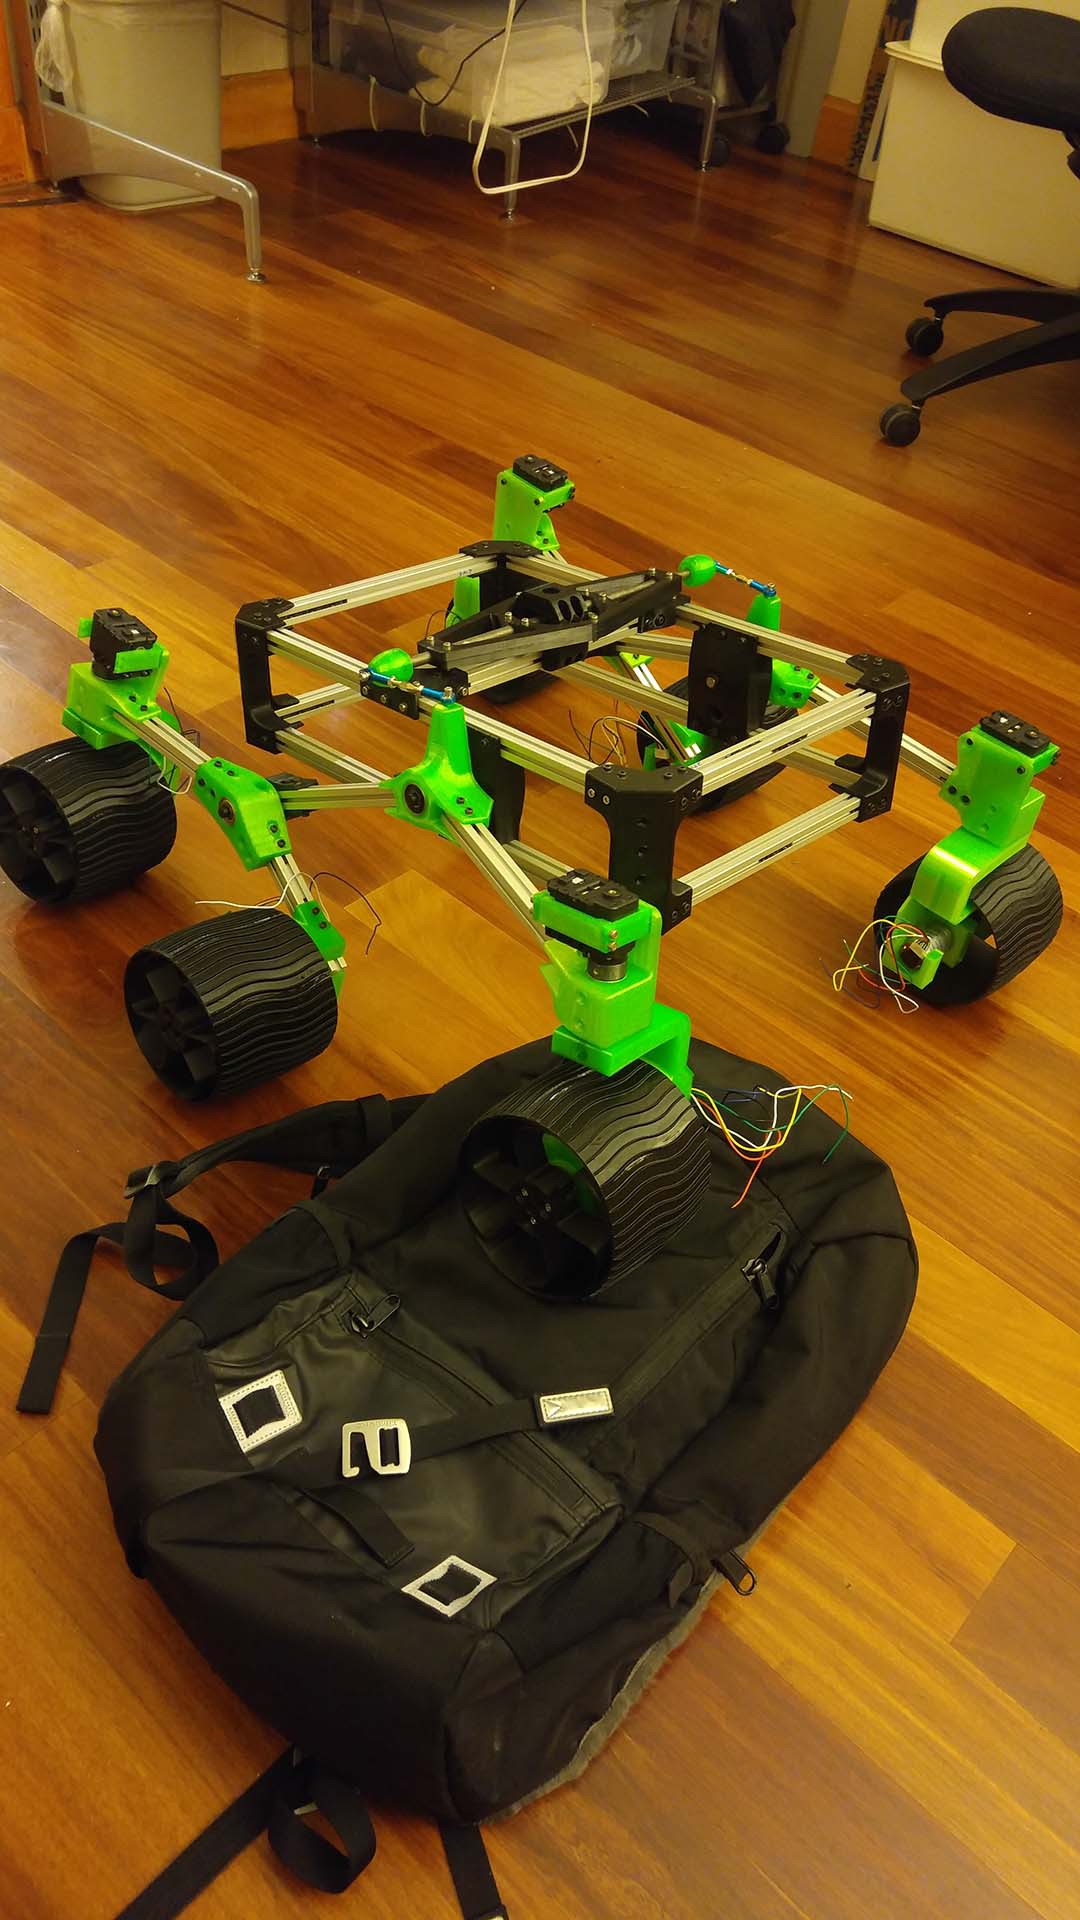
I met Steve at Maker Faire Bay Area 2019 in May, where he showed me pictures of a few of his Sawppy parts. It is now August 2019 and his Sawppy is mechanically complete. Steve is a HomeBrew Robotics member like Marco, and the new rover is neon green to distinguish from Marco's neon yellow Sawppy.
In terms of modifications, Steve is adopting Marco's faster wheel drive motors, and instead of cutting drive shafts from metal Steve has printed his from NylonX. It'll be interesting to see if that material is strong enough for the job!
See more details at Steve's YASP (Yet Another Sawppy Project) page.
![]()
![]()
Leif is teaching a robotics course for high school students and he thought Sawppy might be an interesting team project for the class. The class will start with the Arduino control option, given cost and learning resources available for Arduino. It'll be fun to see what the students dream up for their own Sawppy modifications.
![]()
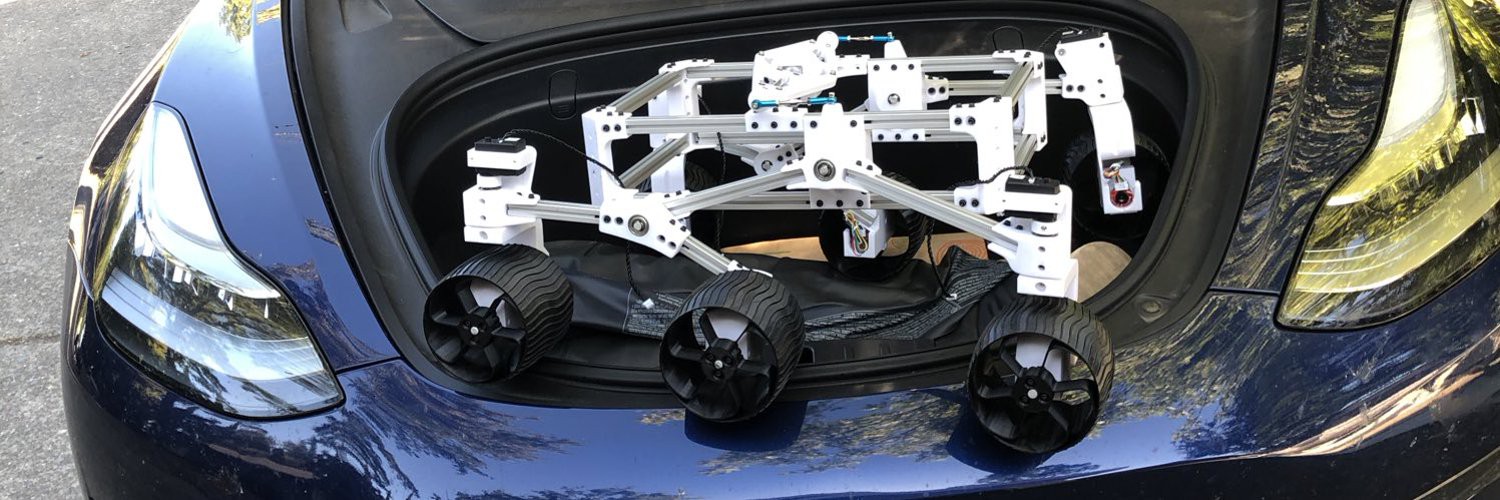
Patrick's Sawppy variant (named Swappy) made an appearance at the Rocklin Mini Maker Faire, representing the Sierra College Robotics Club. It might be the first of Sawppy's siblings to be chauffeured around in a Tesla Model 3, though this picture shows it doesn't quite fit in the frunk.
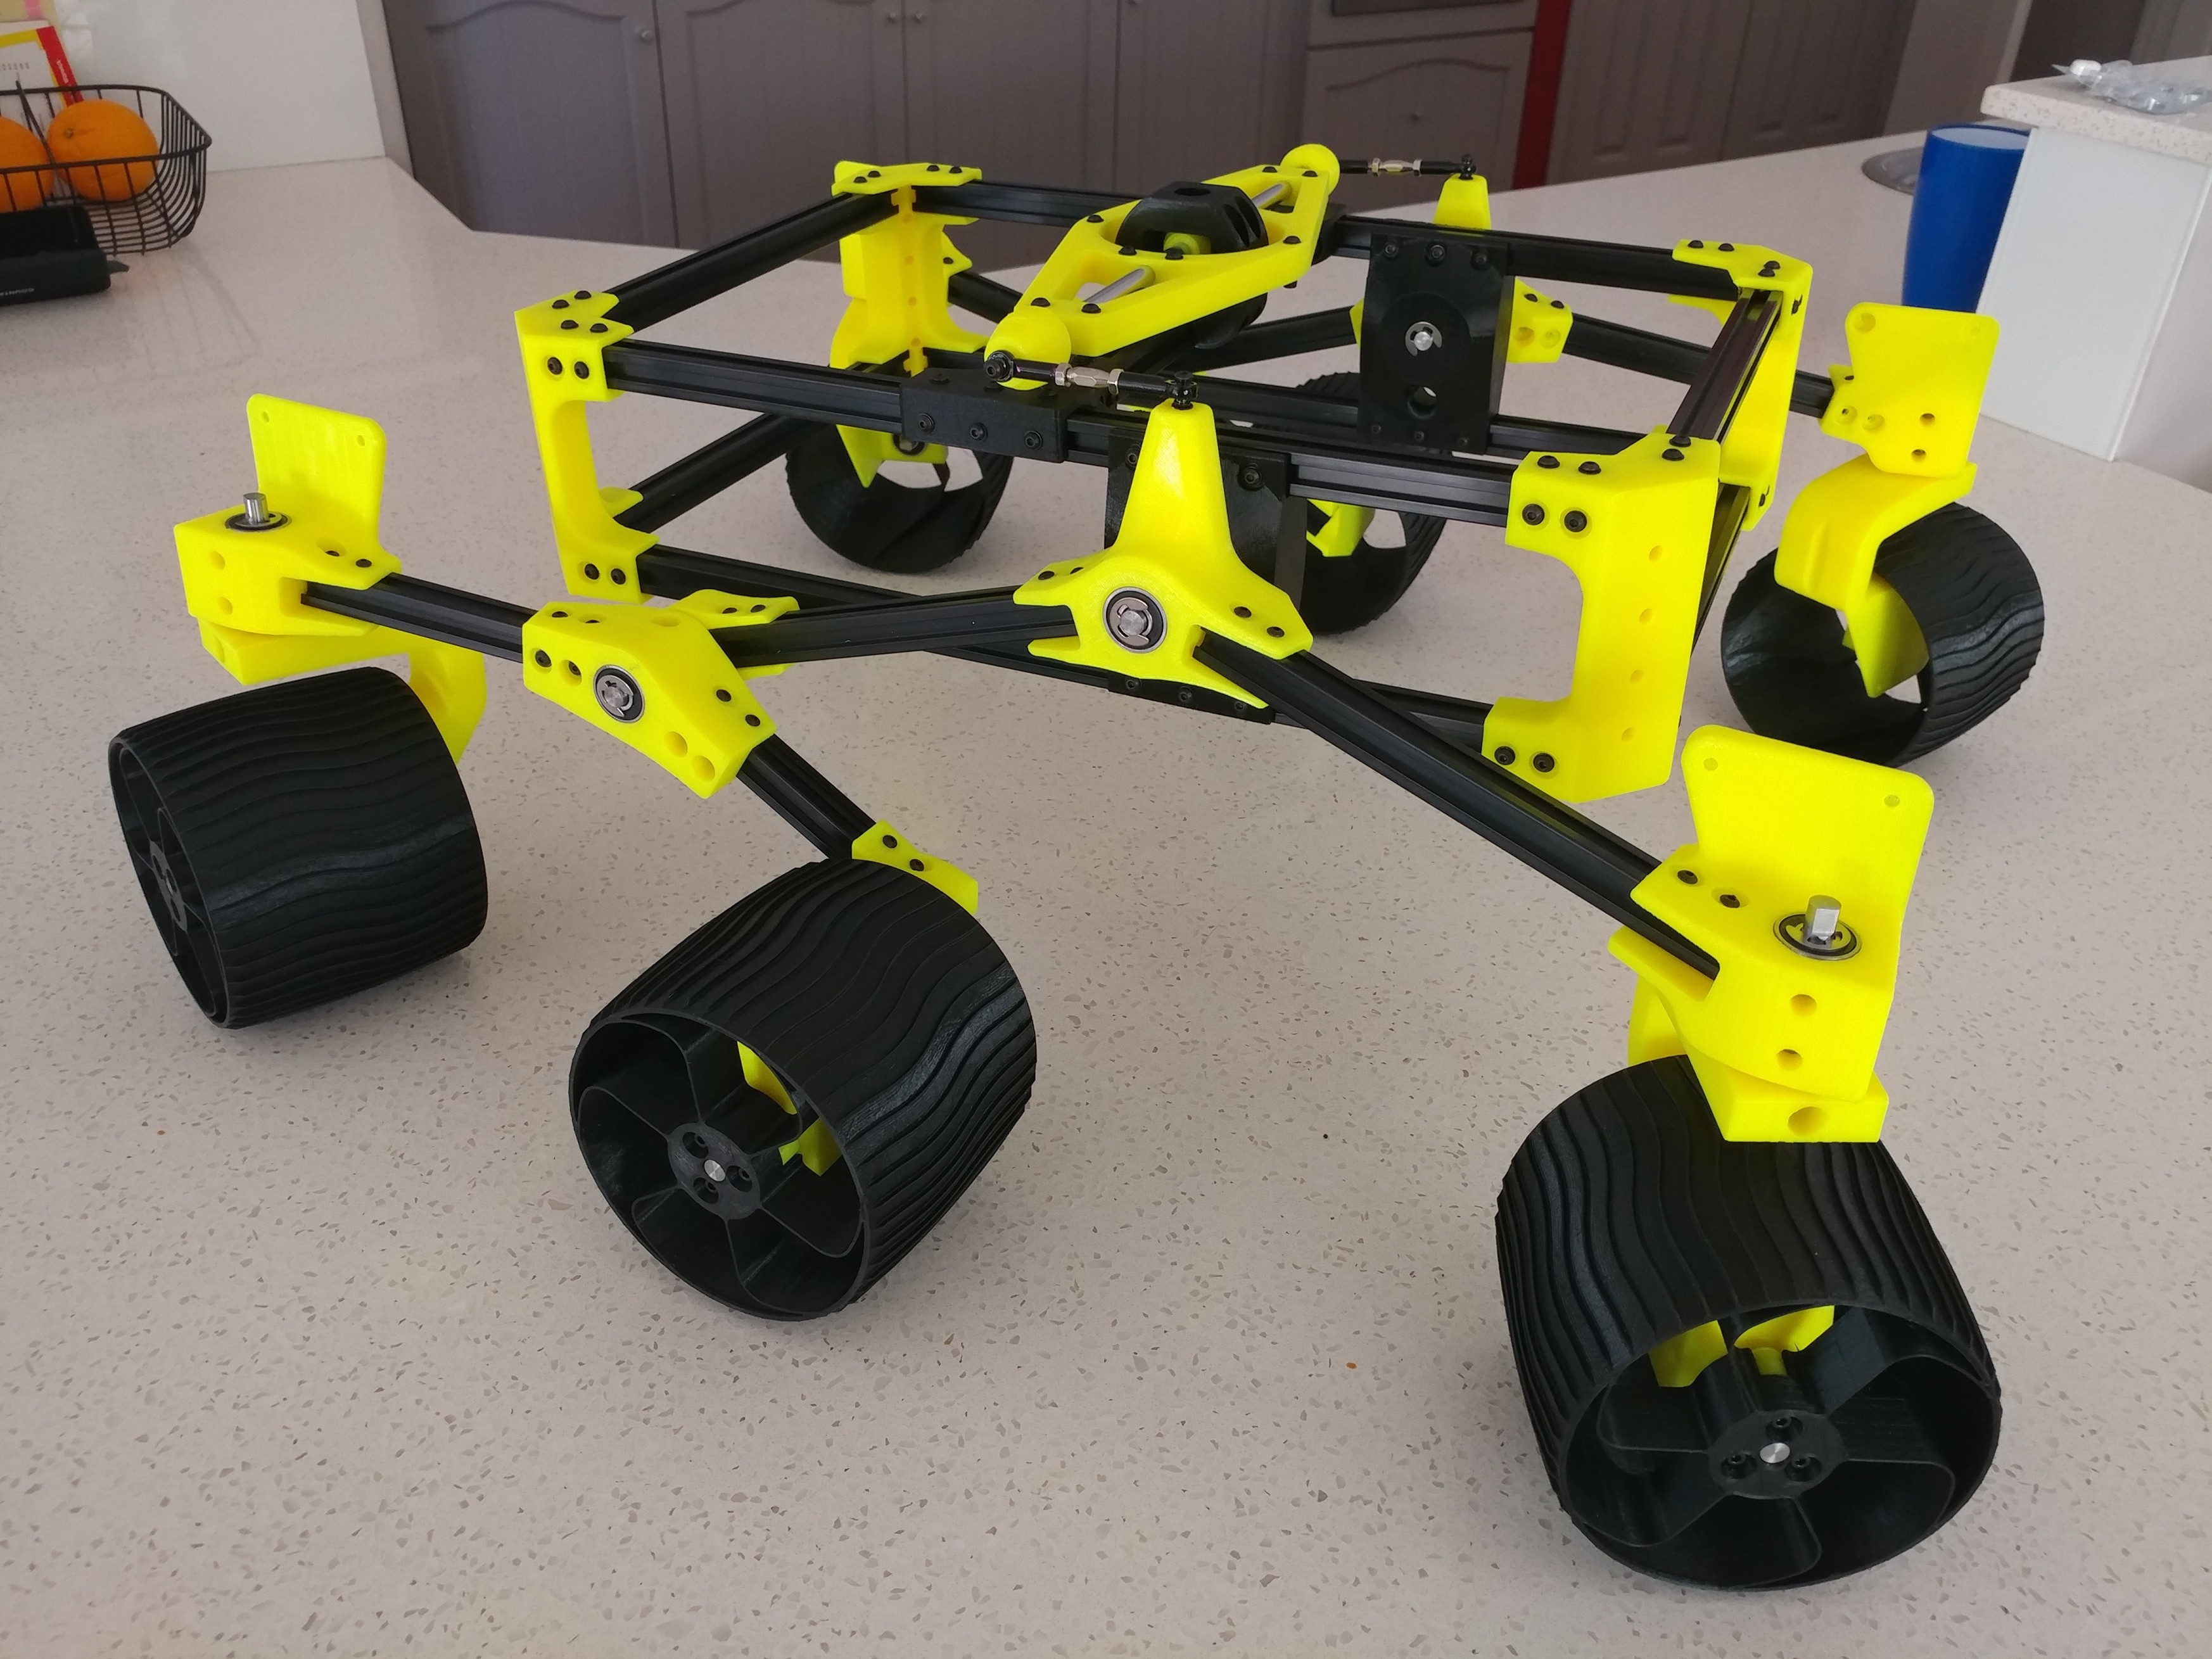
TeamSG Aussie SawppySawppy has a brother down under! This is a father-and-son team putting a rover together, and their chosen yellow-and-black color scheme looks very sharp.
![]()
... and hopefully more rovers to come! -
Sawppy at Maker Faire Bay Area 2019
07/28/2019 at 23:53 • 0 commentsI took some footage of Sawppy's adventures at Maker Faire Bay Area 2019 and assembled them into three videos.
It was raining at the event, so Sawppy needed to put on a raincoat before venturing outdoors:
It was the first time Sawppy attended a three-day long event and one of the steering servos failed on the third day.
After the event, Sawppy needed some cleaning and minor repairs.
-
Curiosity Rover 3D Resources
06/25/2019 at 20:52 • 0 commentsPrompted by a question on the JPL Open Source Rover web forum, I compiled all the 3D resources I had collected on Mars rover Curiosity. This reference data helped Sawppy match Curiosity's overall proportions and suspension geometry, which was my goal of making a mechanically faithful motorized model. I stopped there, but others rover builders like @lmckeega are working to improve accuracy in appearance so I thought I'd share these resources to assist such efforts.
3D web sites
My starting point was JPL's official open source rover website whose opening animation has a 3D model of Curiosity cruising on a simulated Mars surface. I tried to extract that 3D mesh without success.
On a similar front, we could see a 3D model of Curiosity in the "Experience Curiosity" website. It's possible this is using the exact same data set as the OSR, but still I'm not enough of a web developer to pull out the 3D data.
Finally we have a 3D model visible on Curiosity's mission site. Again it may or may not be the exact same one used in above two sites, but the difference here is that we have a "Download" button. Clicking that button results in a file named Curiosity_static.glb. My laptop running Windows 10 has a 3D Viewer app installed by default, which was able to view this file. I don't know what viewer software would be required for other platforms.
3D printing
A web search for "Curiosity 3D Model" and similar keywords would repeatedly lead me to a 3D-printable static model. Unfortunately, for my purposes this model is not useful. The geometry of this model were modified to be friendly to 3D printing and is not a faithful representation of Curiosity.
3D animation
However, on the same site, there are two Curiosity models for the free open source 3D animation program Blender. As far as I can tell, these two models have the same 3D data but with different textures. "Clean" is factory fresh Curiosity, and "Dirty" represents Curiosity after cruising on Mars for a while.
The advantage of these files is that suspension parts are separate elements that can be animated to show suspension articulation. I believe these files formed the basis for Gazebo simulation described here.
It also means we can split parts apart for a closer look. However, this file only has enough detail for animated graphics, it does not have enough detail for CNC machining. Much of the surface detail are represented by bitmap textures instead of 3D mesh data.
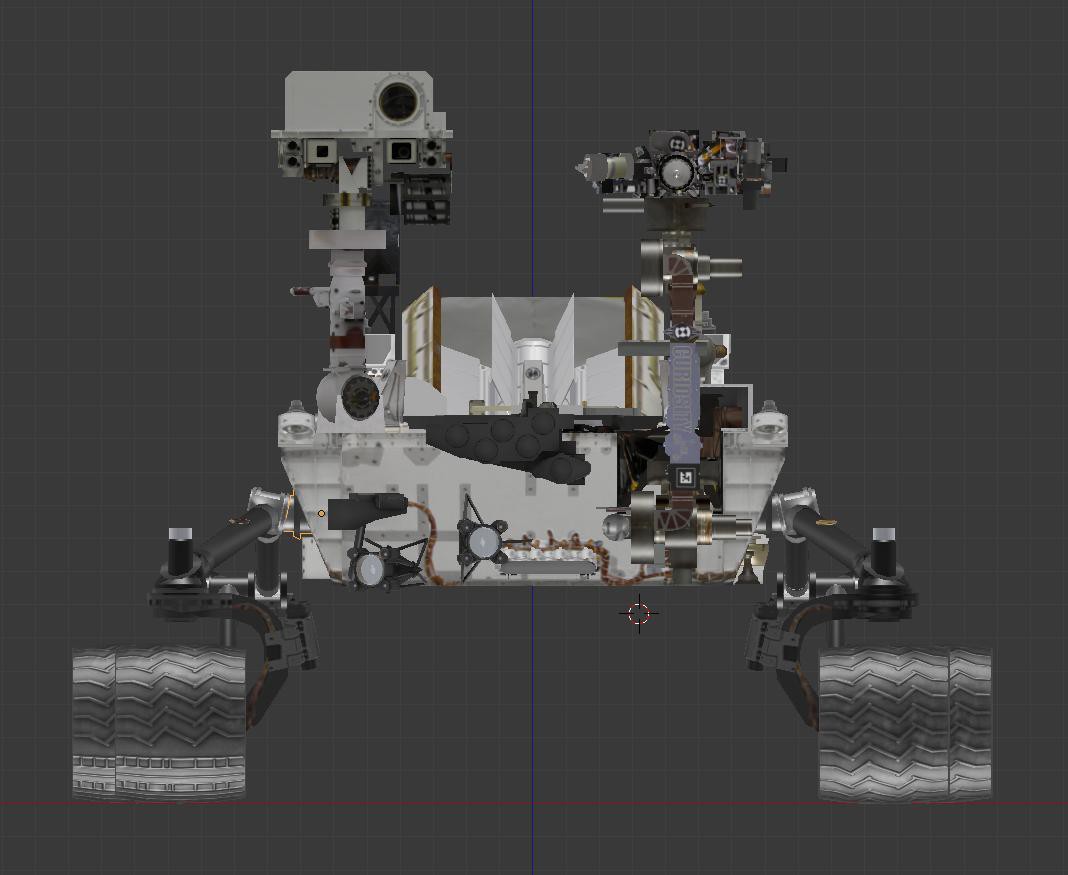
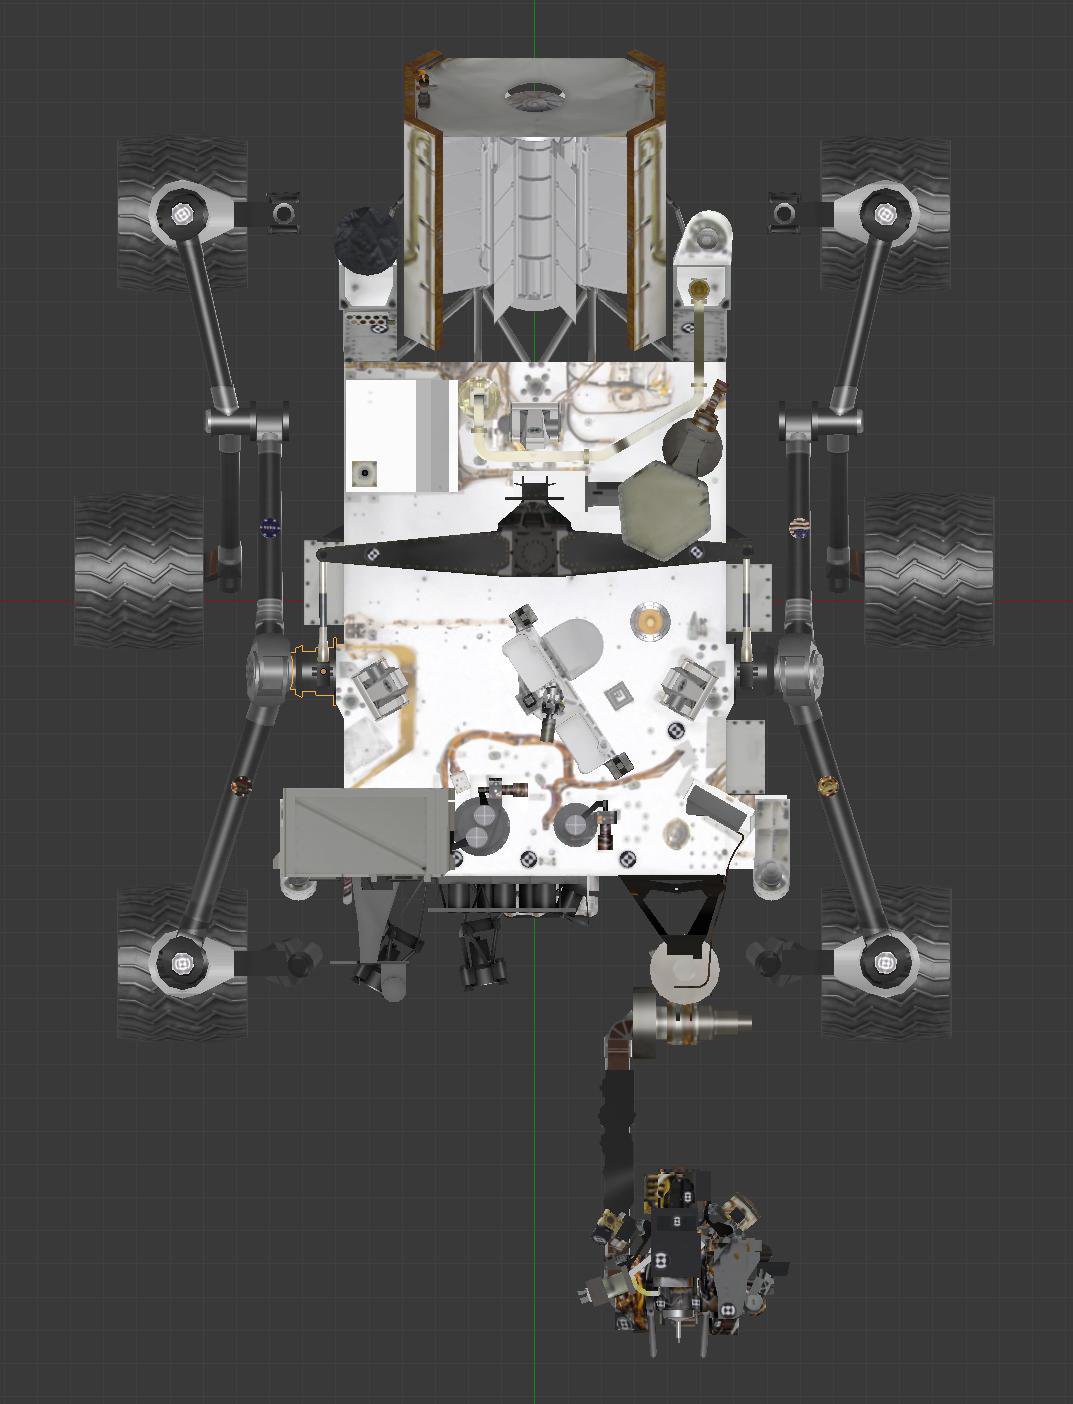
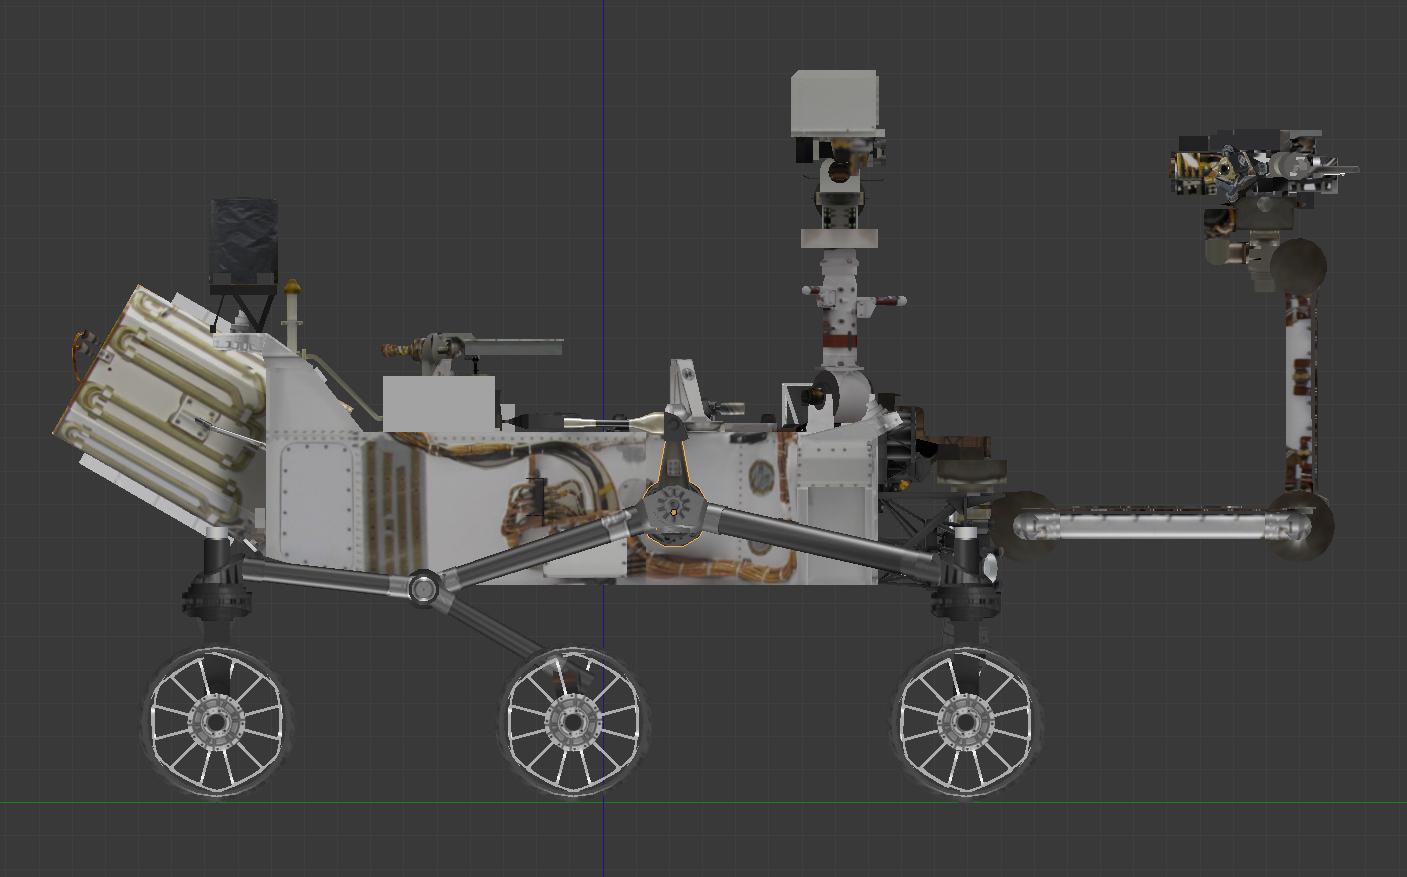
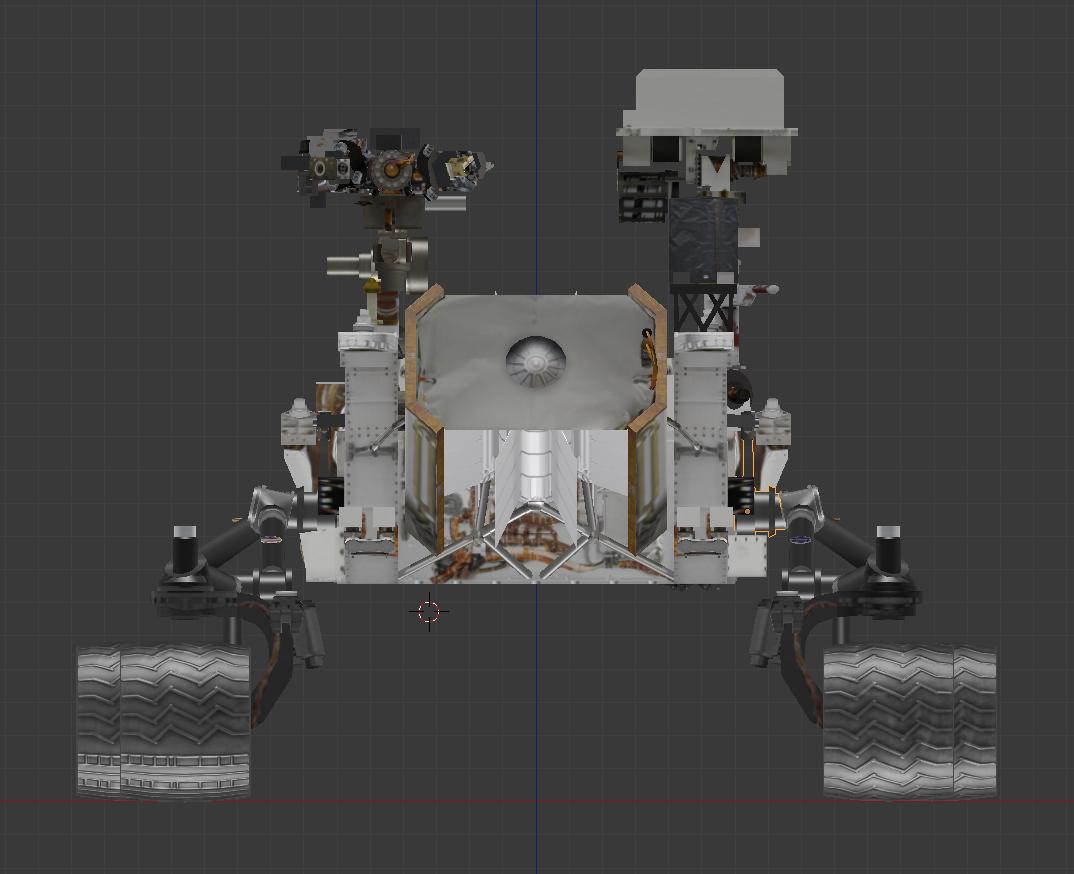
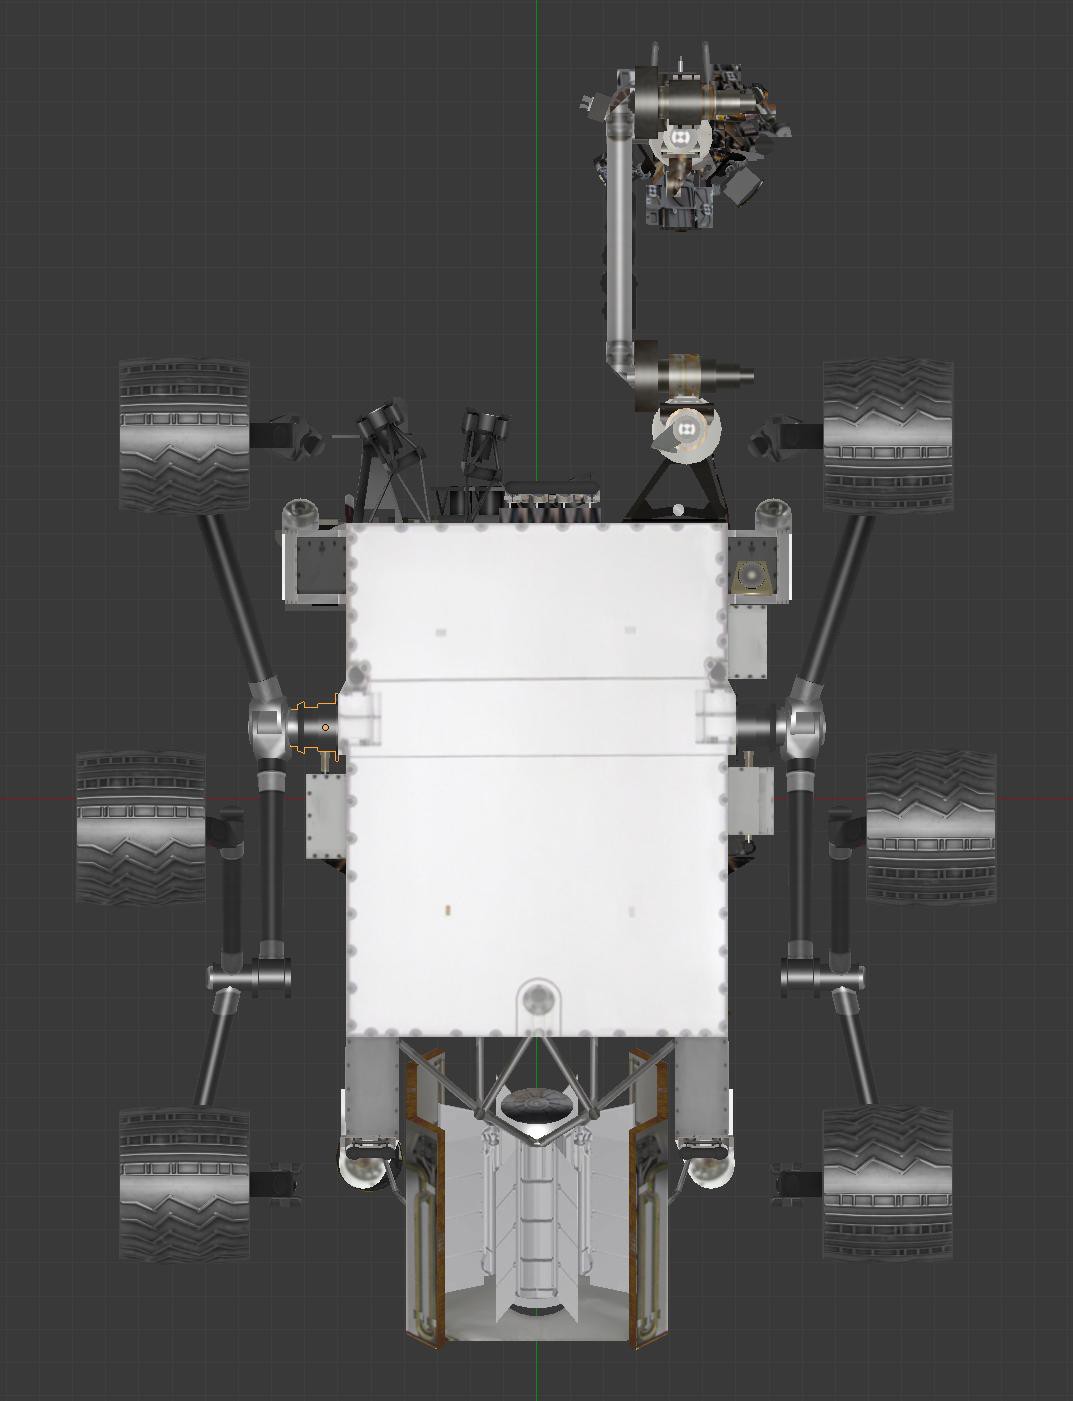
While there is not enough detail for building a high fidelity model, these files were the best resource I had to measure component sizes and their relative layouts. I was able to bring them up in Blender, switch to orthographic projection view, and get images of Curiosity free of perspective distortion. In case that's useful to anyone, and you don't want to install & run Blender just to obtain those images, here they are:
![]()
![]()
![]()
![]()
![]()
![]()
(Cross-posted to NewScrewdriver.com)
-
Wired Joystick Controller With Arduino
05/24/2019 at 00:37 • 2 comments![]()
As a presenter it was great to see the wealth of information provided by Maker Faire Bay Area organizers. It is clearly the compilation of many years of experience and lessons learned. One item caught my eye: anyone using wireless communication should have a contingency plan in case wireless fails.
I've definitely encountered this before with SGVHAK Rover and Sawppy on the standard 2.4GHz WiFi band. So far I've been able to avoid most problems by adding a dual-band router and moving up to the 5 GHz band, but in a large event like the flagship Maker Faire, even that might not be enough.
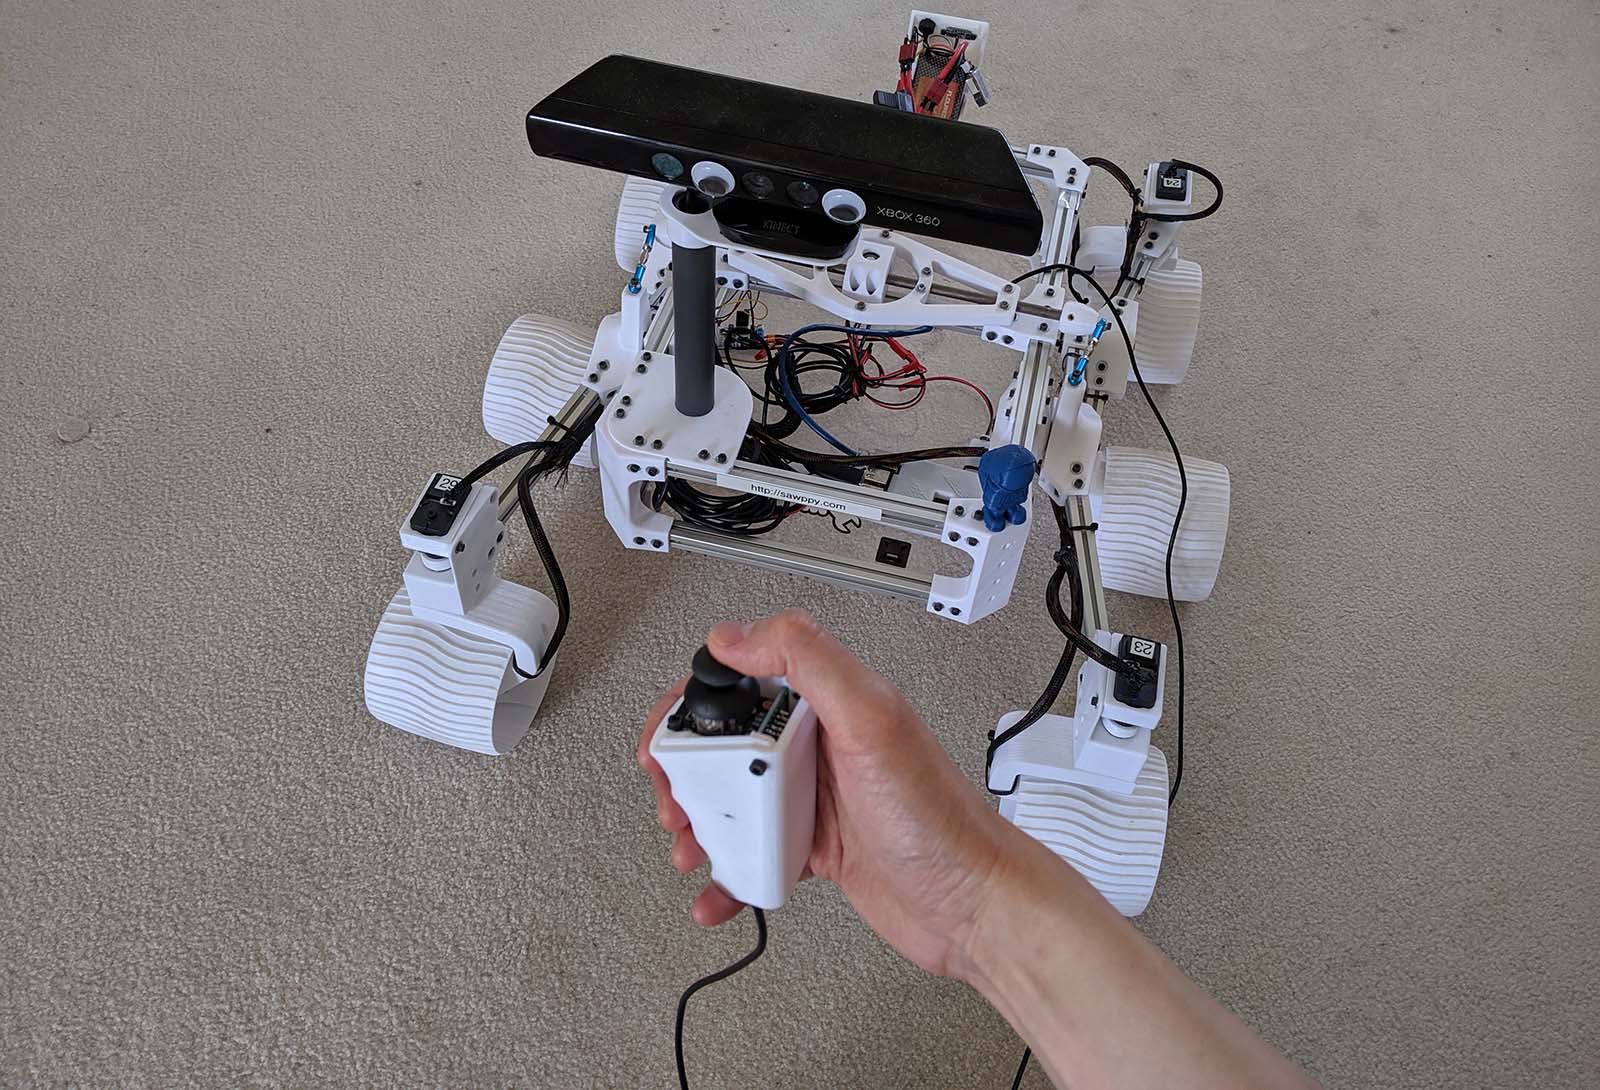
So as part of my Maker Faire prep work, I designed and built a wired joystick controller with an Arduino as the microprocessor. When active, it replaces the Raspberry Pi and wireless router on board Sawppy. This also serves as a lower-cost alternative to rover builders or those who like the thought of walking their rovers on a leash.
More resources:
- Arduino sketch is in the 'arduino_sawppy' directory of Sawppy's Github repository.
- 3D-printed enclosure Onshape CAD document.
- Build log entries:
- Getting started with Arduino crash course.
- Examining Arduino sample code by LewanSoul for LX-16A serial bus servos.
- Putting Arduino joystick sample code together with LewanSoul sample code for joystick-based servo control.
- Implementing the Ackermann steering calculation for rover corner wheel steering.
- Switching to a compact Arduino Nano board to fit in handle.
- Designing the 3D-printed enclosure.
- Building Sawppy's onboard input jack.
- Up and running and ready for Maker Faire!
-
Sawppy Will Be At Maker Faire Bay Area 2019
05/10/2019 at 19:43 • 0 commentsI know I've said I wanted to keep my Hackaday.io project page focused on rover design and evolution and less on rover adventures in the wild... but I'm going to break my own rule for this one. I'm super excited to have been accepted as a maker presenting their project at Maker Faire Bay Area 2019. It's not just A maker faire... it is THE maker faire. Most of my travel logistics have been nailed down, it is happening!
![]()
-
Sawppy Builders (Page 1)
05/07/2019 at 23:03 • 0 commentsI started my Sawppy project in March 2018. By May 2018 I had my first rolling chassis but it was fragile. Every time my rover broke, I learn a little more about mechanical design, and Sawppy improved over the following months. I also started writing assembly instructions and supporting documentation to help any other interested people build their own Sawppy, not knowing if anyone would take me up on my offer. It was extremely gratifying to see other people have indeed accepted my invitation!
This post recognizes those who have embarked on their own Sawppy adventures, roughly in the order of when I learned about their efforts. Sometimes I learn about their ambitions before they got started, sometimes I learn about it only after their rover had been completed. Given this, it is likely there are other Sawppy builders out there I don't know about at all! But that's fine, I just love the fact there are more Sawppy rovers running around.
I used to list a few Sawppy builders in my main project description page, but the list has grown too long to fit in that space. I'm going to track Sawppy builds on this project log entry, editing it as I go to add more rovers as they come online. I don't know if there'll ever be a day when even this is too unwieldy to track all the Sawppy builds out there... but as far as problems go, that's one I would be very happy to have.
To everyone who decided my project was worth your own time and money and effort to build: Thank you.
Roger
Daniel was one of the first to jump in and start exploring the information I had released. Daniel also helped spread the word of Sawppy via comments on various web page comments about JPL's Open Source Rover, and for that I'm grateful.
I designed Sawppy to use Misumi aluminum extrusions because I saw Misumi had distributors worldwide. Unfortunately my hope of easy availability turned out to be wrong in Canada. But makers are problem solvers! Daniel redesigned his Sawppy to use wooden beams instead.
![]()
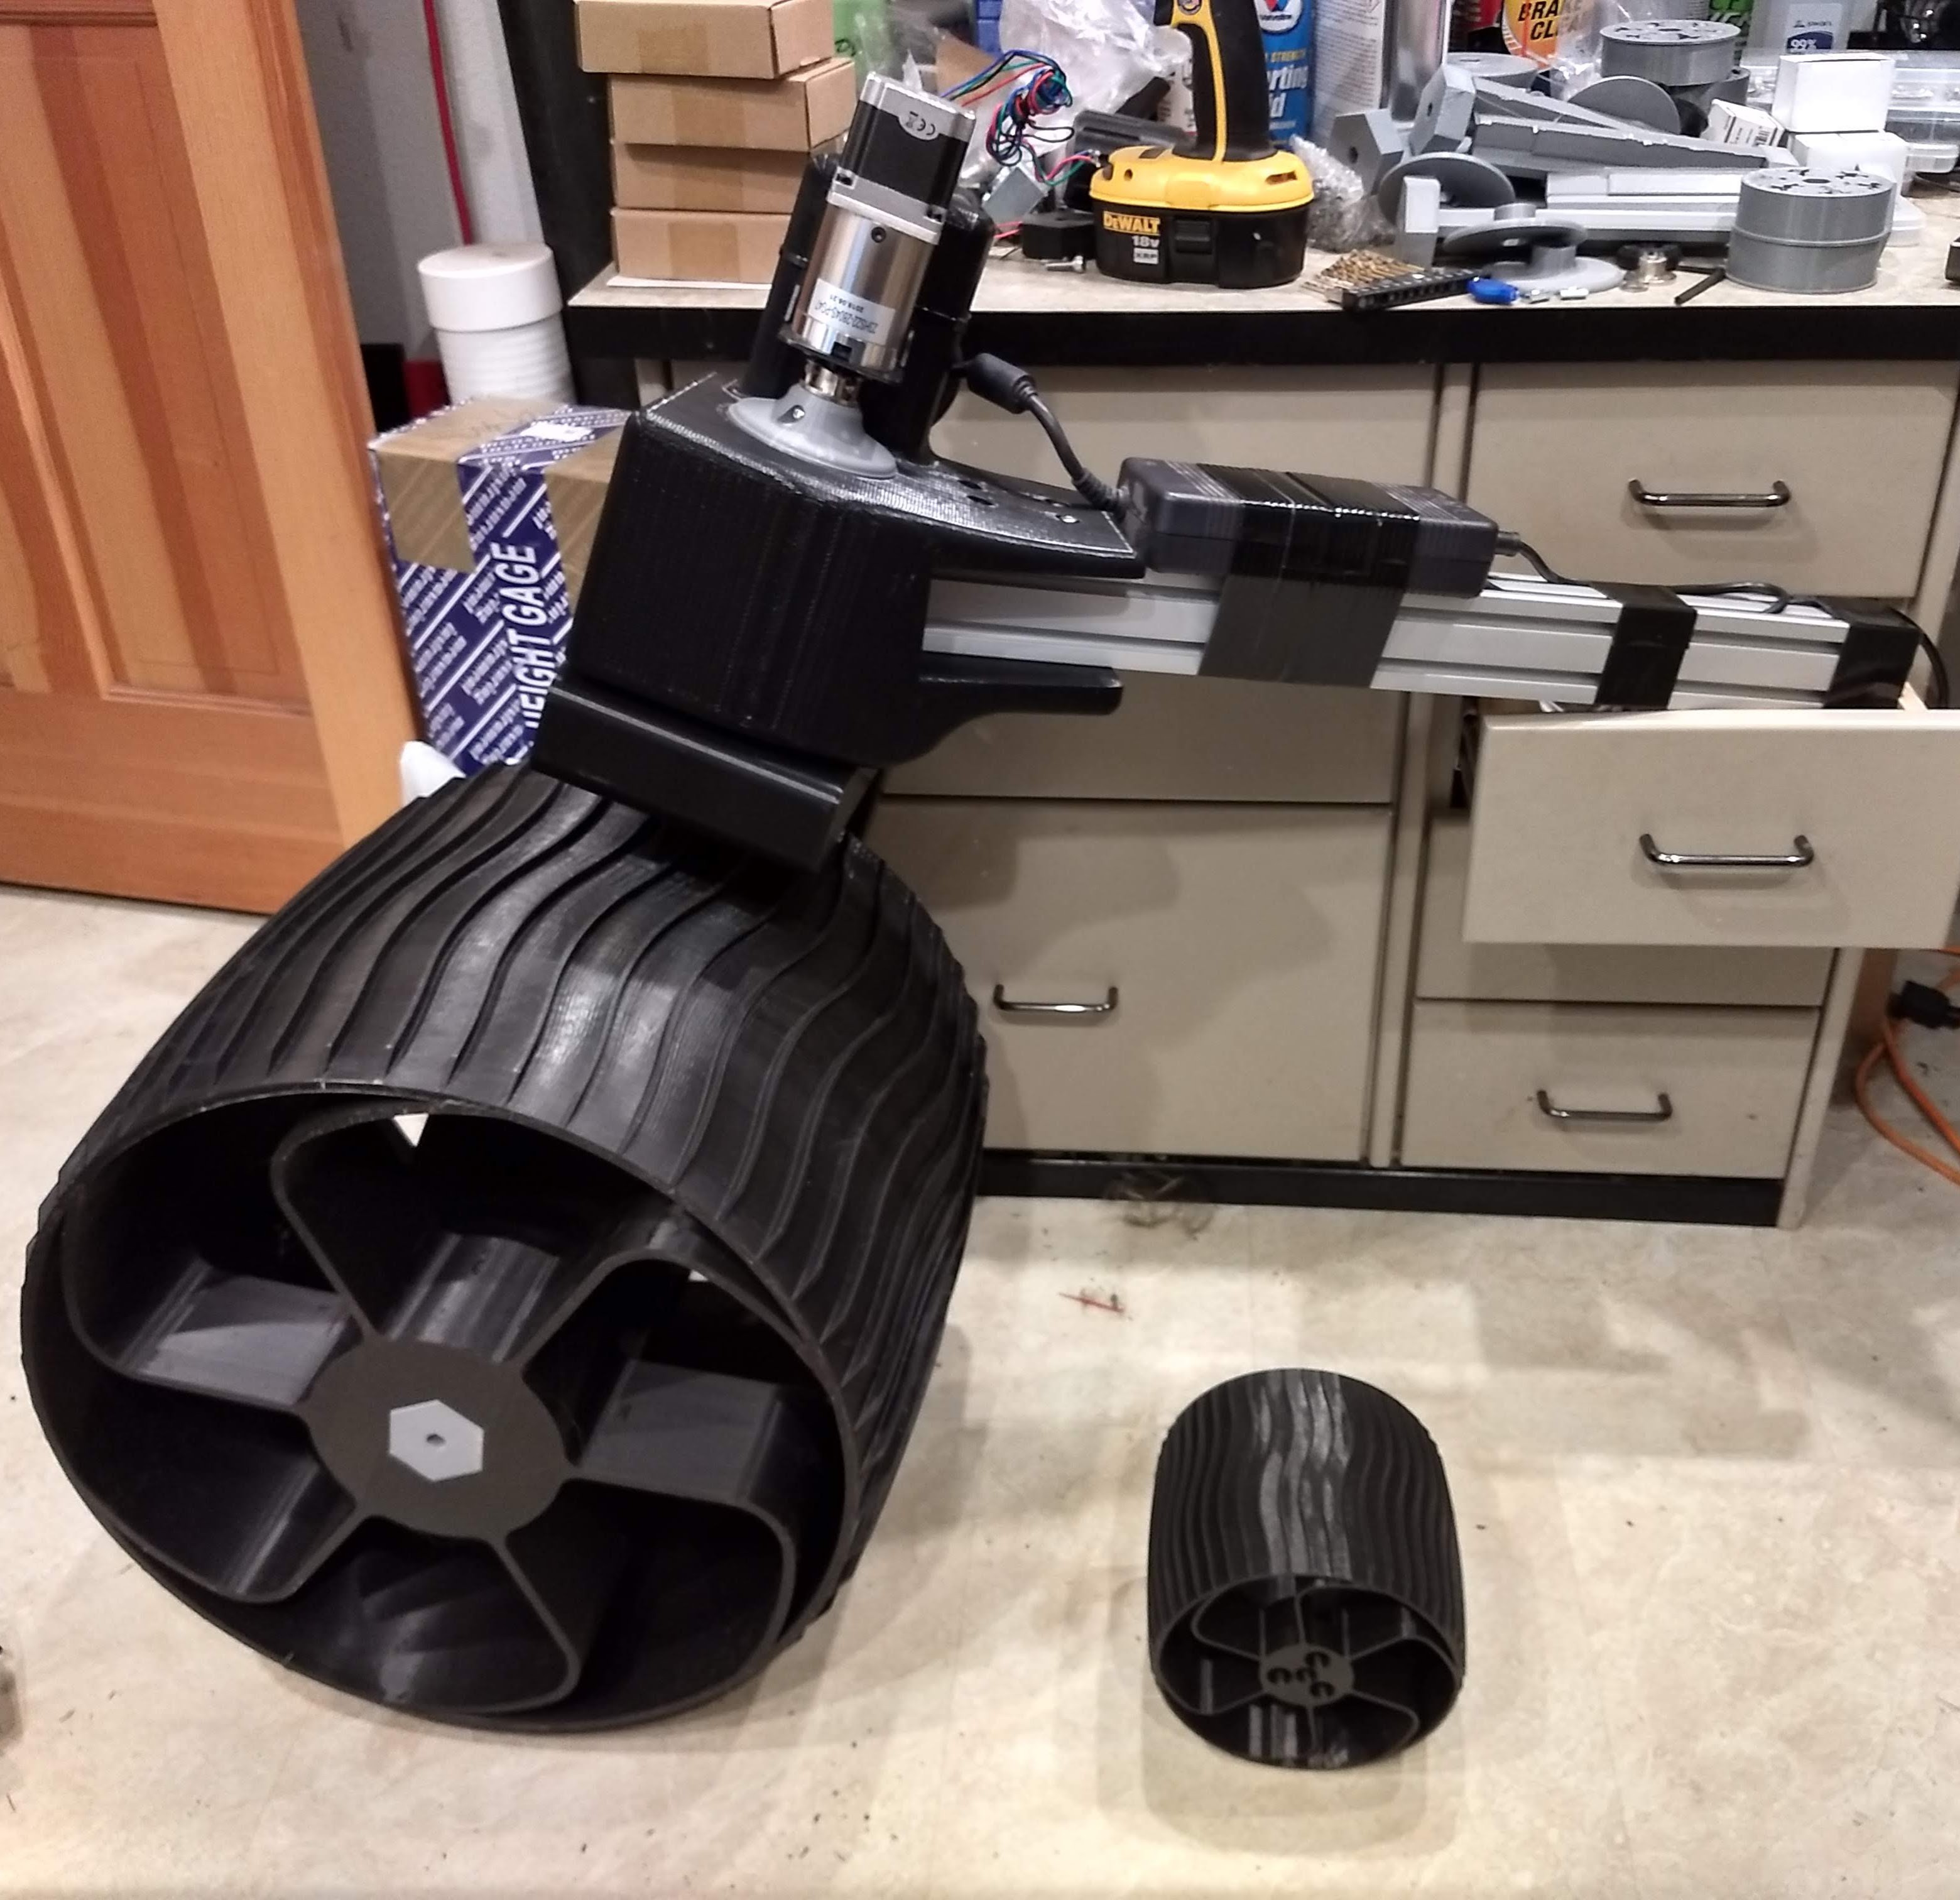
Quinn is a person who thinks big. Quinn has been working to scale up Sawppy's design, making modifications as needed, for a much larger rover. This picture shows one of his big wheels next to a standard sized Sawppy wheel. This rover will be a mobile testbed for his project developing deep ice drilling techniques.
![]()
Bob leads a FIRST Robotics team and they have their own version of Sawppy's CAD file filled with their improvements for a better fit with what they want their rover to do. They can't use their rover in an actual FIRST competition because I didn't design Sawppy around competition rules. However, the team members are thinking about using Sawppy's construction technique for their future projects. All of this makes me extremely happy.
Sawppy has a sibling in the UK! During Sawppy's evolution I had to adjust various pieces and occasionally aluminum extrusion lengths. This resulted in some recuts and some unnecessary (in hindsight) waste. When I documented their final dimensions, I thought it was possible someone could cut all the required pieces out of two extrusion beams at the 2 meter standard length sold by Misumi. Thanks to the build log for Chris' Sawppy, I saw this hypothesis has been proven.
![]()
Marco has lots of robot building experience and wanted to add a Sawppy to his robot army. I received many helpful pieces of feedback about my posted instructions for Sawppy, pointing out where I could add clarifications and substitutions. Marco has also shared his Sawppy enhancements on Github in a way I could merge into my master repository under "modifications" folder. And like his other robots, Marco's Sawppy is printed in a bright yellow UV-reactive plastic that leads to some great videos of roving in the dark.
For control software, Marco has forked my SGVHAK Rover code and modified it to accept commands from his remote control system.
CJ, or "Curiosity, Jr." is Laura's Sawppy variant and the future direction will include efforts on adding detail to make the rover a more faithful model of Curiosity rover. (Hence the name!) I was more focused in mechanical fidelity and didn't spend much time on appearance fidelity. It's great to see people like Laura pick up my slack.
![]()
If someone had asked me if Sawppy should be their first big 3D printing project, I would be a little scared to say yes. But with some persistence and resourcefulness, a Sawppy came together regardless in the hands of WJD. And now that Sawppy is up and running, WJD may tackle more electromechanical projects. It makes me happy to know Sawppy can inspire others to turn their ideas into reality.
I didn't know Philip had been building a Sawppy until it was all done: the first notification I received was a pull request on Github with Philip's suggested changes to improve documentation. These changes were obviously backed by experience of building a Sawppy, and I gratefully accepted the suggestions.
Phillip's Sawppy was printed in plastic of bright red and black, making it one of the more visually distinctive rovers on this page. My favorite image from the project image gallery was one where gigantic googly eyes were mounted to the front. I loved it so much I put googly eyes on my own Sawppy.
Sawppy has a sibling in Germany! I loved seeing Sawppy running around on surfaces like grass and sand. According to the description attached to this YouTube video, the GoPro camera visible here has already been replaced with a Raspberry Pi camera in support of object detection via TensorFlow. I always intended for Sawppy to be a platform for experiments in autonomous robotics, and it's great to see Martin getting started on that front.
The biggest and most obvious change in Chris Bond's Sawppy are the wheels: Chris has swapped them out for RC monster truck wheels. These are not identical to what was used in the JPL OSR but a similar concept. And like much of engineering, a change causes ripple effects. For Chris it meant developing a new way to couple wheels to their drive axle, which evolved into a different way to mount servo couplers on Sawppy's 8mm shafts as well. It appears much more rigid and sturdy than what I had designed in Sawppy, and is worth consideration for other Sawppy builders to adopt. For the immediate future I'm probably going to leave my own Sawppy as-is, but switching over to what Chris had done for shafts is now on the to-do list.
See these and other observations from Chris about building a Sawppy on his blog.
![]()
More stories of Sawppy builders continued on Page 2.
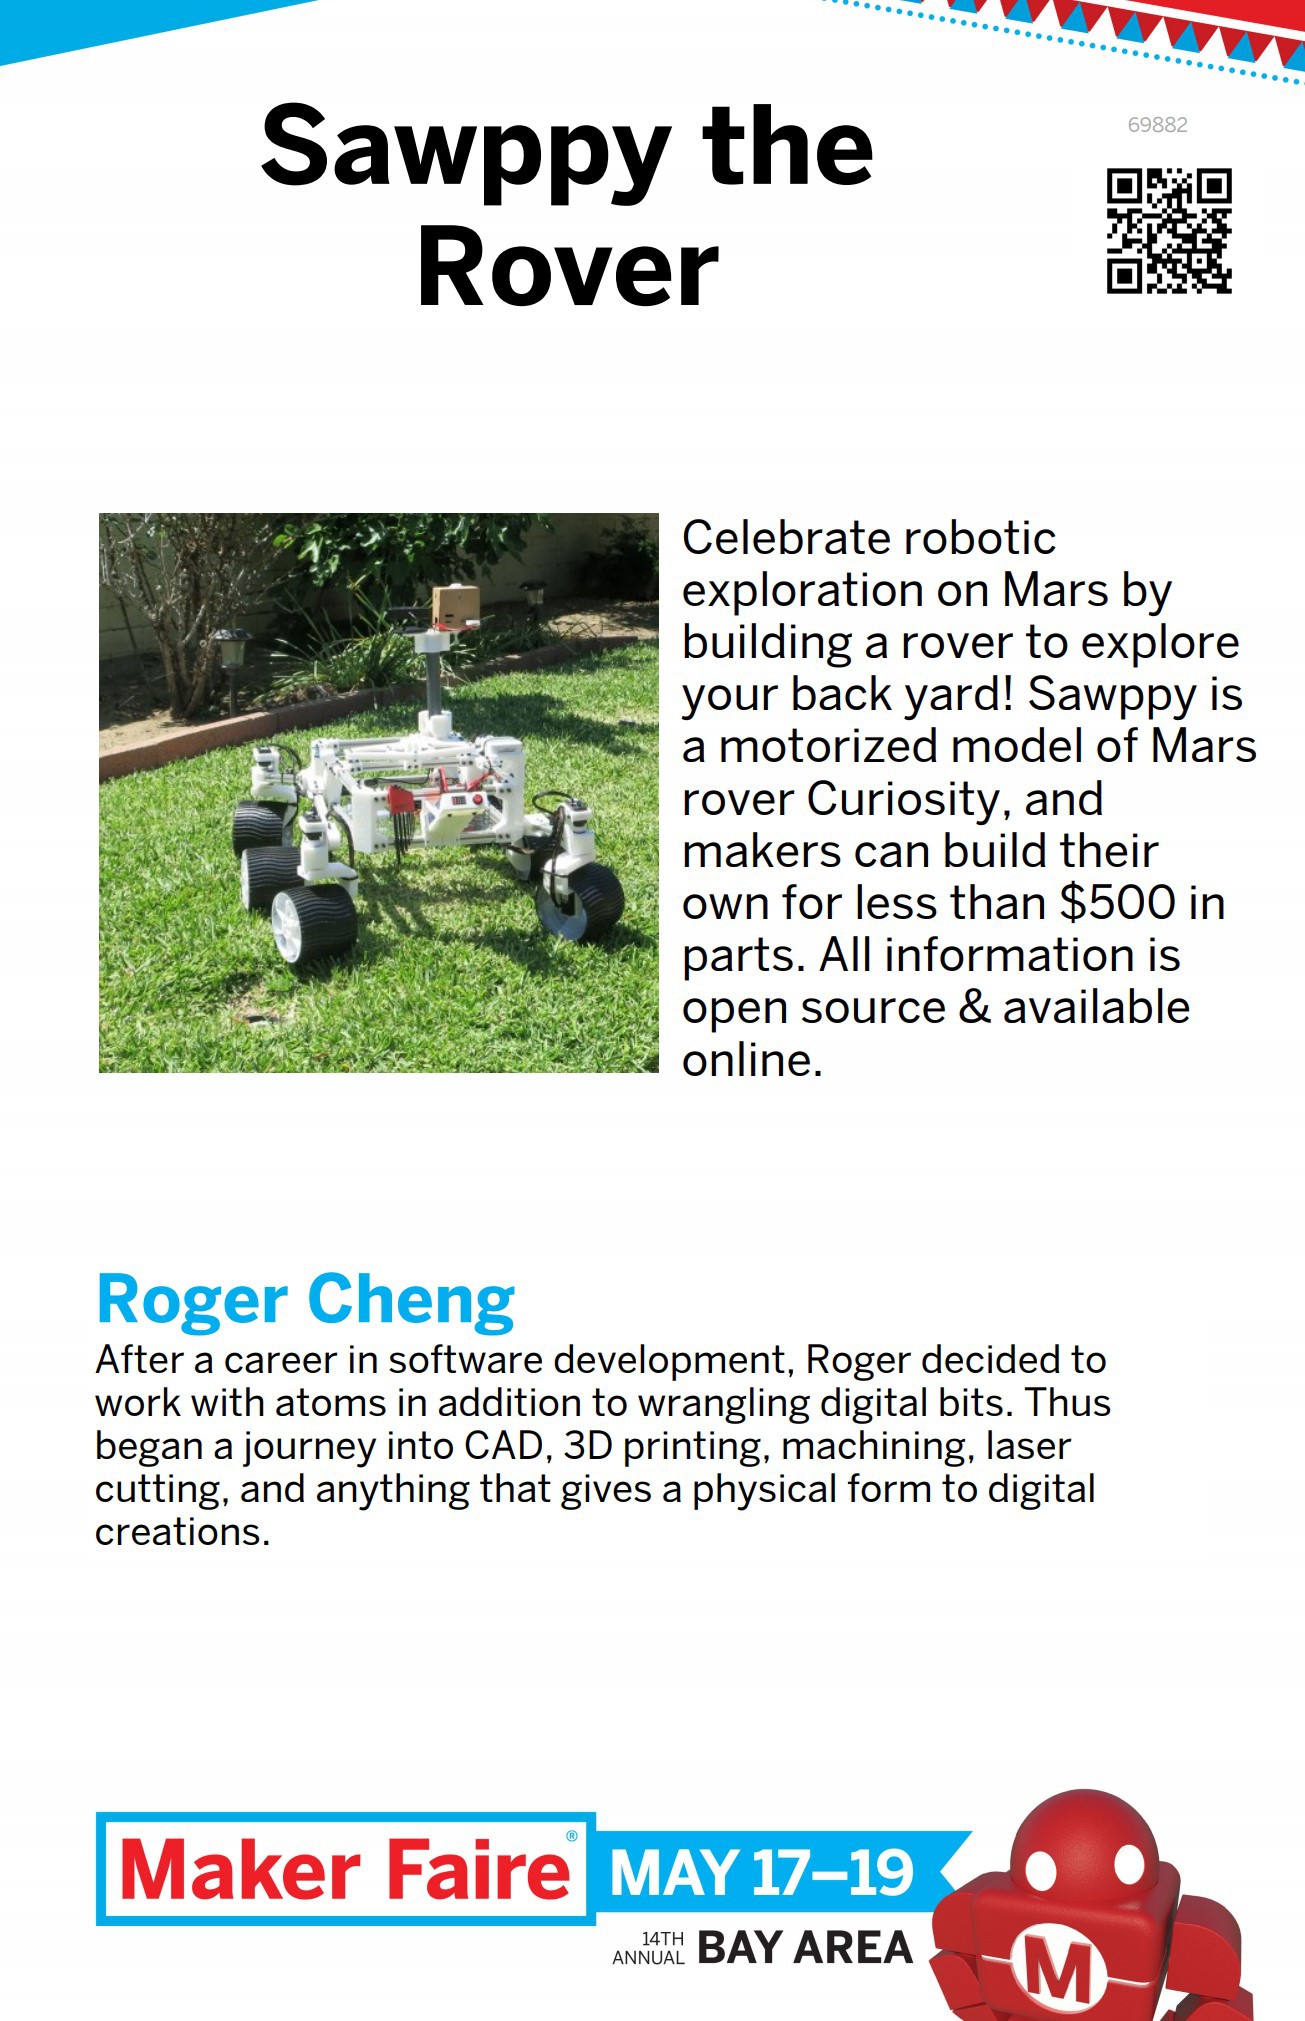
Sawppy the Rover
Motorized model of Mars rovers Curiosity and Perseverance For Under $500