Sure, you can buy after-market lighting kits. What fun is that?!? … especially for us Arduino-heads :-) If you aren't an Arduino-head, I could be persuaded to put together a kit.. Of course you'll still will be able to program it any way you want.
On the surface this is a pretty simple project. It reads 3 on/off switches and drives 2 LED strips. That’s all there is to it. However, this isn’t your typical stand-alone Arduino project. There are some subtle nuances of integrating it into an existing electrical system. Also, Pixel animation can be ... tedious, but hopefully my encapsulation can shield you from that.
Here are the skills and the items you will need to build this project.
- A willingness to dig into your bike’s electrical system. You’ll need to find and tap into:
- Switched 12V line
- Left turn signal line
- Right turn signal line
- Brake light line
- If you remove existing turn signals you’ll probably end up with a "hyper-flash" situation. This is a typical symptom when you replace turn signals with something that draws little amps like an LED. The best solution is to replace the turn signal relay. Alternately you can add load resisters to simulate the load of a normal incandescent bulb. I did the load resisters before I found out the turn signal relay is a better solution.
- Three 12V relays (I chose the small reed type relays)
- 5v power supply capable of a continuous 5 amps (not the peak rating)
- An Arduino of some flavor. I used an Arduino Nano clone.
- Two - 5x8 WS2812 LED matrix (or matrix of your choice)
- Perf board
- Terminal blocks for connecting all the wires
- Wire
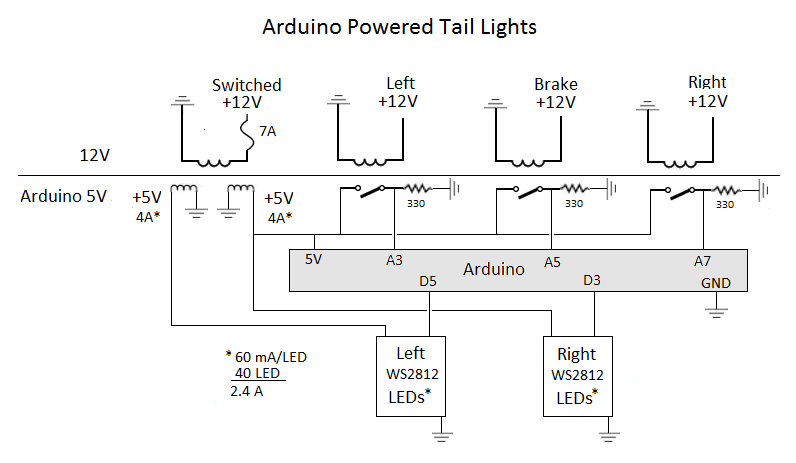
Notes on the schematic
- The goal of this project was to isolate the Arduino completely from the bike's electrical system. That is why relays are used to trigger the Arduino pins. You could probably use a voltage divider and avoid the relay.
- If you have a newer bike with LED turn signals, check the voltage going to your lights. It may already be 5V that could be fed directly to an Arduino pin.
- You’ll probably find it odd that I’m using analog to read the brake/turn signals. This was only done to simplify soldering of the prototype board so I didn’t have all the connections on one side of the Arduino Nano. Typically, you’d use digital pins for this.
- The switched 12V input line is on an existing 10A circuit on my bike. I fused the project at 7A so that if something goes wrong, hopefully it won’t take out my existing brakes and turn signals.
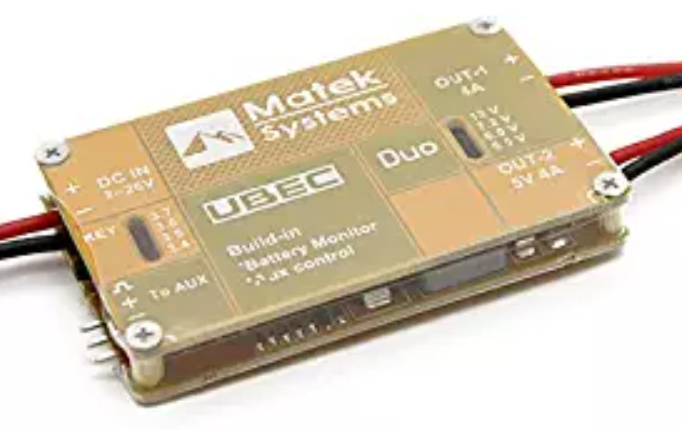
- Don’t under power the project! Each LED matrix could draw 2.5 Amps! As shown, I have a dual output power supply that is capable of 4A on each output and this works flawlessly! Two 3-amp BEC circuits would probably also work. If your Arduino LED flickers while the turn signals run, get a dedicated power supply for the Arduino, or power the Arduino with 12V to the VIN pin. My power supply shown below is good enough that I can power everything w/o seeing the Arduino LED flicker at all.
Building the circuit board
- I used an Adafruit perma breadboard (essentially a perfboard with breadboard traces). I hoped that the built-in traces would make a cleaner build. It’s not a perfect solution and some traces need to be scraped off. I’m ok with this idea, but not wow’ed so I haven’t included the layout. You can probably do a better job anyway.
- Things I might do differently:
- Take the time and design a PCB board
- Put in headers so the Nano can be replaced,...
 david
david
 vishal soni
 Gord Payne
 davedarko