-
Hello, Reinvented Retro Judges!
06/17/2021 at 20:28 • 0 commentsThis project has been a multi-year labor of love. I haven't had much time to work on it since last year but it suits this challenge to a tee. I'm combining a retro Z80 with peripherals emulated on a modern AVR microcontroller to run CP/M, MSX software, ColecoVision games, and more. Check out the linked YouTube video for an overview and peruse the project log for the history of the project and a lot of ideas for what it can do.
-
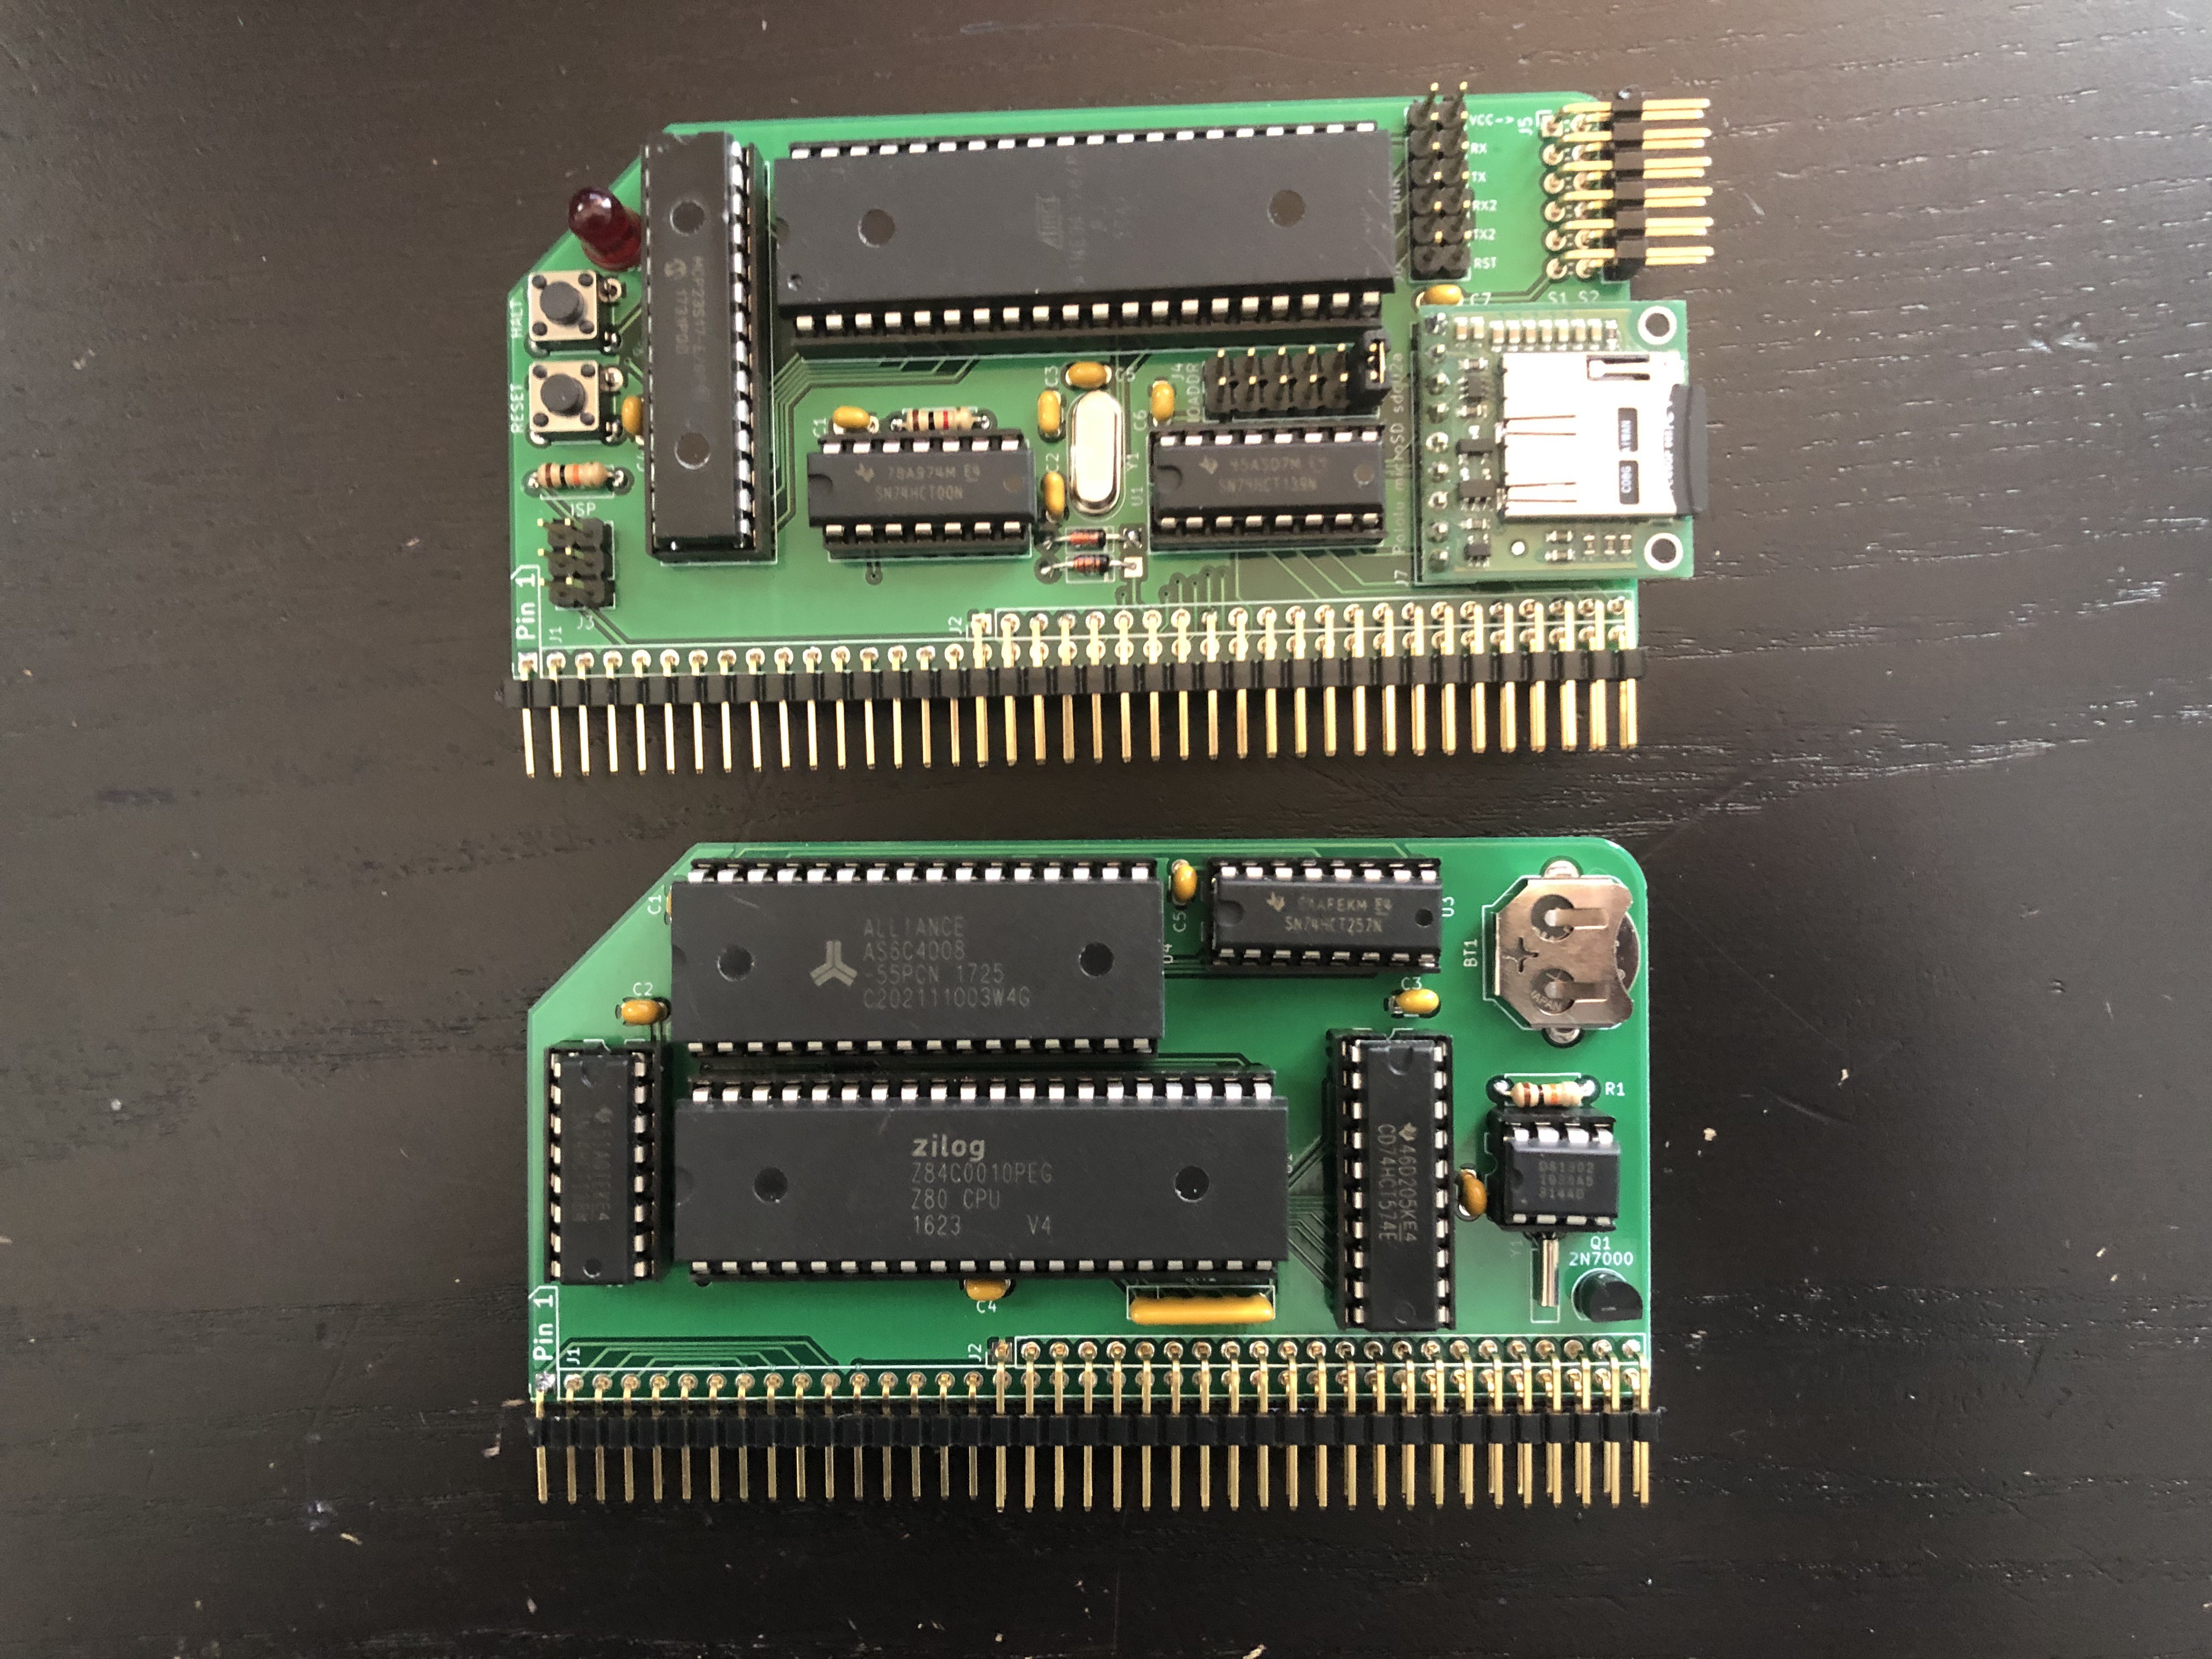
z80ctrl Rev 6 and CPU/RAM/RTC Board
10/03/2020 at 18:47 • 0 commentsI've just put the final touches on a new revision of z80ctrl, plus a new companion module that combines a Z80 CPU, 512KB bankable RAM, and and RTC on a single board.
I expect kits for the new CPU board will be sold on Tindie and z80ctrl kits will be updated to Rev 6 once the current inventory of Rev 4 boards is sold out. The timing will be up to Michael Kamprath who is selling the kits. The current Rev 3 and Rev 4 boards will continue to be supported by the firmware, and the revision to build for will be configurable via a Makefile option.
![]()
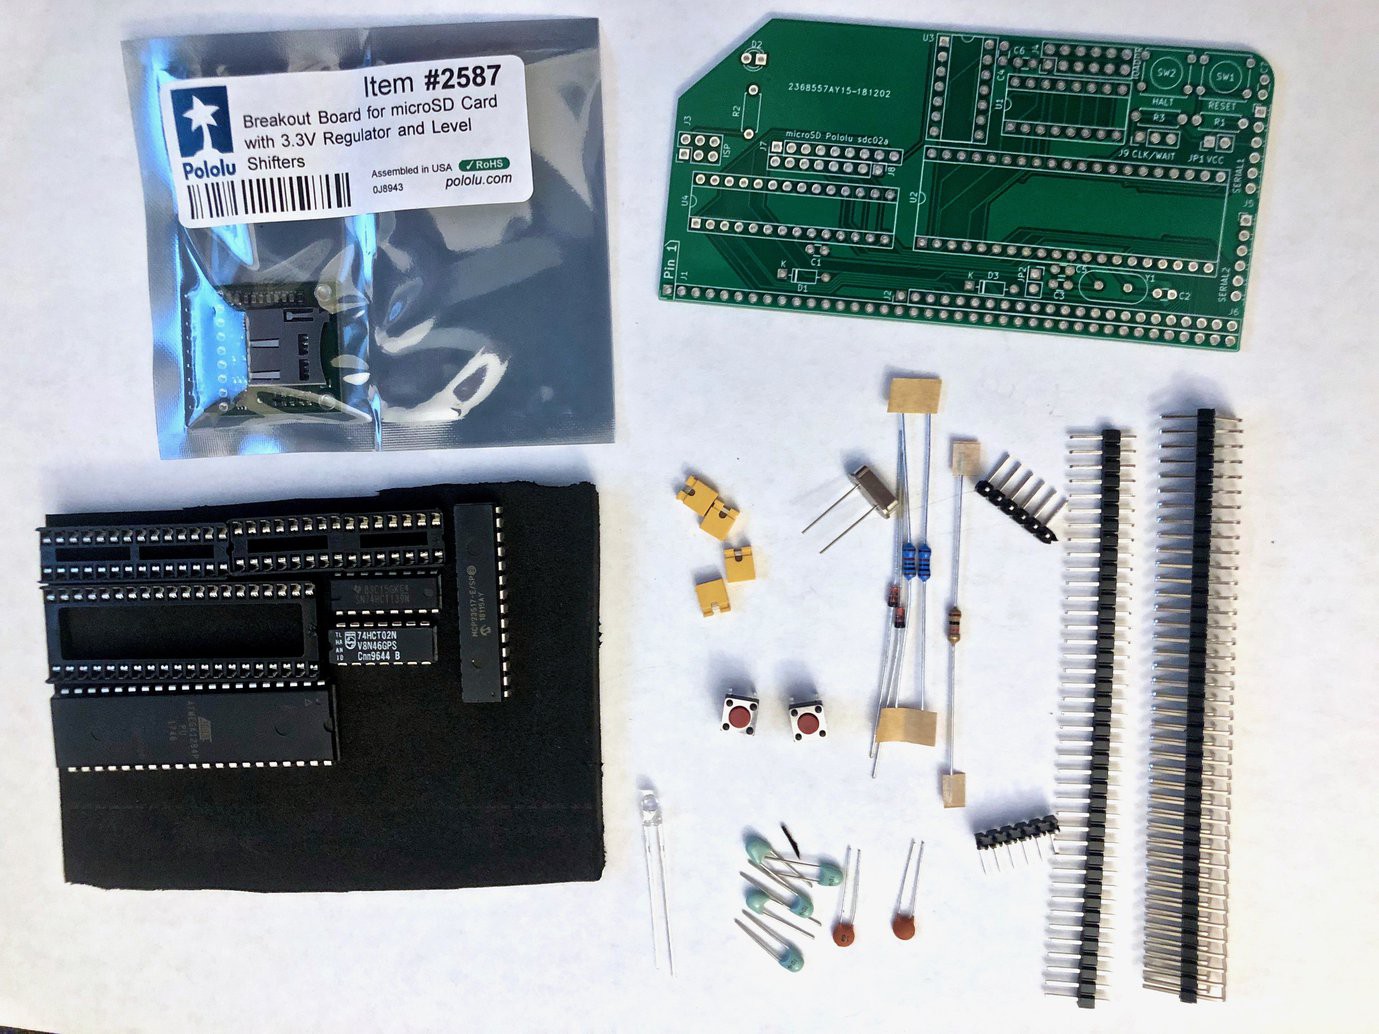
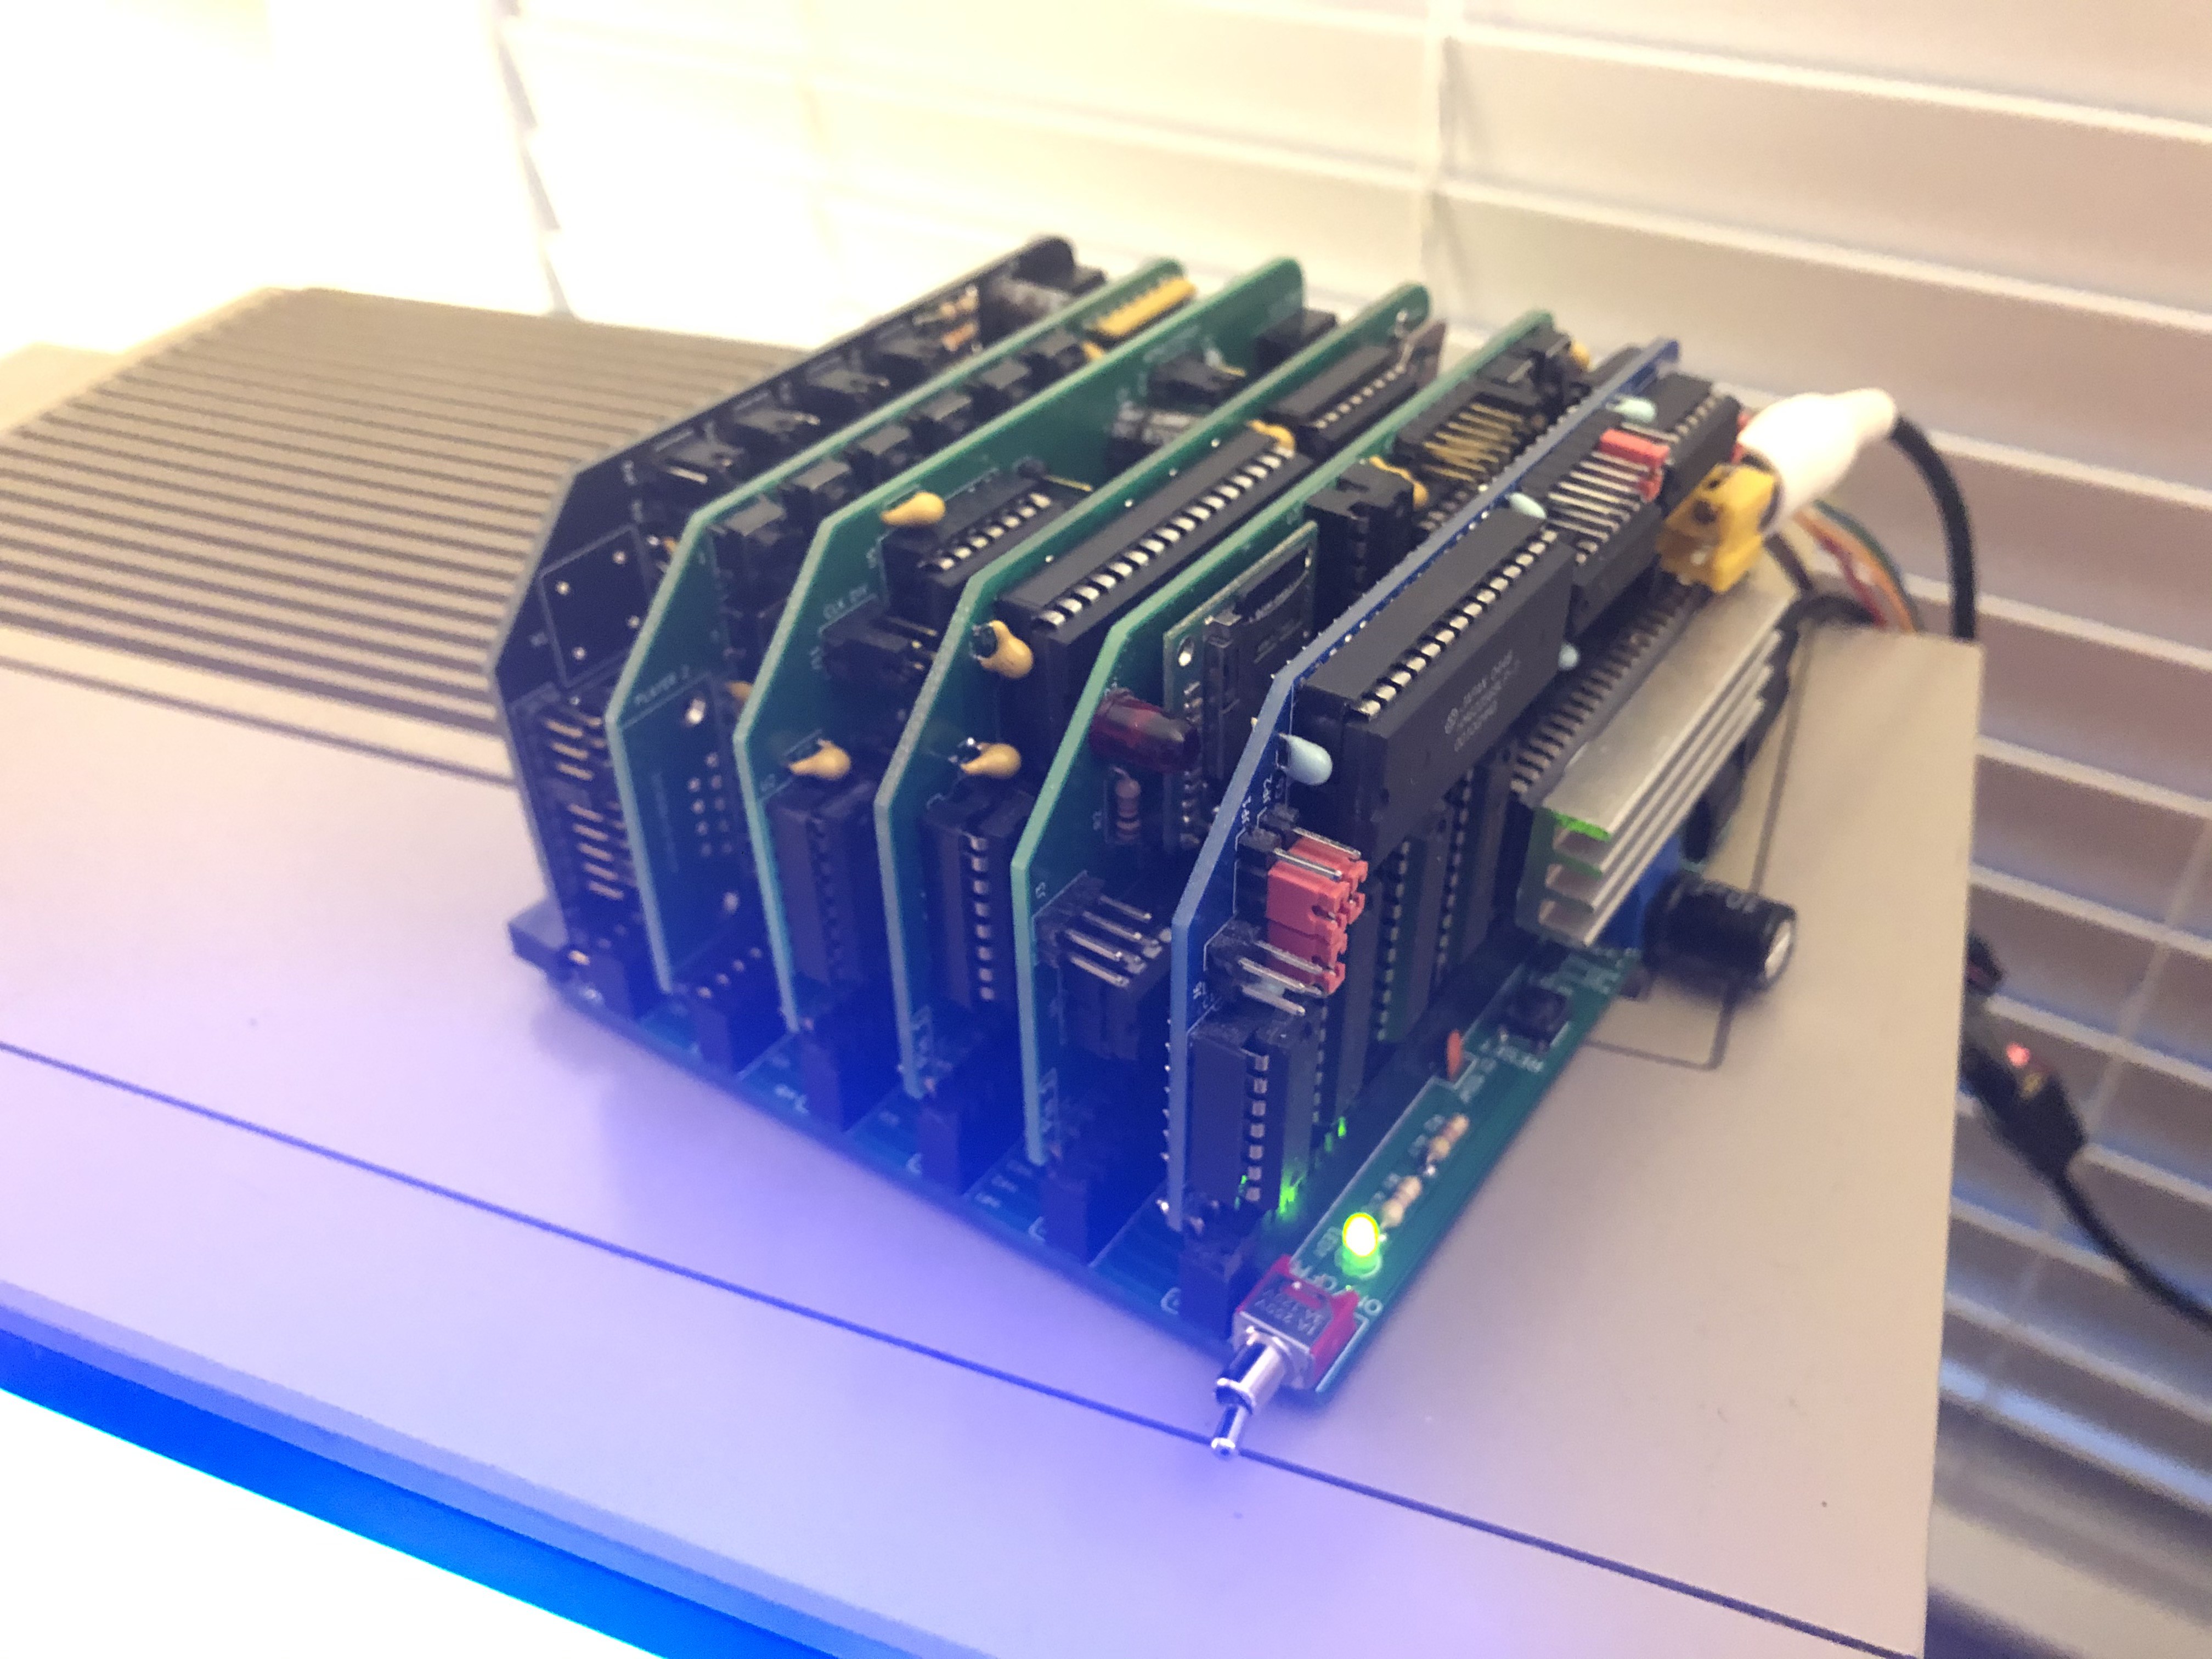
The z80ctrl plus the CPU board comprise a fully functional RC2014-compatible Z80 system in only two modules. The z80ctrl, CPU/RAM/RTC board, TMS9918 video, SN76489 sound, and ColecoVision controller boards, plus Ed Brindley's YM2149 sound board all fit in Steven Cousin's 6 slot SC112 backplane, making for quite a compact package which has everything needed to run CP/M, ColecoVision, and MSX software.
![]() CPU/RAM/RTC Board Features
CPU/RAM/RTC Board FeaturesZ80 CPU
This board is intended to use the Zilog Z84C0010PEG 10MHz Z80 CPU. Other pin-compatible Z80 chips may work, but the z80ctrl can generate a clock signal up to 10MHz, so the CPU should be fast enough to handle this. The CPU is connected to the RAM and RC2014 bus. There are pullup resistors for the NMI, WAIT, BUSRQ, and INT lines to prevent false triggering. The RESET line is expected to be pulled up on the backplane.
512KB Banked RAM
The 512KB RAM is divided into 16 32KB banks, any of which can be mapped into the upper and lower halves of the Z80's 64KB address space. The two 4-bit bank addresses are stored in an 8-bit register accessible at I/O addresses 70-7FH. All 16 addresses are mirrors of the same register. The bank register is write-only so software must independently keep track of the current bank addresses. The lower nybble specifies the bank for the lower 32K and the upper nybble specifies the bank for the upper 32K. Therefore a value of 10H maps the first 64K of physical RAM to the Z80's 64K address space. The bank register is not initialized on power up so random banks will be selected until the z80ctrl initializes it.
DS1302+ Three-Wire RTC
The DS1302+ RTC chip is connected to the SPI signals that the z80ctrl exposes on the user lines of the RC2014 bus. The SCK, MISO, and AUXCS1 lines from the z80ctrl board are used. The MISO line handles both inbound and outbound traffic since the RTC uses a three-wire protocol instead of true SPI. When the z80ctrl wants to access the RTC, it disables SPI, asserts the AUXCS1 line, and bit-bangs the three-wire protocol using the SCK and MISO lines. The CPU is not directly connected to the RTC chip, so the z80ctrl board is required to access it. The z80ctrl exposes the RTC to the Z80 on I/O ports 00-02H. A value of 0 should be written to port 0 to select the RTC (other values may be used to select different SPI peripherals on other boards). Port 1 should be set to the address of the desired RTC register from the datasheet. The selected value can then be read or written on port 2.
z80ctrl Rev 6 Features
Wait State Fix
All revisions of z80ctrl have a jumper that controls which I/O addresses wait states are generated for: none, all, or a configurable block of 32 addresses (00-1FH, 20-3FH, 40-7FH, 80-FFH). Unfortunately in REV3 and REV4, setting the jumper to any setting other than all addresses did not work because the wait signal was not connected to the AVR so it could not tell whether the Z80 was waiting for it to respond to an I/O request. Because of this, the AVR might try to respond to the IORQ signal when the Z80 had already moved on, resulting in I/O timing issues. Rev 6 fixes this by connecting the wait signal to the AVR.
Rearranged Control Signals
IORQ was moved to the IO expander to make room for the WAIT signal and MREQ was moved to make room for the IO expander's interrupt signal on the AVR. IORQ and MREQ only need to be changed once at the start of a read or write cycle so putting them on the IO expander does not significantly slow things down. The interrupt line makes it possible to detect the HALT, RESET, and M1 signals on the IO expander more efficiently, which reduces debugging and IORQ handling latency. There was no longer room on the IO expander for the RFSH signal and the SD card enable signal. However, the RFSH signal is not needed, and the need to reset the SD card is addressed by the inline serial resistors (see below).
Link Jumpers
Rev 6 adds jumpers to connect or disconnect the serial ports from the bus, so that it's possible to use the z80ctrl with other serial devices on the same bus.
Layout Changes
The reset and halt buttons are now at the front of the board for easier access. The new layout also allows for a more solid ground plane on the PCB.
Inline Serial Resistors
1K resistors have been added to the serial lines to prevent parasitic powering from the USB to serial adapter. In previous revisions, enough power could be drawn through the serial port's protection diodes to keep the SD card partially powered, which could prevent it from initializing properly. The resistors cause sufficient voltage drop that the SD cart will reset properly when power is removed.
-
New Features
12/22/2019 at 21:09 • 0 commentsIt's been a long time since my last update. I took a break from the project for the first half of the year, and for the last few months I've been quietly working on some new features that I think are ready to announce. First, check out the video overview, then read on below to find out more.
Seamless CP/M Integration
The headline feature is a BDOS emulation layer that allows unmodified CP/M programs to seamlessly integrate with z80ctrl and access files on the SD card's FAT filesystem directly without using disk images. In addition, the z80ctrl monitor can now run .COM files directly. This means you can copy CP/M .COM programs and their associated files directly to your SD card and run them from the z80ctrl> prompt without booting into CP/M first.
In order for CP/M programs to work, z80ctrl needs to load some Z80 runtime support into memory that allows the programs to access the FAT filesystem via BDOS calls. This runtime is automatically loaded from a file called BDOS.BIN in either your root directory or the current directory. The BDOS.BIN file should be assembled using sjasm from the bdos.asm file in the examples directory.
The CP/M program will be able to transparently access any files located in the current directory when the program was launched. I plan to also add support for mounting additional directories on drives so it will be possible to access files in multiple directories at the same time, but that's not done yet.
The current status of the BDOS emulation is pretty complete. I have been able to successfully run many programs including Turbo Pascal 3.0, Microsoft BASIC-80 (MBASIC.COM), Microsoft M80 assembler, BBC BASIC, Hi-Tech C, SuperZAP file manager, WordMaster, WordStar, Zork, Catchum, Ladder and more. Currently the ZDE editor is the only program I am aware of that does not work. I still need to investigate why.
For the curious, the code for the BDOS emulation is in bdosemu.c. Credit is due to the RunCPM project for showing me that it is possible to emulate BDOS calls on a FAT filesystem and for serving as a sanity check to understand BDOS behavior when I was having trouble understanding the BDOS assembly code. However, none of my code has been copied from RunCPM.
The general concept of the emulation is that the BDOS runtime code establishes a DMA mailbox where the FCB address, DMA address, return code and other pertinent information can be exchanged between the Z80 and the z80ctrl. The Z80 initiates a BDOS command by writing to port 0xC. The z80ctrl will then pick up the command, perform the necessary FAT filesystem operations, and read or write the file or directory data at the specified DMA address in the format that CP/M expects. z80ctrl then returns control to the Z80 and the CP/M program is none the wiser that the data it requested came from a FAT filesystem.
FatFS DMA Interface
For programs written especially for the z80ctrl, I have also provided a way to make FatFS API calls directly from Z80 code. The DMA interface code is in filedma.c, and an assembly library to access the DMA interface from the Z80 is available in filedma.asm. An example filecopy.asm program that copies a file on the FAT filesystem is also provided.
Using the FatFS API is more performant and full featured than using the BDOS emulation. Almost all FatFS API functions can be called directly from the Z80 and FAT-native features like subdirectories are therefore available. In addition, DMA transfers are not limited to 128 bytes at a time like they are when using BDOS emulation.
z80ctrl now automatically loads and executes files with a .PRG extension as a bare-metal program. I borrowed the idea of .PRG files from the C64, where the first two bytes of the file encode the load address. z80ctrl automatically loads the rest of the file minus these two bytes to the specified address and executes it from there. The FatFS API also provides the ability to access command line parameters.
File Management Commands
I have also added several new commands to the z80ctrl command line interface so you can now do standard file operations to files on the SD card, including:
- del/era/rm to delete files
- ren/move/mv to rename or move files
- copy/cp to copy files
- mkdir/md to make directories
- chdir/cd to change the default directory
- rmdir/rd to remove directories
z80ctrl has aliases for both DOS and Linux names for each command so your muscle memory will work regardless of what you're used to. Note that all commands use the "cmd src dest" convention from DOS/Linux instead of the "cmd dest=src" convention used by CP/M. The commands support wildcards so it's possible to copy, move or delete multiple files at once. If wildcards are used, the final parameter is assumed to be a directory. The delete command doesn't prompt for confirmation, so be careful using it with wildcards.
Halt via Keyboard Shortcut
It's now possible to halt a running program using a keyboard shortcut. This is configured using the haltkey command, which can either take the ASCII code in hex or control key ^X notation, where X is any letter A-Z. SIMH AltairZ80 uses ^E to exit to the monitor, so I have been using the same shortcut. However, there's a possibility it could interfere with existing CP/M programs so I didn't want to enable it by default. (I know for a fact it conflicts with WordStar and Turbo Pascal's editor, since they use ^E to move up a line.) If you want this enabled by default, put it in your autoexec.z8c file.
Serial Port File Attachment
z80ctrl can now attach the virtual serial ports to a file, so CP/M can read from the file via the paper tape punch device or write to a file via the paper tape reader devices. It is possible to transfer files to or from a disk image by attaching them using the attach command in the z80ctrl monitor and then using PIP to transfer to and from the PTP: and PTR: devices (e.g., pip test.txt=ptr:). The command allows a separate file to be attached for reading and writing. Syntax for the command is "attach <virtual uart> <read/write> <physical uart or file>", for example "attach 1 read test.txt" to read test.txt over the paper tape reader.
-
z80ctrl Kits Available
01/08/2019 at 23:58 • 0 commentsz80ctrl Kits are now available on Tindie. Get 'em while they're hot!
![]()
These kits are sold by Michael Kamprath with my permission. I do not offer any warranty or guarantee of support.
-
One Year of z80ctrl
01/04/2019 at 05:39 • 0 commentsAround this time last year, I started bread boarding what would become the z80ctrl. In honor of its first birthday, I've decided to take a little trip down memory lane.
I made my first commit to GitHub on January 6. It didn't do a lot back then. It had a hard-coded program that added two numbers together and then went into an infinite loop, while the AVR printed out a trace of the signals on the Z80 bus. But it was enough to prove that my design worked. A day later, I had the AVR doing serial I/O and the Z80 printing "hello, world".
The first real program it ran was the Altair Turn Key Monitor a few days later. That was followed in quick succession by a more advanced monitor, which allowed me to paste in Intel Hex programs for the Z80 to run. By January 12, I had the SD card working and could load hex files directly from it. For the next few days, the z80ctrl monitor started to take shape. The dump and fill commands made their debut and the debugging features started to take shape. The monitor from back then is still recognizable now (although with a much longer list of commands).
On January 15, I got Altair disk emulation working and achieved what felt like the Holy Grail: running CP/M. On January 21, I posted my first two videos to YouTube. One detailed the Hardware:
And the other detailed the software:
Around this time, I started getting the idea that I wanted to design my own PCB. I started work on a SBC that would include the Z80, memory, and AVR all on one board, but then I came across the RC2014. I really liked the modularity of the RC2014 backplane and the community surrounding the RC2014. So on January 20, I ordered a RC2014 Pro kit, and the next day I introduced myself to the RC2014 community. I started working on an RC2014 module in KiCad and had a first draft by January 23.
My RC2014 arrived on February 1, and to prove to myself it would work, I hooked up my breadboarded circuit to the RC2014 backplane. It worked, an after a few weeks of polishing, I finally mustered the courage to place my order from OSH Park on February 16. After 10 long days, the boards arrived, and... they didn't work. I couldn't even get the SD card to work, and I was completely stumped.
I felt so defeated by the failure of my first PCB design that I took a break from the project for two months, until two members of the RC2014 mailing list, Rodney and Jay, encouraged me keep working on it. By April 23, both had their boards working but mine was still a no go. Rodney offered to send me one of his boards to test, and when I got it, I found that it didn't work either. Finally, on May 4, I figured out that it wasn't a problem with my board at all, but two lines shorted together on the RC2014 backplane. After figuring this out, my enthusiasm returned and I made a video going over the board's design and discussing some of the problems I ran into:
I spent the next few weeks helping people on the mailing list to solve problems with their boards and making a new revision to fix the issues I had identified with the first board. Also during this time, I got serious about documenting the project and squashed a few bugs.
On May 20, I started this Hackaday page. The next few weeks were my most productive period since starting the project in January. I added many... new... sofware... features. I also designed REV3 of the board that had some major optimizations and new features.
Also during this time, I started working on my other project, TMS9918A video card, which was the first of my game boards for RC2014. I ordered both the video card and z80ctrl rev3 at the same time. When I got the rev3 boards built, they worked the first time. By mid-July, I was pretty happy with the point I had gotten the z80ctrl to, and I turned my attention to learning to code for the TMS9918A video card and trying to get ColecoVision games to run on it.
The project hit another lull until I was again encouraged to come back to it by a member of the RC2014 community, this time Colin. He was interested in the SPI I/O expander I had mentioned as a possible expansion but never developed and this spurred me to start developing it.
On October 24, I started working on the I/O expander board and a few small changes for rev4 of the z80ctrl. By November 2, I had finished up the designs, and along with the new sound board and joystick interface I designed around the same time, I was ready to order a new batch of PCBs. The first revision of the I/O expander had some problems, and so did the joystick interface I had built at the same time, so I had to do another batch of PCBs 10 days later.
I got the new boards built on November 25, and this time everything worked. I spent the first part of December testing the new game boards I had built (translation: playing lots of ColecoVision games on my RC2014).
By December 15, I turned my attention back to the I/O expander and started writing some examples for using it from both MBASIC and Assembly language. My latest feat has been to get MSX-BASIC running with a compbination of my TMS9918A video card, and the z80ctrl handling keyboard emulation.
Because so much has changed since I made the videos almost a year ago, I felt like the z80ctrl deserved a new video for a new year.
My heartfelt thanks go to everyone who has taken an interest in my projects, and especially to Rodney, Jay, and Colin for encouraging me to keep going. The Z80 and I had great fun together in 2018, and I'm looking forward to seeing what 2019 brings for the z80ctrl and the larger RC2014 community.
Psst... I heard a rumor that there might be some z80ctrl and game board kits available soon.
-
MSX-BASIC on RC2014
01/02/2019 at 00:21 • 1 commentI've gotten MSX-BASIC to run on the RC2014 with my TMS9918A video card and my z80ctrl card emulating the MSX keyboard.
I have checked the keyboard emulation code into GitHub. It takes ASCII characters from the z80ctrl UART and converts them into MSX keyboard scan codes using a table. Currently it doesn't support some of the control keys on the MSX keyboard such as stop and the arrow keys. I will keep working on this, but it's usable as is.
The MSX-BASIC ROM can be obtained from the blueMSX emulator. Copy MSX.rom from the Machines\Shared Roms directory of your blueMSX installation to your z80ctrl SD card. Once you've copied it, load and run it from z80ctrl:
z80ctrl>clkdiv 5
z80ctrl>loadbin 0 msx.rom
z80ctrl>run 0
One of the nice things about MSX-BASIC is that it has built-in graphics primitives for the TMS9918A video card, unlike, say, MBASIC on CP/M. I have used these primitives to draw an analog clock using the time pulled from the RTC chip on my z80ctrl IO expander, which is shown in the video. The BASIC source code is available on GitHub.
Currently, there is no support for MSX tape or disk drives, so you can't save your program once you have typed it in. The way I worked around this was to edit the program on my PC and then paste it into TeraTerm. I had to set a 50 ms per-character delay in order to get the program to reliably type in when pasted. A faster brute force method of saving your program once you have typed it in is to press the halt button on the z80ctrl and run
z80ctrl>savebin 8000 ffff image.binThis will save the complete state of your BASIC interpreter so that you can load it back up the next time using and pick up where you left off. Next time, to pick up where you left off, run
z80ctrl>loadbin 0 msx.rom
z80ctrl>run 0
*press the halt button*
z80ctrl>loadbin 8000 image.bin
z80ctrl>run
Your program should now be in exactly the same state as it was before. You can list it to verify it is there, then run it.
Here are some good references I have found for MSX-BASIC.
- MSX Programming is a good book for learning MSX-BASIC.
- The Magic of MSX goes into low-level implementation details of MSX-BASIC.
- The list of Basic Instructions at the MSX.org is also a good reference.
-
Interfacing a Character LCD
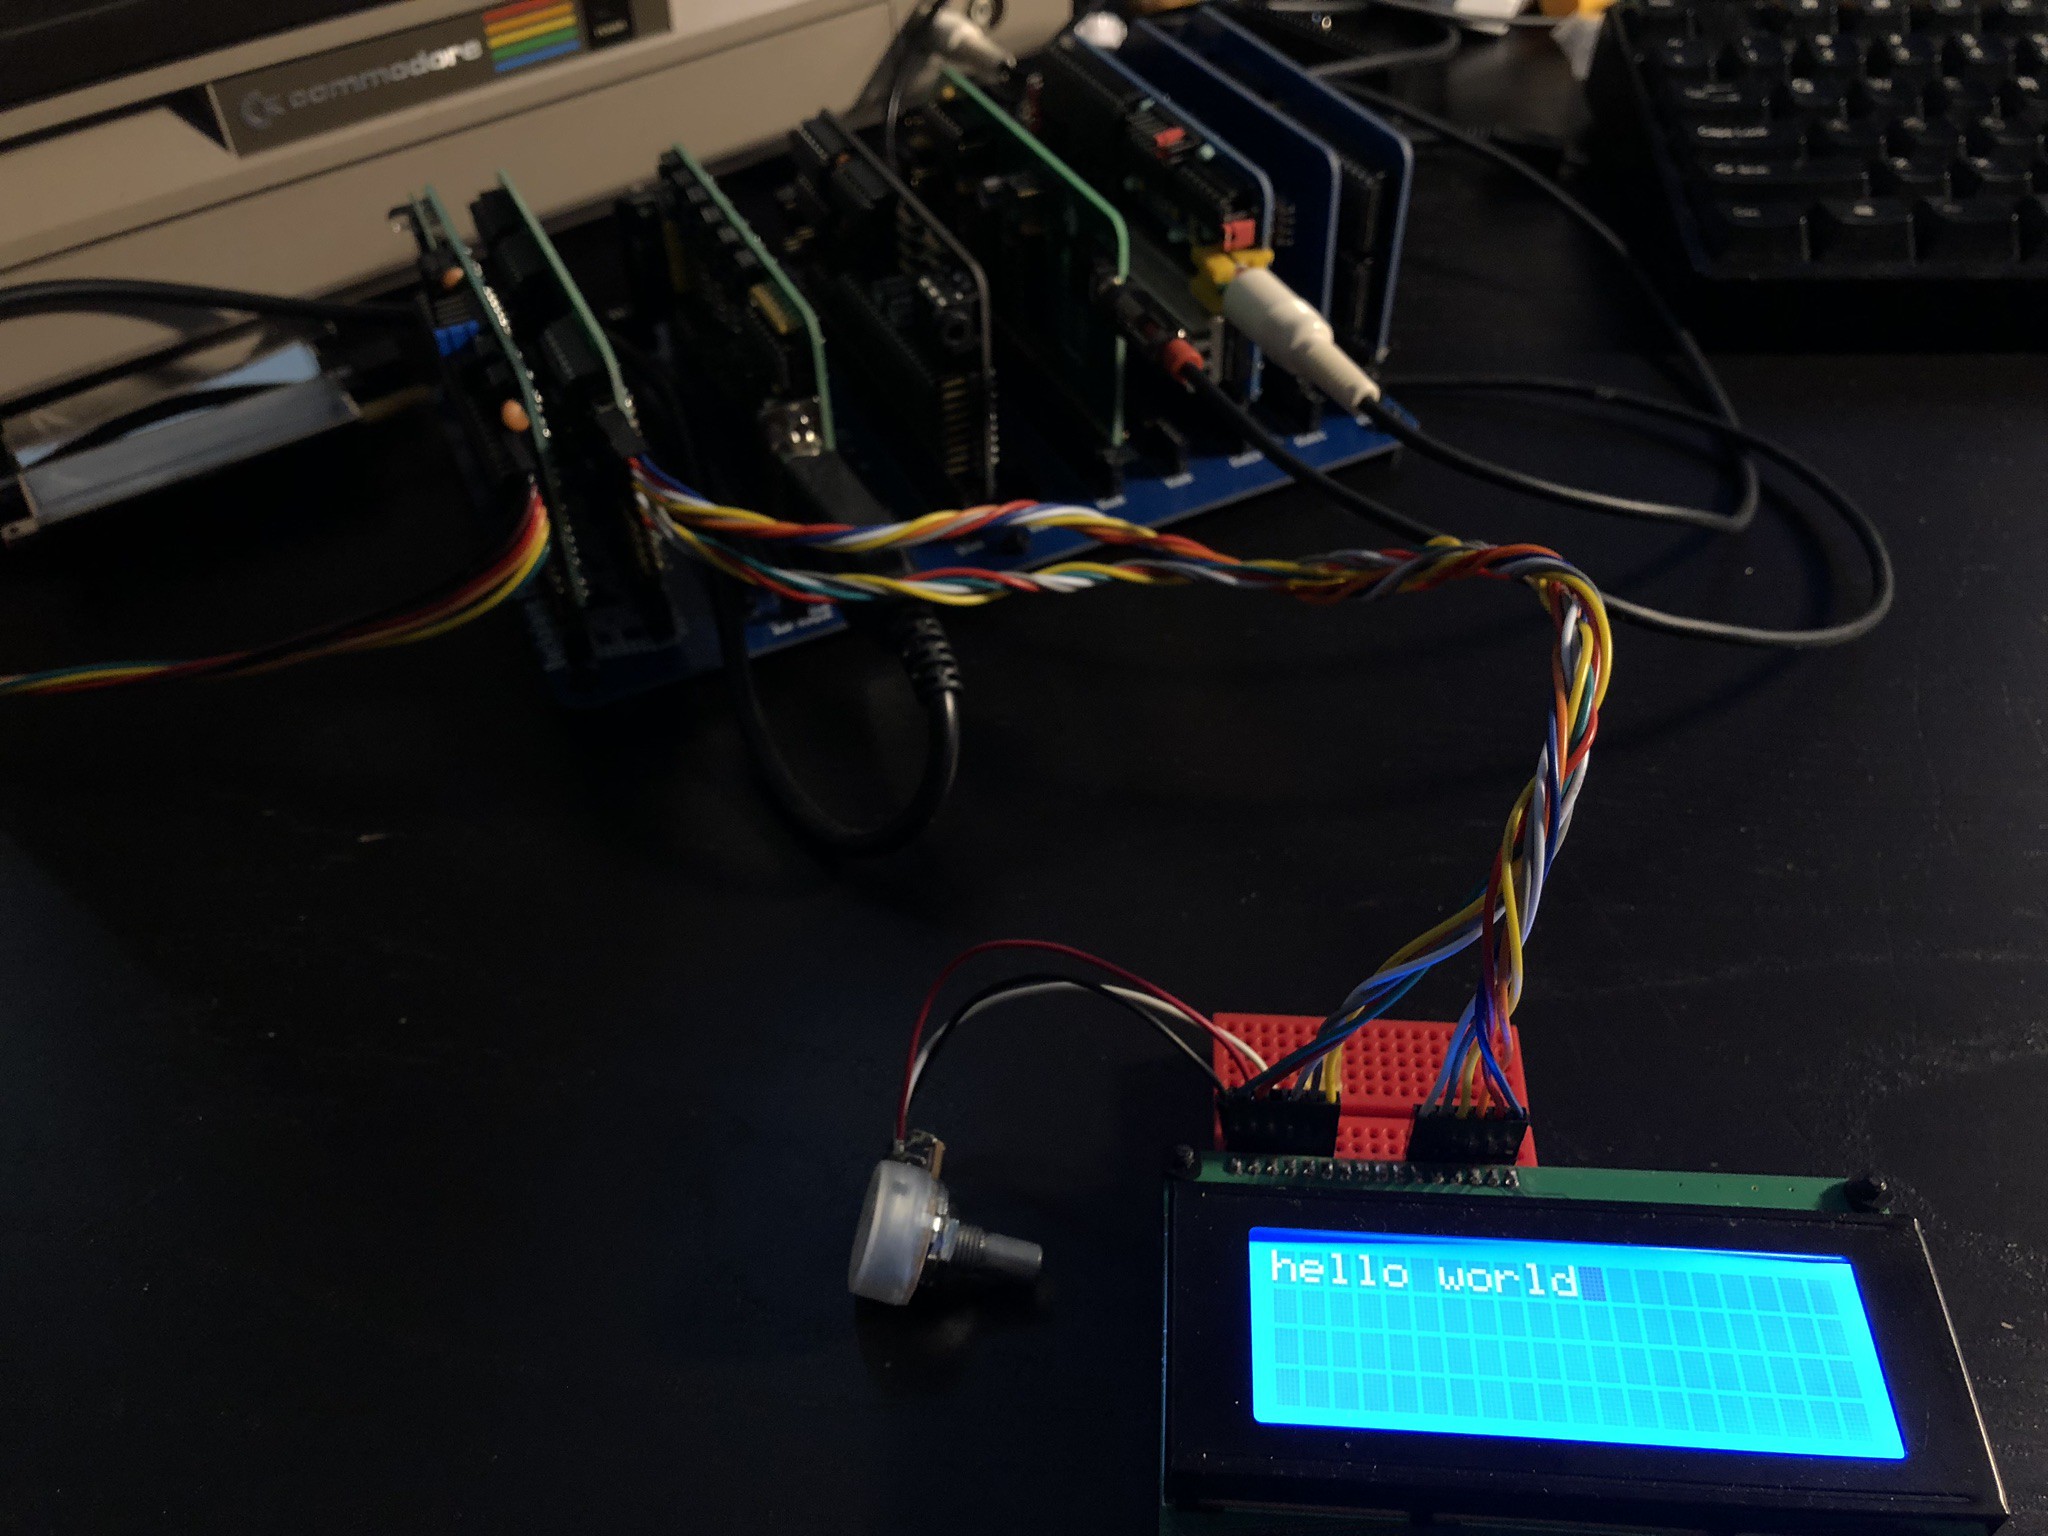
12/31/2018 at 16:27 • 0 commentsI've added a few examples for interfacing a character LCD with the z80ctrl IO expander board. The specific LCD I am using was purchased from Amazon. However, almost every character LCD you can find will use a standard interface based on the HD44780 chip, and my examples should work with any of them.
Since the LCD has a parallel interface to begin with, one could argue that it's a bit convoluted having the Z80 talk to the AVR over the parallel bus, which converts it to a serial signal to send to the IO expander, which converts it back into a parallel signal to send to the LCD. To that, I say: Shut up, one! It's my project and I'll do what I want!
![]()
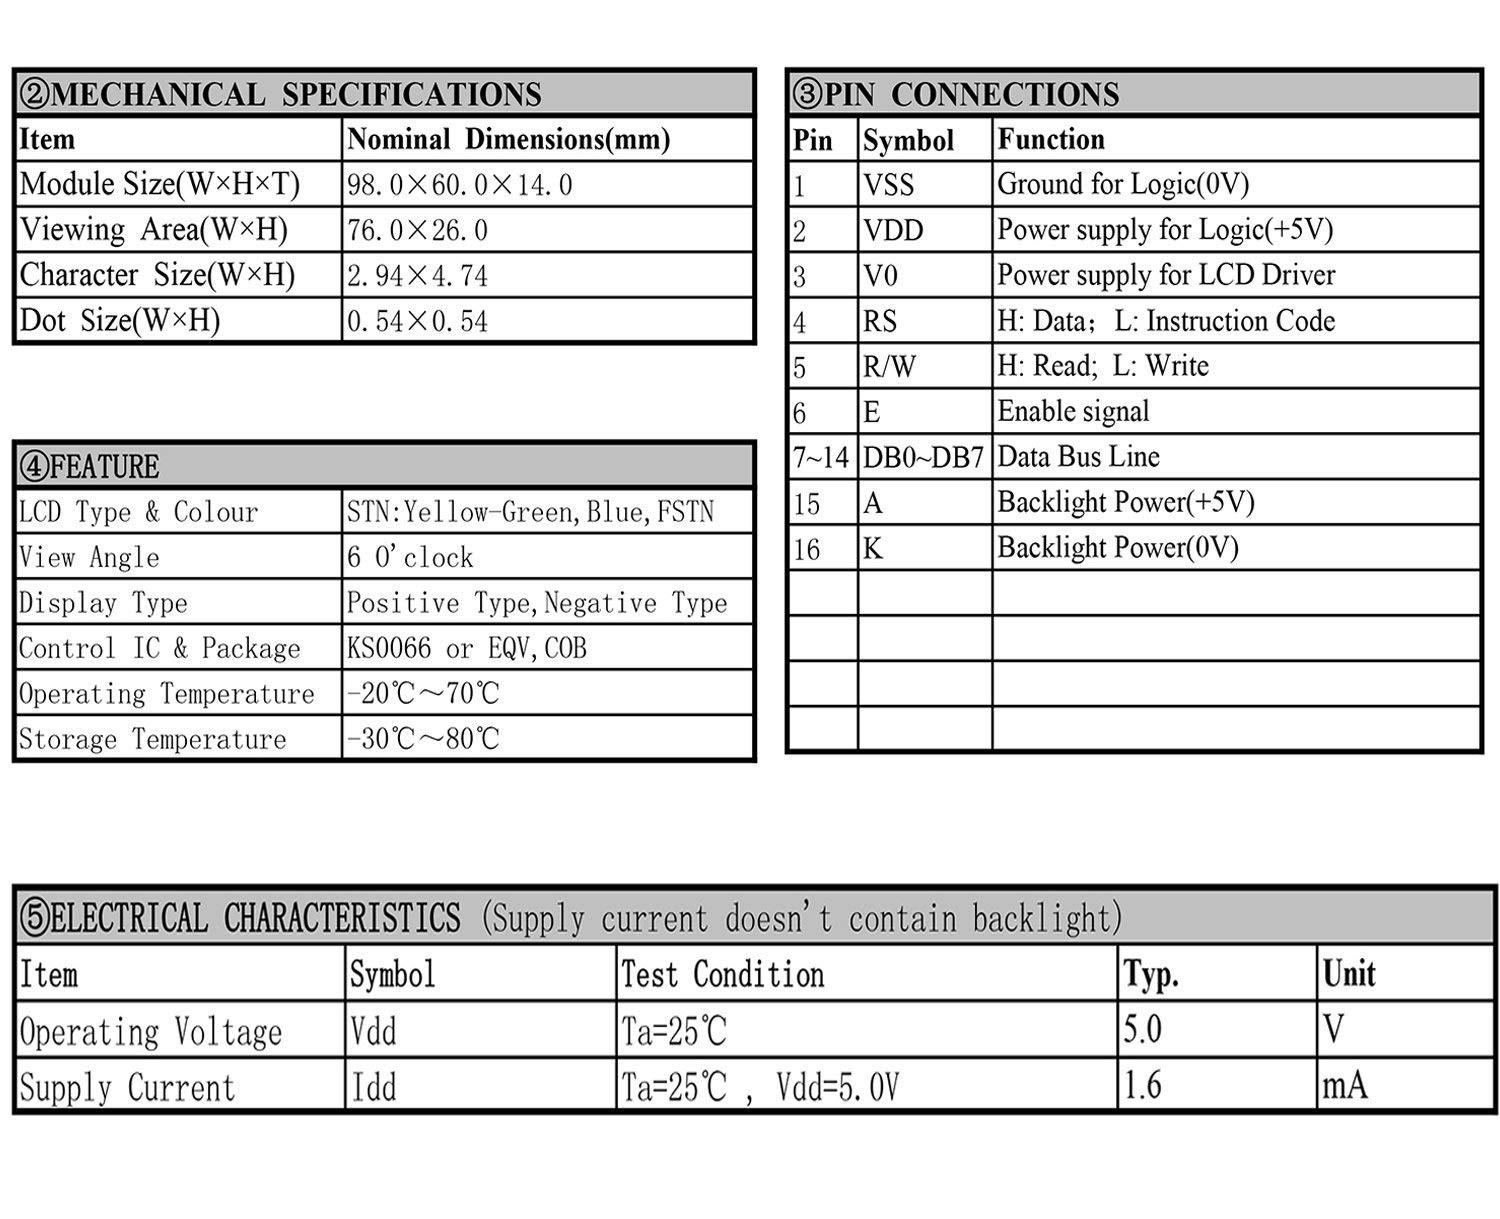
The pinout for a character LCD is also fairly standardized. This is from the LCD I bought:
![]()
Hooking up the LCD to the IO expander board is straightforward:
- Connect pins GPA0-GPA3 from the GPIO A connector to DB4-DB7 on the LCD
- Connect pins GPA4, GPA5, and GPA6 from the GPIO A connector to RS, R/W, and E on the LCD, respectively
- Hook up 5V power to VDD and A on the LCD
- Hook up ground to VSS and K on the LCD
- Connect a 10K pot to V0 to adjust the contrast
Once it's hooked up, I wrote a simple MBASIC program that prints "hello, world" on the LCD:
10 GOSUB 1000
50 C=&H33:GOSUB 3000: REM RESET SEQUENCE, PART 1
60 C=&H32:GOSUB 3000: REM RESET SEQUENCE, PART 2
70 C=&H28:GOSUB 3000: REM 4-BIT MODE, 2 LINES, 5x8 CHARS
80 C=&HD:GOSUB 3000: REM DISPLAY ON, BLINKING BLOCK CURSOR
90 C=&H1:GOSUB 3000: REM CLEAR DISPLAY
100 INPUT "STRING TO PRINT"; S$
110 GOSUB 5000
120 END

1000 REM INITIALIZE GPIO PORT
1010 OUT 0, 1: REM GPIO CHIP 1
1020 OUT 1, 0: REM DATA DIRECTION REGISTER A
1030 OUT 2, 0: REM ALL OUTPUT
1040 OUT 1, &H12: REM GPIO REGISTER A
1050 RETURN

2000 REM SEND BYTE IN C TO LCD
2010 OUT 2, &H40 OR M OR (C\16) : REM TOP NYBBLE WITH ENABLE HIGH
2020 OUT 2, M OR (C\16) : REM TOP NYBBLE WITH ENABLE LOW
2030 OUT 2, &H40 OR M OR (C AND &HF): REM BOTTOM NYBBLE WITH ENABLE HIGH
2040 OUT 2, M OR (C AND &HF): REM BOTTOM NYBBLE WITH ENABLE LOW
2050 RETURN

3000 REM SEND COMMAND IN C TO LCD
3010 M=0
3020 GOSUB 2000
3030 RETURN

4000 REM SEND CHAR IN C TO LCD
4010 M=&H10
4020 GOSUB 2000
4030 RETURN

5000 REM SEND STRING IN S$ TO LCD
5010 FOR I = 1 TO LEN(S$)
5020 C=ASC(MID$(S$,I,1))
5030 GOSUB 4000
5040 NEXT
5050 RETURN
The BASIC program has several subroutines that illustrate how to interface the LCD:
- 1000 initializes the GPIO port on the IO expander to talk to the LCD. It sets the IODIRA register (address 0) to 0 to make all the pins outputs. Then it selects the GPIOA register (address &H12) which will be used by the rest of the program to control the output.
- 2000 sends the byte in C to the LCD with the register select bit set in M. To reduce the number of pins required, the LCD is used in 4-bit mode. Therefore the program has to sends the byte 4 bits at a time, clocking the enable line each time.
- 3000 is a wrapper that sends a command to the LCD by setting M=0 and calling 2000
- 4000 is a wrapper that sends a character to the LCD by setting M=1 and calling 2000
- 5000 sends a complete string in S$ to the LCD. It iterates over each character in the string and converts it to ASCII, then calls 4000 to send each character individually
- The main program starting at 10 sends a series of commands to initialize the LCD by setting the value of C and calling 3000 for each one. Then it sets the value of S$ to "hello, world" and calls 5000 to send the string.
- Note: MBASIC is slow enough that I didn't have to check the LCD's busy flag between writes, which would have made the code considerably more complicated. Check out the assembly program below to see how that's done.
I have also written an assembly program to retrieve the date and time from the RTC and display it on the LCD. Since it's quite long, I won't reproduce it here, but be sure to check it out if you'd like an example of using the IO expander from Z80 assembly. The code is heavily commented so it should be easy enough to follow.
-
IO Expander from MBASIC
12/15/2018 at 21:17 • 2 commentsI've recently pushed an update to the z80ctrl repo which makes my new IO expander board accessible to the Z80.
To access these features, you'll need to pull the latest code from the Github repo, and then uncomment the IOX_BASE variables in the Makefile. After doing so, run 'make clean' and then 'make install' to rebuild and flash the new code. You can change the IOX_BASE if desired, but you must modify any code that will access the ports accordingly.
The board is exposed to the Z80 on 3 consecutive ports starting from IOX_BASE:
- Writing to port 0 selects device you want to control. The RTC is always device 0. The device number of the GPIO chips correspond to the address configured on the jumpers next to the chip. If you select a non-existent device, writing to the other registers will have no effect.
- Writing to port 1 selects the active register on the selected device.
- The registers for the RTC are fully documented in the DS1306+ datasheet. You can also find a concise list in rtc.h.
- The registers for the GPIO ports are fully documented in the MCP23S17 datasheet. You can also look in the iox.h file for a concise list of addresses. You will want to use the register addresses for bank 0 unless you change the bank configuration (read about this in the datasheet).
- Reading or writing port 2 returns or sets the value of the selected register on the selected chip. Refer to the appropriate datasheet for the meaning of the values written to the registers.
Here is a simple MBASIC program to flash an LED on the first GPIO port 10 times:
10 OUT 0, 1: REM select chip address 1
20 OUT 1, 0: REM select register IODIRA0 (0x00)
30 OUT 2, 0: REM set register value to 0 (all pins outputs)
40 OUT 1, &H12: REM select register GPIOA0 (0x12)
50 FOR I = 1 TO 10
60 OUT 2, 0: REM turn all pins on GPIOA off
70 FOR J = 1 TO 1000:NEXT
80 OUT 2, &HFF: REM turn all pins on GPIOA on
90 FOR J = 1 TO 1000:NEXT
100 NEXT
First, we select the IO direction register on the IO expander configured at address 1, and set all pins to outputs. Then we select the GPIO register. Within a loop, we toggle all of the pins on and then off, pausing between each transition.
Here is an MBASIC program demonstrating how to read the time from the RTC:
10 REM CONVERT VALUES FROM BCD
20 DEF FNBCD(V)=(V AND &HF0)/16*10+(V AND &HF)
30 OUT 0,0: REM SELECT RTC CHIP
40 REM READ DATE/TIME FROM RTC REGISTERS
50 OUT 1,6: YR=FNBCD(INP(2))+2000
60 OUT 1,5: MO=FNBCD(INP(2))
70 OUT 1,4: DY=FNBCD(INP(2))
80 OUT 1,2: HR=INP(2)
90 OUT 1,1: MI=FNBCD(INP(2))
100 OUT 1,0: S=FNBCD(INP(2))
110 REM HANDLE AM/PM
120 AMPM$=""
130 IF (HR AND &H40)=0 THEN 160: REM SKIP IF 24-HR FORMAT
140 IF HR AND &H20 THEN AMPM$="PM" ELSE AMPM$="AM"
150 HR=HR AND &H1F: REM GET RID OF AM/PM AND 12-HR BITS
160 HR=FNBCD(HR)
170 PRINT USING "The time is ##:##:##& on ##/##/####"; HR, MI, S, AMPM$, MO, DY, YR
First, we select the RTC device, then read the year, month, day, hour, minute, and second from the corresponding register on the chip. Next, we check to see if the 12 hour bit is set. If so, we check whether the time is currently AM or PM and then mask off those bits. Now, we convert all the values from BCD (as they are returned by the RTC) into binary so that BASIC can print them properly. Finally, we output the date and time in a standardized format.
-
REV4 Complete
12/05/2018 at 03:17 • 0 commentsI have completed REV4 of the z80ctrl board. This revision makes the following changes:
Adds a diode on the /WAIT line to convert it to an open drain output. This is necessary to prevent contention when other boards (such as my SN76489 sound card) need to use the /WAIT line also. If you plan to use a REV3 board with the SN76489 board, you must cut the wait trace and solder a diode in its place to prevent contention.
Updates the wait state generator to allow debugging with an external clock. Previously, z80ctrl only generated wait states for IORQ and when debugging, it single stepped the Z80's clock in software. Now it can optionally also generate wait states for MREQ so that execution of the Z80 can be paused for each memory fetch to allow debugging when the clock cannot be manually controlled. A jumper (J9) is provided to select between CLK and WAIT modes. In CLK mode, pin 20 of the AVR is connected to the CLK line on the RC2014 bus, and the z80ctrl provides the Z80's clock like it has in all previous revisions. In WAIT mode, an external clock must be used and pin 20 is instead used to enable and disable wait states for MREQs. I have not yet written the software to support this mode of operation but the REV4 board will work the same way as REV3 and earlier when the CLK jumper is shorted. Important Note: U3 is now a 74HCT02 quad NOR gate instead of a 74HCT74 dual flip-flop used on previous revisions.
Adds a jumper to optionally connect the AVR reset pin to the D15 line on the RC2014 bus, which is normally unused. This line can also optionally be connected to the I/O expander's reset pins on the new I/O expander board, allowing the I/O expanders to be reset to a known state whenever the z80ctrl is reset.
-
IO Expander Board
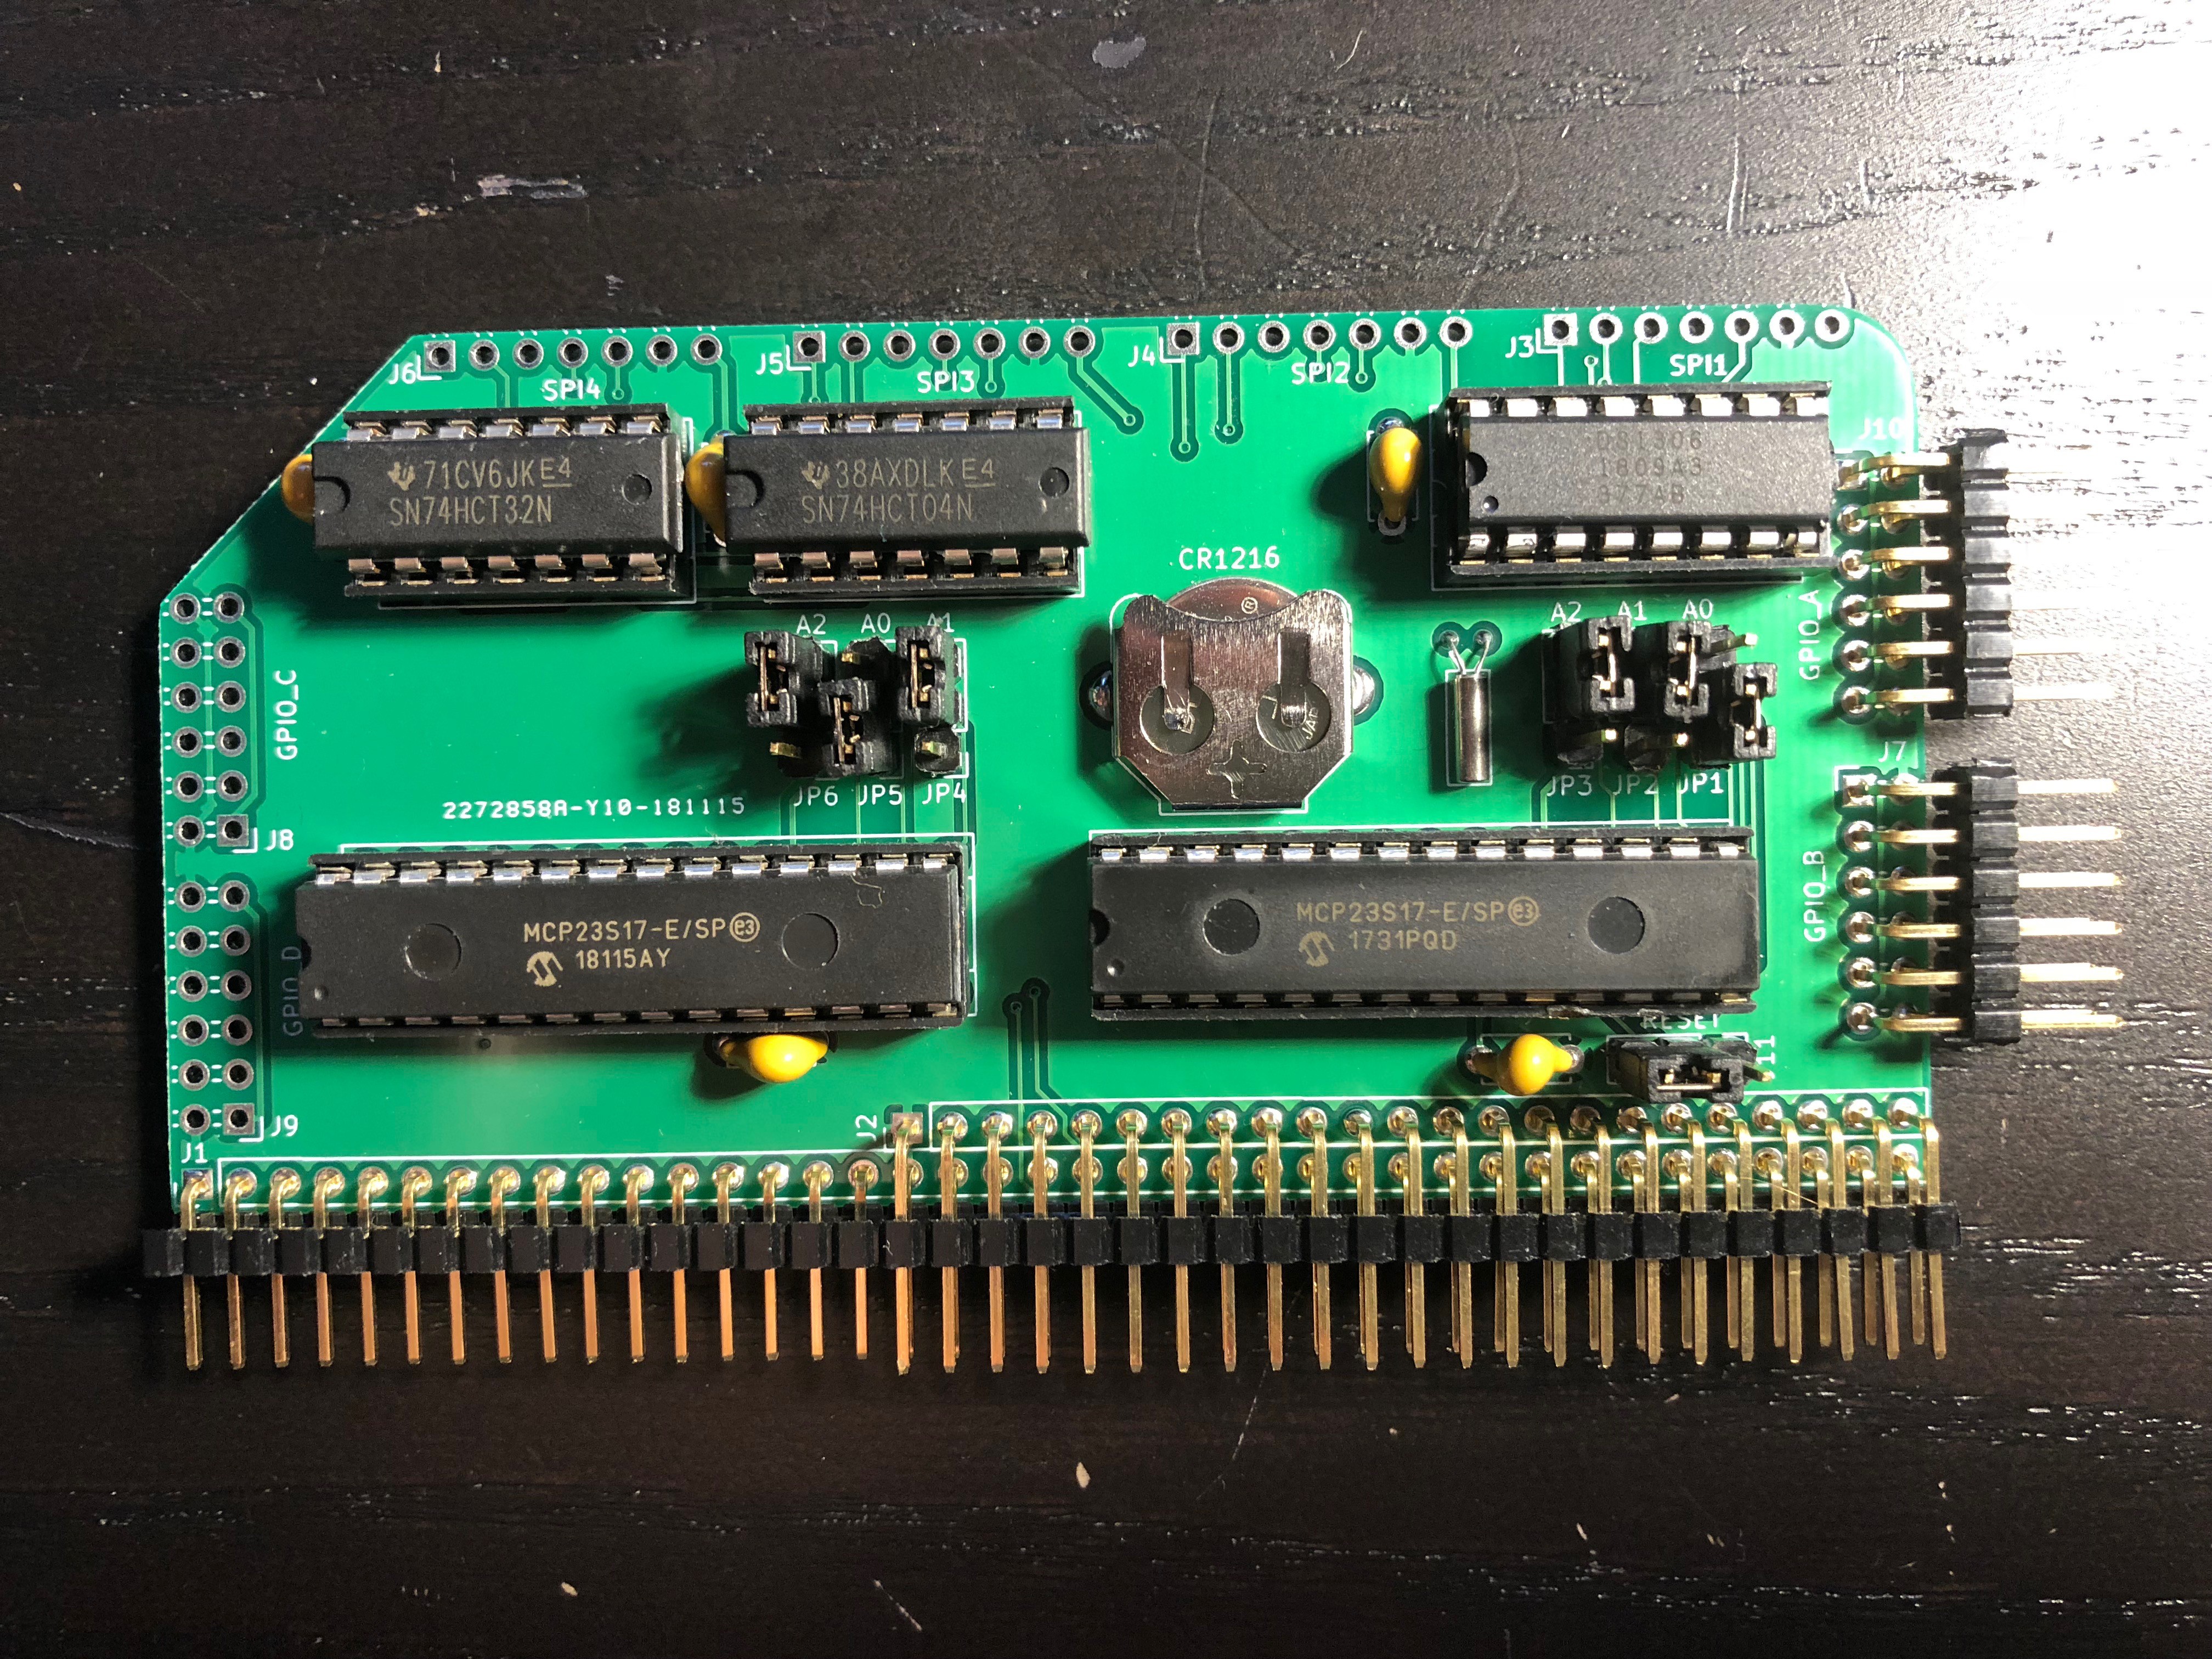
11/25/2018 at 22:08 • 0 commentsI've recently designed an I/O expander companion board for the z80ctrl that adds an RTC, up to 4 8-bit GPIO ports, and 4 SPI ports.
The board makes use of the same MCP23S17 I/O Expander used on the z80ctrl. All of the I/O expanders share the same chip select line and are addressed by a configurable 3-bit address, allowing a total of 8 I/O expanders to share a chip select line. Jumpers are provided to set the address, so up to 3 I/O expander boards can be added to the RC2014 if desired, giving a maximum of 24 8-bit GPIO ports. The I/O expander on the z80ctrl board which interfaces with the RC2014 bus is hard-coded to address 0, so only address 1 and higher should be configured for the I/O expanders on this board.
The board also contains a DS1306+ SPI RTC with a battery backup and 32 kHz crystal. This allows the AVR to keep track of the time in order to correctly timestamp files on the SD Card. It can also share the RTC over the Z80's parallel bus so that the RTC is accessible to CP/M, FUZIX, or other operating systems running on the Z80.
The board allows for up to 4 additional SPI chip selects to connect other SPI peripherals to the board. This is done by ORing the upper 4 bits of the GPIO_B port with the AUX2_CS line from the AVR. The additional chip select will only become active when both corresponding the GPIO_B line and the AUX2_CS line are set low. This way, the AVR can communciate with the I/O expander to enable the additional chip selects, but they will only become active once communication with the I/O expander is complete.
An inverter was also required because the RTC uses an active high chip select whereas most SPI peripherals use active low. Since I had 5 additional inverters in the package, I also inverted the outputs of the OR gate and exported both the active high and active low chip selects on each of the 4 SPI ports.
The KiCad design files for the board are available in the GitHub Repo and further details are provided on the GitHub Wiki.
I have updated the z80ctrl firmware to use the RTC to set the timestamp when creating new files on the SD card. The date can also be viewed and set using the new date monitor command.
I have also added ioxwrite and ioxread monitor commands that directly write or read I/O expander registers. This allows low-level configuration of each I/O expander. The commands take the address of the I/O expander configured via the jumper, and the hex address of the register that you want to interact with. Refer to the MCP23S17 datasheet for information about the specific registers. Additional high-level commands can be added to the firmware if a specific function for the I/O expanders is desired.
Many thanks to JLCPCB for sponsoring the prototypes of this board. Whether you want to manufacture my boards for your RC2014, or you need to prototype your own electronic project, JLCPCB is an excellent choice. They produce top quality PCBs for an incredibly low price and their service is fast. I routinely get 5 day or quicker turnaround on my projects, order placed to board in hand.
 J.B. Langston
 CPU/RAM/RTC Board Features