-
1Getting the NodeMCU Firmware
Many ESP8266 boards come with the Lua interpreter pre-installed. NodeMCU is both the name of the firmware, and also an ESP8266 development board that comes with NodeMCU firmware pre-installed. The firmware can be built with many different modules, which will change the size of the firmware. This is handy because not all modules have the same flash size. With the ESP-12F, we have 32Mbit, or 4Mbyte of flash, which is quite a lot.
![]()
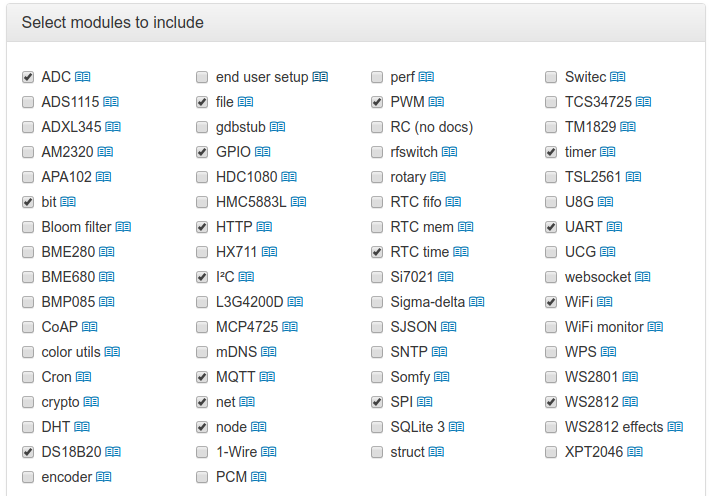
The NodeMCU Development Board There is an online service which will build NodeMCU firmware for you! Just pick the options you want, enter your email, and click build. A good, general-purpose firmware can be built with these options:
![]()
Feel free to add or remove things that you don't need, but be careful not to add too many modules. You might not be able to fit it on your device. Don't select any of the miscellaneous options. Once you are ready, click build. When the server isn't busy, it usually takes less than a minute for you to receive the email with the firmware link. If the server is very busy, it can take longer.
Once you have downloaded the firmware, we can program it to the board. On all OSes, we can use esptool to install it. You will need Python 2.7 or 3.4+ already installed. Go ahead and install it:
pip install esptool
On Windows, you also have a GUI option called NodeMCU Flasher. This will install a firmware with default options, but you can also install your custom-built firmware by using the Config tab. There are instructions on the GitHub page, located here.
With esptool, we first need to move into the directory where the firmware was downloaded to. Then, flash it using this command:
esptool.py --port [port] write_flash -fm=dio -fs=32m 0x00000 nodemcu-master...-float.bin
Replace [port] with the port your device is connected to. On Linux, this is usually /dev/ttyUSB0, and on Windows, it will be a COM port. Check device manager to see which port it was assigned. Also, make sure to select the correct size flash. If you have a different module, you might have 1MB of flash, in which case you would use -fs=8m, and some modules have only 512KB of flash, in which case you would use -fs=4m. This information should be easy to find wherever your purchased your module.
After it has finished flashing, we are ready to connect to the Lua terminal! We will need some software to access the serial port. The ultimate choice of serial terminal is left to the reader, but in the interest of expediency here are a few recommendations:
On Windows, I highly recommend RealTerm. The UI is a bit complex but it's very stable and has lots of options. For Linux, I recommend using minicom if you want to use a command line serial terminal. Make sure to disable software/hardware flow control in minicom -- it's enabled by default! For GUI, I recommend gtkterm. CuteCom is much too barebones, and I couldn't get moserial to work at all under Budgie, though you may have better luck. On OSX, I have heard that CoolTerm is quite good. It is also available for Windows and Linux. There are many other options on OSX but I don't have enough experience with them to recommend one over another.
![]()
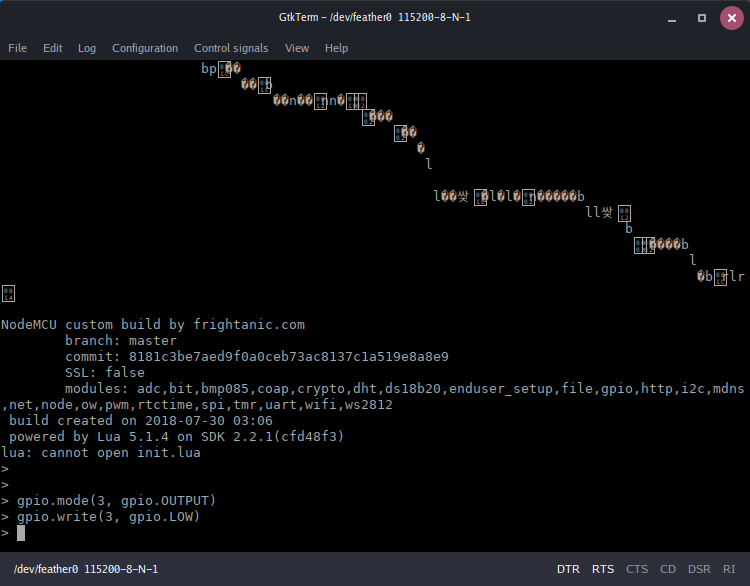
NodeMCU prompt after reset Use whichever serial terminal you choose to connect to the ESP8266 at 115200 baud, 8 bits, 1 stop bit, no parity, no hardware flow control. no software flow control. Once it's connected, hit enter, and you should see the Lua prompt:
>
Now we're ready to move on to Blinky! If you don't see the prompt, or you get errors when trying to connect, the most common issues are:
- On Linux, make sure your user is a member of the group dialout. You can achieve this with the command sudo usermod -a -G dialout username
- On Windows, make sure you have the correct serial port. Make sure no other application is trying to use it. Check Device Manager to make sure the correct drivers are installed. This is also where you can see the port number it was assigned
- Try using a different serial terminal program
- As a last resort, you can try running the serial terminal with superuser permissions. On Linux, use sudo, and on Windows, right-click and Run as Administrator.
-
2Blinky with Lua!
Now that we have the firmware installed, it's time to start playing with Lua. Lua is a scripting language that has been around for many years. It was developed in 1993 in Brazil, by a group of university researchers. They wanted an extensible, easy to use programming language, and Python was only in its infancy at the time and was not widespread. Also, trade restrictions meant they had to develop most software from scratch. Thus, Lua was born. It has elements borrowed from many other languages. It looks somewhat similar to Python and Ruby, but it has many quirks which make it very attractive for many different applications. It is extremely lightweight and fast for an interpreted language. It can interface with C natively, giving it a lot of flexibility.
You don't need to know Lua to get started, though. You'll pick up the basics very quickly. However, I strongly recommend spending an hour or two learning the basics of Lua. Here is an excellent online tutorial aimed at beginners. It will pay dividends as we move further into learning how to use NodeMCU.
For those of you familiar with Python, you'll know that the interpreter prompt, while useful, is not where actual programs are written. It's an excellent way to test out small bits of code, or to play around when learning new concepts. But like most languages, the real power is in writing complete scripts in a standalone file. On a computer, this is then passed to the interpreter which executes the script instead of opening the prompt. On the ESP8266, we need to write the file to flash and tell the Lua interpreter to execute it on startup. But first of all, let's take a look at our Blinky program:
led = 3 -- NodeMCU uses a different numbering scheme
tmr.alarm(1, 1000, tmr.ALARM_AUTO, function()
    gpio.write(led, gpio.LOW)
    tmr.delay(100000)
    gpio.write(led, gpio.HIGH)
end)
This shows the power of NodeMCU. This is the shortest and most concise Blinky app out of the three options we present in these tutorials. One gotcha is that NodeMCU uses the numbering system for the NodeMCU board no matter which module you use. So you need to refer to the NodeMCU pinout diagram and check which GPIO maps to which pin. As we can see, GPIO0 maps to pin 3, GPIO2 maps to pin 4, and GPIO5 maps to pin 1. These are the most common locations for LEDs.
![]()
The NodeMCU pinout diagram This example uses an interesting feature of Lua, in that we can declare functions anywhere. The tmr.alarm() function takes four arguments. The first is the timer ID (0-6), the second is the period in ms, the third is the timer type (either tmr.ALARM_SINGLE for a one-shot timer, tmr.ALARM_SEMI for a manually triggered timer, or tmr.ALARM_AUTO for an automatically repeating timer), and the callback function to call when the timer fires. Instead of providing a function name, we simply declare a function as the fourth argument. This function sets the GPIO pin low, waits 100ms, and then sets it high again. This repeats every 1000ms, and we get a blinking LED!
Well, that's great, but now we need to set this as the init.lua file on the ESP8266. For this, we need one last tool called luatool.py. It can be cloned from GitHub here. I clone it into my ~/workspace/ESP8266 folder. This way it's easily accessible. You can clone it anywhere that is convenient and easy to remember. As I've said before, I highly recommend creating a folder called workspace, no matter which OS you run, and keeping all your development tools, projects and documentation there.
Once it's cloned, move into the luatool subdirectory, and you'll see a few files. Among them is an example init.lua, and the luatool.py tool itself. Open init.lua in any editor, delete all the code that is in there, and then type or copy/paste in our Blinky example. Save it, and now flash it to the ESP8266:
python2 luatool.py --port [port] --src init.lua --dest init.lua --verbose
A word of warning: the --src parameter must either be a file in the current directory, or it must be an absolute path. It will not accept relative paths, ie ./projects/init.lua. This caught me out a few times! Also, I had to reset, then unplug and replug my Feather HUZZAH, then run luatool.py twice in a row to get it to program init.lua. If you get an error saying "No proper answer from MCU", try resetting the board, replugging the USB cable, and running the luatool multiple times in a row. This may be due to the idiosyncrasies of my laptop's USB controller, but if you have similar problems let me know!
Replace port with the port your ESP8266 is on. Check back to step one for details on how to find it. After it's done, you may need to reset the board manually, by pressing the reset button. Then you should see a blinking LED! Pretty awesome, right?
This example shows us a few things that will remain true, no matter what language or method you use to program the ESP8266:
- Pin numbers and GPIO numbers don't always line up. Make sure to check the documentation or schematics that came with your board!
- Even with NodeMCU, a fairly high-level abstraction layer, we can still write code in a simple editor and upload it using the command line. We could also set up an advanced IDE with all sorts of features, but the beauty of the ESP8266 is the flexibility the tools give you
- All user code should be run either in a timer, or as a task (something we'll cover soon!). This is because the ESP8266 has two different watchdog timers that will reset the board if the watchdog reset function isn't called periodically. This is usually referred to as "petting" the watchdog. The software watchdog needs to be pet about every 6 seconds (an eternity to an 80MHz microcontroller!) and the hardware watchdog needs to be pet, depending on where you read, anywhere from every 2ms to 200ms.
- All methods for programming the ESP8266 have documentation and community support. Make sure to read the NodeMCU documentation if you are wondering how a function works or what its arguments are.
ESP8266 Lua Tutorials
NodeMCU brought a whole new paradigm to IoT -- using the Lua scripting language to built internet-connected apps with the ESP8266!
 Alexander


Discussions
Become a Hackaday.io Member
Create an account to leave a comment. Already have an account? Log In.