 Charles Lamb
-
1Buying a guitar or building a faux one
WARNING: ALL INSTRUCTIONS ARE A WORK IN PROGRESS AND ARE LIABLE TO CHANGE ON A REGULAR BASIS TILL THE PROJECT IS COMPLETE!!
Buying vs building
[Discussion of pros and cons]
The main advantage of buying a ready-made guitar is the significant reduction in work needed as compared to building a fake guitar from scratch. The primary disadvantage is that guitar bodies are designed to resonate and to amplify sound, which is not what you want from a speaker housing. I've addressed this latter point in my build by gluing in layers of MDF inside the bodies of the guitars.
Buying
This option involves buying a guitar and then making alterations to it to make it suitable as a speaker housing. (I'll provide more details about this later in the instructions.)
The main considerations to make when buying are guitar are as follows:
- attractive shape and colour;
- choosing one with that has an internal volume a little larger than required for the mid-range driver being used; and
- location of internal framing, as cross-beams that are placed under the sound board can make the widening of the centre hole for placement of the driver quite difficult.
This was the option I went with for this project, as I wasn't overly keen to build any from scratch right at this time. Perhaps in the future...?
I was able to find some ludicrously cheap guitars online that looked okay but importantly were the right volume [see step XX below].
Building
Quality speaker housings are typically constructed from MDF (either painted or covered in a timber veneer) in order to provide a solid, dampened structure. The ideal approach, then, when building the fake guitar bodies is to make them from MDF so you have the best of both worlds—a well-made speaker cabinet but one that looks like an acoustic guitar.
-
2Selecting a mid-range driver
Finding a mid-range driver is the first step for this project, as this will determine an ideal volume for the guitar body. Alternatively, you can
[I'll add more information in here over time about the selection of drivers.]
-
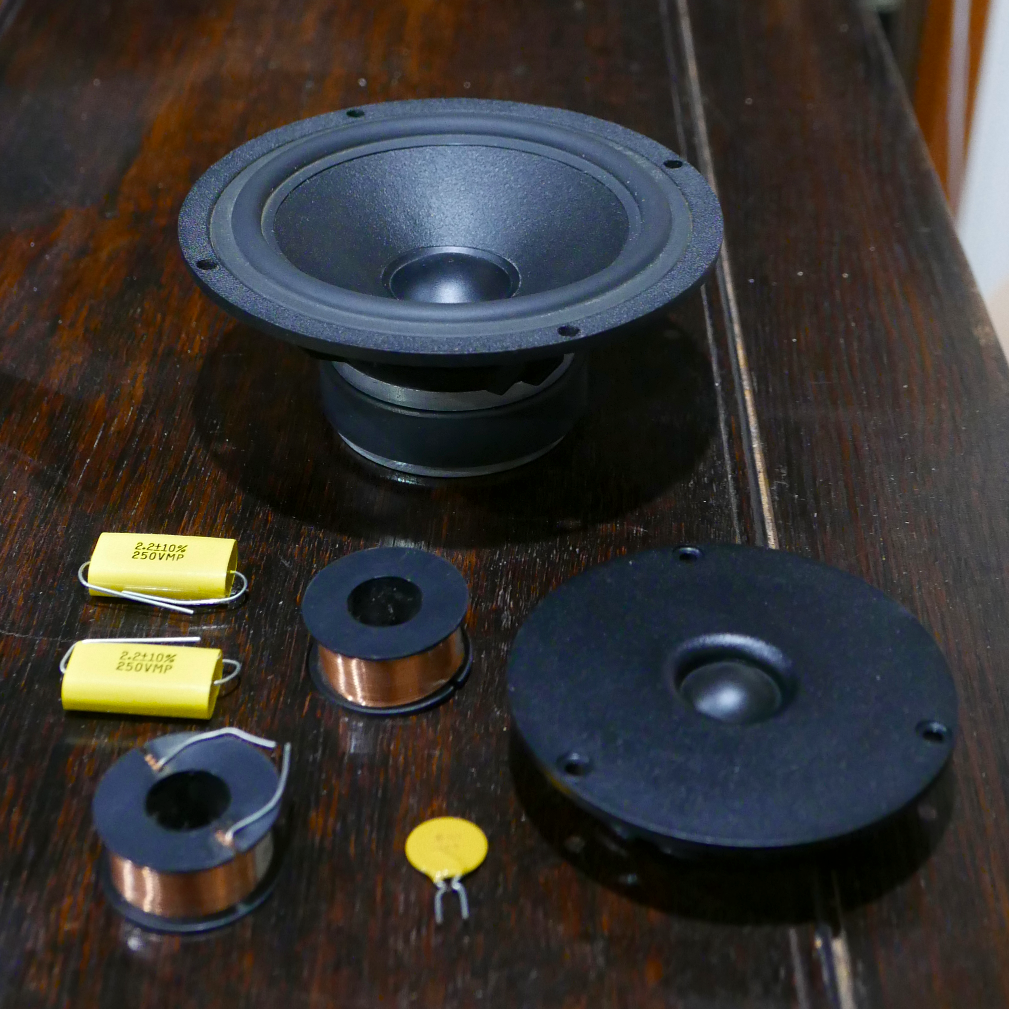
3Selecting tweeters and designing crossovers
![]()
[This will briefly cover 1st, 2nd, and 3rd-order crossover choices plus selection of quality electronic components. I will likely heavily reference other sites here because I don't claim competence in this area.
I'll also talk about options for tweeters in line with the previously chosen mid-range drivers.
Inductors, polyester NP capacitors, polyspeaker protectors, tweeter, and mid-range driver.]
-
4Test housing
This will detail the steps needed to make a temporary speaker housing that has adjustable volume.
-
5To add ports or to not
This step will cover the effect that ports have on speakers.
-
6Adding optional ports to the test housing
This step will cover adding in a few ports of different sizes to the test housing, as well as covers to go over the ports.
-
7Determining the volume
- Music selection
- Graphic/band equaliser
-
8Buying a set of cheap guitars

Extraordinarily affordable guitar bought online. It has a few dents on the left and a sticker on the top right that I need to remove. -
9Modifying the guitar body—Step N: Measuring and marking
Measuring the driver and tweeter to determine the hole sizes required for the guitar body.

The required hole diameters can be measured approximately using a ruler or more accurately using vernier callipers. The data sheets for the tweeter and driver may also provide this information.

Measuring the tweeter to determine the diameter of the hole to cut for it in the guitar body. -
10Modifying the guitar body—Step N: Mounting the driver
[This instruction will cover the steps for marking and shaping necessary for mounting the driver in the guitar body. Need to avoid the braces when widening the sound hole if possible. ]

Brace at the base of the sound hole, beneath the sound board 
Brace at the top of the sound hole, beneath the sound board
Guitars into speakers
Installing some mid-range drivers, tweeters, and crossovers into the bodies of two acoustic guitars.


Discussions
Become a Hackaday.io Member
Create an account to leave a comment. Already have an account? Log In.