HomeMadeGarbage
-
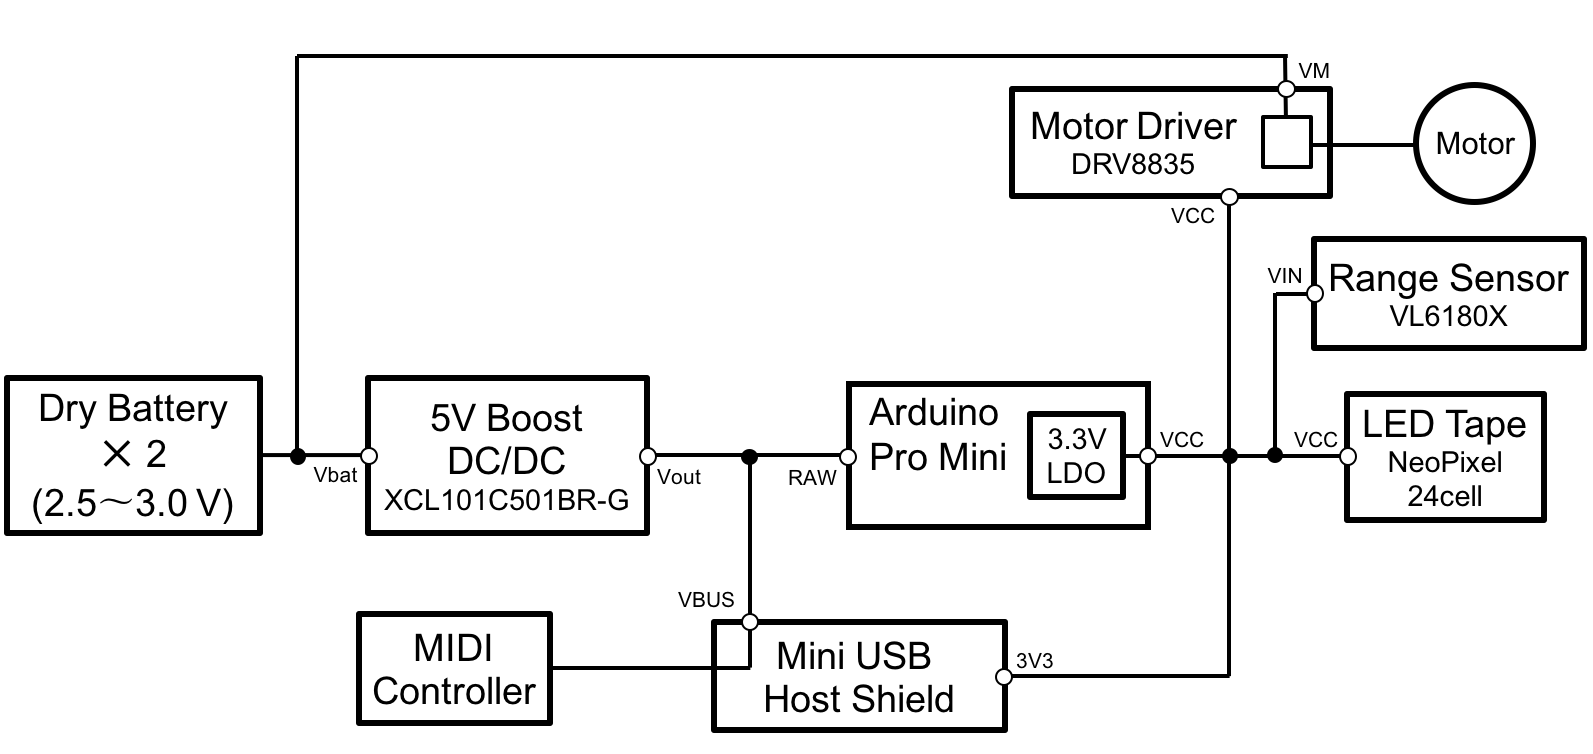
4. Power supply simplification
09/26/2018 at 11:04 • 0 commentsI simplified the power supply to handle portable. I adopted dry batteries.
Power supply schematic
![]()
It was difficult to completely eliminate the motor drive noise, so 5V DC / DC boost convertor and 3.3V LDO in the microcomputer were used for the control system power supply.
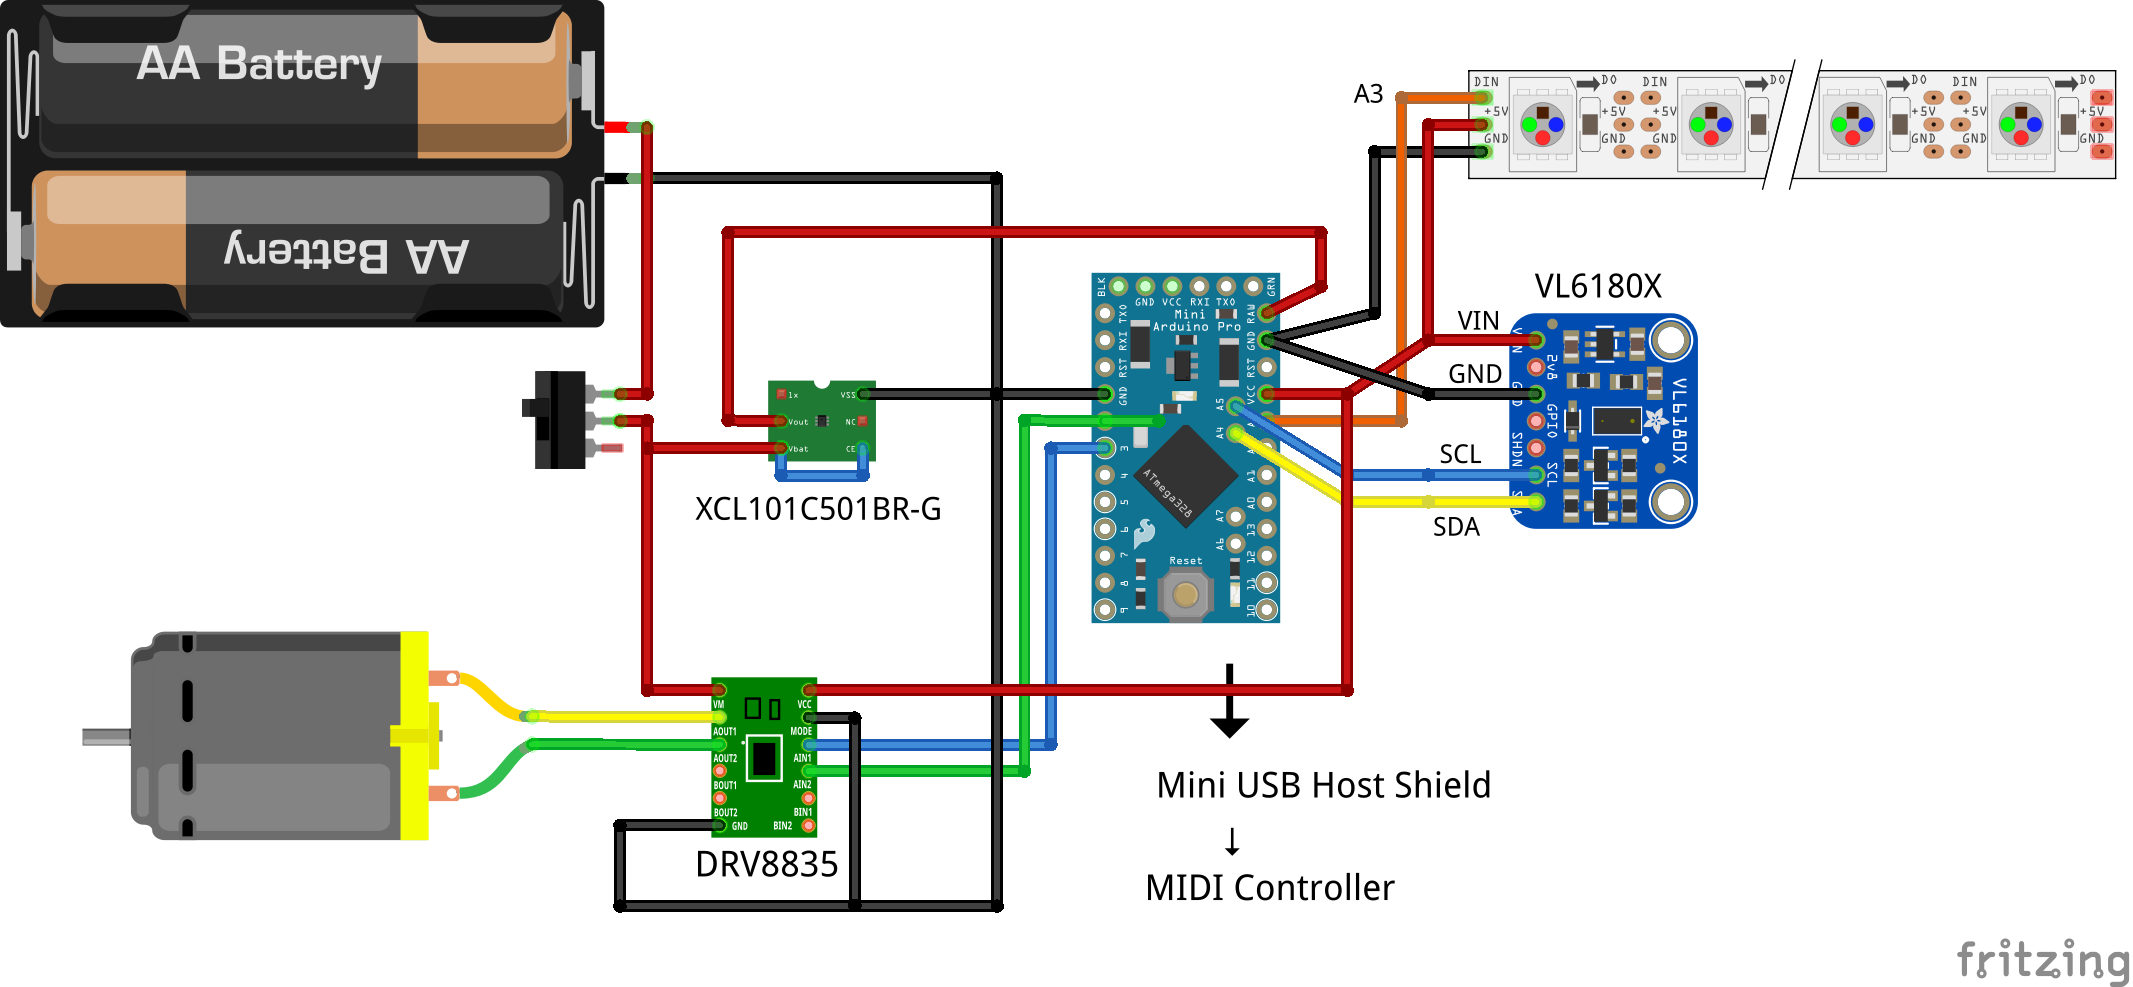
Structure
Using two dry batteries
![]()
Arduino IDE Code
I used the following as a USB MIDI library
https://github.com/felis/USB_Host_Shield_2.0
I programmed with reference to the following
https://github.com/felis/USB_Host_Shield_2.0/tree/master/examples/USBH_MIDI/USBH_MIDI_dump
The library for distance sensor VL6180X is below.
https://github.com/pololu/vl6180x-arduino
The library for NeoPixel is below.
https://github.com/adafruit/Adafruit_NeoPixel
#include <usbh_midi.h>
#include <usbhub.h>
#include <SPI.h>

#include <Wire.h>
#include <VL6180X.h>

#include <Adafruit_NeoPixel.h>

USB Usb;
USBH_MIDI  Midi(&Usb);

uint8_t Note, oldNote;

VL6180X sensor;

int meas;
int aim = 50;
int diff = 5;

#define PIN A3
#define NUM_LEDS 24
#define BRIGHTNESS 30
int num;

Adafruit_NeoPixel strip = Adafruit_NeoPixel(NUM_LEDS, PIN, NEO_GRBW + NEO_KHZ800);

void MIDI_poll();

void setup() {
  Serial.begin(115200);

  Wire.begin();

  pinMode(2, OUTPUT);
  pinMode(3, OUTPUT);
  digitalWrite(2, LOW);
  digitalWrite(3, LOW);

  sensor.init();
  sensor.configureDefault();
  sensor.setTimeout(500);

  strip.setBrightness(BRIGHTNESS);
  strip.begin();
  strip.show();

  if (Usb.Init() == -1) {
    while (1); //halt
  }

  delay( 200 );
}

void loop() {
  Usb.Task();

  if ( Usb.getUsbTaskState() == USB_STATE_RUNNING ) {
    MIDI_poll();
  }
}

// Poll USB MIDI Controler and drive motor
void MIDI_poll() {
  char buf[20];
  uint8_t bufMidi[64];
  uint16_t  rcvd;

  if (Midi.RecvData( &rcvd,  bufMidi) == 0 ) {
    if(bufMidi[0] == 9){
      Note = bufMidi[2];
      Serial.println(Note);

      //Initial operation of the motor
      if(Note > oldNote){
        digitalWrite(2, HIGH);
        digitalWrite(3, LOW);
      }else{
        digitalWrite(2, LOW);
        digitalWrite(3, HIGH);
      }
      delay(50);

      digitalWrite(2, LOW);
      digitalWrite(3, LOW);
    }
  }

  //Slide distance setting
  if(Note == 57) aim = 19;  //A
  if(Note == 58) aim = 29;  //A#
  if(Note == 59) aim = 39;  //B
  if(Note == 60) aim = 49;  //C
  if(Note == 61) aim = 59;  //C#
  if(Note == 62) aim = 67;  //D
  if(Note == 63) aim = 78;  //D#
  if(Note == 64) aim = 85;  //E
  if(Note == 65) aim = 93; //F
  if(Note == 66) aim = 102; //F#
  if(Note == 67) aim = 109; //G
  if(Note == 68) aim = 112; //G#
  if(Note == 69) aim = 120; //A
  if(Note == 70) aim = 124; //A#
  if(Note == 71) aim = 129; //B
  if(Note == 72) aim = 131; //C

  //Distance sensor measurement
  meas = sensor.readRangeSingleMillimeters();
  //Serial.println(meas);

  //LED On
  num = map(meas, 22, 133, 4, 23);
  for(int i=num; i<strip.numPixels(); i++) {
    strip.setPixelColor(i, Wheel(255/strip.numPixels() * i));
    //delay(100);
  }
  strip.show();

  //Motor operation
  if(meas > (aim - diff) && meas <  (aim + diff)){
    digitalWrite(2, LOW);
    digitalWrite(3, LOW);
  }else if(meas > aim){
    digitalWrite(2, LOW);
    digitalWrite(3, HIGH);
  }else if(meas < aim){
    digitalWrite(2, HIGH);
    digitalWrite(3, LOW);
  }

  //LED Off
  strip.clear();

  oldNote = Note;
}

// Input a value 0 to 255 to get a color value.
// The colours are a transition r - g - b - back to r.
uint32_t Wheel(byte WheelPos) {
  WheelPos = 255 - WheelPos;
  if(WheelPos < 85) {
    return strip.Color(255 - WheelPos * 3, 0, WheelPos * 3,0);
  }
  if(WheelPos < 170) {
    WheelPos -= 85;
    return strip.Color(0, WheelPos * 3, 255 - WheelPos * 3,0);
  }
  WheelPos -= 170;
  return strip.Color(WheelPos * 3, 255 - WheelPos * 3, 0,0);
}
Operation
-
3. Add LED Tape NeoPixel
09/26/2018 at 10:50 • 0 commentsi added LED Tape NeoPixel (24 cells) as Indicator to MEMIDION.
![]()
The lighting position of NeoPixel is controlled by the ToF Range Finder Sensor VL6180.
-
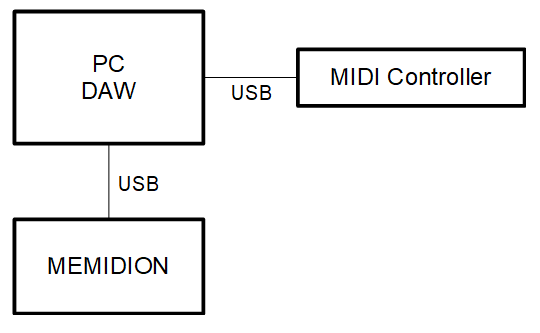
2. Using USB Host Shield
09/26/2018 at 10:30 • 0 commentsMEMIDION can be controlled directly by MIDI controller by using USB host shield.
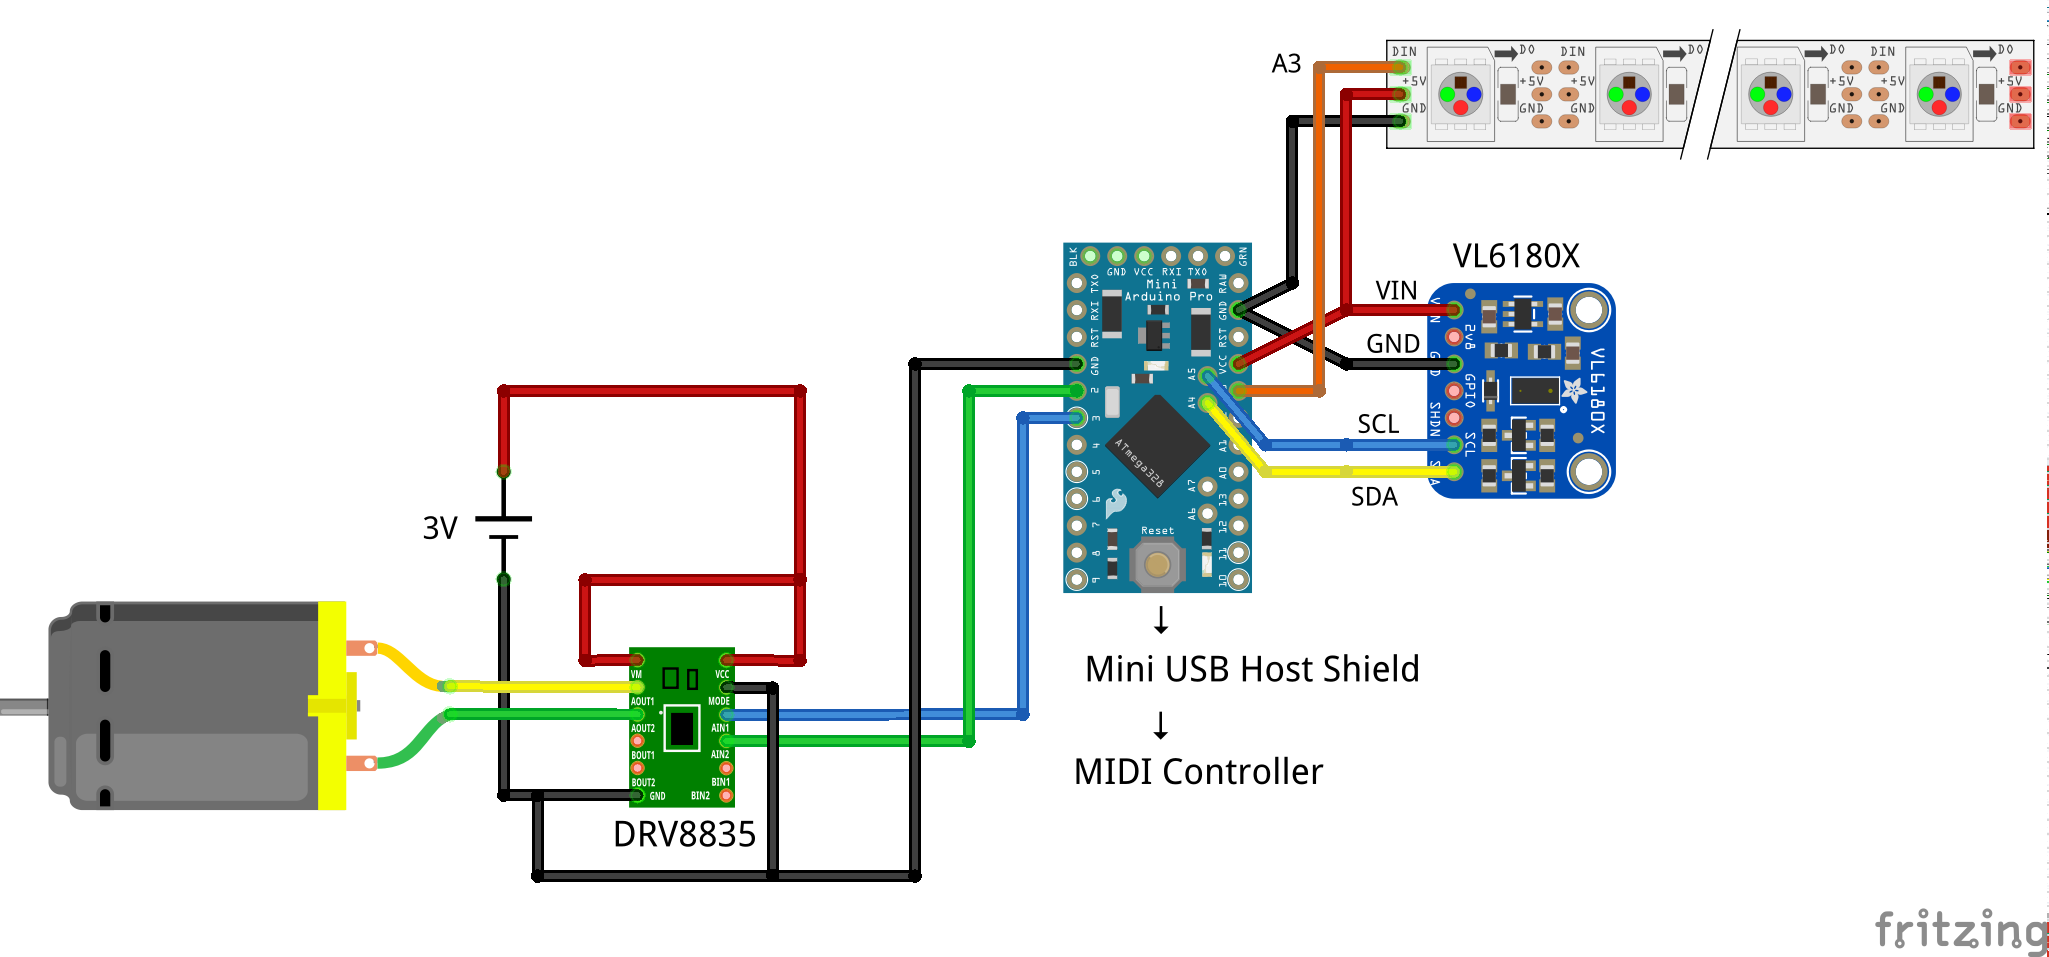
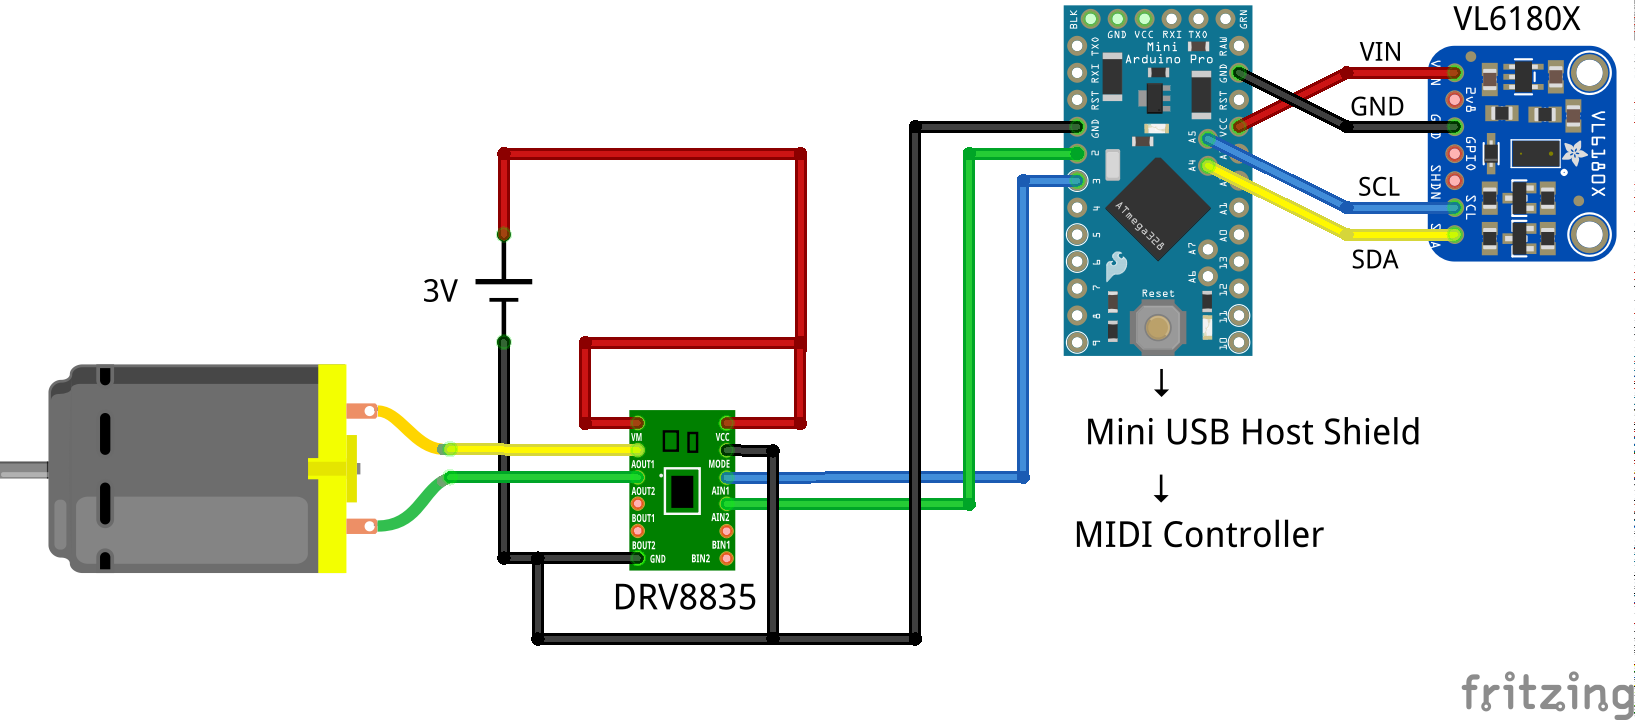
Structure
![]()
![]()
Place the Arduino pro mini on the Mini USB Host Shield and connect it to MIDI controller
![]()
Arduino IDE Code
Move the slider of the whistle with the MIDI signal from the MIDI keyboard. The slide amount is controlled by the measurement value of distance sensor VL6180X.
I used the following as a USB MIDI library
https://github.com/felis/USB_Host_Shield_2.0
I programmed with reference to the following
https://github.com/felis/USB_Host_Shield_2.0/tree/master/examples/USBH_MIDI/USBH_MIDI_dump
The library for distance sensor VL6180X is below.
https://github.com/pololu/vl6180x-arduino
#include <usbh_midi.h>
#include <usbhub.h>
#include <SPI.h>

#include <Wire.h>
#include <VL6180X.h>

USB Usb;
USBH_MIDI  Midi(&Usb);

uint8_t Note, oldNote;

VL6180X sensor;

int meas;
int aim = 50;
int diff = 5;

void MIDI_poll();

void setup() {
  Serial.begin(115200);

  Wire.begin();

  pinMode(2, OUTPUT);
  pinMode(3, OUTPUT);

  sensor.init();
  sensor.configureDefault();
  sensor.setTimeout(500);

  if (Usb.Init() == -1) {
    while (1); //halt
  }

  delay( 200 );
}

void loop() {
  Usb.Task();

  if ( Usb.getUsbTaskState() == USB_STATE_RUNNING ) {
    MIDI_poll();
  }
}

// Poll USB MIDI Controler and drive motor
void MIDI_poll() {
  char buf[20];
  uint8_t bufMidi[64];
  uint16_t  rcvd;

  if (Midi.RecvData( &rcvd,  bufMidi) == 0 ) {
    if(bufMidi[0] == 9){
      Note = bufMidi[2];
      Serial.println(Note);

      //Initial operation of the motor
      if(Note > oldNote){
        digitalWrite(2, HIGH);
        digitalWrite(3, LOW);
      }else{
        digitalWrite(2, LOW);
        digitalWrite(3, HIGH);
      }
      delay(50);

      digitalWrite(2, LOW);
      digitalWrite(3, LOW);
    }
  }

  //Slide distance setting
  if(Note == 57) aim = 22;  //A
  if(Note == 58) aim = 33;  //A#
  if(Note == 59) aim = 41;  //B
  if(Note == 60) aim = 52;  //C
  if(Note == 61) aim = 62;  //C#
  if(Note == 62) aim = 71;  //D
  if(Note == 63) aim = 81;  //D#
  if(Note == 64) aim = 90;  //E
  if(Note == 65) aim = 97; //F
  if(Note == 66) aim = 103; //F#
  if(Note == 67) aim = 109; //G
  if(Note == 68) aim = 116; //G#
  if(Note == 69) aim = 121; //A
  if(Note == 70) aim = 126; //A#
  if(Note == 71) aim = 129; //B
  if(Note == 72) aim = 133; //C

  //Distance sensor measurement
  meas = sensor.readRangeSingleMillimeters();
  //Serial.println(meas);

  //Motor operation
  if(meas > (aim - diff) && meas <  (aim + diff)){
    digitalWrite(2, LOW);
    digitalWrite(3, LOW);
  }else if(meas > aim){
    digitalWrite(2, LOW);
    digitalWrite(3, HIGH);
  }else if(meas < aim){
    digitalWrite(2, HIGH);
    digitalWrite(3, LOW);
  }
  oldNote = Note;
}
Operation
-
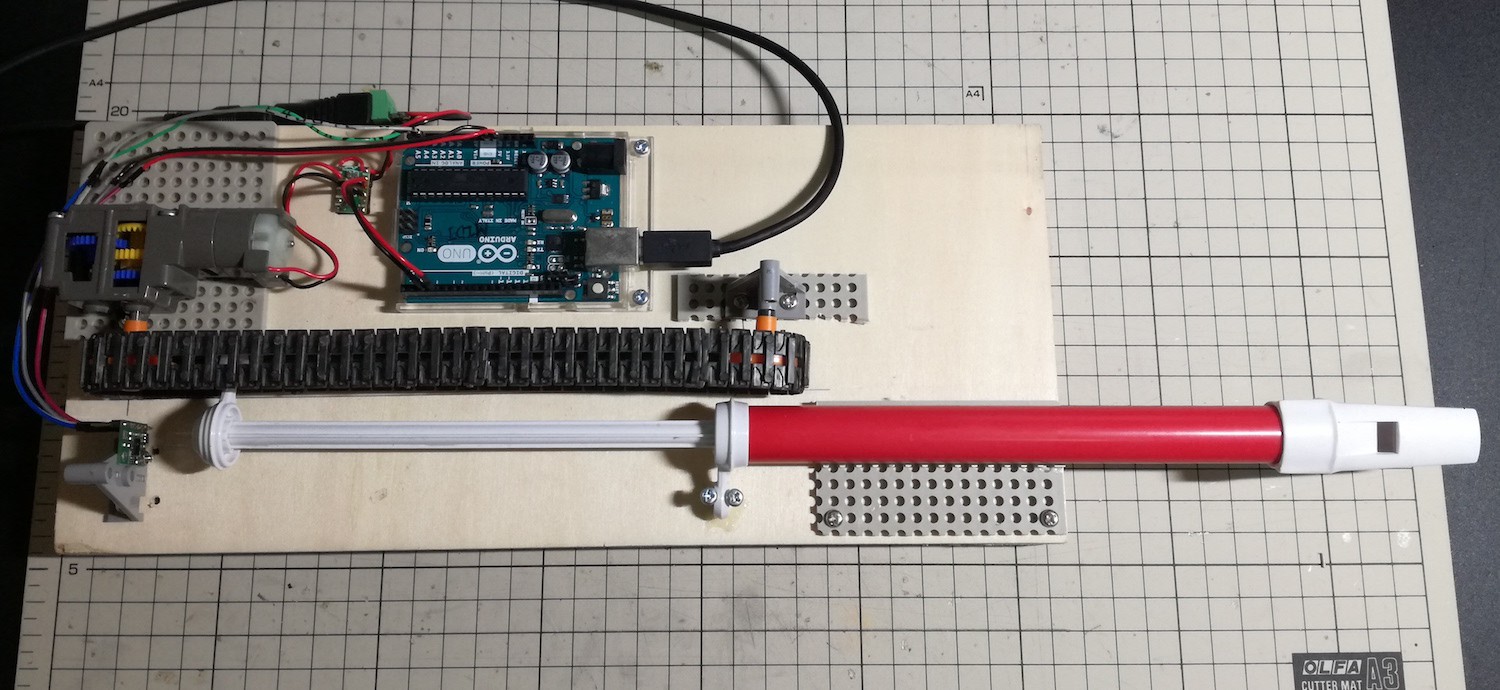
1. Change the gearbox
09/26/2018 at 10:22 • 0 commentsI changed the drive part from TAMIYA double gearbox to single gearbox.
![]()
![]()
-
0. Initial version
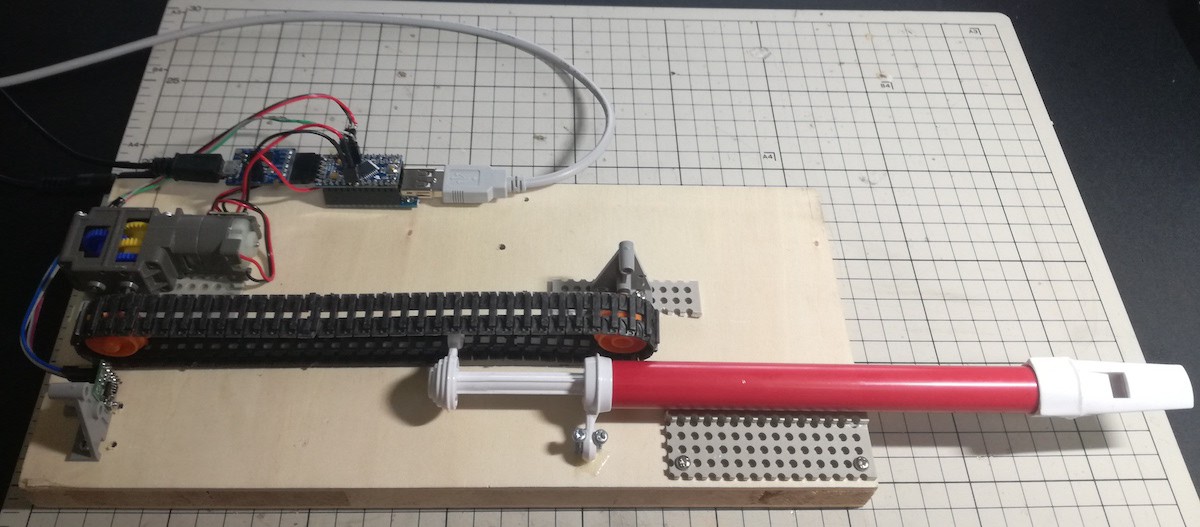
09/26/2018 at 10:17 • 0 commentsStructure
”MEMIDION" is MIDI instruments that you can play with DAW software or MIDI controllers.
![]()
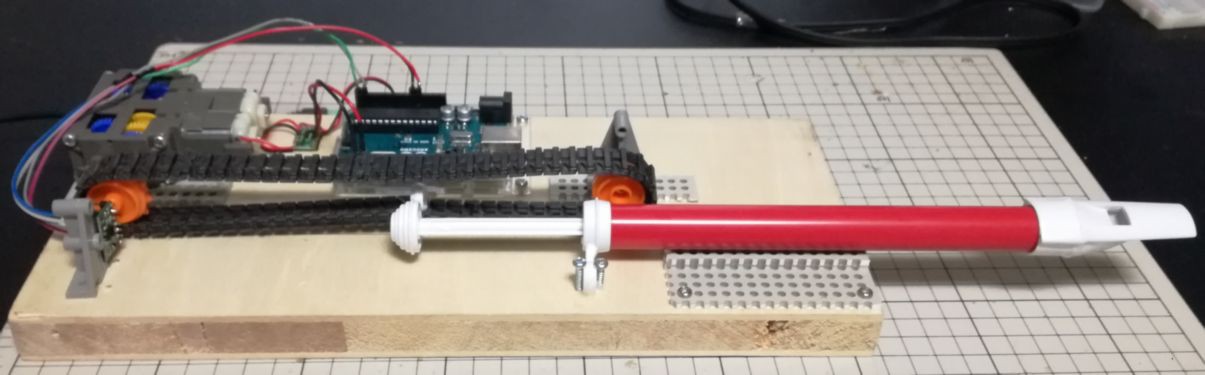
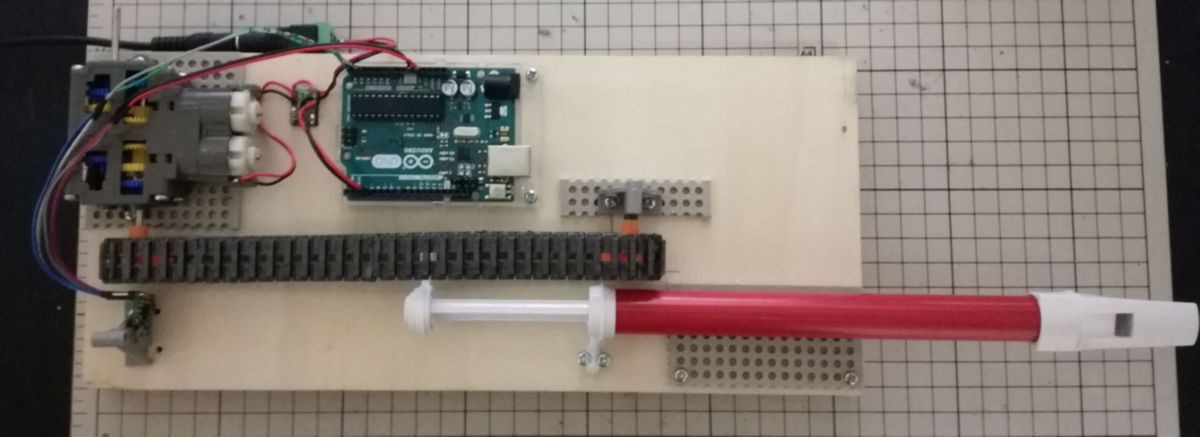
MEMIDION is a slide whistle that controlled by the micro-controller. The motor with the caterpillar slides the slide whistle. The slide amount is controlled by ToF range finder sensor VL6180.
![]()
![]()
![]()
MEMIDION Body
![]()
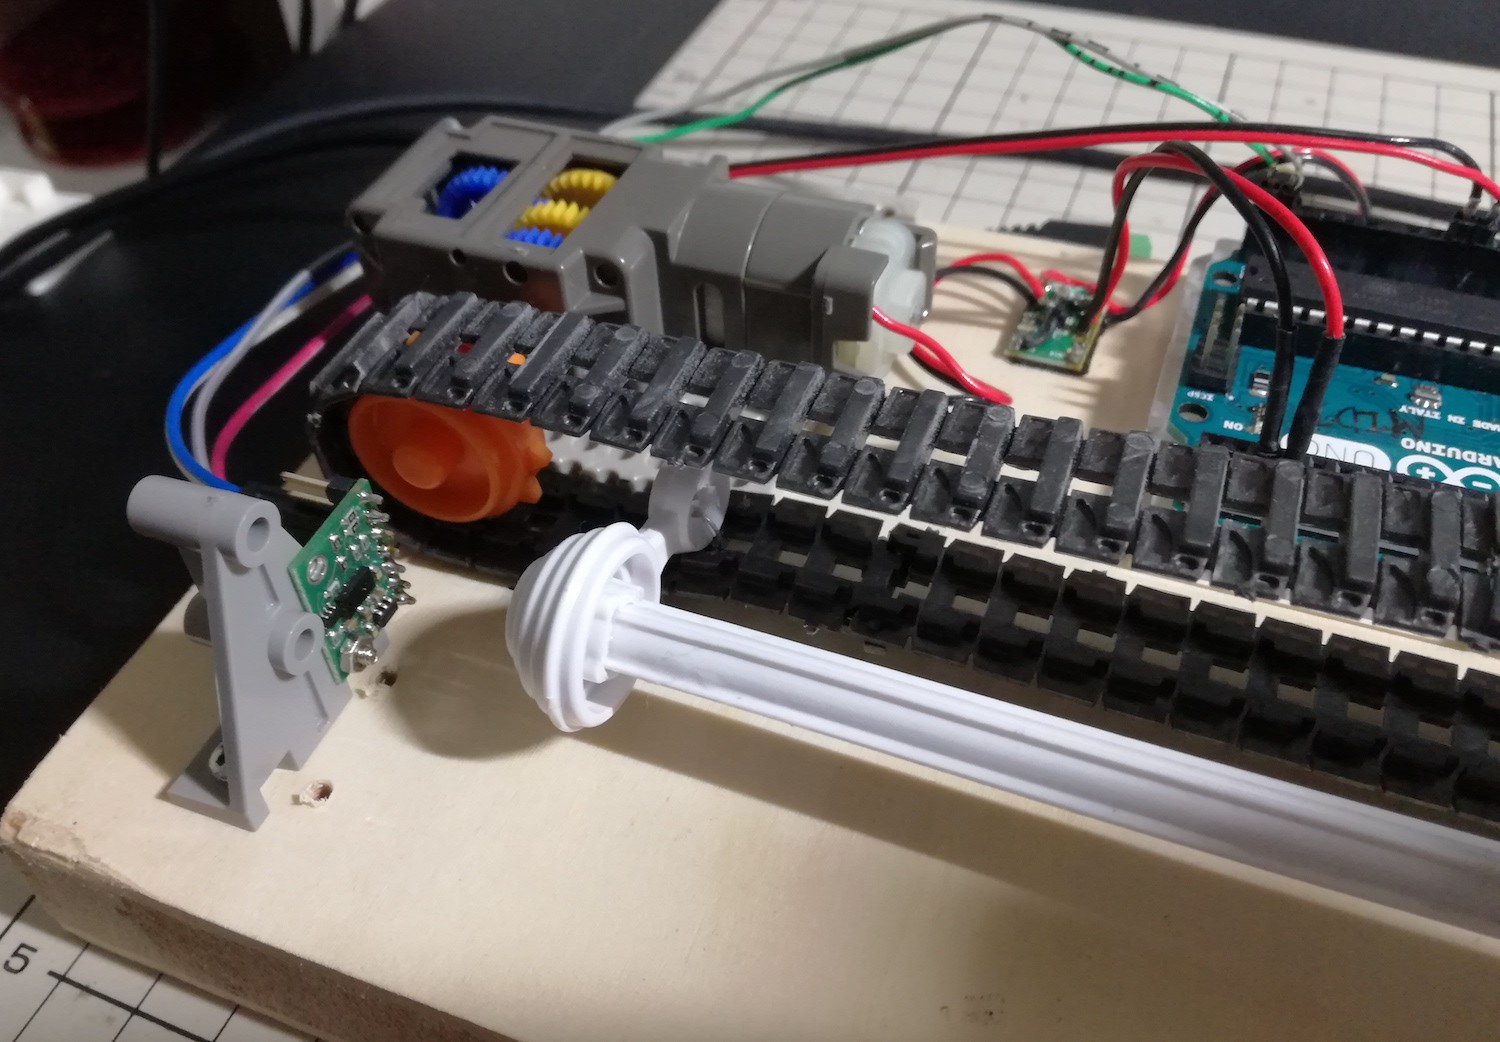
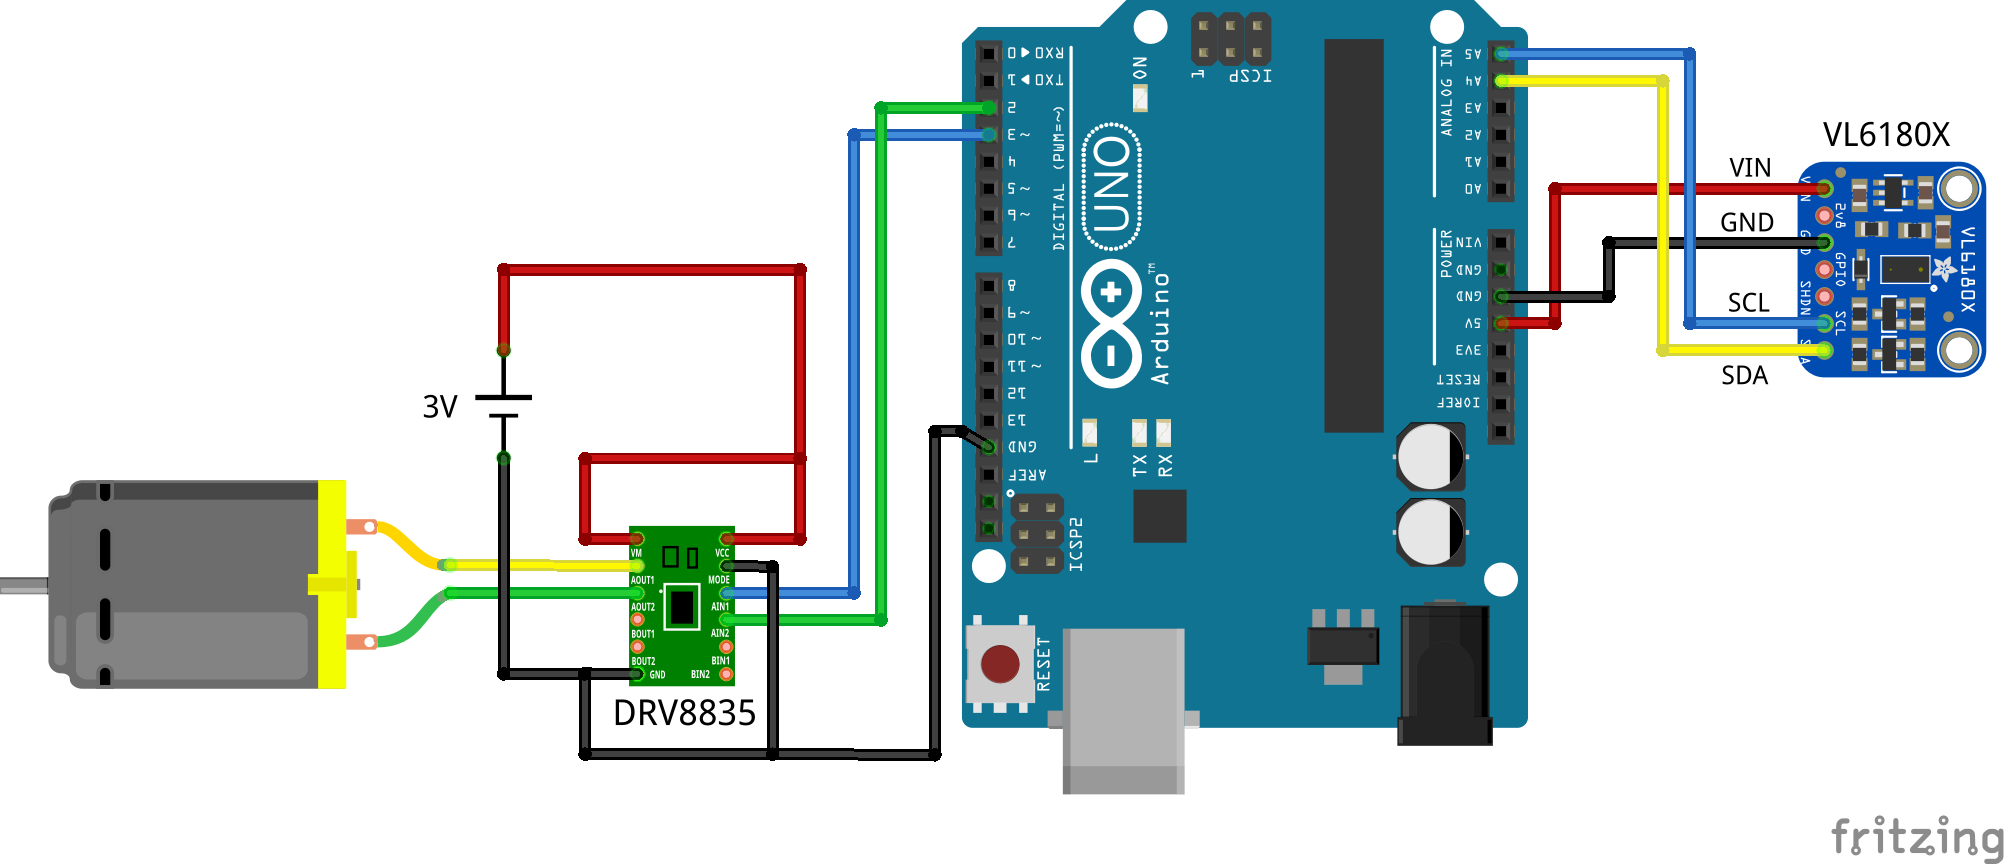
Motor (Caterpillar) control via motor driver DRV 8835 at Arduino.
![]()
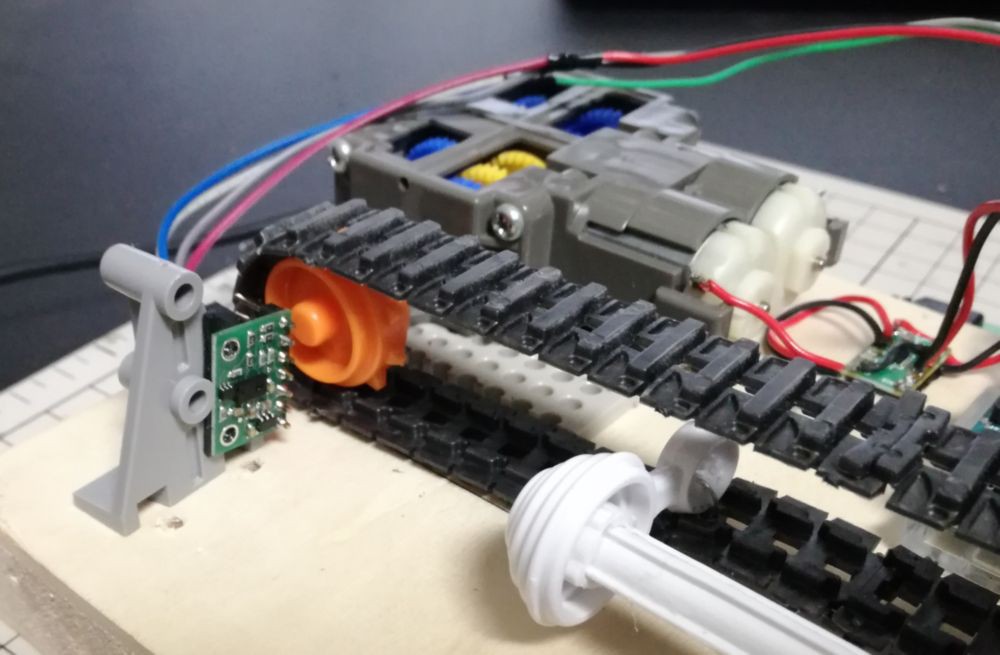
Measure the distance of the tip of the slider of the whistle with the distance sensor VL6180X to control the slide amount.
Arduino USB-MIDI device conversion
Write Moco for LUFA firmware to Arduino and let Arduino recognize it as a MIDI device.
The detail is right below.
https://github.com/kuwatay/mocolufa
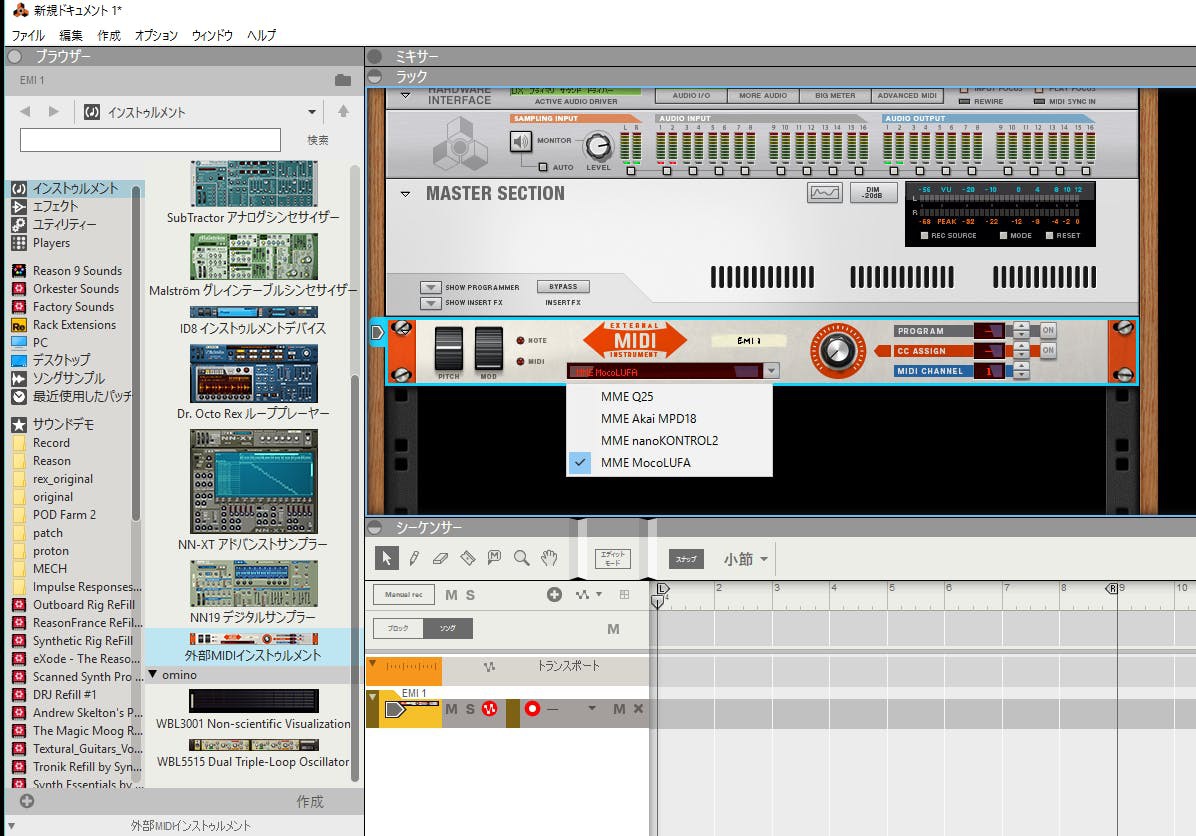
Setting of DAW software Reason
Anything is OK if DAW can output MIDI, but we will use Reason this time.
Place the external MIDI instrument and select "MocoLUFA" for the device.
![]()
Arduino IDE Code
Move the slider of the whistle with the MIDI signal from the MIDI keyboard or DAW and change the scale. The slide amount is controlled by the measurement value of distance sensor VL6180X.
I used the following as a MIDI library for Arduino.
https://github.com/FortySevenEffects/arduino_midi_library/
The library for distance sensor VL6180X is below.
https://github.com/pololu/vl6180x-arduino
#include <MIDI.h>
MIDI_CREATE_DEFAULT_INSTANCE();
#include <Wire.h>
#include <VL6180X.h>

uint8_t Note, NoteOld;
VL6180X sensor;

int meas;
int aim = 50;
int diff = 5;
int moveTime = 100;

void setup() {
  Wire.begin();
  MIDI.begin();
  pinMode(2, OUTPUT);
  pinMode(3, OUTPUT);

  sensor.init();
  sensor.configureDefault();
  sensor.setTimeout(500);
}

void loop() {
 //MIDI detection
 if (MIDI.read()) {
    switch(MIDI.getType()) {
      case midi::NoteOn:
        digitalWrite(2, HIGH);
        digitalWrite(3, LOW);
        delay(10);
        digitalWrite(2, LOW);
        digitalWrite(3, LOW);
        Note = MIDI.getData1();    // Note = 48-72 ALESIS Q25
     break;

     case midi::NoteOff:
        Note = 255;
     break;
   }
 }

  //Slide distance setting
  if(Note == 57) aim = 22;  //A
  if(Note == 58) aim = 33;  //A#
  if(Note == 59) aim = 41;  //B
  if(Note == 60) aim = 52;  //C
  if(Note == 61) aim = 62;  //C#
  if(Note == 62) aim = 71;  //D
  if(Note == 63) aim = 81;  //D#
  if(Note == 64) aim = 90;  //E
  if(Note == 65) aim = 97; //F
  if(Note == 66) aim = 103; //F#
  if(Note == 67) aim = 109; //G
  if(Note == 68) aim = 116; //G#
  if(Note == 69) aim = 121; //A
  if(Note == 70) aim = 126; //A#
  if(Note == 71) aim = 129; //B
  if(Note == 72) aim = 133; //C

  //Distance sensor measurement
  meas = sensor.readRangeSingleMillimeters();

  //Motor operation
  if(meas > (aim - diff) && meas <  (aim + diff)){
    digitalWrite(2, LOW);
    digitalWrite(3, LOW);
  }else if(meas > aim){
    digitalWrite(2, LOW);
    digitalWrite(3, HIGH);
  }else if(meas < aim){
    digitalWrite(2, HIGH);
    digitalWrite(3, LOW);
  }
}
Operation
The amount of slide will change with the MIDI keyboard.
Automatic performance as MIDI sound source with DAW is also possible. My breath has to keep blowing....
MIDI Slide Whistle "MEMIDION"
I tried to make slide whistle move automatically by MIDI signal. This is MEMIDION.