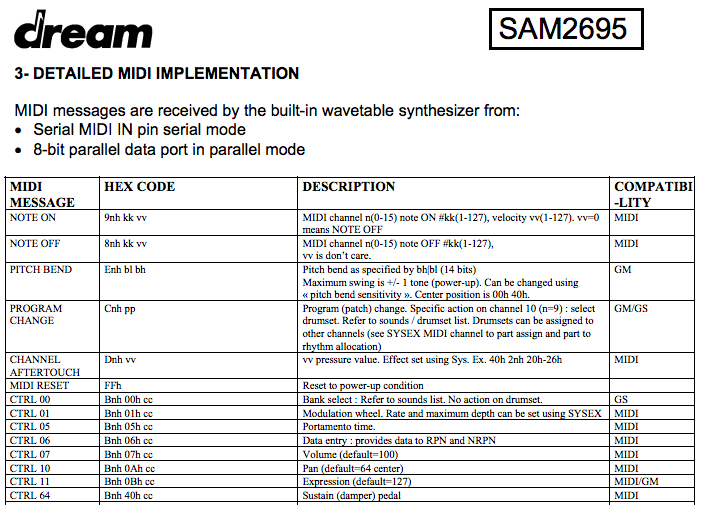
There are two interfaces for communicating with the SAM2695; a simple serial line and a parallel interface. The Fluxamasynth uses the serial interface; all you have to do is send the chip the right MIDI commands in the right order.

The SAM2695 datasheet has several tables of MIDI commands that the SAM2695 recognizes.
The first iteration of the library had all of the basics: noteOn, noteOff, reverb, chorus etc. The latest iteration added access to some of the extras and lower-level capabilities, like the 4 channel equalizer, envelope tweaking, and special percussion modes.
With the new hardware variations the library has to pick the correct communication pins based on the target hardware. These can be determined from the compiler flags passed to the library when the Arduino IDE compiles it in to your code. Here's how to set an environment variable in the library header based on the incoming flags:
IMAGE screenshot of arduino compiler flags
#define FLUXAMASYNTH_ESP32       1
#define FLUXAMASYNTH_SHIELD      2
#define FLUXAMASYNTH_FOR_FEATHER 3
#if defined(ESP_PLATFORM)
    #define FS_PLATFORM FLUXAMASYNTH_ESP32
  #elif defined(ARDUINO_AVR_FEATHER32U4)
    #define FS_PLATFORM FLUXAMASYNTH_FOR_FEATHER
#elif defined(ARDUINO_SAMD_FEATHER_M0_EXPRESS) ||
      defined(ARDUINO_SAMD_FEATHER_M0)
    #define FS_PLATFORM FLUXAMASYNTH_FOR_FEATHER_M0
  #elif defined(ARDUINO)
    #define FS_PLATFORM FLUXAMASYNTH_SHIELD
#endif

#ifndef FS_PLATFORM
#define FS_PLATFORM FLUXAMASYNTH_SHIELD
#endif
The latest library is available on Github. It provides these functions:
- noteOn(channel, pitch, velocity);
- noteOff(channel, pitch);
- programChange (bank, channel, v);
- pitchBend(channel, int v);
- pitchBendRange(channel, v);
- midiReset();
- setChannelVolume(channel, level);
- allNotesOff(channel);
- setMasterVolume(level);
- setReverb(channel, program, level, delayFeedback);
- setChorus(channel, program, level, feedback, chorusDelay);
- pan(int channel, int value);
- setEQ(channel, lowBand, medLowBand, medHighBand, highBand, lowFreq, medLowFreq, medHighFreq, highFreq);
- setTuning(channel, coarse, fine);
- setVibrate(channel, rate, depth, mod);
- setTVF(channel, cutoff, resonance);
- setEnvelope(channel, attack, decay, release);
- setScaleTuning(channel, v1, v2, v3, v4, v5, v6, v7, v8, v9, v10, v11, v12);
- setModWheel(channel, pitch, tvtCutoff, amplitude, rate, pitchDepth, tvfDepth, tvaDepth);
A simple Fluxamasynth program using the Arduino IDE and library looks like this:
#include <Fluxamasynth.h>

Fluxamasynth synth;

void setup() {
  synth.setMasterVolume(255);
}

void loop()
{
  for (int note=60; note<85; note++) {
    synth.noteOn(0, note, 100);
    delay(200);
    synth.noteOn(0, note, 0);
  }
}
 Fluxly
Discussions
Become a Hackaday.io Member
Create an account to leave a comment. Already have an account? Log In.
please provide an example of the schematic midi button as well as the code change controller for Arduino
Are you sure? yes | no